
Chapter 9. Searching for Information and People
Chapter at a glance
Search
Search a SharePoint site, Searching your SharePoint site
Use
Use Advanced Search, Using Advanced Search

Add
Add promoted results, Influencing the relevance rank

Customize
Customize search results pages, Customizing the search results page

IN THIS CHAPTER, YOU WILL LEARN HOW TO
In today’s workplace, huge volumes of increasingly different types of content are produced. Information workers need to quickly find people and content to get answers to their questions and to get their everyday tasks completed. That’s where the new Microsoft SharePoint 2013 search capabilities can help you surface the information that you need, when you need it.
Tip
Search capabilities in SharePoint 2013 are powered by a new search engine that brings together the simplicity of SharePoint Search and the flexibility of FAST Search, which were separate products in SharePoint 2010.
Searching is the process of entering one or more search words in the search box to form a search query that is executed against the index built on the SharePoint server farm. The search application that runs on the server farm processes your query and returns a set of search results that match your query. These search results contain links to the webpages, documents, list items, lists, libraries, or sites that you want to find.
At the heart of the SharePoint search engine is its ability to get the search results that users are looking for. However, the results you are looking for can differ based on who you are, your context, and your previous searches. The SharePoint Search uses relevancy algorithms combined with an analysis engine to provide a search experience that is flexible, intuitive, and tailored to user needs.
In this chapter, you will learn how to search your SharePoint site, use search queries, modify the search behavior on your site, connect to the Search Center, use advanced search and search verticals, set up search alerts, influence relevance rank to promote the search results, customize search results pages, and define whether to include or exclude your site from search.
Note
PRACTICE FILES Before you can complete the exercises in this chapter, you need to copy the book’s practice files to your computer. The practice files that you’ll use in this chapter are in the Chapter09 practice file folder. A complete list of practice files is provided in Using the practice files at the beginning of this book.
Important
Remember to use your SharePoint site location in place of http://wideworldimporters in the exercises.
Searching your SharePoint site
The new SharePoint search experience is intuitive, engaging, and easy to use. The site search box appears on the top right of most webpages on your site, allowing you to search the current site and any subsites below it.
Tip
In a list or a library, there is also a search box on top of the content list so that you can search for content from that list or library.
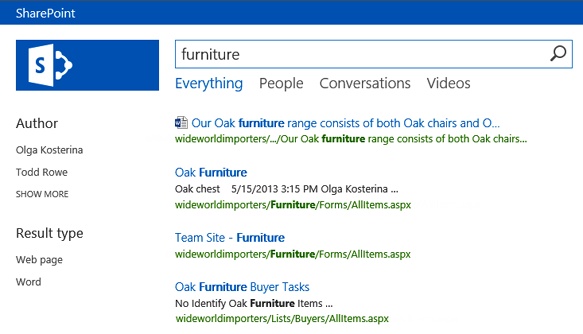
The search results page combines three main areas. There is a search box that displays your query, the search results list shown below the search box, and the search refiners displayed at the left of the screen that provide additional filters so that you can narrow the search results to help you find what you are looking for.

The search results page functionality is provided by three interconnected Web Parts: the Search Box Web Part, the Search Results Web Part, and the Refiners Web Part.
A search result is only helpful when you can act on it. On the search results page, you can act on the search results without opening them; this is done by using the hover panel. When you point to a search result, the callout appears to the right of the result, and you can preview the search result content. For example, with a document, the hover panel provides a callout with a live preview, including a deep dive that takes you to the correct part of the document by using deep links. The hover panel also allows you to act on that result with contextual actions based on the result itself. For a document, the menu of actions includes options to edit the document, to follow the document, to send its link to other people, and to open the library where the document resides. For a webpage, the actions include options to open the page or send its link to other people. The search results are security trimmed so only the content and actions that a user has rights to are displayed.
A search result may be displayed with additional indicators, depending on the type. For example, Microsoft Office files, such as Word or Excel, are displayed with the application icon in front of the title of the search result, whereas newsfeed conversations are displayed with the number of replies and the number of Likes.
In addition to using a search box on your site, you can also use an Enterprise Search Center or a Basic Search Center to enter search queries and view the search results. Both Search Centers provides an ability to search an entire enterprise, including all SharePoint sites, files shares, and Microsoft Exchange folders, as well as other content sources that are set up by your SharePoint administrator. The Enterprise Search Center requires the SharePoint Server 2013 while the Basic Search Center is available in all SharePoint 2013 on-premises solutions.
Tip
In Microsoft SharePoint Online, a Search Center site is automatically available at host_name/search.
The Enterprise Search Center provides several pages known as search verticals. Search verticals are search pages that are targeted for searching specific content, including Everything, for a search across all content; People, for specific people searches; Conversations, for searching newsfeed conversations; and Videos, for searching different types of videos. The list of search verticals is located under the search box in the Search Center page. Search verticals provide different search experiences and display search results that are filtered and formatted for content that is specific to this vertical.

The links that let users move quickly between the search verticals are displayed by the Search Navigation Web Part. By default, the Search Navigation Web Part is set up to show links to the Everything, People, Conversations, and Videos search verticals. The Search Navigation Web Part gets search results from the Search Results Web Part. When users click a link for a search vertical, the search results are displayed according to the search vertical configuration.
The Basic Search Center provides a single search results page, without the search verticals.
In this exercise, you will explore the search results page and use refiners to narrow your search.
Set Up
Open the SharePoint site that you would like to search. This exercise will use the http://wideworldmporters site, but you can use whatever SharePoint team site you wish. If prompted, type your user name and password, and then click. OK.
Important
Verify that you have sufficient permissions to execute a query in the site that you are using. If in doubt, see Appendix A.
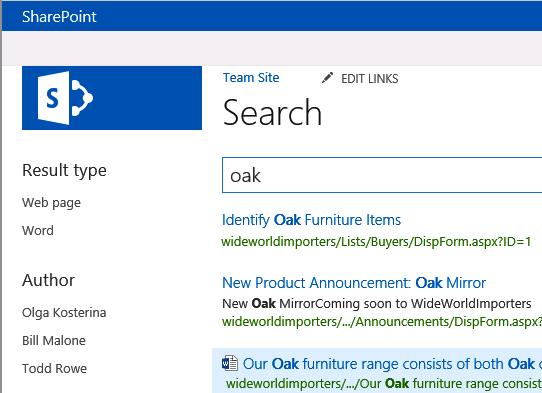
In the top-right corner of the home page, in the search box, type a query term, such as oak, and then click the magnifying glass icon on the right of the search box, or press Enter on the keyboard.
The search results page is displayed. It contains items that match your query term, including documents and webpages. If more than one page of content items matches your query, the total number of pages in the search results appears at the bottom, with each page number representing a link to that page of the overall result set. Notice that the search word, oak, is highlighted in the titles of all results.
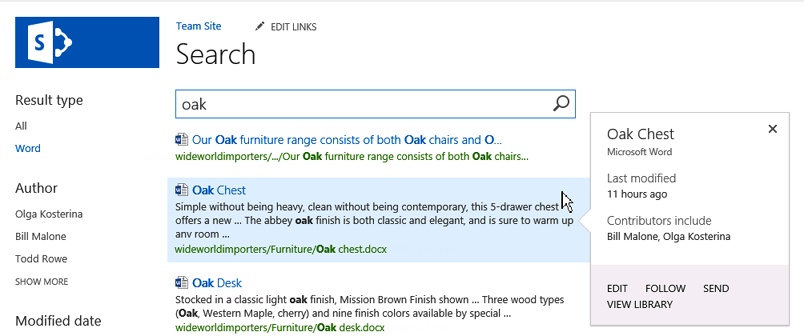
On the left of the page, in the Refiners panel, under Result type, click Word to display all Microsoft Office Word documents in the search results.
Point to the Oak Chest document to open its hover panel. Notice that the panel lists information about the document, such as when it was last modified and the names of the contributors. In this example, the contributors are Bill Malone and Olga Kosterina.
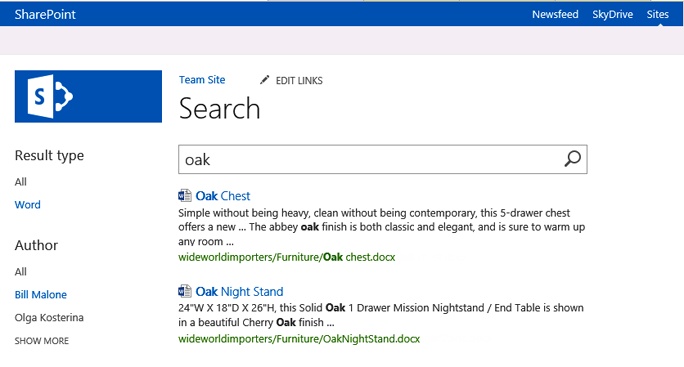
You will now display all Word documents authored by Bill Malone. In the Refiners panel, under Author, click Bill Malone to narrow the search results. There are two documents displayed: Oak Chest and Oak Night Stand.
Remove the Author and the Result type refiners by clicking All in the Author section and the Result type section, respectively.
You will now display the webpages in the search results. Under Result type, click Web page. Point to the Oak Furniture Buyer Tasks - Calendar search result to display the hover panel. Notice the preview of the live page shown in the callout.
Return to the site home page by clicking its link on the top link bar, above the Search title.

Using search queries
A search query contains one or more words that represent the content that you are trying to find. When executing a query, SharePoint returns a set of content items that form a result set. Your queries are executed against an aggregated database of the content, known as an index, which enables SharePoint to respond quickly. You can think of the search index as similar to the index you find at the end of this book. The index is updated periodically using a process called content crawling. By default, the content is crawled incrementally once every 20 minutes, but the frequency can be configured differently by your SharePoint administrator. Therefore, when you create new data in your SharePoint site, such as a new announcement, it may not appear immediately in your result set. Similarly, if you delete a document from a document library, it still may appear in the result set, but when you click the link for the document, an error message, “The webpage cannot be found,” displays. In this case, the link to the document in the result set is called a broken link.
Note
TROUBLESHOOTING If you query to locate information that you know exists, but it doesn’t appear in your result set, check the spelling of your search query, wait at least 30 minutes, and repeat the search query. If it still does not appear in the result set, then the index has not been updated; therefore, contact your SharePoint administrator for assistance.
To find information, you may need to enter more than one query term. The more query terms that you enter, the more specific and precise your query becomes, thereby producing a more focused result set. Search queries can include any of the following items:
A single word
Multiple words
A single phrase in quotes
Multiple phrases in quotes
SharePoint uses an implicit AND query when you search for multiple words or multiple phrases. For example, when you search for the multiple, separate words “oak” and “furniture,” the search result set contains only those content items where both words occur. Those words do not have to be side by side, but they do both need to be in the content item somewhere. If a document contains the words “oak” and “chest” but not “oak” and “furniture,” that document will not appear in the result set. When you search for the complete phrase “oak furniture,” the result set contains only those content items where the two words “oak furniture” appear together.
When you use two words or two phrases in your search query and separate them by the word OR, if either word or phrase appears in a document, that document appears in the result set. You can create more complex search queries, such as (chest OR furniture) AND oak. This will return content items that contain the words “oak” and “chest” or the words “oak” and “furniture,” but will not return content items that contain the word “chest” and “furniture.”
In earlier chapters of this book, you used columns on lists and libraries to save list item and document property values, also known as metadata. You can use some of these metadata properties to help you create powerful search queries, thereby creating a more focused result set. For those metadata properties that store text, in the search box, use the syntax property:value where value is a word or phrase. For example, you can use the following default metadata properties for more targeted searches:
Author Use this to find all content items authored by a particular person or persons, such as
author:peter.Filename Use this to find documents by their file name, such as
filename:proposal.Filetype Use this to find specific file types, such as
filetype:docx.Title Use this to find content items based on the value entered in the title column, such as
title:“oak chest”.Description Use this to find content items based on the value entered in the description column, such as
description:oak.Contenttype Use to find the content items of a particular type; for example,
document,announcement,task.Size Use this to find files according to their size. For example,
size>45000will find all files greater than 45,000 bytes.
Tip
To create targeted search queries, SharePoint 2013 provides a Keyword Query Language (KQL). The query can consist of free-text keywords, property filters, or operators. Keyword queries have a maximum length of 2,048 characters. For more information on KQL syntax, see msdn.microsoft.com/en-us/library/ee558911(v=office.15).aspx.
SharePoint Server 2013 supports managed metadata, which is a hierarchical collection of centrally managed terms that you can define, and then use as attributes for content items. Consistent use of metadata across sites in your organization helps with content discoverability. As you have seen in the previous exercise, by using a metadata property as a search refiner, a user can filter search results based on metadata.
Tip
When you enable managed metadata, the managed metadata service application is automatically created to make it possible to use and share content types across sites on your SharePoint server.
In this exercise, you will use search queries for targeted searches of your site.
Set Up
Open the SharePoint site that you would like to search. This exercise will use the http://wideworldmporters site, but you can use whatever SharePoint team site you want. If prompted, type your user name and password, and then click OK.
Important
Verify that you have sufficient permissions to execute a query in the site that you are using. If in doubt, see Appendix A.
In the top-right corner of the home page, in the search box, type a search query such as Author:“Todd Rowe” to find all content items authored by Todd Rowe, and then click the magnifying glass icon on the right of the search box, or press Enter on the keyboard.
The search results page is displayed showing all content items that were created by Todd Rowe.
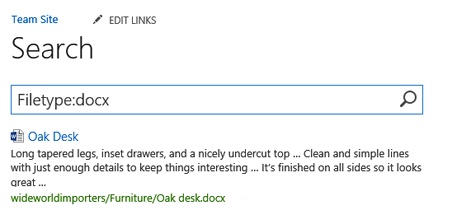
On the search results page, in the search box, type the search query Filetype:docx to find all files with extension .docx, and then either click the magnifying glass or press Enter. All files with a .docx extension on your site are listed in the search results panel.
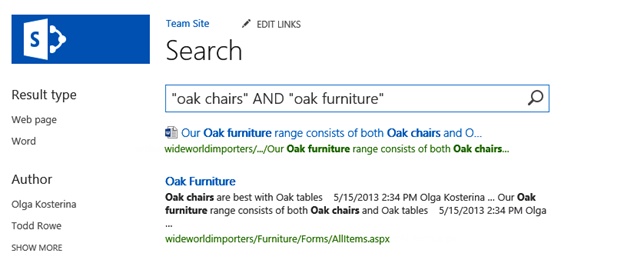
You will now search for the items that contain both “oak chairs” and “oak furniture.” On the search results page, in the search box, type a search query, “oak chairs” AND “oak furniture”, and then either click the magnifying glass or press Enter.
Notice that the search results include a Word document with the title that contains both terms, as well as the webpage of the document library where this document is located.
You will now search for the items that contain either “oak chairs” or “oak furniture.” On the search results page, in the search box, type the search query, “oak chairs” OR “oak furniture”, and then either click the magnifying glass or press Enter.
Notice that there are more items returned in the search results than in the previous step. In addition to the items that include both terms, there are also items that include either of the terms.


Configuring search behavior
Search functionality is flexible and configurable, and you can tailor the search experience for your site. The Search Settings on the Site Settings page allow you to specify the search behavior on you site. The search box and the search results page will use these settings.
Tip
The search settings that you configure on the site collection level will be inherited by all sites within that site collection, unless you configure other settings for the site that would override the inheritance.

Using the Search Settings, you can add the link to an Enterprise Search Center, where users can search everything in your company. Then, the search verticals will be shown in the Search Navigation Web Part on the search result pages on your sites. In addition, the search box on your site can include the drop-down list with search verticals from the Search Center. The users will be able to choose whether to search your site only, or choose the search verticals to search across all sites and other content sources using the Search Center. The default setting for the search box is the site where it is located. You can also add an additional search vertical by using a search navigation configuration for a site. The new link to the vertical will be shown in the Search Navigation Web Part on search result pages, and it can also be shown as a drop-down list in the search box.
In the following exercise, you will configure a Search Center URL, and then test the search behavior on your site. You will need to know the URL of the Enterprise Search Center in your SharePoint environment to complete this exercise.
Set Up
Open the SharePoint site where you would like to configure a search. This exercise will use the http://wideworldmporters site, but you can use whatever SharePoint team site you want. If prompted, type your user name and password, and then click OK.
Important
Verify that you have sufficient permissions to configure search in the site that you are using. If in doubt, see Appendix A.
In the top-right corner of the page, click the Settings gear icon and select Site settings.
On the Site Settings page, under Search, click Search Settings.
In the Search Center URL box, type the URL of the Search Center site in your environment. In this example, the Search Center URL is http://wideworldimporters/search/Pages, but in your environment, it will be different.
To display the drop-down list of search verticals within the search box, select Turn on the drop-down menu inside the search box, and use the first Search Navigation node as the destination results page, if it is not already selected, and then click OK to return to the Site Settings page.
You will now test the search behavior that you’ve configured. Go to the site home page by clicking its link on the Quick Launch.
In the search box on the top of the page, click the down arrow that opens a drop-down menu of search verticals, and then select Everything to search all content via the Enterprise Search Center.
The search box now shows that the search will search Everything. In a search box, type a query text, for example, oak.
The Search Center results page is displayed. Right under the search box, there is a list of search verticals.
Click the Back button in the top-left corner of the browser window to return to the home page of your site.
On your site home page, validate that the search box on the top of the page shows Search this site, and then type oak in the search box. The search results page for your site is displayed.
Under the search box, click expand your search. You are taken to the Search Center results page that shows the results of your search across all sites.


Using Advanced Search
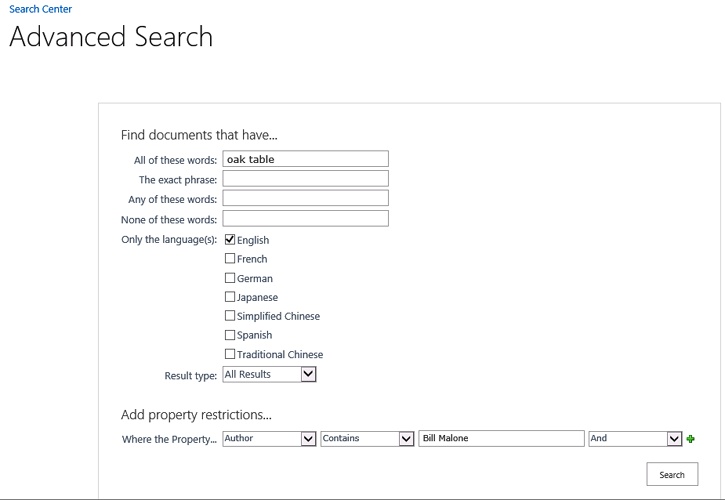
SharePoint provides the form to construct search queries in the Advanced Search page. Using Advanced Search, you can include or exclude words and phrases in the query, filter results by document format, narrow results by language, and filter results by content properties.
In the following exercise, you will construct a query that searches for documents that contain “oak chest”, are in English, and have an Author property that contains “Bill Malone”.
Set Up
Open the Search Center where you would like to use Advanced Search, if it is not already open. This exercise will use the http://wideworldmporters/sites/search, but you can use the Search Center site you want. If prompted, type your user name and password, and then click OK.
Important
Verify that you have sufficient permissions to use search in the site that you are using. If in doubt, see Appendix A.
At the bottom of the Search Center page, below the search results, click Advanced Search.
On the Advanced Search page, in the All of these words box, type oak chest.
Select English from the list of languages available.
In the Result type list, select Word Document.
In the Add property restrictions section, in the Where the Property list, select Author, select Contains as a logical operator, and then type Bill Malone as a property value.
Click Search. Only one document, Oak Night Stand, satisfies the search criteria in our example.

Setting up search alerts
You can set up a search alert on a search results page so that you receive an email or an SMS text message when the results change for that search query. You can set up alerts on any site search results page, as well as a Search Center results page.
You can choose the type of changes that you’d like to be notified of, such as only when there are new items in the search results or only when existing items change, or whether you’d like to be alerted to all changes. You can also set the frequency of alerts to be daily or weekly.
In the following exercise, you will set up an alert for the advanced search query that you performed in the previous exercise.
Set Up
Open the SharePoint site where you would like to set up a search alert, if it is not already open. If prompted, type your user name and password, and then click OK.
Important
Verify that you have sufficient permissions to use search in the site that you are using. If in doubt, see Appendix A.
Run a query that you would like to set an alert for to display the search results page, if it is not already displayed. At the bottom of the search results page, below the search results, click Alert Me.
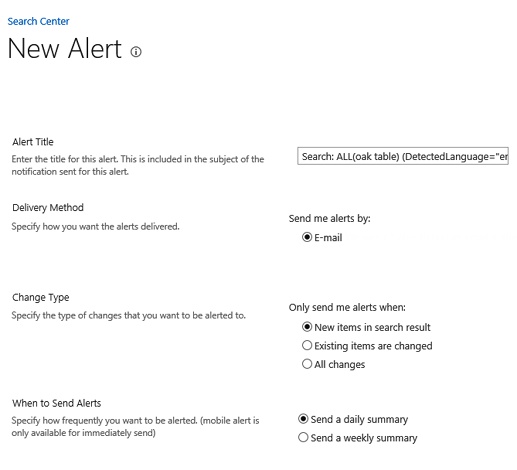
On the New Alert page that appears, specify the name of the query or keep the default, which is the query itself.
Define the delivery method as email.
In the type of changes that you’d like to be notified of, select All changes.
In the frequency, select Send a daily summary, and then click OK.
You have set up a search alert to be notified by email of changes to the search results on a daily basis.
Influencing the relevance rank
When the results of the search are displayed, the search engine calculates the relevance rank; in other words, the order in which the search results appear. SharePoint Search uses several ranking models that are based on the predefined algorithms that calculate the ranking score of a particular item in the search results. By default, search results are sorted in descending order based on their ranking score. Items with the top score get the top position in search results. Rank is the order in which search results are displayed.
Using the search index, the ranking models combine weighted scores for a number of different criteria, including content, metadata, file type, and interaction. For example, depending on your business environment, it may be that some file types are more important from a ranking perspective than others are, and therefore their scores would be higher. Typically, Word and Microsoft Office PowerPoint search results have higher scores than Excel results, and therefore they are displayed higher in the search results page. Another example is an interaction score that is based on the number of times a search result is clicked, and on the queries that led to a result being clicked. For the final ranking score of a search result, all ranking criteria in the ranking model are combined.
Tip
The search system automatically uses the appropriate ranking model for the default search verticals: Everything, People, Conversations, and Videos.
SharePoint provides a mechanism to influence the ranking of search results by using query rules. A query rule consists of a query rule condition and a query rule action. When a query matches a query rule condition, it triggers a query rule action. For example, by using a query rule, you can show a search result above all ranked results. This result is called a promoted result. You can also group several results in a result block, and then promote the group in the same way.
For example, you can promote a specific page that contains important information for site visitors to be aware of so that a link to this page appears on top of all search results for a particular period of time—for example, a day. Or you can promote a specific content item to display at the top of the search results when the user searches for particular topics.
In the following exercise, you will create a query rule that will promote the Oak Furniture library to display at the top of search results when a user searches for “oak” or “furniture.”
Set Up
Open the SharePoint site where you would like to configure the search. This exercise will use the http://wideworldmporters site, but you can use whatever SharePoint team site you want. If prompted, type your user name and password, and then click OK.
Important
Verify that you have sufficient permissions to configure search in the site that you are using. If in doubt, see Appendix A.
In the top-right corner of the page, click the Settings gear icon and select Site settings.
On the Site Settings page, under Search, click Query Rules.
On the Manage Query Rules page, in the Select a Result Source list, select Local SharePoint Results (System). This is a prebuilt result source that includes an index for all SharePoint sites in the current farm, with the exception of people.
Click New Query Rule.
On the Add Query Rule page, in the General Information section, in the Rule name field, type a name for your query; for example, MyQueryRule.
In the Context section, in the Query Conditions section, select Query Matches Keyword Exactly, and then in the Query exactly matches one of these phrases (semicolon separated) box, type oak; furniture.
In the Add Promoted Result dialog, in the Title field, type the name that you want to give this promoted result; for example, Wide World Importers Oak Furniture. This is a display name that will be shown in the results page.
In the URL field, type the URL of the result that should be promoted; for example, http://wideworldimporters/Furniture/AllItems.aspx.
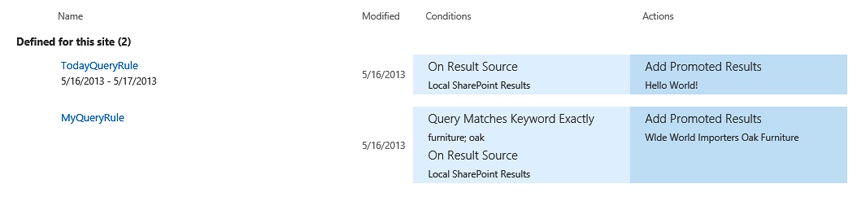
Click Save to return to the New Query Rule page. The new promoted result, Wide World Importers Oak Furniture, has been created and is displayed in the Actions section on the News Query Rule page.
Click Save to save your new query rule and return to the Manage Query Rules page.
On the Manage Query Rules page, validate that your new query is listed under the Defined for this site section.
You will now test your new query rule. Go to the site home page by clicking its link on the top link bar, just above the page title.
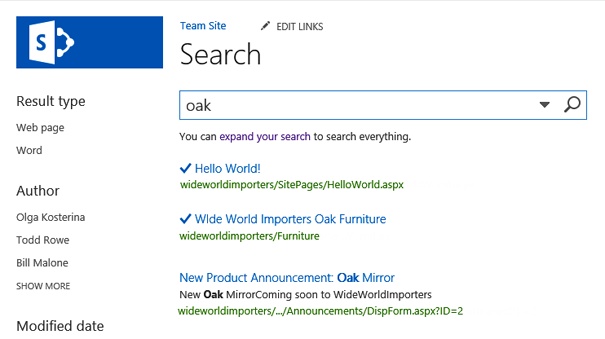
In the search box on the top right of the page, type oak, and then click the magnifying glass icon, or press Enter on the keyboard. In the search results page, validate that the Wide World Importers Oak Furniture link is displayed on top of the results set.


You will often find that you need to display an item on top of the search results page for all search queries, unconditionally, for a limited period. In the following exercise, you will create a query rule that will display an existing webpage at the top of search results on all search queries, active from today until the end of tomorrow.
Set Up
Open the SharePoint site where you would like to configure the search. This exercise will use the http://wideworldmporters site, but you can use whatever SharePoint team site you want. If prompted, type your user name and password, and then click OK.
Important
Verify that you have sufficient permissions to configure a search in the site that you are using. If in doubt, see Appendix A.
In the top-right corner of the page, click the Settings gear icon and select Site settings.
On the Site Settings page, under Search, click Query Rules.
On the Manage Query Rules page, in the Select a Result Source list, select Local SharePoint Results (System), and then click New Query Rule.
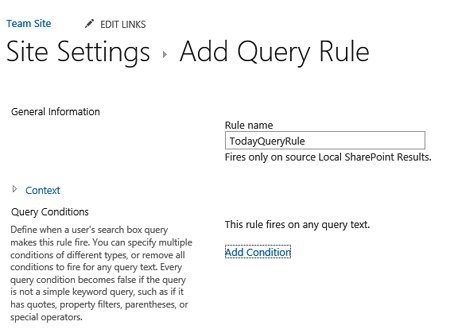
On the Add Query Rule page, in the General Information section, in the Rule name field, type a name for your query rule; for example, TodayQueryRule.
In the Context section, under Query Conditions, click Remove Condition. The query condition boxes have been removed. This query rule will fire on any query text.
In the Actions section, click Add Promoted Result.
In the Add Promoted Result dialog, in the Title field, type the name that you want to give this promoted result; for example, Hello World!. In the URL field, type the URL of the result webpage that you’d like to promote; for example, http://wideworldimporters/SitePages/HelloWorld.aspx, and then click Save.
Back in the New Query Rule page, verify that the new query rule has been created and is listed in the Actions section.
Expand the Publishing section to specify the schedule when the rule will be active. Enter a Start Date of today and an End Date of tomorrow.
Click Save to save your new query rule and return to the Manage Query Rules page.
On the Manage Query Rules page, validate that your new TodayQueryRule query is listed under the Defined for this site section.
You will now test the new query rule. Go to the home page by clicking its link on the top link bar, above the page title.
In the search box on the top right of the page, type any query text; for example, chair. On the search results page, validate that the Hello World! link is displayed on top of the results set.
You will now compare the rankings for the promoted results. In the search box, type oak. Both query rules have fired, and both promoted items are displayed on the top of the list. Hello World! is displayed first because it is a more recently promoted result. The ranking model considers the most recent results as more relevant; therefore, Hello World! has a higher ranking than the Wide World Importers Oak Furniture promoted result, which is displayed second.


Customizing the search results page
On your site, a user enters search queries into a search box and views the search results using the default search results page. On the Enterprise Search Center site, there is a default search page where the search box is located, as well as several search verticals. Search verticals are customized search results pages targeted for searching specific content. By default, the Web Parts on the search vertical pages are the same. However, the query in the Search Results Web Part is executed against a particular result source configured differently for each search vertical page. With the Everything vertical, for example, the query is executed against the Local SharePoint Results, which is a default result source that covers all content in your SharePoint installation, with the exception of people. For the People vertical, the search runs against Local People Results, a result source that defines the search results in the vertical page.
Several Web Part pages provide the search experience in the Enterprise Search Center site, including the following:
Default.aspx The Search Center home page where users enter their queries.
Results.aspx The default search results page for the Search Center; it is also the search results page for the Everything search vertical.
Peopleresults.aspx The search results page for the People search vertical.
Conversationresults.aspx The search results page for the Conversations search vertical.
Videoresults.aspx The search results page for the Videos search vertical.
Advanced.aspx The page that provides an Advanced Search form.
All of these search results pages are located in the Pages library and contain the same Web Parts, as follows:
Search Box Web Part Provides the search box functionality at the top of the search results page
Search Results Web Part Provides the search results in the body of the search results page
Refinement Web Part Provides the refiners, or filters, in the left part of the search results page
Search Navigation Web Part Provides the search verticals navigation links beneath the search box
You can customize Web Parts within the search results pages and configure the different Web Parts settings to modify the pages’ behavior. The Pages library is configured to require checkout, so you need to check in and publish your changes to the search results pages before other users can see them.
In the following exercise, you will modify the default search results page and configure properties of the Refinement Web Part.
Set Up
Open the SharePoint Search Center site where you would like to modify the search results page. This exercise will use the http://wideworldmporters/sites/search site, but you can use whatever Search Center site you want. If prompted, type your user name and password, and then click OK.
Important
Verify that you have sufficient permissions to modify the search results page in the site that you are using. If in doubt, see Appendix A.
Open the Search Center page, and in the search box, type any search text (for example, desk) to display the search results page.
On the search results page, click the Settings gear icon on the top right of the page, and then select Edit Page from the menu. The four Web Parts in the page are displayed.
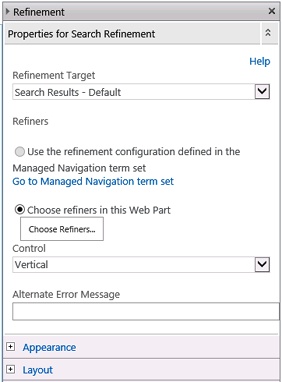
On the left of the screen, in the Refinement Web Part, hover over the Refinement title and click the down arrow that appears on the right to display the Web Part menu. Select Edit Web Part.
In the Web Part tool pane on the right of the screen, in the Properties for Search Refinement section, verify that the Choose Refiners in this Web Part option is selected, and then click Choose Refiners.
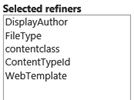
You will now remove a refiner that shows when the item was modified. In the Refinement configuration dialog, in the Selected refiners section on the right, select LastModifiedTime, and then click the Remove button to move this refiner to the list of Available refiners on the left.
You will now change the order of the way that the selected refiners are shown in the Web Part. In the Selected refiners section, click the DisplayAuthor refiner, and then click the Move Up button a few times to position this refiner at the top of the Selected refiners section.
In the Refiner configuration dialog, click OK.
In the Web Part tool pane on the right of the screen, click Apply. Verify that your modifications are shown in the Refinement Web Part, and then click OK in the Web Part tool pane to close it.
In the warning displayed in the yellow bar underneath the ribbon, click Check In, and then in the Comments dialog, click Continue.
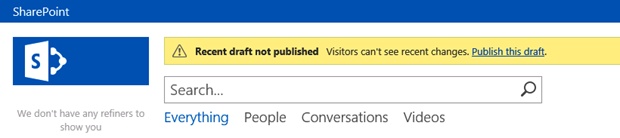
The empty search results page is displayed. Click Publish this draft in the warning (displayed in the yellow bar on top of the page) that the recent draft has not been published.
The search results page has been published and is redisplayed. Type a query into a search box; for example, furniture. Press Enter to see the search results in the page and to test your modifications to the Refinement Web Part.


Searching for people
The People vertical provides the ability to search for people in your organization against the default result source Local People Results, which is dedicated to people information. The profile store and personal sites are a major source of information for a people search. The profile store is crawled on a regular basis in a similar way to other SharePoint sites, and the content is added to a people-specific index that the search queries in the People vertical are executed against. Conceptually, a user profile is treated as a document about that person, with the person’s name as the title.
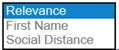
At a basic level, the more search query terms that appear in the person’s profile, the more relevant the result. The people search ranking models differ from the information search ranking models. The relevance rank is assigned to search results that are related to people, and subsequently there are specific relevance criteria that include social distance and expertise. On the People vertical search results page, you can sort the results by relevance, name, and social distance.
Social distance is computed based on colleague relationship. For example, people who are on the same work team as you will be close to you in regards to social distance. You may also follow other people and content, and other people may follow you. You may participate in conversations with them, and they provide regular comments on your Newsfeed. You may also be a member of mailing lists and discussion groups, so you would be considered closer to the members of the same groups than to those who are not members, because your visibility to other people in these groups is higher. The search engine takes this data into consideration when calculating social distance.
Basic expertise information is collected from the user profile; in particular, the Ask Me About and Skills fields. Other fields are also taken into account, including Past projects and Interests, and more importantly, the documents that users worked on that are relevant to the search query. To get the best results from a people search, people in your organization should add as much information as they can to their user profiles in the profile store, as well as in their personal sites.
In the next exercise, you will enter information to your user profile, and then explore the People vertical search results page.
Set Up
Open a SharePoint site where you can access your user profile in the profile store. This exercise will use the http://wideworldmporters site, but you can use whatever SharePoint team site you want. If prompted, type your user name and password, and then click OK.
Important
Verify that you have sufficient permissions to access a profile store. If in doubt, see Appendix A.
To access your user profile, on the top right of the page, click Newsfeed, and then in the Newsfeed page, click About Me on the Quick Launch.
On the About Me page, click edit on the top of the page to open your profile for editing.
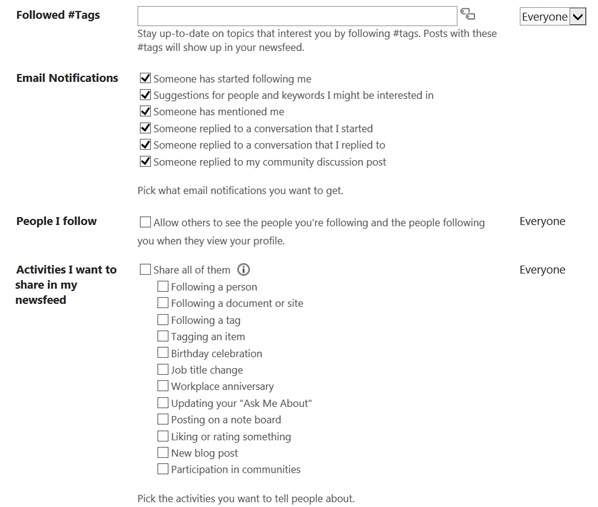
In the Edit Details, page, in the Basic Information tab, notice that some information has been prepopulated, including your name and when the profile was created by your administrator. Click in the About Me field to display the ribbon, and then type some information about yourself. The search engine will crawl this information and use it in the search results page. Your picture from this page will also appear in the search results page in the People vertical.
At the bottom of the page, fill in your areas of expertise in the Ask Me About field. The information from this field will be indexed for the expertise searches and will contribute to expertise relevance rankings.
Click the Contact Information tab and fill in the details, such as your phone number or office location. For some fields, you can choose who will be able to see this data: only you or everyone. Because SharePoint search results are security trimmed, the data that only you can see will not appear in the search results page.
Click the Details tab and fill in the fields as much as you can. The data in these fields can be used not only for relevance ranking, but also for expertise searches (the Past projects, Skills, and Interests fields) and as an input into computing social distance (the Schools, Past projects, and Interests fields).
Click on the ellipsis to the right of the Details tab to display additional tabs, such as Newsfeed Settings and Languages and Regions. Both tabs contain information that is indexed by the People search. The Newsfeed Settings page, for example, provides a lot of information that can be used in computing the social distance.
Fill in as much information as you can, and then on the bottom of the Edit Details page, click Save all and close. In the Profile Changes dialog that warns you that the user profile information might not be available right away, click OK. Depending on your crawler frequency, it might take a bit of time before your profile is indexed and the data appears in the search results.
You will now use the People vertical search. Go to the peopleresults.aspx page in the Search Center site, and in the search box, type one of the skills you entered in your user profile.
Explore the search results page. It displays people in your organization with their photos, where available, in the order of relevance ranking for your query, which is a default for ordering the search results page. You can also display the search results by first name and social distance. On the top of the page, open the drop-down list of ordering options and click Social Distance to display the search results by their social distance from you.


Defining your site visibility
By default, all local sites are included in the search results on the Enterprise Search Center. The local sites are crawled and their content is indexed and included in the default result source Local SharePoint Results. Sometimes you might need to exclude a site from the search results, even though the users in your organization have access rights to it. For example, when you are redesigning or updating a site, you might want to temporarily exclude this site from showing in search results. The Search and Offline Availability page in the Search group in Site Settings provides an option to define whether the site is indexed, and thus, is visible in the search results. When you exclude your site from search, you also exclude all its subsites.
Tip
You can also force reindexing of your site from the Search and Offline Availability page. If you force reindexing, the site will be fully reindexed at the next crawl, instead of running a default incremental crawl that picks up the changes since the last crawl.
In the following exercise, you will exclude a site from the search results, and then bring it back again.
Set Up
Open the SharePoint Search Center site that you would like to exclude from the search results. This exercise will use the http://wideworldmporters site, but you can use whatever SharePoint team site you want. If prompted, type your user name and password, and then click OK.
Important
Verify that you have sufficient permissions to configure search in the site that you are using. If in doubt, see Appendix A.
In the top-right corner of the page, click the Settings gear icon and select Site settings.
On the Site Settings page, under Search, click Search and Offline Availability.
In the Indexing Site Content section, under Allow this site to appear in search results, click No.
Click OK in the Search and Offline Availability page to save your settings and return to the Site Settings page. Depending on the crawl frequency in your environment, you may need to wait at least 30 minutes for the changes to take effect.
Using steps 2–4 as a guide, reselect the setting to Yes to allow your site to be indexed.

Key points
SharePoint 2013 provides a new search engine and an intuitive search experience.
By using the contextual hover panel on the search results page, you can act on the search results without opening them.
The search results are security trimmed, so only the content and actions that a user has rights to are displayed.
For a better way to find what you are looking for, you can target your search by using search queries.
The Enterprise Search Center provides several search verticals that are targeted for searching specific content, such as Everything, for a search across all content; People, for people-related searches; Conversations, for searching newsfeed conversations; and Videos, for searching different types of videos.
You can configure the search behavior and link the search box on your site to the Search Center.
You can set up search alerts to get notified when results of a specific search change.
Search results are displayed in the order of relevance. Using query rules, you can promote content items to appear at the top of ranked search results.
The search results pages include four Web Parts: the Search Box Web Part, the Search Results Web Part, the Refinement Web Part, and the Search Navigation Web Part. You can customize the search results pages to meet your user requirements.
The People search is based on the information in the profile store and the personal sites in your organization. The relevance model for People search includes content, social distance, and expertise.
You can define whether your site is visible in search results.