
Chapter 10. Managing Work Tasks
Chapter at a glance
Work
Working with the timeline, Working with the timeline

Work
Work with the Project Summary Web Part, Working with the Project Summary Web Part

Manage
Manage tasks in one place, Managing tasks in one place

Manage
Manage projects with SharePoint and Project Professional, Managing projects with SharePoint and Project Professional

IN THIS CHAPTER, YOU WILL LEARN HOW TO
Ever since the inception of Microsoft SharePoint, teams have used SharePoint sites to manage work outside a formal project structure. This includes the creation of ad hoc tasks, actions assigned to attendees at meetings, scheduling activities, and the grouping of tasks that are related to one another.
Initially, Microsoft provided an office application, Microsoft Office Project, to assist project managers with developing plans, assigning resources to tasks, tracking progress, managing budgets, and analyzing workloads. Then came Microsoft Project Server, which extends the capabilities of Project and provides organizations a central location to store their project information.
Users of SharePoint, Project Professional, and Project Server may find that they have to visit many places to track their tasks and activities. This includes those tasks created in Microsoft Office Outlook, another repository for tasks that can be stored in Microsoft Exchange, if it is used by your organization. To partially alleviate this situation, tasks stored in Tasks lists can be managed with Project or Outlook, and you can keep them in sync.
However, SharePoint Server 2013 provides new functionality that aggregates tasks from Microsoft Exchange Server 2013, Microsoft Project Server 2013, and SharePoint Server 2013. Users can view all tasks in their personal site on the My Tasks page, which you can find on the Quick Launch, on the Newsfeed hub. Two-way synchronization lets the user update his tasks using the My Tasks page, or he can update the tasks in the products in which they originated.
The task management capabilities within SharePoint 2013 have also vastly improved. You can now have child tasks, known as subtasks. Tasks and subtasks can be displayed in a timeline view and you can edit multiple items at once. You can use the Quick Edit, view to quickly create task items. There is now a new site template, Project Site, which activates all these new task management features by default. In addition to these task management improvements, managing work within a team can be improved with the use of the Microsoft Office OneNote shared notebook.
In this chapter, you will learn how to use the new Project Site, the Timeline Web Part, and the Project Summary Web Part, as well as how to use the My Tasks page and how to manage projects with Project Professional.
Note
PRACTICE FILES You don’t need any practice files to complete the exercises in this chapter. For more information about practice file requirements, see Using the practice files at the beginning of this book.
Important
Remember to use your SharePoint site location in place of http://wideworldmporters in the following exercises.
Creating a Project site
SharePoint Server 2013 provides a new site template, the Project Site template, which lets you create sites in which you can collaborate on lightweight projects. Project managers can quickly get a sense of what is occurring in the project, and members of the project can quickly see how their work fits into the overall context of the project. A Project site includes the following components:
There are other components that you may see in a Project site, which are dependent on the installation of other Microsoft server products in you organization:
If your organization has integrated Microsoft Office Web Apps Server 2013 with SharePoint Server 2013, then a OneNote notebook is created for quickly capturing and organizing information about the project.
When SharePoint is connected to Exchange Server 2013, a Project site can include a site mailbox for unified communication about the project as it progresses.
If your Project site is part of a site collection that is associated with Project Server 2013, the Tasks list can be added to the Project Web App (PWA).
Tip
In SharePoint 2010, whenever you create a Team site, a Tasks list, and a calendar list are automatically created, thereby allowing you to effectively manage lightweight projects. This is no longer the case in SharePoint 2013.
In SharePoint 2013, when you create a new Team site, you can add a Tasks list app, or on the home page of your team site, you can click on the Working on a deadline? tile in the Get started with our site Web Part to activate the new task management capabilities. This will activate the Project Functionality site feature, which adds a Project Summary Web Part to your team site home page and creates the following list apps:
Tasks (with a timeline)
Calendar
When you click on the Working on a deadline? tile, a dialog will subsequently notify you that the project functionality is already installed on the site. It provides you with a link, which if clicked, will display the Your Apps page, where you can create other task or calendar list apps.
Tip
If you are using Project Server, then whoever manages the project server, usually someone from your organization’s Project Management Office (PMO), can choose to make SharePoint sites visible in a Project Web App (PWA) site.
In this exercise, you will create a Project site.
Important
Verify that you have sufficient rights to create a site. If in doubt, see Appendix A.
On the Quick Launch, click Site Contents, and then under Subsites, click new subsite.
In the Title box, type International Contemporary Furniture Fair 2013, and then, in the Description box, type Use this Project site to coordinate activities to ensure WWI gets the most benefit from being a Platinum sponsor of ICFF 2013.
In the URL name box, type ICFF13.
Under Select a template on the Collaboration tab, click Project Site, and then click Create.

Working with the timeline
By assigning tasks to other users, you involve them in collaboration activities. When using a Tasks list with a timeline view, any task item you add to the Tasks list can be added to the timeline, thus providing a graphical interface for viewing important tasks. You can also view your My Tasks page, which rolls up tasks across all of your sites.
Note
SEE ALSO Creating and editing items in the Tasks list on a team site is covered in Chapter 3.
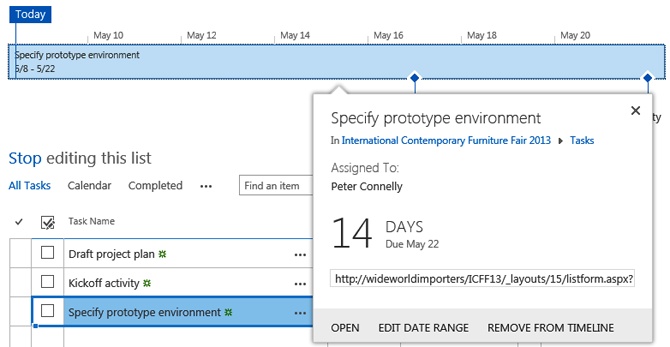
Just like in Project Standard 2013 and Professional 2013, which have timeline views, you can use the timeline view for a Tasks list app. Using either Quick view or Standard view, you can easily add and remove tasks from the timeline. Also, you can remove a task from the timeline by clicking the task to display the callout, and then clicking REMOVE FROM TIMELINE.
Tip
The callout also provides you with more contextual information, such as a countdown to the number of days until the task item is due and a link to where the task item is stored. For PWA projects, the site associated with that project is provided.
You can also apply formatting changes to task items that appear on the timeline. You can change the background color, text color, and font of each task (or subtask), by clicking the task in the timeline and using the commands in the Font group on the Timeline tab. You can also color the milestone markers.

You can use commands on the Timeline tab to show or hide task dates; to see a pointer to today’s date, start and finish dates, and timescales; to change the format of the date; and to lock the current width for all users. In the Current Selection group, you can toggle between displaying tasks on the timeline as a bar or as callouts. The timeline provides a high-level overview of the task items on the timeline, whereas the callout view provides a list of task deadlines and calendar events to see specific details.
Tip
The Tasks list in SharePoint 2013 contains new views. In SharePoint 2010, when you create a Tasks list, the views All Tasks, My Tasks, Due Today, Active Tasks, By Assigned To, and By My Groups are created. In SharePoint 2013, the following views are created: All Tasks, Late Tasks, Upcoming, Completed, My Tasks, Gantt Chart, and Calendar. As with any other list app, you can amend these views and create your own views.
You can also use the Timeline Web Part to display a timeline view of task items on other pages. The Timeline Web Part is listed under the Content Rollup category in the Web Part pane. To configure the Timeline Web Part, in the Web Part tool pane, specify the site where the Tasks list is stored. It can be a Tasks list from any site within the current site collection or within another site collection. Click Verify URL, and then from the Source drop-down list, select the Tasks list. Each Tasks list name is prefixed with the name of the site.

Note
SEE ALSO More information on editing pages and using Web Parts can be found in Chapter 4.
In the following exercise, you will add a task item to a Tasks list, and then add and format it on the timeline.
Set Up
Open the Project site that you created in the previous exercise, if it is not already open. You can also complete this exercise on any Tasks list by displaying it in Quick Edit view and starting at step 2.
Important
Verify that you have sufficient rights to create task items. If in doubt, see Appendix A.
In the Project Summary Web Part, click Edit to display the Quick Edit view of the Tasks list app.
Click in an empty row to create a new task item using the following values, and then press Enter:
Column Name
Value
Task Name
Draft project plan
Due Date
Today + 10 days
Assigned To
Type in your name
Add another new task with the following values, and then press Enter:
Column Name
Value
Column Name
Value
Task Name
Kickoff activity
Due Date
Today + 14 days
Assigned To
Type in your name
Right-click the first column to the left of Kickoff activity, and then click Add to Timeline.
Click Stop, and then click new task. Use the new form to add another new task with the following values, and then click Save:
Column Name
Value
Task Name
Specify prototype environment
Start Date
Today
Due Date
Today +14 days
Assigned to
Type in your name
Click to the left of the Specify prototype environment task to select the entire row (do not select the check box).
On the Tasks tab, click Add to Timeline in the Actions group.
On the Quick Launch, click Home to see the three task items in the Project Summary area.


Creating and managing subtasks
When creating a project plan, project managers usually divide the project into a number of tasks, and then breakdown each task into a number of subtasks. In SharePoint 2010, you could not create subtasks. Many organizations tried to mimic subtasks by using related issue items in an issues list or by using two Tasks lists—one list containing the primary tasks, and the second list containing subtasks, with a lookup column to show the task title from the primary Tasks list. However, neither of the workarounds was satisfactory.
In SharePoint 2013, you can create subtasks, change tasks to subtasks or subtasks to tasks, and have subtasks of subtasks, by using the Indent and Outdent commands on the Tasks tab.

You can also minimize or expand your task hierarchy by using the Outline command on the Tasks tab or by clicking the arrow to the left of the tasks that contain subtasks.
In this exercise, you will create two subtasks, reorganize the order of the subtasks, and then add them to the timeline.
Important
Verify that you have sufficient rights to create task items. If in doubt, see Appendix A.
Click the ellipsis to the right of Specify prototype environment to display the callout, and then click Create Subtask.
In the Task Name column, type Create 4 site collections. In the Due Date column, specify tomorrow’s date, and then in the Assigned To column, enter your user name. Press Enter.
In the Task Name column, type Design site collection / site hierarchy. In the Due Date column, specify tomorrow’s date, and then in the Assigned To column, enter your user name. Press Enter.
Click the first column to the left of Design site collection / site hierarchy to select the whole row, and then on the Tasks tab, in the Hierarchy group, click Move Up.
Hold down the Ctrl key and click the right column of the two subtasks. On the Tasks tab, in the Actions group, click Add to Timeline.


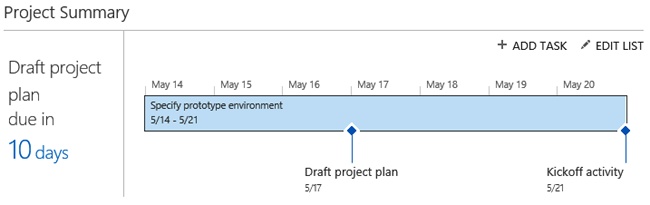
Working with the Project Summary Web Part
The new SharePoint Server Project Site includes the Project Summary Web Part, which provides a timeline view and the ability to identify Late and Upcoming tasks. This provides an at-a-glance view of the project status. You can then drill down to review the task.
In this exercise, you will configure the Project Summary Web Part.
Set Up
Display the home page of the Project site that you created previously, if it is not already open.
Important
Verify that you have sufficient rights to edit the home page. If in doubt, see Appendix A.
On the Page tab, click Edit Page. Click within the Project Summary Web Part (for example, click Today), and then on the Web Part tab, click Web Part Properties.
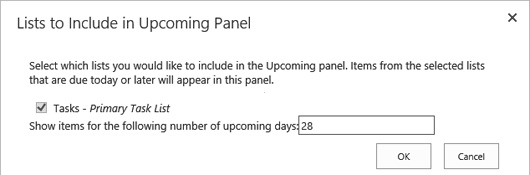
In the Web Part tool pane, click (edit) to the right of upcoming. If a Message from webpage dialog box is displayed, click Yes to save your changes.
In the text box in the Lists to Include in Upcoming Panel dialog, delete 14 and type 7.
Click OK to close the Lists to Include in Upcoming Panel dialog, and then at the bottom of the Web Part tool pane, click OK.
On the Page tab, click Stop Editing.

Managing tasks in one place
The Tasks view in your personal site provides an easily accessible central location where you can manage your tasks. If your SharePoint server administrators have configured something known as the Work Management Service Application, and they have completed the integration of Exchange and SharePoint, then tasks assigned to you in SharePoint Server, Outlook, and Project Server are consolidated in a comprehensive work management view.
You can create, update, and delete task items, which are then written back to the original location. You can edit a task item inline or open the task form, and modifications are written back immediately so that other team members are aware of your updates, no matter whether they are viewing the Tasks list in Outlook or in Outlook Web App, or using an Outlook task app for a smartphone or in the browser.
Note
SEE ALSO Information on Outlook can be found in Chapter 14.
The My Tasks page provides a search box that allows you to search your tasks. It also contains several views that you can use to identify the tasks that are assigned to you. These views are as follows:
Important and Upcoming
Active
Completed
Recently Added
In addition to these views, there are a number of other views that you may also see. If you use Project Web App, the list of views also includes Timesheet and Task Status Reporting. You will also have a view for each project or site that contains tasks assigned to you.
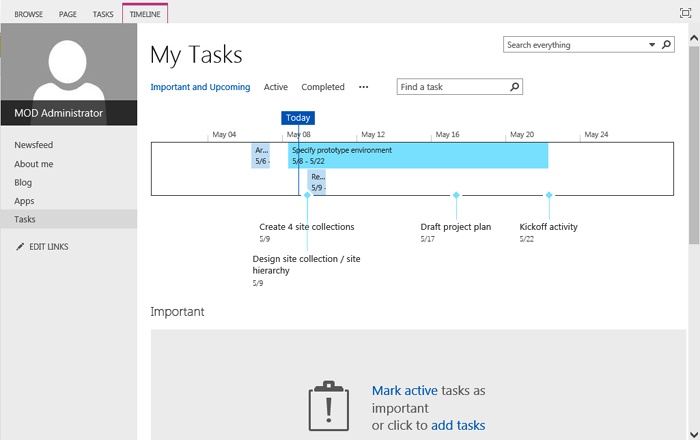
The Important and Upcoming view includes the following:
Timeline This provides an overview of all current and upcoming tasks across approximately a three-week period. You can choose to add and remove tasks from the timeline as required, using the Timeline tab that you used with the Project Summary Web Part and on the timeline view in a Tasks list. You can change the date range for the timeline to show all of your active tasks, using their associated start and due dates to determine the date range. The timeline will begin with the earliest date within all of your tasks, and end with the latest date.
Important The tasks listed in this section have been flagged as Important, denoted by the red exclamation mark.
Upcoming This section shows all tasks assigned to you for approximately the next two months. Late tasks are highlighted in red.

In the Active view, you can see tasks assigned to you, grouped by project and sites. In this view, you can add and view Personal Tasks that will not be seen on any other site, such as planned vacations or personal appointments, which can be synchronized with Exchange, and is therefore visible in Outlook.
The Completed view displays tasks that have the Completed check box selected. You can mark a task as completed by selecting the check box to the left of the task’s name or by using Mark As Complete on the Task tab. If you mark a task as complete on the My Tasks page, it is marked as complete for everyone who is assigned to the task. It is best practice to have only one person assigned to each task; however, that may not always be possible. If you know that other users are working on a task with you, check with them before marking a task as complete on your My Tasks page.
When you complete a task, the % Complete field will be set to 100%. For PWA assignments, the Remaining Work is set to 0 hours and the assignment is sent to the task update through the approval loop. You can click the ellipsis to the right of the task item title to display a callout.
The Recently Added view displays only those tasks that are within a set number of days. You can change the number of days used to determine which tasks appear in this view.
On the My Tasks settings page, you can configure which task items are to be displayed on your My Tasks page, thereby preventing your list of tasks from becoming overwhelming. You can also choose to display task items from specific sites and you can change the color of a site’s task items when displayed on the timeline. As new sites that have task items are assigned to you, they are automatically assigned a color. You can go to the settings page to change them by clicking Settings on the Tasks tab.

Tip
If you have changed the appearance of your timeline to use specific colors for individual tasks, those colors will be used instead of the ones you define as the default colors on the My Tasks settings page.
A particularly useful setting is the Old Tasks Limit option. Tasks that have not changed in a long time may not be worth keeping on the My Tasks page. To hide tasks that have not been changed in a set number of months, select the check box and type the number of months you want to use as a limit; for example, if you do not want to see tasks that have not changed in the last two years, select the check box and type 24 in the box.
In this exercise, you will set a task as Important and complete the task (both added to a Tasks list on a site) and add a personal task.
Set Up
Display the home page of the Project site that you created previously, if it is not already open.
Click Newsfeed in the top navigation bar, and then on the Quick Launch, click Tasks.
Click Important and Upcoming, if this is not the active view.
Scroll down to the Upcoming section, and then click the exclamation mark (!) to the left of Design site collection / site hierarchy, which is a task you created in the previous exercise. The exclamation mark should now be red.
Refresh the page. The Design site collection / site hierarchy task should now be visible in the Important section and is not displayed in the Upcoming section.
On the top of the page, to the right of Important and Upcoming, click Active.
Under Personal, click new task, and then under Title, type Order foreign currency for holiday.
Press Enter.
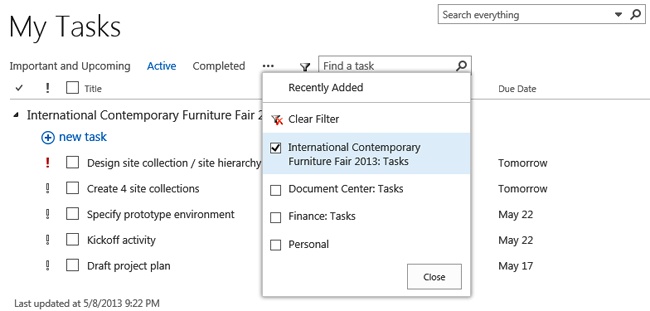
Click the ellipsis to the right of Completed, and then select the check box to the left of International Contemporary Furniture Fair 2013 to filter the tasks displayed.
Select the check box to the left of Create 4 site collections to complete the task.
Refresh the page. The completed task is not displayed.
At the top of the page, to the right of Active, click Completed to display the completed Create 4 site collections task item.
Click International Contemporary Furniture Fair 2013 to display the home page of the site.
On the Quick Launch, click Tasks. Notice that the Create 4 site collections task item is displayed as completed.


Managing projects with SharePoint and Project Professional
Project Professional 2013 provides rich, out-of-the-box reporting tools on the desktop, with a familiar Excel-like grid to help you quickly and easily measure progress and resource allocation. Project Professional 2013 reports follow industry guidelines, and they include Project Overview, Work Overview, and Burndown.
Note
SEE ALSO You can find information concerning Microsoft Project 2013 quick start training at blogs.office.com/b/project/archive/2013/04/18/free-project-2013-quick-start-training-available-on-demand.aspx.
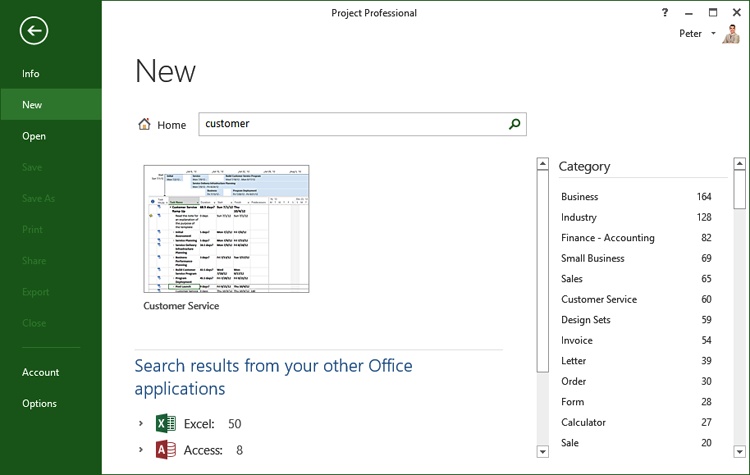
Like many other Office applications, Project includes a set of templates that can be used to jump-start the creation of a project plan. You can also create a project plan from an existing project, an Excel workbook, or from a SharePoint Tasks list. Not all project templates are available when you first install Project; some are only available when you are connected to the Internet. When you choose one of these templates, you are provided a preview of the template, a description, and the download size of the template.
Once you have created a project plan, you can synchronize your plan with a Tasks list on a SharePoint site at any point. You will see the same timeline and project plan in Project, as well as in the SharePoint site and on your My Tasks page. Every time you click Save in Project, your project file is saved to the Site Assets library and the task items in the Tasks list are updated. Now other team members can start updating their progress using SharePoint, Outlook, or a mobile device.
By default, the following fields are synchronized between a SharePoint Tasks list and Project: task name, start date, finish (due) date, % Complete, resource name, and predecessors. However, if you want to map additional fields to be synced between Project and SharePoint, on the backstage Info page, click Map Fields, and select the fields that you would like to sync. You or your team members can now report on custom fields or generate reports based on nondefault SharePoint Tasks list columns.
In this exercise, you will create a new project plan, and then you will synchronize your plan with a Tasks list on a SharePoint site.
Set Up
Start Microsoft Project 2013. Remember to use your SharePoint site location in place of http://wideworldimporters in the following exercise. You will need access to the Internet to complete this exercise.
Important
Verify that you have sufficient rights to create items in a Tasks list and that you can upload a file in the Site Assets library. If in doubt, see Appendix A.
Below the Search for online templates text box, type customer, and then press Enter.
Click Customer Service, and then click Create.
Click File to display the backstage Info page, and then click Save As.
In the middle pane, under Save and Sync, click Sync with SharePoint. In the right pane, under Sync with, select Existing SharePoint site.
In the Site Address text box, type the URL of the SharePoint site, such as wideworldimporters.
Click Verify Site, and then under Tasks List, select a Tasks list that you want to link to the project plan, such as Tasks, or type the name of a new Tasks list.
Click Save, and then wait while SharePoint and Project are updated.
Click OK to any Microsoft Project dialog box.es that appear. You may also need to provide a user name and password.
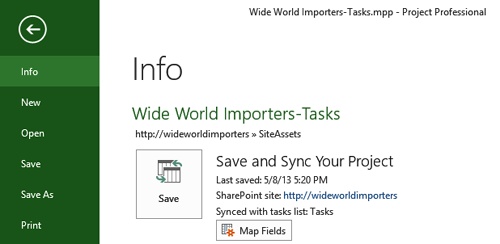
Click File to display the backstage Info page.
In the Save and Sync Your Project section, click the link to the right of SharePoint site to open the site in which you saved your project plan.
On the Quick Launch, click the name of the Tasks list, such as Tasks.
Click Site Contents, and then click Site Assets to check that the project plan uploaded.


Synchronizing a Tasks list with Project
Many projects may begin by using task items in a Tasks list on a SharePoint site. Team members can view and track the progress of their tasks easily in the browser. They do not need to have Project installed. However, the project manager may want to manage the progress in Project. You can sync your Tasks list with Project by using the browser.
In this exercise, you will sync a Tasks list with Project.
Important
Verify that you have sufficient rights to upload a file in the Site Assets library. If in doubt, see Appendix A.


Key points
The task management capabilities within SharePoint Server 2013 are vastly more improved than earlier versions. They include tasks, subtasks, a timeline view, a Timeline Web Part that can display the timeline of Tasks lists from other sites, and a Project Summary Web Part that can aggregate the timeline tasks from Tasks lists in one site.
A new site template called Project Site activates all the new task management features by default.
You can use the Quick Edit view of a Tasks list app to quickly create task items.
SharePoint Server 2013 provides new functionality that also aggregates tasks from Exchange 2013 and Project Server 2013.
Users can view all tasks in their personal site on the My Tasks page, which you can find on the Quick Launch, on the Newsfeed hub.
Two-way synchronization lets users update their tasks using the My Tasks page, or they can update a task in the Microsoft Office product in which it originated.