
Chapter 15. Working with Content Management
Chapter at a glance
Work
Work with Document Sets, Creating Document Sets

Organize
Organize content, Organizing content

Create
Create a page layout, Creating page layouts

Define
Define a SharePoint site policy, Defining a SharePoint site policy
IN THIS CHAPTER, YOU WILL LEARN HOW TO
Microsoft SharePoint Server is an Enterprise Content Management (ECM) system. It contains a core set of enterprise document management features that can store millions and millions of documents, which can be accessed at a high retrieval rate. It includes record sets and electronic records management features that are becoming more critical to organizations. It provides mechanisms for the authoring, branding, and the controlled publishing of web content, known as Web Content Management (WCM). As you can see, ECM is a broad subject area that this chapter can only introduce you to.
Microsoft SharePoint Server 2010 has many of the basic ECM components that remain in place in Microsoft SharePoint Server 2013, including major and minor versioning; check-in and checkout; content approval; version trimming; multiple file uploads; an explorer view of libraries; the synchronization of offline files; and the ability to define data (metadata) at the site, site collection, and enterprise levels using site columns, content types, enterprise content types, keywords, and term sets.
SharePoint Server 2010 also provides many site templates that you can use as a basis for managing content, such as the Document Center and the Records Center. With the records management mechanism, you can enforce content control specified by external pressures, such as those from legislators, regulators, auditors, and legal processes. Not only can you place holds on records and associate them with retention and expiration policies, Microsoft SharePoint Server 2013 now includes two methods for search and locating files: using the Records Center’s eDiscovery features and creating sites from the eDiscovery Center site template.
Any library can make use of these features, including Document IDs and the Content Organizer, which automatically move documents to the libraries where they should be stored.
With SharePoint 2010, WCM functionality mainly consists of WCM pages, known as publishing pages, which are based on page layouts. The WCM feature uses document management capabilities to manage pages so that you can check pages in and out, as well as use the Approval workflow.
Content authors usually add static content to pages and dynamically displayed data from lists or libraries by using the Content Query Web Part (CQWP); however, those lists and libraries have to be stored within sites in the same site collection.
SharePoint Server 2013 introduces additional WCM functionality that is based on displaying content using search, as well as the structure of the site. Navigation can be organized by managed metadata. WCM pages can roll up content from anywhere within your SharePoint implementation using cross-site collection publishing (XSP) and the Content Search Web Part (CSWP). This scenario is particularly suited for an organization that needs to provide information on a range of products, and SharePoint Server provides a new site template, Product Catalog, which can be used as a basis for such a scenario.
Tip
To use many of the ECM features, you need to activate these features at either the site collection or site level. Chapter 5, contains information on features.
In this chapter, you will learn how to configure Document IDs, how to create a Document Set, how to use the Content Organizer, how to create a Records Center site, how to manage records, and how to use in place records management. You will also learn how to create a publishing site, as well as how to create and manage page layouts. You will then activate the cross-site collection feature and define a site policy.
Note
PRACTICE FILES Before you can complete the exercises in this chapter, you need to copy the book’s practice files to your computer. The practice files you’ll use in this chapter are in the Chapter15 practice file folder. A complete list of practice files is provided in Using the practice files at the beginning of this book.
Important
Remember to use your SharePoint site location in place of http://wideworldmporters in the following exercises.
Working with Document IDs
When you upload a file to a library, it is assigned a web address based on the library URL and the file name. When a file is moved to a different library, it is assigned a new web address; therefore, links that were created when the file was stored in the first location no longer work now that the file has been moved. Similarly, when you submit content to a repository, a new web address is created again, and you will not find it later using the original URL if it has been moved from its original location. In these scenarios, you may consider using the Document ID feature, which is a site collection level feature. Once activated at the site collection level, all documents in all libraries in the site collection automatically receive a unique ID.
Document IDs consist of the following two parts:
A prefix, which is randomly generated, so that Document IDs are unique in your SharePoint installation. You can specify the prefix using the Document ID settings page. You should ensure that every site collection that uses the Document ID feature has a unique prefix; otherwise, you could end up with duplicate IDs.
Two numbers, which consist of the ID of the list that the document was first created in and the ID of the item in that list.
An example Document ID is SP13SBS-4-2. When you use a library view or the properties view of a file, the Document ID column can be displayed.

Tip
You can display the Document ID column on any library in the site collection, so that you can see the Document ID assigned to the files. This is useful if you need to reference a file elsewhere.
The Document ID column is a URL with a format like http://wideworldimporters/_layouts/DocIdRedir.aspx?ID=SP13SBS-4-2. When you click this URL, search is used to find the file, and therefore the URL is valid, even if the document has been moved to another location.
Important
When documents are copied, new Document IDs are assigned. Because finding documents using their Document IDs is search dependent, when you copy a document, it cannot be found based on its new Document ID until the library you have copied it to is indexed. When you move or cut and paste documents, Document IDs are retained as long as the site collection that contains the destination library has the Document ID Service feature activated.
When you activate the Document ID Service site collection feature, new hidden site columns are added to the site collection, and those site columns are added to the Document content type and the Document Set content type. Then, a content type pushdown is triggered to all libraries that use those content types, and Document IDs are assigned to existing documents. Also, when the feature is activated, the Find by Document ID Web Part is made available under the Search category on the Insert Web Part pane. By referencing a Document ID in this Web Part, you can display the properties of the document. This Web Part will only look for documents in its current site collection; therefore, if you move a document to another site collection, it will not be found by the Document ID Web Part.
Tip
SharePoint is configured, by default, to run Document ID–related jobs nightly. Until the jobs are run, the Document ID Service is not fully activated, and the existing documents in your site collection will not be assigned Document IDs immediately.
Deactivating the Document ID Service feature removes the link to Document ID Settings on the Site Settings page and stops the assignment of Document IDs. The Document ID columns remain so that, even after deactivation, existing Document IDs are preserved. After the feature is deactivated, users who try to use a static URL to look up an item by its Document ID see an error message indicating that, “This site collection is not configured to use Document IDs.”
In this exercise, you will activate and configure the Document ID Service feature.
Set Up
Open the top level site of a site collection in which you want to activate the Document ID Service feature.
Important
Verify that you have sufficient rights to enable a site collection feature and to amend library settings. If in doubt, see Appendix A.
On the Settings menu, click Site settings. Under Site Collection Administration, click Site collection features, and to the right of Document ID Service, click Activate, if it is not already active.
On the breadcrumb, click Site Settings, and then under Site Collection Administration, click Document ID settings.
In the Begin IDs text box, type SP13SBS.
Click OK.


Creating Document Sets
As part of a business process, you may find that you always have three or four related files, such as a new product proposal created in Microsoft Office PowerPoint, a Microsoft Office Excel file with supporting financial information, and a product sheet created with Microsoft Office Word. You could use the metadata in a column to group them together, or you could use a folder. With SharePoint Server, you can group different files as one item or as a set by using the Document Sets site collection feature. With Document Sets, you can standardize the production of proposals, project documentation, and other content that has multiple files.
Document Sets can share metadata with their contents, making it easier to tag and manage content. Workflows can be run on individual items within a set, or on the Document Set as a whole. For example, you may have a Document Set that defines legal cases. You can specify that when a legal case is closed, the Document Set that represents that legal case can be routed, with all of its content, to a Records Center site for storage and eventual disposition.
You can use versioning with Document Sets. When you change the version of a document within the Document Set, the version number of the document is incremented, but the version number of the Document Set remains unchanged. To change the version number of the Document Set, on the Manage tab, in the Manage group, click Capture Version. Capturing a version of a Document Set is similar to taking a snapshot. The current properties of the documents within the documents are saved. You have the choice to include only the current major version of the documents within the Document Set or the latest minor version.
Note
SEE ALSO There are many settings that you can use to customize your Document Set; for example, each Document Set comes with its own Welcome page, which is like the home page for your Team site. More information can be found at technet.microsoft.com/en-us/library/ff603637.aspx.
In this exercise, you will enable the Document Sets site collection feature, if it is not already activated, create a Document Set content type and add it to a library, and then create a Document Set.
Set Up
Open the top level site of a site collection where you want to activate the Document Set feature. This exercise uses two files, ProductProposalPresentation.pptx and ProductSheet.docx, in the Chapter15 practice folder; you could use any files.
Important
Verify that you have sufficient rights to enable a site collection feature and to amend library settings. If in doubt, see Appendix A.
From the Settings menu, click Site settings. Under Site Collection Administration, click Site collection features, and to the right of Document Sets, click Activate, if it is not already active.
Go to the site where you want to create the Document Set content type. From the Settings menu, click Site settings, and then under Web Designer Galleries, click Site content types.
On the Site Content Types page, click Create to display the New Site Content Types page.
In the Name box, type Product Proposals.
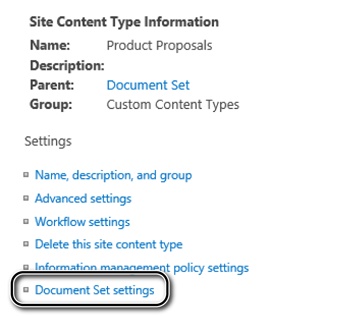
In the Select parent content type from list, select Document Set Content Types, and in the Parent Content Type list, select Document Set.
Click OK to display the Site Content Type page, and then under Settings, click Document Set settings.
On the Document Set Settings page, in the Default Content section, click Browse to the right of File name, and then go to the Chapter15 practice folder. Click ProductProposalPresentation, and then click Open.
Click Add new default content and repeat step 7 to use ProductSheet.
At the bottom of the page, click OK to redisplay the Site Content Type page.
On the Quick Launch, click Site Contents, and then click the library where you want to add the Document Set content type that you have just created.
On the Library tab, in the Settings group, click Library Settings.
On the Settings page, under General Settings, click Advanced settings, and then under Allow management of content type, select Yes, if it is not already selected. At the bottom of the page, click OK.
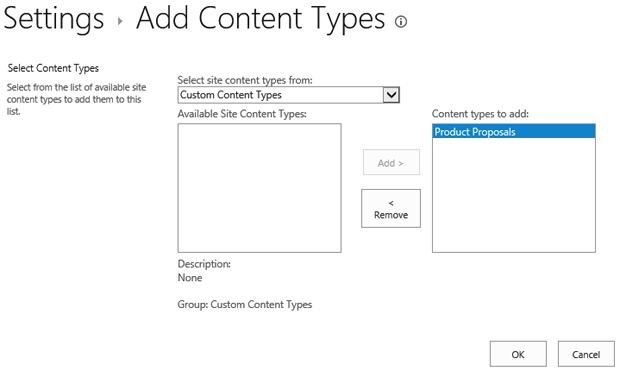
On the Settings page, under Content Types, click Add from existing site content types.
On the Add Content Types page, under Select site content types from, select Custom Content Types, and then under Available Site Content Types, select Product Proposals. Click Add.
Click OK, and then in the breadcrumb, click the library name.
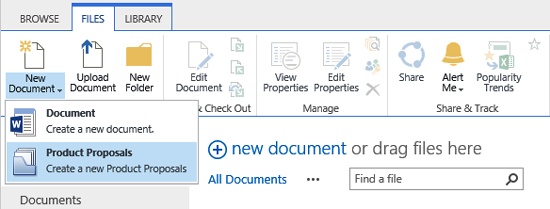
Click Product Proposals, and then in the Name box, type 2014 Madrid Kitchen Furniture.
Click Save to display the welcome page for the 2014 Madrid Kitchen Furniture Document Set.


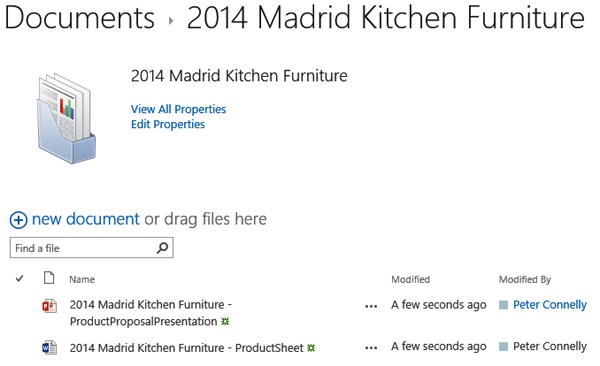
Organizing content
The Content Organizer not only allows you to automatically route documents to different libraries, and folders within those libraries, you can also use it, for example, to make sure that any folder within a library contains no more than, say, 2,500 items. When file number 2,501 is added to the library, the Content Organizer can automatically create a new folder and put the file in that folder. All of this routing and folder creation can be handled automatically without requiring user intervention. After a document is uploaded and the required metadata applied, the upload form displays the URL to the location that the document has been routed; therefore, you know where to find it in the future. The Content Organizer uses the same routing engine as the Records Center site.
Tip
The Content Organizer cannot route documents to a Document Set, nor does it redirect pages. However, you can move a Document Set as long as the content type is added to the destination library. SharePoint will zip the Document Set to do this.
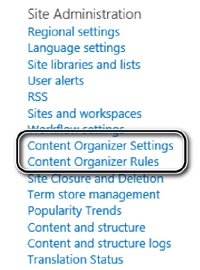
To use the Content Organizer, the Content Organizer site feature must be activated, and it will only work with content types based on the Document content type. Once the Content Organizer site feature is activated, a new library, the Drop Off Library, is created. Two new links are provided under Site Administration on the Site Settings page: Content Organizer Settings and Content Organizer Rules.
Documents are routed as follows:
Documents with the correct content type, metadata, and matching rules are automatically routed to the destination library or folder. The Content Organizer will move the content to the new location whether or not the contributing user has access to the destination location. The user ID of the contributing user will be used for the Modified By property on the destination document.
Documents that lack the metadata required to match a rule, or that are missing required metadata, are stored in the Drop Off Library so that the metadata can be entered.
When you create a rule that uses content types, the first time that you add a rule for that content type, the content type is automatically added to the Drop Off Library.
Content types are not automatically added to the destination library; you must manually add them if they are required.
Use the Content Organizer Settings page to configure whether to route documents that are added to the site based on rules. Any changes made here affect routing for the entire site. The Content Organizer Settings page consists of the following seven sections:
Redirect Users to the Drop Off Library Select this check box to redirect files that are uploaded to libraries with rules to the Drop Off Library. Files loaded into libraries that have no rules are unaffected. When a file is uploaded, the document properties window for Drop Off Library appears, which you can use to enter the metadata properties. Once the routing rules are applied to the document, you will be shown the destination URL for the file. If the check box is cleared, you can bypass the organizer and upload the files directly to a library or folder.
Sending to Another Site Select this check box to allow rules for directing uploads in the current site to route to other sites. The destination site must also have the Content Organizer site feature installed and activated. You can only route files to other sites in site collections within a SharePoint web application.
Folder Partitioning Select this check box to create a threshold limit on the number of files that can be stored in a library. Once the limit is reached, the organizer will create subfolders. You can create very large document libraries by nesting folders.
Duplicate Submissions Select this check box to decide what happens when you upload a file that already exists in the library. You can decide to create a new version, if versioning is enabled in the library, or to append unique characters to the end of the file name.
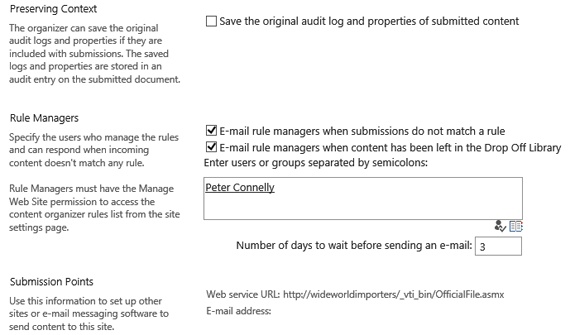
Preserving Context Select this check box to save the original audit logs and properties of the files. This is particularly important when using Records Center sites, so that all the historical information about a file is retained. If this information is retained, you can view it by clicking Compliance Details in the View Properties page.
Rule Managers Use this section to add the users or groups that you want to manage the Content Organizer rules. These users must have Manage Web Site permission to edit rules.
Submission Points Use this section for information on configuring how other sites or email messaging software sends content to the site. By default, email integration with Content Organizer is not enabled; your SharePoint server administrator will need to active this feature. Once activated, you can create a rule to route information submitted by an email. On the New Rule page, in the Submission’s Content Type section, in the Type list, select E-mail Submission. In the Conditions section, you can choose email fields such as Subject, To, From, and CC.


Use the Content Organizer Rules page to create the rules that are used for routing documents. Any rules created here are used to route individual files based on metadata attributes that you choose. The New Rule page consists of the following five sections:
Rule Status And Priority Use this section to specify the priority of the rule and whether the rule should run on incoming files. The priority can range from 1 (highest priority) to 9 (lowest priority). This is useful when you have more than one rule, and you can select which rule should be applied first to the uploaded files.
Submission’s Content Type Use this section to select a content type whose properties can be used in the conditions of the rule. The drop-down list box only shows the content types that are based on the Document content type. With the Alternate names check box, you can define existing content types that are named differently in other sites.
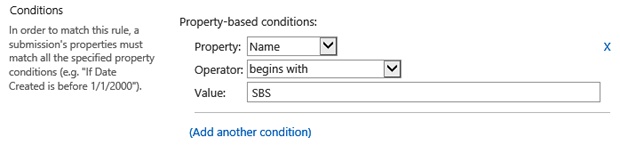
Conditions This is the section where the real power of the feature lies. You can create up to six conditions where the properties of the items must meet certain values.
Target Location Select a destination library or folder to route the file when the preceding conditions are met. It could be on the same site, or a different library on a different site. You can also create a folder for each unique value of a property.


In the following exercise, you will enable the Content Organizer site feature.
Important
Verify that you have sufficient rights to manage a site. If in doubt, see Appendix A.
On the Settings menu, click Site settings, and then under Site Actions, click Manage Site Features.
To the right of Content Organizer, click Activate, if it is not already active.
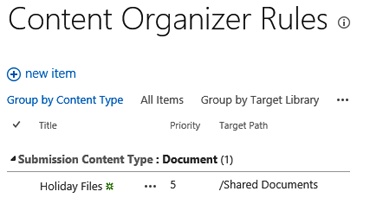
In the breadcrumb, click Site Settings. Under Site Administration, click Content Organizer Rules, and then click new item.
On the New Rule page, in the Name box, type, Holiday Files.
In the Submission’s Content Type section, in the Group list, select Document Content Types, and in the Type list, select Document.
In the Condition section, in the Property list, select Name. In the Operator list, select begins with, and then in the Value box, type Holiday.
In the Target Location section, click Browse. Go to the library where you wish to route files that match this rule, and then click OK.
On the Quick Launch, click Site Contents, and then click Drop Off Library. Click new document. In the Submit Document dialog, click Browse, and then go to the Chapter15 practice folder. Click Holiday budget planner, and then click Open.
Click OK. Once the document has been uploaded, the properties form appears, warning that the document will be moved.
Click Submit to display the Saved to Final Destination page. Click OK.

Creating a Records Center
A record is a document or other electronic or physical entity that serves as evidence of an activity or transaction performed by an organization and that requires retention for some time frame. Records management is the process by which an organization does the following:
Determines the type of information that should be considered a record.
Determines how active documents (that are to become records) should be handled while they are being used, and determines how they should be collected after they are declared as records.
Determines the manner in which and the amount of time that each record type should be retained to meet legal, business, or regulatory requirements.
Researches and implements technological solutions and business processes to help ensure that the organization complies with its records management obligations in a cost-effective and nonintrusive way.
Performs records-related tasks (such as disposing of expired records, or locating and protecting records) that are related to external events, such as lawsuits.
Tip
Records management is not a trivial activity. It needs careful planning and the creation of a file plan. Information on records management planning can be found at technet.microsoft.com/en-us/library/ff363731.aspx.
SharePoint Server can be used in a records management solution. Records can be declared in place, or files can be archived to a records repository where they can be managed as records. You can configure a records repository as a top level site of a site collection or as a subsite by using the Records Center site template.

Tip
A SharePoint server administrator can configure Send To links to send files to a Records Center site by using the Central Administration website or Windows PowerShell.
In this exercise, you will create a Records Center site.
Important
Verify that you have sufficient rights to create a site. If in doubt, see Appendix A.
Click the Settings gear icon, and then click Site contents.
Scroll to the bottom of the Site Content page, and then under Subsites, click new subsite.
In the Title text box, type Wide World Importers Records Center, and in the Description text box, type This site is to be used as the records repository for Wide World Importers.
In the URL name text box, type RecordsCenter.
Click the Enterprise tab, if it is not already active, and then click Records Center.
Leave the default settings for the options in the Permissions and Navigation Inheritance sections, and then click Create.
Introducing eDiscovery features
With the eDiscovery capabilities in SharePoint, legal teams can discover and export content from a variety of sources, such as documents, microblogs, wiki pages, social feeds, instant messages, and emails. The Discovery Center is completely redesigned in SharePoint Server 2013 and has a new site template, which you can use to create the top level site of a site collection; however, you can use core eDiscovery features in a Records Center.

A Discovery Center is usually deployed as a single, centralized enterprise-wide portal in which individual users who have access rights are able to create and manipulate discovery cases across multiple SharePoint farms and in Microsoft Exchange. All of the data managed by the Discovery Center can be exported into the industry-standard Electronic Data Reference Model (EDRM) XML format, so that it can be imported into a review tool.
The eDiscovery features in SharePoint Server 2013 have been specifically reengineered for managing eDiscovery cases and holds, as follows:
An eDiscovery set is a combination of sources, queries, and potentially in place holds. An eDiscovery set source could include Exchange mailboxes, SharePoint sites, and Microsoft Lync conversations.
A hold is a method to preserve content, which is especially useful when the content is needed in legal proceedings or in regulatory reviews, such as an audit. This content is usually identified by an organization as a record. By placing a hold on content, you prevent the deletion of content from any retention or expiration policies.
Tip
In any review process, it is important that reviewers have the ability to find content. With eDiscovery features, you can focus queries by using filters and exporting the results of those queries.
In SharePoint Server 2010, you can place documents, pages, and list items on hold, which prevents users from deleting or editing them. SharePoint Server 2013 provides in place holds, which can be used to preserve sites and Exchange mailboxes. An in place hold also makes it possible for users to continue to edit or even delete preserved content, thereby allowing users to continue working on the content without realizing that a hold has been placed on the content. This is important when you do not want it to be obvious to users that the content is being reviewed.
An in place hold is applied at the site level. When an in place hold is applied, a copy of the content is preserved as it was at the time the hold was initiated. Initially, the content is preserved in its original location. When a user first attempts to modify or delete content, because a hold was applied, a copy is preserved in a preservation hold library.
The preservation hold library is only visible to site collection administrators or users, who at the web-application level, have been given permissions to see all content in all site collections within the web application. Also, SharePoint Server search has special permissions to crawl content in the preservation hold library.
When content in the preservation hold library does not match at least one of the eDiscovery set filters, it is deleted.
Managing records
When a Records Center is first created, the only library that exists is the Drop Off Library. You will need to create libraries and lists to store each record that is specified in your file plan. Each record will be associated with different types of data, and therefore you will create content types, add site columns to those content types, and associate the content types with the lists and libraries in your Records Center. You will then specify information retention policies and configure the Content Organizer to route each record type to the appropriate location.
Information management policies help your organization control its records. There are two ways of configuring and applying compliance and retention rules on a SharePoint site:
Use an information management policy for a content type, and as the content types are applied to records, the policies are applied to the records. However, you cannot specify an information management policy for content types that are installed when a site collection is created. You must create a content type that is based on one of the default core content types and apply an information management policy to your content type.
Associate policies with records based on location; that is, if you associate a policy to a list, library, or folder, the policy is applied to any record stored in them.
Tip
You must be a member of the Owners group for the Records Center site to create and manage policies.
An information management policy can consist of one or more policy features: labels, auditing, expiration, and barcodes.
Once your Records Center is configured, you can then convert active content to records by using one of the following techniques:
Manually declaring a document to be a record. It is very rare that your organization would manually let users declare records. Records are usually declared using the other options in this list.
Defining a policy that declares a document to be a record or that sends a document to a Records Center site at a specified time.
Creating a workflow that sends a document to a Records Center site.
Using a custom solution.
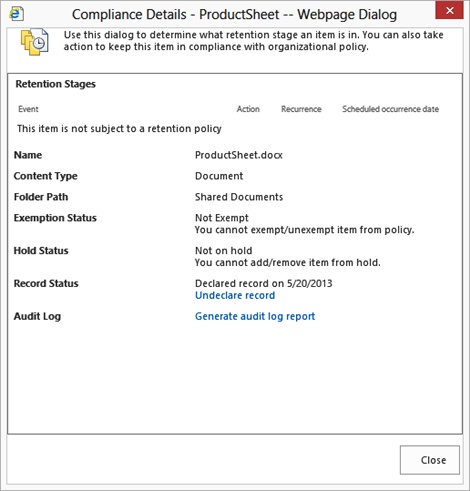
You can use the Compliance Details dialog box to view the important business information about a record, including the name, content type, and folder path of a document; any retention policies on a document (and their recurrence); and exemption status and hold status. You can also add or remove holds and records, and generate audit log reports.
In this exercise, you will create a location-based retention policy.
Important
Verify that you have sufficient rights to edit the home page of this site. If in doubt, see Appendix A.
On the Quick Launch, click Libraries, and then click add an app.
On the Your Apps page, click Document Library and type Contracts. Click Create.
On the Site Contents page, click Contracts. On the Library tab, click Library Settings.
Under Permissions and Management, click Information management policy settings to display the Information Management Policy Settings page.
To the right of Content Types, click Change source to display the Library Based Retention Schedule page.
Select Library and Folders. A dialog box appears, warning that when library and folder retention schedules are used, all content type retention schedules are ignored and that you may be overwriting policies defined by your site administrator.
Click OK. The page redisplays, showing a Library Based Retention Schedule section.
In the Description box, type Declare contracts as records when they are finalized, and then click Add a retention stage to open the Stage properties dialog.
To the right of Created, type 7, and in the Action list, select Permanently Delete.
Click OK to close the dialog.
Click Apply, and then click OK.


Configuring in place records management
In addition to the Records Center as a central repository for document retention, SharePoint Server site owners can configure in place records management. Once a library is configured to allow the manual declaration of records, any document in the library can be declared as a record, and is then protected from changes or deletion.
The following are some additional benefits of using an in place records management system:
Records can exist and be managed across multiple sites. An organization may want certain documents and wikis to be declared as records without moving them to a Records Center.
With versioning enabled, maintaining versions of records is automatic.
eDiscovery search can be executed against records and active documents at the same time.
There is broader control over what a record is in your organization and who can create a record.
The first step in configuring an in place records management system is to activate the feature at the site collection level. Activating the feature enables the Declare/Undeclared Record command on the ribbon. You can then configure record declaration at the site collection level or at the list or library level.
On the Record Declaration Settings page, you can place a restriction on what can be done to items that are declared as records, and choose whether the manual declaration of records should be available in lists and libraries by default.
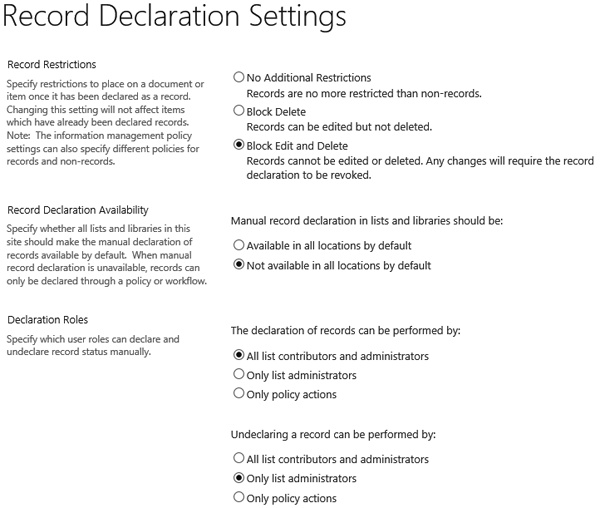
Manual record declaration can be configured at the site collection level and be overridden in each list or library within the site collection. By configuring record declarations for a list or library, you have more control over where items are declared as records. Also, you can have items automatically declared as records when they are added to the list or library.
In this exercise, you will configure in place records management and declare an in place record.
Set Up
Open the top level site of a site collection that contains sites in which you want to use in place records management.
Important
Verify that you have sufficient rights to activate a site collection feature. If in doubt, see Appendix A.
From the Settings menu, click Site settings. Under Site Collection Administration, click Site collection features, and to the right of In Place Record Management, click Activate, if it is not already active.
Go to the library that you want to use in place records management, and then on the Library tab, click Library Settings.
Under Permissions and Management, click Record declaration settings.
In the Manual Record Declaration Availability section, select Always allow the manual declaration of records.
Click OK, and then on the breadcrumb, click the library name. If the library has no file, click new documents and upload a document.
Click to the left of the document that you want to declare as a record so that a check mark appears, and then on the Files tab, in the Manage group, click Declare Record.
Click OK to confirm that you want to declare the selected documents as records.
Click the ellipsis to the right of the document you declared as a record. Click the ellipsis in the callout, and then click Compliance Details.
The Compliance Details dialog box appears.
Click Close.


Creating a publishing site
In SharePoint Server 2013, you have two methods of providing and controlling web content. You can create publishing pages based on page layouts, or you can display web content based on information that has been indexed by SharePoint Server or has been tagged using the Terms Store, which is part of the Managed Metadata Service (MMS). In reality, many of your Internet and intranet sites will use a combination of these two methods. Whichever method your organization chooses to use, you will need at least one publishing site.
Publishing sites can be created as a top level site of a site collection or a subsite. Publishing functionality is available when the SharePoint Server Publishing site feature is activated, which, in turn, depends on functionality available when the SharePoint Server Publishing Infrastructure site collection feature is activated.
The SharePoint Server Publishing Infrastructure site collection feature adds a number of objects to the top level site of your site collections. These objects include the following SharePoint groups: Approvers, Designers, Hierarchy Managers, Restricted Readers, and Style Resource Readers; and several new libraries: Pages, Site Collection Documents, Style Library, and Site Collection Images. They also include the Content and Structure reports and Reusable Content lists. In addition, the Publishing Infrastructure feature adds new Web Parts, site columns, and content pages, and replaces the top link bar with a global navigation menu. It also adds a number of new links to the Site Settings page.
SharePoint Server provides the following publishing sites templates:
Note
SEE ALSO Information on using an Enterprise Wiki site can be found in Chapter 8.
Typically, publishing sites are created as subsites (or child sites) in a site collection, which was created, for example, by using the Publishing Portal or Product Catalog site templates. The Publishing Portal is typically used for creating multiple publishing sites that contain many publishing pages. The Product Catalog can be used when you want to use search to display content and manage navigation.
The Publishing Portal, Product Catalog, and Enterprise Wiki site templates can only be used to create the root site of a site collection. These three site templates automatically activate the SharePoint Server Publishing Infrastructure feature.
All publishing site templates automatically activate the SharePoint Server Publishing site feature. This site feature automatically creates the Pages library. Site owners can activate features to extend the functionality of their sites. Therefore, it is possible for a site based on the Team Site template to be turned into a publishing site by activating the SharePoint Server Publishing feature.
On a site based on the Publishing Site with Workflow template, both content approval and the approval workflow are enabled so that a page will move from content creator to an approver. Also, on any publishing site, by configuring Manage Item Scheduling, you can place the page in a scheduled state, whereby the page is not visible until a particular date is reached. You can also configure an end date with the option to automatically send the page’s contact an email message when the page expires. You can also configure scheduled reviews of publishing pages, as well an information management policy on the Pages library to manage the retention and deletion of pages.
To maintain a large Internet or intranet site, you will need people who have the following roles:
Site Owners For a large site that contains many child sites, this may be a team of people who decide the site structure and governance, and manage centrally stored resources, such as images. Within each child site, a person or team may decide on the lists and libraries that the site contains, or the pages required. This team produces wire diagrams that represent how each component on the page should be laid out.
Page Layout designer This person uses Design Manager or Microsoft SharePoint Designer 2013 to create and maintain page layouts. You might need a developer, depending on the complexity of the requirements.
Content creator These users create and modify publishing pages based on page layouts, or enter data into product catalogs. Users who are placed in the Members SharePoint groups can amend items, documents, and publishing pages. Therefore, most installations will create an additional SharePoint group, so they can differentiate between users who can edit and modify publishing pages and those, for example, who can upload and approve files in other document libraries, such as the Site Collection Documents and Site Collection Images library or items in the Reusable Content list.
Approver These users moderate, edit, and approve publishing pages. This special SharePoint group is created automatically and, on a site created from the Publishing Site with Workflow template, is linked to the Page Approval workflow on the Pages library. Users in this group can approve any item or document in any list or library that has Content Approval enabled.
In this exercise, you will create a publishing site with workflows, and include yourself in the Approvers SharePoint group.
Note
TROUBLESHOOTING To create a publishing subsite, the SharePoint Server Publishing Infrastructure site collection feature must be activated. This feature is automatically activated if the top level site of a site collection was created using a publishing site template. Normally, this site collection feature is not activated on site collections where the top level site was created using a Team site; therefore, you usually cannot create a publishing site as a subsite of a Team site.
Important
Verify that you have sufficient rights to create a site. If in doubt, see Appendix A.
On the Quick Launch, click Site Contents, and then at the bottom of the Site Content page, under Subsites, click new subsite.
In the Title text box, type Wide World Importers Job Vacancies, and in the Description text box, type This site contains job vacancies that anyone within Wide World Importers can apply for.
In the URL name text box, type JobVacancies.
Click the Publishing tab, if it is not already active, and then click Publishing Site with Workflow.
Note
TROUBLESHOOTING If the Publishing tab is not displayed, check that the SharePoint Server Publishing Infrastructure site collection feature is activated. Information on activating site collection features can be found in Chapter 5.
Leave the default settings for the options in the Permissions and Navigation Inheritance sections, and then click Create.

Creating page layouts
One of the key constructs of publishing sites is the ability to control the strict layout of content on a page by using a page layout. Each publishing page is based on a page layout. Each page layout is associated with a master page so that the branding and navigation are the same on publishing pages as they are on ordinary content pages. You can restrict the content shown in different areas of a page by placing controls on the page layout. The content displayed in these controls are saved in the columns of the Pages library. The page layout controls are responsible for retrieving the content from the Pages library of a site, and shows that content to the users.
Tip
When a page is created from a page layout, you can include Web Parts or app parts by adding at least one Web Part zone to the page layout. If a page layout contains no Web Part zones, then no Web Parts or app parts can be added to a publishing page.
Each page layout is based on a content type, which consists of a number of site columns. When the content type is associated with the Pages library, the site columns, in turn, specifies the field controls (columns) that the page layout can use. For example, you might want to create new publishing pages when new vacancies arise in your organization. You therefore create a site column for information about job vacancies, such as Job Reference, Job Title, Department, Location, Salary, Job Type, and Pay Band. You then create a content type, Job Vacancy, and add to it the site columns that you created. You create your page layout based on the Job Vacancy content type. This allows you to decide with field controls (site columns) how to add to the page layout.
Note
SEE ALSO Information on site columns and content types can be found in Chapter 6.
SharePoint Server comes with the following built-in page-layout content types:
Page This content type is used when you want to create your own page layout.
Article Page This content type is based on the Page content type and is used to create Article page layouts. SharePoint Server provides four Article Page page layouts; for example, the Image on right page layout is used for presenting an article (as in a magazine article) on a website. It contains a Page Image field control and a Page Content field control to capture data and a few other simple field controls.
Catalog-Item Reuse This content type is used when you want to create article pages that can be easily reused or republished across site collections.
Enterprise Wiki Page This is the default content type in the Pages library of an Enterprise Wiki site. It provides a basic content area, as well as ratings and categories field controls.
Error Page This page layout is used to create error pages and is associated with every Pages library.
Project Page This content type is associated with the Pages library on the Enterprise Wiki site. It provides basic information to describe a project, including a project status column and a contact name column.
Redirect Page This content type is used to create a variations page layout to direct users to the variations home page when the variations settings are configured.
Welcome Page This content type is based on the Page content type and is used to create the Blank Web Part page, and Splash and Summary Link page layouts.
All page layouts are stored in the Master Page Gallery in the top level site of a site collection. Although the Master Page Gallery has all the features of a normal document library because of its importance to the whole site collection, it is secured to limit the rights of most users. As a page layout designer, you must have Design permission levels or higher to work with the files in this library. Such permission levels are automatically assigned to you if you are a member of the Designers SharePoint group. To protect the contents of the Master Page Gallery further, content approval and minor and major versioning is enabled by default; therefore, for a user to see pages based on your page layouts, the page layouts must be published as a major version and approved. To facilitate this process, you might consider enabling the approval workflow for the Master Page Gallery.
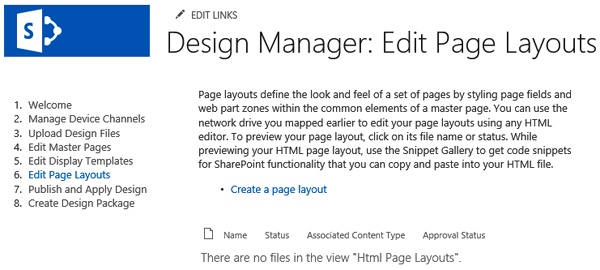
You can create a page layout by using a Design Manager in the browser or by using SharePoint Designer 2013. The Design Manager is new in SharePoint Server 2013. It is available on the Settings menu on publishing sites and provides a step-by-step approach for creating design assets that you can use to brand sites. Field controls and other components can be added, moved, and deleted from your page layout using the Design Manager.
Important
Whenever you create a page layout, you must create a page to check that the page layout is as designed. To create a publishing page, you must have Contribute rights on the Pages document library. To approve publishing pages, you must be a member of the Approvers SharePoint group.
In this exercise, you will create site columns and a content type, associate the site columns with a content type, and then using the Design Manager, you will create a page layout based on that content type.
Set Up
Open the publishing site that you created in the previous exercise, if it is not already open.
Important
Verify that you have sufficient rights to create page layouts and content types. If in doubt, see Appendix A.
From the Settings menu, click Site Settings, and then under Site Collection Administration, click Go to top level site settings.
Under Web Designer Galleries, click Site content types. Create and use the following values, and then press OK.
Label
Value
Name
Job Vacancy
Description
Use this content type to create the job vacancy page layout.
Select parent content type from
Page Layout Content Types
Parent Content Type
Article Page
New Group
WWI HR
On the Site Content Type page, at the bottom of the page, click Add from existing site column to display the Add Columns page.
In the Select Columns section, add the two site columns, Job Title and Location, so that they appear in the Columns to add list. Click OK.
On the Site Content Type page, at the bottom of the page, click Add from new site column, and then select the Create Column page to create the following two site columns.
Column Name
Column type
Job Description
Full HTML content with formatting and constraints for publishing.
Closing Date
Date and Time
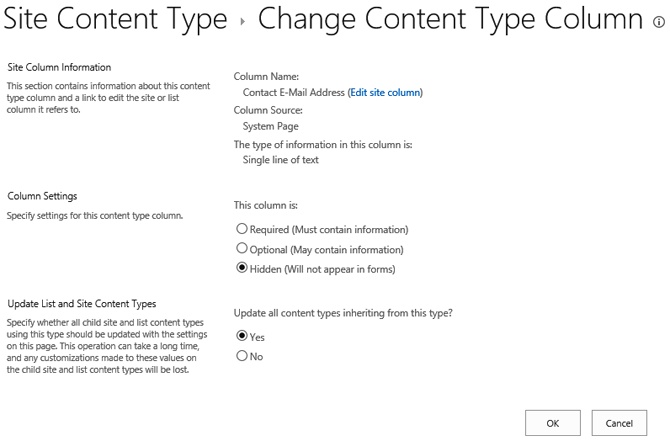
On the Site Content Type page, under Columns, click each of the following columns: Contact E-Mail Address, Contact Name, Contact Picture, Page Image, Page Content, Summary Links, Image Caption, and Byline. On the Change Content Type Column page, in the Column Setting section, select Hidden (Will not appear in forms), and then click OK.
On the Site Content Type page, under Columns, click each of the following columns: Job Title, Location, and Job Description. On the Change Content Type Column page, in the Column Setting section, select Required (Must contain information), and then click OK.
From the Settings menu, click Design Manager.
Click Create a page layout. In the Create a Page Layout dialog, in the Name text box, type Job Vacancy page layout. Leave the Master Page settings as is.
In the Content Type list, select Job Vacancy.
Under Name, click Job Vacancy page layout to display a preview of the page layout.
Click the Back button on the browser toolbar to display the Edit Page Layout page. For the Job Vacancy page layout to be listed on the page, you may have to click the Refresh button on the browser toolbar.
Click the ellipsis to the right of Job Vacancy page layout, and then in the bottom right of the callout, click the ellipsis to open the menu. Click Publish a Major Version.
In the Publish Major Version dialog, click OK to display the Edit Page Layouts page where the Job Vacancy page layout now has an approval status of Approved.


Managing page layouts
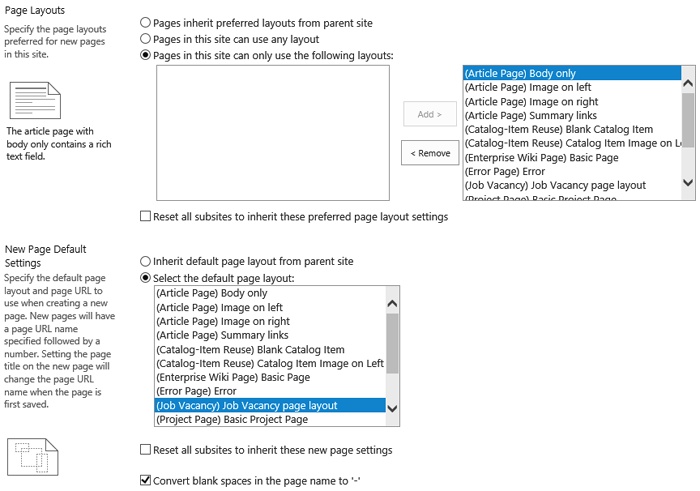
Using a browser, you can configure each site within a site collection to display all or some of the page layouts. Therefore, if you create page layouts that are specific to the Human Resources department, you can limit the Human Resources site to use only the Human Resources page layouts, and any child site of the Human Resources site can be configured to inherit the preferred layouts from its parent site.
In this exercise, you will set the default page layout, and then you will create a page to check that the page is using the default page layout.
Set Up
Display the publishing site that you created earlier in this chapter, if it is not already displayed.
Important
Verify that you have sufficient rights to manage page layouts. If in doubt, see Appendix A.
From the Settings menu, click Site settings, and then under Look and Feel, click Page Layouts and site templates.
In the New Page Default Settings section, select Select the default page layout, and from the list, select (Job Vacancy) Job Vacancy page layout.
At the bottom of the page, click OK.
On the Settings menu, click Add a page. In the Add a page dialog, type IT Support vacancy, and then click Create.
In the Job Title text box, type IT Technician, and in the Location text box, type London.
On the Page tab, in the Edit group, click Save.


Using reusable content
When creating content on a publishing page, you may find that you are typing the same content again and again. SharePoint Server provides the capability to reuse content items by creating the Reusable Content list. This list is created at the top level site of a site collection and automatically gets created when the SharePoint Server Publishing Infrastructure site collection feature is activated.
Use reusable content in the following scenarios:
You have text within your organization that is very standardized and should never change, such as in a corporate mission statement, an executive bio, or a product description. This text should always be written exactly the same way when displayed. There may also be content that needs to be displayed in multiple locations. Reusable content minimizes the effort associated with maintenance because you can update the text in a single list and push all changes out to each page in the site collection where the content appears.
You have text that acts as a template to demonstrate to page creators how content should be formatted. This could be an outline for a product, which acts as a starting point to help minimize the time it takes to add content to the page. The page creator can add more defined and relevant information.
You must have Contributor permissions to add items to the Reusable Content list. You can create categories and folders within the list to help you organize these items. Once items are added to the Reusable Content list, you can add those items to the content area of a publishing page by using the Reusable Content Picker.
Each item of reusable content can consist of either HTML or plain text and can be designated as either automatically updated or not. Reusable content that consists of HTML can contain text and HTML elements, such as images, tables, and lists. These HTML elements can be styled or formatted as needed. Reusable content that consists of plain text can contain only use unformatted, unstyled text. If a reusable content item is designated as automatically updated, the content is inserted into webpages as a read-only reference, and the page content is updated if the item is changed.
If the reusable content item is not designated as automatically updated, the content is inserted as a copy in the webpage, and the content is not updated if the item is changed.
In this exercise, you will create a new content category and add a reusable content item.
Set Up
Open the publishing page that you created in the previous exercise, if it is not already open.
Important
Verify that you have sufficient rights to modify the Content Category column and add items in the Reusable list. If in doubt, see Appendix A.
From the Settings menu, click Site settings, and then under Site Collection Administration, click Go to top level site settings.
On the Quick Launch, click Site Contents, and then click Reusable Content.
On the List tab, in the Settings group, click List Settings, and then under Columns, click Content Category.
On the Edit Column page, under Type each choice on a separate line, delete None, if it exists, and then type Copyright and Furniture on separate lines. At the bottom of the page, click OK to display the Settings page.
In the breadcrumb, click Reusable content, and then click new item. In the Title text box, type Wide World Importers copyright, and in Content Category list, select Copyright, if it is not already selected.
Leave the Automatic Update check box selected, and then in the Reusable HTML section, click Click here to add new content.
Type Wide World Importers, and then if you have a keyboard that contains a numeric keyboard, click the Num Lock key so that it is selected. Hold down the Alt key and type 0169 on the numeric keyboard to include a copyright symbol. Then type copyright 2013.
Click Save.
Go to the publishing page where you want to use the reusable content, such as the IT Support vacancy page that you created in the previous exercise.
On the Page tab, click Edit, and then in the Job Description text box, type Desktop skills are required.
On the Insert tab, click Reusable Content, and then click Wide World Importers copyright.
On the Page tab, click Save.


Using a product catalog
Previously in this chapter, you created content on publishing pages. You can use this content as static data or you can dynamically display content from lists and libraries by using the Content Query Web Part (CQWP), where lists and libraries have to be stored within sites in the same site collection. However, in SharePoint Server 2013, you can use cross-site collection publishing (XSP) to create one authoring site collection, whose content is displayed on pages in multiple publishing site collections without the need to redeploy the content to those site collections.
Note
SEE ALSO XSP is not explained in depth in this section; it is an advanced WCM technique. More information can be found in Chapter 12, “Designing web content management sites,” in Microsoft SharePoint 2013 Inside Out, by Darvish Shadravan, Penelope Coventry, Thomas Resing, and Christina Wheeler (Microsoft Press, 2013).
To achieve this, you need to use catalogs to publish content across site collections; in other words, without catalogs, you cannot use XSP. To use XSP, the Cross-Site Collection Publishing site collection feature must be activated. Using this feature, you can share lists and libraries—including the Pages library—as catalogs so that other sites and site collections can use the catalog content on their pages. For example, content stored in libraries and lists in an authoring site collection can be displayed across three separate publishing site collections by using the CSWP.
When the XSP site collection feature is activated, on the list or library Settings page, under General Settings, there is a new link named Catalog Settings. When you click this link, the Catalog Settings page is displayed, where you can suggest how friendly URLs are created. You can choose up to five columns in the list or library that, when combined, uniquely identify an item in the list. In the Catalog Navigation section, select the column you created earlier that maps to a term set. You can also choose to enable anonymous access.
Tip
Before configuring a list or library as a catalog, you should add a column to the list or library so that you can tag items from an MMS term set. You should add at least one item to the list or library, and then tag it against one of the terms from the term set (using the column that you just created) before publishing the item. The MMS and Term Store are only available in SharePoint Server, and the MMS service application and Term Store must be created by your SharePoint server administrators. If your server administrators have not created the MMS service application and Term Store, you will be severely limited when using XSP.
In this exercise, you will activate the Cross-Site Collection Publishing site collection feature, and then configure a library to be available using XSP.
Set Up
Open the top level site of a site collection where you wish to activate the Cross-Site Collection Publishing feature.
Important
Verify that you have sufficient rights to enable a site collection feature, and amend library settings. If in doubt, see Appendix A.
From the Settings menu, click Site settings, and then under Site Collection Administration, click Site collection features. To the right of Cross-Site Collection Publishing, click Activate, if it is not already active.
Go to the library that you want to configure as a product catalog, and then on the Library tab, in the Manage Views group, click Create Column.
In the Column Name box, type Department, and under The type of information for this column is, select Managed Metadata.
Scroll down, and in the Term Set Settings section, click the arrow to the left of your Managed Metadata Service to display the term set groups.
Click the arrow to the left of one of the term set groups, such as People, and then click a term set, such as Department. Click OK to create the column.
On the Library tab, click Library Settings, and then under General Settings, click Catalog Settings.
On the Catalog Settings page, in the Catalog Sharing section, select Enable this library as a catalog.
In the Catalog Item URL Fields section, under Available Field, click Department, and then click Add.

Defining a SharePoint site policy
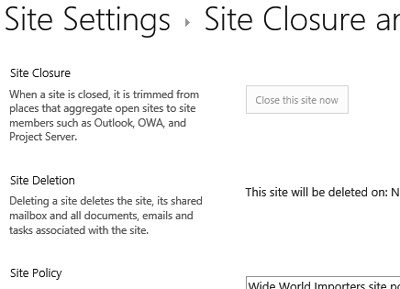
With SharePoint Server 2013, site policies have been improved to include retention policies for sites and site mailboxes. You can use site policies to help control site proliferation. A site policy defines the life cycle of a site by specifying when the site will be closed and when it will be deleted. When you close or delete a site, any subsites are also closed or deleted. If an Exchange mailbox is associated with a site, the mailbox is deleted from Exchange Server 2013 when the site is deleted.
The concept at the heart of this new functionality is site closure. When you close a site, applications that aggregate open sites to site members—such as Microsoft Office Outlook, Outlook Web Access, and Microsoft Office Project Server—will trim links to the site. The site can still be accessed via its URL and it can still be modified. When you select to delete a site based on its closed date, closing that site starts the countdown to its deletion. Closing a site collection, however, makes the site collection and all subsites read-only. Also, if the closed site has any subsites, when the closed site is deleted, all of its subsites are deleted, whether they are in a closed state or not. Site owners do have the option of postponing the deletion of a closed site, depending on the configuration of the site policy.
Tip
A site owner can reopen a closed site. To do so, on the Site Settings page, click Site Closure and Deletion.
Site policies are created at the site-collection level, but are applied at the site level, including the top level site of a site collection. In the New Site Policy page, you can choose from four options:
Do not close or delete site automatically Use this condition when you want the site owner to manually delete the site.
Delete sites automatically Use this condition when you want to manually close the site, but the site will be deleted automatically. This option offers the same choices as the next option, in regard to deleting the site automatically, and it also requires you to specify the amount of time after its creation that the site will be closed.
Close and delete sites automatically Use this condition when you want to automate site closure and deletion. You are provided with the following five configuration options:
Close Event Use this option to specify the amount of time to wait after a site is created before closing the site. You can specify the length of time in Days, Months, or Years.
Deletion Event Use this option to specify the amount of time to wait after a site is created before deleting the site. You can specify the length of time in Days, Months, or Years.
Send an email notification to site owners this far in advance of deletion Use this option to send an email to the site owner at a specified length of time before the site is scheduled for deletion.
Send follow-up notifications every Use this option to send recurring follow-up notifications warnings of the site deletion and to specify the intervals at which they are to be sent.
Owners can postpone imminent deletion for Use this option to allow site owners to postpone the deletion of the site for a specified length of time.
Run a workflow automatically to manage site closure, then delete them automatically Use this condition when you want to add custom logic to the closure process. You can specify the name of the workflow, the amount of time after the site is created to run the workflow, and whether to rerun the workflow periodically until the site is closed.
On the New Site Policy page, you can optionally select the The site collection will be read only when it is closed check box. A notification of the read-only state is displayed in the status bar at the top of every page within the site collection, including application pages.
You can close the notification message by clicking the X at the far right of the message; however, when you return to the page, the notification is redisplayed.
Tip
When you define site policies in a site collection, which is a content-type hub, you can publish and share those site policies across site collections.
Once a site policy is created, you can apply it to any site within your site collection. From the Site Settings page, you can display the Site Closure and Deletion page, which allows you to complete the following tasks:
Apply, select, or remove a site policy. You cannot change the selected site policy of a closed site. You must first open the site, and then select a different policy. To remove all site policies, select No Site Policy.
View the site policy details, such as the date and time that the site was closed and when the site will be deleted.
Manually close a site. Before you can manually close a site, however, you must apply a site policy for which the Do not close or delete site automatically condition has been selected.
Open a closed site.
In this exercise, you will define a SharePoint site policy and apply it to a site.
Important
Verify that you have sufficient rights to manage this site collection. If in doubt, see Appendix A.
On the Settings menu, click Site settings, and then under Site Collection Administration, click Site Collection Features.
On the Site Collection Features page, to the right of Site Policy, click Activate, if the site collection feature is not already activated.
On the breadcrumb, click Site Settings, and then under Site Collection Administration, click Site Policies.
On the Site Policies page, click Create.
On the New Site Policy page, in the Name box, type Wide World Importers site policy.
In the Site Closure and Deletion section, click Close and delete sites automatically.
Under Close Event, in the Site created date box, type 1 to set the site to close automatically after one year.
Under Deletion Event, in the Site closed date box, type 3 to automatically delete the site three months after the site has been closed.
In the Site Collection Closure section, select The site collection will be read only when closed.
Click OK to create the new policy.
Go to the site in the site collection where you would use the site policy. On the Settings menu, click Site settings, and then under Site Administration, click Site Closure and Deletion.
On the Site Closure and Deletion page, in the Site Policy list, select Wide World Importers Site Policy.
Click OK, and then under Site Administration, click Site Closure and Deletion to review the site closure and deletion dates, which are set based on the policy.


Key points
The Document ID feature assigns documents unique IDs, which can be used to retrieve a document, even if its location has changed during its lifetime.
The Content Organizer allows documents to be routed to their correct location based on rules, which are configured to use the content type and columns of a document.
The Records Center can be used in conjunction with the Send To connection in SharePoint to centralize the storage and management of documents that must be treated as a record.
Records management in SharePoint Server supports the creation of records, either manually or by using automated processes such as workflow.
You can declare and manage records on any site using in place records management.
Web Content Management is one of the functions included in the SharePoint Server Enterprise Content Management capability.
The key concept of publishing sites is page layouts. A master page controls the appearance of the branding and navigation, whereas the page layout controls the appearance of the content portion of the page.
Page layouts are stored in the Master Page Gallery library in the top level site of a site collection. Content approval, minor versioning, and major versioning are enabled in this library; therefore, you must publish a page layout as a major version and approve it before any pages that are based on it can be viewed by visitors to your site.
Page layouts are created from page layout content types and publishing pages are created from a page layout.