
Chapter 6. Making Lists and Libraries Work for you
Chapter at a glance
Configure
Configure a SharePoint list, Key points

Set Up
Set up ratings, Setting up ratings

Create
Create and manage content types, Working with content types

Manage
Manage users and permissions, Creating a view

IN THIS CHAPTER, YOU WILL LEARN HOW TO
In this chapter, you focus on the list and library settings. Chapter 3, discussed how to create and use Microsoft SharePoint lists and libraries, how to add and remove content, how to work with the documents, how to add columns, and how to sort and filter lists and libraries. Now that you have a good grasp of SharePoint lists and libraries, this chapter will explore the settings available to manage and configure the features and functionality of Microsoft SharePoint 2013 lists and libraries to make them work for you.
Because a library is a list of files, the list settings and the library settings are very similar. With list and library settings, you can configure the options for the list or the library, including name, navigation, content types, versioning, and validation, as well as permissions for the users who may require access to the list or the library. There are also configuration settings that apply only to the lists or only to the libraries. For the lists, these settings include, for example, the list item level access, and enabling attachments to list. For the libraries, these settings include, for example, the default behavior for opening documents, managing library templates, and configuring the Site Assets library.
In this chapter, we will discuss the configuration options to manage the lists and the libraries on your site. These options are available on the Settings page for a list or a library. You can access the settings for a list from the list page by clicking the List Settings button in the Settings group on the right side of the List ribbon.
You can access the settings for a library from the library page by using the Library Settings button in the Settings group on the right side of the Library ribbon.

The Settings page groups configuration settings in six sections, as follows: General Settings, Permissions and Management, Communications, Content Types, Columns, and Views. The General Settings section, for example, provides the ability to change the name of a list or a library, its description and navigation, and the settings for versioning, validation, ratings, audience targeting, as well as the advanced and form settings. For a document library, this section also includes the ability to set up the default values for columns. In this chapter, we will discuss how to use these settings to effectively configure your SharePoint lists and libraries.
Note
PRACTICE FILES Before you can complete the exercises in this chapter, you need to copy the book’s practice files to your computer. The practice files you’ll use in this chapter are in the Chapter06 practice file folder. A complete list of practice files is provided in Using the practice files at the beginning of this book.
Important
Remember to use your SharePoint site location in place of http://wideworldimporters in the exercises.
Setting the name, description, and navigation
It is important to give the name, description, and navigation settings some thought when you create a list or a library. With regards to the list and library names, the default app names are descriptive, but could be made more descriptive within an organization. Consider a Contacts list as an example; if it only contains employees, then Employees or Staff may be a better name for it. With regards to the list and library navigation, you may need to display your new list on the Quick Launch. However, if you have added a list or a library as a Web Part on the page of your site, you may find it unnecessary to also have a link to it on the Quick Launch. Under the Name, Description, and Navigation options, you can turn the Quick Launch link on or off for the list in question.
Tip
To make navigation to a list or a library easier, avoid using spaces within the list name when the list is created. A space in the name shows as %20 within the URL. For more information, refer to the Naming a URL sidebar in Chapter 5. You can also rename a list and a library after setting up its URL when it is created. For more information, refer to the exercise in the Creating a new list section in Chapter 3.
In this exercise, you will create an Announcement list, and then put a permanent link to it on the Quick Launch.
Tip
You can also create a permanent Quick Launch link for a list or a library by dragging its tile onto the Quick Launch in edit mode. For more information, refer to the exercise in the Customizing the site navigation section in Chapter 2.
Set Up
Open the SharePoint site where you would like to create an Announcement list and display its link on the Quick Launch. The exercise will use the http://wideworldimporters site, but you can use whatever site you wish. If prompted, type your user name and password, and then click OK.
Important
Verify that you have sufficient rights to create a list. If in doubt, see Appendix A.
Click the Settings gear icon at the top right of the screen, and then select Add an app to display the Your Apps page.
On the Your Apps page, scroll down to the Announcements tile and click it.
The Adding Announcements dialog is displayed. In the Name box, type Team Announcements and click Create to create a list.
On the Site Contents page that is displayed, click the new Team Announcements tile to go to the newly created list page.
Note that the Team Announcements link is displayed under the Recent section on the Quick Launch. However, this link is temporary because the Recent section only displays links to the five newest apps. After another five lists and libraries have been created on the site, the link to Team Announcements will no longer be shown in the Recent section on the Quick Launch. You will now create a permanent Quick Launch link for this list.
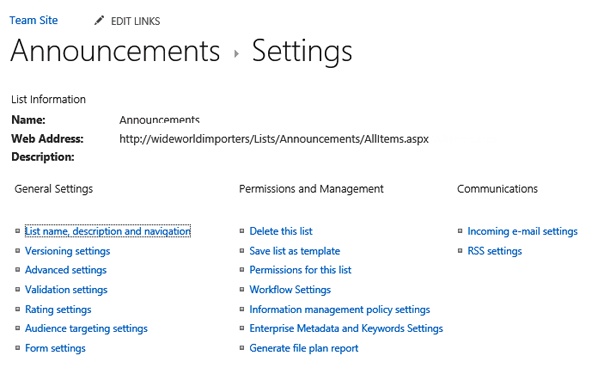
On the Team Announcements list page, click the List tab on the top left of the page, and then click List Settings in the Settings group on the right side of the ribbon to display the Settings page for this list.
On the Settings page, in the General Settings section, click List name, description and navigation.
In the Navigation section, click Yes to Display this list on the Quick Launch, and then click Save.
Back on the Settings page, click the Team Announcements list link on the Quick Launch to open the list page.
Note that the Team Announcements list is displayed on the Quick Launch in the main section. The temporary link to this list is no longer displayed under the Recent section because there is now a permanent link in the main section of the Quick Launch.
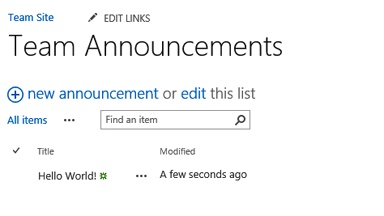
You will now create a new announcement in this list. On the Team Announcements page, click new announcement, and then in the new announcement form, in the Title field, type Hello World!.
Click Save to add a new announcement and to display the list page.


Configuring content approval and versioning for a list
The Versioning settings option under General Settings for a list provides Content Approval, Item Version History, and Draft Item Security options. By turning on Content Approval, list items can be created as draft items that are not displayed to other users unless the item has been approved. This means that you can work on the item in draft mode, and then submit the item for approval when you are ready to do so. An approver (user with Approve permission) can then approve the item, which allows the list item to show for all users with Read permission. The same options are available for a library.

Tip
When a list item is submitted for approval, there is no notification that is automatically sent to the approver. The approver should visit the list periodically to see if list items are waiting for approval. Alternatively, you could use an Approval Workflow or consider configuring alerts for this list. For more information, refer to Chapter 11.
Item Version History settings provide you with the benefit of being able to track the editing history of a list item. If versioning is enabled, a new version of the list item will be stored upon each edited version of the list item. With this you can view the history, as well as restore a previous version to become the latest version of the list item. You may specify the number of versions and the number of approved versions to keep in the history. The version history is only available if versioning is enabled. By default, the list versioning is disabled.

Tip
SharePoint lists allow you to use major versions only, whereas libraries allow you to use major and minor versions. More information on major and minor versioning settings for a library can be found later in this chapter.
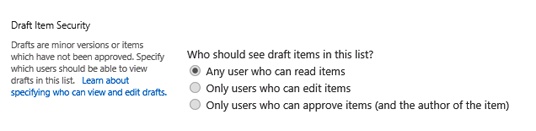
Draft Item Security is an option that is specific to draft items. It provides additional user permissions to the Permission settings on list items. Using the Draft Item Security settings, you can choose who is allowed to view the item when it is in draft. The default is any user who can read items, but you can also choose Only users who can edit items or Only users who can approve items. Users with Contribute permissions or higher will see the draft version, while users with less than Contribute permissions will see the last approved item and not the more recent draft item. Therefore, users with different permissions are likely to see different list items and different versions of those list items. The same settings are available for a library and define the permissions for viewing the draft documents in the library.
In this exercise, you will configure the versioning settings, and then set up the content approval for the Team Announcements list.
Set Up
Open the SharePoint site where you would like to configure a list, if it is not already open. The exercise will use the http://wideworldimporters site, but you can use whatever site you wish. If prompted, type your user name and password, and then click OK.
Important
Verify that you have sufficient rights to manage a list. If in doubt, see Appendix A.
Open the Settings page for the Team Announcements list by clicking List Settings on the List ribbon.
Under General Settings, click Versioning Settings to display the Versioning Settings page for this list.
You will now set up content approval. In the Content Approval section, under Require Content Approval for Submitted Items, click Yes.
Notice in the Draft Item Security section, under Who can see draft items in this list, the selected option has changed from its default setting to Only Users Who Can Approve Items (and the Author of the Item).
You will now configure versioning for this list. In the Item Version History section, click Yes to Create a version every time you edit an item in this list.
Click OK to save the changes and to go back to the Settings page for the list.
Click Team Announcements on the Quick Launch to open the list page.
The Approval Status column has been created within the list, and any existing announcement items are set to Approved.
Click new announcement to display the new item form, and then in the Title field, type New Product Announcement. Notice the warning that the items on this list require approval. Click Save to save the new announcement.
A new announcement has been created. It has an Approval Status of Pending. Click the ellipsis to the right of the new announcement title, and then click Approve/Reject from the menu that appears to display the Approve/Reject dialog.
In the Approve/Reject dialog, in the Approval Status section, select Approved. In the Comment section, type a comment such as Product details correct, and then click OK.
The Team Announcements list is displayed, and the Approval Status for this list item is now Approved.
You will now view the version history of a list item. Click the ellipsis to the right of the New Product Announcement item, and then click Version History from the menu to display the Version History dialog.
Close the Version History dialog to return to the Team Announcements list page.
Using steps 1–3 as a guide, change the setting for content approval for the Team Announcement list to No.
Click OK in the confirmation box if it appears, then save your changes by clicking OK in the Versioning Settings page.
Return to the list page by clicking its link on the Quick Launch to validate your changes. The Approval Status column is no longer displayed.


Configuring versioning and required checkout for a library
The Versioning settings for a library include options to configure the Content Approval and Draft Item Security that are identical to the list versioning settings. However, there are additional options available for libraries under the Versioning settings. The library versioning supports major and minor versions, and there is an additional configuration setting for libraries to enforce the document checkout.
Similar to the list items, you can turn on or turn off the versioning for the documents stored in the library via Versioning settings. By default, the library versioning is turned off. When the library versioning is turned on, SharePoint saves a copy of the edited version of a document each time the document is changed. This provides you with multiple versions of the same document so that you can easily see what the document contained before the modifications, and revert to any previous version if necessary.
When library versioning is turned on, you can select from two types of versioning: major versions only or major and minor versions. Major versions store a full-text copy of each document version. The latest version is always published, meaning that those with access to the document library can view the most recent version of the document.
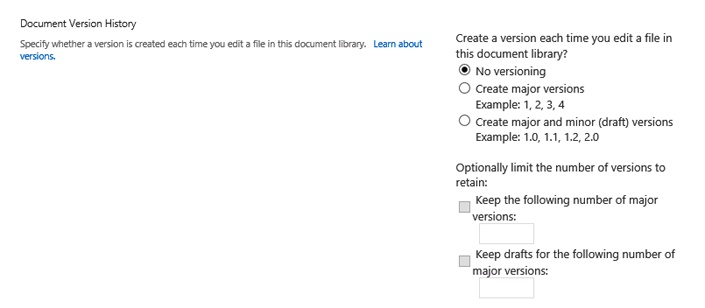
Major and minor versioning allows you to publish major versions of a document while creating modified, minor versions of the same document that only a subset of users with access to the library can view and edit. You can control who views a minor version by using the Draft Item Security configuration setting. Using major and minor versions is useful when performing multiple modifications of a document prior to submitting it for approval. When major and minor versioning is selected, you can control the number of versions of each document that are retained in the document library. You can think of this as “version pruning.” As mentioned previously, only SharePoint libraries provide the ability to use both major and minor document versions. SharePoint lists also have versioning settings; however, you cannot use major and minor versions as you can use with libraries.
The Versioning settings for a library also provide the ability to configure mandatory checkout. Checking out documents from a library is invaluable when several people could be making changes to the same document at the same time. In Chapter 3, you learned how to check out a document, and then how to check it in the library. You can also enforce the checkout of a document before a user can edit it by setting up the Require Check Out option. The default for this option is set to No, meaning that users are not required to check out a document before it can be edited. In many organizations, the policy requires that all documents always be checked out for editing. To meet this requirement, a SharePoint library can be configured to require checkout before its documents can be edited.

In this exercise, you will configure a Documents library versioning to use both major and minor versions, and require checkout for all documents. You will then create a new document in the Documents library and explore how these settings are working.
Set Up
Open the SharePoint site where you would like to configure a library, if it is not already open. The exercise will use the http://wideworldimporters site, but you can use whatever site you wish. If prompted, type your user name and password, and then click OK.
Important
Verify that you have sufficient rights to manage this library. If in doubt, see Appendix A.
On the Quick Launch, click Documents to open the Documents library page. Open the Settings page for the library by clicking Library Settings on the Library ribbon. Under General Settings, click Versioning Settings to display the Versioning Settings page for this library. In the Document Version History section, select Create major and minor (draft) versions.
Select the Keep drafts for the following number of major versions check box, and then type 10 in the text box.
In the Require Check Out section, select Yes, and then click OK at the bottom of the page.
You will now create a document in the Documents library to validate the settings you have set up. On the Quick Launch, click Documents to open the Documents library page.
On the Documents library page, click New Document on the left of the Documents ribbon.
Depending on your server settings, a new document will open either in the browser or in the Microsoft Office Word client application, if it is installed on your computer. If a new document opens in the browser, please move to step 9 in this exercise. Otherwise, please continue to the next step.
A new document opens in Word. If a warning about allowing this website to open a program on your computer appears, click Allow. If a warning about opening a file appears, click Yes to confirm that you want to proceed. If prompted, provide your user name and password. Word opens.
Make any edits that you want in the new document. For example, you might want to type =rand() followed by pressing the Enter key to insert text.
In Word, click the Close button in the top-right corner of the Word window to close the window. In the Word message box that appears, click Save to confirm that you would like to save the document, and then in the Save As dialog, enter Proposal as the name of your new document. Click Save to save the document back to the Documents library. If a Word message box appears, asking you to check in the document, click No.
Go back to the browser where the Documents library is displayed.
Move to step 11 in this exercise.
The browser opens an empty document based on the library’s default template in the Microsoft Office Word Web App. If prompted, provide your user name and password. Click Edit Document on top left of the page, and then select Edit in Word Web App from the menu.
In the Word Web App, in the new document, type some text, and then click the Save icon in the top-left corner of the screen to save the document back to the Documents library. In the Save As dialog, enter Proposal as the name of your new document, and then click Save to save the document back to the Documents library.
On the Documents library page, refresh the page to show the new Proposal document. Note the green down arrow on the Proposal document icon, which shows that the document is checked out, because this library is configured with the setting to require checkout for all documents. To check in the document, click the ellipsis to the left of the document to display its callout, and then in the bottom right of the callout, click the ellipsis to display the document menu and select Check In from the menu.
In the Check in dialog box that opens, in the Version section, leave the selected option, 0.1 Minor version (draft). In the Version Comments box, type Wide World Changes, and then click OK to return to the Documents library.
Tip
If you have appropriate permissions, the checked out documents that do not have a published version can be managed from the library Settings page using the Manage files that do not have the checked in version option, located in the Permissions and Management group, even though the files might have been checked out by somebody else.
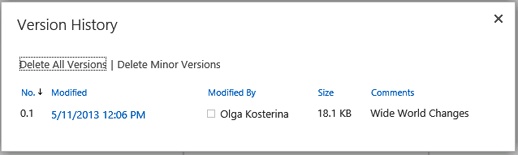
You will now view the version history for the Proposal document. In the Documents library, click the ellipsis to the left of the document to display its callout. In the bottom right of the callout, click the ellipsis to display the document menu and select Version History from the menu to open the Version History dialog. Note that the document minor version is 0.1, and then close the Version History dialog.
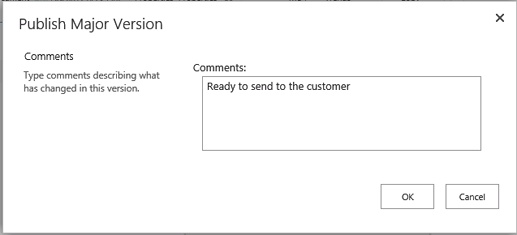
You will now publish a major version for the Proposal document. In the Documents library, click the ellipsis to the left of the document to display its callout, if it is not already displayed. In the bottom right of the callout, click the ellipsis to display the document menu, and then select Publish a Major Version from the menu to open the Publish Major Version dialog.
In the Publish Major Version dialog, in the Comments field, delete the existing text and type Ready to send to the customer, and then click OK.
After the major version of the document has been published, you will view the version history for the Proposal document again. In the Documents library, click the ellipsis to the left of the document to display its callout, and then in the bottom right of the callout, click the ellipsis to display the document menu and select Version History from the menu to open the Version History dialog. Note that the current document major version is 1.0.
Close the Version History dialog, and then close the document callout to return to the Documents library page.


Working with advanced settings for a list
Advanced settings for a list include options for content types, item level permissions, list attachments, folders, search, list reindexing, offline client availability, and dialogs. Item Level Permissions options and Attachment options are only applicable to lists. All other options are equally applicable to libraries. In this section, we will look into all the list configuration options that are available in the list Settings page under Advanced Settings, with the exception of Content Types options, which is covered later in this chapter, in the section Working with content types.
The Item Level Permissions option allows you to refine the default permissions levels, such as Read, Contribute, Design, or Full Control for a list item. For example, you can use this option to set up what the creator of the list item is allowed to do. This option allows you to set whether people with Read access may read all items or only those that they created. The default is Read all items. You may also set whether users with Create and Edit access can edit all items or just those that they created, or they can be prevented from creating and editing any list item by clicking the None option. The default is Create and edit all items. By clicking the None option, you are effectively making any user with Contribute permissions a reader for this list. However, users with rights to manage this list are able to read and edit all items.

Using the Attachments option, you can allow or disallow attachments to list items. By default, the attachments to list items are enabled.
Note
SEE ALSO Please refer to the exercise on attaching documents to list items in the Adding and editing list items section in Chapter 3.

Tip
You may wish to disable list attachments if you prefer that users store documents within document libraries.
The Folders option lets you disable the New Folder command in the list. This command is enabled by default. The same setting is available for the libraries.
An alternative to using folders is using the custom columns. Ever since the introduction of SharePoint, users have been taking advantage of custom columns to organize their content. This means that through the use of custom columns, you can organize content into views using filters rather than using folders. If you prefer this method to using folders within lists, you can turn off the use of folders so that users do not become confused as to which approach they should use. If you do use folders, you should consider carefully training your users on how to use folders effectively.

Tip
In SharePoint, the recommended number of items within a view or folder is limited to 5,000. This limitation is related to the time it takes to display the number of items in a view or a folder. Therefore, if you have 6,000 list items in the list, it would be better to create views or folders to display 5,000 or fewer list items, allowing for future growth.
Note
SEE ALSO More information on managing lists and libraries with a large number of items, as well as the recommended limits for lists and libraries, can be found at office.microsoft.com/en-us/sharepoint-server-help/manage-lists-and-libraries-with-many-items-HA102771361.aspx.
Using the Search option, you can exclude the list from the search results. Searching content in SharePoint will return search results from any list or library by default. All of the items that the current user has permission to view will display within the results, and no user will see content that they do not have permission to view. You may exclude an entire list from displaying within search results by clicking the No option for Allow items from this list to appear in search results?. The same setting is available for the libraries.

Note
SEE ALSO For more information on search, please refer to Chapter 9.
With the Reindex List button, you can mark the list for full reindexing when the next scheduled content crawl occurs. If the list is not marked for full reindexing, then the content will be indexed incrementally by default. A similar setting, Reindex Library, is available for the libraries.

The Offline Client Availability setting defines whether the list is available for offline viewing in the client applications that allow you to synchronize data for offline use, so that you have access to the SharePoint content while in a disconnected environment. Microsoft Office Outlook can be used for offline access to a list content. The default setting is to allow items to be downloaded to the offline clients. If the list contains sensitive information, you can ensure that it is only available in an online environment and switch off the offline availability.
The same setting is available for the libraries. Turning it off will prevent the library content from being synchronized to users’ computers for offline use.

Note
SEE ALSO For more information on taking lists offline, see Chapter 14.
The Quick Edit setting defines whether editing the list within the page using datasheets is allowed. It is enabled by default. The Quick Edit view of a list provides a spreadsheet-type view of the list content, allowing you to enter data more quickly and use operations such as fill down. The updates are provided in bulk, which is convenient for making modifications quickly. However, using such operations can result in accidently overwriting content, and the disadvantage is that it is difficult to undo a mistake that has been made in bulk. Therefore, you can decide to not allow the editing of the list using Quick Edit, and then the inline edit option will not be displayed and the Quick Edit button on the ribbon in the List tab will be disabled.
The same option is available for the libraries. Turning off Quick Edit for a library will disable the Quick Edit button on the Library tab, which is enabled by default.

Tip
Some lists and libraries, such as External Lists and Picture Libraries, do not allow the use of Quick Edit.
With the Dialogs option, you can switch between dialogs and full pages for displaying list forms, including new, edit, and display forms. SharePoint provides the forms within a dialog when accessing a list item. The dialog is displayed within the webpage and the rest of the webpage is dimmed. The dialogs are implemented using Silverlight. If your work environment has desktops that do not have Silverlight installed, you may consider either installing Silverlight or not enabling this option. The default is No. The same option is available for the libraries.

In this exercise, you will disable the Attachments option for the Team Announcements list. Formatted content can appear within the attachment’s body field, and therefore it would be better to type the content than link to an attachment.
Important
Verify that you have sufficient rights to manage a list. If in doubt, see Appendix A.
On the Quick Launch, click Team Announcement to open the list page.
Open the Settings page for the Team Announcements list by clicking the List Settings on the List ribbon.
Under General Settings, click Advanced Settings to display the Advanced Settings page for this list.
In the Attachments section, set Attachments to this list are to Disabled.
Click OK. If a confirmation message appears, notifying you that disabling attachments will remove all existing attachments within the list, click OK.
You have disabled attachments in the Team Announcements list.

Working with advanced settings for a library
The advanced settings for a library include options to configure content types, folders, search, library reindexing, offline client availability, and dialogs that are the same as the respective list settings. However, there are also additional options available for libraries under the Advanced settings. These additional settings include options for setting up a document template, configuring whether the documents open in the client or the browser, setting up a custom Send To destination, and making this library a Site Assets library.
The Document Template option provides the ability to set up a template for new documents created in this library. When a document library is created, you can choose the document template for this library. Then, when you click the New Document command on the Documents tab, the document template determines which Office client program, or which Office Web App, is opened. The document template is then used as a basis for the new documents. For example, the Documents library on a Team site, by default, uses a blank Word document as its document template. Using the Document Template option, you can change the template for a library. For example, you may prefer a blank Microsoft Office Excel workbook, or a Word template that perhaps contains headers such as your corporate logo. By default, the template document resides in a hidden folder, called Forms, within the library. You can edit the existing template, or you can type another URL for an alternative template.

The Opening Documents in the Browser option provides the ability to define the default open behavior for documents in this library, and to choose whether to open a document within the browser, as opposed to having it displayed in its native Microsoft Office client application, such as Word. The default option is to open in the browser using Office Web Apps, such as Word Web App, so that a user can use the browser to view documents online. For on-premises deployments, this feature depends on Office Web Apps being installed and activated on the SharePoint server. The benefit of opening Word, Excel, Microsoft Office PowerPoint, and Microsoft Office OneNote documents in the browser is that you can view and edit the documents using Office Web Apps from any computer or other device that has a browser. While the online functionality of Word Web App, for example, is lighter in comparison to the Microsoft Word client application, there are many everyday editing tasks that Word Web App supports, and this is very handy for making changes to documents when you are on the go. You can configure the default open behavior for a document to always open documents in the client application, to always open documents in the browser, or to go by the server default, which is to open in the browser.

The Custom Send To Destination option allows you to enter a name and a URL for a document library other than the Official File Repository that your administrators might have set at the SharePoint Server farm level, to which users can automatically send their documents once they are finished and ready for a wider audience’s consumption. This is a handy feature if you want to ensure that all documents under development are written in one document library, while those available for public consumption are hosted in a different document library (with different permissions) in the same site. Or you can set up, for example, an archive location that allows you to send the documents from this library to the archive. After you’ve set up a name and a URL for the custom Send To destination, this name will be listed in the drop-down list when the user clicks the Send To button in the Copies group on the Files ribbon on the library page.

With the Sites Assets option, you can specify a library that you would like to use to store site assets, such as images. When you create a team site, the Site Assets library is created by default. Site assets are usually images and other files that are uploaded for use within a wiki page. When you upload a file to a site via the Insert tab when editing a wiki page, instead of being prompted for a location to save your files, the Site Assets library can be used as the default location. This makes it easier to find site assets for wiki pages. However, you do not have to use the Site Assets library as the default location. This option allows you to change the default Site Assets library to the current one. You can choose any document library as the default location for your site’s assets.

In this exercise, you will configure the Documents library so that its documents always open in the Microsoft Office client application. You will then modify the default template for the Documents library, and then create a new document based on the modified template.
Set Up
Open the SharePoint site that contains the library that you wish to configure. The exercise will use the http://wideworldimporters site, but you can use whatever site you wish. If prompted, type your user name and password, and then click OK.
Important
Verify that you have sufficient rights to manage this library. If in doubt, see Appendix A.
On the Quick Launch, click Documents to open the library page.
Open the Settings page for the Documents library by clicking Library Settings on the Library ribbon.
Under General Settings, click Advanced Settings to open the Advanced Settings page for this library.
In the Opening Documents in the Browser section, click Open in the client application option, and then click OK. From now on, all documents from this document library will always open in the client application.
Open the Advanced Settings again. In the Content Types section, validate that the Allow Management of content types option is set to No so that the Template URL field in the Document Template section is enabled.
In the Document Template section, click Edit Template below the Template URL box.
A template opens in Word. If a warning about allowing this website to open a program on your computer appears, click Allow. If a warning about this template appears, click Yes to confirm that you want to proceed with opening a file. If prompted, provide your user name and password. Word opens.
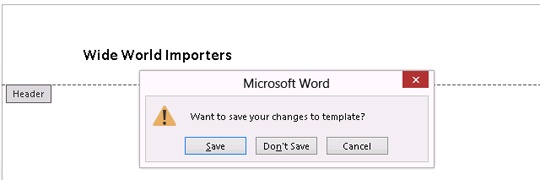
Double-click the top of the blank Word document to enter the Header section. Type Wide World Imports, set the text to bold, and increase the font size.
Click File | Close to close the document. When the Microsoft Word confirmation dialog opens, click Save to save the modified template to the Documents library.
You will now create a new document based on this template. In the browser, click OK in the Advanced Settings page, and then go back to the document library by clicking Documents on the Quick Launch.
Click the Files tab on the top left of the library page, and then click New Document on the left side of the ribbon.
If a warning about allowing this website to open a program on your computer appears, click Allow. If a warning about opening a file appears, click Yes to confirm that you want to proceed. If prompted, provide your user name and password. Word opens a new document that is based on the template that you’ve just created.
In the new document, type Report. Add any other text that you’d like.
In Word, click the Close button in the top-right corner of the Word window to close the window. In the confirmation dialog box that appears, click Save to confirm that you would like to save the document, and then in the Save As dialog, enter Report as the name of your new document and click Save to save the document back to the Documents library.
In the Word dialog that appears, click Yes to confirm that you would like to check in the document.
In the Check In dialog, select 1.0 Major version (publish) and click OK.
In the browser, refresh the Documents library page to see the Reports document listed in the library.


Using validation settings
The list and library validation settings provide you with the ability to validate user entries into each column in a list or a library. When a user enters a value that does not meet the requirements that you have defined, a custom message is displayed, allowing the user to correct the value.
Tip
Validation of user entry can be configured in two places. You can configure validation using validation settings on a list level, and you can configure validation at the column level when creating or modifying the column properties. The difference is that using the column properties does not provide the ability to compare two columns in the same list, whereas the list settings validation option does. The column properties validation settings are useful when comparing a columns value with a static value.
In this exercise, you will add validation to the Team Announcements list to ensure that only future dates are added to the Expires column.
Important
Verify that you have sufficient rights to manage a list. If in doubt, see Appendix A.
On the Quick Launch, click Team Announcements to open the list page.
You will now create a new announcement with an expiration date set in the past. Click new announcement. In the Title field, type Past Announcement and in the Expires field, click the calendar icon to open a calendar, and then select a date in the past (prior to today).
Click Save.
You will now create a validation rule to check that the expiration date of any new announcement is always set in the future.
On the List tab, click List Settings in the Settings group, and then on the Settings page, under General Settings, click Validation Settings to display the Validation Settings page.
In the Formula section, in the Formula box, type =[Expires]>=[Created].
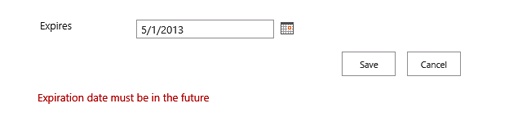
In the User Message section, in the User Message box, type an error message that will be displayed to the user in case of incorrect entry, such as Expiration date must be in the future.
Click Save.
You will now verify the validation rule. On the Quick Launch, click Team Announcements to go to the list.
Click new announcement. In the Title field, type Validated Announcement, and then once again select a past date using the calendar control in the Expires field.
Click Save. The error message that you have set up is displayed at the bottom of the page, indicating that the date is invalid.
In the Expires field, set a date in the future. Click Save. The new Validated Announcement item has been created and is shown in the Team Announcements list.
Using steps 4–7 as a guide, remove the validation settings by deleting the formula for validating the expiration date that you created.

Setting up ratings
The Rating settings provide the ability to add a rating control to a list or a library, so that users can rate the content in this list or library. You can configure the user experience in terms of whether the content is rated using the Likes (Like or Don’t Like) or the Star Ratings (from no stars to five stars). The default setting is that rating is not enabled.

In the following exercise, you will set the Likes ratings for the Team Announcements list and the Star Ratings for the Documents library.
Important
Verify that you have sufficient rights to manage a list. If in doubt, see Appendix A.
On the Quick Launch, click Team Announcements to open the list page, if it is not already open.
Open the Settings page for the list by clicking List Settings on the List ribbon.
On the Settings page, under General Settings, click Ratings Settings.
Select Yes under Allow items in the list to be rated, and then select Likes as a voting/rating experience. Click OK.
On the Quick Launch, click Team Announcements to open the list page. Notice that the new Number of Likes column has been created, with the Like links that you can click to rate the list items. Click the Like links for those items that you’d like to vote for.
Notice that your Likes are counted. In addition, the Unlike link appears, which allows you to withdraw your vote for a list item that you have already voted for.
You will now set up the star ratings for the Documents library. On the Quick Launch, click Documents to open the library page.
Open the Settings page for the library by clicking Library Settings on the Library ribbon, and then on the Settings page, under General Settings, click Ratings Settings.
Select Yes under Allow items in the list to be rated, and select Star Ratings as a voting/rating experience. Click OK.
On the Quick Launch, click Documents to open the library page. Notice that the new Rating (0–5) column has been created. It displays the five stars that the users can select to rate the list items. The column also counts how many users have voted, and shows the number of voters to the right of the star rating, which displays the average number of stars among all votes. Rate the documents that you’d like to vote for.
Notice that the star rating is more nuanced because it provides the opportunity to rate the items from zero to five stars, while the Likes ratings are binary.


Working with content types
Often, we need to redesign a list or a library and to add a new column. For example, in Chapter 3, you added new columns to a list. You would add a new column to a list or a library if you needed to collect more information from the user than what is there by default within the list or library template. For example, consider a Sales Team site in which salespeople can create quotations, proposals, and invoices.
You may want to create a new column to store the type of document, providing choices such as Quotation, Proposal, Invoice, and Report. Collecting the type of document is useful when creating a view and filtering by type, as well as if you decide to roll up the documents using an aggregation Web Part. You would then want to ensure that all document libraries have the option of using this new column, but it would be tedious to add that new column to every library. You could get around the tediousness of creating a library or a list with an additional column by using a custom template. However, what would happen if the choices for the type of document changed? You may want to add another column to the type of document to provide additional information, such as the value of a proposal, for example. This is where site columns and content types are useful. A site column could also be described as a shared column. You create a site column once, and it resides in a gallery at the level of a site or a site collection. It is inherited by all sites in the collection that are beneath the site in which it was created. A content type is made up of the site columns and other configurations, such as workflows. This enables you to reuse a group of the site columns and perhaps have a workflow associated with the content type, which you would then add to an existing list or library. Each content type has a predefined specific set of columns, workflows, and metadata. Lists and libraries can use more than one content type. In the example Sales Team site, the three document types—Quotation, Proposal, and Invoice—could be created within the same document library, with each one containing its own template.
By default, the content types for a list or a library are turned off. You can enable the management of content types for the list or the library by using the Content Types options under the Advanced Settings section on the Settings page for this list or library.

In this exercise, you will create a custom content type for proposal documents, called Global Proposal, and then create a new document based on this content type. The Global Proposal content type will consist of a new document template along with custom metadata to display the Customer Name and the Value of the proposal.
Important
Verify that you have sufficient rights to create content types. If in doubt, see Appendix A.
Click the Settings gear icon in the top-right corner of the screen, and then select Site settings from the menu.
On the Site Settings page, under Web Designer Galleries, click Site content types to display the Site Content Types page.
Click Create on the top of the page, above the list of site content types, to display the New Site Content Type page.
In the Name box, type Global Proposal, and in the Description box, type Wide World Importers Customer Proposal.
In the Parent Content Type section, in the Select parent content type from list, click Document Content Types in the list of available options, and in the Parent Content Type list, click Document.
Leave the other fields at their defaults and click OK. The new Global Proposal content type page is displayed.
Under Settings, click Advanced Settings to display the Advanced Settings page.
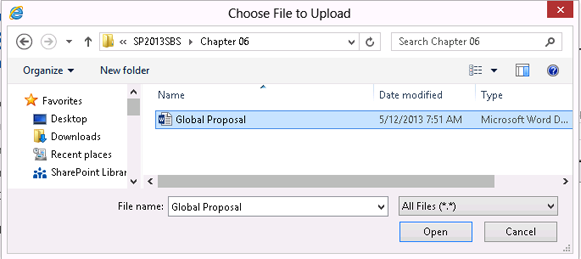
In the Document Template section, click Upload a new document template, and then click Browse.
In the Choose File to Upload dialog, go to the Chapter06 folder and click GlobalProposal.docx. Click Open to upload the file and to close the Choose File to Upload dialog.
On the Advanced Settings page, accept the defaults and click OK. The Global Proposal content type page is displayed.
In the Columns section, click Add from new site column to create the custom column for this content type. The New Site Column page is displayed.
In the Column name box, type the name of your column, such as Customer Name, and ensure that Single Line of Text is selected. Accept the defaults and click OK.
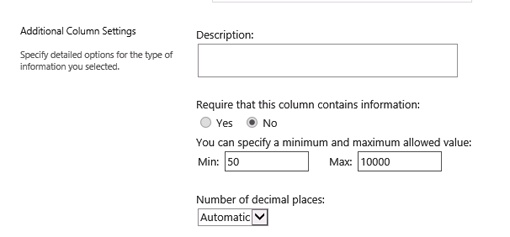
The Global Proposal site content type page is displayed. In the Columns section, click Add from new site column again to create another custom column for the proposal value. In the Name and Type section, enter the name Value, and then select Currency as the column type.
In the Additional Column Settings section, specify a minimum value of 50 and a maximum value of 10000. Click OK to add this column to the Global Proposal site content type.
You will now enable the management of content types for the Documents library and add the Global Proposal content type to this library.
On the Quick Launch, click Documents. Click the Library tab, and then click Library Settings on the ribbon to display the Settings page for this library.
Click Advanced Settings from the General Settings section. In the Content Types section, under Allow management of content types, select Yes, and then click OK.
The Settings page for the Documents library is displayed. In the Content Types section, click Add from existing site content types to display the Add Content Types page.
In the Select site content types from list, select Custom Content Types. In the Available Site Content Types list, select Global Proposal, and then click Add. Click OK to confirm adding the content type to this library.
You will now create a new document that is based on this content type. Go back to the Documents library using the Quick Launch.
Click the Files tab to open the ribbon, and then click the down arrow on the New Document button. Select Global Proposal.
A template opens in Word. If a warning about allowing this website to open a program on your computer appears, click Allow. If a warning about this template appears, click Yes to confirm that you want to proceed with opening a file. If prompted, provide your user name and password.
In Word, in the document information panel, in the Title field, type My Company Proposal. In the Customer Name field, type My Company. In the Value field, type 1000. If an Auto Complete dialog appears, click No.
Click File | Save As. Under Current Locations, select the library. In the Save As dialog, type the name My Proposal, and then click Save to save the document back to the library.
In the browser, refresh the Documents library page to display the new document. Notice that the My Proposal document is checked out to you because this library requires mandatory checkout. To check in the document, click the ellipsis to the left of the document to display its callout. Then, in the bottom right of the callout, click the ellipsis to display the document menu and select Check In from the menu to open the Check In dialog. Select the 1.0 Major version (publish) option, and then click OK.
You will now view the properties of the new document to see the values that you set. Click the ellipsis to the left of the document to display its callout. Then, in the bottom right of the callout, click the ellipsis to display the document menu and select View Properties to display the document properties dialog.
Close the document properties dialog, and then close the document callout to return to the library page.
Tip
The properties that you set do not display in the default view because you have used a content type. If you had created custom columns directly in the library, the option to display them in the default view would be available. In the next exercise, you will create a custom view to display these columns.


Creating a view
Creating a view in a library is a beneficial way of organizing content within a library. A view can be created with filters based on the columns, providing an easy way to find documents. If a library contains custom metadata, you may want your view to be created with a filter on that custom column. Custom views work very well with the content types that were described in the previous exercise. For example, if you would like to display all proposal documents in their own view to keep them separate from invoices, you could create a filter on each view based upon the content type column.
In this exercise, you will create a new custom view within a document library to display all of the proposal documents that are created with the new Global Proposal template. The custom columns, Customer Name and Value, will become the columns within the new view.
Set Up
Open the SharePoint site and display the document library where you would like to create a new view, if it is not already displayed.
Important
Verify that you have sufficient rights to create views in this library. If in doubt, see Appendix A.
Click the ellipsis to the right of the All Documents view at the top of the documents list, and then select Create View from the menu that appears.
On the View Type page, click Standard View to display the Create View page.
On the Create View page, in the Name section, in the View name box, type a view name, such as Global Proposals.
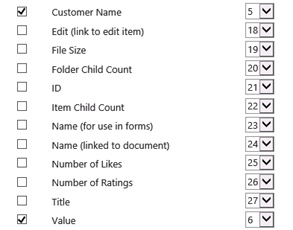
In the Columns section, check the Customer Name column and change its Position from left to 5. Check the Value column and change its Position from left to 6.
In the Sort section, in the First sort by the column list, select Customer Name.
In the Filter section, click the Show items only when the following is true option, and set the filter to Content Type is equal to Global Proposal.
Expand the Totals section, and then for the Proposal Value column, set the Total drop-down list to Average.
Click OK to create the new view.
The library page is displayed in the newly created view. It shows only those documents that were created based on the Global Proposal content type, and displays the two custom columns that you created, along with an average proposal value.
Click All Documents on the top of the file list to change to the default library view. You can also use the Manage Views section on the ribbon to switch between the views.


Managing users and permissions
Within an organization, you are going to find that there are many different roles, and therefore different levels of permissions are going to be required on list and libraries, and their content.
A list or a library can inherit its permissions from the site where the list or library is located, or it can have its own unique permissions. If permissions are inherited, they will be managed either by the site in which the list or the library resides, or a parent of the site. Permission inheritance within a list or a library can also be disabled, and unique permissions can be managed for a folder or a document within a library, or a list item in a list.
SharePoint includes 12 list and library permissions that determine the specific actions that users can perform in the list or the library, as described in Table 6-1.
The list and library permissions can be assigned to permission levels. Each permission level is a named collection of permissions that can be assigned to SharePoint users and groups. There are a number of default permission levels, including Read, Contribute, Design, Full Control, and Limited Access. You can use the default permissions levels, or create your own.
Note
SEE ALSO For more information about permissions and permission levels, see Appendix A.
When lists and libraries are created, they automatically inherit their permissions from the site in which they reside. This means, for example, that users who are assigned Contribute permissions to the site will also have Contribute permissions to the list. After creating a list or a library, you might want to grant more privileges to certain people, or restrict their privileges. More often than not, you might want to give some people more access rights to a particular library. For example, Olga Kosterina might have given Edit permission to the overall site to Todd Rowe when it was created. However, she might decide later that she wants him to manage the Documents library. Todd currently has only Edit access to this library because that is his overall permissions level on the site. Olga Kosterina can assign Todd a permission level of Full Control for the Documents library so that Todd can manage this library.
In this exercise, you will configure the permissions for the Documents library so that a user such as Todd Rowe has a permission level of Full Control in this document library. You can follow the same procedure for a list.
Important
Verify that you have sufficient rights to manage permissions for this library. If in doubt, see Appendix A.
On the Quick Launch, click Documents to open the Documents library, if it is not already open.
On the Library ribbon, click Library Settings to display the Settings page for this library.
In the Permissions and Management section, click Permissions for this document library to display the Permissions page for this library.
On the Permissions page, notice the yellow status bar below the ribbon that says that this library inherits its permissions from its parent. You will now check what permission level the user, such as Todd Rowe, has in this library. On the Permissions tab, click Check Permissions.
In the Check Permissions dialog, type the user name, such as Todd Rowe, and then click Check Now. The permissions level for the user in this library is displayed at the bottom of the box, such as the Edit permission level for user Todd Rowe, which is given through this user’s membership in the Members group for the site where the library resides.
Click Close to close the Check Permissions dialog.
You will now grant the user, such as Todd Rowe, a Full Control permission level. On the Permissions tab, click Stop Inheriting Permissions.
A dialog box appears, warning you that you are about to create unique permissions for this document library and that changes made to the parent site permissions will no longer affect this document library. Click OK.
Notice that the yellow status bar below the ribbon states that this library has unique permissions, and that there are now additional commands on the ribbon available to you. On the Permissions tab, click Grant Permissions.
In the Share dialog that appears, in the Invite people box, type the user name or the email address of the user to whom you would like to grant permissions, such as Todd Rowe, and then click Show Options.
Clear the Send e-mail invitation check box, and then in the Select permission level list, select Full Control.
Click Share. The user, such as Todd Rowe, is now added to the list of users and groups who have access to the document library with the Full Control permissions level.


Sharing a document or a folder
Often, you need to share a document in a library on your site for review and collaboration with other people inside or outside your organization who do not have access to the library or any other content on your internal site. You can give access to the document to other people in your organization using a Share command on the document menu. You can also share a folder in the library in the same way.
When you share the document, you can assign different types of access to this document to different people. There are two options: view and edit. When you share the document with the view option, users will be able to open the document but not modify it. The edit option gives users the ability to modify the document. The permission level assigned to those users is Contribute. If email has been enabled for your SharePoint installation, you also have the option of sending a message to let people know that they have access to the document.
Tip
If you share documents outside your organization using anonymous guest links, then it is possible for the invitation recipients to share those guest links with others, who could use them to view content. If you want to limit access to the document to invitation recipients only, consider requiring external users to always sign in.
In the following exercise, you will share a document with a user who does not have any access to the library where a document is located, or the site where a library resides. In our example, Olga Kosterina wants to give Bill Malone an Edit access to the My Proposal document in the Documents library.
Important
Verify that you have sufficient rights to manage permissions for this library. If in doubt, see Appendix A.
On the Quick Launch, click Documents to open the Documents library, if it is not already open.
In the Documents library, click the ellipsis to the right of the My Proposal document to open the document callout.
In the document callout, click Share.
In the Share dialog, in the Invite people box, type a name or an email address of a user that you would like to share a document with, for example, Bill Malone.
In the drop-down list to the right of the Invite people box, select the level of access you want to give to the user; for example, can edit.
At the bottom of the dialog, click Show Options, and then clear the Send an email invitation check box.
Click Share to share the document. The confirmation message stating that the document has been shared appears on the top right of the screen.


Granting list item permissions
Similar to a document or a folder within a library, unique permissions may be granted to a list item or a folder contained within a list. List items and folders in the root of the list inherit permissions from the list itself. In other words, the same inheritance rules that apply to lists also apply to the list items. A list item or a subfolder that is stored within a folder inherits permissions from the parent folder. Permission inheritance can be stopped for any list item or folder at any level.
In the following exercise, you will modify the permissions of a list item, New Product Announcement, within the Team Announcements list so that a user, such as Bill Malone, has a permission level of Full Control for this item.
Set Up
Open the SharePoint site that you would like to assign list item permissions, if it is not already open.
Important
Verify that you have sufficient rights to manage permissions for the list. If in doubt, see Appendix A.
On the Quick Launch, click Team Announcement to open the list.
Click the ellipsis to the right of the list item that you’d like to grant unique permissions to, such as New Product Announcement, and then select Shared With from the list item menu that appears.
In the Shared With dialog, explore the list of users that have access to this list item, and then click Advanced to open the Permissions page for this item.
The Permissions page for this list item is displayed, with the yellow status line that shows that this list item inherits permissions from its parent. You will now create unique permissions for this list item. On the Permissions tab, click the Stop Inheriting Permissions, and then click OK to the warning message. The permission inheritance for this item has been broken. The yellow status line shows that this item has unique permissions.
Click Grant Permissions on the ribbon.
In the Share dialog that appears, in the Invite people box, type the user name or the email address of the user to whom you would like to grant permissions, such as Bill Malone, and then click Show Options.
Clear the Send e-mail invitation check box, and then in the Select permission level list, select Full Control.
Click Share. The user, such as Bill Malone, is now added to the list of users and groups who have access to this list item with the Full Control permissions level.
You will now validate that the list item has been shared with the user, such as Bill Malone. Go to the list page by clicking its link on the Quick Launch, and then click the ellipsis to the right of the list item that you’ve changed permission to, such as New Product Announcement, to display the list item menu. Select the Shared With option. Validate that the user, such as Bill Malone, is listed in the Shared With dialog, and then close the dialog to return to the list page.

Deleting and restoring a list or a library
When a SharePoint list or a library is no longer required or was perhaps created by mistake, you may wish to delete this list or library. Deleting the list will also delete all of the list items (content) within that list, and deleting the library will delete all files within the library as well, so deleting should be used with caution. For reassurance, note that sufficient permissions are required to delete the list or the library. For example, a user with a Contribute permission level for a site (or a list or a library) will not be able to delete the list or the library. If a list or a library is accidentally deleted, as with list items and documents, it will be placed within the site Recycle Bin for 30 days (by default) and can be restored.
In this exercise, you will delete and restore a SharePoint list.
Important
For this exercise, do not use a list that contains data that you wish to keep. If you get through half of the exercise and come back to it after 30 days, your list will not be available for restoring.
Set Up
Open the SharePoint site where you would like to delete the list. The exercise will use the http://wideworldimporters site, but you can use whatever site you wish. If prompted, type your user name and password, and then click OK.
Important
Verify that you have sufficient rights to delete and restore this list. If in doubt, see Appendix A.
If it is not already open, go to the Team Announcements list by clicking its link on the Quick Launch.
Click the List tab, and then click List Settings on the ribbon.
On the Settings page, in the Permissions and Management section, click Delete this list.
Click OK in the message that appears, confirming that you want to send the list to the Recycle Bin.
The list has been deleted and the Team Announcements link no longer appears on the Quick Launch. You will now restore the list.
On the Quick Launch, click Site Contents, and then on the top right of the Site Contents page, click Recycle Bin.
On the Recycle Bin page, select the Team Announcements list by clicking the check box to the left of its name, and then click Restore Selection.
In the confirmation message, click OK to restore the Team Announcements list to its original location.
On the Quick Launch, click Site Contents, and then on the Site Contents page, click the Team Announcements tile to open the list page. Verify that the list has been successfully restored.

Key points
List and library configuration settings are accessed via the Settings page. There are six groups of settings: General Settings, Permissions and Management, Communications, Content Types, Columns, and Views.
You can think about a library as a list of files, and many library settings are similar to the list settings. However, there are also settings that are specific for libraries, including default open behavior, library template, required checkout, major and minor versioning, and others.
With versioning, you can view the history of a document in the library, and of list items in a list, and restore previous versions if required. Libraries support major and minor versions, whereas lists only support major versions.
Adding validation to list and library columns helps to create more consistent and accurate content.
You can configure Likes or Star Ratings to allow users to vote for content in lists and libraries.
Content types provide the ability to group custom columns, workflows, and other metadata and to make it available to any list or library within the current site or a child site. You can use multiple content types within a list or a library, and create different views to display them.
Lists and libraries inherit permissions from the site that contains them. However, you can stop that inheritance and configure unique permissions for lists, list items, libraries, and the documents that they contain by granting access to individual users or groups. You can share a document for viewing and editing with users who may have no access to its containing library.
If a list or a library is deleted by accident, it can be restored from the site’s Recycle Bin within 30 days.