
Chapter 3. Working with Documents and Information in Lists and Libraries
Chapter at a glance
Discover
Discover list and library apps, Key points

Create
Create and edit list items, Adding and editing list items

Edit
Edit documents, Editing documents

Add & Remove
Add and remove list and library columns, Adding, editing, and removing list and library columns

IN THIS CHAPTER, YOU WILL LEARN HOW TO
The information managing capabilities of Microsoft SharePoint come through the lists and the libraries.
You can think of the lists found in Microsoft SharePoint 2013 as spreadsheets that you and your coworkers can simultaneously use on the Internet. SharePoint lists represent editable, web-based tables that facilitate concurrent, multiuser interactions against a common, centralized, extensible set of columns and rows. They empower you to provision your own repositories of structured information in which list items behave like rows consisting of self-labeled columns. All of the webpages needed to create, review, update, delete, and manage a list and its data are automatically and dynamically generated by SharePoint.
One of the most compelling features that SharePoint 2013 provides is libraries. A library can be thought of as a list of files. Libraries are a great place to store documents or forms. In the business world, being able to work with documents quickly and effectively is of paramount importance. While lists provide an effective way to work with all types of data, SharePoint libraries function similarly for documents and forms, such as Microsoft Office Word documents. Using SharePoint document libraries, you can filter and group documents, as well as view metadata for documents stored in the library.
In this chapter, you will learn how to work with lists and list items, as well as how to work with libraries and their documents in SharePoint 2013. Depending on a site that you initially create, a Documents library may be provisioned when the site is created, and you need only to begin using it. Yet, there will come a time when the library that is autoprovided does not quite meet a need. Therefore, this chapter explores how you can create your own custom lists and libraries. You will also do the following: discover the default lists and libraries that can be provisioned on your site; create new lists and libraries; alter existing lists; create and upload new documents; edit existing documents; organize lists and libraries; delete and restore list items and documents; set up alerts and follow-up documents to get notified when changes occur; and take libraries offline and synchronize them with the live site.
Note
SEE ALSO For more information on how to manage and configure SharePoint lists and libraries, refer to Chapter 6.
Note
PRACTICE FILES Before you can complete the exercises in this chapter, you need to copy the book’s practice files to your computer. The practice files that you’ll use in this chapter are in the Chapter03 practice file folder. A complete list of practice files is provided in Using the practice files at the beginning of this book.
Important
Remember to use your SharePoint site location in place of http://wideworldimporters in the exercises.
Discovering default lists and libraries in a site
Many default lists and libraries are included with SharePoint 2013. Each type of list or library has a specific purpose, and some have a different set of features. When you need to create a new list or a library, you can use the default library and list apps accessible from the Your Apps page to generate a new a list or a library with a specific predefined functionality and a set of columns. Each list and library app has its own tile that visually indicates the type of list or library. Later in this chapter, we’ll explore how additional columns can be added and how most default columns can be altered or deleted, even after data has been entered into them.
There are 10 library apps and 20 list apps provided by SharePoint 2013, which are described in Table 3-1.


Tip
There are two additional library apps, Data Feed library and PowerPivot Gallery, which are made available in the Your Apps page when you install Microsoft SQL Server 2012 SP1 PowerPivot for SharePoint Server 2013. For more details, refer to Chapter 13.
In the following exercise, you will browse to the Your Apps page to see the list and library apps available on your site.
Set Up
Open a SharePoint site where you’d like to explore the list and library apps. The exercise will use the http://wideworldimporters site, but you can use whatever site you wish. If prompted, type your user name and password, and then click OK.
Important
Verify that you have sufficient permissions to create a list and a library on this site. If in doubt, see Appendix A.
Click Settings on the top right of the screen, and then select Add an app.
The Your Apps page is displayed. It shows all apps that are available to you on your site in the Apps you can add section. In addition, the Noteworthy section on top of the Your Apps page shows the apps that are most popular for the sites of the same type as the current site.
On the Your Apps page, in the search box on the top of the page, type list and press Enter on the keyboard. The list apps available on your site are displayed.
In the search box on the top of the page, delete your previous typing, and then type library and press Enter on the keyboard. The library apps available on your site are displayed.
Click the X on the right side of the search box to remove the search results and redisplay all available apps.


Creating a new list
The first step in creating a new list is to ask yourself, “What kind of information do I want to gather/display?” The answer to this question will help you determine which list type to choose. Perhaps you want to start with a list that is close to your end goal, and then add, delete, and alter the default columns to provide the solution you are trying to achieve. For example, if you are planning to collect information such as names and addresses, you can choose the Contacts list app to create your initial list, and then modify it. Perhaps you want to start with a bare-bones list and build it entirely from scratch. In that case, you would likely choose the Custom list app to create your initial list.
Tip
If the list items in the list that you want to create always begin with a document, consider using a document library instead of a list.
In the following exercise, you will create a list for the buyers at Wide World Importers to track the status of tasks involved in the buying process. This task list will be based on the Tasks app. Once the list is created, you will alter the display name so that it displays Common Buyer Tasks.
Set Up
Open the SharePoint site where you would like to create the new list. The exercise will use the http://wideworldimporters site, but you can use whatever site you wish. If prompted, type your user name and password, and then click OK.
Important
Verify that you have sufficient permissions to create lists in this site. If in doubt, see Appendix A.
Click Settings on the top right of the screen, and then select Add an app to display the Your Apps page, if it is not already displayed.
On the Your Apps page, scroll down to the Tasks tile and click it.
The Adding Tasks dialog is displayed. In the Name box, type BuyerTasks to establish a display name for the new list. This box also supplies the value that SharePoint uses for the new list’s URL.
Tip
There is no restriction on the number of copies of any list that you can create in a site. You can create as many task lists as you like.
Important
When you initially create a list in SharePoint, you are establishing two name values: the display name, usually labeled Name or Title, and the URL name, also known as the internal name. The display name that you provide is used to populate both names. However, only the display name can be easily changed after the list is created.
Tip
The best practices for naming a list in SharePoint Foundation include the following guidelines: The initial name should be descriptive, intuitive, and easy to remember. The initial name should be concise. The initial name should not contain spaces. The initial name should be consistently used throughout the site. Your organization may also have specific naming conventions that you will want to follow.
Note
SEE ALSO More details about these naming recommendations and the reasons they are needed can be found in the Naming a URL sidebar in Chapter 5.
Click the Create button to complete the list creation.
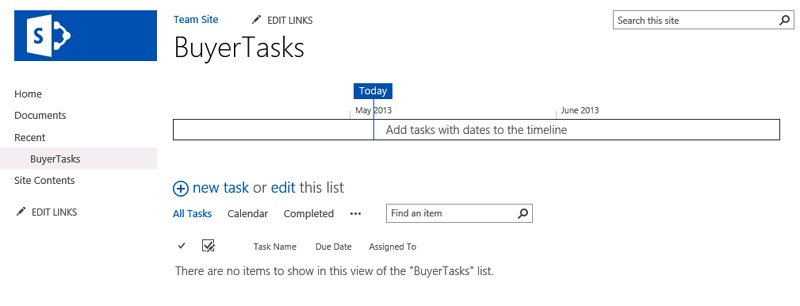
The Site Contents page is displayed, with a new tile for the BuyerTasks list and a green new! icon to the right of the tile. The new BuyerTasks link is also shown on the Quick Launch in the Recent section.
Click the BuyerTasks tile (or the BuyerTasks link on the Quick Launch) to go to the default list view page (AllItems.aspx).
Because this list was named without a space between Buyer and Tasks, it would be useful to change the display name so that it has a space in it. The remainder of this exercise demonstrates that revisions to the list name only impact the display name and not the URL name.
On the top left of the page, click the List tab to display the ribbon, and then click List Settings in the Settings group on the right side of the ribbon.
On the BuyerTasks - Settings page, in the General Settings area, click List name, descripti on and navigation.
Note
SEE ALSO For more information on configuring the lists, refer to Chapter 6.
On the Settings - General Settings page, replace the BuyerTasks name by typing Common Buyer Tasks (with spaces) in the Name box.
Click the Save button to save the change and display the list Settings page. Notice that the list name on the top of the page and the link on the Quick Launch now reflects the modified display name.
On the Quick Launch, in the Recent section, click the new display name, Common Buyer Tasks, to go to the Common Buyer Tasks default list view page.
The title on the top of this page and all other pages associated with this list shows the modified display name. However, you can see that the browser’s address bar still reflects the initial name (internal name) given to this list.


Adding and editing list items
Creating a SharePoint list automatically generates the pages needed to view the list as a whole, to view a list item, to add a new list item, and to edit an existing list item. In addition to adding and editing list items using a form in a separate page, you can create and edit lists within the list page, in a grid that is similar to working in Microsoft Office Excel.
Tip
If you need to import data from an Excel spreadsheet into a SharePoint list, use the Import Spreadsheet app that can be found in the Your Apps page. In the Import Spreadsheet app, you can browse to the Excel spreadsheet that you’d like to import the data from, and specify the range of cells that contain this data, and then you can import the data into the newly created SharePoint list. Please refer to Chapter 12, for more information.
Note
SEE ALSO You can export data from Microsoft Office Access into a SharePoint list. Please refer to Chapter 12 for more information.
While some lists only have a single view when initially created, multiple list views are generated when a new Tasks list is created. A view defines how the information in a list or library is displayed to the users. The Common Buyer Tasks list was created using the Tasks list app that has the following six list views: All Tasks (default), Calendar, Completed, Gantt Chart, Late Tasks, My Tasks, and Upcoming. Several list views are shown on top of the list, so that you can switch between them at will. You can display your list in more views by clicking the ellipsis to the right of the displayed view links.

You can go to a list’s default list view page from other locations by clicking the list’s name on the Quick Launch, or by clicking the link at the top of any List View Web Part for that list.
In this exercise, you will add several Tasks list items for the buyers at Wide World Importers to use in their buying process. You will add the first task using a form, and then add list items using inline editing.
Set Up
Open the SharePoint site where you would like to modify the list, if it is not already open. The exercise will use the http://wideworldimporters site, but you can use whatever site you wish. If prompted, type your user name and password, and then click OK.
Important
Verify that you have sufficient permissions to modify this list. If in doubt, see Appendix A.
On the Quick Launch, click the Common Buyer Tasks list (created in the last section) to display the Common Buyer Tasks default list view page, if it is not already displayed.
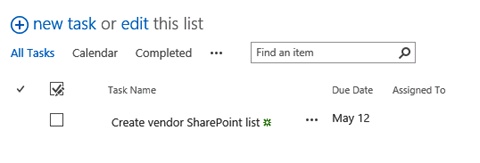
In the body of the page, click new task.
On the list item page, in the Task Name textbox, type Create vendor SharePoint list.
In the Due Date text box, enter a future date, for example, 10 days from now.
Click the Save button to save the list item and redisplay the Common Buyer Tasks default list view page.
The newly created list item shows in the body of the page. A green icon displays to the right of the Task Name text, indicating that this list item was recently created.
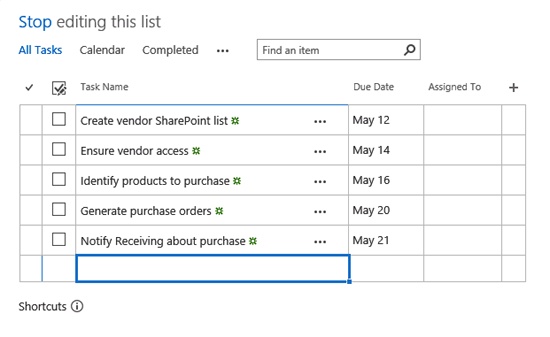
You will now create and edit list items within the list page. In the body of the page, on top of the list, click the edit link to the right of the new task link. The list is redisplayed as a grid in the datasheet view, also known as the Quick Edit view, with a new empty line at the bottom.
Position your cursor in the Task Name column on the new line and type Ensure vendor access.
Position your cursor in the Due Date column and type any date of your choosing as a due date for the new task, or select a date from the calendar by clicking the calendar icon that appears to the left of the field you are working with.
Note that a new empty line has been added to the bottom of the table. Using steps 14 and 15 as a guide, create another three list items with the values in the following table.
Task name
Due date
Identify products to purchase
Any date of your choosing.
Generate purchase orders
A date after the previous date.
Notify Receiving about purchase
A date after the previous date.
After all the new tasks have been added, click Stop on the top of the list. The list is redisplayed in its default view, showing all the tasks that you have created.


You will find that you need to edit existing list items in a list at some stage after they have been created. For instance, after the Common Buyer Tasks list was created, it transpired that Todd Rowe had already identified products to purchase. In this exercise, you will edit a list item, Identify products to purchase, to specify that the task has been completed. You will then display all tasks on the timeline for better visual representation.
Set Up
Open the SharePoint list that you would like to modify, if it is not already open. The exercise will use the Common Buyer Tasks list at the http://wideworldimporters site, but you can use whatever site you wish. If prompted, type your user name and password, and then click OK.
Important
Verify that you have sufficient permissions to modify items on this list. If in doubt, see Appendix A.
Select the list item that you are going to edit, Identify products to purchase, by clicking in its leftmost column.
Click the Tasks tab on the top of the screen to display the ribbon.
On the ribbon, click Edit Item in the Manage group to open the list item page in edit mode.
In the % Complete field, type 100 to specify that this task is 100% completed, and then click Save.
The list page is redisplayed. Note that the completed task is now checked and crossed through to show that it has been done already.
You will now display all tasks on the timeline. Select all items in the list by clicking the check mark on top of the leftmost column.
Click the Tasks tab on the top of the page to display the ribbon, if it is not already displayed.
On the ribbon, click Add to Timeline in the Actions group. All selected tasks are plotted on the timeline. Click the check mark on top of the leftmost column again to deselect all list items.


Occasionally, you might want to attach one or more documents to a list item. By default, all lists in SharePoint allow attachments. In this exercise, you will attach a document to an existing list item in the Common Buyer Tasks list.
Note
PRACTICE FILES You will use the WideWorldPurchaseOrder.docx practice file, located in the Chapter03 folder.
Set Up
Open the SharePoint list that you would like to modify, if it is not already open. The exercise will use the Common Buyer Tasks list at the http://wideworldimporters site, but you can use whatever site you wish. If prompted, type your user name and password, and then click OK.
Important
Verify that you have sufficient permissions to modify items on this list. If in doubt, see Appendix A.
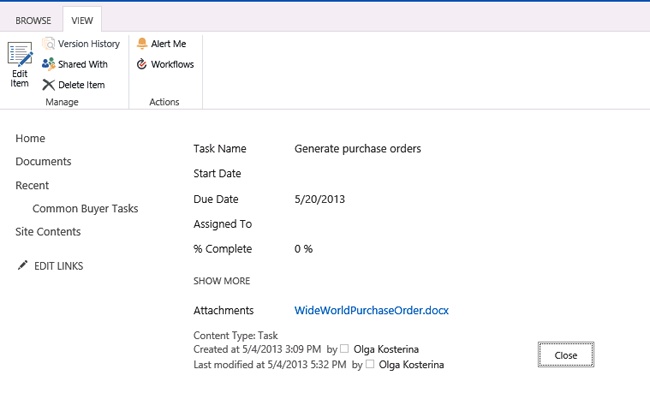
Select the Generate purchase orders list item by clicking in its leftmost column, and then click the Tasks tab on the top of the page to display the ribbon, if not already displayed.
On the ribbon, in the Action group, click Attach File to display the Attach File dialog.
Click Browse. In the Choose File to Upload dialog, go to the practice files folder, Chapter03, select WideWorldPurchaseOrder.docx, and then click Open. Once chosen, the location of the selected document is displayed in the Name text box in the Attach File dialog.
Click OK to attach the document to the list item. The default list view page is displayed.
To validate that the document has been successfully attached, click the Generate purchase order list item to display its page. Check that the WideWorldPurchaseOrder.docx is shown in the Attachments field at the bottom of the list item page.
Click Close to return to the list page.

Creating a document library
A library is a location on a site where you can create, collect, update, and manage files with other team members. Each library displays a list of files and key information about the files, which helps people to use the files to work together.
You can use document libraries to store your documents on a SharePoint site, rather than on your local computer’s hard drive, so that other employees can find and work with these documents more easily. Libraries are used to store files, whereas lists are used to store other types of content. Like lists, libraries contain metadata, so that you can easily filter, sort, and group items in the libraries.
When you create a new SharePoint team site, a generic document library, called Documents, is created. Because this library lacks a descriptive name, you should create new libraries for a particular business category or subject instead. You want to make sure that the name of a document library is descriptive and that each library has a specific topic to make it easier to find documents. Storing all documents together in the default Documents or any document library defeats the purpose of using SharePoint sites to make information easier to locate.
In the following exercise, you will create a new document library, called Furniture, on your SharePoint site.
Set Up
Open the SharePoint site in which you would like to create your document library. The exercise will use the http://wideworldimporters site, but you can use whatever site you wish. If prompted, type your user name and password, and then click OK.
Important
Verify that you have sufficient permissions to create a library in this site. If in doubt, see Appendix A.
Click Settings gear icon on the top right of the screen, and then select Add an app to display the Your Apps page.
On the Your Apps page, click the Documents Library tile.
The Adding Document Library dialog is displayed. In the Name box, type the name that you want to give to the new document library; for example, Furniture.
Click the Create button.
The Site Contents page is displayed, with a new Furniture library tile and a green new! icon to the left of the tile. The new Furniture link is also shown on the Quick Launch in the Recent section.
Click the Furniture tile, or the Furniture link on the Quick Launch, to go to the default library view page.


Creating a new document
After a library has been created, you can populate it with documents. In this section, you will create a new document from the SharePoint document library. The new document will use the default template for the library.
Note
SEE ALSO For more information about templates in document libraries, please refer to Chapter 6.
The new document can be created in a Microsoft Word client application, if it is installed on your computer, or in an online Word Web App using the browser.
Tip
Microsoft Office Web Apps are a part of Microsoft Office 365 and are available if you are using Microsoft SharePoint Online. If you are using SharePoint 2013 in an on-premises environment, then Office Web Apps should be installed and activated on your server so that users can create and edit documents online using Office Web Apps such as Word, Excel, PowerPoint, or OneNote Web Apps. You can then view and, depending on the license, edit Office documents by using a supported web browser on computers and various mobile devices, such as Windows Phones, and Apple iPhones and iPads. The Office Web Apps can be used on any device in which a browser is available; however, they have less functionality than client applications.
Note
SEE ALSO For more information on using Office Web Apps with SharePoint 2013, refer to technet.microsoft.com/en-us/library/ff431685.aspx.
In the following exercise, you will create a new document from the SharePoint document library.
Set Up
Open the SharePoint site and document library in which you want to create a new document, if it is not already open. If prompted, type your user name and password, and then click OK.
Important
Verify that you have sufficient permissions to create a document in this library. If in doubt, see Appendix A.
On the Quick Launch, click the Furniture link.
On the top of the page, click the Files tab, and then click the New Document button at the left of the ribbon.
Depending on your server settings, a new document will open either in a browser or in a Word client application, if it is installed on your computer. If a new document opens in the browser, please move to step 7 in this exercise. Otherwise, please continue to the next step.
A new document opens in Word. If a warning about allowing this website to open a program on your computer appears, click Allow. The document is based on the default template for this SharePoint library, called template.dotx. If a warning about this template appears, click Yes to confirm that you want to proceed with opening a file.
If prompted, provide your user name and password. Microsoft Word opens. If a Read Only banner appears on the top of the document, click Edit Document on the banner. Then, in the new document, type some text; for example, Oak Mirror.
In Word, click the File tab, and then click Save to save the document back to the Furniture document library. In the Other Web Locations section, under Current Folder, click Furniture.
The Save As dialog opens. Note that the location points to the Furniture document library. Enter OakMirror as the name of your new document, and then click Save.
Go back to the browser where the Furniture library is displayed.
Move to step 10 in this exercise.
The browser opens an empty document based on the library’s default template in the Word Web App. If prompted, provide your user name and password. The Word Web App interface is similar to the interface of Microsoft Word, and you can perform many light-editing tasks in Word Web App. Click Edit Document on top left of the page, and then select Edit in Word Web App from the menu.
In the Word Web App, in the new document, type some text, for example, Oak Mirror.
Click the File tab, and then click Save to save the document back to the Furniture document library. The Furniture library is displayed.
Validate that the OakMirror document is listed in the Furniture library. There is a green icon next to the document, indicating that this document is a new addition to the library.


Editing documents
Once documents are placed in the library, you can search and filter them to make it easier to find what you are looking for, as well as to collaborate with others to help develop the final version of the document. At times, you will find that you need to edit a document in a SharePoint document library.
SharePoint allows you to edit documents in Office client applications such as Word and Excel, or in the browser using Office Web Apps that provide online companion web applications to Office client applications, such as Word Web App or Excel Web App. For in-browser editing to be available, Office Web Apps must be installed and activated on your on-premises SharePoint 2013 server, or available to you as a part of your SharePoint Online or Office 365 subscription.
In the following exercise, you will edit in Microsoft Word the document called OakMirror.docx, which was created in the previous exercise in the Furniture library.
Set Up
Open the SharePoint site where you’d like to edit a file in a document library. If prompted, type your user name and password, and then click OK.
Important
Verify that you have sufficient permissions to edit a document in this library. If in doubt, see Appendix A.
On the Quick Launch, click the Furniture document library.
To open a document for editing, click the ellipsis to the right of its name, and then select Edit from the callout menu.
Alternatively, to open a document for editing, you can select the document by clicking its leftmost column, clicking the Files tab on top of the page to open the ribbon, and then clicking Edit Document on the ribbon.
Tip
Depending on your server settings, you might be able to just click the document you would like to edit, such as OakMirror.docx, to open it for editing. The document will open in either a Word client application, if it is installed on your computer, or in a Word Web App in a browser. If a new document opens in Word Web App in a browser, on the Edit Document menu, select Edit in Microsoft Word, and continue to the next step.
The document opens in Word. If a warning about opening the program on your computer appears, click Allow. If a Microsoft Office warning about opening a file appears, click Yes to confirm that you want to open the file. If a Read Only banner appears on the top of the document, click Edit Document on the banner.
In Word, make some changes to the document; for example, select the Oak Mirror text and make it bold and centered.
In Word, click File | Save to save the document back to the Furniture document library.
Go back to the browser and validate that the document has been saved to the document library by checking its timestamp.

When you’re on the move, it is often very useful to have the ability to edit your document within a browser, without the need for a client application to be installed on the device you’re using.
Tip
You can configure whether to open a document within the browser as opposed to having the document open in its native Microsoft Office client application, such as Word. The default option is to open in the browser using an Office Web App such as Word Web App, so that a user can use the browser to view the document online. For on-premise deployments, this capability depends on Office Web Apps being installed and activated on the SharePoint server. For more details, refer to Chapter 6.
In the following exercise, you will modify the OakMirror.docx document using in-browser editing in Word Web App.
Set Up
Open the SharePoint site where you’d like to edit a file in a document library, if it is not already open. If prompted, type your user name and password, and then click OK.
Important
Verify that you have sufficient permissions to edit a document in this library. If in doubt, see Appendix A.
On the Quick Launch, click the Furniture document library.
Click the document you would like to edit, such as OakMirror.docx, to open it for editing.
The document opens in Word Web App in the browser. Click Edit Document on the top left of the page, and then select Edit in Word Web App from the menu to open the Word Web App ribbon.
Make some changes to the document; for example, select the Oak Mirror text and italicize it.
Click the Save icon in the top-left corner of the page—or click the File tab, and then click the Save menu option—to save the document back to the Furniture document library.
Validate that the newly edited document has been saved to the document library by checking its timestamp.

Uploading documents
Document libraries let keep track of the new versions of a document as the document is modified, and revert to older versions if necessary. First, you need to ensure that your documents are uploaded and available in the SharePoint library.
There are several ways to add documents to a document library, including the following:
Using the browser to upload documents to the library via the SharePoint interface.
Using File Explorer to copy or move documents into the library, including dragging between your desktop, or any other location, and SharePoint.
Using sync to upload the documents stored offline.
In this section, you will use the first two methods: the browser and File Explorer. Later in this chapter, you will use sync to add a document to the library, as well.
You will now add a document to the library using a browser. In the following exercise, you will upload a new furniture description to the Furniture library.
Set Up
Open the SharePoint site where you’d like to upload a file to a document library. If prompted, type your user name and password, and then click OK.
Important
Verify that you have sufficient permissions to add a document to this library. If in doubt, see Appendix A.
On the Quick Launch pane, click the Furniture document library.
In the Furniture document library, in the body of the page, click the new document link. The Add a Document dialog appears.
Click the Browse button.
In the Choose File to Upload dialog, browse to the file you would like to upload, such as OakDesk.docx, in the Chapter03 folder. Select the file, and then click Open.
In the Add a Document dialog, click OK to confirm the upload, and then return to the Furniture library.
Validate that the OakDesk document has been uploaded and is listed in the Furniture library.


You can also drag a document—or a selection of multiple documents—to the library from the desktop or any other location via File Explorer. In the following exercise, you will drag a document to the Furniture document library.
Set Up
Open the SharePoint site where you’d like to upload a file to a document library, if it is not already open. If prompted, type your user name and password, and then click OK.
Important
Verify that you have sufficient permissions to add a document to this library. If in doubt, see Appendix A.
On the Quick Launch, click the Furniture document library to open it, if it is not already open.
Open File Explorer and go to the Chapter03 practice folder.
Position the File Explorer window next to the browser window, displaying the Furniture library, so that you can drag a file from the File Explorer to the browser.
In File Explorer, select the file OakChest.docx, and drag it to the Furniture library where it says drag files here in the body of the page in the browser.
Validate that the OakChest document has been uploaded and is listed in the Furniture library. Click Dismiss on the top of the documents list to dismiss the confirmation that an upload has been completed and one document has been added to the library.


Another way to add documents to the library is to copy and paste using File Explorer. This way of uploading works well if you need to upload multiple documents. In the following exercise, you will copy two documents to SharePoint library by using the Explorer view of the Furniture document library.
Note
PRACTICE FILES You will use the OakEndTable.docx and OakNightStand.docx files, located in the Chapter03 folder.
Set Up
Open the SharePoint site where you’d like to upload files to a document library, if it is not already open. If prompted, type your user name and password, and then click OK.
Important
Verify that you have sufficient permissions to add a document to this library. If in doubt, see Appendix A.
On the Quick Launch, click the Furniture document library to open its page, if it is not already open.
Click the Library tab on the top of the page to display the ribbon.
In the Connect and Export group, click Open with Explorer. The library content is displayed in File Explorer.
Open File Explorer and go to the folder where the documents that you wish to copy to the library are stored, such as the Chapter03 folder, if it is not already open.
Select the files titled OakNightStand.docx and OakEndTable.docx by clicking the first file, and then holding down the Ctrl key and clicking the second file.
Right-click in File Explorer and select Copy, or press Ctrl+C on the keyboard.
Go to the File Explorer window with Furniture library. Right-click and select Paste, or press Ctrl+V on the keyboard, to add the files to the library.
In the browser where the Furniture library is displayed, refresh the page and verify that OakNightStand.docx and OakEndTable.docx are listed in the library.


Checking documents in and out from the document library
One of the features provided by SharePoint Server 2013 is document management. Checking out and checking in documents lets others know what documents you are working on so that they don’t work on them at the same time. When using check-in, you can also enter comments about what you’ve changed, which others can then view.
When you check out a file, you lock the file for editing to prevent other users from editing the file at the same time. When you have finished editing the file, you check the file back in, allowing other users to edit the file.
In the following exercise, you will check out a document from a document library, and then check it back in and change the comments to reflect that this is the final version of the document.
Set Up
Open the SharePoint site from which you’d like to check in or check out a document, if it is not already open. If prompted, type your user name and password, and then click OK.
Important
Verify that you have sufficient permissions to check out and check in a document in the document library. If in doubt, see Appendix A.
On the Quick Launch, click Furniture to open the Furniture document library, if it is not already open.
Select a document that you would like to check out, such as OakChest, by clicking in its leftmost column.
On the top of the screen, click Files to display the ribbon, and then click Check Out in the Open & Check Out group on the ribbon.
The document has been checked out. The file icon has changed and shows a green, downward-pointing arrow, indicating that the document is now checked out. No one else can change this document and no one else can see your changes while you have it checked out.
You will now check in the document.
In the browser window, select the OakChest document by clicking its leftmost column.
On the Files ribbon, click Check In in the Open & Check Out group.
In the Check In dialog that appears, in the Comments box, type This is the final version of the document.
Click OK to check in the document and to return to the Furniture document library. The document has been checked in, and its icon no longer shows a green arrow.


Working with version history
When versioning is enabled, SharePoint Foundation 2010 creates a separate copy of the document each time it is edited. Although this takes up extra space on the server, it also makes it easy to revert to an older version of the document if necessary.
You can keep major versions only, or major and minor versions. Major versions are whole numbers such as 1, 2, 3, and so on. Minor versions are decimals such as 1.1, 1.2, 1.3, and so on. A major version number is associated with a version that has been published. A minor version number is associated with a version that is in progress but is not yet published.
Note
SEE ALSO A more in-depth discussion of versioning is covered in Chapter 6.
When you view a document’s version history, you see a list of the occasions when this document was edited and saved, as well as the author’s comments on those changes.
In the following exercise, you will see the changes that have been made to the OakChest.docx document, and then revert to the final copy of the document.
Set Up
Open the SharePoint site where you’d like to see the version history of a document, if it is not already open. If prompted, type your user name and password, and then click OK.
Important
Verify that you have sufficient permissions to check out, modify, and check in a document in the document library. If in doubt, see Appendix A.
On the Quick Launch, click Furniture to open the Furniture document library, if it is not already open.
Select a document that you would like to see the version history for, such as OakChest, by clicking in its leftmost column.
On the Files ribbon, click Version History in the Manage group to display the Version History dialog that lists the versions saved for the OakChest.docx file. Each version of the saved document, the date and time that version was created, and any comments for the version appear.
Note
TROUBLESHOOTING If the Version History button on the ribbon is dimmed, it means that the versioning is disabled for this document library. To enable versioning, on the Library ribbon, click Library Settings, and then on the Settings page, under General Settings, select Versioning settings. On the Versioning Settings page, in the Document Version History, select Create major versions, and then click OK. To continue with this exercise, go back to the Furniture library, check out the OakChest document, and then check it in to create a second version.
You will now restore an earlier version of the document. Move the mouse over the time stamp that identifies the earlier version of the document, and then click the arrow that appears to the right of the timestamp. On the menu that appears, click Restore.
The dialog box that appears indicates that you are about to replace the current version with the selected version. Click OK.
Note that there is a new version shown in the Version History dialog, which is a copy of an earlier version that you restored. If major versioning is enabled, then this is the latest version that is published on the site. Close the Version History dialog to return to the library page.
Tip
If minor versioning is enabled, then there is now an additional, unpublished version. SharePoint 2013 actually copies the version that you want to restore and makes it the newest minor version. If you want to publish this version, you need to do so manually using the Publish button on the ribbon.


Creating a new folder in a library or a list
Using folders provides a common way to organize documents in an efficient way. With SharePoint 2013, you can create folders in libraries and lists.
Tip
SharePoint 2013 provides other mechanisms for the organization of your documents, including views and filters. However, people are often most familiar with folders, and thus find it easier to create a folder structure.
In this exercise, you will create a folder in the Furniture library for documents classified as In Progress so that they can be differentiated from completed documents.
Set Up
Open the SharePoint site that you’d like to use to add a folder to a document library, if it is not already open. If prompted, type your user name and password, and then click OK.
Important
Verify that you have sufficient permissions to create a folder in the document library. If in doubt, see Appendix A.
On the Quick Launch, click Furniture to open the Furniture document library, if it is not already open.
On the Files ribbon, click New Folder in the New group to display the Create a new folder dialog.
In the Name box, type the name of the folder you would like to create, such as In Progress.
Click Save. The In Progress folder has been created and is shown on the Furniture library page.


Adding, editing, and removing list and library columns
The list and library apps provided by SharePoint 2013 offer an easy way to generate a list or a library with very little effort. However, should you need to customize the lists and libraries views, with SharePoint 2013, you can add, edit, and remove existing list and library columns, as well as create additional columns using the Settings page for this list or library. In addition, for a list, you can add columns without leaving the list page.
There are many types of columns that can be added to the list or a library, including a single line of text, currency, the date and time, a Yes/No check box, a drop-down list of options, and others. You can remove a column from being displayed in a list or a library view, and most columns in the list or the library can be deleted. However, all lists have at least one column that cannot be deleted. For instance, the Title column can be renamed but not deleted. Certain lists also prevent the deletion of columns so that the list can display properly or integrate with Microsoft Office applications properly. For example, the Assigned To, Status, and Category columns of any list based on the Issues list app cannot be deleted, and all of the default columns in any list based on the Calendar list app cannot be deleted.
There are also columns that are automatically created and populated for each list item or document in a library that cannot be changed: ID, Created, Created By, Modified, and Modified By. The ID column ensures that the list item is unique in the list. It contains a sequential number beginning with 1 and increments by 1 for each new list item. SharePoint automatically captures when the list item was Created, who it was Created By, when it was last Modified, and who it was last Modified By. Initially, the Created and Modified columns are equal, as are the Created By and Modified By columns.
In the following exercise, you will use inline editing to create a column called Sequence of type Number in the Common Buyer Tasks list, which will be used to order tasks. You will then modify the default list view by adding, removing, and rearranging the existing columns.
Set Up
Open the SharePoint site where you would like to modify a list, if it is not already open. The exercise will use the http://wideworldimporters site, but you can use whatever site you wish. If prompted, type your user name and password, and then click OK.
Important
Verify that you have sufficient permissions to modify columns in this list. If in doubt, see Appendix A.
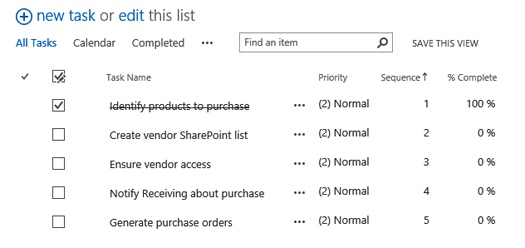
On the Quick Launch, click Common Buyer Tasks to display the Common Buyer Tasks list in its default All Tasks view. On top of the list, click edit to switch to the datasheet view and display the list in a grid.
In the list header row, on top of the rightmost empty column, click the plus sign (+), and then select Number from the menu of column types that appears.
The new column has been created. It is named Number after its type, and the name is displayed highlighted and boxed, showing that you can rename the column. Position your cursor within the box and type Sequence to rename the column.
Fill in the new Sequence column with numbers from 1 to 5 to identify the preferred order of tasks in the list, as shown in the following table:
Title
Sequence
Create SharePoint list
2
Ensure vendor access
3
Identify products to purchase
1
Generate purchase orders
5
Notify Receiving about purchase
4
You may want to alter the tasks’ Due Dates to any dates of your choosing to reflect the new order of tasks. Note that the new dates are immediately plotted on the timeline.
On the top of the list, at the right side of the line that displays links to the views and begins with All Tasks, click the ellipsis, and then select Modify this View from the menu that appears.
On the Settings - Edit View page, in the Columns section, explore the list of columns that are available for the list. Then, in the Display column, clear the check boxes for the Assigned To column and the Due Date column to remove them from the default list view. Select the %Complete column to display it in the default list view.
Scroll down to select the Priority column, and then change Position from Left to 3 so that it is displayed immediately to the left of the Task Name column in the list view page.
Scroll to the top or to the bottom of the page, and then click OK to confirm your changes and return to the list page. Validate that the list page in default view is set up in the way that you expected.


You will now work with the library columns. In the following exercise, you will change the default view for the Furniture library. You will add the Version column to display the document version and remove the Modified By column.
Set Up
Open the SharePoint site where you would like to modify a library view, if it is not already open. The exercise will use the http://wideworldimporters site, but you can use whatever site you wish. If prompted, type your user name and password, and then click OK.
Important
Verify that you have sufficient permissions to modify columns in this list. If in doubt, see Appendix A.
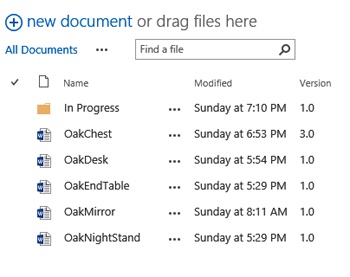
On the Quick Launch, click Furniture to display the Furniture document library in its default All Documents view.
On the top of the file list, to the right side of All Documents, click the ellipsis and select Modify this View from the menu that appears.
On the Settings - Edit View page, in the Columns section, explore the columns that are available for the document library and note that they are different from the columns available for a list that you explored in the previous exercise. Then, in the Display column, clear the check box for the Modified By column to remove it from the default library view, and then select the Version column to display it in the default list view.
Scroll to the top or to the bottom of the page, and then click OK to confirm your changes and return to the library page. Validate that the list page in default view is set up in the way that you expected.

Sorting and filtering a list or a library
As a list or a library grows, it eventually becomes difficult to see the entire list or the entire library on a single page. To this end, SharePoint provides built-in sorting and filtering capabilities. On any standard list and library view page, individual column headers can be used to alphabetically sort the entire list by ascending or descending order.
Filtering the list and library pages works similarly to the way that an Excel AutoFilter works. Filtering is enabled on the top-right corner of every column, and a unique list of the values for each column is generated and presented as a drop-down list above that column. Filters are cumulative but temporal; the next time a list view is chosen, its settings, including filters, will be applied to the list regardless of what was previously chosen for a given column.
Tip
In datasheet view, sorting and filtering are available from the drop-down arrow, which is also located in the top-right corner of every column.
SharePoint allows you to save the view that you have created by sorting and filtering a list or a library so that you can keep the sorting orders and filters, and come back to it again.
In this exercise, you will first sort and filter the Common Buyer Tasks list, and then sort the documents in the Furniture library in ascending order.
Set Up
Open the SharePoint site where you would like to sort and filter the list and the library, if it is not already open. The exercise will use the http://wideworldimporters site, but you can use whatever site you wish. If prompted, type your user name and password, and then click OK.
Important
Verify that you have sufficient permissions to sort and filter lists and libraries. If in doubt, see Appendix A.
On the Quick Launch, click Common Buyer Tasks to display the Common Buyer Tasks page.
On the list page, click the Sequence column heading. The list items are displayed in ascending numerical order sorted by this column, and a thin up arrow icon displays to the right of the column name, indicating that the list is sorted by this column in ascending order. Note the Save This View option that appears in the top right of the list.
Click the Sequence column heading again. The list items are displayed in descending order, and a thin down arrow icon displays to the right of the column name.
Next, click edit on the top of the list to switch to the datasheet view. Change Priority to (1) High for Ensure Vendor Access and Generate Purchase Order list items by clicking within the Priority column for each list item and selecting (1) High from the drop-down list. When you’ve completed the changes in the Priority column, click Stop on the top of the list to return to the default list view.
Hover over the Priority column heading and click the down arrow that appears on the right to show the sorting and filtering options for this column. On the menu that appears, click (1) High for Priority.
Click Close. The page redisplays the filtered list with only those list items that are set to a high priority.
Note the Filtered icon (displaying to the right of the Priority column) that has an applied AutoFilter.
To display a full list, hover over the Priority column heading one more time, click the down arrow at the right to display a menu, and then click the Clear Filters from Priority option.
You will now sort the documents in the Furniture library, first in the ascending order, and then in the descending order. On the Quick Launch, click Furniture to display the Furniture library page.
On the library page, click the Name column heading. The documents are displayed in ascending alphabetical order, and a thin up arrow icon displays to the right of the column name, indicating that the documents are in ascending order. Click the Name column, heading again to sort the documents in descending order. Note that the thin arrow is now pointing downward to identify a descending sort order.


Deleting and restoring list items and documents
When documents, list items, folders, or even entire lists are deleted, they are simply flagged as removed so that they no longer appear in the site from which they were deleted. By default, sites in a SharePoint web application are configured to display the deleted item in the site’s Recycle Bin for 30 days. The Recycle Bin provides a safety net when deleting documents, document sets, list items, lists, folders, and files. If the user hasn’t restored the deleted item within that time, it is permanently expunged from the database. If the user empties his Recycle Bin before the 30 days have elapsed, the deleted item is still available to a site collection administrator from the site collection’s Recycle Bin. However, the total size of the deleted items must remain below a given percentage (50%, by default) of the total size that a site is allowed to consume (the site quota). If a deleted item exceeds the configured size allowed by the SharePoint central administrator for sites in the web application, the items that were deleted first are purged, even if 30 days have not elapsed, to make room for the newly deleted item. In this way, SharePoint administrators can make disaster recovery plans based on the allowable total maximum size of the Recycle Bin. Of course, a SharePoint administrator can set the number of days that a Recycle Bin retains deleted items, ranging from the default 30 days to some other specific number of days, as well as to Never retain deleted items or to Never remove deleted items.
Todd suggests that creating the vendor SharePoint list is only done when a new vendor is established, rather than at each buying cycle. He therefore wants the task removed. He also wants to remove the OakChest document from the Furniture library. In the next part of the exercise, you will delete the Create Vendor SharePoint list task from the Common Buyer Tasks list, and the OakChest document from the Furniture library.
Set Up
If it is not already open, open the SharePoint site where you would like to delete an item from the list and a document from a library. The exercise will use the http://wideworldimporters site, but you can use whatever site you wish. If prompted, type your user name and password, and then click OK.
Important
Verify that you have sufficient permissions to delete list items and documents. If in doubt, see Appendix A.
On the Quick Launch, click Furniture to display the Furniture library, if it is not already displayed.
Click the ellipsis to the right of the document that you’d like to delete, such as OakChest, to display the document callout, and then click the ellipsis in the bottom-left corner of the callout to display the menu.
Click Delete in the callout menu. In the dialog that asks whether you are sure you want to send the item to the site’s Recycle Bin, click OK. The document is removed from the library and placed into the site Recycle Bin.
On the Quick Launch, click the Common Buyer Tasks list.
Click the ellipsis to the right of the list item that you’d like to delete, such as Create Vendor SharePoint list, to display the list item callout, and then click the ellipsis in the bottom-left corner of the callout to display the menu.
Click Delete on the callout menu, and then click OK to confirm the deletion.
Todd realizes that deleting the Create Vendor SharePoint List task and the OakChest document was a mistake. He visits the site Recycle Bin and restores the data.
On the Quick Lunch, click Site Contents, and then on the top right of the Site Contents page, click Recycle Bin to display the site Recycle Bin page.
Select the Create vendor SharePoint list item and the OakChest document by clicking the check boxes to their left.
On the top left of the list of deleted items, click Restore Selection to restore the selected items, and then click OK to confirm.
Using the Quick Launch, go to the Common Buyer Tasks list, and then go to the Furniture library to validate that the list item and the document have been restored to their respective original locations.


Setting up alerts
SharePoint 2013 includes a handy feature that sends an email notification or a text message whenever changes are made to the content in a site, including changes made to list items in a list. The setup for this notification is called an alert. You can set up an alert for a list, a library, a folder, a file, or a list item. No alerts are set up automatically, so you must sign up for the alerts that you want. Alerts can be set up for different types of changes, so that you can learn about the changes that you are most interested in.
Alerts are quite easy to set up. Every list and library in a SharePoint 2013 site displays an Alert Me button in the Share & Track group on the ribbon. By clicking this option on a List or a Library ribbon, you can subscribe to an alert on a list or a library level. When you select an item in the list or a document in a library, the Alert Me button on the Items or Files ribbons, respectively, allows you to subscribe to the item-level or document-level alert. Alternatively, for a list item, you can select an Alert Me option in the callout.
Tip
For email alerts to be available, the SharePoint central administrator must configure the outgoing email settings for your server. Similarly, for the text alerts to be available, the SharePoint Farm administrator must configure the SMS/MMS service settings. Both settings can be configured in SharePoint Central Administration. If these settings are not configured, the Alert Me button on the ribbon and the Alert Me option in the callout menu will not be available.
Alerts specify to whom the alert will be sent, the kind of changes for which the alert will be sent, and the frequency. By default, the alert is sent to the email address of the user setting up the alert. If no email address has been established for the authenticated user, an email prompt is generated in the Send Alerts To area. Once provided, the address will be remembered for subsequent subscriptions.
When setting up alerts, you have a choice as to the type of change for which you want an alert to be initiated. For example, list-level alerts offer subscriptions when All Changes to Any List Item are made or, alternatively, when New Items Are Added Only, Existing Items Are Modified Only, or Items Are Deleted Only. If you wish to see added and changed items, but not deleted items, you need to set up two alerts. List item–level alerts, on the other hand, are only fired when that item changes, because you can only set up this alert once the list item already exists, and a deletion is considered a change to the list item.
You must specify when to send alerts; the default is when anything changes. Different lists and libraries have different options available. For example, a document library has the following options:
Anything changes
Someone else changes a document
Someone else changes a document created by me
Someone else changes a document last modified by me
You must also specify the alert frequency. The following three choices exist for any type of alert:
Send email immediately
Send a daily summary
Send a weekly summary
Choosing to receive an alert immediately actually queues the notice to be sent as soon as the next job runs once the alert is triggered. By default, the alert job runs every 5 minutes, but it could be configured by your administrator to wait as long as 59 minutes. The daily and weekly summaries store all changes made to the list or list item, and send a summary at the end of the period chosen. By default, daily summary alerts are generated at midnight each night, and weekly summary alerts are generated at midnight every Sunday night.
In this exercise, you will set up an alert for an item in the Common Buyer Tasks list.
Important
Your server has to be configured to send email messages; otherwise, you will not be able complete the steps in this exercise.
Set Up
Open the SharePoint site where you would like to set up an alert, if it is not already open. The exercise will use the http://wideworldimporters site, but you can use whatever site you wish. If prompted, type your user name and password, and then click OK.
Important
Verify that you have sufficient permissions to set up alerts. If in doubt, see Appendix A.
On the Quick Launch, click Common Buyer Tasks to display the Common Buyer Tasks list page, if it is not already displayed.
Select the Generate purchase orders task by clicking its leftmost column. Then click Tasks to display the ribbon, click the Alert Me button in the Share & Track group, and then select Set alert on this item from the drop-down list.
Alternatively, click the ellipsis to the right of the list item you’d like to set an alert for, then click the ellipsis in the bottom-left corner of the callout that appears, and then select the Alert Me option from the callout menu.
In the New Alert dialog, scroll down to explore the options available. Leave the default options unchanged, and then click OK.
The email alert has been set. You will now modify the list item to trigger an alert.
On the top of the list, click edit to switch to the datasheet view, and then change the Priority for the Generate purchase orders task to (2) Normal. Then, on the top of the list, click Stop editing to switch back to the list default view.
Open your email application, such as Outlook 2013, and verify that you have received an email alert notifying you of a change in priority in this list item.

Following documents
SharePoint 2013 includes the ability to follow documents to track their updates in your newsfeed. Whereas setting an alert for document changes keeps you notified of specific changes on a predefined frequency via email or SMS, following a document adds a link to this document in your newsfeed and provides notifications of all document changes via your newsfeed. In addition, people who are following you will get a newsfeed notification that you’re following this document, provided that they have appropriate permissions to access it. All documents that you follow are shown in one place in your newsfeed, in the list of followed documents.
In the following exercise, you will set a follow-up for the OakDesk document.
Set Up
Open the SharePoint site where you would like to follow up a document. The exercise will use the http://wideworldimporters site, but you can use whatever site you wish. If prompted, type your user name and password, and then click OK.
Important
Verify that you have sufficient permissions to view the document that you’d like to follow. If in doubt, see Appendix A.
On the Quick Launch, click Furniture to display the Furniture library page.
Click the ellipsis to the right of the document, and then click Follow in the callout.
On the right side of the Newsfeed page, under I’m following, click the number of documents to open your list of followed documents. Verify that the OakDesk document is listed under Docs I’m following.

Working offline
For mobile users, it’s not always possible or convenient to connect to SharePoint every time they want to read or modify documents. SharePoint 2013 provides the ability to work with your documents offline. You can synchronize, or sync, a SharePoint library to your computer. This process creates a copy of the library on your computer in the SharePoint Libraries folder, under the name that combines the name of the source SharePoint site with the name of the source library, with a hyphen in between; for example, Team Site-Documents. You can modify the location to one of your choosing. You can then work with files in the library by using File Explorer. When working offline, you can view and modify the content in the same way that you do when working in SharePoint. Updates to the files synchronize back to SharePoint when you are back online. For example, if you create a new document in a library folder on your computer, it will be synced back into the source library when you are online.
Tip
There are limits on the number and the size of files that you can sync. You can sync up to 5,000 items in a SharePoint library, including folders and files. You can download files up to 2 GB.
Important
To use sync, you must have Microsoft Office 2013 installed on your computer, or an Office 365 subscription that includes Office applications.
In the following exercise, you will sync a Furniture library to your computer.
Set Up
Open the SharePoint site from where you would like to sync a library to your computer. The exercise will use the http://wideworldimporters site, but you can use whatever site you wish. If prompted, type your user name and password, and then click OK.
Important
Verify that you have sufficient permissions to sync the library. If in doubt, see Appendix A.
On the Quick Launch, click Furniture to display the Furniture library page.
Click SYNC in the top-right corner of the page.
In the dialog that appears, note that you can change the default location for the copy of the library on your computer. Leave it as default and click Sync Now to start synchronizing the library.
In the confirmation dialog, click Show my files to open your synced library folder in Files Explorer. The synced library folder is located in the SharePoint Libraries folder and is named Team Site-Furniture.

Key points
Lists are like editable, web-based tables.
Libraries provide a central location to store and share documents, forms, and pictures.
List and library apps can be used to generate a new list or a new library with a specific set of features. SharePoint 2013 provides 20 list apps and 10 library apps.
There are many ways to add existing documents to a document library, including via the browser or File Explorer, or using sync. You can drag files from your computer into the SharePoint library.
Remember to check out a document before you edit it.
You can use versioning to manage the history of your documents in SharePoint.
You can create folders to organize content in list and libraries.
With SharePoint 2013, you can add, edit, and delete the columns in any list or library.
Column headings can be used to sort and filter lists and libraries.
Deleted documents and list items can be restored from the site Recycle Bin to their original locations.
You can set up an alert for a list, a library, a folder, a file, or a list item for notification via email or SMS about any changes. You can follow documents via your newsfeed.
You can take documents in a SharePoint library offline by using sync.