
Chapter 2. Navigating a SharePoint Site
Chapter at a glance
Navigate
Navigate the site components, Navigating the home page and the SharePoint site

Understand
Understand the site structure, Understanding the site structure
Customize
Customize site navigation, Customizing the site navigation
Use
Use the two-stage Recycle Bin, Using the Recycle Bin

IN THIS CHAPTER, YOU WILL LEARN HOW TO
A typical Microsoft SharePoint 2013 collaboration website provides you with a structured environment where your team can communicate, share documents and data, and work together. Different types of SharePoint collaboration sites have different structures, such as a team site, a project site, a community site, and a blog site.
In addition to collaboration sites, SharePoint Server 2013 includes templates for enterprise sites that provide set up for content and record management, search, and business intelligence centers.
Note
SEE ALSO For more information about SharePoint sites, refer to Chapter 5.
The team site may include the following components:
Libraries Document, picture, form, and wiki libraries represent a collection of files that you share and work on with your team members. A typical team site includes a built-in document library called Documents that is displayed on the team site home page. You can create your own document, picture, wiki, and form libraries when needed.
Lists With SharePoint lists, you and your team members can work with structured, tabular data on the website. A typical team site includes several list apps that you can add to your site, such as Announcements, Calendar, Links, and Tasks. You can also create custom lists using the Custom list app. In addition, there are other list apps provided by SharePoint that you can add to your site, if required.
Newsfeed A site newsfeed is a site’s communication hub. It displays posts and replies among the users of the site. You and your team members can post comments and reply to each others’ posts. The site newsfeed, or a site feed, is displayed on the team site home page by default.
Surveys Surveys provide a way of polling team members. SharePoint sites don’t have a built-in survey, but you can create your own.
Recycle Bin The Recycle Bin allows you to restore items that have been deleted from the site.
The functionality of a site component is encapsulated in an app. Apps for SharePoint provide self-contained pieces of functionality. For example, a library is implemented as a library app that you can add to your site. Each list is implemented using a list-specific app; for example, a Task list is implemented using a Task app, a newsfeed is implemented via a MicroFeed app, and a survey that you can create on your site is implemented using a Survey app. In addition, you can download apps for SharePoint that extend the SharePoint functionality from your organization’s internal App Catalog and from a public SharePoint Store.
Note
SEE ALSO For more information about SharePoint 2013 apps, refer to msdn.microsoft.com/en-us/library/fp179930.aspx.
In this chapter, you will learn how to navigate the SharePoint team site structure. You will start with the home page of a typical SharePoint team site and then learn how to browse the site components, as well as your own personal SharePoint social components. You will learn how to customize site navigation and how to navigate the ribbon, as well as understand the concepts of Web Part pages. You will also learn how to use the two-stage Recycle Bin and how to restore files and documents after they have been deleted from your site.
Note
PRACTICE FILES Before you can use the practice site with the two subsites provided for this chapter, you need to download and install the Chapter02 practice files from the book’s website, and then create the practice site structure for this chapter. See Using the practice files at the beginning of the book for more information.
Important
Remember to use your SharePoint site location in place of http://wideworldimporters in the exercises.
Navigating the home page and the SharePoint site
A home page is the main page of a SharePoint website; it provides a navigational structure that links the site components together. Typically, a home page of a SharePoint site has two main navigation areas: the left navigation area, which is a panel at the left of the page, and the top navigation area, which is a strip at the top of the page. Cumulatively, these areas are referred to as the site navigation.

The left navigation panel typically contains a set of Quick Launch links. Typically, the Quick Launch contains the following links:
Home The Home link points to the home page of the current site.
Documents The Documents link opens a built-in Documents library.
Recent When a new list or a library is created, its link is displayed in the Recent section on the Quick Launch. Five of the newest links are shown in this section.
Site Contents The Site Contents link opens the Site Contents page that lists all of the libraries, lists, newsfeeds, surveys, and other apps on your site. The Site Contents page also provides links to the subsites, as well as the site’s Recycle Bin.
The Quick Launch can also contain links to the subsites of the current site and also the site components created by you and your team members, such as specific document libraries or lists.
The top navigation area contains the top link bar located above the page title. It consists of the tabs displayed on all pages within the SharePoint site. The top link bar typically includes the following links:
Current Site Title This is the link to the home page of the current site. It is usually displayed on the first tab on the left.
Links To The Subsites On a well-organized site, the top link bar contains tabs with links to the subsites of the current site, such as the Travel link and the Facilities link on the second tab and the third tabs, respectively, in our example.
Important
If a subsite is configured to use the top link bar of the parent site, then the first tab link on the subsite points to the home page of the parent site.
On the top right of the page, to the left of the Help button, you can see the Settings gear icon. Clicking this button opens the Settings menu, which enables you to edit the current page, add a new page or an app, share the site, access the Site Contents page, change the settings for your site, and view the Getting Started links. The options displayed in the Settings menu depend on the permissions that you have on the site: only options applicable to you are displayed.

The Site contents link in the Settings menu is identical to the Site Contents link on the Quick Launch. This link takes you to the Site Contents page, which lists all of the libraries, lists, and other apps on your site, as well as the child sites, if there are any. It also has the link to the site’s Recycle Bin. The Site Contents page contains links to all major parts of the site’s structure and is your main navigational aid for the site you are in.

The Site settings link on the Settings menu opens the Site Settings page that enables you to administer and customize your site.

In addition to the site navigation, the home page of a typical SharePoint team site includes the Getting Started area with graphical links, the site newsfeed, and also a view of the Documents library that is presented within its own page component called a Web Part, which allows you to work with the documents in this library without leaving the home page. On the top-right side of the page, there is a Search box that allows you to search the current site.
The bar at the very top of the page is referred to as a global navigation bar. On its right, it contains links to your personal SharePoint social components, such as Newsfeed and SkyDrive, as well as Sites. While the site components are stored within the site that they are a part of and shared between the site’s users, your personal components are dedicated to you and stored centrally in a secure, password-protected location in the cloud or on your organization’s SharePoint servers. Links to your Newsfeed, SkyDrive, and Sites accompany you across all SharePoint sites that you have access to.
Newsfeed is your own social hub, where updates from people, posts, documents, and sites that you are following are displayed, as well as the system alerts. Your posts to the site newsfeeds are also displayed, and you can post to a site newsfeed from your own newsfeed.
SkyDrive is your own personal library, where you can store your private work documents. SkyDrive allows you to share your private files with your coworkers and give them permission to review or edit the content. You can also sync your work files to your local device to work on the documents offline. In addition, your SkyDrive displays the links to the documents that you are following.
Sites is a link that gives you easy access to the sites you are interested in. All the sites that you are following are listed on your Sites page.
Underneath the global navigation bar, on the right of the screen, there is a group of buttons that have the following functionality:
Share The Share button allows you to share this site with other users and assign them permissions for accessing this site.
Follow The Follow button allows you to follow this site and be notified of changes.
Sync The Sync button allows you to synchronize the Documents library—displayed in the bottom right of the page—with your local device, such as a PC, tablet, or phone, for working offline.
Edit The Edit button allows you to edit the current page.
Focus on Content The Focus on Content button hides site navigation so that the page content is displayed in full-page view.
In this exercise, you will navigate both your site’s components and your own personal components. First, you will go to the Site Contents page and explore your site’s components. You will then use the global navigation bar to go to your personal components, such as Newsfeed, SkyDrive, and Sites.
Set Up
Open your SharePoint site (this exercise uses http://wideworldimporters, but you can use any site that you wish). If prompted, type your user name and password, and then click OK.
On the Quick Launch, click Site Contents.
Explore the page. Notice that the top link bar and the Quick Launch have not changed.
Scroll down to the bottom of the page and notice all parts of the site that are listed on the Site Contents page, including the apps for libraries and lists, the subsites, and the Recycle Bin.
Click the Team Announcements app to go to the Team Announcements list.
On the Team Announcements page, on the top link bar, click Travel to go to the Travel site home page.
In the site Newsfeed located at the bottom of the page, type Hi Everyone!.
Click the Post button to post to the site newsfeed. Notice that your post has appeared in the site newsfeed, below the text box.
In the global navigation bar on the top of the page, click Newsfeed to open your own personal newsfeed.
Enter your credentials, if prompted.
Explore your Newsfeed page. In the text box at the top of the page, type Hello World!.
Click the Post button to post to your newsfeed. Notice that your post has appeared in the newsfeed, below the text box.
Click the browser’s Back button, located in the top-left corner of the browser window, to return to the Travel home page.
Type the address of your team site in the browser address bar, such as http://wideworldimporters, to return to your site home page.
On the global navigation bar on the top of the page, click Newsfeed. Verify that this is the same page as the Newsfeed that you were taken to from the Travel site.
Click the browser’s Back button to return to the site’s home page.
On the global navigation bar, click SkyDrive to open your own personal library.
Explore your library, and then click the browser’s Back button to return to the site’s home page.
On the site home page, click the Follow button to follow this site. The confirmation that you follow this site is displayed.
On the global navigation bar, click Sites to open your Sites page.
Explore the page. Notice that your team site is now listed as the site you are following. Click the browser’s Back button to return to your team site’s home page.


Understanding the site structure
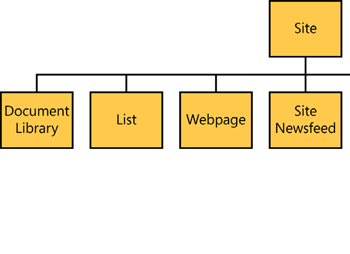
A typical SharePoint site contains the following components: webpages, document libraries, lists, newsfeed, and other apps. These items are created and maintained by SharePoint and are linked together within the site structure. In a graphical form, this site structure can be represented as a tree-like diagram.

In addition to its own components, such as pages and document libraries, a SharePoint site can have many subsites, the hierarchy of which, on web servers, resembles the hierarchy of folders on file systems. Sites that do not have a parent site are referred to as top level sites. Top level sites can have multiple subsites, and these subsites can have multiple subsites, proceeding downward as many levels as you need. The entire hierarchical structure of a top level site and all of its subsites is called a site collection.

Because the subsites are contained within their parent’s site, the overall hierarchical structure of a SharePoint site has the site’s own items—such as pages, document libraries, lists, and other apps—as well as the child sites. This overall structure can be represented as a site contents tree.

Set Up
Open the SharePoint site in which you’d like to view the subsites (for example, http://wideworldimporters), if it is not already open. If prompted, type your user name and password, and then click OK.
Important
Verify that you have sufficient permissions to view the subsites. If in doubt, see Appendix A.
On the Quick Launch, click Site Contents.
On the Site Contents page, scroll down to see a list of subsites.
Click the link to the Travel subsite.
On the Travel subsite home page, notice that the top link bar is different from the top link bar of the parent site. The first left tab points to this subsite home page. This subsite is independent and there is no link to the parent site.
Click the browser’s Back button to return to the parent site home page.
On the top link bar of the parent site, click the link to the Facilities subsite.
On the Facilities subsite home page, notice that the top link bar is the same as the top link bar on the parent site. The first left tab points to the parent site home page. This subsite is set up to inherit the top link bar from the parent site.
Click the first link on the left, Team Site, to return to the parent site home page.

Note
SEE ALSO For more information on setting up navigation between the site and its subsites, refer to Chapter 5.
Customizing the site navigation
In a SharePoint site, you can customize both the top and left navigation areas. There are many options available for navigation customization. You can add new links, edit and reposition existing links, and delete those links that you no longer require in both the top link bar and the Quick Launch by using the in-page editing functionality. You can also drag and drop items from the Site Contents page to create new links. In addition, you can group and sort the links and do more advanced customization using the Site Settings.
In the following exercise, you will use an in-page editing functionality to customize the top link bar and the Quick Launch. You will add a link to the parent SharePoint site to the top link bar, change the position of this link, and then rename a link on the Quick Launch.
Set Up
Open your SharePoint site from the address bar of your browser (for example, http://wideworldimporters/travel). If prompted, type your user name and password, and then click OK.
Important
Verify that you have sufficient permissions to change the site navigation. If in doubt, see Appendix A.
On the Travel site home page, at the right of the top link bar, click EDIT LINKS.
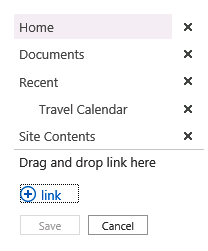
Notice that the layout of the top link bar area has changed. It now displays additional controls that allow you to add and delete links.
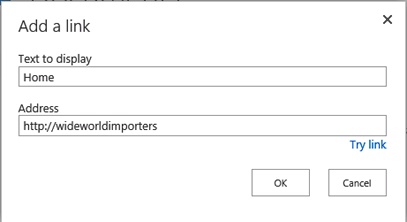
Click link to add a new link to the top link bar. The Add a link dialog appears.
In the Text to display field, type a display text for the new link, such as Home. In the Address field, type the URL of the parent site, such as http://wideworldimporters.
Click OK to add the new link to the top link bar. The new link is added to the right of the existing links.
Drag the new link to the left, so that it is positioned before the Travel link.
Click Save to save your changes and display the modified top link bar on the Travel site home page.
You will now rename the Home link on the Quick Launch that points to the Travel site home page so that this link is not confused with the link to the parent site home page in the top link bar that you created in steps 1–6.
On the left navigation panel, below the Quick Launch, click EDIT LINKS. Notice that the layout of the left navigation panel has changed. It now displays additional controls that allow you to add and delete links on the Quick Launch.
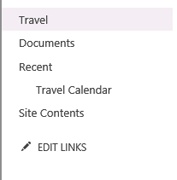
To rename this link, type Travel. After you’ve finished typing, click outside the link.
Click Save to save your changes and display the modified Quick Launch on the Travel site home page.

In the following exercise, you will drag and drop an app from the Site Contents page to the navigation to add a link to it.
Set Up
Open the SharePoint site where you’d like to customize navigation (for example, http://wideworldimporters/travel), if not already open. If prompted, type your user name and password, and then click OK.
Important
Verify that you have sufficient permissions to edit the site navigation. If in doubt, see Appendix A.
On the Quick Launch, click Site Contents.
On the Site Contents page, locate the Travel Calendar.
Drag the Travel Calendar and drop it on the Quick Launch, above the Documents link, to create a permanent link to it on the Quick Launch.
You will now remove the temporary link to Travel Calendar from the Recent section. Click the x to the right of the Travel Calendar link under the Recent section to remove it.
Click Save to save your changes to the Quick Launch.
Click Travel on the Quick Launch to return to the Travel site home page.


For more advanced customization of site navigation, the Site Settings can be used to modify the top link bar and the Quick Launch. In this exercise, you will add a new section to the Quick Launch and rearrange the Quick Launch links using the Site Settings.
Set Up
Open the SharePoint site where you’d like to customize navigation (for example, http://wideworldimporters/travel), if not already open. If prompted, type your user name and password, and then click OK.
Important
Verify that you have sufficient permissions to edit the site navigation. If in doubt, see Appendix A.
On the Travel site home page, click Settings, and then select Site settings from the menu.
On the Site Settings page, in the Look and Feel section, click Quick launch. The Quick Launch page appears.
On the Quick Launch page, click New Heading. The New Heading page appears.
In the URL section, in the Type the Web text box, type #, and in the Type the description text box, type SharePoint Resources. Click OK to create a section heading on the Quick Launch.
Tip
If you’d like to create a heading on the Quick Launch that is a link, type its URL in the Web address text box.
Back on the Quick Launch page, notice that the new section heading has been created. You will now add a link to this section.
On the New Navigation Link page, in the URL section, type a web address for the new link, such as http://sharepoint.microsoft.com, and then type a description, such as SharePoint Products.
In the Heading section, select SharePoint Resources from the drop-down list.
Click OK to add the new link to the SharePoint Resources section on the Quick Launch. Notice that the new link has been added.
Click Travel on the Quick Launch to return to the Travel site home page.
To test the new link, click it to open the SharePoint Products home page at the Microsoft website. Explore the site, and then return to the Travel site home page using the browser Back button.


Important
You need Internet access to view a page at an external website, such as the Microsoft site.
Clean Up
Go to the parent site, and leave the browser open if you are continuing to the next exercise.
While Quick Launch represents the frequently needed links, it is sometimes useful to see the full structure of the site visually, in a graphical representation. In this exercise, you will modify the left navigation panel for the parent site to display the tree view of the site’s structure. You will then return to the original configuration and bring back the Quick Launch.
Set Up
Open the SharePoint site where you’d like to modify the left navigation panel (for example, http://wideworldimporters/), if not already open. If prompted, type your user name and password, and then click OK.
Important
Verify that you have sufficient permissions to edit the site navigation. If in doubt, see Appendix A.
On the Settings menu, select Site settings. The Site Settings page is displayed.
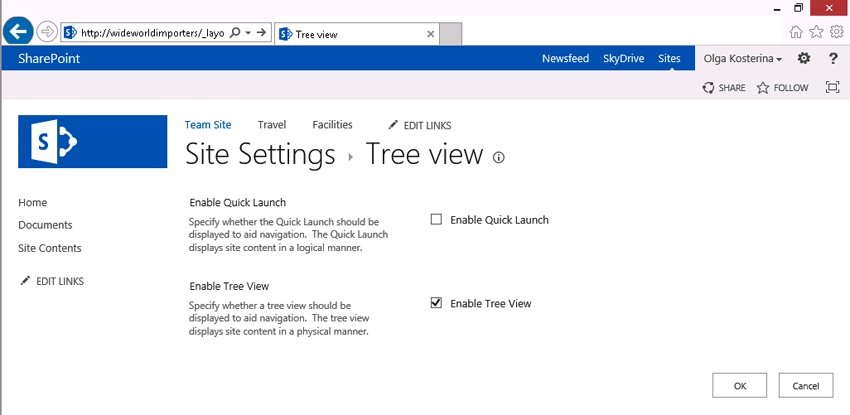
In the Look and Feel section, click Tree view.
On the Tree View page, clear the Enable Quick Launch check box and select the Enable Tree View check box. Click OK.
You are taken back to the Site Settings page.
Return to the current site’s home page by clicking its link on the top link bar.
The left navigation panel on the home page has changed. It now displays the Site Content panel, which shows the parts of the site, as well as subsites, in a tree view. In the Site Content panel, notice the difference in the icons that represent different parts of the site’s infrastructure, for example, the Travel and Facilities subsites, the Documents library, and the Team Announcements list.
You will now bring the left navigation panel back to its original configuration, in which it displays the Quick Launch and does not display the Site Content.
Using steps 1–4 of this exercise as a guide, on the Tree view page, enable the Quick Launch and disable the Tree View. Return to the site home page and verify that the left navigation panel displays the Quick Launch.

Navigating the ribbon
In SharePoint 2013, the ribbon provides a consistent interface for accessing the commands and tools that you require for the tasks that you want to accomplish, much like the ribbon in other Office applications, such as Microsoft Word and Microsoft Excel. In a SharePoint site, the ribbon appears across the top of a webpage and is designed to help you quickly locate the most commonly used commands and tools for performing actions on pages, documents, and lists.
Commands on the ribbon are organized in logical groups, displayed together under tabs that provide titles for each group of commands that form a ribbon. Each ribbon relates to a type of SharePoint site component that you are working with, such as a document library or a webpage. Tabs, groups, and commands on the ribbon are contextual: the ribbon commands available to you change depending on the context of what you are doing and where you are on the SharePoint site. The tabs are displayed at the top of a webpage on your site. To use the ribbon commands, you need to select the tab that corresponds to the kind of task you want to perform. The currently selected tab is highlighted. Each ribbon provides a specific set of commands, depending on the actions that you would like to perform.
The Browse tab, as the name suggests, allows you to browse the current page. It is selected when you open a page, providing you with the ability to view the page in the browser. The top link bar is displayed on the Browse tab. This tab does not have ribbon-based tools associated with it.
Depending on the page that you are viewing, other tabs become available. For example, the home page of the team site provides a Page tab that allows you to modify the page and its settings.
Commands on the ribbon are represented as buttons, drop-down lists, and other controls. To make it easier for you to locate the necessary command, they are grouped together by common functionality into several sections on the ribbon. The names of the groups are shown at the bottom of the ribbon. For example, on the Page tab, the Edit group contains commands that provide you with the ability to edit the page, whereas the Manage group contains commands that allow you to manage the page.
The number and types of commands that are available to you under each tab on the ribbon depend not only on the context of where you are and what you are doing, but also on your permission level and the configuration of your site. Some commands on the ribbon may be unavailable because you do not have sufficient permissions to use them, or because they have not been enabled for your site. In other cases, to enable a command, you may need to select an object. In a document library, for example, you must first select a document in the library to enable the ribbon commands for working with the document.
When the ribbon is displayed, the top links bar is not visible. On all pages with the ribbon, you can use the following navigation aids for moving to other pages within the site and the site collection:
In addition, on the pages with the ribbon where the left navigation panel is available, you can use Quick Launch, including the Site Contents link.
On a list page, SharePoint provides two ribbons: Items and List. The Items ribbon provides a set of commands for working with the individual list items. The List ribbon provides the commands for working with the list as a whole. Similarly, a library page provides two ribbons—Files and Library—for working with individual documents and configuring a library, respectively.
Note
SEE ALSO For more information on working with lists and documents, refer to Chapter 3. For more information on configuring lists and libraries, refer to Chapter 6.
In this exercise, you will browse to a Documents library, explore its ribbon, use the ribbon control to rename the document in the library, and then return to the home page.
Set Up
Open your SharePoint site, such as http://wideworldimporters, if not already open. If prompted, type your user name and password, and then click OK.
Important
Verify that you have sufficient permissions to edit the Documents library. If in doubt, see Appendix A.
On the top link bar, click Travel to open the Travel subsite.
On the Quick Launch, click Documents to open the Documents library.
On the top left of the screen, notice the Browse tab. To the right of the Browse tab, notice two additional tabs: Files and Library.
Click the Files tab to display the ribbon that contains the commands for working with documents.
Explore the ribbon and notice the ribbon groups, such as New, Open & Check Out, Manage, Share & Track, Copies, Workflow, and Tags & Notes. Notice that only the New group commands are available, while the others are dimmed out.
Select a document, such as WideWorldTravelGuidelines, by hovering your mouse over its name and clicking the tick mark that appears on the left of the name. Notice that the commands on the Files ribbon become available and are not dimmed out any longer.
To rename the selected document, in the Manage group on the ribbon, click the Edit Properties button.
On the Edit Properties page, in the Name field, change the name of the document to TravelGuidelines.
Click Save to save the changes and to go back to the Documents library.
Click the Library tab. The Library tab opens and displays the commands on the ribbon that allow you to configure the library.
Explore the ribbon and notice the ribbon groups, such as View Format, Manage Views, Share & Track, Tags & Notes, Connect & Export, Customize Library, and Settings.
On the Quick Launch, click Travel to return to the site home page.


Understanding app parts and Web Parts
A webpage on a SharePoint site can contain—in addition to text, images, and links—one or more Web Parts. A Web Part is an independent component that can be reused, shared, and personalized by all users who have permission to access it. Web Parts are the basic building blocks of a page; each Web Part occupies its own rectangular area within the page.
An app part is a type of Web Part that xposes the content of a SharePoint app, such as a list or a library in a Web Part. For example, the home page of a newly created team site contains a Web Part that displays the content of the Documents library app.
Webpages can contain several Web Parts that can be connected together if necessary. SharePoint provides built-in app parts for all lists and libraries on the current site that you can insert in a webpage. By using Web Parts, you can organize disparate information and consolidate data (such as lists and charts) and web content (such as text, links, and images) into a single webpage.
Note
SEE ALSO For more information on webpages, Web Parts, and app parts, refer to Chapter 4.
In this exercise, you will explore the Web Parts on the home page of the team site.
Set Up
Open your SharePoint site, such as http://wideworldimporters/travel, if not already open. If prompted, type your user name and password, and then click OK.
Important
Verify that you have sufficient permissions to edit the site home page. If in doubt, see Appendix A.
On the top left of the screen, click the Page tab.
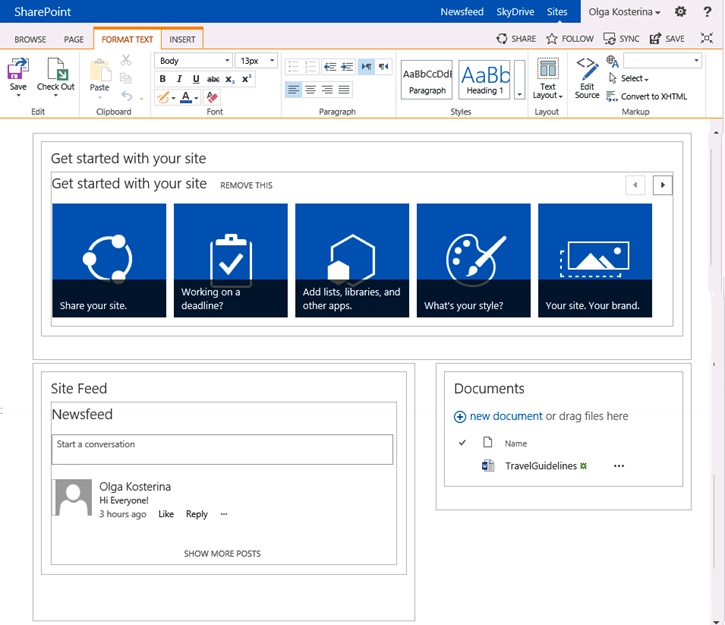
In the Edit group on the Page ribbon, click the Edit button. The Web Parts on the page are displayed within rectangular areas that show the position of each Web Part on the page. Click the Focus on Content button on the top right of the page to better see the page.
Notice that two additional ribbon tabs have appeared to the right of the Page tab: the Format Text tab, which is selected, and the Insert tab. The Format ribbon provides controls that allow you to change and format the text on the page, as well as its markup. The Insert ribbon provides controls to insert video, audio, graphics, and Web Parts into the page.
In the bottom right of the page, click in the Documents Web Part to select it. This Web Part provides access to the content of the Documents library directly on the home page. Notice the document that you modified in the previous exercise.
Notice that three additional ribbon tabs have appeared: the Files and the Library tabs that provide the ribbon commands for working with the library and individual documents that are displayed in this Web Part, and the Web Part tab that provides commands for working with the Web Part.
Click the Save button on the top right of the page to close the ribbon.
Click the Focus on Content button to redisplay the page navigation.
Using the Recycle Bin
The Recycle Bin in SharePoint provides two-stage protection against accidental deletions. When you delete a document or other item from the SharePoint site, it is deleted from the site and moved to the site Recycle Bin, where it can be restored, if needed. If you then delete this item from the site Recycle Bin, it is moved to the Recycle Bin in the site collection. From there, the document can be either restored to its original location or deleted.
Important
By default, the site Recycle Bin holds items for 30 days. Your SharePoint administrator can modify this setting.
Tip
A site owner can restore any content from the site Recycle Bin, whereas a site user will only be able to restore the content that has been deleted by that user.
In this exercise, you will delete and restore a document from the Recycle Bin.
Set Up
Open the SharePoint site in which you’d like to delete and restore the document, if not already open. This exercise uses the http://wideworldimporters/travel site, but you can open any site you want. If prompted, type your user name and password, and then click OK.
Important
Verify that you have permissions to delete and restore items on this site. If in doubt, see Appendix A.
On the Documents library page, select a document that you would like to remove by hovering your mouse over its name and selecting the tick mark that appears on the left of the name.
Click the Files tab to open the ribbon.
In the Manage group on the ribbon, click Delete Document, and then click OK in the confirmation message box when it appears.
The document has been deleted from the Documents library. You will now restore this document from the site Recycle Bin.
On the Quick Launch, click Site Contents.
On the top right of the Site Contents page, click Recycle Bin.
On the Recycle Bin page, select the document you have just deleted by clicking the check box to the left of its name. Then, to restore the document to its original location, click the Restore Selection option on the top of the page.
Click OK in the message box to confirm that you would like to restore this document.
The document has been restored.
Return to the Documents library by clicking Documents on the Quick Launch. Verify that the document has been restored.


If an item has been deleted accidentally from the site Recycle Bin, it can be restored from the Recycle Bin of the site collection. In this exercise, you will restore the document that has been removed from the site and its Recycle Bin.
Set Up
Open the SharePoint site in which a document to be deleted and restored is residing, if not already open. If prompted, type your user name and password, and then click OK.
Important
Verify that you have permissions to manage the top level site. If in doubt, see Appendix A.
Using steps 2–7 of the previous exercise as a guide, delete a document from the Documents library, and then go to the site Recycle Bin page.
On the Recycle Bin page, select the document by clicking the check box to the left of its name. Then, click Delete Selection on the top of the page.
Click OK in the confirmation message box when it appears. The document has been deleted from the site Recycle Bin.
On the top right of the page, click the Settings gear icon and select Site settings.
On the Site Settings page, at the bottom left, under the Site Collection Administration, click Go to top level site settings to display the Site Settings page for the top level site.
On the Site Settings page for the top level site, in the Site Collection Administration section, click Recycle Bin.
On the Site Settings - Recycle Bin page, in the left navigation area under Select a View, click Deleted from end user Recycle Bin.
Select the document you have just deleted by clicking the check box to the left of its name, and then clicking Restore Selection.
Click OK in the confirmation message box when it appears. The document has been restored to its original location.
Using the top link bar, go to the home page of the Travel subsite from which the document was removed, and verify that it has been restored and is displayed in the Documents Web Part.

Key points
The structure of a typical SharePoint 2013 team site includes the following components: libraries, lists, newsfeed, and a Recycle Bin. The SharePoint 2013 components are implemented as apps.
The Site Contents page displays all site components, such as libraries, lists, newsfeed, and other apps on your site. It also provides links to the child sites.
A home page of a SharePoint site has two main navigation areas at the top and left of the page, which are known collectively as the site navigation. The top navigation area contains the top link bar that provides navigation between the sites. The left navigation panel contains the set of Quick Launch links that provide navigation within the current site.
Site navigation can be customized to include the links of your choice. You can add and delete links in the site navigation using the in-page editing. You can also drag and drop items to create new links. More advanced customization can be done using the Site Settings.
A SharePoint site can have many subsites, the hierarchy of which, on web servers, resembles the hierarchy of folders on file systems. Sites that do not have a parent site are referred to as top level sites. Top level sites can have multiple subsites, and these subsites can have multiple subsites, proceeding downward as many levels as you need.
The SharePoint ribbon is contextual and is designed to help you quickly locate the commands for performing actions on pages and documents. Commands on the ribbon are organized in logical groups, with each group displayed together under a tab with the ribbon title. Each ribbon relates to a type of SharePoint site component that you are working with, such as a document library or a webpage.
The home page of a typical SharePoint site contains one or more Web Parts.
A Recycle Bin provides two-stage protection against accidental deletions.