
Chapter 11. Working with Workflows
Chapter at a glance
Configure
Configure a workflow, Configuring a workflow

Work with
Work with a workflow, Working with workflows

Manage
Manage workflows, Managing workflows

Manage with Outlook
Manage workflow tasks within Outlook 2013, Managing workflow tasks within Outlook 2013

IN THIS CHAPTER, YOU WILL LEARN HOW TO
The workflow technology included in Microsoft SharePoint Foundation 2013 and Microsoft SharePoint Server 2013 can help you automate new and existing business processes. In the past, creating a workflow was typically a task for developers. Most companies have many different types of workflows, and hiring a developer to create workflows can be time-consuming and expensive. SharePoint provides you with a number of built-in workflows that you can configure using the browser.
You can add SharePoint workflows to lists, libraries, and content types. You can also use site workflows; however, adding workflows to lists or libraries will probably still be the most popular type of SharePoint workflow.
In this chapter, you will learn the fundamentals of the workflow architecture and what workflows are provided by default when you install either SharePoint Foundation or SharePoint Server. You will learn how to create, delete, and modify workflows, and how to track the status of workflows that are currently running using the browser and within Microsoft Outlook 2013. You will also learn how to associate workflows with content types.
Important
Remember to use your SharePoint site location in place of http://wideworldimporters in the following exercises.
Note
PRACTICE FILES You don’t need any practice files to complete the exercises in this chapter. For more information about practice file requirements, see Using the practice files at the beginning of this book.
Automating business processes using SharePoint
Automating frequently run or time-consuming business processes helps you to make efficient use of your time and the time of people on your team. Also, with the introduction of SharePoint in an organization, the initial productivity boom can be transformed into a management burden as more content is added to the SharePoint installation and the amount of work that users will need to do to maintain the content on a day-to-day basis increases. SharePoint can help you with your old and new business processes.
In previous chapters, you were introduced to how SharePoint can help you complete your work with the use of the following:
RSS feeds, for finding information from a variety of sources on an ad-hoc basis
Alerts, for regular notifications of new, modified, or deleted content
Content approval, which along with versioning, helps you to manage content and who can see content that is classified as draft
However, none of these three methods helps you automate business processes beyond a one-step process. You could combine these methods, such as using content approval with alerts to provide a lightweight workflow that sends you emails when your team members change documents. However, such a solution can help solve only a small number of your business processes. You might want to route a document or a webpage to a number of people before publishing it.
SharePoint provides two other methods to help automate processes:
User-centric workflows Used to automate and track processes that require human intervention, such as notifying users when their action is required to move the process forward. Such processes could take days, weeks, or months to complete and may need to wait for an event or another process to complete.
Fully automated workflows, which developers know as event receivers Used to automate processes that require no human intervention, such as moving job applications from one document library to a series of other document libraries for some purpose.
Workflows and event receivers cannot automate a task unless time is taken to define exactly how the task should be automated, nor can they track the status of information stored on paper documents. They also cannot force users to perform a particular task. You must have a clear understanding of how the business process operates. If you do not understand how to complete a business process manually, you will not be able to describe the business process in sufficient detail to automate that process.
Therefore, some planning and startup tasks are needed to automate a process. You do not necessarily want to automate every little process in your organization. You want to automate processes that are predictable and those where the startup cost of creating a workflow and ensuring that your team is happy with the new process will be offset by the productivity improvement that the automated process will provide. You must also understand what SharePoint has to offer.
Understanding the built-in workflows of SharePoint
SharePoint provides a number of built-in workflows that you can configure using the browser. Additional workflows can be created using Microsoft SharePoint Designer 2013, Microsoft Visual Studio 2012, or Microsoft Visio 2013 in combination with SharePoint Designer 2013. Event receivers can be created only using Visual Studio 2012.
Tip
SharePoint Designer is a free product found at www.microsoft.com/en-us/download/search.aspx?q=sharepoint+designer+2013.
You can think of a workflow as a series of tasks that produce an outcome. In the same way that you base a new site, list, or library on a template, you can base a new workflow on a workflow template. These templates are implemented as features that can be activated or deactivated at the site or site collection level by using the browser or by using applications. A workflow template is available only when a workflow feature is activated.
Many SharePoint workflows are created by associating a workflow template with a list, library, or content type. Such workflows are focused on documents; however, not all workflows are like that. To cater to other scenarios, you can create site workflows by associating a workflow template at the site level.
Site workflows operate within the context of a SharePoint site instead of being attached to a specific list and operating on a specific list item. Site workflows are started manually or programmatically, but a user cannot use the browser to configure a site workflow to start automatically. SharePoint 2013 does not come with any workflow templates that you can associate at the site level; therefore, to create site workflows, you must use either Visual Studio 2012 or SharePoint Designer 2013.
SharePoint 2013 allows you to run the same type of workflows that you may have used in SharePoint 2010, known as SharePoint 2010 workflows. However, SharePoint Server 2013 introduces a new, highly scalable workflow framework that is implemented by using a new piece of software, Workflow Manager, which allows you to run SharePoint 2013 workflows. Workflow Manager is installed separately from SharePoint 2013 by your server administrators. Workflow Manager can only be used with SharePoint Server and does not interact with SharePoint Foundation, and therefore you cannot use SharePoint 2013 workflows with a SharePoint Foundation installation. SharePoint Server contains no SharePoint 2013 workflow templates. To create SharePoint 2013 workflows, you must use either Visual Studio 2012 or SharePoint Designer 2013.
SharePoint Foundation ships with only one generic SharePoint 2010 workflow template, the Three-state workflow template that can be used across multiple scenarios. On the other hand, SharePoint Server contains additional SharePoint 2010 workflow templates:
Approval – SharePoint 2010 Provides an approval mechanism for documents.
Collect Feedback – SharePoint 2010 Provides a feedback mechanism for documents.
Collect Signatures – SharePoint 2010 Provides a mechanism for collecting digital signatures for completing a document.
Publishing Approval Similar to the Approval workflow template, this workflow is commonly used with the Pages library on publishing sites to approve publishing pages. More information on publishing sites and pages can be found in Chapter 15.
Disposition Approval Provides an expiration and retention mechanism that allows you to decide whether to retain or delete expired documents. This workflow can be started only by using the browser.
Group Approval Similar to the Approval workflow; however, it is available only in East Asian versions of SharePoint Server.
Translation Management Provides a mechanism for document translation by creating copies of documents to be translated, and also assigns tasks to translators. This workflow is available when activated by your SharePoint server administrators using Windows PowerShell. You can then create a SharePoint Server Translation Management library, a Languages And Translators list, and a Translation Management workflow. More information on the Translation Management workflow can be found at office.microsoft.com/en-us/sharepoint-server-help/use-a-translation-management-workflow-HA010154430.aspx.
Note
SEE ALSO More information about the workflows included in SharePoint can be found at office.microsoft.com/en-us/sharepoint-help/about-the-workflows-included-with-sharepoint-HA102771434.aspx.
Not all workflow templates are automatically available within sites on all site collections. Your site collection administrator may need to activate a site collection feature for you to use a workflow template; for example, to use any of the workflow templates that have SharePoint 2010 appended to their name, your site collection administrator would need to active the Workflow site collection feature. Table 11-1 details which workflow templates are active on which sites.
Tip
The Microsoft Office SharePoint Server 2007 workflows are only available on sites that were upgraded from SharePoint Server 2007 to Microsoft SharePoint Server 2010, and then upgraded to Microsoft SharePoint Server 2013.
The workflow templates that have SharePoint 2010 appended to their name are reusable workflows, and therefore can be modified by using SharePoint Designer 2013. They also contain a Microsoft Visio visualization of the workflow.

Note
TROUBLESHOOTING Visio visualizations of SharePoint 2010 workflows are only available when your organization is using the Enterprise edition of SharePoint Server and your server administrator has configured Visio Services. The SharePoint Server Enterprise feature also needs to be active at the site collection and site levels. Visio visualizations can also be seen in the SharePoint Online Enterprise (E3 & E4) and SharePoint Online Small Business.
Configuring a workflow
Each of the built-in workflow templates can be customized in a limited fashion to define the exact process necessary to meet your business needs. An instance of a workflow uses the configured workflow template as a blueprint, which defines the conditions that should be tested to decide which tasks to complete to produce the outcome.
For example, you can configure the Three-state workflow template to define an expense-approval workflow process. Members of your team create an expense form, and when they upload it into a document library, you want the document to progress through the expense-approval workflow process.

The workflow process always has a start and an end. The trigger for entering the process is uploading the document into the document library. An instance of workflow is created when a workflow event is triggered. Each expense form must be approved by Approver #1 (stage 1) and Approver #2 (stage 2), in sequence. Once the expense form has completed both stages, it is approved (stage 3). When the workflow instance reaches the end of the workflow process, it is set to Completed. The workflow process then does no other work until a new workflow instance is created.
To maintain the status of the document as it progresses through the workflow, you must create a Choice column that can store the three states of the workflow and helps you track the progress of the document through the workflow.
The Three-state workflow can be triggered in the following ways:
Manually, using the browser or using SharePoint Server from a Microsoft Office 2010 or Microsoft Office 2013 application. You can restrict who can start workflow instances manually to those users who have the Manage Lists permissions.
Automatically, when you create a list item or document.
Other SharePoint Server workflows can have other trigger events. For example, the Approval workflow template can be configured for any of the following:
Changing an item or file will automatically start the workflow.
Starting a workflow instance automatically when publishing a major version of an item or file. Choosing this option, a workflow instance will not automatically start when a minor version of a file is saved. Therefore, to use this option the library must be configured with major and minor versioning enabled. See Chapter 6, for more information on how to configure a library to use major and minor versions.
Workflows can use both a Task list and History list as the workflow process executes. A workflow can add task items to a Task list so that users can keep track of all the work that needs to be finished to complete the workflow process for a particular workflow instance. The workflow could send emails to users when a task item is assigned to them.
The History list keeps track of the workflow instances that are running or that have been completed for a given list item or document. This is a hidden list and is not shown on the Site Content webpage. You can display this list in the browser by appending /lists/workflow history/ to your site’s Uniform Resource Locator (URL); for example, http://wideworldimporters/lists/workflowhistory/.
Tip
You could export the contents of the Workflow History list to Microsoft Office Excel and create reports to analyze the workflow process. However, you should not rely on items in the workflow history lists for auditing purposes. Items in the Workflow History list are purged every 60 days, or deleted when workflow templates are removed from lists, libraries, or sites.
There are four distinct workflow roles:
The person who creates workflow templates is usually a business analyst or power end-user, who knows the business process that they wish to automate and is known as the workflow creator.
The person who associates the workflow template with a content type, site, list, or library is known as the workflow author. To associate a workflow template with a list or library, the workflow author must be mapped to the Manage List or Web Designer permission rights on the list or library. To associate a workflow template with a site or content type, the workflow author must be a member of the Site Owners group on the SharePoint site. When the default workflow templates do not meet business needs, the business analyst or power end-user could use SharePoint Designer to build a workflow to automate the business process; alternatively, a developer could be involved to use Visual Studio 2012.
The workflow initiator is the person who starts a workflow instance on a document or list item. They must have Edit Item permission rights on the list item or file to manually start a workflow instance or to terminate a workflow instance.
Users who interact with a workflow instance are known as workflow participants. They complete the task items that support the workflow instances.
In the following exercise, you will add a site column to a document library that gives you a choice for each workflow state. You will then associate a workflow template with the document library.
Set Up
Open a Team SharePoint site where you would like to associate a workflow template with a document library. This exercise will use the http://wideworldimporters site, but you can use whatever SharePoint Team site you want. If prompted, type your user name and password, and then click OK.
Important
Verify that you have sufficient rights to manage the document library. If in doubt, refer to Appendix A.
On the Quick Launch, click the document library where you want to associate a workflow template.
On the Library tab, click Create Column in the Manage Views group.
In the Column Name box, type Workflow States and select the Choice option.
In the Type each choice on a separate line box, enter three choices: Submitted to Approver #1, Submitted to Approver #2, and Approved. Be sure to delete the three predefined generic choices first. Then click OK.
Tip
You can create more than one Choice list column, and a Choice list can have more than three choices. However, the Three-state workflow can be configured to use only three values.
Once the new column is created, you can create the new workflow.
On the Library tab, in the Settings group, click the arrow to the right of Workflow Settings, and then click Add a Workflow.
On the Add a Workflow page, select Three-state, and then in the Name section, type a new name for this workflow, such as Approval Workflow.
Note
TROUBLESHOOTING If the Three-state workflow does not appear, then you may need to activate the Three-state workflow feature at the site collection level. See Chapter 5, for more information on features.
In the Select a task list, select a Tasks list if one is already created, or Tasks (new) if one has not been created.
In the Start Options section, leave the selections at their default settings.
Click Next to display the second workflow settings page, known as the association page.
In the Workflow states section, the new column that you added to the document library automatically appears with the three choices that you entered for the three states of the workflow. If it does not appear, from the Select a choice field list, click Workflow States, and enter the initial, middle, and final states in the three fields, if needed.
In the Specify what you want to happen when a workflow is initiated section, in the Tasks Details area, leave the selections at their default settings, and in the E-mail Message Details area, clear the Send e-mail message check box.
Repeat step 11 for the Specify what you want to happen when a workflow changes to its middle state section, and then click OK.


Working with workflows
Once a workflow template is associated with a list or library and customized to define the process as required to meet your business needs, a list item or document can be sent through the process.
In the following exercise, you manually start a workflow instance for a document and complete the tasks for the workflow process.
Important
If the workflow is configured to allow only users with Manage Lists permissions to start workflows manually, and you do not have the Manage Lists permissions for the document library, you will not be able to complete this exercise.
Set Up
Go to the document library where you associated the workflow template. Make sure that you have at least one document in the library before you start this exercise.
Important
Verify that you have sufficient rights to start a workflow for a document. If in doubt, refer to Appendix A.
Click to the left of the document that you want to start a workflow, and then on the Files tab, in the Workflows group, click Workflows.
On the Start a New Workflow page, under Start a New Workflow, click Approval Workflow to display the default view of the library containing the two new columns: Workflow States and Approval Workflow.
In the Approval Workflow column, click In Progress to display the Workflow Status page.
Notice that this page is divided into three parts: Workflow Information, Tasks, and Workflow History. In the Tasks section, one task item is listed as being assigned to you, with a status of Not Started. In the Related Content column, there is a link to the document with which the workflow instance is associated. There is also a link to the document in the Workflow Information section. In the Workflow History section, there is one entry with an Event Type of Workflow Initiated.
In the Tasks section, under Title, click Workflow initiated to display the task item.
On the View tab, click Edit Item to display the task input form.
In the Status list, select Completed. You may have to scroll down and click SHOW MORE to see the Status list. Then, on the Edit tab, in the Commit group, click Save to close the task input form and display the Workflow Status page.
Notice that the Tasks section contains two task items; the first is Completed, and the second is Not Started. The Workflow History section has two entries: Workflow Initiated and Task Completed.
Under Tasks, to the right of the sentence that starts You can also view them in, click the link to the Tasks list.
In the default view of the Tasks list, click the task item with a title of Review task, and repeat steps 5 and 6.
The All Tasks page refreshes again, and the two task items related to the workflow have a status of Completed.
On the Quick Launch, click the document library with which you are working in this exercise to display the default view of the library.
Notice that the Workflow States column has a value of Approved, and the Approval Workflow column has a value of Completed for the document that you started a workflow instance in step 2.
In the Approval Workflow column, click Completed.
On the Workflow Status: Approval Workflow page, in the Workflow Information section, the workflow instance has a status of Completed. In the Tasks section, the two tasks have a status of Completed, and in the Workflow History section, there are four events: a Workflow Initiated event, two Task Completed events, and a Workflow Completed event.


Managing workflows
As you use the workflow process, you may find that it does not match your business requirements. Therefore, you will need to modify the workflow as time progresses, perhaps to change the person who does the first stage or second stage of the process.
In the following exercise, you modify a workflow process for a document library, complete both of the tasks for the workflow process, and then terminate the workflow instance.
Important
Verify that you have sufficient rights to modify the workflow process for the document library. If in doubt, refer to Appendix A.
On the Library tab, click Workflow Settings in the Settings group to display the Workflow Settings page.
Under Workflow Name, click Approval Workflow to display the Change a Workflow page.
In the Start Options section, select the Creating a new item will start this workflow check box, and then click Next.
On the Customize the Three-state Workflow page, in the Specify what you want to happen when a workflow is initiated section, in the Custom message box, type Review Stage 1, and under Task description, in the Include list field, select Version.
Under Task Assigned To, select Custom, and then in the Custom box, enter the user name of a person to approve the document. Click the Check Name icon to the right of the Custom box to verify that you have entered a valid user name.
Tip
By specifying a person to assign a task to, you have not modified the permissions of the Task list. You have configured the workflow to store the user name in the Assign To column on the Task list. If you want that person to complete the task, he will need access to the list. Any user who has Full Control on the list can complete the task item.
Click OK to return to the default view of the library.
Click the new document to display the Add a document dialog box, and then click Browse.
In the Choose File to Upload dialog box, browse to the file that you would like to upload. Click Open, and then click OK to open a dialog displaying Workflow States on Submitted To Approver #1.
Click Save.
The default view of the document library refreshes, with the new document that you uploaded listed on the page with an Approval Workflow status of In Progress.
Click the ellipsis to the right of the document you uploaded in step 8. In the hover card, click the ellipsis, and then on the list item menu, click Workflows.
The Workflows: document name page is displayed and in the Workflows section, there is a running workflow for the Approval Workflow, with a status of In Progress. The Approval Workflow is not listed in the Start a New Workflow section.
Under Running Workflows, click Approval Workflow.
On the Workflow Status page, in the Tasks section, there is a task assigned to the user you specified in step 5.
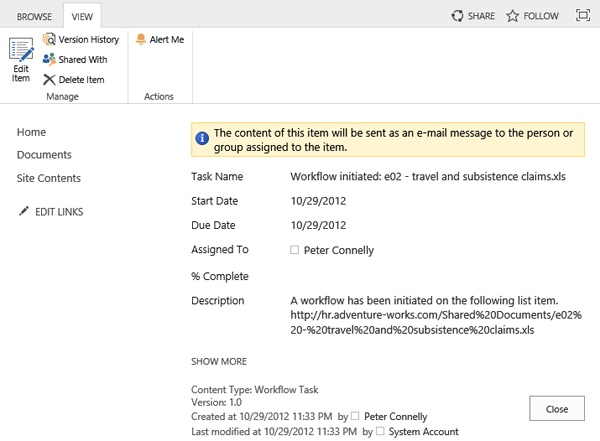
Click Review Stage 1 to open the Approval Workflow Tasks page.
In the Description field, the version number of the document is displayed along with a message box with the text, “A workflow has been initiated on the following list item,” and a link to the document.
Click Close to return to the Workflow Status page.


Managing workflow tasks within Outlook 2013
Workflow tasks are assigned to participants by using a Tasks list. You can use Outlook 2007, Outlook 2010, or Outlook 2013 as a place to receive workflow-related notifications and complete workflow tasks.
Tip
More information on using Outlook 2013 with SharePoint can be found in Chapter 14.
In the following exercise, you will manage workflow tasks in Outlook 2013.
Set Up
Open the Workflow Status page for the document you used in the previous exercise, if it is not already open.
Important
Verify that you have sufficient rights to manage tasks in the Approval Workflow Tasks list. If in doubt, refer to Appendix A.
In the Tasks section, to the right of the sentence that starts You can also view them in, click the link to the Tasks list so that you can see the task named “Review Stage 1: document name” with a status of Not Started, which you created in the previous exercise.
On the List tab, in the Connect & Export group, click Connect to Outlook.
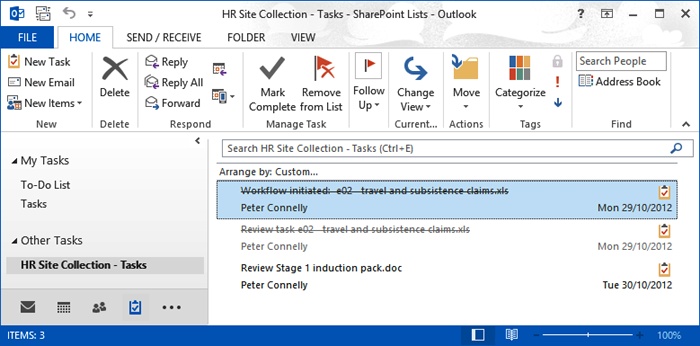
Click Allow to confirm that you want to open Outlook, and then click Yes to connect the Task list to Outlook. In the Outlook Tasks navigation pane, under Other Tasks, the Tasks list that you associated with the workflow is selected, and in the detail pane, the Review Stage 1: document name task is listed.
Click the task, and on the Home tab, click Mark Complete.
The text of the task, Review Stage 1: document name, is struck through, denoting that the task is completed.
Press F9. In the detail pane, a second task, Review task document name, is added.
Double-click the task to open the Review task document name Task form. The task contains two links to the document: the task item in the Tasks list and a link to the Tasks list. By using these links, you can open, review, and modify the document’s contents.
From the Status drop-down list, select Completed, and then on the Task tab, click Save & Close. The text of the Review task: document name task is struck through.
In Outlook, in the Tasks navigation pane, under Other Tasks, click the Tasks list that you associated with the workflow, and on the Folder tab, click Open in Web Browser in the Actions group to display the Tasks List page with the two completed tasks.
In the browser, on the Quick Launch, click the library you associated with the workflow. In the workflow name column for the document on which you started, the workflow appears with a status of Completed.

Terminating workflows
From time to time, you may need to terminate a workflow instance. For example, a person may have left your organization, and you have used a different business process to pay expenses to him or her. In the following exercise, you will start a workflow instance on a document; you will then terminate that workflow instance.
Set Up
Open the All Documents view of the document library where you associated the workflow template.
Important
Verify that you have sufficient rights to create and delete workflow instances on a document. If in doubt, refer to Appendix A.
Start a workflow on a document, and then in the workflow name column, click In Progress.
In the Workflow Information section, click End this workflow.
A Message from webpage dialog box opens, asking if you are sure that you want to terminate this workflow.
Click OK.
The Workflow Status page refreshes, and in the Workflow Information section, the workflow has a status of Canceled. There are no task items listed in the Tasks section, and in the Workflow History section, the last event in the list has an event type of Workflow Canceled.
On the Quick Launch, click the document library with which you are working to display the default view of the library. The workflow name column for your document is set to Canceled.


Removing workflows from lists and libraries
When an automated business process is no longer needed, you should remove the workflow from the list or library. This will prevent confusion for users who use that list or library. In the following exercise, you will remove a workflow from a document library.
Set Up
Open the All Documents view of the document library where you associated the workflow template.
Important
Verify that you have sufficient rights to remove a workflow from the document library. If in doubt, refer to Appendix A.
On the Quick Launch, click the document library or list where you associated a workflow template.
On the Library tab, in the Settings group, click Workflow Settings to display the Workflow Settings page.
Click Remove, Block, or Restore a Workflow to display the Remove Workflows page.
Select Remove, and then click OK.
Tip
When there are a number of instances in progress for the workflow, select No New Instances, and then return to this task in a day or two, allowing the people on your team to complete the outstanding tasks for these workflow instances.
The Workflow Settings page is displayed, showing that the workflow is no longer associated with the list or library.


Associating workflows with content types
Content types are designed to help users define a reusable collection of settings that can include columns, workflows, and other attributes. They can be associated with their own document template and with their own workflow and retention policies. Content types and site columns can be defined at the site or site collection level, or within the content type hub if your organization is using Managed Metadata Service. When created at the site collection level, they can be used by lists and libraries, or by any site within the site collection hierarchy. When created at the site level, they can be used only by lists and libraries within that site and any child sites.
If you need to use the same workflow process with a particular type of list or library, or a specific document type, then you should consider associating a workflow template with a content type and customizing it to define the process necessary to meet your business needs. This will reduce the amount of rework you would otherwise need to complete to achieve this consistency.
You may want the same approval process on every document library in a site or site collection, so users can send a document through the approval process manually when needed. To create this solution, you would amend the document content type in the content type hub or at the top of the site collection, and select the Update All Content Types That Inherit From This Type With These Workflow Settings option.
Tip
When a site collection contains many sites, it may take some time for the content type configuration to be applied to all child sites. If you are creating a new site hierarchy, then create all of your content types and site columns before creating any child sites.
Another example could be the need to have two types of announcements—team announcements that must be approved and announcements that need no approval. To meet this business need, you could create a new announcement content type based on the original content type, so that you get all the same functionality of the built-in announcement list and a workflow. Site owners can then choose to associate the new content type with their announcement list, so they are able to create the two types of announcements.
Important
The Three-state workflow needs a column to store the three states. All columns in a content type must be a site column; therefore, if you associate the Three-state workflow with a content type, you must add a Choice site column to store the three states.
In the following exercise, you will create a new content type, add a site column to the content type, associate a workflow template with the content type, and configure its settings.
Set Up
Open the SharePoint Team site that you used in the previous exercise, if it is not already open.
Important
Verify that you have sufficient rights to create a content type. If in doubt, refer to Appendix A.
Click the Settings gear icon, and then click Site settings to display the Site Settings page.
Under Web Designer Galleries, click Site Content Types, and then on the Site Content Types page, click Create to display the New Site Content Type page.
In the Name box, type Team Announcements, and in the Description box, type Use this content type to create new lists where the team can create team announcements.
In the Select parent content type from list, select List Content Types, and in the Parent Content Type, select Announcement, if it is not already selected.
In the Group section, select New Group and type WideWorldImporters.
Click OK to display the Team Announcements page.
In the Columns section, click Add from existing site columns to display the Add Columns page.
In the Available columns list, scroll down and select Status, and then click Add.
The Status column appears in the Columns To Add list.
Click OK to display the Team Announcements Site Content Type page. Status is listed in the Columns section, with the Source column blank. This indicates that the Status column was added to this content type and not inherited from a parent content type.
In the Settings section, click Workflow settings, and then on the Workflow Settings page, click Add a workflow.
On the Add a Workflow page, in the Workflow section, select Three-state. Then, in the Name section, type a new name for this workflow, such as Announcement Approval. Leave the other sections at their default settings, and then click Next.
In the Workflow states section, the site column that you added to the content type automatically appears with the three choices—Not Started, Draft, and Reviewed—for the three states of the workflow. If this column does not appear, from the Select a Choice field list, click Status and enter the initial, middle, and final states in the three lists as needed.
Leave the other sections at their default settings, and then click OK. You can now associate this content type with any list and the workflow will be automatically associated with that list.


Key points
Workflows can help to automate and track long-running, repetitive processes that require human interaction, after someone has defined exactly what form that automation will take.
Plan your workflows and involve the people who will use the workflow.
You can use the same workflows that you may have used in SharePoint 2010, known as SharePoint 2010 workflows.
SharePoint Server 2013 introduces a new, highly scalable workflow framework that is implemented by using a new piece of software, Workflow Manager, which allows you to run SharePoint 2013 workflows.
Workflow Manager is installed separately from SharePoint 2013 by your server administrators.
A workflow template is available only when a workflow feature is activated.
Workflow templates can be associated with sites, lists, libraries, or content types.
Each of the built-in workflow templates can be customized in a limited fashion to define the exact process necessary to meet your business needs.
To maintain the status of a document through a Three-state workflow process, you must create a Choice column that stores the three states of the workflow.
The workflow name is used as the name of a column; therefore, do not give the workflow the same name as an existing column.
You cannot start two instances of the same workflow on a list item or document.
A workflow’s progress is recorded in a Workflow History list, and workflow tasks are assigned to participants by using a Tasks list.
You can receive an email notification when a workflow task is created.
Outlook 2013 serves as a place to receive workflow-related notifications and to complete workflow tasks.
Workflow templates can be associated with content types. This reduces the amount of rework you would otherwise need to complete to provide consistent workflows across multiple lists, libraries, and sites.