
Chapter 7. Getting Social
Chapter at a glance
Use
Use the Newsfeed hub, Using the Newsfeed hub

Start
Start a conversation, Starting a conversation

Use
Use Yammer, Using Yammer

Manage
Manage a Community site, Managing a Community site
IN THIS CHAPTER, YOU WILL LEARN HOW TO
Prior to Microsoft SharePoint Server 2013, you collaborated with others through emails, wikis, blogs, and documents. SharePoint Server now incorporates functions like those you may have seen on Twitter and Facebook, such as writing short messages known as microblogging or status updates. However, to differentiate between those activities that you may use on other social networks, the features within SharePoint are targeted toward Enterprise Social Networking; that is, it focuses on the networks and relations you have with others who share your business interests.
Tip
To investigate the areas that are important in Enterprise Social Networking, Microsoft hired Harris Interactive to conduct a study concerning Enterprise Social Networking usage and adoption. The survey found that 59 percent of respondents consider it “absolutely essential” or “extremely important” for Enterprise Social Networking software to be integrated with their companies’ existing infrastructure. Regarding the types of communication that Enterprise Social Networking software should facilitate, 67 percent of respondents said instant messaging; followed by email (64 percent); video conferencing (62 percent); being able to “follow” people, documents, or sites (51 percent); audio conferencing (47 percent); activity streams (34 percent); video sharing (33 percent); being able to “like” content or people (28 percent); and microblogging (26 percent). You can find an executive summary of the report at download.microsoft.com/download/B/D/D/BDDDA21D-2B10-4426-BC89-944E5AC56112/Harris_Interactive-Executive_Summary.docx.
With newsfeeds on a site, you can create posts or start “conversations” by using the new microblogging feature, which is available on your personal site, known as your My Site, and collaboration sites, such as Team sites, Project sites, and Community sites, but not publishing sites.
Community sites are new with SharePoint Server 2013, created from the site template, Community Site. My Sites and Team sites are centered on people, feeds, and following, whereas Community sites offer a forum experience to categorize discussions around subject areas and to connect users who have the expertise or seek information about subject areas.
Note
SEE ALSO For information on Project sites, refer to Chapter 10.
If your organization uses Microsoft Lync Server 2013 or the Outlook Social Connector 2013, real-time features such as instance messaging, web conferencing with voice, and video may be available to you.
Note
SEE ALSO For information on SharePoint integration with Outlook and Lync, refer to Chapter 14.
In this chapter, you will learn how to use newsfeeds, how to follow sites and people, and how to use Community sites. In the middle of 2013, Microsoft acquired Yammer, an office social network site that is a tool for making companies and organizations more productive through the exchange of short, frequent answers to one simple question.
Your organization may have customized (or it may not have set up) the social features described in this chapter, and therefore you may not be able to complete all the tasks in this chapter. Your organization may have replaced the SharePoint newsfeed with Yammer, particularly if you are using Microsoft Office 365. Yammer will be briefly discussed in this chapter.
Note
PRACTICE FILES Before you can complete the exercises in this chapter, you need to copy the book’s practice files to your computer. The practice files you’ll use in this chapter are in the Chapter07 practice file folder. A complete list of practice files is provided in Using the practice files at the beginning of this book.
Important
Important Remember to use your SharePoint site location in place of http://wideworldmporters in the following exercises.
Using the Newsfeed hub
Your SharePoint Server 2013 personal assets are organized into three distinct hubs:
Newsfeed This is the primary landing page for social activities in SharePoint 2013; thus, it is also referred to as the social hub. Newsfeed is hosted in your My Site, and it provides quick access to the lists of people, documents, sites, and tags that you are following. In the Newsfeed hub, you can create posts or start “conversations” by using the microblog feature. My Site, also known as your personal site, is discussed in Chapter 5.
SkyDrive The SkyDrive hub is the Documents library (My Documents) on your My Site. Because the link to your document library is on the global navigation, you can access your personal library from anywhere.
Sites The Sites hub displays promoted sites, the sites that you are following, and suggested sites.
You can find links to the three hubs on the global navigation bar; therefore, you do not need to specifically visit your My Site to find these three hubs.

Below the global navigation bar, on the Sharing menu, the following links are available:
Share Use this link to quickly share a site. Permissions are discussed in Chapter 5.
Follow Use this link to follow people, content, documents, sites, and tags. On the Newsfeed hub, you can find an aggregation of the content that you follow. Also, if you follow, for example, a document, but someone else is modifying and saving that document, you will receive a notification that the user has changed the document. You do not have to follow sites that you create, because this occurs automatically and will appear on the Sites hub.
Sync Use this link to create a synchronized copy of a document library in a folder on your computer. The technology used to synchronize the SharePoint library with the computer folder is SkyDrive Pro, which replaces SharePoint Workspace. SkyDrive Pro is part of Microsoft Office 2013 (Standard or Professional edition) or an Office 365 subscription that includes Office applications. The use of SkyDrive Pro is discussed in Chapter 6.
When you click Newsfeed on the global navigation bar, the Newsfeed hub appears.

Tip
A SharePoint Newsfeed app for Windows Phone and iOS mobile devices can be found at office.microsoft.com/en-us/office365-sharepoint-online-enterprise-help/try-the-sharepoint-newsfeed-preview-app-HA103683516.aspx.
The Newsfeed hub contains the following areas:
Your profile photo and name By clicking the photo, you change your photo. By clicking on your name, which is the same as clicking About Me on the Quick Launch, your profile appears. You can also display your profile from any SharePoint site by clicking the down arrow to the right of your name in the global navigation bar, and then clicking About Me.
Quick Launch Here you will find links to the following:
About Me This page displays your profile, including a bio and personal information such as your name, job title, work address, and phone number. The content on your profile page is used to display information about you so that other users can read about your skills, the projects that you have worked on, ways to contact you, and what you are doing within SharePoint.
Blog site This is your personal blog site, which is created the first time you click Blog on the Quick Launch. More information on blog sites can be found in Chapter 8.
Apps This link displays the Site Contents page, where you can add apps or subsites to your My Site. See Chapter 3, for more information on adding apps to a site. The Site Contents page of your My Site also contains links to the MicroFeed list and the Social list, which contains the two views used on the Sites hub and the SkyDrive hub.
Tasks This link displays your My Tasks page, where you can view all the tasks that you need to complete. See Chapter 10 for more information on how to work with tasks on your personal site.
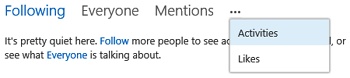
MicroFeed This area consists of two parts: the microblogging text box, labeled Share with everyone, which allows you to post a brief message, and a unified overview of content, which you can filter. The brief messages and updates are displayed in modified time sort-order, so that the most recent content appears at the top of the list. The filters available are as follows:
Content that you are following.
Content available to everyone in your organization.
Content in which you are mentioned.
Social activities that you have completed, such as links to sites or people that you have followed, documents that you have rated or tagged, any microblogs that you have created, or replies to other users’ microblogs.
Content where you have clicked Like.
The last two filters may not be immediately visible within the MicroFeed Web Part. Click the ellipsis to the right of Mentions to display the Additional Options menu.
The MicroFeed area also includes the MicroFeed Web Part, which provides a link to any user who has posted content, including a thumbnail image of his photo, if it is available in his profile. If you click the name of the user or his thumbnail, his profile page appears.
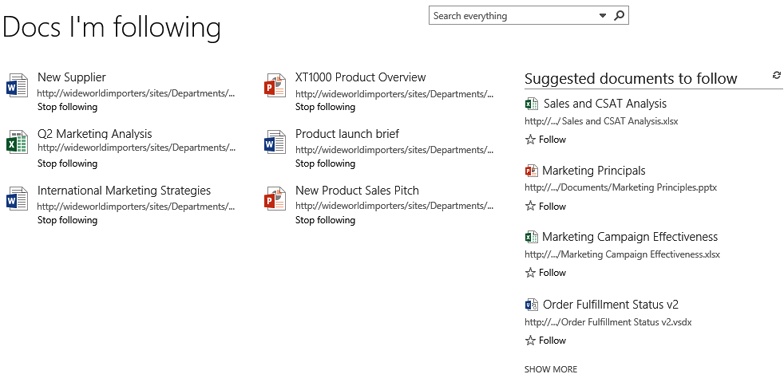
Followed Counts This Web Part displays the counts of followed users, content, and tags for the current user. By clicking one of the numbers, you can see the details on the content that you are following, such as documents, as well as suggested documents that you might like to follow.
Trending Hashtags To monitor a topic that interests you, you may follow a tag for that topic. A tag is a keyword preceded by a hashtag symbol (#). For example, if you want to get the latest information on your organization’s marketing campaigns, you might follow #MarketingCampaign. In the Trending Hashtags area, you will see the hashtags that are currently popular in public newsfeed posts.
Because the Newsfeed hub is part of your My Site, you may find that when you first click Newsfeed in the global navigation bar, you have to wait for your My Site to be created before the Newsfeed hub appears. The We’re almost ready! page appears, as well as the Let’s get social! dialog, also known as the My Site privacy notification dialog.
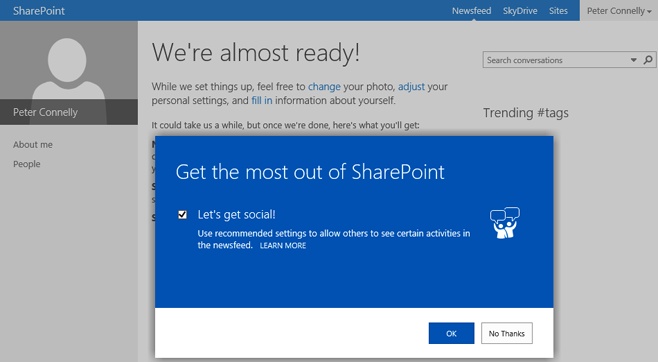
By accepting the default, Let’s get social!, the newsfeed settings are automatically updated to let other users see and respond to site activities. You can modify the newsfeed settings; for example, you can decide whether to receive emails that notify you of events, such as when you have started following another user. You can allow others to see the list of people that you are following or your list of followers, and choose the activities that you want to share with other users. You can also configure your settings to allow just you (Only Me) or other users (Everyone) to see the hashtags that you follow.
In this exercise, you will explore the Newsfeed Settings page.
Important
Verify that your organization has set up social features and that your My Site is created. If your organization has customized the social features, then you may not be able to complete the exercise.
On the global navigation bar, click Newsfeed to display the Newsfeed hub.
Click the number above tags, under I’m following, to display the tags that you are following on the Newfeed Settings page.
Review the options that you can modify, and then click Cancel and go back.

Starting a conversation
On Team sites or on the Newsfeed hub, you will find a MicroFeed Web Part, where you can leave a message, usually one hundred words or less, which can be likened to the messages you might leave on a sticky note. This is known as microblogging. On a user’s About Me profile page, you will see a similar Web Part where you will see only the posts generated by the user.
Like many other microblogging systems, SharePoint limits the number of characters that you can use. In SharePoint 2013, the limit is 512 characters, which is more than what is allowed on Twitter. Before posting, you should look at the way other users are using the 512 characters. To get started, search for other users who are influential in your field of interest, and follow them. You can find more information about searching for people in Chapter 9. By following users, you will see all of their posts on your Newsfeed hub. Take note of what the leaders in your niche regularly post about. You will soon recognize that the posts that you like most are from those users who provide great content, great ideas, great links, and breaking news. It is good practice to click the Like link that appears below such posts. The posts that you find interesting also appear in the newsfeeds of the people who follow you. You can view your “likes” later and find these posts again.
Next, you should try to add content that supplements and emulates these posts, and you will start to get a following from users with similar interests. With microblogging, you can
Start a conversation that is shared with everyone in your organization.
Share a post to a newsfeed on a site that you are following.

When you share a post on the sites that you are following, the Newsfeed hub displays the post with the site name to the right of your name. This site name is a link to the site, so that you can quickly go to it. When you visit the site, the conversation you posted on the Newsfeed hub will also appear on the newsfeed for the site.
When you microblog, others who read it may reply, and therefore, by microblogging, you have started a conversation. On a collaboration site, anyone who is a contributor to the site can start a conversation. When you start a conversation on your My Site, you can also decide whether to share it with everyone (Public) or on sites that you are following.
Tip
When you upgrade from Microsoft SharePoint Server 2010, your Team sites will not display the MicroFeed Web Part that allows you to start a conversation. If you want to include this functionality on those sites, you must first activate the Site Feed feature on the Site Features page, as discussed in Chapter 5. This feature creates a list, named MicroFeed, where conversations are persisted. It provides you with the MicroFeed Web Part that you can place on your site’s home page. Details on how to add Web Parts to pages can be found in Chapter 4. Site Feeds will appear on the Sites hub when both the Site Feeds and the Following Content site features are activated.
As you microblog, you may want to ensure that another user sees the post, in which case you would include her name by adding her name prefixed with an at sign (@). This is often referred to as @mention. Enter the @, followed by sufficient characters to suggest this person in the AutoComplete box.
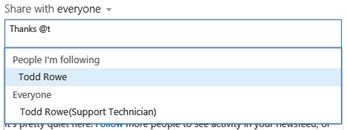
Initially, the AutoComplete box displays the users that you are following, but as you type more of the characters in a user’s name and fewer users are found, the search is expanded to Everyone. The user’s name becomes a link in the post, which other users can click to view her About Me page. A user is notified when she is mentioned in a post.
When you include the user’s @name on a popular microblog, this user will likely track who is referencing him and come to see who you are! In this way, microblogging encourages the development of conversations with other users.
As you review other users’ microblogs, you will probably have questions for them. If you click the ellipsis to the far right of Like, on the More Options menu, you can click Follow up. This adds a task item to your personal task list. You can also share entire conversations by copying a link to the conversation. Any hashtags that appear in the microblog will also appear on the menu, so that you can quickly follow them.

Alternatively, you can reply to a microblog and ask the user to elaborate; or you can create a new conversation (that is not targeted to a particular user) about a specific topic that you want everyone to see, in the hope that someone will know the answer. In this situation, it is best to include a hashtag symbol (#) before the name of the topic of the question. Keywords that are tagged are dynamically pulled from or added to the Managed Metadata Service (MMS) metadata store.
Note
SEE ALSO For more information on MMS, please refer to Chapter 9.
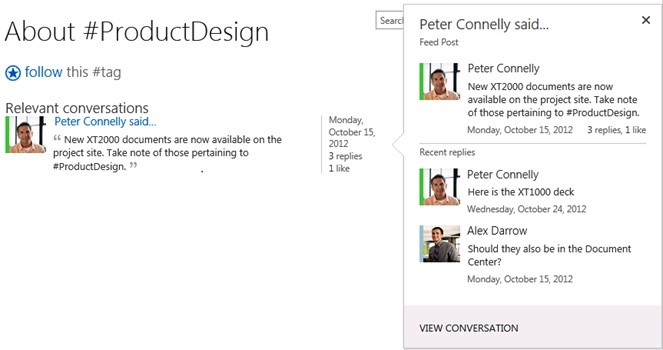
Similar to @mentions, an AutoComplete box displays MMS tags. You can quickly view all conversations that reference that tag by clicking the tag, which displays the About #<tag> page. This page also allows you to add a description, edit the tag, and add related tags. When you place the cursor over a post, a callout appears, which contains more information about the conversation.
In your conversations, you can include links to list and library apps, as well as list items and documents. You can also add web URLs and modify the URLs to display as text. You can include pictures and videos in your conversation by clicking the camera icon under the conversation text input box.
In this exercise, you will start a conversation on the Newsfeed hub, mention a user, and include a hashtag. You will modify the properties of the hashtag, and then delete the conversation.
Set Up
You don’t need any practice files to complete this exercise. Go to your Newsfeed hub, if it is not already open.
In the Start a conversation text box, type @, followed by the first two characters in the name of a user known to you; for example, @er.
In the suggest list, click the name of the user, and then type I’m organizing the launch of the #2013Madrid furniture line, can you help?.
Press Enter to save the conversation.
Click #2013Madrid to be directed to the About #2013Madrid page.
Under Related tags, click Add, and then in the text box that appears, type # and select an existing hashtag from the suggestions list, if one exists. If no suggestions are displayed, go to step 7.
Click the check mark to the right of the text box to save the new related tag, if you selected one.
Click Newsfeed in the global navigation bar to return to the Newsfeed hub.
Click the ellipsis to the right of Mentions, and then click Activities to display your recent activity.
Hover over the conversation that you entered in step 3, and then click the X that appears in the top-right corner.
In the Get rid of this conversation? dialog, click Delete it to confirm the deletion of the conversation.


Using Yammer
Yammer can be used for stand-alone social computing, and as an aggregator of all the social communications that a user might have in an organization. With the Microsoft acquisition of Yammer, there is a kind of a convergence of social computing between SharePoint 2013 and Yammer; however, at the time of this book’s writing, full integration between the two products is not there. However, it looks as if Yammer and SharePoint are going to remain separate products; Yammer will be cloud-based and aimed at organizations, where each organization has its own home Yammer network using its own email address.
In Office 365 you can switch your Enterprise Social Collaboration setting to Yammer, and make Yammer your primary experience. The Newsfeed link on the global navigation bar is replaced with a link to Yammer. A Yammer app is planned for the SharePoint Store, so that you can easily embed a Yammer group feed into a SharePoint site. At that time, guidance will be provided on how organizations who install their own SharePoint environments replace the Newsfeed link. Further Yammer connection updates are expected later in 2013. In the meantime, your organization may view the Yammer newsfeed by displaying Yammer.com in the browser or by using the Yammer Web Part.
Both products have similar social offerings—for example, both SharePoint Server 2013 and Yammer let you create a conversation, and both let you follow objects, such as documents; therefore, the basics described earlier in this chapter are similar in both products.
Note
SEE ALSO Information on picking your social network: Yammer or Newsfeed, can be found at: office.microsoft.com/en-us/office365-sharepoint-online-enterprise-help/pick-your-enterprise-social-network-yammer-or-newsfeed-HA104037368.aspx.
In this exercise, you will create a conversation using the Yammer Web Part.
Set Up
You don’t need any practice files to complete this exercise. Go to a page where the Yammer Web Part has been added and is associated with a Yammer network. If Log In With Yammer appears, click it, and then log on to the appropriate Yammer network.
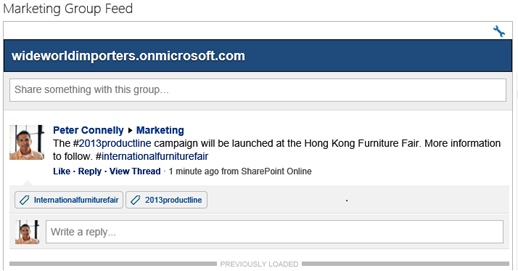
In the Share something with this group text box, type The #2013productline campaign will be launched at the Hong Kong Furniture Fair. More information to follow. #Internationalfurniturefair.
Click Update to update the feed, and the hashtags become links to Yammer “topics.”
Right-click the name of a person in the Yammer feed, and then click Open link in new tab. Switch to the new tab to see the person’s personal page, which can be likened to a user’s profile page in SharePoint.
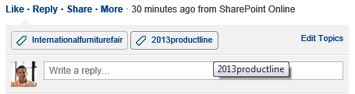
Hover over the 2013productline Yammer topic, and then click the Edit Topics link that appears.
In the Add topic text box, type HongKong.
Click Add, and then click Done.


Working with tags and notes
In SharePoint 2010, you can tag content on a site or leave a note in a document by using the Tags & Notes command on the Browse tab. In SharePoint 2013, this command is no longer on the Browse tab; however, you can still tag and leave notes on pages, lists, libraries, list items, blogs, wikis, images, and tag profiles. Tagging content helps other users quickly find content using search. When a user searches for a term, content that is tagged with that term will appear higher on the search results page than content that is not tagged with that term.
Note
SEE ALSO More information on search can be found in Chapter 9.
You can also use the Tag Cloud Web Part to display a visual depiction of the tags used in your site, where the font size of the words that make up the tag name become larger as the frequency of that tag increases. Click a tag in the Tags And Notes dialog or a tag in the tag cloud to display the tag profile page that displays all items that have been tagged with that term and other information. By default, it will only display items that have been tagged in the past 60 days. To search for all items that have been tagged, click All to the right of View. When you create notes, they appear on the tag profile pages and on your thoughts page. You can go to your thoughts page from a tag profile page or by typing http://my.wideworldimporters/personal/_layouts/15/thoughts.aspx, in which http://my.wideworldimporters is the web address where your My Site is hosted in your organization.

Tip
In SharePoint 2010, the Note Board Web Part allowed users to quickly add notes to a page. You can still use this Web Part, however, if the Site Feed site feature is activated on your site, then microblogging should generally be used.
In the following exercise, you will use tags and notes on a document.
Set Up
Go to the document library, which contains the document that you would like to tag and make notes in.
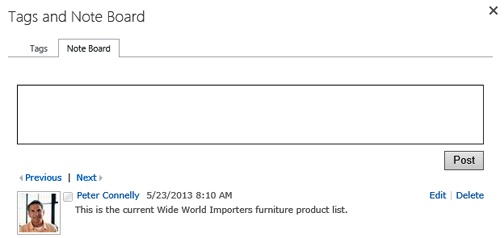
Click to the left of the document, and then on the Files tab, click Tags & Notes to display the Tags and Note Board dialog.
In the My Tags text box, slowly type Product Furniture, and you may notice that some suggested tags are provided for you.
Click Save.
Click the Note Board tab, and then type This is the current Wide World Importers furniture product list. Click Post.
Click the X in the top-right corner to close the dialog.

Creating Community sites
In SharePoint Server 2013, you can create a Community site where like-minded users can collaborate on a common interest. Such groups were probably in existence in your organization and communicating prior to the creation of the Community sites within SharePoint. They may have previously used discussion lists or forums to facilitate communication and exchange information. Members of a community can ask questions on the Community site, knowing that other members of the community are interested in the topic area and may be able to help these answer questions. Such communities are usually based on job types that span the entire organization, such as nurses, lead firefighters, or project managers.
Community sites consist of members and moderators. Users can view the discussions and become members of the community if they want to contribute to those discussions. Moderators manage the community, for example, by setting rules, reviewing and addressing inappropriate posts, and marking interesting content as featured discussions.
Because Community sites are a means for fostering collaboration among large groups of employees in your organization, you should ensure that you have the appropriate backing within your organization. Depending on your organization, this may mean identifying and obtaining the approval of an official sponsor. You also need the commitment of at least two or three moderators. The moderators should welcome new members, be active in the community, and where appropriate, identify replies to posts as a best reply. In your organization, there may be other guidelines that your moderators and members need to be made aware of. In large communities, you may also consider engaging the help of users to look after discussions that are associated with specific categories.
Tip
Only one post can be marked as a best reply. Site owners and the user who created the discussion can remove a reply marked as a best reply.
Categories are created in the Categories list and consist of a name, description, and picture. The list keeps track of the amount of discussions and replies, so that you can quickly review active discussions.
Note
SEE ALSO More information on planning communities can be found at technet.microsoft.com/en-us/library/jj219489.aspx.
In addition to the Community Site template in SharePoint Server 2013, there is a new enterprise site template, Community Portal, where Community sites throughout an organization are listed and where you can visit to search for Community sites that you might want to join. Depending on the way that SharePoint Server is installed in your organization, you may be able to access the Community Portal from the Sites hub.
Tip
There can only be one Community Portal for an organization, which can only be created as a top level site of a site collection.
Unlike Community sites, once created, a Community Portal requires very little configuration or maintenance by the site owner. The portal is continually updated through tight integration with search, which finds new communities and tracks community statistics such as creation date, number of members, number of discussions, and so forth. The order of Community sites listed on the Community Portal is determined by the number of posts, the number of replies, and the number of members. Posts have a higher weight than replies and members. This means that a community with a smaller number of very active users is considered more popular than a larger, less active community. On the Community Portal home page, you can click the ellipsis to the right of a Community site to display a callout that contains more information.

Tip
You can activate the Community Site feature on any site, thereby allowing you to include community functionality on your site; however, the Community Portal uses a Content Search Web Part, which by default is configured to display only those sites that where created using the Community Site template. Sites that were not created from the Community Site template, but have activated the Community Site feature, will not appear on the community portal. Of course, the Content Search Web Part on the Community Portal home page could be configured differently. Search is discussed in Chapter 9.
In the following exercise, you will create a community subsite.
Important
Verify that you have sufficient rights to create a site. If in doubt, see Appendix A.
Click the Settings gear icon, and then click Site contents.
Scroll to the bottom of the Site Contents page, and then under Subsites, click new subsite.
In the Title text box, type Wide World Importers Furniture Ideas, and in the URL name text box, type FurnitureIdeas.
Click the Collaboration tab, if it is not already active, and then click Community Site.
At the bottom of the page, click Create.

Managing a Community site
Once you create your Community site, you can manage discussions, categories, members, reputation settings, and other community settings. The Community Site template is based on the Team Site template and uses wiki pages stored in the Site Pages library. It contains the Discussions, Categories, Badges, and Community Members lists.
When you create a Community site with unique permissions, an additional SharePoint Group, named Moderators, is created. It is mapped to the Moderate permission level, which allows moderators to view, add, update, delete, and moderate list items. Members can view, add, update, and delete list items and documents; however, they can only read the Categories and Members list items and site pages.
The Community Members list is used to maintain those users who are members of the Community site, as well as their reputation settings. The Members page displays the Members list, which can be sorted by Top contributors, New members, A–Z, or Z–A.

The more that a community member contributes, the higher his reputation. A community owner controls the points for each activity, and can configure point thresholds that are required for the five achievement levels. These achievement levels can be displayed on the Members page as either text or an image.
Community owners can also assign gifted badges to members in recognition of their contributions to the community or their expertise. A member can only be assigned one gifted badge; and when it is assigned to a member, the achievement level for that user is not visible on the Members page, only the badge.
Tip
You can remove yourself from a community by going to the Members page, and in the right pane at the bottom of the My Membership area, click Leave This Community.
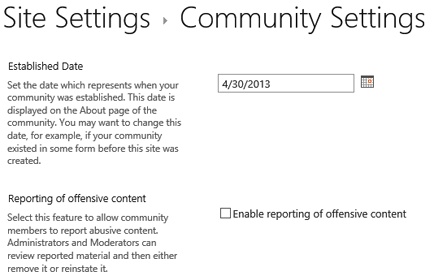
You can also use the Community Settings page to allow members to report abusive content. Site owners and moderators can review the reported material, and then either remove it or reinstate it.
The Community site home page consists of the following areas:
Quick Launch This area provides links to the Categories, Members, About, and Site Content pages.
Welcome In this area, you can describe the purpose of the community and any rules that members should abide by.
Conversation This area includes links to create new discussions. Users can sort the discussions by most recent, the most active, and My Discussions. By clicking the ellipsis to the right of My Discussions, you can use the Additional Options menu to find unanswered questions, answered questions, and featured discussions.
When categories are associated with an image, the conversation area includes a Tile view of all the categories, which, when you hover over them, provide information on the number of discussions and replies.
Join this community This link does not appear on the page for users who are already community members.
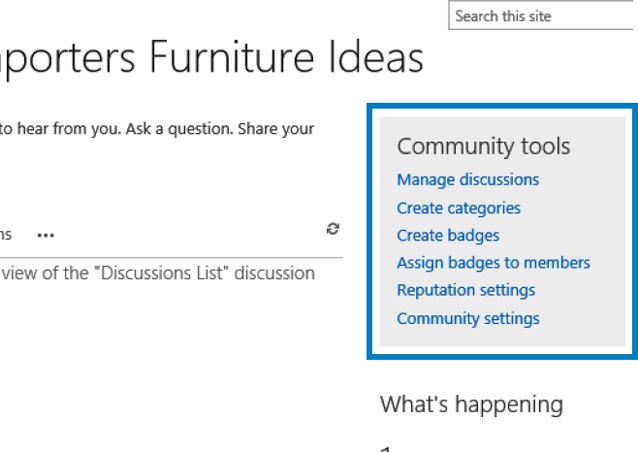
Community Tools This area provides administrators with links to manage discussions, create categories and badges, assign badges to members, and configure reputation settings and community settings. These tools are also listed on the Site Settings page.
What’s happening This area provides a top level summary of the community activities. It is also displayed on the About page. The area displays the following information:
The total number of members.
The total number of topics, across all categories, where a topic is the root level discussion.
The total number of replies to all topics across all categories.


In the following exercise, you will upload an image into the Site Assets library that will be used for a category. You will create a category, add a discussion for that category, and then modify the reputation settings for the site.
Set Up
Open the community SharePoint site that you created in the previous exercise, if it is not already open. This exercise uses the image file, Sales.jpg, in the Chapter07 practice folder, but you could use any image file.
Important
Verify that you have sufficient rights to manage the Community site. If in doubt, see Appendix A.
On the Quick Launch, click Site Contents, and then under Lists, Libraries and other Apps, click Site Assets.
Open Windows Explorer and go to the Chapter07 folder. Drag the image file, Sales.jpg, into the Site Assets library.
Click the ellipsis (to the right of the image file) to display the hover card, and then right-click the URL and click Copy.
On the Quick Launch, click Home, and then under Community tools, click Create categories.
Click new item. In the Category Name text box, type Sales, and in the Description text box, type Sales questions.
Right-click the text box under Type the Web address, and then click Paste.
Click Save.
On the Quick Launch, click Home, and then click new discussion.
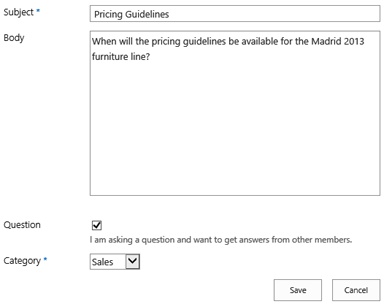
In the Subject box, type Pricing Guidelines, and in the Body box, type When will the pricing guidelines be available for the Madrid 2013 furniture line?.
Select the Question check box, and then in the Category list, select Sales.
Click Save.
Click Pricing Guidelines. Click the ellipsis for the post, and then click Mark as featured.
In the Community tools area, click Reputation settings to display the Community Reputation Settings page.
In the Member achievements point system area, in the Creating a new post text box, type 5.
In the Achievement level representation area, click Display achievement level as text. Set Level 1 to Beginner.
Click OK. On the Quick Launch, click Categories and hover over the Sales tile. The number of discussions is 1.


Key points
The social and collaboration features in SharePoint Server 2013 help you to connect and communicate with other users, and to find, track, and share important content and information.
The social features within SharePoint are targeted toward Enterprise Social Networking; that is, they focus on the networks and relations you have with others who share business interests.
Yammer is a cloud-based social network aimed at organizations, where each organization has its own home Yammer network using its own email address. In Office 365, the Newsfeed link on the global navigation bar may be replaced with a link to Yammer.
My Sites and Team sites are centered on people, feeds, and following.
You can tag and leave notes on pages, lists, libraries, list items, blogs, wikis, images, and tag profiles.
Tagging content helps other users quickly find content using search.
Community sites offer a forum experience to categorize discussions around subject areas, to connect with users who have subject expertise, and to seek information about subject areas.