
Chapter 8. Working with Wikis and Blogs
Chapter at a glance
Categorize
Categorize wiki pages, Categorizing wiki pages

Create
Create an Enterprise Wiki site, Creating an Enterprise Wiki site

Create
Create a blog post, Creating a blog post
Add
Add a blog comment, Adding a blog comment

IN THIS CHAPTER, YOU WILL LEARN HOW TO
Wikis and blogs are methods that enable anyone, including nontechnical users, to write webpages and publish them on Internet, extranet, and intranet websites for other users to see. Both provide users the freedom to publish content for broad consumption. Blogs are personal journals or observations, whereas anyone can contribute to the content on a wiki. When making changes, wiki users are responsible for ensuring accuracy and relevance.
Wiki pages are stored in a wiki library, and when you create a new Team site, Microsoft SharePoint creates a wiki page library, named Site Pages; therefore, your webpages on a Team site are wiki pages. You can create a wiki on any site by creating a wiki library; however, if you want the content on wiki pages to go through a formal approval process, you can create an Enterprise Wiki site. Pages in an Enterprise Wiki site use the same concepts as publishing pages. To create a blog, you must create a blog site.
Note
SEE ALSO For information on wiki pages and publishing pages, please refer to Chapter 4, and Chapter 15.
Most wikis and blogs can use Really Simple Syndication (RSS) feeds to notify users when site content changes. In this chapter, you will learn how to use wikis and blogs, as well as how to enable an RSS feed on a blog.
Note
PRACTICE FILES You don’t need any practice files to complete the exercises in this chapter. For more information about practice file requirements, see Using the practice files at the beginning of this book.
Important
Remember to use your SharePoint site location in place of http://wideworldmporters in the following exercises.
Creating a wiki
In organizations, a wiki provides a low-maintenance way to record knowledge. Information that is usually stored in email, discussed around the water cooler, or written on paper can be recorded as knowledge in a wiki, together with similar knowledge. Other example uses of wikis include creating an instruction guide, gathering data from the field, tracking help desk or call center knowledge, brainstorming ideas, and building an encyclopedia of knowledge. For example, wikis are a great way to collate, document, and agree on the practices or ways of working, as well as a way to record work-specific terminology, such as accounting or legal terms. It is a knowledge repository.
If the knowledge is specific to a particular team or project, then a wiki should be created within a site that is used by that team or project. If the knowledge domain will be useful to a number of teams, then you need to create the wiki in a site that all teams can access. Such wikis would store their wiki pages in a wiki library; however, when the knowledge domain is of use for all users in an organization, and the business requires that the content be approved before all users can see it, you should consider using an Enterprise Wiki site.
Tip
If your team wants to brainstorm on a project, collect reference material, take notes, or share meeting minutes, then you should consider using a Microsoft Office OneNote notebook for the team. This team notebook should be stored in a document library, and you could provide a link to the team notebook on the Quick Launch. Team members need their own copies of OneNote or your organization needs to have installed Microsoft Office Web Apps Companion (WAC) servers, which allow users to view and, depending on the license, edit Office documents, including OneNote notebooks using supported browsers on computers and on mobile devices. If your organization has configured Office Web Apps along with your SharePoint 2013 deployment, then when you create a Team site, a OneNote shared notebook is automatically created as part of the site, and a link to it is provided on the Quick Launch. For Team sites that have been upgraded from SharePoint 2010, activating the OneNote site feature will create the shared notebook and link for you. WAC servers are also known as Web Application Open Platform Interface (WOPI) application servers.
By default, all Team sites contain a wiki library where you can store all of your wiki pages, which contain team information, as well as the content that refers to a specific knowledge domain; however, it is best to separate the different types of knowledge into their own wiki page libraries. You can then apply different permission settings on the two wiki libraries; that is, those who create the team pages may not be the users, who should be granted access to contribute, edit, or update the content in a wiki for a specific knowledge domain.
Unlike other libraries, when you click the name of a wiki library, you will be taken to the home page. With other libraries, you are directed to the default view of the library. On the home page of your wiki library, you should specify the purpose of the wiki and any assumptions that apply to the wiki.
For example, if the wiki is to be used for brainstorming, the home page should contain an overview of the brainstorming challenge; you can then provide a list of your thoughts and ideas, which can become links to pages where you and the rest of the team elaborate on them. Other team members can add to your list of thoughts and ideas, which may, in turn, stimulate other brilliant ideas. You may need to monitor the content that others add—not to remove ideas, because in a brainstorming activity, there are no wrong ideas or thoughts; however, if someone has written a judgmental comment, you may need to remove it. Also, as the list of ideas and thoughts grow, you should look for duplicate ideas that you can amalgamate or group together, or for ideas that are not practicable. As the brainstorming wiki progresses, some structure to the content appears. You can first identify the major contender ideas, with supporting comments that other wiki contributors can add to, and then make a decision before sharing the final recommendation to the interested users who were not part of the brainstorming exercise.
Therefore, a wiki helps you collect, organize, and share information. Wikis often become the repositories for your unstated knowledge, which otherwise might not be stored anywhere. Wikis can encourage informal learning and sharing tips with other users, which can reduce the need for formal training or continuous IT support.
You might also consider including on the wiki home page a reminder to users to check out wiki pages before editing them. If checkout is not used, information can be lost when more than one person edits a wiki page at the same time; the first person’s edits are overwritten when the second user saves the page. You might also have information on how you want contributors to work with your wiki page, which you can include on the home page; for example, when you have recently released a new wiki, you might suggest that contributors limit the time they edit a single page to 10–15 minutes, so that other contributors can add their knowledge.
In this exercise, you will create a wiki page library.
Important
Verify that you have sufficient rights to create a library in your site. If in doubt, see Appendix A.
Click the Settings gear icon, and then click Add an app to display the Your Apps page.
Under Apps you can add, click Wiki Page Library to display the Adding Wiki Page Library dialog.
In the Name text box, type Company History, and then click Create.
On the Quick Launch, under Recent, click Company History. The home page appears with the title, Welcome to your wiki library.

Important
The Name box is used for both the title and the web address of the wiki page library. A wiki page name should not exceed 128 characters, so you should choose a terse but meaningful name.
Note
SEE ALSO For more information on using wiki pages, please refer to Chapter 4.
Categorizing wiki pages
If your wiki page library contains many pages, you might want to group pages into categories, and then display those categories on the home page of the wiki library so that visitors to your wiki can easily find information on a specific category. By default, the wiki page library does not provide a method to categorize your pages; however, by adding one or more columns to the wiki page library, and then using a list app on your home page, you can provide an easy category solution for visitors to your wiki.
Before creating a category column in your wiki page library, you need to decide which column type you need to use. You could use a choice column if the categories you wish to use are not specified elsewhere. If the categories are created as items in another list, or as terms in a Term Store, then you could use a Lookup or Managed Metadata column type. When the category choices are used in many lists or libraries, the category column may already be created in your site or site collection as a site column.
Note
SEE ALSO Information on column types can be found in Chapter 3.
In the following exercise, you will create a category column, categorize a page, and then add a list app to the home page to display the pages grouped by category.
Set Up
Open the home page of the wiki page library that you created in the previous exercise, if it is not already open.
Important
Verify that you have sufficient rights to edit the library settings of the wiki page library. If in doubt, see Appendix A.
On the Page tab, click Library Settings, and then on the Settings page in the Columns section, click Create Column.
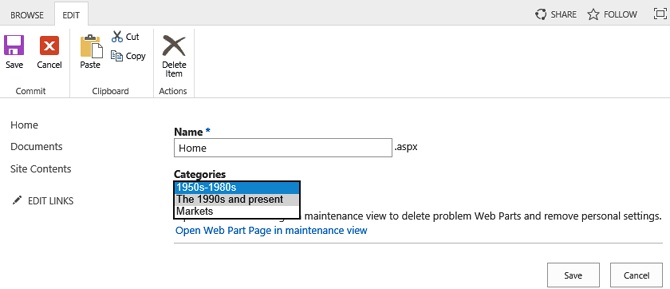
In the Column name text box, type Category, and under The type of information in this column is, select Choice.
In the Type each choice on a separate line box, enter three choices: 1950s-1980s, The 1990s and present, and Markets. Be sure to delete the three predefined generic choices first.
Click OK, and then on the breadcrumb, click the name of your wiki page library (for example, Company History), and then click Home.
On the Page tab, in the Manage group, click Edit Properties, and then in the Categories box, select The 1990s and present.
Click Save to return to the home page, and then on the Page tab, click Edit.
Place the cursor in the wiki content area, to the left of Welcome. Press Ctrl+A to select all content, and then press Delete.
In the wiki content area, type The History of Wide World Importers, and then press Enter to move the cursor to a new line.
On the Insert tab, in the Parts group, click App Part. In the Parts pane, under Parts, click your wiki page library (for example, Company History), and then click Add.
On the home page, click Company History, and then on the Web Part tab, click Web Part Properties to display the Company History Web Part tool pane. You may need to scroll to the right to see the tool pane.
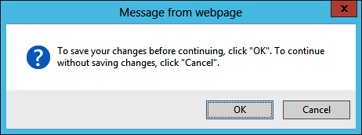
Under the Selected View box, click Edit the current view. If a Message from webpage dialog box is displayed, click OK.
On the Edit View page, in the Columns section, clear the Modified By, Modified, Created By, and Created check boxes.
In the Sort section, in the First sort by the column box, select Name (for use in forms).
Scroll down and click the plus sign (+) to the left of Group By. In the First group by the column box, select Category, and then under By default, show groupings, select Expanded.
At the bottom of the page, click OK.


Tip
When a wiki page contributor adds a column to a wiki page library, it may not be obvious that the properties of the page also need to be amended. If you add columns to a wiki page library, you must tell wiki contributors that they need to click Edit Properties on the Page tab to categorize the page.
Creating an Enterprise Wiki site
An Enterprise Wiki is similar to a wiki based on a wiki page library in that it is a knowledge repository; however, it is a publishing site that should be used for sharing and updating large volumes of information across an enterprise. If your organization needs a large, centralized knowledge repository that is designed to both store and share information on an enterprise scale with many authors, consider using an Enterprise Wiki.
Enterprise Wikis can be created as a top level site of a site collection or as a subsite using the Enterprise Wiki site template, which is built on the Microsoft SharePoint Server 2013 publishing infrastructure. This infrastructure provides various ways to control content; for example, you can assign permissions or use a workflow to establish an approval process.
If you believe that the pages of an Enterprise Wiki site will be frequently referenced by a large number of users, and that your wiki will become a valuable business-critical asset to your company, you should consider creating the Enterprise Wiki site as the top level of a site collection. Depending on the implementation of SharePoint in your organization, you may not be able to do this; you may need to contact your IT department. Even if you can create a site collection, you should still contact your IT department because they may wish to implement other infrastructure configurations, such as storing the site collection in a single, dedicated Microsoft SQL Server database so that they correctly prioritize the recovery of the wiki, should a hardware failure occur, or in a disaster recovery scenario.
Important
To create an Enterprise Wiki subsite, the SharePoint Server Publishing Infrastructure site collection feature must be activated. This feature is activated if the top level site of a site collection was created using a publishing site template. Normally, this site collection feature is not activated on site collections where the top level site was created using a Team site; therefore, you usually cannot create an Enterprise Wiki site as a subsite of a Team site.
In the following exercise, you will create an Enterprise Wiki subsite.
Important
Verify that you have sufficient rights to create a site. If in doubt, see Appendix A.
Click the Settings gear icon, and then click Site contents.
Scroll to the bottom of the Site Contents page, and then under Subsites, click new subsite.
In the Title text box, type SharePoint Governance, and in the Description text box, type This site contains information on how Wide World Importers are implementing SharePoint, guidance on how to use SharePoint, a knowledge base where answers to questions can be found and who to contact, plus their roles and responsibilities.
In the URL name text box, type WideWorldImporters_Governance.
Click the Publishing tab if it is not already active, and then click Enterprise Wiki.
Keep the default settings for the options in the Permissions and Navigation Inheritance sections, and then click Create.


Note
SEE ALSO Information on sites can be found in Chapter 5.
Using an Enterprise Wiki site
When an Enterprise Wiki site is first created, the home page of the site describes what an Enterprise Wiki site is and why you might want to use one. The Enterprise Wiki site provides additional capabilities that you do not see when you are using a wiki page library to store your wiki pages, such as assigning a category or rating to the page. Also, wiki pages on an Enterprise Wiki site are stored in a document library named Pages.

A wiki page on an Enterprise Wiki site behaves similarly to a wiki page in a wiki page library:
It can contain static and dynamic content, including Parts (app parts and Web Parts).
You can create forward links to pages by using the double square brackets around a WikiWord. For example, type [[Site-Collection-Administration]] to create a link to the page named Site-Collection-Administration. The page does not have to exist when the forward link is created.
Major versioning is enabled on the Pages library; therefore, no amendments are lost and you can restore a page to a previous version.
You use the ribbon tabs, such as Page, Format Text, and Insert to add content to a page and manage pages.
Note
SEE ALSO For more information on editing and managing pages, refer to Chapter 6.
However, there are some differences:
The top of the page shows the date the page was last modified and the person who modified it.
You can edit the page by clicking Edit This Page, which appears at the top of the page to the right of the name of the person who last modified the page.
When you upload an image or a file, the default location is the Images library. By default, the Enterprise Wiki site does not have a Site Assets library. The Documents, Site Collection Documents, and Site Collection Images libraries are other libraries where you might consider storing uploaded files.
When an Enterprise Wiki site is first created, you cannot change the layout of the page. You are limited to one column of content. Additional page layouts can be created using the Design Manager, which can be accessed from the Settings gear icon.
Tip
You cannot convert or migrate Enterprise Wiki pages to wiki pages in a wiki page library without using custom code. You could create a new wiki page in a wiki page library, and then copy and paste the content; however, any content, such as the insertion of apps or Web Parts may need to be deleted and re-created. Also if you included images on a page, when you copy the image from one page to another, the location where the image is stored remains the same; for example, it will still be stored in the Images library. You may consider deleting the image from the page, uploading the image in the Site Assets library on the Team site, and then placing the image on the wiki page.
Because a page on the Enterprise Wiki site is a publishing page, you can complete the following tasks:
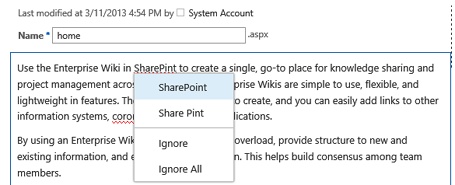
With the page in edit mode, you can check the spelling of text on the page by clicking Spelling on the Format Text tab. You can also check spelling in another language from the Spelling split button command.
As in Microsoft Office programs such as Word or Excel, misspelled words are underlined with a jagged red line. When you right-click the misspelled word, a drop-down list provides recommended suggestions, or you can choose to ignore the misspelled word or all misspelled words that were found.
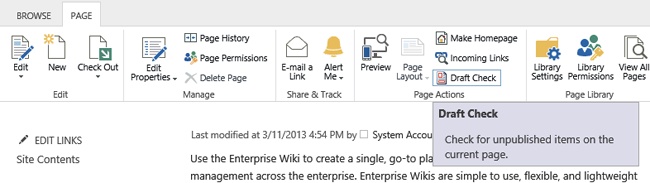
You can check for unpublished items on your page. This is useful, for example, if you upload images into a library that has been configured for content approval, or you have enabled minor and major versioning, and you include those images on your page; however, if you have not approved the image or you have not published it as a major version, a user who comes to your page and only has Read permission will not be able to see the image. The user may see a red X where the image should be; this is known as a broken link. To identify such images or files, you can use the Unpublished Items Report, which is generated by clicking Draft Check on the Page tab, in the Page Actions group.
On the Insert tab, you can add predefined content, such as the company name, a copyright, or a hyperlink. This is known as reusable content, which can consist of blocks of text and HTML elements. This allows the wiki owner to create content once, and then the wiki contributors reuse these pieces of content rather than copying and managing duplicate copies of content manually on different pages.


The Pages library on the Enterprise Wiki site is less restrictive than other publishing pages that you may be used to. Scheduling and the Publishing Approval workflow are not enabled in the library.
Note
SEE ALSO Information on publishing pages can be found in Chapter 15.
Adding categories to Enterprise Wiki pages
Pages in an Enterprise Wiki site can be categorized to help readers browse or find related pages. A category can be a word or a phrase. When you first create an Enterprise Wiki site, the category box appears to the left of the wiki content, but it is dimmed and does not allow you to categorize the page. The categorization of Enterprise Wiki pages relies on the Managed Metadata Service (MMS) and Term Store, which allow you to centrally define categories, and then reuse them throughout the organization in multiple site collections.
Categories, also known as terms, are collected together as term sets. Term sets are put into groups, which can be managed by one or more designated users. Term sets can be created in the Term Store by the designated users using the browser, or imported from a .csv file. A designated user can go to the Term Store from the Site Settings page by clicking Term Store Management, under Site Administration. Before you can categorize pages, you must select a term set for the Pages library column: Wiki Categories.
Note
TROUBLESHOOTING The MMS and Term Store are only available in SharePoint Server. The MMS service application and Term Store must be created by your SharePoint server administrator. If the server administrator has not created the MMS service application and Term Store, you will not be able to categorize your Enterprise Wiki pages using the Categories box to the right of the wiki content.
In the following exercise, you will select a term set for the Wiki Category column, and then categorize a wiki page.
Set Up
Open the Enterprise Wiki site that you created in the previous exercise, if it is not already open.
Important
Verify that you have sufficient rights to edit the library settings of the Pages library of the Enterprise Wiki site. If in doubt, see Appendix A.
On the Page tab, click Library Settings.
Scroll down the Settings page, and then in the Column section, click Wiki Categories.
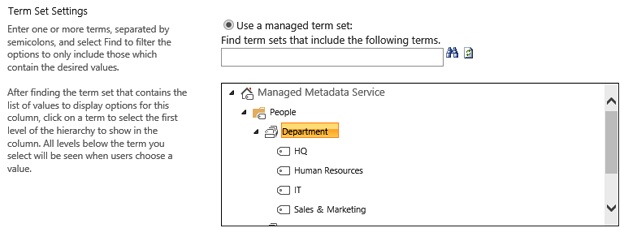
On the Edit Column page, in the Term Set Settings section, click the arrow to the left of your Managed Metadata Service to display the term set groups.
Click the arrow to the left of a term set group, and then click a term set.
In the Default Value section, to the right of the Default Value text box, click Browse for a valid choice to display the Select Default dialog.
Click one of the terms, and then click Select.
Click OK to close the Select Default dialog.
Click OK to close the Edit Column page.
On the breadcrumb, click Pages to display the contents of the Pages library, and then click the page that you would like to categorize, such as home.
On the line that contains Last Modified, click Edit this page.
To the right of the Categories text box, click Browse for a valid choice to display the Select Wiki Categories dialog.
Click one of the terms, and then click Select. Click OK to close the Select Wiki Categories dialog.
On the Page tab, click Save.


Creating a blog site
A web log, known as a blog, is a personal journal or commentary shared on a website. Blogging refers to publishing thoughts, in formal essays or more informal formats, on a blog website. A person who does this is called a blogger. The thoughts shared on the blog website are called posts or articles. Each post or article is displayed in reverse chronological order, with the most recent additions featured most prominently, and older items grouped in archives organized by the month in which they were created.
Blog posts can be categorized to help users find past conversations. Also, blogs are indexed so that a visitor can search through old blogs and learn from past conversations. Bloggers write blogs frequently, often on a daily basis. Some bloggers allow visitors to comment on the blog to provide feedback and to ask questions.
Tip
When using SharePoint, the logical location for a user’s blog site is his personal site, or My Site, where a link exists to create a blog.
A blog can also be used by a group of people, such as a team or an organization. The Microsoft SharePoint and the Microsoft Office team blogs, for example, are found at blogs.office.com and blogs.office.com/b/sharepoint, respectively.
Instead of sending out email or newsletters to the team or organization, you should consider using a blog as a platform where information and opinions can be traded among team members or employees. An organization blog that is published on the Internet is a powerful marketing tool and can influence purchasing decisions by showing visitors to the blog that the organization is an expert in its field.
If you are going to create a team or business blog, then you should spend time thinking of what you want to achieve and the areas of expertise you want to share. You should carefully choose who should join you in posting blogs, ensuring that they commit to blogging, let’s say, at least once a month. Choose authors who are smart and passionate about the topics you wish the blog to cover. Also, at least one of you must manage the blog.
In this exercise, you will create a blog site, and then establish categories for your blog posts.
Important
Verify that you have sufficient rights to create a site. If in doubt, see Appendix A.
On the Quick Launch, click Site Contents, and then under Subsites, click new subsite.
In the Title box, type IT Blog, and then, in the URL name box, type IT_Blog.
Under Select a template on the Collaboration tab, click Blog.
Click Create.

Managing your blog
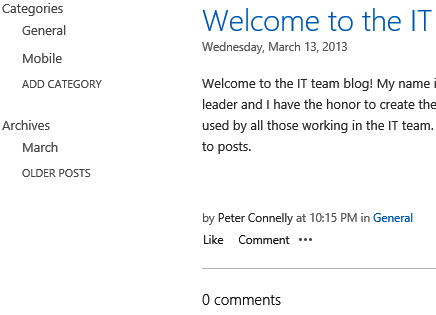
The home page of a Blog site consists of three areas:
Quick Launch This area contains the following:
Categories This section provides links to words or phrases that you can use to categorize your posts. When a blog site is created, three sample categories are created: Events, Ideas, and Opinions. The names of the categories are saved in a list named Categories.
Archives This section provides links to old blog posts and displays only those posts that are approved.
Left This area displays blog posts in published date order, 10 blog posts at a time. Posts are stored in a list named Posts. Each post states the time that the post was published, and at the bottom of the post are the name of the person who published it and the category. Clicking the category link on this line displays a page where all similarly categorized posts are listed. This behavior is the same as clicking a selection under Categories on the Quick Launch.
Right This area contains the following:
Blog Tools This section provides blog owners and administrators links to create and manage posts, to manage comments and categories, and to launch a blogging app. It also allows you to change the layout of the main part of the page. You have three options: Basic, Boxed, and Inline.
About This Blog This is a Content Editor Web Part (CEWP), which, when you first create a blog site, contains an image and some static text. The CEWP is configured to hide the title of the Web Part, and therefore you will only see the title, About This Blog, when the page is in edit mode.
Blog Notifications This Web Part allows visitors to your blog site to register for blog post notifications using RSS Feeds or Alerts. The Web Part title—Quick Links—is hidden, and is therefore only visible when the page is in edit mode.
In this exercise, you will create categories for your blog posts and remove the categories and blog post that were created when the blog site was created.
Important
Verify that you have sufficient rights to edit the home page of the blog site and the rights to amend the Category and Posts lists. If in doubt, see Appendix A.
On the Quick Launch, under Categories, click ADD CATEGORY, and then in the Title text box, type Mobile.
Click Save.
On the home page, under Blog tools, click Manage categories.
Select the Ideas, Opinions, and Events categories, and then on the Items tab, click Delete Item in the Manage group.
Click OK to confirm that you wish to send the items to the site Recycle Bin.
Under Categories, click new item. In the Title text box, type General, and then click Save.
On the Browse tab, click Home to display the home page of the blog site.
Under Blog tools, click Manage posts to display the Posts list.
Click the ellipsis to the right of Welcome to my blog, and then click Delete Item from the list item menu.
Click OK to send the blog post to the site Recycle Bin.

Creating a blog post
A blog post is the method by which you share your opinions and knowledge. You must remember that, as a blogger, you are responsible for the commentary that you post and you can be held personally liable if your posting is considered defamatory, obscene, proprietary, or libelous. Similar to posting information on a wiki, you should practice good manners and understatement.
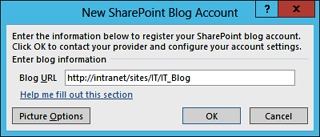
You can create a blog post by using many tools, including Word 2007, Word 2010, and Word 2013; OneNote 2007, OneNote 2010, and OneNote 2013; Microsoft Live Writer; and the browser. On the blog website, under Blog Tools, there is a link that allows you to start a blogging app, such as Word, to quickly create a blog post. The New SharePoint Blog Account dialog box appears. The web address of the blog site is listed in the Blog URL text box.
A Word dialog box then opens, warning that when Word sends information to the blog service provider, it may be possible for other people to see that information, including your user name and password. If you choose to continue, another Word dialog box opens, stating that the account registration was successful.

Once a blog post is opened in Word, the Blog Post tab is active. The Blog group provides easy access to the home page of your blog site, so that you can insert a category to the blog post, open an existing blog, manage accounts, and publish the blog. Any pictures that you insert into the post using Word are automatically copied to the Photos picture library when the blog post is either published or published as a draft.

In the following exercise, you will create and modify a blog post by using the browser.
Important
Verify that you have sufficient rights to create a post. If in doubt, see Appendix A.
On the blog site’s home page, under Blog Tools, click Create a post.
In the Title box, type Welcome, and in the Body box, type Welcome to the IT team blog! My name is Peter Connelly and I’m the IT team leader and I have the honor to create the first entry for the team blog, which will be used by all those working in the IT team. Please use comments to provide feedback to posts.
In the Category list, select General, and then click Add.
On the Edit tab, click Publish.
At the bottom of the post, click the ellipsis, and then click Edit.
In the Title section, to the right of Welcome, type to the IT team blog.
Click Publish.


Adding a blog comment
To interact with a blogger, you can leave comments on a blog post. As a blogger, you must review the comments on your posts, not only to respond to comments but also to delete comments that are either off-topic or are used to advertise websites or broadcast spam. If the aim of a blog post is to start a discussion but you receive virtually no responses, you could use a comment to post a question to your own blog post.
In this exercise, you will add a blog and delete a comment on a blog post.
Set Up
Open the blog SharePoint site that you used in the previous exercise, if it is not already open.
Important
Verify that you have sufficient rights to create comments in the Comments list. If in doubt, see Appendix A.
On the blog site’s home page, below a post, click 0 comments.
In the Add a comment text box that appears, type Hi Peter and Team! Great to see the team blog and I look forward to your posts.
Click Post.
To the right of the date of the comment, click Edit.
On the Edit Comment page, on the Edit tab, click Delete Item.


Key points
Use a wiki when you need a knowledge repository and you want to encourage informal contributions.
A wiki helps you create webpages quickly, and it helps users to freely create and edit webpage content by using a web browser.
Use a wiki page library if you need to set up a project or team area of knowledge.
An Enterprise Wiki is a good solution for sharing and updating large volumes of information across an enterprise.
Enterprise Wiki pages can be rated and categorized with enterprise keywords.
A page on the Enterprise Wiki site is a publishing page, and therefore you can complete other tasks that you cannot complete on a wiki page in a wiki page library, such as spell check, draft check, and reusable content.
Blogs are personal journals or observations that are usually maintained by one person.
Blog posts can be categorized to help users find past conversations.
To interact with a blogger, you can post comments on the blog.
Bloggers should moderate posted comments for objectionable or inappropriate content.
The Blog Posts list is enabled for RSS support, thereby allowing users to syndicate content.