
4
Using Different Flavors of JavaScript
With the previous chapter, you’ve completed the essentials for doing projects in Node.js. Looking at real projects out there, you’ll find quickly that people use Node.js with all kinds of flavors of JavaScript. A flavor of JavaScript is a new language that can be seen as a variation of the official JavaScript language standard. Mostly, these flavors look very much like the JavaScript you are used to but differ in key parts. Sometimes, they add new language constructs to simplify certain tasks; sometimes, they bring improvements for reliability before releasing any code.
In this chapter, we’ll learn how different flavors of JavaScript can be used with Node.js. We will introduce the most important tools and flavors. As far as the tooling part is concerned, we’ll introduce the popular open source package, Babel. This tool can be quite helpful to teach Node.js how to use a flavor of JavaScript. These flavors include interesting additions to the language such as Flow or TypeScript. Both introduce type systems, but the latter also adds new constructs to the language.
This chapter will help you to use languages that can be converted to JavaScript with Node.js. Ultimately, this is key – not only to be able to run JavaScript files independent of their syntax with any version of Node.js but also to introduce additional safety and convenience in larger projects.
We will cover the following key topics in this chapter:
- Integrating Babel
- Using Flow
- Using TypeScript
Technical requirements
The complete source code for this chapter can be found at https://github.com/PacktPublishing/Modern-Frontend-Development-with-Node.js/tree/main/Chapter04.
The CiA videos for this chapter can be accessed at http://bit.ly/3UeL4Ot.
Integrating Babel
In the last decade, JavaScript ascended from a simple scripting language to the most used programming language in the whole world. With the increased popularity, the language has also gotten a lot of interesting features. Unfortunately, it always takes a while until the latest features are made available in all implementations. The problem gets worse if we want to use the latest language features in old implementations anyway.
This is a problem that has been known by frontend developers for years – after all, the version and variety of the browser used cannot be predetermined by the developer. Only the user makes this decision – and an older browser may not understand some of the modern features that the developer wants to use. In Node.js, we don’t have exactly the same problem – as we can theoretically decide the version of Node.js – but it can be a similar issue if Node.js does not have the latest language features or if we create tools that are supposed to run on other people’s machines.
A nice way out of the language feature lockdown (that is, the restriction to only use the feature set supported by the engine) is to use a tool that understands the latest language specification and is capable of properly translating it into an older language specification. The process of such a programming language translation is called transpilation. The tool is called a transpiler.
One of the most known transpilers for JavaScript is Babel. Its power lies in a rich plugin ecosystem. Actually, it is so easy to extend the JavaScript language with constructs using Babel, that many features were first introduced in Babel before they either became part of the official standard or a de facto standard. An example of the former is async/await, which is a fairly complex feature. An example of the latter is JSX, that is, the extension of JavaScript with XML-like constructs.
The following code is using async/await and would be incompatible with Node.js before version 7.6.0:
function wait(time) {
  return new Promise(resolve => setTimeout(resolve, time));
}
async function example() {
  console.log('Starting...');
  await wait(1000);
  console.log('1s later...');
  await wait(1000);
  console.log('2s later...');
  await wait(3000);
  console.log('Done after 5s!');
}
example();
If we want to make this compatible with older versions (or, in general, JavaScript engines that cannot handle the modern async/await syntax), then we can use Babel.
There are three ways of transpiling the code with Babel:
- We can use the @babel/node package, which is a thin wrapper around Node.js. Essentially, it will transpile the modules during execution – that is, when they are needed.
- The @babel/cli package can be used to transpile the modules beforehand and run Node.js on the transpiled modules.
- Alternatively, the @babel/core package can be used to programmatically control the transpilation process – that is, which modules are being transpiled and what is done with the results.
Each way has its own advantages and disadvantages. For instance, choosing @babel/node might be the easiest to get running, but will actually give us a small performance hit and some uncertainty. If some lesser-used module has a syntax problem, then we would only find out later when the module is used.
Likewise, @babel/cli certainly hits the sweet spot between convenience and power. Yes, it only works with files, but that is what we want in almost all cases.
One way to see very conveniently how Babel handles things is to use the interactive website located at https://babeljs.io/repl. For our previous code example, which is using an async function with await, we get a view as shown in Figure 4.1:
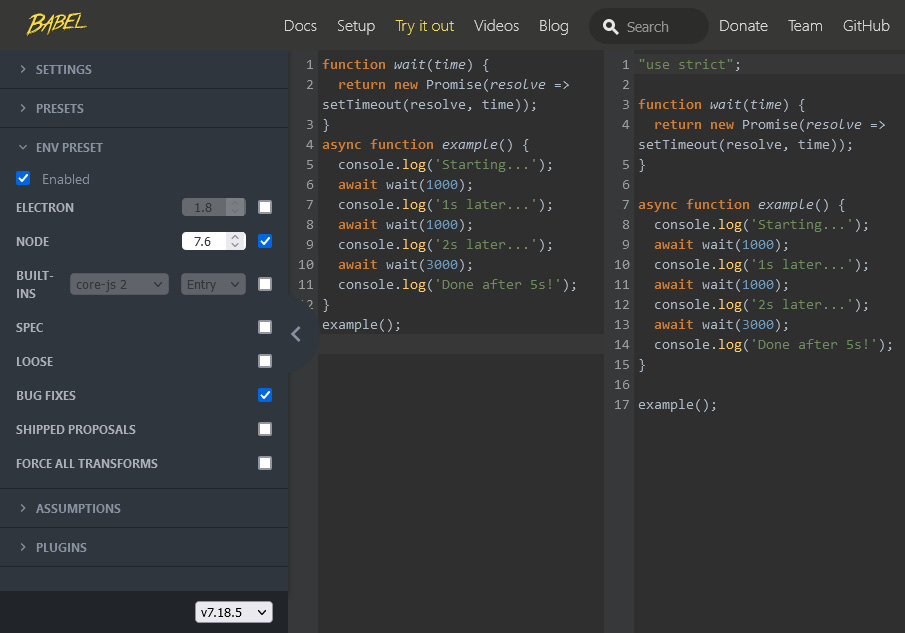
Figure 4.1 – Transpiling some JavaScript via Babel online
For the screenshot shown in Figure 4.1, we specified the version of Node.js to be 7.6. Once we change that to something lower, for example, 7.5, we get a different output. It all starts with some generated code:
"use strict";
function asyncGeneratorStep(gen, resolve, reject, _next, _throw, key, arg) { try { var info = gen[key](arg); var value = info.value; } catch (error) { reject(error); return; } if (info.done) { resolve(value); } else { Promise.resolve(value).then(_next, _throw); } }
function _asyncToGenerator(fn) { return function () { var self = this, args = arguments; return new Promise(function (resolve, reject) { var gen = fn.apply(self, args); function _next(value) { asyncGeneratorStep(gen, resolve, reject, _next, _throw, "next", value); } function _throw(err) { asyncGeneratorStep(gen, resolve, reject, _next, _throw, "throw", err); } _next(undefined); }); }; }
After the generated code, our own code is spat out. The crucial difference is that our code now uses the helpers from the preceding generated code:
function wait(time) {
  return new Promise(resolve => setTimeout(resolve, time));
}
function example() {
  return _example.apply(this, arguments);
}
function _example() {
  _example = _asyncToGenerator(function* () {
    console.log('Starting...');
    yield wait(1000);
    console.log('1s later...');
    yield wait(1000);
    console.log('2s later...');
    yield wait(3000);
    console.log('Done after 5s!');
  });
  return _example.apply(this, arguments);
}
example();
As you can see, the code was modified with the generated functions. In our case, those functions have been used to replace the standard async/await mechanism with a generator function using yield. But even that could be changed further when transpiling for Node.js before version 6.0, which introduced support for generator functions.
In any case, Babel is actually doing the hard work of figuring out which constructs are used in our code, and which constructs need to be replaced depending on the target version of Node.js. It also knows the proper replacements and can generate some boilerplate code to support the language constructs.
For Babel to do all this work, it needs to understand the JavaScript language. This is done by parsing the source code. Parsing is a process that involves going over all characters, grouping them into so-called tokens (such as identifiers, numbers, etc.), and then putting these tokens in a tree-like structure known as an abstract syntax tree (AST). One tool to explore the AST as seen by Babel can be found at https://astexplorer.net/.
Understanding ASTs
Much like processing HTML results in a tree of different nodes, any programming language actually resolves to a tree of expressions and statements. While statements such as a for loop form a closed block of instructions, expressions such as an addition will always return a value. The AST puts all of those in relation and integrates all provided information for the respective node types. For instance, an addition expression consists of two expressions that should be added together. Those could be any expression, for example, a simple literal expression such as a number token.
A snippet of the AST of the preceding example can be seen in Figure 4.2. Each node in the AST has an associated type (such as AwaitExpression) and a position in the source document:

Figure 4.2 – The AST Explorer shows the information as parsed by Babel
Equipped with this knowledge, we can now try to do something locally using @babel/node:
- We start by creating a new Node.js project. In a new directory, run the following:
$ npm init -y
- This will create a package.json and include some basic information. Afterwards, you can install the @babel/node and @babel/core packages as a development dependency:
$ npm install @babel/core @babel/node --save-dev
- Feel free to use another package manager for this. Once the installation has finished, we should add the script. Create a new index.js file with the following content:
index.js
let x = 1;

let y = 2;

// use conditional assignment – ES2021 feature

x &&= y;

console.log('Conditional assignment', x);
The code uses an ES2021 feature called conditional assignments. Only if y is truthy will the assignment be done. In this case, we expect x to be 2 after the conditional assignment.
- To run the code, we need to modify package.json. In the scripts section, we add a start field. Now, the scripts section should look like this:
"scripts": {"start": "node index.js",
"test": "echo "Error: no test specified" && exit
1"
}
- At this point, we can conveniently run the script using npm start. For recent Node.js versions (15 or later), the output should be as follows:
$ npm start
> [email protected] start
> node index.js
Conditional assignment 2
- However, if we try to run the code with Node.js 14, we’ll get an error:
$ npm start
> [email protected] start /home/node/examples/example01
> node index.js
/home/node/examples/example01/index.js:4
x &&= y;
^^^
SyntaxError: Unexpected token '&&='
Now, if you want this to run, you can switch the start script of package.json to use babel-node instead of the standard node. Trying this, however, will not work. The reason is that, by default, Babel does not understand the current environment and, therefore, cannot apply the transformations.
- For Babel to actually understand it, we need to use the @babel/preset-env package. This is a preset that represents a collection of plugins. In this case, the env preset is a special one that intelligently looks for the right plugins depending on the current environment. Let’s first install it:
$ npm install @babel/preset-env --save-dev
- Afterward, we can integrate it by creating a new file:
.babelrc
{

  "presets": [["@babel/preset-env"]]

}- The file has to be placed next to package.json. Once there, Babel will automatically load the file and take its content as configuration input. Now the output matches our expectations:
$ npm start
> [email protected] start
/home/rapplf/Code/Articles/Node.js-for-Frontend-
Developers/Chapter04/example01
> babel-node index.js
Conditional assignment 2
With these instructions, you are now able to run modern code, even on older versions of Node.js. The preceding example did finally run in Node.js 14 – even though this version does not support the &&= new assignment operator.
There are many different packages that work together with Babel. Full languages or language extensions have been written for Babel. One of those extensions is Flow.
Using Flow
Flow is mainly a static type checker for JavaScript code. The purpose of a static type checker is to ensure at build time that everything works together as it should. As a result, we should see a lot fewer errors at runtime. In fact, proper usage of a static type checker will essentially eliminate all simple bugs and let us focus on solving the algorithmic and behavioral issues that would arise anyway.
In Flow, every JavaScript file can be changed to a Flow file. All that needs to be done is to introduce the @flow comment. A simple example is as follows:
// @flow
function square(n: number): number {
  return n * n;
}
square("2"); // Error!
Even though the code would work pretty well in standard JavaScript, Flow will help us by raising an error in the last line. The square function has been annotated using types for the n input argument and the return value. The colon notation separates the identifier or function head from the specified type.
Since the colon notation is not part of the JavaScript standard, we cannot just run the preceding code. Instead, we can use Babel together with the @babel/preset-flow package to strip away the Flow type annotations – keeping only the JavaScript that Node.js can understand.
Let’s test this with a new project:
- We start in a new directory by initializing an npm project and installing the necessary development dependencies:
$ npm init -y
$ npm install @babel/core @babel/node @babel/preset-
flow --save-dev
- Now, we configure Babel and change the package.json file:
.babelrc
{

  "presets": ["@babel/preset-flow"]

}- In package.json, we need to add a start field to the scripts section:
package.json
{

  "name": "example02",

  "version": "1.0.0",

  "scripts": {

    "start": "babel-node index.js"

  },

  "devDependencies": {

    "@babel/core": "^7.18.5",

    "@babel/node": "^7.18.5",

    "@babel/preset-flow": "^7.17.12"

  }

}
Now, running npm start should work without any error message. However, if we run node index.js, then we’ll actually face an error. Still, shouldn’t we also face an error in this case?
- Well, as mentioned, the Babel part is only for running. The installed preset only understands and removes the type annotations. It does not do the actual type checking. For this, we need to install another package called flow-bin:
$ npm install flow-bin --save-dev
- We can run flow with the npx runner that comes already with npm. First, we initialize the project:
$ npx flow init
- Then, we can type-check our solution:
$ npx flow
Launching Flow server for
/home/node/examples/example02
Spawned flow server (pid=13278)
Logs will go to /tmp/flow/example02.log
Monitor logs will go to
/tmp/flow/example02.monitor_log
Error
 index.js:6:8
Cannot call square with "2" bound to n because string
[1] is incompatible with number [2]. [incompatible-
call]
[2] 2│ function square(n: number): number {3│ return n * n;
4│ }
5│
[1] 6│ square("2"); // Error!7│
Found 1 error
As expected, the call does not satisfy the type checks. This is great for our own code, but it is even better for using third-party libraries. With type checking, we can be sure that we use the provided APIs correctly. Not only now but also in the future when we install an update for third-party libraries.
Unfortunately, not every package comes with flow-type annotations. However, the situation looks a bit more promising for a quite similar tool called TypeScript.
Using TypeScript
TypeScript is a full programming language that was designed as a superset of JavaScript. The basic idea was to start with JavaScript, enhance it with missing parts such as types, classes, or enums, and choose JavaScript as a transpilation target for the language. Over the years, many of the features that were first introduced in the TypeScript language also made it to the JavaScript language.
Today, TypeScript is the most popular way to write large-scale JavaScript projects. Nearly every package on the official npm registry comes with TypeScript-compatible type annotations – either within the package or in a dedicated package. As an example, the type annotations for the react package can be found in the @types/react package.
To use TypeScript, we need to install the typescript package. This contains the tsc script, which gives us the ability to check types and transpile TypeScript files written using the .ts or .tsx extension.
Let’s go ahead and create a new project, install typescript, and add a source file:
- We start with the project creation. In a new directory, run the following:
$ npm init -y
$ npm install typescript --save-dev
- Let’s add an index.ts file with content similar to the example for Flow:
index.ts
function square(n: number): number {

  return n * n;

}

square("2"); // Error!
The content of the file is pretty much the same as beforehand, however, the @flow comment is missing.
- We can now run this directly via the tsc command, which has been installed together with the typescript package:
$ npx tsc index.ts
index.ts:5:8 - error TS2345: Argument of type 'string'
is not assignable to parameter of type 'number'.
5 square("2"); // Error!~~~
Found 1 error in index.ts:5
In comparison to the flow tool, tsc does a bit more. It does not only do the type checking but it will also produce output files. What it does not do is run the code. The immediate evaluation functionality of @babel/node can be found in the ts-node package, which works quite similarly to its Babel counterpart.
- By default, tsc tries to convert a .ts or .tsx input file to some new files: a .js and .d.ts file. Even in the case of failed type checks, these files might be produced. The .js file will be written by default, that is, with every use of tsc, unless we tell TypeScript to not emit the output. The .d.ts file will only be written if we also enable the creation of declarations. Looking at the directory after we’ve run the previous example will reveal two new files:
$ ls -l
-rw-r--r-- 1 64 index.js
-rw-r--r-- 1 79 index.ts
drwxr-xr-x 4 4096 node_modules
-rw-r--r-- 1 387 package-lock.json
-rw-r--r-- 1 278 package.json
- Having the additional JavaScript is needed to actually run the code. This also applies to TypeScript being written for the browser. Since no browser understands TypeScript code, we need to transpile it to JavaScript beforehand. Like Babel, we can actually transpile for different versions of the JavaScript standard.
- In order to keep your code repository clean, you should not use TypeScript as shown earlier. Instead, a much better way is to introduce a tsconfig.json file, which you should place adjacent to the package.json. This way, you can not only properly define the target JavaScript version but also a destination directory where the transpilation output should be placed. The destination directory can then be ignored in your version control system:
tsconfig.json
{

  "compilerOptions": {

    "target": "es6",

    "outDir": "./dist"

  },

  "include": [

    "./src"

  ],

  "exclude": [

    "node_modules"

  ]

}
In the configuration, we indicated an src directory as the root for the transpilation. Every .ts and .tsx file inside will be transpiled. The output will be available in the dist directory.
- Now, you can just move index.ts inside a new src subfolder and try running tsc again. The same error pops up, but instead of creating the index.js adjacent to the index.ts file, the output would appear in the dist folder:
$ npx tsc
src/index.ts:5:8 - error TS2345: Argument of type
'string' is not assignable to parameter of type
'number'.
5 square("2"); // Error!~~~
Found 1 error in src/index.ts:5
$ ls -l dist/
-rw-r--r-- 1 64 index.js
Today, most libraries that are published on the public npm registry will be created using TypeScript. This not only prevents some unnecessary bugs but also makes the experience for consumers of the library much better.
Summary
In this chapter, you learned how to use different flavors of JavaScript with Node.js. You have seen how Babel can be installed, configured, and used to transpile your code to the JavaScript standard supported by the target version of Node.js.
Right now, you should also know the basics of the most important JavaScript flavors: Flow and TypeScript. We discussed how they can be installed and configured. Of course, to practically use these flavors, you’ll need additional material to learn their syntax and master the concepts behind these languages. A good book to learn TypeScript is Mastering TypeScript by Nathan Rozentals.
In the next chapter, we will discuss a quite important area of tooling – applications that can give our code improved consistency and validation.