
6
Building Web Apps with Bundlers
In the previous chapter, we covered an important set of auxiliary tooling – linters and formatters. While code quality is important, the undoubtedly most important aspect of every project is what is shipped and used by the customer. This is the area where a special kind of tooling – called bundlers – shines.
A bundler is a tool that understands and processes source code to produce files that can be placed on a web server and are ready to be consumed by web browsers. It takes HTML, CSS, JavaScript, and related files into consideration to make them more efficient and readable. In this process, a bundler would merge, split, minify, and even translate code from one standard such as ES2020 into another standard such as ES5.
Today, bundlers are no longer nice to have, but necessarily used for most projects directly or indirectly. Pretty much every web framework offers tooling that is built upon a bundler. Often, the challenge is to configure a bundler so that it understands our code base and does exactly what we’d expect it to do. Since web code bases are quite different, bundlers need to be flexible in many directions.
In this chapter, you’ll build up an understanding of what bundlers do and how you can control their inner processes. We’ll also introduce the most important bundlers as of today, and see how they can be used and configured to work efficiently for us. This will help you get your web project from raw source code to production-ready artifacts.
We will cover the following key topics in this chapter:
- Understanding bundlers
- Comparing the available bundlers
- Using Webpack
- Using esbuild
- Using Parcel
- Using Vite
Technical requirements
The complete source code for this chapter is available at https://github.com/PacktPublishing/Modern-Frontend-Development-with-Node.js/tree/main/Chapter06.
The CiA videos for this chapter can be accessed at https://bit.ly/3G0NiMX.
Understanding bundlers
Writing a modern web application is quite difficult. One of the reasons for the level of difficulty is the large variety of different technologies that need to be involved in the process. Let’s just mention a few:
- HTML for writing documents
- CSS for styling those documents
- JavaScript with the DOM API to bring some interactivity
- A JavaScript UI framework to create interactive components
- A CSS preprocessor to use variables, nesting, and more features for CSS
- Potentially TypeScript or some other typed system to improve reliability in certain source code areas
- Service and web workers need to be mastered
- All static files should be easy to cache
Before the introduction of a new class of tooling that was capable of building up module graphs, dedicated task runners such as Grunt or Gulp were used. These runners were inspired by more generic approaches such as Makefiles. The problem, however, was that two aspects – the build process and the source code – needed to be kept in sync. Just adding one file to the source code was not sufficient; the build process had to be informed about this new file. With bundlers, this all changed.
At its core, a bundler is a tool that leverages other tools. The most important addition is that a bundler understands the module graph – that is, the relationships (imports and exports) of code modules such as the CommonJS or ESM modules we discussed in the previous chapters. It can build up a module graph and use that to let other tools such as Babel work.
To get started, a bundler requires so-called entry points – quite often, these are referred to as entries. These are files that are used as roots in the module graph. These files may depend on other files, in which case the bundler will continue in these files to build up the module graph.
Figure 6.1 shows an example module graph constructed from two entry points. The interesting property of this graph is that the content of Entry 2 is fully contained in Entry 1, too. In many situations, there won’t be any significant overlap between the module graphs of multiple entry points:

Figure 6.1 – Example module graph constructed from two entry points
Most bundlers work in phases. While each bundler uses slightly different terminology, they almost always come with the following high-level phases:
- Module resolution
- Module transformation
- Chunk and asset generation
- Applying optimizations
The module transformation is often necessary. On the one hand, the bundler needs to understand the module to find imported modules to build up the module graph; on the other hand, the chunk generation must rely on normalized input modules.
While the transformation phase needs to work hand-in-hand with a resolver to continuously build up the module graph, all other phases are pretty much independent. Quite often, the optimization phase is either reduced or fully disabled during development. This reduction helps speed up the bundling process by a fair margin. Additionally, further instructions that are quite helpful during debugging will be kept.
Minification
One of the most common optimizations is minification. The goal of minification is to make the files as small as possible without using active compression. While minification on the surface is rather easy and efficient in a language such as JavaScript, other languages such as CSS or HTML are a bit more problematic. Especially minification of HTML has been proven to be a hard problem without as many gains compared to the minification of JavaScript. After minification, files are usually not as readable as they were previously. One reason is the removal of unnecessary whitespace, which was introduced to give the original code readability and structure.
The whole bundling process can be sketched in a diagram. Figure 6.2 shows how the different entries enter the different phases:
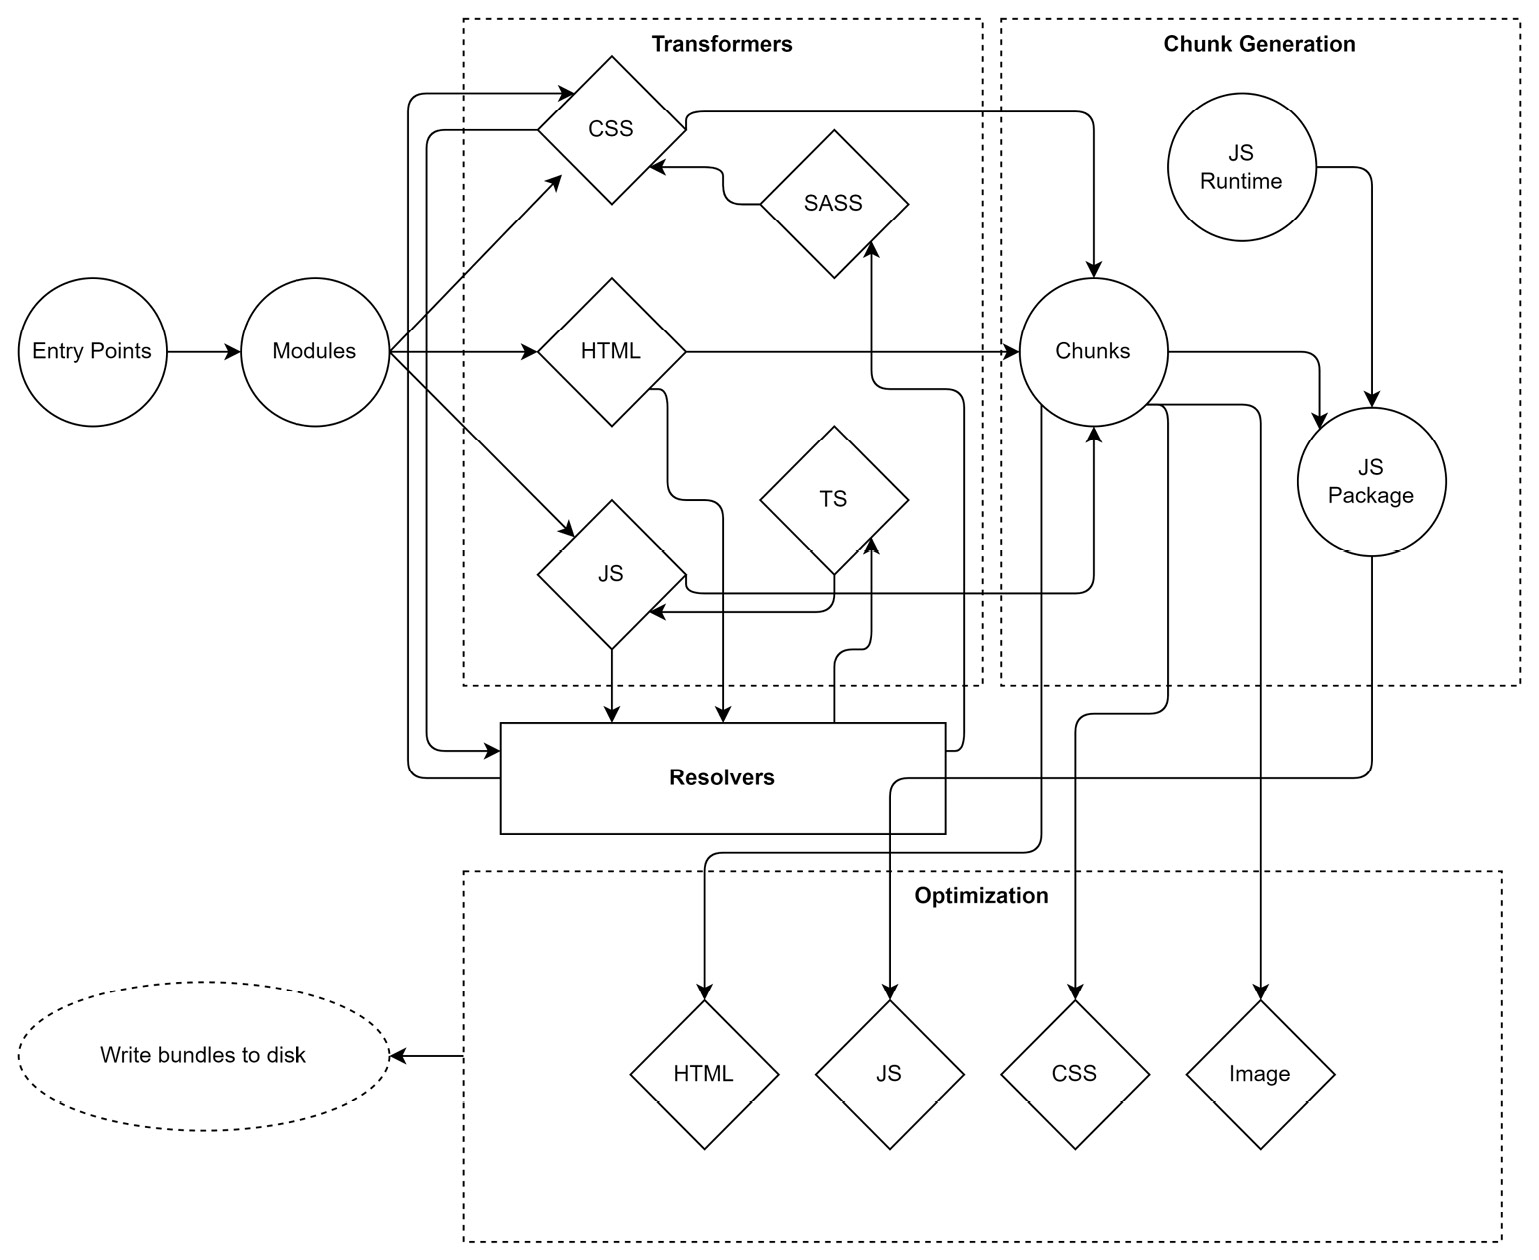
Figure 6.2 – High-level phases of a modern web bundler
Another thing to consider is that the chunk generation will mostly also introduce some kind of JavaScript runtime. This can be as lightweight as teaching the resulting code how to load additional bundles that have been created as script files, but it can also include full support for loading shared dependencies from foreign code and more. The introduced code is fully bundler-specific.
With that in mind, let’s see what kind of bundlers are out there and how they compare.
Comparing available bundlers
There are multiple generations of bundlers. The first generation was centered around the belief that Node.js applications are the only kind of applications that should be written. Therefore, changing these applications into JavaScript files that work in the browser has been the primary concern of the bundlers from that generation. The most popular one in that category is Browserify.
The second generation went on to extend the idea from the first generation to pretty much all JavaScript code. Here, even HTML and CSS assets could be understood. For instance, using @import rules in CSS would extend the module graph to another CSS module. Importantly, while the CommonJS (or later on, ESM) syntax was still used to derive the JavaScript module graph, these second-generation bundlers did not care about Node.js. They always assumed that the code was written for the browser. Quite often, however, you could change the target and also bundle code for Node.js with them. The most popular one in this category is Webpack, even though Webpack always tried to go with the times and adapt.
Third-generation bundlers introduced a much-improved user experience. They tried to find a native or obvious way of handling things and often did not even require any configuration. The most popular tool in this category is the original Parcel bundler.
The current fourth-generation bundlers are all about performance. They either come with a dedicated runtime or sit on top of natively written tooling, which usually outperforms their older JavaScript-written counterparts. Here, we see tools such as esbuild or experimental runtimes such as Bun.
The big question is: When should you use what? With half a dozen popular bundlers and more available, the question is not easy to answer. Surely, if a team is already really familiar with one of the options, then going with it for a project is very often the right choice. Otherwise, look for similar projects and try to understand what bundler they picked – and why. In any other case, you could use the following catalog of questions to identify which bundler might be the best option:
- What kind of assets are involved? If only JavaScript is involved, then Webpack might be good. If you have multiple HTML pages that all need to be processed, then Vite might be a great option.
- How many dependencies are you using? Especially when you use older libraries from npm, a bundler with a broad range of support – such as Webpack – may be the best choice. Otherwise, look for faster options, such as esbuild.
- How familiar is the team with bundlers and their options? If the team is not familiar with bundling at all, then Parcel could be a great way to get started. Otherwise, Webpack potentially has the most documentation out there. A community that is rather new and very active and helpful can be found with Vite.
- Are you building an application or just want to optimize the assets of a library? Especially for a library, something smaller, such as esbuild, might be useful. On the other hand, Parcel has a lot to offer here, too. In general, Vite should be avoided for libraries. Support is there, but it just does not feel to be ready yet for building libraries more efficiently than Rollup.js and esbuild.
- Do you need support for advanced scenarios such as offline mode or web workers? In these cases, the ecosystem of Webpack is very often hard to beat. Parcel also does a good job of offering helpers in this area. esbuild should be avoided for such scenarios.
- How important is performance? If you have a larger code base (above 1,000 modules or 100,000 lines of code), then Webpack is known to be a performance killer, taking easily 30 seconds to minutes. Picking something such as Vite or – if possible – esbuild will certainly help speed up the process. While the former is more developer friendly, it also comes with a lot of hidden complexity. The latter is more direct but lacks standard features such as hot-module reloading (HMR).
- How much maintenance is acceptable? Bundlers that rely on a lot of plugins are traditionally much harder to maintain. Upgrading Webpack to the next major version has been notoriously difficult. From missing plugins to breaking changes in the plugin’s API – everything that can happen will also happen in such cases. Prefer bundlers such as Parcel or Vite that try to come with everything necessary out of the box.
- How important are additional development features such as bundle insights? If these are supercritical, then nothing is better than Webpack. As the Webpack ecosystem is super large, you’ll find additional tools, libraries, and guides easily. On the other hand, choosing something with a growing community such as Vite might also work fine. If something is missing, the community should be capable of picking it up quickly, too.
In the following sections, we’ll go over an example project to see how some of the most popular bundlers can be used to build it. We’ll use a project with a small, but non-trivial code base. For this example, we’ll use React – but don’t worry, you don’t need to know React to follow this chapter.
React
React is arguably the most popular UI library for web frontend development. It allows developers to build UIs quickly in JavaScript by leveraging a language extension known as JSX. By using JSX, we can write code that looks quite similar to HTML but is transpiled to JavaScript function calls. In React, the basic building block of the UI is a component, which is very often just a plain JavaScript function. By convention, the names of components usually start with an uppercase letter; for example, Button or Carousel.
The code base for the example we’ll cover consists of the following:
- The source code of a single-page application (SPA)
- An HTML file as the entry point (index.html) of the SPA
- Several asset files (videos, images in different formats, audio)
- Several non-trivial dependencies
- Some files that use TypeScript instead of JavaScript
- A special CSS preprocessor called SASS
- A web framework (React with React Router) is being used
- Different virtual routes should lead to different pieces of the page that have to be lazy loaded
All in all, this example should produce a small demo application that contains a video and audio player that uses third-party dependencies.
Lazy loading
Lazy loading describes a technique where not all parts required by an application are loaded immediately. For a SPA, this makes sense – after all, not every component or part of the SPA will be required for the current user interaction. And even if it isn’t required, it could be at some later point in time. Lazy loading usually involves loading additional script (or other) files when some action such as a user clicking on a button or following some internal link is performed. The implementation of lazy loading needs to be supported by the respective UI framework (for example, React has a function called lazy) but is done by the bundler.
The boilerplate for this example can be created by initializing a new Node.js project:
$ npm init -yNow, we’ll add all the runtime dependencies – that is, the packages that will be required when our application runs in the browser:
$ npm i react react-dom react-router-dom video.js --saveAt the end of the day, it will be the job of the bundler to add the preceding dependencies to scripts that can be run in the browser. However, for us, it makes sense to do this to get a clear view of which packages are just required for the tooling, and which dependencies are needed for the code to run.
The basic devDependencies – that is, the ones that are required for the tooling – are as follows:
$ npm i typescript sass @types/react @types/react-dom --save-devAdditional tooling dependencies are required, too, but will be bundler-specific.
The example application contains the following source files:
- index.html: Template for the SPA website
- script.tsx: Starts to run the application
- App.tsx: The application root
- Layout.tsx: The layout of the application
- Home.tsx: The home page containing links to all pages
- Video.tsx: The page containing the video player
- Audio.tsx: The page containing the audio player
- Player.jsx: The React component for the video and audio player
- earth.mp4: Video file to play
- river.webp: Preview image (.webp format) for the video file
- snow.jpg: Preview image (.jpg format) for the sound file
- sound.mp3: Audio file to play
The process of showing a UI is usually called rendering. When React first renders the application, it needs to mount its component tree on the DOM tree. This is done in the script.tsx file:
script.tsx
import * as React from 'react';
import { createRoot } from 'react-dom/client';
import './style.scss';
import App from './App';
const root = createRoot(document.querySelector('#app')!);
root.render(<App />);
The usage of angle brackets for initiating App is referred to as JSX. Under the hood, the additional x in the file extension (tsx) enables such expressions to be processed, where <App /> will be transformed into React.createElement(App).
The App component itself is defined as follows:
App.tsx
import * as React from "react";
import { BrowserRouter, Route, Routes } from
  "react-router-dom";
import Layout from "./Layout";
const Home = React.lazy(() => import("./Home"));
const Video = React.lazy(() => import("./Video"));
const Audio = React.lazy(() => import("./Audio"));
const App = () => (
  <BrowserRouter>
    <Routes>
      <Route path="/" element={<Layout />}>
        <Route index element={<Home />} />
        <Route path="video" element={<Video />} />
        <Route path="audio" element={<Audio />} />
      </Route>
    </Routes>
  </BrowserRouter>
);
export default App;
This kind of structure is typical for a SPA. All the different routes come together in a router or root component to be displayed when a certain path is found. For instance, in our application, the /video path would show the Video component, while the /audio path would show the Audio component. All these components will be embedded in a Layout component, which is responsible for the general layout, such as showing the header and the footer, of the application.
In the App.tsx file, lazy loading is initiated by using the ESM import function. Bundlers should be capable of transforming that into loading another script and returning a Promise at that location.
Promises
The specification describes an import function to return a Promise. A Promise is an object that can be used to determine when an asynchronous operation is finished. The object exposes functions, which are called with the result of the asynchronous operation or with an error that was thrown during the operation. The most important functions are then and catch. The former can be used to define what to do when something is successfully returned, while the latter can be used to handle errors.
In a SPA, it makes sense to put every page in a router into lazy loading. Figure 6.3 shows a high-level overview of the example application’s modules. The dashed boxes indicate bundling areas – that is, source files that can be grouped into combined output files. This bundling is one of the most crucial aspects of any bundler:
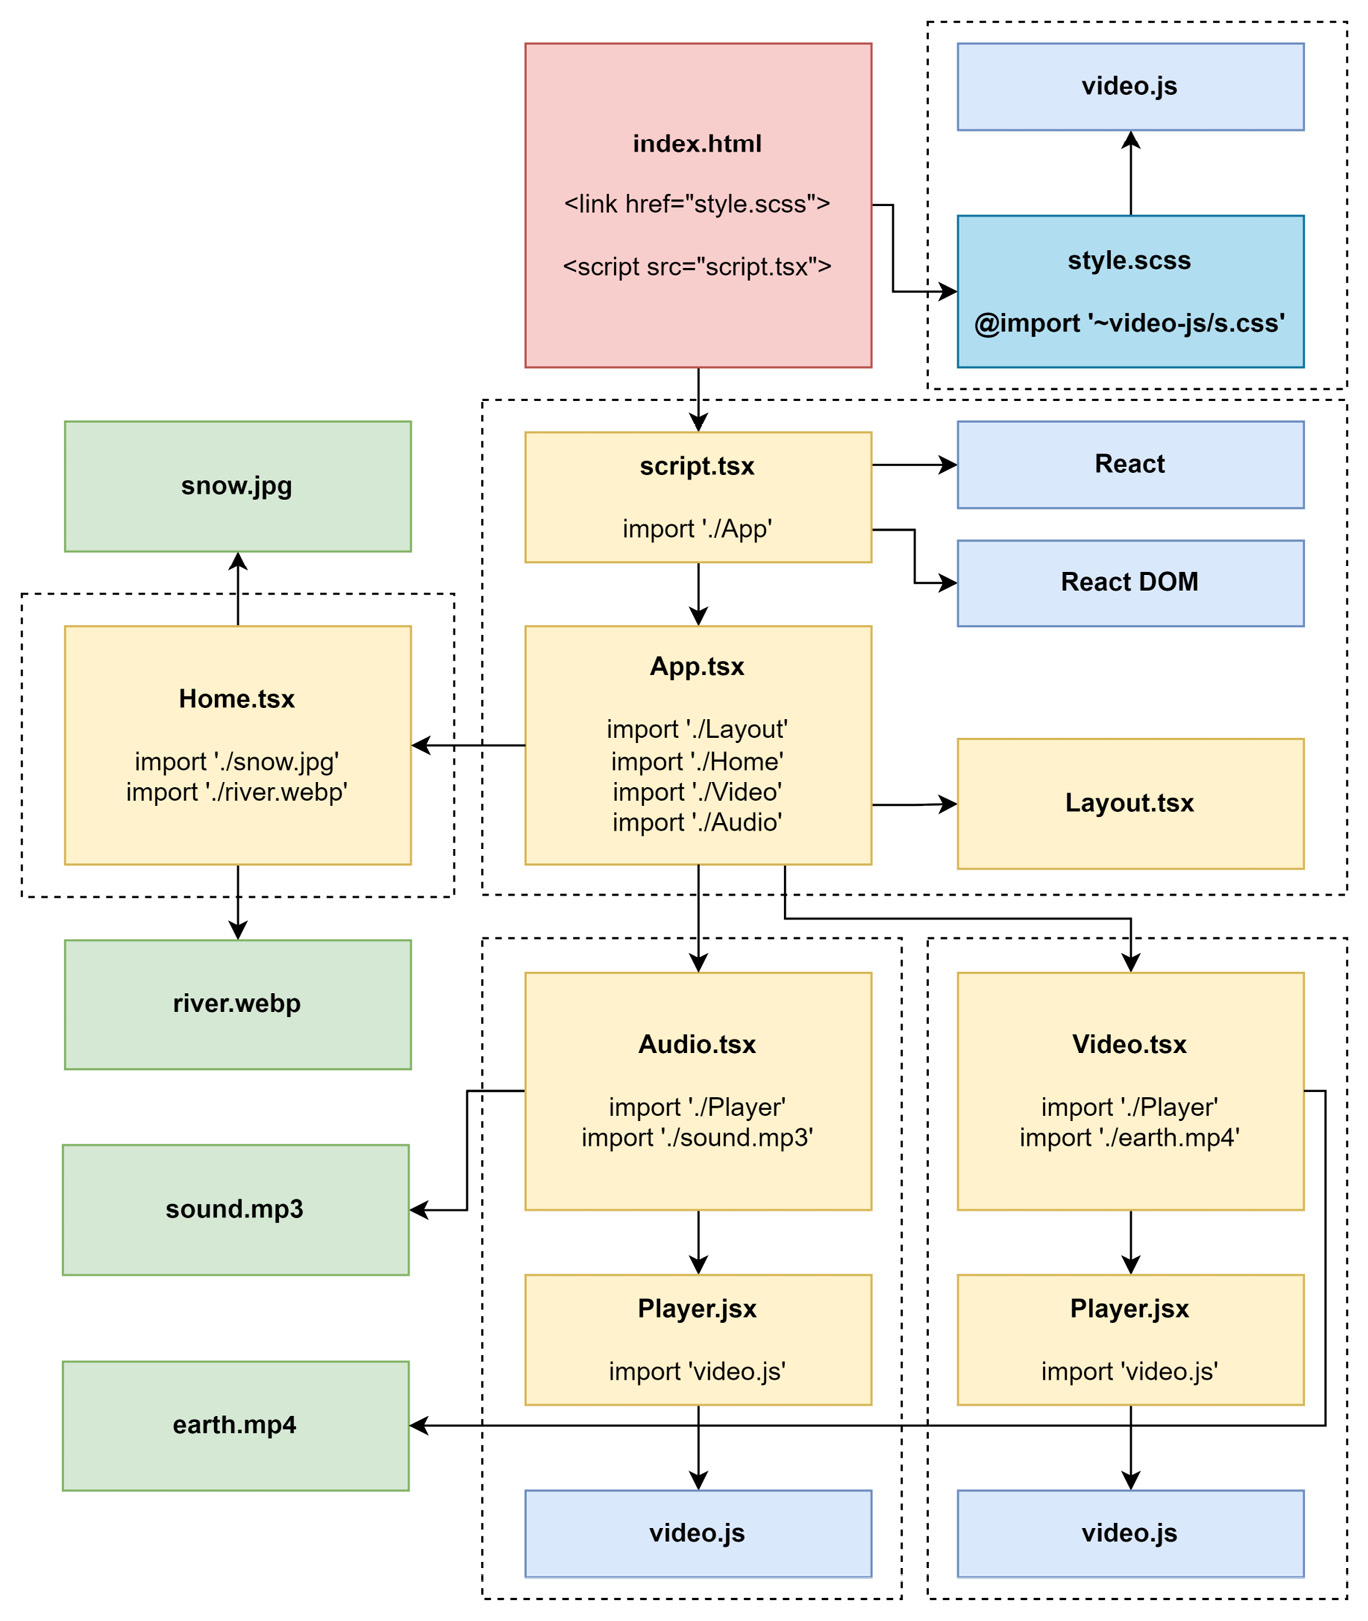
Figure 6.3 – The example application’s modules
While some of the given aspects should be rather simple to implement in a bundler, other properties of the example application might be challenging. For instance, what is the behavior of a bundler when duplicate modules are found? Some bundlers may duplicate the generated code while others may create a shared bundle that is a loading prerequisite for the generated side bundles.
In the case of this example, we can see that Player.jsx appears twice. We’ll use this to answer the question for each bundler. Furthermore, pretty much every module requires react; however, since it is already required in the initial script module (script.tsx), it should not be duplicated.
Without further ado, let’s see how this example application can be bundled using Webpack.
Using Webpack
Webpack is presumably the most popular option among the available bundlers. It is also among the oldest bundlers – dating back to a time when Node.js was still young and the whole idea of bundling was rather new. At this time, task runners were still dominantly used. However, the increasing complexity of frontend development opened the door for much more elaborate tooling.
One thing that makes Webpack stand out is its ecosystem. From the very beginning, Webpack decided to develop only a very shallow core focusing on module resolution. In some sense, Webpack is just the wrapper holding all these plugins together with a fixed plan of execution. It pretty much combines the configuration that was thrown in by the user, with the power of all the selected plugins.
Today, Webpack can also work without plugins or a configuration. At least in theory. In practice, every project that goes beyond some simple examples will require a bit of configuration. Also, interesting features such as support for other languages such as TypeScript will require a plugin.
To get started with Webpack, we need to install the webpack and webpack-cli packages using npm:
$ npm install webpack webpack-cli --save-devIf we only wanted to use Webpack programmatically, such as from a Node.js script, then we could also spare the webpack-cli package installation.
To run Webpack from the command line, you can use npx together with the webpack executable:
$ npx webpackJust running Webpack like this will not be successful:
assets by status 0 bytes [cached] 1 asset

WARNING in configuration

The 'mode' option has not been set, webpack will fallback to 'production' for this value.

Set 'mode' option to 'development' or 'production' to enable defaults for each environment.

You can also set it to 'none' to disable any default behavior. Learn more: https://webpack.js.org/configuration/mode/

ERROR in main

Module not found: Error: Can't resolve './src' in '/home/node/examples/Chapter06/example01'

[...]

webpack 5.74.0 compiled with 1 error and 1 warning in 116 ms
Fixing the warning about mode is rather simple – all we need to do is to provide a CLI flag such as --mode production. The more problematic issue is that Webpack does not find any entry point.
As mentioned already, there is a chance that Webpack may just work, but usually, we’ll be forced to create a configuration file. Webpack uses real Node.js modules to provide the configuration, which gives us the full power of the Node.js ecosystem. A Webpack configuration is called webpack.config.js and should be placed next to the package.json file.
Let’s create a rather lightweight one. The highlighted property is one of Webpack’s fundamental configuration sections, telling the bundler what entry points to use:
webpack.config.js
module.exports = {
  entry: {
    app: "./src/script.tsx",
  },
};
Now, we can try running Webpack again:
$ npx webpack --mode production

assets by status 360 bytes [cached] 1 asset

./src/script.tsx 185 bytes [built] [code generated] [1 error]

ERROR in ./src/script.tsx 5:54

Module parse failed: Unexpected token (5:54)

You may need an appropriate loader to handle this file type, currently no loaders are configured to process this file. See https://webpack.js.org/concepts#loaders

| import App from './App';

|

> const root = createRoot(document.querySelector('#app')!);

| root.render(<App />);

|

webpack 5.74.0 compiled with 1 error in 145 ms
This is better, but we’re still not there yet. Webpack requires a plugin to understand special files such as TypeScript or SASS sources. Therefore, we need to install these development dependencies, too. In this case, we require quite a list of plugins to make everything work:
- ts-loader is a plugin for handling TypeScript files by transforming them into JavaScript
- sass-loader is a plugin for handling SASS files by transforming them into CSS
- css-loader is a plugin for handling CSS by transforming it into a text module
- style-loader is a plugin for handling CSS by transforming it into a JavaScript module
- babel-loader is a plugin for using Babel to transform JavaScript files with additional syntax (such as JSX) into plain JS
- html-webpack-plugin is a plugin for loading an HTML file as a template for the output HTML file
The big disadvantage of Webpack is that everything must be a JavaScript module in the end. Quite often, plugins perform some tricks to end up with empty modules, but they still emit the result (such as a separate image or CSS file) to the filesystem.
You can install the remaining dependencies can be done from the command line:
$ npm i ts-loader sass-loader css-loader style-loader babel-loader @babel/core @babel/preset-env @babel/preset-react html-webpack-plugin --save-devOne thing we also need to supply is a proper tsconfig.json. Without this file, TypeScript won’t be configured correctly. The ts-loader plugin of Webpack works quite closely together with TypeScripts, so it requires this file to know what files to consider and which files to drop. It also uses this to properly transform the file:
tsconfig.json
{
  "compilerOptions": {
    "jsx": "react",
    "module": "ESNext"
  },
  "include": ["./src"],
  "exclude": ["./node_modules"]
}
In this configuration, TypeScript has been set up to process JSX in the default React way (that is, transforming JSX into React.createElement calls). The configuration will also output ESM module syntax (the highlighted option), which is important for Webpack to correctly identify imports and exports. Without this, bundle splitting won’t work if triggered from TypeScript files. Finally, we include all the files in the src folder and exclude the node_modules folder. The latter is a common practice to save a substantial amount of processing time.
Now, to get all these things working together, we need to extend the Webpack configuration quite a bit. First, we need to import (that is, require) all the plugins that we’d like to use. In this case, we only want to use html-webpack-plugin. Next, we need to set up the rules for all the loaders we need to include. This is done via the module.rules array. Finally, we need to define what to do with the remaining assets.
Let’s see how the Webpack configuration could be written to successfully bundle our example:
webpack.config.js
const HtmlWebpackPlugin = require("html-webpack-plugin");
const babelLoader = { // make the config reusable
  loader: "babel-loader", // name of the loader
  options: { // the specific Babel options
    presets: ["@babel/preset-env", "@babel/preset-react"],
  },
};
const tsLoader = {
  loader: "ts-loader", // name of the loader
  options: { // the specific TypeScript loader options
    transpileOnly: true,
  },
};
module.exports = {
  entry: { // defines the entry points
    app: "./src/script.tsx", // named ("app") entry point
  },
  resolve: {
    // defines what extensions to try out for resolving
    extensions: [".ts", ".tsx", ".js", ".jsx", ".json"],
  },
  module: {
    // defines the rules for transforming modules
    rules: [
      { // applied for all *.scss files
        test: /.scss$/i,
        use: ["style-loader", "css-loader", "sass-loader"],
      },
      { // applied for all *.css files
        test: /.css$/i,
        use: ["style-loader", "css-loader"],
      },
      { // applied for all *.js and *.jsx files
        test: /.jsx?$/i,
        use: [babelLoader],
        exclude: /node_modules/,
      },
      { // applied for all *.ts and *.tsx files
        test: /.tsx?$/i,
        use: [babelLoader, tsLoader],
      },
      { // applied for anything other than *.js, *.jsx, ...
        exclude: [/^$/, /.(js|jsx|ts|tsx)$/i, /.s?css$/i,
          /.html$/i, /.json$/i],
        type: "asset/resource",
      },
    ],
  },
  // defines plugins to use for extending Webpack
  plugins: [
    new HtmlWebpackPlugin({
      template: "./src/index.html",
    }),
  ],
};
The preceding code is quite lengthy. One of the often-heard criticisms of Webpack is that its configuration tends to become quite complex quickly.
An important part of a Webpack configuration is the use of regular expressions. The test and exclude parts of a rule work best with a regular expression. Therefore, instead of having a string with some magic behavior or a very explicit and repetitive function, a regular expression is supplied that will check if the current module should be processed by this rule or not.
The options for each loader or plugin are determined by the respective loader or plugin. Therefore, knowing Webpack is not sufficient to successfully write a Webpack configuration. You’ll always need to look up the documentation of the different parts that are used in the configuration. In the preceding configuration, this has been the case with the ts-loader and babel-loader configurations.
Loaders are evaluated from right to left. For instance, in the case of *.scss files, the content is first transformed by sass-loader, which then hands over to css-loader. In the end, all the content is packaged up as a style tag by style-loader.
We don’t always need to use a dedicated package for loaders. Using the type property highlighted in the previous code, we can use some premade loaders from Webpack, such as the resource loader (asset/resource) to return the paths to referenced files. Other options include data URIs (asset/inline) and accessing a file’s raw content (asset/source).
Another way to use Webpack is to start a small server during development. Whenever we make updates to the code, the bundler can reprocess the changed parts and automatically update any active browsing sessions. All in all, this is a very convenient and quite productive way of writing a frontend application.
For Webpack’s live server to work, we’ll need to install yet another tooling dependency:
$ npm install webpack-dev-server --save-devThis allows us to run the serve command:
$ npx webpack serve --mode development

<i> [webpack-dev-server] Project is running at:

<i> [webpack-dev-server] Loopback: http://localhost:8081/

<i> [webpack-dev-server] On Your Network (IPv4): http://172.25.98.248:8081/

<i> [webpack-dev-server] Content not from webpack is served from '/home/node/examples/Chapter06/example01/public' directory

[...]

webpack 5.74.0 compiled successfully in 1911 ms
The live server will keep on running until it is forcefully shut down. On the command line, this can be done by pressing Ctrl + C.
One thing to add to webpack.config.js would be the history API fallback for the development server (the devServer section in a Webpack configuration). This will improve the development experience of a SPA by a fair margin:
// ... like beforehand
module.exports = {
  // ... like beforehand
  devServer: {
    historyApiFallback: true,
  },
};
This setting will respond to all 404 URLs with index.html of the root directory – just like a SPA should be configured in production mode. This way, refreshing when being on a page with a different path than / will still work. Without the shown configuration, the 404 error will be shown in the browser – no SPA will load and handle the route.
Now that we know how bundling the example application works in Webpack, it’s time to look at a more lightweight alternative named esbuild.
Using esbuild
esbuild is quite a new tool that focuses on performance. The key to esbuild’s enhanced performance is that it was written from the ground up in the Go programming language. The result is a native binary that has certain advantages over pure JavaScript solutions.
If esbuild stopped at providing a native solution, it would potentially not be qualified to make this list. After all, flexibility and the option to extend the original functionality are key for any kind of bundler. Luckily, the creator of esbuild has thought about this and come up with an elegant solution. While the core of esbuild remains native – that is, written in Go and provided as a binary – plugins can be written using JavaScript. This way, we get the best of both worlds.
To get started with esbuild, we need to install the esbuild package using npm:
$ npm install esbuild --save-devWith this one installation, you can use esbuild programmatically, as well as directly from the command line.
To run esbuild from the command line, you can use npx together with the esbuild executable:
$ npx esbuildThis will show all the CLI options. To do something, at least one entry point needs to be supplied:
$ npx esbuild --bundle src/script.tsx --outdir=dist --minify
 [ERROR] No loader is configured for ".scss" files: src/style.scss
src/script.tsx:3:7:
3 │ import './style.scss';
[ERROR] No loader is configured for ".scss" files: src/style.scss
src/script.tsx:3:7:
3 │ import './style.scss';
 ~~~~~~~~~~~~~~
[ERROR] No loader is configured for ".mp3" files: src/sound.mp3
src/Audio.tsx:4:22:
4 │ import audioPath from "./sound.mp3";
~~~~~~~~~~~~~
[...]
5 errors
~~~~~~~~~~~~~~
[ERROR] No loader is configured for ".mp3" files: src/sound.mp3
src/Audio.tsx:4:22:
4 │ import audioPath from "./sound.mp3";
~~~~~~~~~~~~~
[...]
5 errorsAs expected, we miss a few configuration steps. As with Webpack, the best way to teach esbuild about these extra bits is by creating a configuration. Unlike Webpack, we do not have a predefined configuration file – instead, the way to configure esbuild is by using it programmatically.
To do that, we must create a new file called build.js and import the esbuild package. We can use the build and buildSync functions to trigger the bundling process via esbuild.
The previous CLI command can be written programmatically like this:
build.js
const { build } = require("esbuild");
build({ // provide options to trigger esbuild's build
  entryPoints: ["./src/script.tsx"], // where to start from
  outdir: "./dist", // where to write the output to
  bundle: true, // bundle the resulting files
  minify: true, // turn on minification
});
Of course, the given script will essentially give us the same error as using the CLI directly. Therefore, let’s add a few things:
- esbuild-sass-plugin integrates the transformation of SASS into CSS files
- @craftamap/esbuild-plugin-html allows us to use template HTML files
Before we can use these two plugins, we need to install them:
$ npm i esbuild-sass-plugin @craftamap/esbuild-plugin-html ––save-devOnce the plugins are installed, we can extend the build.js file so that it includes these two plugins:
build.js
const { build } = require("esbuild");
const { sassPlugin } = require("esbuild-sass-plugin");
const { htmlPlugin } = require("@craftamap/esbuild-plugin-
  html");
build({
  entryPoints: ["./src/script.tsx"],
  outdir: "./dist",
  format: "esm", // use modern esm format for output
  bundle: true,
  minify: true,
  metafile: true, // required for htmlPlugin
  splitting: true, // allow lazy loading
  loader: {
    ".jpg": "file",
    ".webp": "file",
    ".mp3": "file",
    ".mp4": "file",
  },
  plugins: [
    sassPlugin(),
    htmlPlugin({
      files: [
        {
          entryPoints: ["./src/script.tsx"],
          filename: "index.html",
          scriptLoading: "module", // because of esm
          htmlTemplate: "./src/index.html",
        },
      ],
    }),
  ],
});
Along the way, we taught esbuild about our preference for the given file extensions. With the loader section, we map extensions to specific file loaders. The file type refers to a loader that will produce an external file. The import of that file will result in a reference to the file’s relative output path.
To enable bundle splitting, the splitting option needs to be set. This also makes the use of the esm format necessary. It’s the only format where esbuild knows how to produce scripts that can lazy load something. Additionally, htmlPlugin requires esbuild to produce a metafile to reflect the build artifacts. Therefore, the metafile option needs to be set to true.
Like Webpack, the ecosystem of esbuild is what makes this tool so flexible, yet hard to master. The options for the different plugins need to be collected from the different plugin documentation. Like the Webpack ecosystem beforehand, the quality of these plugins, as well as their maturity and the community behind them, varies a lot.
If you want to have a development server – just like the one we added to Webpack in the previous section – you can use the serve function, which can be imported from esbuild. The first argument describes server-specific settings such as the port where the service should be listening. The second argument comprises the build options – that is, the options we are supplying right now – as the only argument to the build function.
Let’s write another script called serve.js to illustrate this usage:
serve.js
const { serve } = require("esbuild");
const { sassPlugin } = require("esbuild-sass-plugin");
const { htmlPlugin } = require("@craftamap/esbuild-plugin-
  html");
// use helper from esbuild to open a dev server
serve(
  {
    // will be reachable at http://localhost:1234
    port: 1234,
  },
  {
    // same options as beforehand (supplied to build())
    // ...
  }
);
One thing that esbuild does not do at the moment is HMR. Consequently, the developer’s experience of just using esbuild may be a little bit underwhelming in that area when compared to similar tools.
With this in mind, let’s explore yet another option that is widely used for bundling – let’s have a look at the configuration-less Parcel bundler.
Using Parcel
When Parcel arrived in the community, the hype around it was massive. The reason for this was to be found in one new feature: configuration-free bundling. Parcel tried to leverage information that was already given in package.json – or configuration files written for specific tools such as Babel. Using this mechanism, the creators of Parcel thought to remove the complexity of configuring a bundler.
Ultimately, however, the whole aspect backfired in some sense. As mentioned previously, a bundler requires some flexibility. To achieve this kind of flexibility, a sound configuration system is necessary. While the configuration system of Webpack is a bit too verbose and complex, the one provided with esbuild might be a bit too low-level.
The successor of the original Parcel now also offers an optional configuration system, which tries to be right between the verbosity of Webpack and the low-level one of esbuild. This makes Parcel no longer configuration-free, but rather a configuration-less bundler.
To get started with Parcel, we need to install the parcel package using npm:
$ npm install parcel ––save-devWith this installation, you can use Parcel programmatically, as well as directly from the command line.
To run Parcel from the command line, you can use npx together with the parcel executable. For Parcel, the entry point can be the HTML file:
$ npx parcel src/index.htmlIn our case, we still need to modify the HTML so that it also points to the other source files to continue building up the module graph. A version of the index.html file that fits much better with Parcel would look as follows:
index.html
<!DOCTYPE html>
<html lang="en">
<head>
    <meta charset="UTF-8">
    <meta http-equiv="X-UA-Compatible" content="IE=edge">
    <meta name="viewport" content="width=device-width,
      initial-scale=1.0">
    <title>Bundler Example</title>
    <link rel="stylesheet" href="./style.scss">
</head>
<body>
<div id="app"></div>
<script type="module" src="./script.tsx"></script>
</body>
</html>
Importantly, we’ve added the stylesheet and script entry points. These will be detected by Parcel and properly bundled. In the end, the HTML file will be used as a template – with the entry points being replaced by the bundled stylesheet and script file references.
Starting Parcel right now will already partially work, but at this time, Parcel still has some problems with our audio and video files. While Parcel knows most image files (such as *.webp or *.png) already, some other assets need to be configured first. In Parcel, this means creating a .parcelrc file and adding a section about the transformers to use:
.parcelrc
{
  "extends": "@parcel/config-default",
  "transformers": {
    "*.{mp3,mp4}": ["@parcel/transformer-raw"]
  }
}
The configuration instructs Parcel to still rely on the very well-chosen defaults. However, we also added the definitions for the two file types in question to the section that handles the transformation logic. Like Webpack or esbuild, Parcel also has an in-built type to handle such imports by returning a filename that can be used within the code. In the case of Parcel, this type is called @parcel/transformer-raw.
Now, let’s see if Parcel is already running:
$ npx parcel src/index.html

Server running at http://localhost:1234

 Built in 12ms
By default, Parcel will start a development server. This already contains everything that is needed for developing an application. Quite convenient. If we want to build the files – for example, to place the output artifacts on a server – we can use the build subcommand:
$ npx parcel build src/index.html

 Built in 6.11s

dist/index.html                  402 B    4.73s

dist/index.3429125f.css       39.02 KB    149ms

dist/index.cb13c36e.js       156.34 KB    1.90s

dist/Home.bf847a6b.js          1.05 KB    148ms

dist/river.813c1909.webp      29.61 KB    150ms

dist/snow.390b5a72.jpg        13.28 KB    138ms

dist/Video.987eca2d.js           908 B    1.90s

dist/earth.4475c69d.mp4       1.5 MB     61ms

dist/Video.61df35c5.js       611.76 KB    4.62s

dist/Audio.677f10c0.js           908 B    149ms

dist/sound.6bdd55a4.mp3      746.27 KB     92ms
1.5 MB 61ms
dist/Video.61df35c5.js 611.76 KB 4.62s
dist/Audio.677f10c0.js 908 B 149ms
dist/sound.6bdd55a4.mp3 746.27 KB 92msThere are CLI flags and options to set almost everything, such as the output directory. Nevertheless, by default, the quite common dist folder is chosen.
Last, but not least, let’s have a look at the quite trendy Vite bundler, which tries to combine the advantages of all previous approaches into a single tool.
Using Vite
The latest addition to the set of popular bundlers is Vite. It combines a few existing tools – such as Rollup.js and esbuild – together with a unified plugin system to allow rapid development. Vite’s approach is to give you the power of Webpack at the speed of esbuild.
Originally, Vite was built by the creator of the frontend framework Vue. However, as time went on, Vite’s plugin system became a lot more powerful. With its increased API surface, other frontend frameworks such as React or Svelte could be supported. Now, Vite has evolved from a single-purpose tool to a real Swiss Army knife – thanks to a well-thought-out plugin mechanism with an active community.
To get started with Vite, we need to install the vite package using npm:
$ npm install vite --save-devWith this installation, you can use Vite programmatically, as well as directly from the command line.
One thing to know about Vite is that it embraces having an index.html file as an entry point even more than Parcel. For Vite to work as intended, we need to move the index.html file from the src folder to the parent directory – that is, the project’s root folder.
As we did previously, we should set the references properly:
index.html
<!DOCTYPE html>
<html lang="en">
<head>
    <meta charset="UTF-8">
    <meta http-equiv="X-UA-Compatible" content="IE=edge">
    <meta name="viewport" content="width=device-width,
      initial-scale=1.0">
    <title>Bundler Example</title>
    <link rel="stylesheet" href="./src/style.scss">
</head>
<body>
<div id="app"></div>
<script type="module" src="./src/script.tsx"></script>
</body>
</html>
To run Vite from the command line, you can use npx together with the vite executable:
$ npx vite

  VITE v3.0.5  ready in 104 ms

    Local:   http://localhost:5173/

    Network: use --host to expose
Local: http://localhost:5173/
Network: use --host to exposeThis starts quickly as nothing has been bundled or transformed yet. Only when we hit the server will Vite start to transform things – and only the things that we are currently looking at. If you are interested in a more realistic picture, then the preview subcommand can be handy. It does a production build but exposes the outcome via the development server.
Of course, like with Parcel, we can still produce files that can be placed on a server. Very similar to Parcel, we can do this with the build subcommand:
$ npx vite build

vite v3.0.5 building for production...

 110 modules transformed.

dist/assets/river.4a5afeaf.webp   29.61 KiB

dist/assets/snow.cbc8141d.jpg     13.96 KiB

dist/assets/sound.fa282025.mp3    746.27 KiB

dist/assets/earth.71944d74.mp4    1533.23 KiB

dist/index.html                   0.42 KiB

dist/assets/Home.82897af9.js      0.45 KiB / gzip: 0.23 KiB

dist/assets/Video.ce9d6500.js     0.36 KiB / gzip: 0.26 KiB

[...]

dist/assets/index.404f5c02.js     151.37 KiB / gzip: 49.28 KiB

dist/assets/Player.c1f283e6.js    585.26 KiB / gzip: 166.45 KiB
110 modules transformed.
dist/assets/river.4a5afeaf.webp 29.61 KiB
dist/assets/snow.cbc8141d.jpg 13.96 KiB
dist/assets/sound.fa282025.mp3 746.27 KiB
dist/assets/earth.71944d74.mp4 1533.23 KiB
dist/index.html 0.42 KiB
dist/assets/Home.82897af9.js 0.45 KiB / gzip: 0.23 KiB
dist/assets/Video.ce9d6500.js 0.36 KiB / gzip: 0.26 KiB
[...]
dist/assets/index.404f5c02.js 151.37 KiB / gzip: 49.28 KiB
dist/assets/Player.c1f283e6.js 585.26 KiB / gzip: 166.45 KiBFor this example, Vite is the only bundler that just works – at least once all the prerequisites have been fulfilled. If you require a custom configuration, such as for adding some plugins, then you can follow Webpack’s approach and create a vite.config.js file in the project’s root folder.
Now, let’s recap what you’ve learned in this chapter.
Summary
In this chapter, you learned what a bundler is, why you need it, what bundlers exist, and how you can configure and use them. You are now able to take your web projects from their raw source code to build production-ready assets.
Equipped with detailed knowledge about bundlers, you can create very reliable code bases that are tailored toward efficiency. Not only will unnecessary code be removed upon bundling, but also all referenced files will be processed and taken into consideration. Therefore, you’ll never have to worry about missing a file.
The large variety of existing bundlers can be intimidating at first. While there are some obvious choices, such as the very popular Webpack bundler, other options may be even better due to less complexity or better performance, depending on the project you have at hand. If in doubt, you can refer to the Comparing available bundlers section of this chapter to ascertain which bundler might be the best fit for you.
In the next chapter, we will take closer look at another category of crucial development tools. We’ll see how testing tools give us confidence that our code works as it should, both today and in the future.