9
Structuring Code in Monorepos
In the previous chapter, you learned about everything to create and publish great libraries and tools to enhance your projects. While some packages are created in a bit of vacuum, most already have a consuming application in mind. In this case, having two separate repositories – that is, one for the application and one for the library – is quite some overhead. After all, any change to the library should be at least partially tested before the library is published. A good way to make this relation more efficient is to structure this code in a monorepo.
A monorepo is a single code repository that hosts multiple projects. Since we focus on Node.js projects, we can say that a monorepo is a repository containing multiple packages identified by their own package.json.
Today, monorepos are frequently used to power some of the largest Node.js project code bases in the world. If you want to properly read and contribute to projects such as Angular, React, or Vue, you’ll need extensive knowledge about monorepos and the tools that make monorepos possible. For your own projects, a good structure – quite often provided by implementing monorepos – can also be crucial.
We will cover the following key topics in this chapter:
- Understanding monorepos
- Using workspaces to implement monorepos
- Working with Lerna to manage monorepos
- Working with Rush for larger repositories
- Integrating Turborepo instead of or with Lerna
- Managing a monorepo with Nx to enhance Lerna
Technical requirements
The complete source code for this chapter is available at https://github.com/PacktPublishing/Modern-Frontend-Development-with-Node.js/tree/main/Chapter09.
The CiA videos for this chapter can be accessed at https://bit.ly/3EjGZTL.
Understanding monorepos
The structure of a dedicated repository has always been very similar; we have a single package.json in the root, a single node_modules folder containing the resolved dependencies, and a set of source and configuration files, usually scattered between the root and some specific folders such as src. A quite popular setup is shown in Figure 9.1:

Figure 9.1 – Common setup for a repository with a single package
In the common setup, we have some folders for CI/CD pipeline definitions and potential tools that are useful for managing the repository, as well as auxiliary files such as project documentation. Of course, for a Node.js project, we’ll see a node_modules directory, as well as a package.json file.
In contrast, a monorepo will contain multiple package.json files with multiple node_modules (or alternative) folders. Likewise, the source files and potentially some of the configuration will also be scattered across multiple locations. A very common structure is shown in Figure 9.2 for the main part and Figure 9.3 for the individual packages:

Figure 9.2 – Common setup for a repository with multiple packages
In comparison to Figure 9.1, the hierarchy of the outlined folders is a bit more sophisticated. Now, we don’t see the source files immediately and need to descend into some of the directories inside the packages folder:
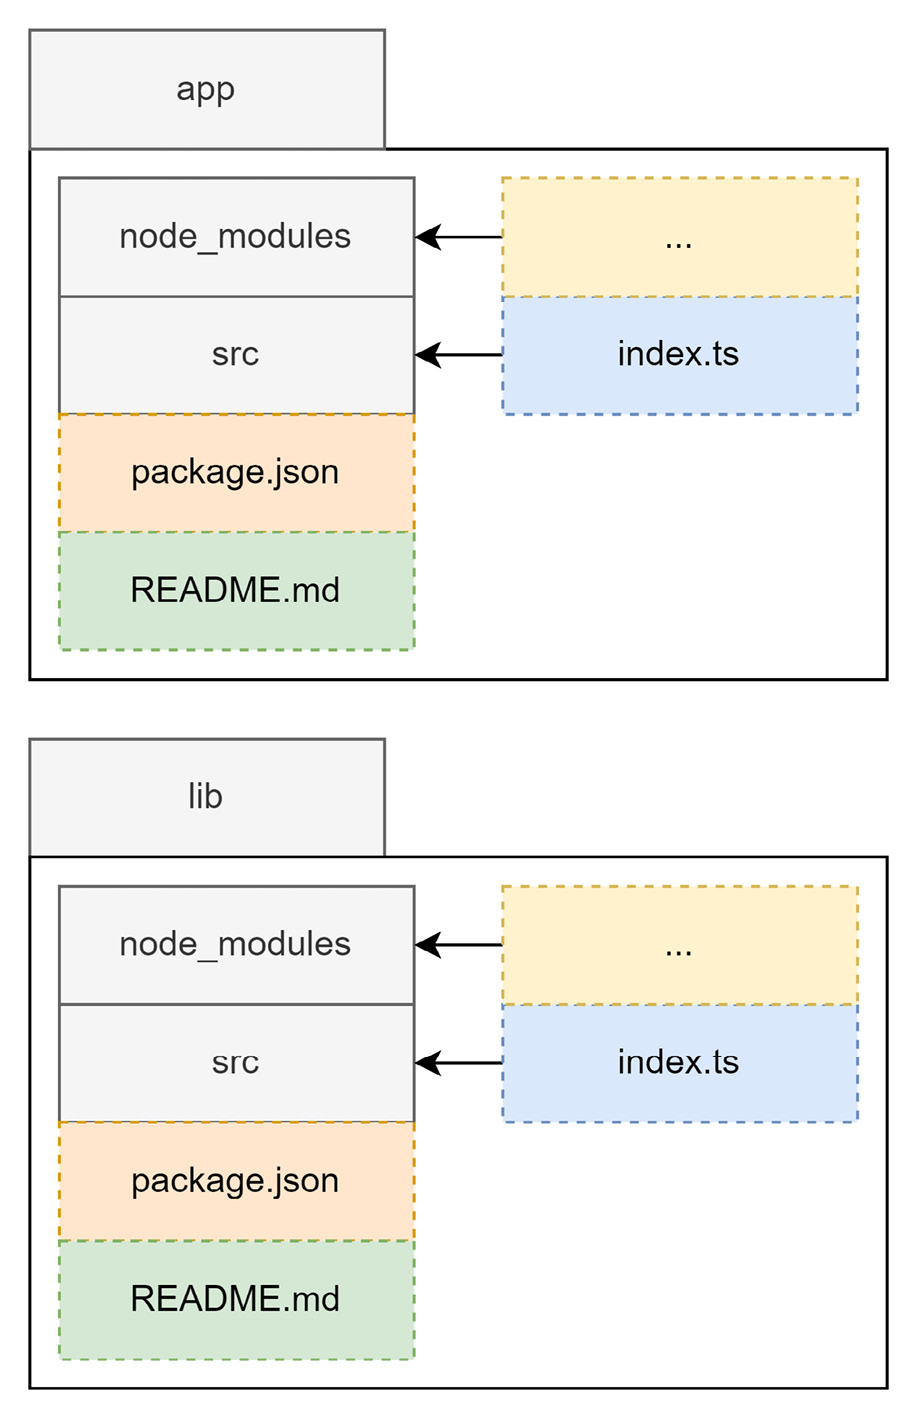
Figure 9.3 – The contents of the individual package directories
Ideally, the packages contained in a monorepo are crafted in such a way that makes them rather easy to extract later on. Let’s say you have a specific library in your monorepo that should now be handled by another team. If your monorepo was created to serve as the single point of development for your current team, then transferring this library makes sense.
Quite often, common development concerns, such as the usual packages contained in the devDependencies of a package.json file, are concentrated in a dedicated package.json file. In many monorepos, this package.json file is found in the root directory of the monorepo. While this pattern makes sense from a maintenance point of view, it can also bring up challenges when it comes to library extraction. After all, you’ll now need to decide what dependencies to add to restore the development capability of the extracted library.
In general, multiple challenges make supporting monorepos a task of its own. Here are some of the most pressing concerns:
- How are dependencies efficiently shared to avoid installing the same dependencies over and over again?
- How can packages be treated as if they are dependencies installed from a registry?
- How can common tasks such as build steps be run in a way that works consistently?
Let’s go through these one by one. For (1), the idea is that monorepos can be more efficient than just having many different directories, where you’d need to run npm install in each of them. Running npm install in each directory would be a massive overhead, duplicating not only direct dependencies but also indirect ones – that is, dependencies of installed dependencies.
While (1) is only a performance (installation time and disk space) concern, the issue with (2) is developer convenience. The reason for having a monorepo in the first place is to have packages that depend on one another in close proximity. This way, a bug should be visible at development time, rather than later at integration time when a package has already been published. The usual mechanism of npm for this is to use the npm link command, which will make a local package globally available for referencing. There are, however, multiple downsides to this mechanism. Additionally, it is not very convenient to use this command for every package.
Finally, the dependencies between the packages in a monorepo require special attention when running commands. In terms of (3), tasks such as building the source code need to be performed in reverse reference order. This means, that in the case that package A depends on package B, the build process of package B needs to be done before package A is built. The reason is that through the dependency, the content of package A may only build successfully if the content of package B has been fully created – that is, the package has been built. Similar constraints arise for testing and when publishing a package.
With this in mind, let’s start with one of the easiest options for implementing a monorepo: leveraging the workspaces feature that comes with the most popular npm clients.
Using workspaces to implement monorepos
As the need for monorepos grew, npm clients tried to help users by incorporating them. The first of the big three was Yarn. Already, with the first version of Yarn, a new concept called Yarn workspaces was introduced, which was represented by a special field called workspaces in package.json:
package.json
{
  "name": "monorepo-root",
  "private": true,
  "workspaces": [
    "packages/*"
  ]
}
Yarn workspaces require a package.json at the root directory of the monorepo. This package.json won’t be used for publishing and needs to have the private field set to true. The workspaces field itself is an array that contains the paths to the different packages. Wildcards using the * or ** symbols – as shown here – are allowed.
With npm v7, the standard npm client also received a workspaces feature. The feature is pretty much the same as the implementation in Yarn. Here, we need to have a package.json in the root, too. Likewise, the behavior is controlled by a workspaces field.
Finally, the implementation in pnpm is a bit different. Here, we need a dedicated file called pnpm-workspace.yaml. This file contains the paths to the different packages:
pnpm-workspace.yaml
packages:
  - 'packages/*'
In contrast to the other two npm clients, with pnpm, you don’t need a package.json file in the root directory. Since the workspaces definition is in a separate file, this file alone is sufficient to enable the workspaces feature of pnpm.
To illustrate that, let’s create a new directory and add the preceding pnpm-workspace.yaml file to it. Then, create a packages subfolder. In there, add two more folders, p1 and p2. In each of these directories, run npm init -y. You can now modify the contained package.json files, adding some dependencies to both.
From the root directory with the pnpm-workspace.yaml file, run the following:
$ pnpm install

Scope: all 2 workspace projects

Packages: +5

+++++

Packages are hard linked from the content-addressable store to the virtual store.

  Content-addressable store is at: /home/node/.local/share/pnpm/store/v3

  Virtual store is at:             node_modules/.pnpm

Progress: resolved 5, reused 5, downloaded 0, added 5, done
While editing the respective package.json file is always possible, pnpm also makes it easy to add a dependency to some contained package – or workspace in the terminology of pnpm.
Let’s say you want to add react-dom to the p1 workspace:
$ pnpm add react-dom --filter p1

No projects matched the filters "/home/node/ Chapter09/example01" in "/home/node/Chapter09/example01"

.                                        |   +2 +

Progress: resolved 5, reused 5, downloaded 0, added 0, done
The --filter argument allows you to select the workspaces where the dependency should be added. While full names are accepted, the names can also be specified with wildcards (*).
Specifying dependencies in monorepos
Dependencies on other packages contained in the same monorepo are declared just like any other dependency – in the corresponding package.json fields, such as dependencies or devDependencies. The specified version, however, is crucial here. You need to make sure to either match the version of the referenced package (e.g., 1.2.3 or ^1.0.0 would both correctly match a package in version 1.2.3) or use the wildcard specifier *. Today, most package managers also support the special workspace protocol. With this, you can write workspace:* instead of a version to link against a package in another workspace.
The workspaces option is certainly appealing to optimize packages and make their linking quite easy; however, it fails to make common monorepo tasks more approachable or convenient. An alternative is to use a tool such as Lerna on top of a workspace.
Working with Lerna to manage monorepos
Lerna is one of the oldest tools for managing monorepos. We can even say to some degree that Lerna not only made monorepos manageable but also popular. Lerna is the backbone of some of the most important monorepos, such as Jest. It also was the original choice for projects such as Babel or React.
Originally, Lerna was mainly picked because it correctly installed and resolved all the packages. At this time, no package manager was capable of doing that intrinsically. However, today, Lerna is most often used together with the workspace features offered by the different package managers. Of course, you can still use the original mode of Lerna, where plain npm is used to install and link the different packages. So, how does Lerna fit into this new role when the whole installation is done by the chosen package manager anyway?
It turns out that Lerna is a really great task-running layer on top of a package manager. For instance, running a package.json script such as build in all the contained packages is as straightforward as invoking the following:
$ npx lerna run buildThis would only run the script in the packages that contain this kind of script. In comparison, Yarn would actually error out if one of the packages did not have a build script.
To get started with Lerna, you need to initialize the current repository as a Lerna monorepo. For this, the init command can be used:
$ npx lerna initOnce initialized, the repository should contain a lerna.json and a package.json file. By inspecting these files, you’ll notice that lerna.json contains a version (by default 0.0.0), but package.json does not. This is intentional. Lerna will actually manage the version here. The default choice is uniform versioning – that is, all packages will always get the same version. The other option is independent versioning. Here, each package can have its own version number. This is handy if different packages have their own release cycle.
To enable independent versioning, we can change lerna.json:
lerna.json
{
  // ... as beforehand
  "version": "independent"
}
Alternatively, we could also initialize the repository using the --independent flag for the lerna init command.
The package.json file contains the workspaces property. By default, this is configured to include all directories from the package directory as packages. In the given configuration, Lerna would use npm as a package manager. In any case, the whole package management is left to an actual npm client.
As mentioned, Lerna is really good at running tasks. What else is considered a strength of Lerna? The whole publishing and version management. We’ve already seen that Lerna knows two modes: independent and uniform versioning. In the independent versioning mode, Lerna will check the published versions with the current version that is about to be published. Only in the case of a new version will the publish command actually run.
Let’s see how the packages from the previous example would actually be published with Lerna. We’ll use a local registry running Verdaccio for this:
$ npx lerna publish --registry http://localhost:4873

lerna notice cli v5.5.2

lerna info versioning independent

lerna info Looking for changed packages since [email protected]

? Select a new version for p1 (currently 0.0.0) Major (1.0.0)

? Select a new version for p2 (currently 0.0.0) Major (1.0.0)

Changes:

 - p1: 0.0.0 => 1.0.0

 - p2: 0.0.0 => 1.0.0

? Are you sure you want to publish these packages? Yes

lerna info execute Skipping releases

lerna info git Pushing tags...

lerna info publish Publishing packages to npm...

[...]

Successfully published:

 - [email protected]

 - [email protected]

lerna success published 2 packages
Without additional flags, Lerna will guide us through the whole publishing process. As we specified independent versioning, the tool will ask us the version to pick for each contained package. In the case here, we selected 1.0.0 for both packages.
Lerna also does a bit more than just running npm publish for each package. It is strongly related to Git as a version control system. It also ties the publish to the current commit and marks the publish via Git tags, which are automatically pushed to a potential origin such as GitHub.
Another thing that Lerna brings to the table is extensive information about a monorepo. Since Lerna needs to know which packages exist and what their relations are quite well, it also makes sense that this information is exposed to us.
A great command to use to see what exists in the current monorepo is lerna list:
$ npx lerna list --graph

lerna notice cli v5.5.2

lerna info versioning independent

{

  "p1": [

    "react",

    "react-dom"

  ],

  "p2": [

    "react",

    "react-dom"

  ]

}

lerna success found 2 packages
There are multiple options – all geared to fine-tune what information to include, exclude, and how to represent it. Ultimately, this is designed to make consumption in many ways possible. Independent of whether you consume this from a script or directly, the lerna tool has the right options to present the data accordingly.
Lerna has certainly been established as one of the go-to options for handling monorepos; however, its configuration options can be daunting, and making it efficient in a larger repository could be troublesome. An alternative is to use an opinionated tool instead. One of the best options in this category is Rush.
Working with Rush for larger repositories
While Lerna provided a lot of the utility that made monorepos possible at all, its configuration and flexibility also posed some challenges. Furthermore, finding best practices proved to be difficult. Consequently, plenty of quite opinionated alternatives to using Lerna have been born. One of the most successful ones is Rush from Microsoft.
Rush allows a variety of npm clients to be used. Classically, Rush used to be npm-only. Today, Rush recommends using pnpm, which is also the default client when setting up a monorepo with Rush.
To work efficiently with Rush, a global installation of the tool is recommended:
$ npm install -g @microsoft/rushAfter a successful installation, the rush command-line utility can be used. As with npm, an init subcommand to actually initialize a new project exists:
$ rush initThis will create and update a couple of files. Most notably, you’ll find a rush.json file in the current folder. This file needs to be edited next. However, before you continue, make sure to remove the files you don’t need. For instance, Rush added a .travis.yml, which can be useful if you use Travis for your CI/CD pipelines. In case you don’t know what Travis is or you know already that you don’t want to use Travis, just delete that file.
Since with Rush, every package is added explicitly, there is no direct need for a packages subfolder. If you still prefer to group the contained packages in this way, you can of course do so.
In order to make Rush aware of the contained packages, we need to edit the rush.json file in the root folder. In our case, we want to add two new packages:
rush.json
{
  // keep the rest as is
  "projects": [
    {
      "packageName": "p1",
      "projectFolder": "packages/p1"
    },
    {
      "packageName": "p2",
      "projectFolder": "packages/p2"
    }
  ]
}
Once the file is saved, you can run the following command – just make sure that the given directories really exist and contain a valid package.json file:
$ rush updateAmong the given output, you should see some output containing messages similar to the ones we’ve seen when we introduced pnpm. As mentioned, under the hood, Rush uses pnpm to make package installation quite efficient.
Adding or updating a dependency in a package involves running rush add within the package directory. Let’s say that we want to add react-router to p1:
$ cd packages/p1

$ rush add --package react-router
To run commands, Rush comes with two primitives. One is the generic rushx command, which can be seen as a wrapper around npm run. Let’s say the p1 package defines a hello command as follows:
packages/p1/package.json
{
  // as beforehand
  "scripts": {
    "hello": "echo 'Hi!'"
  }
}
Running this script can be done as follows:
$ cd packages/p1 && rushx hello

Found configuration in /home/node/examples/Chapter09/example02/rush.json

Rush Multi-Project Build Tool 5.68.2 - Node.js 14.19.2 (LTS)

> "echo 'Hi!'"

Hi!
The other primitive is to use in-built commands such as rush build or rush rebuild. They assume that every package contains a build script. While the rebuild command will run all the build scripts, the build command actually uses a cache to enable an incremental build process – as in, reuse as much as possible from the output of the previous run.
While Rush is very restrictive and requires taking possession of the whole repository, an alternative is to use a more lightweight tool such as Turborepo.
Integrating Turborepo instead of or with Lerna
So far, we’ve seen quite a variety of tools in this chapter. While the workspaces feature of modern npm clients is already more than sufficient for smaller monorepos, larger ones require more dedicated tools to be manageable. In cases where Lerna is a bit too simplistic and Rush is too opinionated, another alternative exists – Turborepo, or Turbo for short. It can be seen as a replacement for or an addition to Lerna.
Starting from scratch is rather easy – Turbo comes with an npm initializer:
$ npm init turboThis will open a command-line survey and scaffold the directory with some sample code. In the end, you should see a couple of new files being created, such as a turbo.json or a package.json file. Furthermore, Turbo creates apps and packages directories containing some sample code.
Let’s show the strength of Turbo by running the build script:
$ npx turbo run buildIn contrast to Lerna, this will not run the build script in each package – following the package graph. Instead, this will run one of the pipelines defined in turbo.json. In there, you can see the following:
turbo.json
{
  "$schema": "https://turborepo.org/schema.json",
  "pipeline": {
    "build": {
      "dependsOn": ["^build"],
      "outputs": ["dist/**", ".next/**"]
    },
    "lint": {
      "outputs": []
    },
    "dev": {
      "cache": false
    }
  }
}
The given pipeline property defines a set of Turbo build pipelines. Every given key (in the definition here, build, lint, and dev) can then be run via turbo run. The specifics of each pipeline are specified by its given value. For instance, the dev pipeline does not use a cache, while the lint pipeline does not produce any outputs. By default, each pipeline runs a script with the same name in each package.
The build pipeline here specifies some output directories that are cached to perform incremental builds. It also specifies that the build script has to be run in dependencies before it can run in the current package. Therefore, if you have two packages, p1 and p2, where p1 depends on p2, the build script of p2 needs to run before the build script of p1 can be invoked.
Besides the “in a different workspace” dependency (e.g., ^build), you can also specify “in the same workspace.” For instance, if the build script depends on a prebuild script, you’d just write prebuild:
turbo.json
{
  "pipeline": {
    "build": {
      "dependsOn": ["^build", "prebuild"]
    }
}
The turbo run command can also invoke multiple commands at the same time:
$ npx lerna turbo lint buildThe result is a pretty efficient run since lint does not specify dependencies – so all linting can be done in parallel, while the build is executed hierarchically. The idea is illustrated in Figure 9.4:

Figure 9.4 – Task planning and execution from Turbo
Turbo is not the only tool that can be used to make monorepos more efficient. A good alternative that goes beyond task running is Nx.
Managing a monorepo with Nx to enhance Lerna
Earlier in this chapter when we discussed Lerna, one thing we did not mention is that there is a special key in lerna.json, which is called useNx and configured to be true. This is a new addition to Lerna 5, which is now maintained by the people behind Nx – another popular solution for managing monorepos. So, what does this actually bring and how can it enhance Lerna – or any other monorepo management tool?
With Lerna or without?
Nx does not depend on Lerna and the use of Nx within Lerna is also optional. Therefore, the two technologies can be seen as non-exclusive – rather, they complete each other. In the end, it is your choice to decide which technologies you’d like to use. The example in this section, for instance, does not use Lerna.
We start with a new repository again. This time, we’ll use the nx-workspace npm initializer provided by Nx:
$ npm init nx-workspace -- --preset=react

 Workspace name (e.g., org name)     · example05

 Application name                    · example

 Default stylesheet format           · css

 Enable distributed caching to make your CI faster · Yes

[...]
Workspace name (e.g., org name) · example05
Application name · example
Default stylesheet format · css
Enable distributed caching to make your CI faster · Yes
[...]As with Turbo, we get a command-line survey. The initial preset (in this case, react) defines some of the questions that appear. There are other similarities to Turbo, too. For instance, running something is done via nx, such as the following:
$ npx nx buildThis will look for the Nx build task executor of the current application (in this case, example) in a given environment (by default, production). Here is an explicitly written example:
$ npx nx run example:build:productionThe task executor is specified in the project.json of a package. Nx uses plugins to actually run these executors; in the case of our sample project with the react preset, the @nrwl/webpack package is used as the plugin.
In order for Nx to work, each package requires either a package.json or a project.json file. Both can be specified, too. In this case, Nx will actually merge them internally to get the desired configuration. Usually, you’d want a package.json if you wanted to use npm scripts. The project.json file contains Nx task executors, which are a bit more powerful, but unfortunately, are beyond the scope of this quick introduction.
Let’s stop here and recap what we learned in this chapter.
Summary
In this chapter, you learned how to organize multiple Node.js projects in a single repository known as a monorepo. You’ve seen different techniques and tools for maximizing efficiency and dealing with multiple packages and their dependencies.
You are now ready to deal with the largest code bases available. Independent of whether a code base just uses workspaces with one of the npm clients or some other tool such as Lerna on top of it, you are able to understand its structure, run commands, and add new packages in no time.
In the next chapter, we will conclude with a look at WebAssembly, which not only offers a lot of flexibility for code running in the browser but can also be used to run arbitrary languages in Node.js.