8
Publishing npm Packages
Before now, our main focus has been to learn everything about improving and contributing to existing projects, but quite often, this is not everything. Some projects will need to be initiated correctly by you and one part of this process is to decide which packages should actually be reused.
We’ve already learned that reusability in Node.js is primarily gained through the module system, which can be enhanced by third-party dependencies in the form of npm packages. In this chapter, you’ll learn how you can publish npm packages yourself. This way, a functionality implemented once can be shared among the team working on the same project or with anyone.
To achieve our goal in this chapter, first, we’ll set up a simple library to serve our case well. Then, we publish this library to the official npm registry in a way that makes the code available to any Node.js developer. If you want to keep your library a bit less exposed, then the following sections will be interesting for you. In these, you will first learn how to select other registries before you actually select a local registry to use for publishing and installation.
Finally, we’ll also look at ways to broaden the scope of our library – by making it isomorphic or exposing it as a tool. In summary, we’ll cover the following key topics in this chapter:
- Publishing to the official registry
- Selecting another npm registry via .npmrc
- Setting up Verdaccio
- Writing isomorphic libraries
- Publishing a cross-platform tool
Technical requirements
The complete source code for this chapter is available at https://github.com/PacktPublishing/Modern-Frontend-Development-with-Node.js/tree/main/Chapter08.
The CiA videos for this chapter can be accessed at https://bit.ly/3UmhN4B.
Publishing to the official registry
Let’s start by creating a small library that uses a structure that can be seen very often in Node.js projects. The structure consists of an src folder, where the original sources are located, and a lib folder, containing the output to be used by the target system. The target system could either be something such as a bundler for browser applications or a specific version of Node.js.
To initialize this kind of project, we can use the npm command-line utility as we did before:
$ npm init -yNow, we’ll set everything up. First, we will install esbuild as a development dependency. This can be very helpful for transforming our source files into usable library files:
$ npm install esbuild --save-devNext, we change package.json to fit our needs:
package.json
{
  "name": "lib-test-florian-rappl",
  "version": "1.0.0",
  "description": "Just a test library",
  "keywords": [],
  "author": "Florian Rappl",
  "license": "MIT",
  "main": "lib/index.js",
  "source": "src/index.js",
  "scripts": {
    "build": "esbuild src/*.js --platform=node --outdir=lib
      --format=cjs"
  },
  "devDependencies": {
    "esbuild": "^0.15.0"
  }
}
Importantly, replace the chosen placeholder’s name (florian-rappl in the name field and Florian Rappl in the author field) with your name. For the name field, make sure to only use letters allowed for package name identifiers. Also, feel free to change the selected license.
Licenses
An important piece of information in every package.json is the license field. While the MIT License is a very good choice for many open-source projects, it is by no means the only one. Other popular choices include the Apache License 2.0, BSD 3-Clause, and the ISC License.
Now, we’ll add some content to our source file:
src/index.js
import { readFile } from "fs";
import { resolve } from "path";
export function getLibName() {
  const packagePath = resolve(__dirname,
    "../package.json");
  return new Promise((resolve, reject) => {
    readFile(packagePath, "utf8", (err, content) => {
      if (err) {
        reject(err);
      } else {
        const { name, version } = JSON.parse(content);
        resolve(`${name}@${version}`);
      }
    });
  });
This file was written in a way that makes sense for us as developers, but cannot be run by Node.js directly. The problem is twofold. First, we are using ESM syntax without guaranteeing that Node.js supports this. Second, we are mixing ESM constructs such as import and export with CommonJS constructs such as __dirname.
Luckily, we already installed esbuild to take care of this, with the defined build script actually using it for convenience:
$ npm run build

> [email protected] build /home/node/code/example01

> esbuild src/*.js --platform=node --outdir=lib --format=cjs

  lib/index.js  1.4kb

 Done in 2ms
At this point, we have two directories in our project: src, containing the original sources, and lib, containing the CommonJS output. This is also reflected in package.json, where the source field points to src/index.js and the main field points to lib/index.js.
Just as a reminder: the main field tells Node.js what module to use in case the package is included via require – for example, require('lib-test-florian-rappl') would reference and evaluate the lib/index.js file.
Let’s say you want to publish this package now to the official npm registry. For this, you first need an account on npmjs.com/signup. Once successfully registered and logged in, you should see a view similar to that in Figure 8.1:

Figure 8.1 – The view on npmjs.com once logged in
On your own machine, you can now authenticate to the official npm registry by running the following:
$ npm loginThis will request your username and password. Alternatively, you could authenticate using so-called access tokens. This is especially useful for scripts, such as automation running in a CI/CD pipeline. To generate a new access token, follow the link highlighted in Figure 8.1.
Now that you have authenticated the npm utility, you can go ahead and publish your package:
$ npm publish

npm notice

npm notice   [email protected]

npm notice === Tarball Contents ===

npm notice 1.5kB lib/index.js

npm notice 425B  src/index.js

npm notice 344B  package.json

npm notice === Tarball Details ===

npm notice name:          lib-test-florian-rappl

npm notice version:       1.0.0

npm notice package size:  1.1 kB

npm notice unpacked size: 2.3 kB

npm notice shasum:        2b5d224949f9112eeaee435a876a8ea15ed3e7cd

npm notice integrity:     sha512-cBq1czwmN4vep[...]/vXrORFGjRjnA==

npm notice total files:   3

npm notice

+ [email protected]
[email protected]
npm notice === Tarball Contents ===
npm notice 1.5kB lib/index.js
npm notice 425B src/index.js
npm notice 344B package.json
npm notice === Tarball Details ===
npm notice name: lib-test-florian-rappl
npm notice version: 1.0.0
npm notice package size: 1.1 kB
npm notice unpacked size: 2.3 kB
npm notice shasum: 2b5d224949f9112eeaee435a876a8ea15ed3e7cd
npm notice integrity: sha512-cBq1czwmN4vep[...]/vXrORFGjRjnA==
npm notice total files: 3
npm notice
+ [email protected]This will package your project as a compressed archive. Then, the utility will upload the tarball to the official npm registry.
Now, you can go to npmjs.com to look for your package name. You should see the package info page similar to Figure 8.2 with more details about the published package. Note that we did not include a README.md or any keywords:
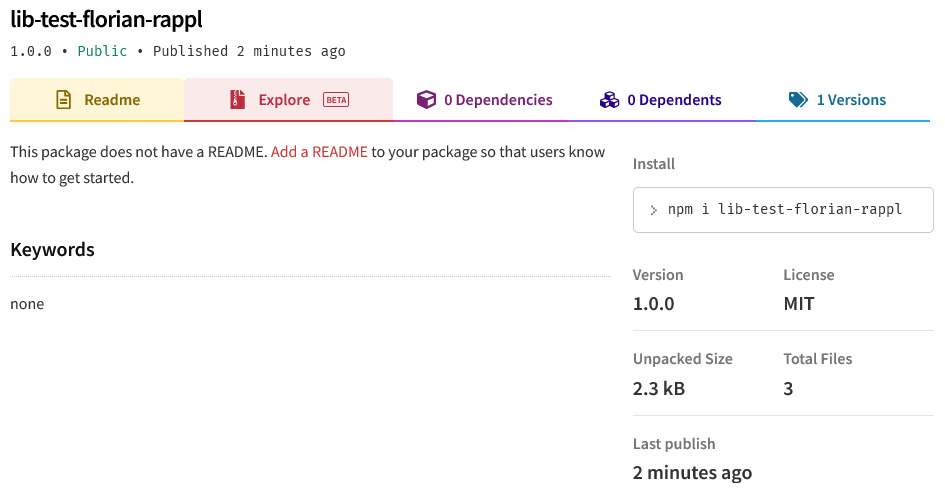
Figure 8.2 – The details of the published package
One thing that you might consider is to give your package a scope. When you publish a package with a scope, then you’ll need to configure the access settings of the package. By default, non-scoped packages are public, and scoped packages are private.
For publishing a scoped package to the official npm registry, you’ll first need to be either a member or owner of an organization on the npm website. The organization name must match the name of the scope.
Package scope
A good way to group packages is to put them in a common scope. The scope has to start with an “@” symbol, which is followed by the name of the scope. The rules for the name of the scope are identical to package names. Besides grouping packages, scopes can be used to place certain packages in a different registry without much trouble. Most importantly, scopes can be reserved on the official npm registry, such that only authorized accounts can publish new packages using a reserved scope.
To consistently publish a scoped package such as @foo/bar with public access, you need to modify the package.json. The relevant configuration is stored in a property called publishConfig:
package.json
{
  "name": "@foo/bar",
  // ... like beforehand
  "publishConfig": {
    "access": "public"
  }
}
Alternatively, the access configuration could also be set directly when using the npm publish command with the --access=publish flag.
So far, we have only discussed how we can publish something to the official npm registry. What about choosing some other npm registry? For this, we need to change the .npmrc file.
Selecting another npm registry via .npmrc
To configure the behavior of npm, a special file called .npmrc is used. We’ve already briefly touched on this file in Chapter 3, Choosing a Package Manager. This file can be used not only to determine the source of the packages but also to define where to publish to.
A simple modification might look as follows:
.npmrc
; Lines starting with a semicolon or
# with a hash symbol are comments
registry=https://mycustomregistry.example.org
This way, all installations and publish attempts will be performed at https://mycustomregistry.example.org instead of the official registry located at https://registry.npmjs.org.
Quite often, this extreme approach is unnecessary or even unwanted. Instead, you might only want to use another registry for a subset of the packages. In the most common case, the subset is already defined by a scope.
Let’s say the @foo scope that we used in the previous section with the @foo/bar package should be bound to a custom registry, while all the other packages can still be resolved by the official one. The following .npmrc covers this:
.npmrc
@foo:registry=https://mycustomregistry.example.orgWhile the local .npmrc – that is, the one adjacent to a package.json of a project – should be used to define the registries, a global .npmrc – located in your home directory – should be used to provide information regarding authentication. Quite often, a private registry can only be used with such authentication information:
~/.npmrc
//mycustomregistry.example.org/:username="myname"
//mycustomregistry.example.org/:_password="mysecret"
//mycustomregistry.example.org/:[email protected]
always-auth=true
The always-auth setting is used to tell npm that even GET requests – that is, requests for resolving or downloading packages – need to use the provided authentication.
An easy way to test custom configuration is to roll out your own npm registry. A good way of doing that locally is to use the open source project Verdaccio.
Setting up Verdaccio
There are a couple of commercial registry options out there. Arguably, the most popular option is to get a pro plan for the official npm registry. This way, you’ll be able to publish and manage private packages. Whatever option you pick, you will always have to use a cloud version for publishing your packages.
Especially for playing around with the publishing process, having a registry locally would be great. A great option is to leverage Verdaccio for this. Verdaccio can be either run by cloning the Verdaccio code repository, running the Docker container provided by Verdaccio, or using npx.
Let’s go for the npx approach:
$ npx verdaccio

 warn --- config file  - ~/.config/verdaccio/config.yaml

 info --- plugin successfully loaded: verdaccio-htpasswd

 info --- plugin successfully loaded: verdaccio-audit

 warn --- http address - http://localhost:4873/ - verdaccio/5.14.0
Now that Verdaccio is running, you can go to the URL shown in the console. You should see Verdaccio’s home page as shown in Figure 8.3:
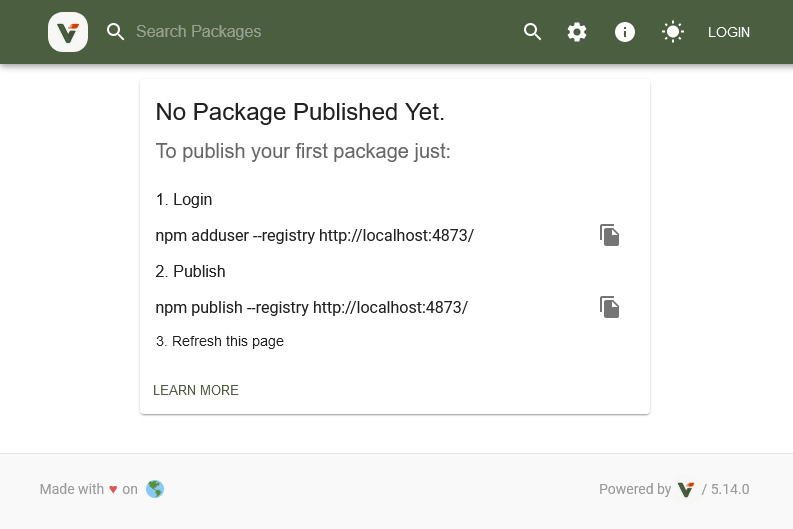
Figure 8.3 – The home page of Verdaccio with publishing instructions
Let’s say we want to publish the package we created earlier to Verdaccio instead of the official npm registry. The steps we need to follow are these:
- Authenticate against the new registry (in Verdaccio, you can use whatever credentials you’d like by default, but npm requires you to authenticate)
- Either configure the URL to your running instance of Verdaccio via a .npmrc file or by explicitly using the --registry flag with the npm publish command
In practice, these two steps look as follows:
$ npm adduser --registry http://localhost:4873/

Username: foo

Password:

Email: (this IS public) [email protected]

Logged in as foo on http://localhost:4873/.

$ npm publish --registry http://localhost:4873

npm notice

npm notice   [email protected]

npm notice === Tarball Contents ===

npm notice 1.5kB lib/index.js

npm notice 425B  src/index.js

npm notice 344B  package.json

npm notice === Tarball Details ===

npm notice name:          lib-test-florian-rappl

npm notice version:       1.0.0

npm notice package size:  1.1 kB

npm notice unpacked size: 2.3 kB

npm notice shasum:        2b5d224949f9112eeaee435a876a8ea15ed3e7cd

npm notice integrity:     sha512-cBq1czwmN4vep[...]/vXrORFGjRjnA==

npm notice total files:   3

npm notice

+ [email protected]
Once published, the package is also listed on the website of the Verdaccio instance accessible at http://localhost:4873/. This, of course, is mostly useful for testing out a publishing process or for speeding up npm installations with a local cache. Most of the time, having a local npm registry is not really necessary.
One question might come up at this point: how can we make sure that a published package can be used by most users? What requirements need to be fulfilled for actually using a package in a client-based application running in the browser, as well as in a server-based application running in Node.js?
The concept of being pretty much target-independent is called being isomorphic. The terminology itself does not go uncriticized and some people actually prefer to call it universal. Having isomorphic code is great for gaining flexibility. Let’s see what is needed to deploy isomorphic packages.
Writing isomorphic libraries
The holy grail of web development is the ability to write code not solely for the frontend or the backend but for both parts. Many frameworks and tools try to give us this capability.
To be accessible to multiple platforms, we not only need to ship multiple variants of our code but also only use APIs that are available on all supported platforms. For instance, if you want to make an HTTP request, then using fetch would be the right call for modern browsers. However, fetch was not available in less recent versions of Node.js. Therefore, you might need to solve this differently.
In the case of HTTP requests, there are already isomorphic libraries available – that is, libraries that will just do the right thing depending on the target runtime. You should only depend on these libraries.
Isomorphic fetch
The HTTP request problem can be solved in many ways – that is, by choosing an isomorphic library such as axios or isomorphic-fetch, the issue can be delegated to a dependency. The advantage of this method is that we do not need to find out what ways we need to follow on each platform. Additionally, testing and verification are much simpler that way.
For now, we will focus on providing multiple variants. If we want to publish our library with support for multiple module formats – say CommonJS and ESM – we can do that by extending the package.json. Setting type to module will tell Node.js that the module referenced by the main field actually follows ESM. In addition, we can define all of the package’s exports explicitly – with an additional option to define what module to use depending on the used target platform and module system.
Let’s see an example of this kind of configuration:
package.json
{
  // ... like beforehand
  "type": "module",
  "main": "dist/index.js",
  "exports": {
    ".": {
      "browser": {
        "require": "./lib/index.min.js",
        "default": "./dist/index.min.js"
      },
      "default": {
        "require": "./lib/index.js",
        "default": "./dist/index.js"
      }
    }
  }
}
In the case of our small library, there is a significant difference between the browser version and the non-browser version. However, for optimization, we’ve used minified modules for the browser, while all other platforms including Node.js will resolve to non-minified modules.
To create output suitable for CommonJS, we can use the build script that we’ve derived already:
$ esbuild src/*.js --platform=node --outdir=lib --format=cjsThe output for ESM is similar, but contains one important change:
$ esbuild src/*.js --platform=node --outdir=dist --format=esm --define:__dirname="'.'"The crucial change is to avoid using the __dirname global variable, which only works in Node.js using CommonJS. Instead, we just use the current directory. The change is not perfect, but should get the job done.
Right now, everything seems to be well prepared – but actually, it’s not. The most important thing is still missing – the removal of the Node.js inbuilt package references. Our simple library references fs and path, but these packages do not exist in the browser. They would not know how to work there. Luckily, in this case, we have multiple solutions. The best one is arguably to replace the dynamic file read with a static import of the package’s package.json:
index.js
import { name, version } from '../package.json';
export function getLibName() {
  return `${name}@${version}`;
}
Of course, this kind of algorithmic change is not always possible. In the given scenario, we also benefit from esbuild’s bundle option, which will include the necessary parts from the referenced JSON file to produce an output file that matches our expectations.
With these changes in mind, let’s see how the build scripts are defined:
{
  // ... like beforehand
  "scripts": {
    "build-cjs-node": "esbuild src/*.js --platform=node
      --outdir=lib --format=cjs",
    "build-cjs-browser": "esbuild src/*.js --platform=node
      --outdir=lib --bundle --format=cjs --minify --entry-
      names=[name].min",
    "build-cjs": "npm run build-cjs-node && npm run build-
      cjs-browser",
    "build-esm-node": "esbuild src/*.js --platform=node
      --outdir=dist --format=esm",
    "build-esm-browser": "esbuild src/*.js --platform=node
      --outdir=dist --bundle --format=esm --minify --entry-
      names=[name].min",
    "build-esm": "npm run build-esm-node && npm run build-
      esm-browser",
    "build": "npm run build-cjs && npm run build-esm"
  }
}
It makes sense to define the scripts so that they can be run independently but also conveniently together without much effort. In many cases, the tool you’ve chosen has to be configured extensively to have the desired behavior. In the case of our example, esbuild was already quite equipped for the task – everything that we needed could be done via the command-line options.
One additional case that can be covered with an npm package is to actually provide a tool. Ideally, these are tools to be run with Node.js making it a cross-platform tool. Let’s see how we can write and publish this kind of tool.
Publishing a cross-platform tool
Node.js would not be so powerful without its ecosystem. As we learned in Chapter 1, Learning the Internals of Node.js, relying on the power of its ecosystem was an elementary design decision. Here, npm takes the leading role by defining the package metadata in package.json, as well as the installation of packages.
During the installation of a package, a couple of things are happening. After the package has been downloaded, it will be copied to a target directory. For a local installation with npm, this is the node_modules folder. For a global installation with npm, the target will be globally available in your home directory. There is, however, one more thing to do. If the package contains a tool, then a reference to the tool will be put into a special directory, which is node_modules/.bin for a local installation.
If you go back to the code from the previous chapter, you will see that, for example, jest is available in node_modules/.bin. This is the same jest executable that we started with npx. Let’s take the following:
$ ./node_modules/.bin/jest --helpWe can compare it to this:
$ npx jest --helpBoth will yield the same result. The reason is that npx for local installation is just a convenient tool to avoid writing out the path. As a reminder, you should opt for local installations over global installations.
npx and npm
npx is another command that comes together with the installation of npm. From a command perspective, npm is used to manage the dependencies, while npx is used to run packages. The npm utility also has a run subcommand, which runs commands that are defined in the scripts section of package.json, whereas npx runs commands as defined in the bin section of npm packages.
Now, the question is how can we create a package that also adds a script to the .bin folder so that it just works when installed? The answer lies in the package.json of our previous library.
Let’s modify package.json a bit:
package.json
{
  "name": "@foo/tool",
  "version": "1.0.0",
  "description": "A simple tool greeting the user.",
  "bin": {
    "hello": "lib/hello.js"
  },
  "license": "MIT"
}
We added a bin section that defines a single script to be referenced from the .bin directory. The reference should be called hello and pointed to the lib/hello.js file within this package.
Let’s also add the script to run when hello is called:
hello.js
#!/usr/bin/env node
// check that at least one argument has been provided
if (process.argv.length < 3) {
  console.log("No argument provided.");
  return process.exit(1);
}
// take the last argument
const name = process.argv.pop();
console.log(`Hello ${name}!`);
This will essentially check whether at least one argument was given and print a message in the console using the last argument.
Let’s see the behavior when running directly via node:
$ node hello.js

No argument provided.

$ node index.js foo

Hello foo!
Now, the package can be published as before – for example, by choosing our local Verdaccio instance:
$ npm publish --registry http://localhost:4873In a new project, you can now install the dependency and run the tool:
$ npm install @foo/tool --registry http://localhost:4873

$ npx hello bar

Hello bar!
With that, we have seen the most crucial aspects regarding the publishing process of npm packages. Let’s recap what we have learned.
Summary
In this chapter, you have learned about what it takes to publish a package to an npm registry – whether it is an official or private one. You also touched on a commonly used npm registry in the form of Verdaccio.
Equipped with the knowledge from this chapter, you should now be able to write reusable libraries that work in browser-based applications as well as in Node.js-based applications. You are also now capable of publishing tools that are based on Node.js. In a sense, these tools are just libraries with some additional fields in their associated package metadata.
In the next chapter, we will have a look at a different approach to structuring code – placing multiple packages in a single repository known as a monorepo.