
2
Dividing Code into Modules and Packages
One of the most important aspects to consider when writing professional software is reusability. Reusability means that parts of our code base can be purposed to work in several places or under different circumstances. This implies that we can actually use existing functionality quite easily.
As we learned, a key part of the Node.js success story is down to the fact that it comes with a module system. So far, we’ve only touched upon the basic concept of CommonJS, which is the default way of importing and exporting functionality from modules.
In this chapter, we’ll take the chance to become familiar with more module formats, including their history, use cases, and development models. We’ll learn how to divide our code into modules and packages efficiently. In addition to learning about CommonJS, we will see what a package is and how we can define our own packages. All in all, this will help us to achieve great reusability – not only for our tooling in Node.js but also for our applications running in the browser.
We will cover the following key topics in this chapter:
- Using the ESM standard
- Learning the AMD specification
- Being universal with UMD
- Understanding SystemJS and import maps
- Knowing the package.json fundamentals
Technical requirements
The complete source code for this chapter can be found at https://github.com/PacktPublishing/Modern-Frontend-Development-with-Node.js/tree/main/Chapter02.
The CiA videos for this chapter can be accessed at http://bit.ly/3FZ6ivk.
Using the ESM standard
CommonJS has been a good solution for Node.js, but not a desirable solution for JavaScript as a language. For instance, in the browser, CommonJS does not work. Doing synchronous imports on URLs is just not possible. The module resolution of CommonJS was also way too flexible in terms of adding extensions and trying directories.
To standardize modules in JavaScript, the ECMAScript Module (ESM) standard was established. It is capable of defining modules that run in the browser, as well as Node.js. Furthermore, instead of using an arbitrary function such as require, the whole module system relies on language constructs using reserved words. This way, the module system can be brought over to the browser, too.
The ECMAScript standard specified two keywords for this:
- import: Used to import functionality from other modules
- export: Used to declare the functionality that can be imported into other modules
The import keyword must appear at the beginning of a file – before any other code. The reason for this choice lies in the demand for ESM files to be used not only within Node.js, but also in the browser. By placing the import statements on top, each ESM file can safely wait until all the imports have been resolved.
Rewriting the example from the previous chapter, we get the following for a.js:
import * as b from './b.js'; // get all things from b.js
// use imports
console.log('The value of b is:', b.myValue);
The rewrite of the b.js file to be valid per the ESM standard is as follows:
export const myValue = 42;There are multiple possibilities with the import keyword. We can use the following:
- Wildcard (using *) imports with a name selected by the developer
- Named imports such as myValue
- Default imports with a name selected by the developer
- An empty import that does not get anything, but makes sure to run the module
Using a named import, we can get a cleaner version of a.js:
// get only selected things
import { myValue } from './b.js';
console.log('The value of b is:', myValue); // use imports
The preceding code is very similar to the destructuring assignment, which decomposes an object into its fields using the assignment operator (=). There are crucial differences, however. One of these differences is how to make aliases.
For instance, when using a destructuring assignment, we can use the colon (:) to rename the variables, which would have the name of the respective fields by default. If we wanted to give the variable a different name (e.g., otherValue) from its original field (e.g., myValue), we’d have to write the following:
// gets all the things, but only uses myValue
const { myValue: otherValue } = require('./b.js');
With an import statement, you need to use the as keyword to achieve this:
// gets only myValue – but renames it
import { myValue as otherValue } from './b.js';
A topic that becomes relevant quite quickly is the notion of a default export. Especially when handling exports from an unknown module, there is a great need to define the export name. In CommonJS, developers therefore picked the whole module; however, this is no longer possible with ESM. Every export needs to be named.
Luckily, the standardization committee thought about the topic of default exports. An export is considered to be a default export if it uses the default keyword. For instance, changing the export in b.js to use default values could look as follows:
export default 42;Importing the default export is quite convenient, too. Here, we are free to select a name to refer to the default export within our module. Instead of being able to rename the import, we are forced to give it a name:
import otherValue from './b.js'; // gets only default
console.log('The value of b is:', otherValue);
The whole idea is to use default exports as much as possible. In the end, modules that are effectively written to revolve around exporting a single functionality are often considered the goal.
We’ve already learned that CommonJS does not work in the browser. In contrast, the modern ESM specification is supposed to work, as imports are declared in the beginning. This modification allows the browser to safely suspend module evaluation until the imports are fully processed. This kind of suspension to wait for the dependencies to finish loading was actually taken from another attempt at a module system called Asynchronous Module Definition (AMD).
Learning the AMD specification
Before ESM was established, people tried to make modules work in the browser, too. One of the earliest attempts was a small library called RequireJS. RequireJS is a module loader that works in the browser as well as in Node.js. Initially, the essential idea was that a script reference to RequireJS would be embedded in the <head> of a document. The script would then load and run a defined root module, which would process even more modules.
An example website using RequireJS is as follows:
<!DOCTYPE html>
<html>
  <head>
    <title>My Sample Project</title>
    <!--
      data-main attribute tells RequireJS to load
      ./main.js after ./require.js has been loaded
    -->
    <script data-main="./main" src="./require.js"></script>
  </head>
  <body></body>
</html>
RequireJS was born at a time when promises had not yet been established in the JavaScript world. Therefore, the module loader was based on the next best thing: callbacks. Consequently, a module is loaded by calling a requirejs function defined by RequireJS. The whole process can then start loading modules asynchronously as shown in Figure 2.1:
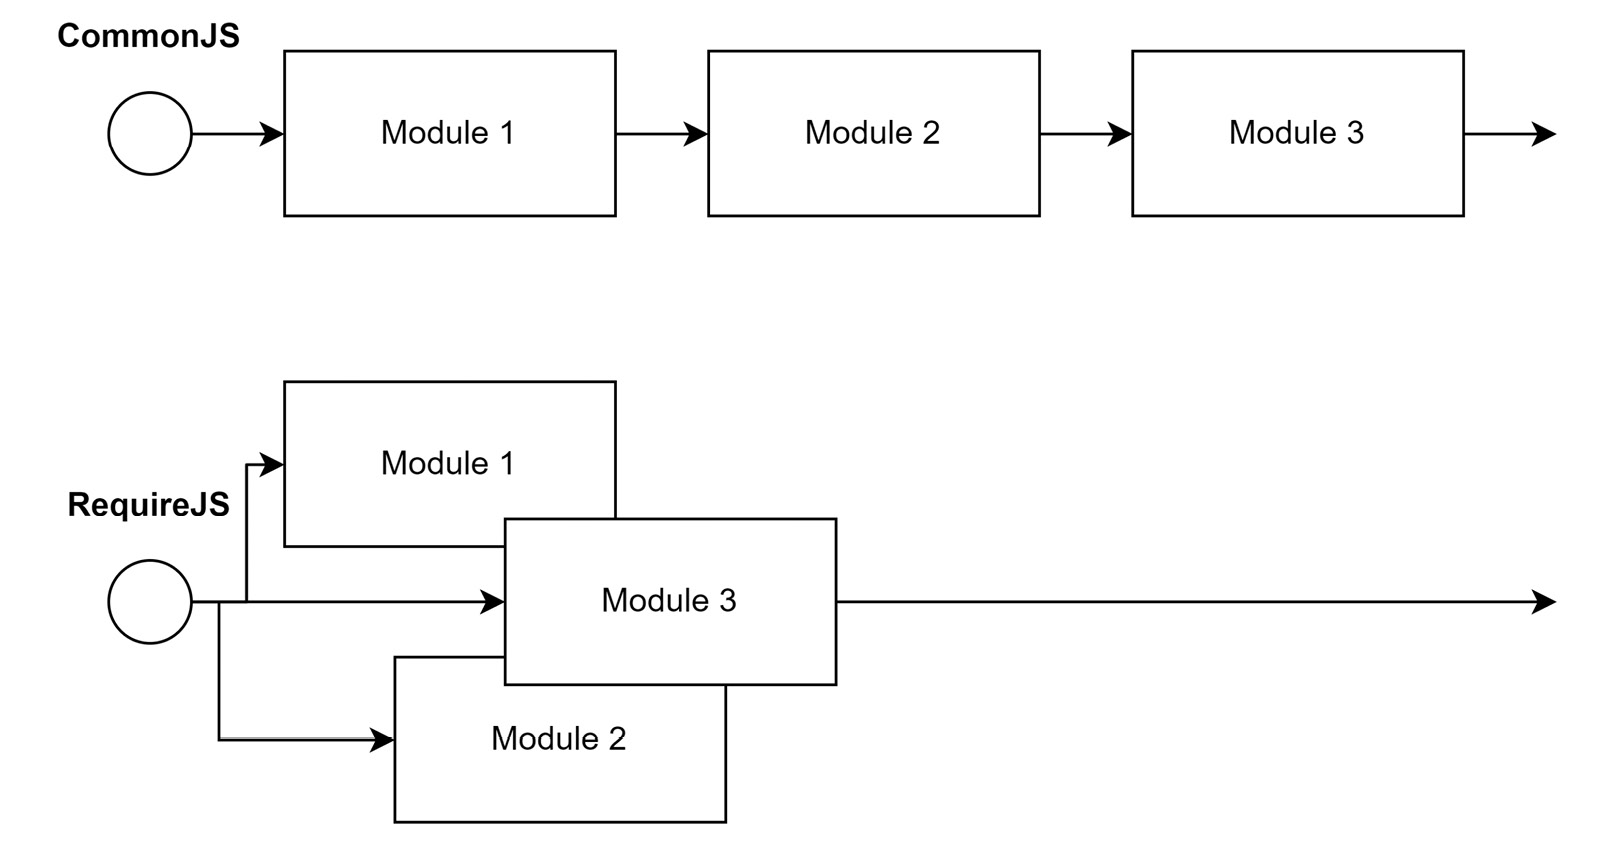
Figure 2.1 – Loading modules sequentially vs. asynchronously
To achieve asynchronous module loading, the requirejs function takes two arguments. The first argument is an array with all the dependencies. The second argument is a callback that receives the exports of the dependencies and returns the exports of the current module.
The whole idea behind RequireJS is very similar to that of ESM today, which shifts the two parts (loading the dependencies and the code that uses the dependencies) into the same module – but still distinguishes between the import statements and all the other statements. Here, ESM leverages the fact that it’s actually a language construct.
In short, a module that uses RequireJS looks as follows:
requirejs(['./helper/util'], (util) => {
  // This is called when ./helper/util.js. has been processed
});
The shape of these modules was not arbitrarily decided. Instead, the RequireJS library is merely one implementation of a specification for an asynchronous module system. This specification is called AMD.
Using AMD, the previous RequireJS-specific example could be rewritten as follows:
define(['./helper/util'], (util) => {
  // This is called when ./helper/util.js. has been processed
});
In addition to the two-argument variant of the define function, there is also a three-argument version, where the first argument helps to name the defined module.
An example of the three-argument call to define is shown here:
define('myModule', ['dep1', 'dep2'], (dep1, dep2) => {
  // Define the module exports by returning a value.
  return {};
});
Now, the only thing left before we can use AMD universally is to learn how we can integrate it into Node.js. First, we need to grab r.js from the official download page: https://requirejs.org/docs/download.html#rjs. Download it via the Download button as shown in Figure 2.2:

Figure 2.2 – The Download button for r.js on the RequireJS website
Store the downloaded file in the directory where you have placed the scripts to run via node. Create a new a.js script in the same directory:
a.js
const define = require('./r.js'); // gets the loader
define.config({
  // Will also correctly resolve other Node.js dependencies
  nodeRequire: require
});
define(['./b'], (b) => {
  console.log('The value of b is:', b.myValue);
});
The code here does not look so different from the CommonJS example. After all, only the initialization of the RequireJS loader has been added. The actual content of the module is now part of the callback.
Let’s see what the transformed b.js looks like:
b.js
const define = require('./r.js'); // gets the loader
define.config({
  // Will also correctly resolve other Node.js dependencies
  nodeRequire: require
});
define([], () => {
  return {
    myValue: 42,
  };
});
In the preceding code for b.js, again, we have added the same envelope, just as in a.js. Remember that each module needs to be treated as standalone code. While how explicit this is may seem rather redundant, the real advantage becomes obvious once it’s used with an unknown number of other modules. In this case, we never know what has been loaded or used already. Being independent means being predictable in these scenarios.
The problem with the preceding approach is that while this works in Node.js, it certainly does not work in the browser. Even though we’ve chosen AMD for this specific reason, we failed to make it work in the browser. The problem lies in the initial call to require, which uses CommonJS to obtain the AMD loader.
To mitigate the problem and use AMD in different JavaScript environments, the Universal Module Definition (UMD) specification was created.
Being universal with UMD
When the UMD specification was brought up, there was a lot of hype in the community. After all, the label universal already claims that UMD is the final module system – the one to rule them all. It tries to do this by supporting essentially three different kinds of JavaScript module formats:
- The classic way of doing things without a module system – that is, just by running JavaScript using <script> tags in the browser
- The CommonJS format that is used by Node.js
- The previously discussed asynchronously loaded modules from the AMD specification
When you write a JavaScript file with the UMD specification in mind, you essentially make sure that every popular JavaScript runtime can read it. For instance, UMD works perfectly in Node.js and the browser.
To achieve this universality, UMD makes an educated guess regarding what module system can be used and selects it. For example, if a define function is detected, then AMD might be used. Alternatively, detecting something such as exports or module hints towards CommonJS. If nothing is found, then the assumption is that the module runs in the browser without AMD present. In this case, the exports of the module would be stored globally.
The main target group for UMD is library authors. When you build a library, you want it to be useful. Consequently, you’ll also need to make sure that the library can be used. By providing your library in the UMD format, you ensure that it can be used on pretty much all platforms – in Node.js and the browser.
So, how would our code from the previous example look if we used UMD as the format of choice? Let’s have a look:
a.js
((root, factory) => { // context and export callback
  if (typeof define === 'function' && define.amd) {
    // there is a define function that follows AMD – use it
    define(['b'], factory);
  } else if (typeof exports === 'object' && typeof module
    !== 'undefined') {
    // there is module and exports: CommonJS
    factory(require('b'));
  } else {
    // we just take the global context
    factory(root.b);
  }
})(typeof self !== 'undefined' ? self : this, (b) => {
  // this is the body of the module, follows AMD
  console.log('The value of b is:', b.myValue);
});
As before, the preceding code consists of two sections. The first section establishes the module system and sets up the callback. The second section puts the actual content of our module into the callback.
The only thing left is to see how we can mark our exports with UMD. For this part, we will look at b.js in the UMD format:
b.js
((root, factory) => {
  if (typeof define === 'function' && define.amd) {
    // in AMD we depend on the special "exports" dependency
    define(['exports'], factory);
  } else if (typeof exports === 'object' && typeof module
    !== 'undefined') {
    // in CommonJS we'll forward the exports
    factory(exports);
  } else {
    // for scripts we define a new global and forward it
    factory(root.b = {});
  }
})(typeof self !== 'undefined' ? self : this, (exports) =>
{
  // use the CommonJS format in here
  exports.myValue = 42;
});
With all the boilerplate code in place, the script is universal. The defined callback (named factory in the two examples in this section) is either called indirectly from the AMD runtime or directly in the other two cases.
Usually, we will not write the whole boilerplate code shown here ourselves. The boilerplate will be generated by tooling, which we will look into in Chapter 6, Building Web Apps with Bundlers. Instead, the ideal option for writing modules in many cases is ESM. Since it’s syntax-based, we follow the language’s standard. The other formats can then be used by our tooling as output formats.
One more module format to have a closer look at is SystemJS. One of the reasons why SystemJS is interesting is that it brings support for import maps, which can simplify dealing with module systems.
Understanding SystemJS and import maps
Earlier in this chapter, we learned that ESM is arguably the best module system for JavaScript. After all, it is integrated into the JavaScript language. One of the reasons why other formats are still relevant today is backward compatibility.
Backward compatibility allows formats such as AMD or UMD to be used in older JavaScript runtimes, such as older versions of browsers such as Internet Explorer, but even if we don’t need backward compatibility, the alternative formats still have one or more advantages over ESM.
One of the core problems with ESM is that it does not define how modules are resolved. In fact, the only specified way to resolve a module is explicitly via the filesystem. When we used ESM, we explicitly stated our module imports, such as in ./b.js. As mentioned, we are not allowed to implicitly use something such as ./b or even just b.
When doing frontend development, the notion of dependencies has become quite elementary. From boilerplate libraries to UI frameworks, frontend developers make use of a wide array of given code. That code is usually packaged into libraries and then installed locally for development purposes, but how should these dependencies be used?
Turns out that Node.js solved this problem already in the early stages of its development. We have seen that using CommonJS we are able to write code such as the following:
host-cjs.js
const os = require('os');
console.log('The current hostname is:', os.hostname());
The reference to os is resolved by Node.js through CommonJS. In this special case, the reference leads to one framework library of Node.js. However, it could also lead to a third-party dependency that has been installed by us. In Chapter 3, Choosing a Package Manager, we will see how this works.
Let’s translate the preceding code into ESM:
host-esm.js
import { hostname } from 'node:os';
console.log('The current hostname is:', hostname());
The conversion of the little snippet is not very complicated, with the exception of the module name. Previously, we used os as an identifier. Node.js has chosen to also allow this for backward compatibility – at least for now. The preferred way, however, is to use a custom protocol. In the case of Node.js framework libraries, the node: protocol has been chosen.
Leveraging custom protocols to resolve dependencies is possible in the browser. However, it is also cumbersome. After all, the whole resolution would now need to be done by us. This also represents a classic chicken-egg problem. To define custom protocols, we need to have some JavaScript running; however, if this piece of JavaScript relies on third-party dependencies that are actually resolved via the custom protocol, then we cannot successfully implement the resolution of dependencies.
One way that we can still use convenient references such as os is to define a so-called import map. An import map helps the browser map module names to actual URLs. It uses JSON with an object stored in the imports field.
The following is an import map to find an implementation of the os module:
{
  "imports": {
    "os": "https://example.com/js/os.min.js"
  }
}
The URLs don’t have to be fully qualified. In the case of relative URLs, the module’s URL is computed from the base URL of the import map.
The integration of import maps into a website is relatively simple. All we need to do is to specify a <script> tag with the type being importmap:
<script type="importmap">
{
  "imports": {
    "os": "https://example.com/js/os.min.js"
  }
}
</script>
In addition, import maps may be loaded from external files, too. In any case, the specified mapping of module names to URLs only works for import statements. It will not work in other places where a URL is expected. For instance, the following example does not work:
fail.html
<script type="importmap">
{
  "imports": {
    "/app.mjs": "/app.8e0d62a03.mjs"
  }
}
</script>
<script type="module" src="/app.mjs"></script>
In the preceding code, we have tried to load /app.mjs directly, which will fail. We need to use an import statement:
success.html
<script type="importmap">
{
  "imports": {
    "/app.mjs": "/app.8e0d62a03.mjs"
  }
}
</script>
<script type="module">import "/app.mjs";</script>
There is a lot more that can be written about import maps; however, for now, the most important detail is that they only work partially – that is, without external files, in recent versions of Google Chrome (89 and higher) and Microsoft Edge (89 and higher). In most other browsers, the import map support is either not there or must explicitly be enabled.
The alternative is to use SystemJS. SystemJS is a module loader similar to RequireJS. The main difference is that SystemJS provides support for multiple module systems and module system capabilities, such as using import maps.
While SystemJS also supports various formats such as ESM, it also comes with its own format. Without going into too much detail, the shape of a native SystemJS module looks as follows:
System.register(['dependency'], (_export, _context) => {
  let dependency;
  return {
    setters: [(_dep) => {
      dependency = _dep;
    }],
    execute: () => {
      _export({
        myValue: 42,
      });
    },
  };
});
The preceding code is structurally quite similar to the AMD boilerplate, with the only difference being how the callback is structured. While AMD runs the module’s body in the callback, SystemJS specifies some more sections in the callback. These sections are then run on demand. The real body of a module is defined in the returned execute section.
As before, the short snippet already illustrates quite nicely that SystemJS modules are rarely written by hand. Instead, they are generated by tooling. We’ll therefore come back to SystemJS once we have more powerful tooling on hand to automate the task of creating valid SystemJS modules.
Now that we have heard enough about libraries and packages, we also need to know how we can define our own package. To indicate a package, the package.json file has to be used.
Knowing package.json fundamentals
The aggregation of multiple modules forms a package. A package is defined by a package.json file in a directory. This marks the directory as the root of a package. A minimal valid package.json to indicate a package is as follows:
package.json
{
  "name": "my-package",
  "version": "1.0.0"
}
Some fields, such as name or version, have special meanings. For instance, the name field is used to give the package a name. Node.js has some rules to decide what is a valid name and what is not.
For now, it is sufficient to know that valid names can be formed with lowercase letters and dashes. Since package names may appear in URLs, a package name is not allowed to contain any non-URL-safe characters.
The version field has to follow the specification for semantic versioning (semver). The GitHub repository at https://github.com/npm/node-semver contains the Node.js implementation and many examples for valid versions. Even more important is that semver also allows you to select a matching version using a range notation, which is useful for dependencies.
Semver
Besides the rules and constraints for version identifiers, the concept of semver is used to clearly communicate the impact of changes to package users when updating dependencies. According to semver, the three parts of a version (X.Y.Z – for example, 1.2.3) all serve a different purpose.
The leading number (X) is the major version, which indicates the compatibility level. The middle number (Y) is the minor version, which indicates the feature level. Finally, the last number (Z) is the patch level, which is useful for hotfixes. Generally, patch-level changes should always be applied, while feature-level changes are optional. Compatibility-level changes should never be applied automatically, as they usually involve some refactoring.
By default, if the same directory contains an index.js file, then this is considered the main, root, or entry module of the package. Alternatively, we can specify the main module of a package using the main field.
To change the location of the main module of the package to an app.js file located within the lib subdirectory, we can write the following:
package.json
{
  "name": "my-package",
  "version": "1.0.0",
  "main": "./lib/app.js"
}
Furthermore, the package.json can be used to include some metadata about the package itself. This can be very helpful for users of the package. Sometimes, this metadata is also used in tooling – for example, to automatically open the website of the package or the issue tracker or show other packages from the same author.
Among the most useful metadata, we have the following:
- description: A description of the package, which will be shown on websites that list the package.
- license: A license using a valid Software Package Data Exchange (SPDX) identifier such as MIT or BSD-2. License expressions such as (ISC OR GPL-3.0) are also possible. These will be shown on websites that list the package.
- author: Either a simple string or an object containing information about the author (for example, name, email, or url). Will be shown on websites that list the package.
- contributors: Essentially, an array of authors or people who contributed in one way or another to the package.
- repository: An object with the url and type (for example, git) of the code repository – that is, where the source code of the package is stored and maintained.
- bugs: The URL of an issue tracker that can be used to report issues and make feature requests.
- keywords: An array of words that can be used to categorize the package. This is very useful for finding packages and is the main source of search engines.
- homepage: The URL of the package’s website.
- funding: An object with the url and type (for example, patreon) of the package’s financial support platform. This object is also integrated into tooling and websites showing the package.
There are a couple more fields that are necessary to specify when dealing with third-party packages. We’ll cover those in Chapter 3, Choosing a Package Manager, when we discuss package managers in great detail.
Summary
In this chapter, you learned about a set of different module formats as alternatives to the CommonJS module format. You have been introduced to the current standard approach of writing ESMs, which brings a module system directly to the JavaScript language.
You also saw how alternative module formats such as AMD or UMD can be used to run JavaScript modules on other older JavaScript runtimes. We discussed that by using the specialized module loader, SystemJS, you can actually make use of truly convenient and current features as a web standard today. The need for import maps is particularly striking when talking about third-party dependencies.
You learned that most third-party dependencies are actually deployed in the form of packages. In this chapter, you also saw how a package.json file defines the root of a package and what kind of data may be included in package.json file.
In the next chapter, we will learn how packages using the discussed formats can be installed and managed by using special applications called package managers. We’ll see how these package managers operate under the hood and how we can use them to improve our development experience.