
Managing Activities and Projects with Groups
Moodle has a very useful tool for manipulating and managing groups of learners and teachers within each course: the Groups functionality. This tool provides an effective way to manage activities, projects, or the complete course. For example, if you, as an instructor, have three periods of the same course, you don't need to set up three different courses; instead, you have just the one course and you organize the different courses into three groups in the course. This functionality is set up at the course level. If, on the other hand, you have one very large course, you can use groups to set up sections.
If you set up groups in the course or at the activity level, you can run the groups completely independent of each other. You can also set them up as partially separate groups, allowing for some interaction, such as each group can see each other groups' activities (for instance, a wiki) but cannot interact or add to the other groups' activities.
 To set up groups, they must be enabled in the course settings. Groups are enabled by default. If you don't see the Group icon and link in your course Administration block, contact your Moodle administrator.
There are three group mode options that you will see when you're adding resources and setting up activities:
- No groups: Groups aren't used in the course; every learner participates in all activities.
- Separate groups: When using separate groups, you split up the course, and participants in the groups can add to and see only their own work or participate only in activities for their group, such as a group forum discussion.
- Visible groups: Learners contribute and work in their own groups, but they can view the work of other groups. For example, if you set up groups for wikis and make them visible groups, learners can access the other groups' wikis and read the entries, but they can contribute only to their own wiki.
On your course front page, groups are indicated by the two small figure icons next to the activity if groups are visible groups. If both figures are filled, that indicates visible groups. If only one figure is filled, and one gray, the activity is set up for separate groups.
Before you start using groups, you need to create your groups, set them up, and then add learners (and teachers) to the groups. Moodle makes this process quite easy for you, and it takes just a few steps.
- Go to your course (not site) Administration block and click the Groups link.
Moodle takes you to your course Groups page.
Notice two columns in Figure 4-19: Groups (on the left) and Members Of (on the right). The Members Of column lists all possible users you can add to the groups.
Figure 4-19: The Groups page showing the Create a Group button.
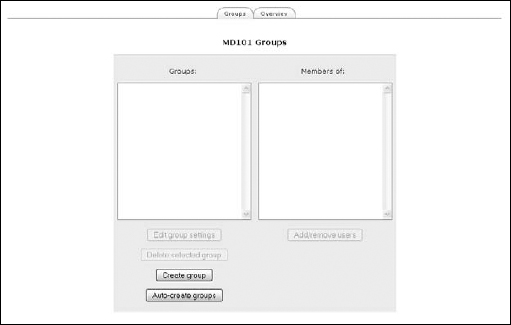
- Click the Create Group button under the left column.
Moodle takes you to the Create Group page shown in Figure 4-20.
- Set options for your group:
- • Group Name: Add the name. This is a required field. The group name will appear in various places in your course.
- • Group Description: Add a brief description identifying the group and, if relevant, its purpose. Note that this description will appear above group members on the Participants page.
Figure 4-20: Creating your group editing page.

- • Enrollment Key: If you set an enrollment key for the course and for the group, anyone who enrolls in the course is also enrolled in a group. Students need to know only the group enrollment key. Set the first letter for each group enrollment key to be the same as the course settings key. If a student forgets the key, a and types in the incorrect characters, Moodle displays a pop-up window and gives the learner a hint using the first character of the key.
- • Hide Picture: Use the drop-down list to hide learner profile pictures. If you allow for pictures to be shown, they're listed with every activity throughout the course. Showing pictures can use up your allocated space if you have many students.
- • New Picture: Moodle enables you to upload a picture for the whole group.
- Click the Create Group button.
Moodle returns you to the Groups page with your new group added in the Groups list. (See Figure 4-21.)
Notice the three new group setting buttons under the Groups column.
- • Edit Group Settings: Enables you to edit groups you have created.
- • Delete Selected Group: Allows you to delete the group.
- • Auto Create Group: Enables you to create groups automatically.
Note that unless you have created a group, the first two buttons are grayed out.
Figure 4-21: The Groups page displaying the newly created group, with a number of new buttons below the Groups field.

Under the right column is an Add/Remove Users button.
- Click the Add/Remove Users button to add learners to your new group.
Moodle takes you to the Add/Remove Users page. (See Figure 4-22.)
- Select a student from the Potential Members list on the right by clicking a name. Then click the Add button.
Figure 4-22: Add users to or remove users from a selected group.
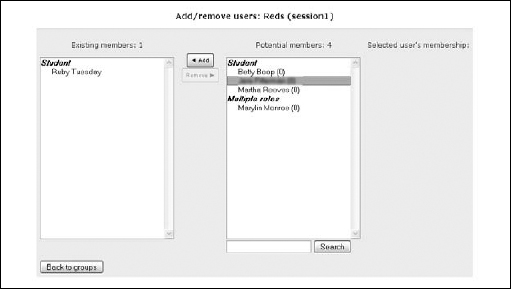
The user is added to the new group. You can select multiple learners by holding down the Shift key (or
 key on Macs) and clicking the names. A participant with multiple roles can be in different groups. You can also have a student in more than one group. This flexibility is useful if the particular student has extra permissions for particular capabilities.
 - Repeat the steps to create more groups and add students to the different groups.