
Understanding and Implementing Moodle Conventions
Moodle uses specific conventions, icons, and fill-in fields throughout all its tools and features. The most common and oft-used of these conventions — the Moodle Help system and the settings for resources and activities — are ones that you may want to continue to reference, so I discuss those here. When you become a regular Moodler, these will become second nature. Developers of Moodle have kept to the same layouts for every version, which makes you quickly fall in love with it, knowing that after you learn a way of doing things, it won't be changed — thank you, development team!
Moodle Help system
![]() Wherever you see the help icon, you can click it to open a small help window defining or briefly explaining the term or functionality.
Wherever you see the help icon, you can click it to open a small help window defining or briefly explaining the term or functionality.
Resources and activities settings
Each of the setup pages for all activities and resources has several groups, each containing any number of steps, always ordered in the same sequence. The following sections summarize the settings and explain some of the conventions. You see these setup pages when you set up a resource, such as linking to a file, or an activity like a forum discussion or a quiz.
General settings
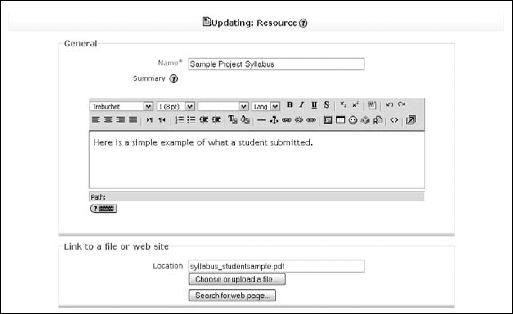
The General settings are shown in Figure 3-12. Each setup page requires you to enter a name in the field, a summary (which I recommend because the summary is listed in a table when learners access the activity or resource from the activity block), and then content. Specific activities have other settings particular to the activity, such as setting dates (for instance, for a chat or forum discussion) or linking to a Web site or file.
Figure 3-12: The standard Moodle general settings for resources and activities.
Window settings
The Window settings, shown in Figure 3-13, enable you to set up your new activity or resource in a new window or the same window. If the activity or resource opens in the same window, select the check box to show course blocks enabling learners to navigate back. Often when learners have finished with the activity or resource, they close it by clicking the red X in the top-right corner. In Moodle, this action closes the Moodle session, and learners have to log back in.
Figure 3-13: The standard Moodle window settings for resources and activities.
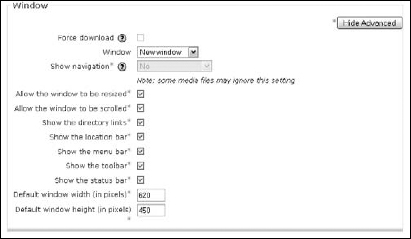
Unless pop-up windows are blocked by your system administrators, I recommend opening the resource or activity in a new window. When you select New Window from the drop-down list, Moodle lets you select a number of different options. If you aren't sure what to pick, leave the default settings; they work well!
![]() If your system administrator has blocked pop-up windows, try anything, including bribery, to get him to enable them for your Moodle site. Take up the issue with him. The pop-up windows will help you structure the course and help your learners to use and navigate the course with ease. You have a number of choices when you enable a new window and you can make your selections depending on your needs.
If your system administrator has blocked pop-up windows, try anything, including bribery, to get him to enable them for your Moodle site. Take up the issue with him. The pop-up windows will help you structure the course and help your learners to use and navigate the course with ease. You have a number of choices when you enable a new window and you can make your selections depending on your needs.
Parameters
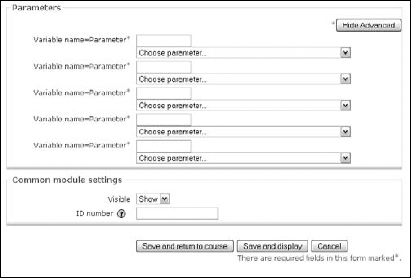
The Parameters section, shown in Figure 3-14, contains advanced features that you most likely won't use. The parameters are useful when you want to send data about your learners and course to another site. For example, you may want to send information about your learners from your Moodle site to another schools server, which will give learners access.
If the parameters aren't displayed, click the Show Advanced button on the right. Next select the options you require. Depending what the server is requiring, you can choose it from the drop-down list. For example, you just may need the learner's e-mail address, or you may need a combination of e-mail address and learner ID. Moodle provides you with every exception possibly required, and you can use up to five. There are 30 parameter type entries that you can use. (Table 5-1 lists the most widely used parameters. You can see the remainder by opening the Choose Parameter drop-down list.)
Figure 3-14: The standard Moodle Window settings for parameters and Common Module Settings.
Common Module Settings
Most resources and activities include these items (refer to Figure 3-13):
- Group Mode: If groups are set up at the course level, this option is available. Moodle by default enables activities by group setting if forced is turned on and set to Yes. If set to No, group selection can be set to one of three levels:
- • No Groups: Every setting is same for all groups (for example, assignments are submitted in one area).
- • Separate Groups: Students carry out task or activities in separate, designated groups.
- • Visible Groups: Students can choose to associate with a group or see other group activities.
- Visible drop-down list: Enables you to hide or show (eye closed/opened) and activity or resource. For example, you can set up many activities and resources but choose not to make them visible to learners until you're ready for the information or activity to be presented — planning ahead!
- ID Number: ID setting is useful if you have many activities and resources. It is easier to track in log files, grade book, or exporting them to spreadsheet. If you decide to use ID numbers or combination of numbers and characters, either use a standard system used within your organization, or make up a logical system that's easy to understand and identify. If you're using grade calculations, you'll be required to set up an ID. You can leave this field blank.
Common Module Settings are also used in resources and activities, but they don't include all the options for both. For instance, group settings are not used in resources, and parameters are not used with activities.
Password settings
Moodle developers understand that you have to deal with far too many passwords, so wherever you may want to use a password, you see a check box. When you select this check box, Moodle reveals the password you set. This must be one of my most-loved setup functions because I have no need to keep a spreadsheet of passwords ever again when working with Moodle.