
Adding Resources to Your Course
In Moodle, all the tools that help you add content are called resources, and you find them in the Add Resources drop-down list in each section and week of your course. The tools in the drop-down list aren't ordered according to any specific way of using them.
Inserting a label
A label is simply a bit of text and/or graphics that you can add to the top of each course front page in each topic or week. You can use labels to add a unit title, a short introduction or explanation, or brief instructions telling your learners what to do next. To insert a label, follow these steps:
- Click the Turn Editing On button in the upper-right corner of your course front page.
- In the section where you want to add a label, open the Add a Resource drop-down list and select Insert a Label.
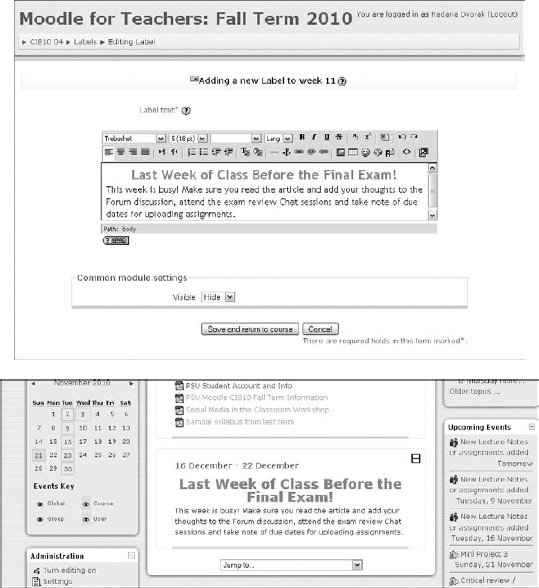
Moodle takes you to an Adding a New Label to Week (or topic) page, shown in Figure 5-1.
- Add text for your label in the text box editor.
This is a required field, as denoted by the asterisk. Note that you can be creative here: Use it for a heading, use different color text, or create bullet points if you want a short outline.
- In the Common Module Settings area, choose whether you want to make the label visible to your learners.
(Other resources and activities have a few more Common Module Settings.) Selecting Yes from the Visible drop-down list makes the label visible to your learners. If you select No, it will be hidden until you want to make it available for viewing. This option may be useful if you're planning a few weeks ahead and you want to coordinate topics. You can make it visible by updating the label and changing this option, or from the course front page, open the Eye icon when editing tools are on. See Chapter 3 for more information about editing tools.
- Click the Save and Return to Course button, which takes you to the front page of your course, where you can see your new label.
The bottom of Figure 5-1 shows the new label I saved. To preview what the page looks like, click the Save and Display button instead of the Save and Return to Course button.
Be creative with positioning. Notice you can indent the label by using the right-pointing arrow when you have the editing features turned on.
Note the navigation bar at the top of the course front page under the title in Figure 5-1. On this screen, the following links trace the steps “CI810![]() Labels
Labels![]() Editing Labels.”
Editing Labels.”
Figure 5-1: Inserting a label.
Composing a text page
A text page is a simple page you can use for instructions or some basic information. The editing features are quite limited, and the pages you create using plain text can appear dull. Because of the textual limitation, I rarely use text pages. Within the same group of resources, Moodle provides the option of adding a Web page that has more functionality and editing capabilities. See the next section.
After knowing the limitations, if you want simplicity and speed, adding a text page may be a useful resource for you. Follow these steps to create a text page:
- Click the Turn Editing On button in the upper-right corner of your course front page.
- In the section where you want to add a text page, open the Add a Resource drop-down list and select Compose a Text Page.
Moodle takes you to the Adding a New Resource for Week (or topic) page.
- Enter a name (required) for the text page.
- (Optional) Add a summary.
The name and summaries appear in the Resources outline and are both accessible to all learners. The Resources outline is a good overview, so it's important you name the resource so it's understood by your learners. Short summaries provide further explanation and identification of how the resource is tied to the learning goals. You and your learners can access the Resources outline from the Activities block on the course front page, located right under the Participants block on the left side.
- In the Full Text area, add the content for your text page in the text box.
- From the Format drop-down list, select a different format to display the text.
Although you don't have text editor functionality to format the text, Moodle tries to improve the layout and look and feel of the page. Plain text is the default, or you can choose Moodle auto format, HTML format, or Markdown format. Any of the formats will improve the look slightly, though you may as well use the Web page and editor to add information.
Using a text page is useful if you copy and paste text from a number of Web pages or Word and PDF documents. You don't have to worry about bringing the back-end code with the documents or using a clean code utility. I discuss clean code tools in the “Using the Moodle Web Editor” section.
- From the Window drop-down list, select whether you want to open the text page in a new window.
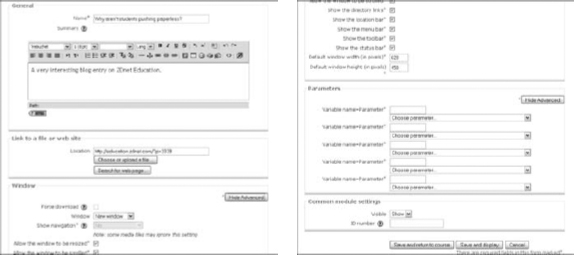
The default is to open it in the same window. By asking Moodle to open the page in a new window, you have a number of options to deselect window functionalities and also change the default size. Read these carefully because you need to allow for most of the default settings; otherwise, you may restrict learners from using basic window functionalities. If the Window options are not displayed, click the Show Advanced button on the right. Refer to Chapter 3 for an explanation of the different settings.
 I suggest that, unless your system administrator has blocked all pop-ups, you enable resources to open in a new window. If you don't have a new window opening up and you don't enable the Moodle navigation bar, learners have to close the resources by clicking the red X in the right corner. Consequently, this action also closes the Moodle session, and they have to log in again, which can become frustrating for learners if they have to do this a few times. If you cannot use the New Window option, select the Show Navigation check box so that Moodle adds the navigation bar or instruct learners to add the browser back arrow.
 - Choose the Common Module Settings as you would when you set up any Moodle activity or resource.
I discuss Common Module Settings in Chapter 3.
- Click Save and Return to Course button.
Moodle returns you to the course front page. You see the link to your new text page with the text page icon in front of it. If you click the name of the text page, you're taken to it, or it will open in a new window (depending how you set it up; Chapter 3 identifies and explains all the standard Moodle icons). As an alternative to clicking the Save and Return to Course button, you can preview what the page looks like by clicking the Save and Display button.
Composing a Web page
You can use a Web page for all the same tasks as the text page discussed in the preceding section, but Web pages include more functionality and options. A Web page has a full editing toolbar and HTML WYSIWYG editing capabilities. (WYSIWYG stands for What You See Is What You Get.) In addition to creative text capabilities, you can add graphics, embed YouTube video clips, embed sound files, and include links to other sites. See the “Using the Moodle Web Editor” section, later in this chapter, where I explain in more detail the Web page editor capabilities and adding graphics.
To set up a Web page, follow these steps:
- Click the Turn Editing On button in the top-right corner of your course front page.
- In the section where you want to add a Web page, open the Add a Resource drop-down list and select Compose a Web Page.
Moodle takes you to the Adding a New Resource for Week (or topic) page.
- Enter a name for the Web page.
 Anything marked with an asterisk, as shown in Figure 5-2, is a required field.
 - (Optional) Write a summary.
A summary is useful to learners because they see it in the Resources outline page. You and your learners can access the Resources outline from the Activities Block on the course front page, located right under the Participants block on the left side.
Figure 5-2: Setting up a Web page.
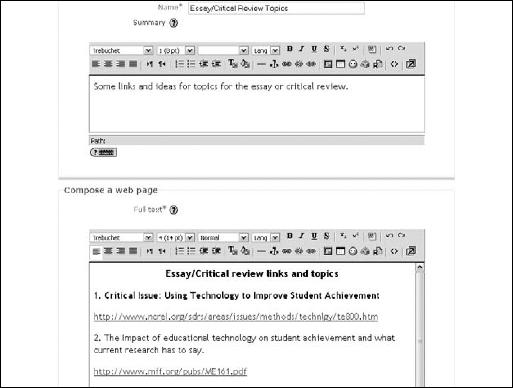
- Add content for your Web page in the text box provided (as shown in Figure 5-2).
You can use various styles and graphics, embed YouTube videos, and/or link to resources. You can make it as creative as you need. If you copy and paste text from another file, make sure you first paste the text into Notepad or use an application to clean up the HTML code; otherwise, it can look messy. If you're familiar with HTML, you can paste straight from Word or other applications and then tidy it up. (I explain accessing HTML by toggling from text to HTML in the “Using the Moodle Web Editor” section.) However, I find the process much quicker when I just copy the text into Notepad and then copy and paste from Notepad to the text field.
- From the Window drop-down list (see Figure 5-3), select New Window so the page opens in a new window.
The default is Same Window. If you open the Web page in a new window (I recommend that you do), you have a number of options to deselect window functionalities and also change the default size. If the Window options are not displayed, click the Show Advanced button on the right, and Moodle opens the extra selections. For more information about the new window and menu bar settings, see Chapter 3.
- Choose the Common Module Settings as you would when you set up any Moodle resource or activity.
- Click the Save and Return to Course button, and Moodle returns you to the course front page.
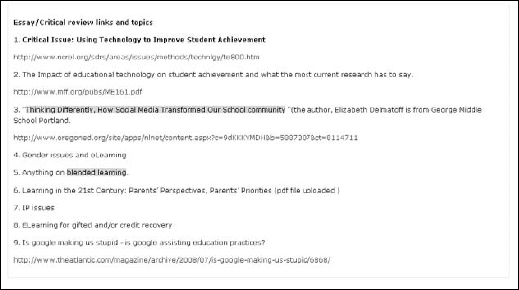
You see the link to the Web page, with the Web page icon in front of it. Clicking on the title will take you to the Web page. (You can see an example in Figure 5-4.)
As an alternative to clicking the Save and Return to Course button, you can preview what the page looks like by clicking the Save and Display button.
Figure 5-3: Choosing how the window displays.
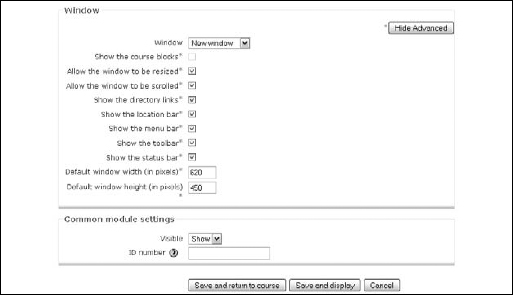
Figure 5-4: A completed Web page.
Linking to a file or a Web site
Learning how to compose a Web page in Moodle is relatively easy, and you can quickly add content to your course, as shown in the previous section. Moodle has another useful tool to add content by linking to a Web site or one of your files. No doubt you have many different types of informative files you've used, such as PowerPoint, Excel, and Word files, PDFs, sound files and video files, or any other type of industry-standard files. Moodle enables you to upload and link to these files. You can also link to various resources on the Internet. I first explain how to upload and link to a file you've created, followed by how to link to a Web site.
Uploading and linking to your files
You can easily upload any file you've created for your Moodle class or used in your course on different systems. Remember that your learners need to have the appropriate software on their computers in order to view certain files. For example, if you upload a PowerPoint presentation, your learners need PowerPoint to view it.
![]() If you aren't sure your learners have the software for the type of file you'd like to upload, be creative by saving the file in a second format and uploading both. For example, when I upload a PowerPoint presentation, I also save the presentation as a PDF file with the same name as the presentation; after I upload it, I position it right under the PowerPoint presentation. Most computers come with the Adobe PDF reader installed, or users can download it for free from http://get.adobe.com/reader.
If you aren't sure your learners have the software for the type of file you'd like to upload, be creative by saving the file in a second format and uploading both. For example, when I upload a PowerPoint presentation, I also save the presentation as a PDF file with the same name as the presentation; after I upload it, I position it right under the PowerPoint presentation. Most computers come with the Adobe PDF reader installed, or users can download it for free from http://get.adobe.com/reader.
To link to a file you created, follow these instructions:
- Click the Turn Editing On button in the upper-right corner of your course front page.
- In the section where you want to add a file, open the Add a Resource drop-down list and select Link to a File or a Web Site.
Moodle takes you to the Adding a New Resource for Week (or topic) page.
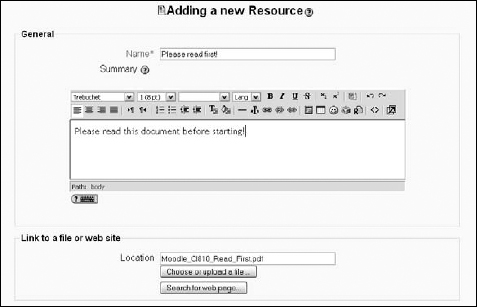
- Fill in the Name field (required; shown on the left side of Figure 5-5) for the file as you want it to appear on the front page.
It does not have to be the name of the file as stored on your computer.
- (Optional) Fill in the Summary field.
This field is useful to learners because they can view the summary on the Resources outline page.
- Link to the file by clicking the Choose or Upload a File button under Location (shown on the left side of Figure 5-5).
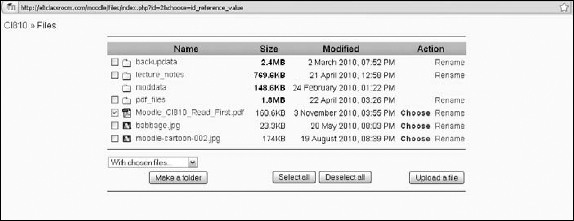
Moodle takes you to a directory that stores all the files you've uploaded. The first time you upload a file, this directory is empty. Unless a file is already in the Moodle directory, you have to upload the file from your hard drive or thumb drive. Figure 5-6 shows you what the page looks like with files listed.
- Add files to the directory:
- From the directory page, click the Upload a File button.
Moodle provides you with the standard Browse button and a field to locate the file you want to upload.
- When you locate the file on your computer, click the Upload button, and your file appears in the directory.
- Select the check box to the left side of the file you want to upload to Moodle and click the Choose link on its right.
Moodle automatically returns to the setup page and puts the path into the Upload a File field. Figure 5-7 shows the file I chose, as it appears in the Location field.
Figure 5-5: Linking to a file or Web site.
 It's important that after selecting the file in the directory, you don't click the Upload button. It seems that's what you would want to do, but that button only takes you back to the Browse field in the set up Resources editing page. Clicking Choose uploads the link to the Add a Resources page.
- From the directory page, click the Upload a File button.
- (Optional) Select the Force Download check box.
Moodle provides you with an option to force files stored in Moodle to be downloaded, rather than being displayed in the browser window. If you want learners to save specific files on their computers or if they may have browser or multimedia plugin issues, select the Force Download check box. This option may be useful for Word, PowerPoint, PDF, sound, or video files.
- Select whether you want the file to open in a new window.
See Step 7 in the previous section “Composing a Web page” for an explanation.
For now, ignore the Parameters section, which is used with linking to other servers. See the “Linking to Web sites” section (Step 4) for a detailed explanation.
- Choose the Common Module Settings as you would when you set up any other resource or activity in Moodle.
- Click the Save Changes button.
Moodle returns you to the course front page, to the section where you added this resource. You see a link with the title and file type listed under the section where you added it. Moodle doesn't have separate icons for document types; the same Resources icon is displayed related to all linked files, such as PDF, MP3, Word, PowerPoint, and so on.
Linking to Web sites
This procedure is very similar to linking to a file, as described in the preceding section, except that you don't have to store the link in a directory like you do a file. To link to a Web site, follow these steps:
- Follow Steps 1–4 in the preceding section, adding a name for the link in the Name field.
- Add the location (the Web address) of the page you want your learners to visit.
You can copy and paste the Web address or click the Search for Web Page button. Moodle launches Google in a new Web page. If you paste the link, make sure you don't include http:// two times — notice it's already set in the field.
- Select whether you want the Web page to open in a new window.
See the Step 7 in the previous section “Composing a Web page” for an explanation.
- (Optional) Set parameters.
Parameters are advanced features that you most likely will not use. The parameters are useful when you want to send data about your learners and courses to another site. For example, you may want to send information about your learners from your Moodle site to another school's server that will give learners access. If the parameters aren't displayed, click the Show Advanced button on the right. Select the options you require, as shown in Figure 5-8.
- Choose the Common Module Settings as you would when you set up any course resources or activities.
Figure 5-8: The Parameters settings of the Resources page.

- Click the Save Changes button.
Moodle returns you to the course front page, to the section where you added this resource. You see an icon depicting the Web link and the name you gave to the link.
Depending what the server requires, you can choose a parameter from the drop-down list. For example, you may need the learner's e-mail address, or you may need a combination of e-mail address and learner ID. Moodle provides you with every exception possibly required, and you can use up to five parameters — pretty clever, don't you think? Thirty parameter type entries are available, and I list the most widely used ones in Table 5-1. You can see the remainder by opening the Choose Parameter drop-down list.
Table 5-1 Selected Parameter Options
| User | Id |
| User | Username |
| User | First name |
| User | Surname |
| User | Full name |
| User | Email address |
| User | ICQ number |
| Course | ID |
| Course | Full name |
| Course | Teacher |
Creating a directory and folders
If you need your learners to access many files that you've uploaded, displaying directory, depicted as a folder, that contains all the files on the course front page is simpler and easier for your learners. You can structure folders by unit, theme, or types of files, such as links to resources or lecture notes. Your learners can open the folders and subfolders and open the files they need from there instead of scrolling through many different files.
To set up a directory, you first need to create the folder that will hold your files. If you put it in the root directory (the default directory created by Moodle), learners will be able to access all files, which you may not want. To create a folder, follow these steps:
- From your course front page, click the Files link in the Administration block.
Files are denoted by a folder icon and is the third from the bottom. Moodle takes you to your directory page, as shown in Figure 5-9.
Figure 5-9: A Moodle directory.
- Select a folder, choose With Selected Folder from the drop-down list, and click the Make a Folder button.
Moodle takes you to a new window where you can name your folder.
- Name your folder and then click Create.
Moodle takes you back to your folder screen with your new folder. Figure 5-9 shows a number of folders.
- Use the navigation bar to return to your course front page.
Setting up a directory involves first creating the folder and then putting files in it. Note: The “directory” that you create on your course front page is the folder you created in your files utility. (It's a slight mix of terms in the Moodle language and can be confusing.) Follow these steps to set up a directory on your course front page:
- Click the Turn Editing On button in the top-right corner of your course front page.
- In the section where you want to add a directory, open the Add a Resource drop-down list and select Display a Directory.
Moodle takes you to the Adding a New Resource for Week (or topic) page.
- Fill in the Name field for the new directory, which is required.
- (Optional) Add a summary.
The summary is useful to learners because they see it on the Resources outline page.
- Select the directory you want to display in your class from the drop-down list.
- Choose the Common Module Settings as you would when you set up any course resources or activities.
I discuss Common Module Settings in Chapter 3.
- Click the Save Changes button.
Moodle returns you to the front page, to the section where you added this resource. You see the folder with the name. (This folder is the directory you will be choosing.)
After you create your directory, you need to fill it with your files; to do so, follow these steps:
- Go back to your folder directory by clicking the Files link in the Administration block.
- Select the check box next to the files you want to move to the folder. (Refer to Figure 5-6.)
- Under the With Chosen Folders drop-down list, click the Move to Another Folder button.
Moodle refreshes the page, and at the top of the page, you see a statement confirming the number of files you've selected for moving.
- Select the folder where you want to move the files by clicking it.
The folder will open with the files there.
- Click the check box next to the files, and then click the Move Files Here button.
Moodle moves the files. You will see them as the page refreshes.
- Return to your front page by clicking the class name in the navigation menu.
Once you have created a number of directories and added files to them, when you choose Add a Directory from the front page Resources menu, you will see a drop-down list of all your folders.
Adding an IMS Content Package
IMS Content Packages are packaged resources that have an agreed specification format (IMS format) enabling them to be re-used in different systems. It's a standard file format you can use without having to convert the material into new formats. If you have purchased or developed online instructional material that can be saved as an IMS Content Package, you can upload it to Moodle. Another way to look at it is like a PowerPoint slide show that you have used for training. If it has navigation, images, small quizzes, video clips, and sound, you can add it as a IMS content resource and use it within your class. You would find that if you uploaded a PowerPoint slide show, you would lose the extra features listed.
- Click the Turn Editing On button in the top-right corner of your course front page.
- In the section where you want to add IMS Content, open the Add a Resource drop-down list and select Add an IMS Content Package.
Moodle takes you to Adding a New Resource for Week (or topic) page.
- Fill in the Name field for the resource.
I recommend giving it a name that best identifies the purpose, such as Exam Review or Supplementary Material.
- (Optional) Fill in the Summary field.
This field is useful to learners because they see the summary in the Resources outline page. You can elaborate here or give brief directions.
- Add an IMS Content Package using the file uploading function discussed in the preceding section.
Follow Steps 7-9 in the earlier “Uploading and linking to your files” section.
Your IMS Content Package is most likely zipped. After you select Choose link, Moodle automatically unzips the file.
- For the Window option, decide whether you want to display the IMS Content Package in the same window or a new window.
- (Optional) Set the display parameters.
Different from the parameters discussed earlier in the chapter, these parameters relate to display and navigational features available in your IMS CP. If you aren't sure what to choose, the safest bet is to accept Moodle defaults.
- Choose the Common Module Settings as you would when you set up any course resource or activity.
I discuss Common Module Settings in Chapter 3.
- Click the Save Changes button.
Moodle returns you to the course front page, to the section where you added this resource. You see a link with the title and file type listed under the section where you added it.