
Using the Moodle Web Editor
Like most software tools that allow you to enter content and format it, Moodle has its own Web-based editor with all the industry-standard functionality and a few Moodle-specific extras. I can reassure you that you will be comfortable with most of the features because you have used them with other programs, such as Word and Outlook. You can find this editor in most resources and activities modules you set up for your learners and anywhere you can create or send content, such as forum discussions, feedback for grades, and so on.
Figure 5-10 shows you the tools on the toolbar. (When the editor is open, place the cursor over the icon to see the name of the tool.) Many of these tools, such as Bold, Italic, and Underline, are familiar tools that appear in many applications. Others, such as Clean Word and Anchor, may be unfamiliar to you if you're new to Moodle. I explain these tools in some detail in the following sections.
Cleaning Word
![]() The Clean Word tool cleans most of the Word formatting from your pasted text. If you use this button, or copy and paste from Notepad, you won't transfer the HTML code and any other setting, meaning it looks better and loads faster. If you've seen text with various characters and tags, that means someone copied and pasted and didn't clean it up.
The Clean Word tool cleans most of the Word formatting from your pasted text. If you use this button, or copy and paste from Notepad, you won't transfer the HTML code and any other setting, meaning it looks better and loads faster. If you've seen text with various characters and tags, that means someone copied and pasted and didn't clean it up.
You can download free HTML filter packs. There are a number of different applications for different operating systems. This book is beyond the scope of assisting you with finding the correct software and installation. I tend to use Notepad. You can paste your content into Notepad, and then copy and paste from Notepad.
Creating anchors
![]() An anchor links terms within a document or outside the document within Moodle and also to Web sites. To use the Anchor tool, follow these steps:
An anchor links terms within a document or outside the document within Moodle and also to Web sites. To use the Anchor tool, follow these steps:
- Highlight the word that you want to become an anchor and click the Anchor icon.
A small window pops up, asking you to name the anchor.
- Type a name for the anchor.
- Click the Link icon (described in the next section).
Another small window pops up.
- From the Anchor drop-down list, choose the word you anchored and from the Target drop-down list, choose Open In New Window.
Your link to another resource is created.
- Click the Save Changes button at the bottom of the page.
Moodle takes you back to the course front page.
- Test the text you anchored to make sure it works.
Your anchored word(s), once linked to another resource or linked to another place in the same document, will look like any other active link.
You can create a set of anchors as you're preparing the document and later select the anchors when you want to link them to other Moodle resources or activities, or to Web sites.
![]() Anchoring and linking don't work within a wiki module. You need to use a different method to link wiki pages and link to external resources.
Anchoring and linking don't work within a wiki module. You need to use a different method to link wiki pages and link to external resources.

Using the Web link tools
The Moodle HTML editor enables you to link to information external to Moodle, such as Web sites, internal resources, activities, or within the current page. You need to use this tool to link your anchored text. The link tool constructs a way to the external Web page, internal resource, or within the same page using the text you anchor (explained in the preceding section) as the link to the resource.
Inserting Web links
To insert a Web link into your document, follow these steps:
 Highlight the text in your document that you want to act as a link and then click the Insert Web Link tool (shown in the margin).
For example, if you were to type For more information, visit www.dummies.com/moodle., I recommend highlighting www.dummies.com/moodleM and making it a link so that learners can simply click those words to be taken to the Web site.
A new small window pops up. (See Figure 5-11.)
Figure 5-11: Inserting a Web link.

- Provide the Web site address in the URL text field.
Notice that Moodle already places http:// in the field, so you shouldn't include this when you're adding the address. If you do, the double http:// results in a broken link (the dreaded 404 Error).
If the link is internal on the Moodle site, click the Browse button to find your file within the Moodle course, saved in a Moodle directory that holds all your files.
- Write a title for your link in the Title field, located under the URL field.
This is the text that will appear when the mouse rolls over the link. It does not have to be the URL.
- From the Target drop-down list, choose where you want to open the new document.
I recommend selecting To a New Window. The other options are Same Window, Same Frame, and Other.
- From the Anchors drop-down list, select the Anchor you created on the page.
- Click the OK button to save the link.
![]() Clicking the Remove Link icon depicted by the broken link to remove the HTML links you've created. Make sure you highlight the text before clicking the Remove Link icon.
Clicking the Remove Link icon depicted by the broken link to remove the HTML links you've created. Make sure you highlight the text before clicking the Remove Link icon.
Preventing automatic linking
![]() Clicking the Prevent Automatic Linking tool (depicted by the link with a red X icon) blocks selected text from being linked to other resources and activities. Moodle allows for automatic linking if the filter has been enabled at the site level. For example, if your course uses a glossary, Moodle links the term throughout all activities and resources. Seeing many terms as highlighted links can be distracting in quizzes, assignments, or in forum discussions. This tool enables you to prevent this cross-site automatic linking.
Clicking the Prevent Automatic Linking tool (depicted by the link with a red X icon) blocks selected text from being linked to other resources and activities. Moodle allows for automatic linking if the filter has been enabled at the site level. For example, if your course uses a glossary, Moodle links the term throughout all activities and resources. Seeing many terms as highlighted links can be distracting in quizzes, assignments, or in forum discussions. This tool enables you to prevent this cross-site automatic linking.
Inserting an image
![]() Any resource or activity (including the News forum) that has the HTML editor capabilities allows you to upload images to your site folders and embed images into your content. Adding images can support many different learning activities. For example, adding a world map and linking from the map to countries, cities, or demographic and geographical representations can enhance content. Images can also be used for quizzes and assessment activities. There are many different uses for pictures. Use your imagination and a variety of media to enhance your students' learning experience.
Any resource or activity (including the News forum) that has the HTML editor capabilities allows you to upload images to your site folders and embed images into your content. Adding images can support many different learning activities. For example, adding a world map and linking from the map to countries, cities, or demographic and geographical representations can enhance content. Images can also be used for quizzes and assessment activities. There are many different uses for pictures. Use your imagination and a variety of media to enhance your students' learning experience.
To add an image to your content, take these steps:
 Select the Insert Image icon in the editor menu bar.
Moodle opens a new window with the image-editing tools that help you add and adjust the picture, as shown in Figure 5-12. In this example, I'm preparing an image to include in a quiz question.
 As with all Web-based tools, you should use the JPG, GIF, or PNG image format.
- Click the Browse button to find and select the image you want to use.
Moodle places the address of the file's location in the Image URL field.
- In the Alternate field, add an image title or other text.
You have to fill in the Alternate field, or the image won't be saved into your content. The alternate text appears when a learner moves her mouse over the image.
 Notice in the example in Figure 5-12, I didn't add the name of the person in the photo because I'm asking learners in a quiz to identify who it is. (If I added the name, learners would obviously have the answer.)
After completing the preceding steps, you can save the image (proceed to Step 5), and it will appear in your text bar. To adjust the size and layout of your image, go to Step 4.
Figure 5-12: Embedding an image.
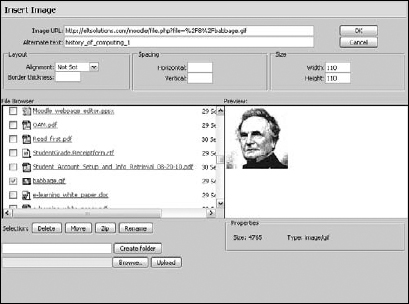
- Use these additional options (shown in Figure 5-12) to resize and position the image.
This is not a required field, but something you may need to do to create a size appropriate for the resource or activity.
- • Layout: You can set the layout of the image in relation to the text. For example, the Alignment drop-down list allows you to choose, left, right, text top, middle, baseline, absbottom (absolute bottom), middle, or top. For the Alignment drop-down list, the default is Not Set. You can also put a border around the image or leave it without. Not entering any digits into the Border Thickness field leaves the image without a border. Thickness is decided by entering the number of pixels.
- • Spacing: The horizontal and vertical spacing is the space between text and the image, and is also measured in pixels. If you leave the fields blank, the text appears right next to the image. I recommend 5–10 pixels for each field. Of course, if you don't have any text, only the image, there's no reason to add anything to these fields.
- • Size: In the figure, notice that I added the size, in pixels, of the image. I wanted it small so that it would fit in the matching question type. You can play with the width and height sizing to prepare the image for your requirements. Remember to keep the same proportions as the original so the image doesn't look blurry or distorted.
- Click OK (to the right of the Image URL field) to save your changes and return to your editing window.
Notice the two fields and three buttons in the lower-left corner of the Insert Image dialog box. Use the buttons — Create Folder, Browse, and Upload — to locate image files that have not been uploaded to your Moodle directory.
The four Selection buttons — Delete, Move, Zip, and Rename — are actions you can take with the files that have been uploaded to your Moodle files directory.
Inserting a table
![]() Inserting a table is simpler than inserting an image. Click the Insert Table icon, located next to the Insert Image icon. Moodle opens a new window with a number of fields to choose rows and columns, layout (the positioning of the table within your content), cell padding, and cell spacing.
Inserting a table is simpler than inserting an image. Click the Insert Table icon, located next to the Insert Image icon. Moodle opens a new window with a number of fields to choose rows and columns, layout (the positioning of the table within your content), cell padding, and cell spacing.
Changing the editing field to HTML source
![]() If you plan to paste HTML code, you need to change the editor to raw HTML mode. For example, when you need to embed YouTube into documents, you need to toggle to HTML source (using the Toggle Text and WYSIWYG tool) and paste the code, and then switch back. When you're viewing the source window, most buttons don't work. If you know HTML code and want to play with making changes to documents, this toggle feature will be your best friend.
If you plan to paste HTML code, you need to change the editor to raw HTML mode. For example, when you need to embed YouTube into documents, you need to toggle to HTML source (using the Toggle Text and WYSIWYG tool) and paste the code, and then switch back. When you're viewing the source window, most buttons don't work. If you know HTML code and want to play with making changes to documents, this toggle feature will be your best friend.
Enlarging the editor
![]() When you're working in the HTML window, selecting the Enlarge Editor tool enlarges the editing window. Working with HTML is much easier if your editor window is expanded. You will be less prone to errors when copying and pasting, and searching for bugs will be kinder on your eyes. You can return to the default size by clicking the icon again.
When you're working in the HTML window, selecting the Enlarge Editor tool enlarges the editing window. Working with HTML is much easier if your editor window is expanded. You will be less prone to errors when copying and pasting, and searching for bugs will be kinder on your eyes. You can return to the default size by clicking the icon again.
File formats: Tips and suggestions
You can employ a number of strategies to optimize your Moodle resources, allowing for quicker downloads, preventing broken icons, and ensuring your learners will be able to view all your resources. Here's a list of things to keep in mind when preparing resources for your learners:
- For learners to open specific files such as Excel, Word, PowerPoint, and ODS, they have to have the associated software installed on their computers. If you are unsure if all your learners have the appropriate software, it's safer to save the files in the PDF format. You can save text documents as RTF (rich text format) files, which most word processing programs can open.
- Reduce sizes of all files.
- If you have to scan articles, save them as text scans, not graphic images.
- Slide shows can become very large, so save them as PDF files. Alternatively, you can use SlideShare (www.slideshare.net) and link to slide shows.
- Save pictures as GIF or JPG files. PNG is also viewable in Moodle, but PNG files can be much larger than GIFs and JPGs.
- Sound and video files can be large, so using compression to minimize size is important. Make sure that the files are not larger than your upload capacity. Moodle supports the following formats: for audio, WAV, MP3, RAM, and MOV; and for video, MOV, WMV, RV, and FLV. Learners need media software to view these files. Most learners can play MP3 files and have QuickTime, Window Media Player, or RealPlayer. Check whether the videos you plan to upload can play with these media players.
- Embedding images in Moodle resources or activities is an efficient way to use images instead of uploading them as separate files (unless they're attached to wikis).
Note that if the URL address of the file changes, the image can't be displayed, and you see the dreaded red X. If this happens, first try refreshing your browser. If the red X is still there, you need to do some sleuthing: Turn on editing, click the Insert Image editing tool, click the image to open the image editor, check the URL field, and go through the Browse option to check whether the file is still where it was when you first added it to the content. Sometimes when you back up your course and copy it to be reused, or copy it to another server, a link can be broken. Making a quick check and relinking the image can quickly solve the problem.
- If you and your learners use digital cameras for projects and then plan to embed those photos in resource files or attach them to specific activities, reduce the photo size. You will be able to view 72dpi. Many large photos quickly eat up allocated server space and can be slow to view.