
Adding Choice to Your Course
Moodle Choice is a simple one-question survey you can use to get quick feedback from your learners about any course topic or activity. For example, instructors use Choice at the end of units to get student feedback on that particular unit. Used over a period of time with many courses, instructors have been able to collect valuable data about specific topics or units, for example, and what types of activities learners prefer or find useful.
The best part is that the Choice tool is quick to set up, and the results are easy to evaluate. Most learners do not mind spending under a minute on a poll. You have two restrictions when creating your informal Choice poll:
- You can ask only one question.
- The question must be in multiple choice format.
Creating a Choice activity
To add a Choice activity to your course, follow these steps:
- Click the Turn Editing On button in the upper-right corner of your course page.
The front page changes to show editing tools, allowing you to change the appearance and add functionality to your course.
- Click the down arrow next to Add an Activity and then select Choice.
You see the Adding a New Choice screen, as shown in Figure 7-7. The selections follow a similar format of other Moodle activities.
Figure 7-7: The General and Limit areas of the Adding a New Choice screen.
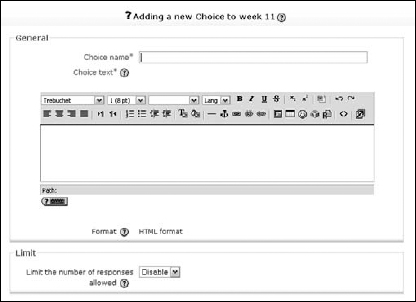
- In the General area, fill in the Choice Name (required).
 It's useful to use descriptive names, especially if you will use Choices frequently.
 - In the Choice text section (also in the General area), add your question.
- Decide whether you want to limit the number of responses by selecting Enable from the drop-down list. (Disable is the default.)
By enabling a limit, you choose how many responses are allowed for each option available for learners to select; when the limit is reached, no other student can select the response. If you disable the limit, each of the responses can be selected by any number of students.
- Enter the responses in the Choice fields, and if you enabled a limit, enter the value.
Moodle provides five Choice fields by default.
- (Optional) If you need more than five Choice fields, click the Add 3 Fields to Form button shown in Figure 7-8 and repeat Step 6 for the new fields.
Figure 7-8: If necessary, you can add three additional Choice fields.

- Select the Restrict Answering to This Time Period check box (shown in Figure 7-9) and enter dates and times if you want to limit the time the questions are available.
Figure 7-9: Don't forget to save your changes.
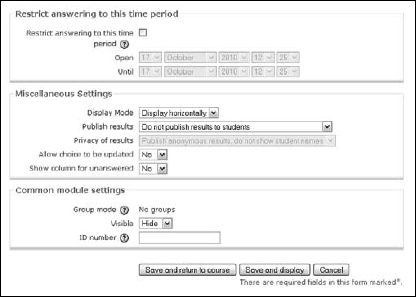
- In the Miscellaneous Settings area, choose layout and display options.
Your choices are
- • Display Mode: From the drop-down list, select whether you want to display the responses horizontally or vertically. If you have very few responses, they look better horizontally displayed; a large number of and/or long responses look much better displayed vertically.
- • Publish Results: In this drop-down list, you have four options to display the results to the students: Do Not Publish the Results to the Student, Show Results to Students Immediately after They Answer, Show Results to Students Only After the Choice Is Closed, and Always Show Results to Students.
- • Privacy of Results: Depending on what you chose on your Publish Results setting, from the drop-down list select whether you want to publish results anonymously or with learners' names.
- • Allow Choice to Be Updated: Select Yes from the drop-down list if you want to allow your learners to change their minds.
- • Show Column for Unanswered: Select No from the drop-down list if you don't want to show names of learners who didn't answer the question.
- Choose the Common Module Settings as you would when you set up any Moodle activity.
See Chapter 3 for a rundown of the Common Module Settings.
- Click the Save and Return to Course button.
Moodle saves your settings and returns to your course front page. Notice that Choice has its own unique icon, and it also appears in the Activities block, the Upcoming Events block, and the course calendar.
Administering choices
To keep track of Choice responses and gather feedback, Moodle has a View [number] Survey Responses link that appears in the top-right corner of the Choice page. Clicking the link takes you to a Responses page (shown in Figure 7-10) where you see the students, their replies, and tools to organize and maintain the responses. (You see the student names even if you selected in the Privacy of Results field the option to post anonymous results; the anonymity means only that participating students and guests cannot see other participants.)
Figure 7-10: Viewing responses.

You can delete selected responses from the With Selected drop-down list. You also have links to Select All/Deselect All right above the drop-down list. This saves you from moving from student to student when you want to delete a large group of responses.
Moodle also features download functionality so that you can save data in industry-standard formats. You have three choices: Download in ODS (Open Document Spreadsheet) Format, Download in Excel Format, and Download in Text Format. Select the format you want to use to download your data, click the button, and follow the instructions.