
Exploring the Front Page Settings and Enrollment Options
To access the course front page settings, click the Settings link in the Administration block (located on the left side, as shown in Figure 4-1). Moodle takes you to Edit Course Settings page. These settings enable you to decide how you want things to appear to your learners and structure the course layout to meet your learning objectives. In the following sections, I describe these settings (in groups, as they're divided on the Edit Course Settings page) so that you can make changes if you don't want to keep the Moodle default settings.
Figure 4-1: The basic layout of course front page, with the Administra-tion block on the left.

 As you look over these settings and make changes, remember two things:
- When you're done, click the Save Changes button at the bottom of the Edit Course Settings page.
- Any field marked with an asterisk is a required field, and you must fill it in.
General
This is the largest group on the Edit Course Settings page. The following list describes each setting (as shown in Figure 4-2):
- Category: Categories are set up by the site administrator. They can help instructors and learners quickly find their courses if the site is large. The Moodle default category is Miscellaneous, and your site admin may have a list to help structure and organize the site. For example, a university Moodle site may be organized by schools (for instance, medical school, business school, dental school, and so on) or departments (such as math, science, engineering, humanities, and the like). If you have a Teacher or Course Creator user account, you will not be able to create new categories or change the names unless you have Administrative capabilities.
 If you want to change category names and create new categories, go to the site Administration block and click Courses. As mentioned previously, you need to have an Administrator user account or privileges added to your Teacher or Course Creator account.
 - Full Name: Enter the full name of your course as it may appear in a course catalogue, such as Moodle 101 in Figure 4-2. This is a required field.
- Short Name: Enter the short name as used by your organization, such as MD101. This field is also required.
If you don't have a specific short name, make one up! Moodle won't let you set up the course without a short name. The short name will appear in the navigation bar.
- Course ID Number: Enter the unique course alphanumeric ID.
This field has a variety of uses, and it can be left blank. It's mainly set up in case an organization has a unique identifier for each course and needs to synchronize the IDs with backend data systems used for courses and enrollments. Students don't see ID, but if they need to see it because it's listed in a catalogue, you can use it as part of the course short name.
- Summary: The summary appears on the course listing page for your learners to see. Enter a sentence or short paragraph depicting the nature of your course.
- Format: Moodle allows you to set a course format to support your teaching requirements. The drop-down list gives you a number of options:
- • Weekly Format: This is one of the most popular formats, which allows you to specify start and end dates and any number of weeks you want the course to run.
Figure 4-2: The Edit Course Settings page.

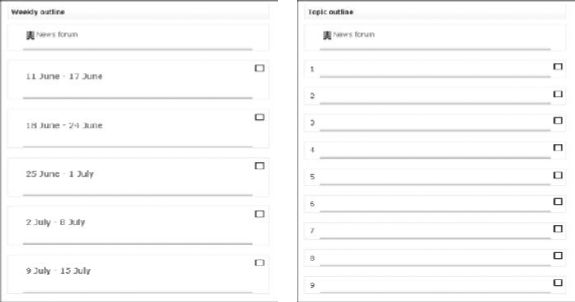
- The course dates will be listed based on the course start date you enter, with the current week highlighted. This format is useful if you structure your course by your organization's academic calendar and your learners move at a similar pace. Figure 4-3 shows an example of this format (on left).
- • Topics Format: With this format, the course is organized by topics or units, and you choose how many topics you want to structure the course. The right side of Figure 4-3 shows an example topic outline.
- This is a useful format if time is not a constraint and some topics have more activities or take longer and/or build on knowledge from previous topics. Moodle adds numbers for topics, which you can change using the front page editing tools described in Chapters 3 and 5.
- • Social Format: The main focus of the social format takes on the structure of one main forum discussion. This format isn't often used for courses, but it's used to create departmental or organizational discussions around issues. For example, one school district used a social format to involve teachers in a discussion on training needs and training courses. Check out Moodle Lounge, an open forum to chat with other Moodle users at http://moodle.org/course/view.php?id=55, http://moodle.org to see how this format is being used.
Figure 4-3: Course front page showing a weekly format.
- • LAMS Format: LAMS stands for Learning Activity Management System. This is an open source format that has been used for a few years by instructors. The system uses a Flash-based authoring environment. Moodle developers integrated the LAMS format so that instructors can incorporate LAMS-based activities into a Moodle course, benefiting from Moodle tools. LAMS is not widely used because it is a bit dated. Instructors and organizations are adopting Moodle or other similar open source content management systems or Web 2.0 tools.
- • SCORM Format: SCORM stands for Sharable Content Reference Model. SCORM and AICC are standard content packages that are used by a variety of applications that support the format. Moodle enables you to use this package either as a complete course format or within individual activities. For example, if you set up a complete course with Adobe's Articulate, you can use the SCORM format and make it available on your Moodle site. For more information, go to http://docs.moodle.org/en.
If you use the entire course in a SCORM format, your learners can't interact with the Moodle tools. It makes more sense to create SCORM activities.
- • Weekly Format, CSS/No Tables: This format is very similar to the weekly format without the table layout. You get more flexibility for displaying variety of activities. Older browsers may not be able to display this format.
- • Weekly Format: This is one of the most popular formats, which allows you to specify start and end dates and any number of weeks you want the course to run.
- Number of Weeks/Topics: Choose the number of sections from the drop-down list.
You use this drop-down list only with topic and weekly formats. Ten is the default, and you can choose up to 52. You can add sections as you find the need. Moodle adds any new section to the bottom of the list.
- Course Start Date: Specify the course start date. If you're using a weekly format, the start date appears in the first week. Choose your date to coincide with the date that you want logs to start and your course to be visible to students. If you set the date after you want the learners to see sections, they will be unable to view them.
- Hidden Sections: This function enables you to display a collapsed section to your learners, showing them the unit title.
I suggest you leave the default setting (Hidden Sections Are Shown in Collapsed Form) unless you want to hide the topic completely because each activity and resource can be hidden.
- News Items to Show: From the drop-down list, select how many news items you want to show in the News block that appears on the front page (right side column).
- Show Gradebook to Students: Use this drop-down list to determine whether your learners have access to their grade book.
By default, Moodle enters a grade for every graded activity that is displayed to the learners from the Grades link on the course front page. Unless you have a particular reason for not wanting learners to see their grades and class average, I suggest you allow learners to view their grade books.
- Show Activity Reports: Displays all Moodle activities to learners.
Similar to the reports available to teachers from the Administration block, if you enable the activity report for students, they can view all of their own activities. Unless you have a particular learning objective for the learners to view their Moodle participation (for example, you can get them to chart, graph, use spreadsheet from the data obtained), I don't suggest enabling this feature. These log reports can place an extra load on the server if you have a large number of learners enrolled in your course. You may even find yourself battling your system administrator on this one.
- Maximum Upload Size: This option limits the size of files your learners can upload.
You should know how much space your course has and then set this option appropriately. Making this option much smaller than system allocation is wise. Beware; students will use up space quickly when they realize they can do exciting things with their projects and upload video files and sound files.
- Is This a Meta Course? This is purely an enrollment functionality, meaning a meta course automatically gets students enrolled from one or more courses. A meta course in Moodle is a course that is linked to any number of other courses to ease registration. See Chapter 13 for more information.
Enrollments
The Enrollments settings (shown in Figure 4-4) enable you to make decisions about the people who enroll and what they can see and do.
- Enrollment Plugins: Moodle has various plugins, including internal enrollment and PayPal to manage the course enrollment.
This concern may be taken off your hands if the system administrator controls the enrollment; in that case, just leave the default. You can find more details on enrollments later in this chapter and in Chapter 13.
- Default Role: Allows you to set a default login roll for everyone that's enrolled. Moodle sets this to Student, and I strongly recommend that you leave the default if you and your administrator want any control over your course.
- Course Enrollable: You have three options: No, Yes, and Date Range. If you select Yes to allow self enrollment, the grayed out Start and End Dates become active, and you can set the range as required.
This setting has no effect if users are enrolled using an external database.
Figure 4-4: Course Administra-tion Block: enrollments, groups, and availability options.
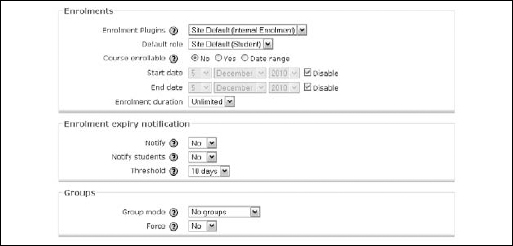
- Enrollment Duration: This function sets how long a student can be enrolled in the course, not how long self enrollment is available (as many instructors believe). Another way some people use this setting is to automatically unenroll students from a course instead of deleting them manually.
 Be careful about how you set this; for example, if you set it for 28 days, all students will be locked out of your course after the duration. If you aren't sure what to select, leave the default setting.
Enrollment Expiry Notification
Use the Enrollment Expiry Notification settings (refer to Figure 4-4) if you want users notified when their enrollment is about to expire. You have just a few things to adjust here:
- Notify: Select Yes from the drop-down list if you want all other registered users, other than student accounts, notified.
- Notify Students: Select Yes from the drop-down list if you want students notified.
- Threshold: From the drop-down list, select how many days prior to the course expiration date the enrolled accounts should be notified.
Groups
Moodle enables you to set up groups for your course or any activity and assign any number of learners or teachers (or other user accounts) to the groups. For example, if you teach three different sections of the same course, you can set up three different groups, or you can assign groups to participate in different forum discussions. I explain groups in more detail later in this chapter in the “Managing Activities and Projects with Groups” section, but you see the following two settings here. (Refer to Figure 4-4.)
- Group Mode: You have these three choices:
- • No Groups: You have one course with no groups for activities.
- • Separate Groups: Groups see and participate in only their own group. Other groups are invisible.
- • Visible Groups: Each group member participates and works in his own group but can also see other groups' work. For instance in Forums, everyone can see groups' postings, but can post discussions and replies in only their own group.
- Force: If you force groups, you don't have to set up groups in specific activities, and you can assign learners to specific groups. See the section “Managing Activities and Projects with Groups,” later in the chapter, for details on creating groups.
Availability
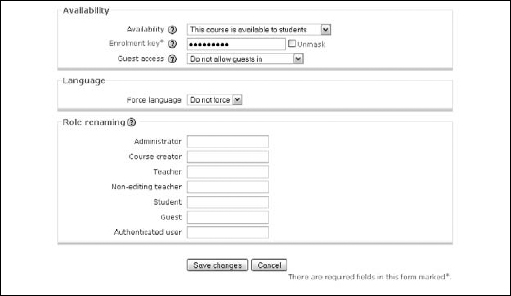
The Availability settings (shown in Figure 4-5) determine the availability for registered users and guests.
- Availability: Enables you to hide your course or make it available to students. If you're making it available, I recommend that you set an enrollment key.
- Enrollment Key: Select any alphanumeric key. Anyone who wants to view your course needs this key to be able to access it. One nice Moodle feature is that if you forget the key, you can select the check box, and the key will be displayed.
- Guest Access: Determine whether guests can access the course. Using the drop-down list, you have a choice of letting them in needing a key, not needing a key, or not letting guests in at all. Guests can only read content; they can't interact or add to any activity.
- Cost: If a payment gateway has been added as an enrollment plugin, you can set the cost in the field, and students have to make a payment before they can enroll in the course.
Figure 4-5: Control course availability.
Language
Select an option from the Language drop-down list if you want to force a language. If you force the language of the site, the Moodle interface is presented in that language, and students can't change languages within personal profiles. I recommend you accept the default setting (Do Not Force) shown in the preceding Figure 4-5.
Role Renaming
Moodle enables you to rename roles in your course. For instance, instead of Teacher role, you may want to change it to Instructor, Tutor, or Facilitator. The Student role can be named Participant, and Non-Editing Teacher can become Mentor or Substitute. Moodle allows you to change role permissions for most of the roles in the course. See the later section, “Implementing Moodle Roles and Course Permissions.” Note that the default role names, as they appear in Figure 4-5, may have been changed at the site level by your Moodle administrator. Even if they've been changed already, you can still change the names for your course.