
Saving Time by Reusing Your Course
After putting in hours of work creating your course, you can sit back and relax because you will never have to create another Moodle course if you offer the same course, or even a similar one, again. The backup and restore processes allow instructors to duplicate — yes, clone, as one of my students called it — the entire course so it can be reused. You can also duplicate specific activities from one course for use in another, similar to the import function.
Restoring your entire course
The process for restoring and duplicating a course is straightforward. Unless your system administrator moved the backup, it's stored in the backup data folder located in the course Files folder, accessible from your course Administration block.
To restore your course, follow these steps:
- Click the Files link in the course Administration block.
Moodle takes you to the list of files and folders.
- Click the backupdata folder.
Moodle takes you to your backup files directory, as shown in Figure 14-9.
Figure 14-9: The backup file directory.
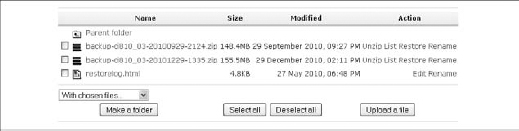
- Under the Action column, click the Restore link located next to the backup file you want to restore or copy.
Moodle takes you to a new page stating You are about to start the restore process for:, and then the filename is listed below.
- Click the Yes button to answer the question Do you want to continue?
The restore process begins. Moodle lists all the files on the next page that appears.
- Click the Continue button at the bottom of the page.
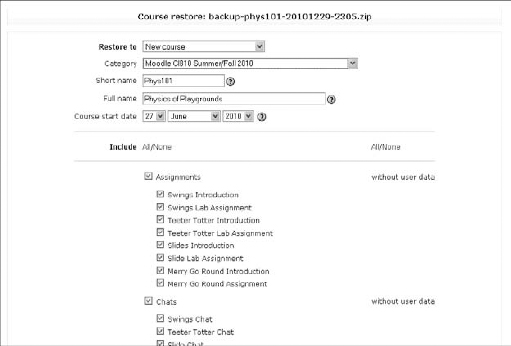
The Course Restore page appears, as shown in Figure 14-10. This page allows you to restore the course. You have an option to add and/or delete data to it first.
- Fill in the Category, Short Name, Full Name, and Course Start Date fields.
 This is where you can clone (duplicate) a course by just giving it a new name, such as Physics 101 Winter Term, and new start date.
 - If needed, deselect the check boxes next to the activities you don't want to include.
By default, all check boxes are selected.
- At the bottom of the Course Restore page, as shown in Figure 14-11, select the following options:
- • Metacourse: Choose whether this is a meta course.
- • Users: Choose Course or None. The default is Course.
- • Groups: Choose whether you will use groups.
- • Logs: Select No. (You do not want to restore log files.)
- • Site Files: Files pertaining to the whole site, meaning available to all courses.
Figure 14-10: The first half of the options and selections page for restoring a course.
- • Grade Histories: Grade data related to your course. If you're starting a new course, you don't want to restore the grade histories. Notice in Figure 14-11 that in this example there isn't a drop-down list to make a choice, just the word No, because I deselected restoring grade history.
- • Role Mappings: Teacher roles, by default, are only given permission to assign roles for Non-Editing Teacher, Student, and Guest.
- Click the Continue button.
Moodle takes you to the Confirmation page, which is the last page before the restoration begins. This page informs you that certain course data needs to be restored for specific activities and that the process may take a long time.
- Click the Restore This Course Now! button.
If you include user data for specific activities, this button is available only for users with this capability enabled (moodle/restore: userinfo).
Moodle takes you to a new page informing you about the progress of the restoring procedure. Moodle then tells you whether it was successful.
- Click the Continue button.
The restoration is complete, and you can see the restored course listed on the site front page and under the courses category you've chosen.
Figure 14-11: The second half of the options and selections page for restoring a course.

Importing specific data from your course
You don't need to go through the whole backup and restore process if you want to import data from another course. You can import any number of activities and resources from other courses, including other instructors' courses if you have a Teacher role (or another role with editing rights) in those courses. This importing tool allows you and your colleagues to reuse popular and useful activities and resources, saving everyone time.
 The importing tool isn't designed to import student or teacher data from activities (such as forums, chats, and so on). It imports the activity as you have set it up without the discussion threads. The importing tool imports questions from your quizzes, but not students' data if they have taken the quiz.
To import activities or resources from your course, follow these steps:
- Go to the course to which you want to import data.
- Click the Import link in the course Administration block.
Moodle takes you to the Import Activities from Another Course page, where you choose which course you want to select data from. (See Figure 14-12.)
Figure 14-12: The Import Activities from Another Course settings page.

- From the Courses I Have Taught drop-down list, select the course you want to import. Then click the Use This Course button immediately below the list.
Notice at the bottom of the page you can import your groups.
Moodle takes you to a new page listing all the activities and resources from the course you want to transfer.
- Select the type of activities or resources you want to import. At the bottom of the page, choose whether you want to include course files and site files for the course.
By default, everything is selected. The All/None links enable you to deselect everything.
The site files option imports backups at the site level. For this particular example, the backup would be quiz questions in the question pool. Select the yellow question mark, and Moodle informs you of what's included.Moodle displays a reporting page that informs you of what's being imported.
- If all looks fine, click the Continue button at the bottom of the page.
Be patient. This step can take a little time, so go get yourself a cup of tea and relax.
Moodle returns another page informing you of what was imported.
- Click the Continue button at the bottom of the page.
You have to wait again, and then another screen appears with an Import course data statement and a Continue button.
- Click Continue and then, on the next page, click Continue again.
When everything is completed, Moodle returns you to the front page of the course into which you are importing.
![]() If you imported quizzes or assignments from your course, don't forget to change any dates (that is, starting availability dates and due dates) associated with them; otherwise, the learners will not be able to access the content.
If you imported quizzes or assignments from your course, don't forget to change any dates (that is, starting availability dates and due dates) associated with them; otherwise, the learners will not be able to access the content.