
Adding Lessons to Your Course
In Moodle, a lesson is an activity that's structured to adapt answers to questions and send learners to different pages of the lesson based on their answers. Moodle adapts to the learner so content can be interesting and ever-changing. Lessons are most useful (and fun) when you're presenting branched or guided content or an assessment activity because these types of lessons enable learners to follow their own paths through the information.
Unlike other activities in Moodle, creating lessons is more complicated, but if you spend time planning them, you will quickly find they aren't as tricky as they may first appear. Taking extra time thinking and organizing your content will benefit the lesson's success and usefulness. Go on; jump in and have fun!
Effectively using lessons with learners
Classroom activities can support various learning styles that involve remembering, understanding, applying, analyzing, evaluating, and creating new knowledge. One of your main goals as an educator is for your learners to put to use new knowledge and be creative. The unique aspect of a Moodle lesson activity over other Moodle activities is that you enable your learners to drive the lesson. Structuring is tied to a learning objective based on the choices learners make on each page. Here are a few examples of how you can use Moodle lessons for instructional and/or assessment purposes:
- Branched assignment or quiz: Set up questions where each correct answer allows the learner to continue; if the learner answers incorrectly, Moodle loops back to display more information before allowing the learner to answer the question again. Question types can be multiple choice, matching, true/false, and essay, though the essays require you to correct them.
- Flashcards: You can set up lessons to test knowledge or for review, like a stack of flashcards (which most learners are familiar with). Vocabulary, multiplication tables, sign language, geography, new policy, quotations, anatomy, periodic table elements — these are just few examples of successful uses of lessons.
- Case studies: Learners are presented with a real-life situation and, as they proceed through the lessons, they need to decide what to do next. For example, case studies have been used with CPR training, where learners need to learn and understand a sequence of steps to save victims from choking or heart attacks.
- Role play: By using simple role play, your learners can take on the persona of a literary character (such as Hamlet or Huck Finn) and answer a set of multiple choice questions leading them to scenarios where they have to demonstrate they have read the material. If the learner chooses an incorrect answer, you can structure the role play to take her back to an explanation, or refer her to specific parts in the book. As stated previously, you need to structure the lesson and decide what type of feedback you use for incorrect answers.
Choosing the right lesson
Before you start building your lesson, you need to decide which type of lesson page style you want to use. Only you will be able to view the page structure; your learners will see only the questions. They will not see that the way they answer the questions determines what they are presented with next, such as the path through the lesson.
- Branching page: Give your learners choices to select an option from a branch presented as a chain of questions. Because there is no correct or incorrect answer for each response, the choices are not graded. When learners complete a chain, they're returned to the branch table and choose another one or end the lesson.
- Question page: You can set questions requiring your students to provide a correct answer. Depending on the answers you have set up, the learners are taken to another question or looped back. The question page allows you to include information, instructional content, and graphics before displaying the question. You can set scoring for question pages.
Creating lessons
Structuring and organizing your content are the most challenging parts of creating a lesson activity for your learners. Before you start, I recommend drawing a flowchart after deciding which type of lesson you want to set up. The flowchart should include the following:
- How you will represent the first page
- The number of options you have and where each option leads the learner
- Where you want to give feedback or hints
 More than one option can lead to the same information. Wherever it makes sense to do so, be sure to reuse pages! Reusing pages keeps your page numbers smaller.
When Albert Einstein was asked about the most difficult part of his work on the theory of relativity, he replied, “thinking about the problem.” To assist you with planning and structuring a lesson activity, you can download a template from this book's companion Web site at www.dummies.com/go/moodlefd.
The general settings that come first are similar to settings for other activities (such as the wiki and glossary outlined earlier in this chapter). Dive right in and create a lesson by following these steps:
- Click the Turn Editing On button in the top-right corner of your course front page.
The front page changes to show editing tools allowing you to change the appearance and add resources and activities to your course. The editing icons are listed on the Cheat Sheet and in Chapter 3.
- Locate the week or unit in your course for which you want to add the lesson, click the down arrow next to Add an Activity, and select Lesson from the drop-down list.
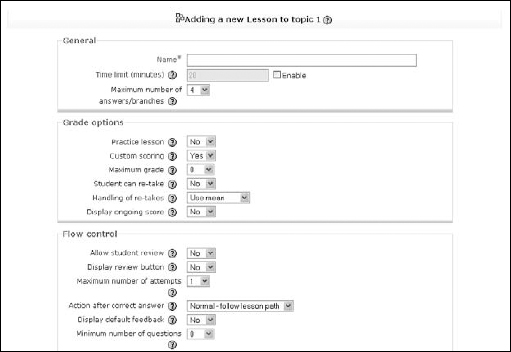
Moodle takes you to the Adding a New Lesson to Week page, shown in Figure 9-12, which has a similar layout to pages for other activities you may have set up.
Figure 9-12: Add a new lesson.
 Don't let the long list scare you away — I promise most settings can be left as default and updated later. Play, test, get your hands dirty, and have fun!
 - Fill in the Name field, which is required.
- (Optional) Select the check box next to Enable if you want to set a time limit for the lesson. The field and text come to life. Add the time limit in minutes.
By setting a time limit on the lesson, if learners run out of time, Moodle allows them to finish the lesson, but questions are not counted.
- Select a number from the Maximum Number of Answers/Branches drop-down list.
I advise to choose a higher number so you don't limit yourself. For example, if you put only 4, you're limiting yourself to only four multiple-choice or matching answers or four branches. You can always change the settings later on.
- Fill in the Grade Options section if the lesson will be used for assessment.
- • Practice Lesson: Select Yes if you want the lesson to be only used for practice. The scores won't be recorded in the grade book.
- • Custom Scoring: Select Yes if you want to score each question independently.
- • Maximum Grade: Select a value from the drop-down list. I tend to set the grading to 100 unless I know I have a set of 10 or 20 questions and then assign each to be worth 10 or 5 points. Working with 100 gives you the most flexibility. If you leave this setting at 0, Moodle knows you aren't using the lesson for assessment.
- • Student Can Re-Take: Selecting Yes allows students to go through the lesson questions and re-enter answers. If you set this to Yes, you need to decide how you want Moodle to handle the scoring, which is what the next option is for.
- • Handling of Re-Takes: From the drop-down list selecting Use Mean or Use Maximum tells Moodle how to assess learners at the end of the lesson if they retake the lesson. If you selected No for the preceding option, Moodle ignores this setting.
- • Display Ongoing Score: Selecting Yes shows learners how they're doing as they progress through the lesson.
- Fill in the Flow Control section (shown at the bottom of Figure 9-12).
These settings allow you to set how learners will move through the lesson. Learners can move at different paces depending how you set up the reviews, attempts, and feedback in the lesson settings.
- • Allow Student Review: Selecting Yes allows your learners to move through the lesson again from the start or back and forth to check answers.
- • Display Review Button: If you select Yes, a review button is displayed under incorrectly answered questions. The learner will see “Yes, I'd like to try again” and “No, I just want to go on to the next question.” The learner is given another chance to answer a particular question before a penalty is given.
If you're using essay questions, leave the default setting for Review button set to No because it isn't compatible with this type of assessment.
- • Maximum Number of Attempts: If you allowed your learners to use the review functionality, you now need to set how many attempts they're allowed before a penalty is set. For example, if you set a matching question with eight different matches, you may set the penalty to 3, meaning the learner can choose three different options before he is penalized for an incorrect answer and moved to the next page.
- • Action after Correct Action: Select from the drop-down list what you want the learners to see after they answer a question.
Normal - Follow Lesson Path: You want to direct learners to a page following the correct answer.
Show an Unseen Page: You can direct your learners to a randomly selected new page they have not seen before if they answer the question incorrectly. You will find this setting useful with flashcard-type questions and exercises.
Show an Unanswered Page: You can set this option if you want to see the page again, but it will be shown only if they have not answered the question correctly. This setting is most useful with flashcard exercises to give your learners another chance if they did not get a correct answer.
- • Display Default Feedback: If you don't want to set up your own feedback, leave this setting to Yes. Moodle's default feedback is That's the correct answer/That's the wrong answer.
- • Minimum Number of Questions: Leave the default 0 unless your lesson is set for grading. Learners are told how many questions they have attempted and how many they are expected to attempt before their work is graded. Each learner will have to answer the minimum number generated to receive a grade. If the learner answers fewer questions, his grade will be based on the value at which you set it.
- • Number of Pages (Cards) to Show: You use this setting only if you're using a flashcard lesson. Select the number of cards you want your learners to view. Once the student sees all the cards, the lesson ends. See the next section for instructions on how to effectively set up a flashcard lesson.
- Fill in the Lesson Formatting section.
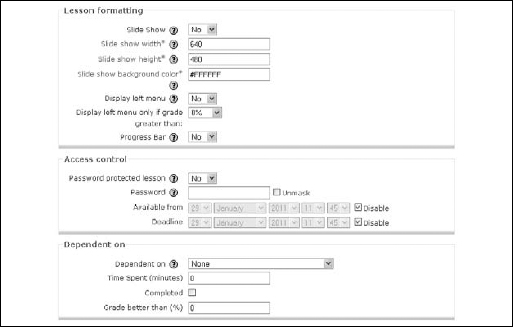
You have to scroll down to see this section, as shown in Figure 9-13.
Figure 9-13: Set your lesson-formatting preferences.
Moodle lets you present the lesson as a slide show. The default is No. If you leave it set to No, you don't need to worry about the following settings.
Selecting Yes from the drop-down list activates the slide show and a few options for customizing it.
- • Slide Show Width and Slide Show Height: The default settings are same for all the pop-up window options used with the resources. You can make this window smaller or larger, though I recommend you do not make it much smaller than the default.
- • Slide Show Background Color: The Moodle default is white. Choose a different HTML color code if you want to change the background of the lesson.
 Changing the color requires you to enter an HTML character color code reference. Remember to use the six-character HEX value in the field.
 - • Display Left Menu: Selecting Yes displays a navigation bar on the left side allowing your learners to jump slide to slide. Without this bar, learners have to proceed through the slide show in order and exit only when they finish. You can set a percentage grade for learners to achieve before allowing them to jump freely reassuring you they've completed the lesson to an acceptable standard before you allow the freedom to roam.
- • Progress Bar: Selecting Yes from the drop-down list enables learners to view their progress at the bottom of the lesson page.
- Fill in the Access Control section.
Selecting these settings gives you options to place various restrictions on the lesson.
- • Password Protect Lesson: If you select Yes, you're required to enter a password. Your learners need to enter it before they can begin the lesson. If you forget your password, selecting the Unmask check box shows you what you've entered.
- • Available From and Deadline: Entering dates and times in which learners have to complete the lesson.
- Select the Dependent On settings.
These settings allow you to set conditions on the lesson activities preceding the lesson.
If you've set this lesson as a practice lesson or if this is your only lesson, you cannot set dependency values, and Moodle defaults to None. If you have more than one lesson, select the lesson that this one is dependent on from the drop-down list and then make the following selections:
- • Time Spent: Requires your learners to spend a specific time on the previous lesson. Enter a value in minutes or leave it at 0.
- • Completed: Requires your learners to have completed the lesson selected.
- • Grade Better Than %: Setting a required percentage restricts the learners to achieve a certain grade to access the lesson.
- Fill in the Pop-Up to File or Web Page section.
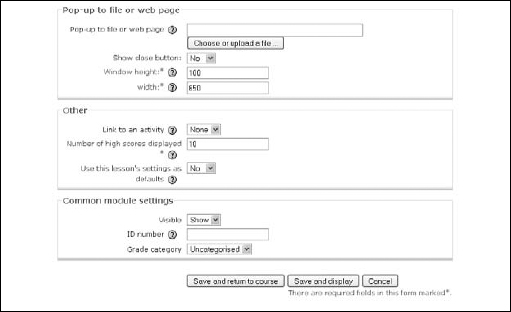
This section is at the bottom of the Adding a New Lesson page. The options are shown in Figure 9-14.
Figure 9-14: Adjust how windows display.
Click the Choose or Select File button, which is standard to most software and discussed in Chapter 3. The file or page will be displayed in a separate window at the beginning of the lesson.
Enabling a file or a Web page is useful if you want your learners to see, read, or hear a file or Web site before or during the lesson. For example, you can show your learners an image (such as a map) that they can use to answer specific questions. Or you can use a sound file of spoken words for any language course if part of your lesson is built around oral comprehension.
- • Show Close Button: Default setting No restricts learners to close the window. Selecting Yes allows learners to close it.
- • Window Height and Width: Change the default settings if you require a different size. You can always go back and change the window after viewing the lesson. Notice that these are required fields.
- Review the Other option settings, which give you more flexibility and save you time when creating the next lesson.
- • Link to an Activity: Selecting an activity from the drop-down list will display it at the end of the lesson. All activities you have created will be listed. If you don't choose anything, Moodle will return the learner to the front page.
- • Number of High Scores Displayed: This is a required field and ignored if the lesson is set as a practice lesson. Choose a high score, and the learners achieving the highest score will be able to enter their names.
This feature is useful for igniting the competitive nature of your students, or if they're an inactive bunch, bribery can work.
- • Use This Lesson's Settings as Defaults: Selecting Yes will save all your settings for the next lesson you'll be preparing. This is a very useful feature if you need to prepare a series of similar activities, such as flashcards or case studies.
- Choose the Common Module Settings as you would have when you set up any Moodle activity and then click the Save and Return to Course button.
Chapter 3 describes the Common Module Settings.
Moodle saves your settings and returns you to the course front page. You can see the newly added lesson icon with its title in the week or unit where you first set it up.