
Viewing Your Database — What You and Your Learners Will See
When you or your learners select the database from the course front page, Moodle displays the main database page with a number of tabs. Each tab has a specific function. Student roles, by default, see only three tabs, as shown in Figure 12-11. In this list, I describe all the tabs shown in Figure 2-12:
Figure 12-11: The learners' view of the database from the View List tab.
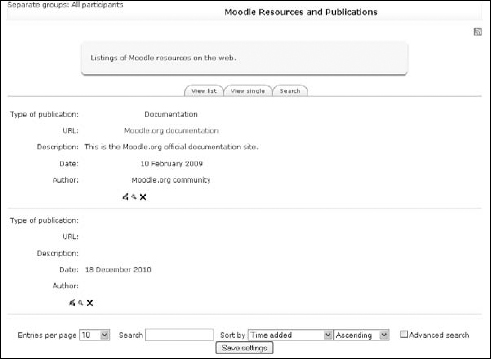
- View List tab: This is the first page you and your learners see when you select the database from the course page. The page lists the entries that you and your learners have added. You decided how many entries can be viewed in the list when you set up the database. Note that you see the same view; the only difference is that you see more tabs.
- View Single tab: Only one entry is displayed. If you enabled users to add comments, the comment feature is available here.
- Search tab: Enables you or your learners to search for specific entries.
- Add Entry tab: Allows you and your learners (if you enabled student entries) to add entries to the database by filling in the form you created. I give an explanation on how to add entries earlier. The front end, the interface is decided on the templates you have chosen and possibly edited. Note: Your learners can see this tab only if you enabled the Student role to add entries to the database.
Figure 12-12: The main database page showing all the tabs available.
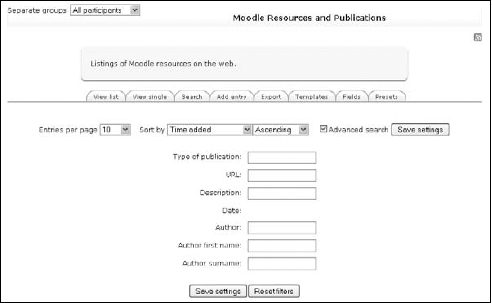
- Export tab: You can export your data to a CSV file with a choice of delimiters, Excel, or ODS. This is a required field. One format must be chosen in order for Moodle to proceed with the export. You can also choose which fields you want to export. They're all listed with a check mark in the check box. If you don't need a particular record of the entry, deselect the check box and then click the Export Database Records button. This tab is not seen by your learners.
- Templates tab: The template controls how you enter and edit the data into your database. For the lowdown on the individual templates, see the section “Editing your database interface,” earlier in this chapter. This tab is not seen by learners.
- Fields tab: This is the tab where you define what type of data you want to enter into your database. (See the earlier section “Adding fields to your database” for more on this tab.) This tab is not seen by learners.
- Preset tab: A preset, in the Moodle database, is an ingenious functionality that allows you to reuse the database you created, saving you valuable time. Similar to the quiz question pool, the motto is “create once, reuse many times.” For example, if you set up your course in groups and you want each group to have its own database, you can replicate it by using this functionality. Similarly, you can share the database (referred to as preset) with your colleagues, just as the Moodle community has shared its most popular databases with you. For example, the ever-so-popular image gallery preset is bundled in the Database module to help you learn how to use this tool and get you started creating quickly. Check out the companion Web site for more presets!
To import a preset, follow these steps:
- Click the Presets tab.
The Presets page appears, as shown in Figure 12-13.
Figure 12-13: The importing and exporting settings of the Presets page.
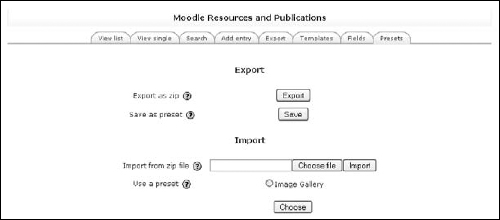
- In the Import section, click the Choose File button, locate the Zip file on your computer, and then click the Import button.
- After the preset is imported, you can alter the fields and the template, and start to add entries.
Note that after you've imported and/or created a number of databases, you will have an option to choose a previously loaded preset.
Quite simple, don't you think? All the tedious work is done for you — marvelous!
If you've developed an absolutely fabulous database and it has become a marvel to all your colleagues and learners, share it! You will be loved by all. What better way is there to become popular in your department, organization, and even an international star than by sharing your creation through the Moodle.org community?
To export your database preset, click the Presets tab and then do one of the following:
- Select the Export as Zip option by clicking the Export button. Follow the steps to save your file as a zipped file on your computer so that you can import it to another course or Moodle site.
- Select the Save as Preset option by clicking the Save button. Moodle takes you through a few steps, and Moodle publishes the database for other teachers on the site to use. When you save your database as a preset, it appears in the preset list, and you can reuse it.