
Courses
Teacher, Course Creator, and Administrator roles are all responsible for adding courses to a Moodle site. Although teachers are an integral part of the process, they don't have permissions on the Teacher role to add courses unless the administrator changes the capabilities. If you're an administrator, and depending on the organization and how involved you are with the site, you may want to give the Teacher role the capability to add courses to save you time.
You can find a number of links within the Courses folder: Add/Edit Courses, Enrollments, Course Default Settings, Course Request, and Backups.
Add/Edit Courses
It's good practice to define a number of categories before you start adding courses. Moodle provides you with one category, Miscellaneous. You can name your categories anything you want, though it makes sense to follow either departmental listings or a logical and descriptive format that instructors and students will be able to easily understand.
To add a category, follow these steps:
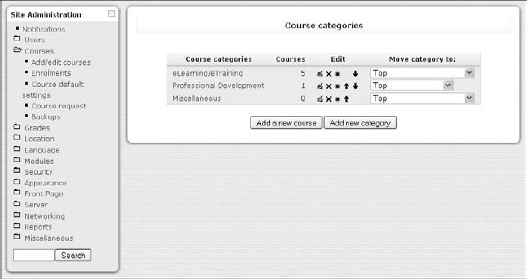
- Click Courses in the Site Administration block and then click Add/Edit Courses.
You see the Course Categories page, shown in Figure 13-9.
Figure 13-9: The Course Categories page.
- Click the Add New Category button.
The Add New Category page appears, as shown in Figure 13-10.
Figure 13-10: The Add New Category settings page.
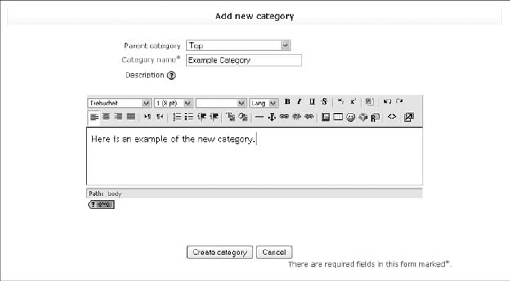
- In the Category Name text box, give the category a name and, if useful, add a short description in the Description box.
- Save the category by clicking the Create Category button.
Moodle takes you to a page where you can add courses, as shown in Figure 13-11.
Figure 13-11: The Add/Edit Courses page.
- If you want to add a new course, click the Add a New Course button and then fill in the information about the course.
- When you finish, click the Save Changes button, and Moodle takes you to Assigning Roles in Your Course page.
- Add a Teacher role and then click the Click Here to Enter Your Course button.
- Return to the Add/Edit Courses page by clicking the link in the Site Administration block.
This page provides you with a number of options to edit and move the categories around. (See Figure 13-12.)
Figure 13-12: The Add/Edit Courses and Categories page.

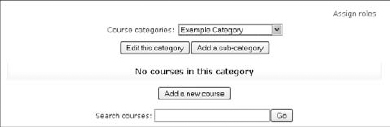
![]() Selecting one of the categories in the Course Categories drop-down list brings you to a list of courses (see Figure 13-12), and you have the same editing capabilities as with the categories, including a drop-down list to move the courses to a different category, Add a New Course button, and Re-Sort Courses by Name button. You can hide the course and category by clicking the eye icon.
Selecting one of the categories in the Course Categories drop-down list brings you to a list of courses (see Figure 13-12), and you have the same editing capabilities as with the categories, including a drop-down list to move the courses to a different category, Add a New Course button, and Re-Sort Courses by Name button. You can hide the course and category by clicking the eye icon.
![]() You can edit the default Miscellaneous category — just select the editing tools and rename it to meet your requirements. Click the Edit This Category button to make changes.
You can edit the default Miscellaneous category — just select the editing tools and rename it to meet your requirements. Click the Edit This Category button to make changes.
Enrollments
Authenticating and enrolling users are discussed in the Users category in this block, explained earlier in this chapter. In this section, Moodle gives you options to set up course enrollment.
Exploring the Enrollment plugins
The default setting enables users to self enroll by selecting a course name and then selecting Yes when the question “You are about to enroll yourself as a member of this course. Are you sure you want to do this?” If you don't want self enrollment or you want to set up a payment method, Moodle enables you to set up other methods to manage enrollment by using plugins. Figure 13-13 shows the Enrollments page with the following plugins:
Figure 13-13: The Enrollments page.
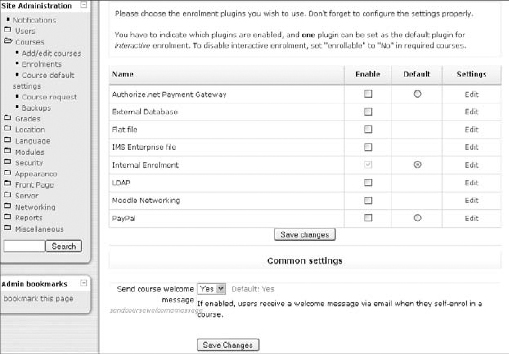
- Authorize.net Payment Gateway
- External Database
- Flat File
- IMS Enterprise File (from 1.6 onwards)
- Internal enrollment (default method)
- LDAP
- Moodle Networking
- PayPal
The Moodle documentation (you can find a Moodle Docs for This Page link at the bottom of the Moodle page, as shown in Figure 13-13) explains each of these methods in detail. When you know the type of enrollment method you want to use, your next step is quite simple — all you need to do is select the check box in the Enable column and then click the Edit link. Remember to click the Save Changes button.
Setting up automatic payments
Moodle provides you with two different plugins to set up automatic payment methods for your learners: Authorize.net Payment Gateway and PayPal. Here's how to set up those modules:
- Authorize.net Payment Gateway module: This module enables you to set up a payment method by third-party merchants. You may have to pay a fee for the service, which you can add to the cost of the course. There are many different merchant options, including the usual, major credit-card merchants.
- 1. In the Site Administration block, click Enrollments.
- 2. On the enrollments page (refer to Figure 13-13), select the check box for Authorize.net Payment Gateway.
- 3. Click Edit in the Settings column.
Moodle takes you to the plugin page shown in Figure 13-14.
- 4. Follow the instructions, and if you need more information, Click the Moodle Docs for This Page link.
- 5. Click the Save changes button when you're finished.
 For security reasons, you need to turn on security filters. These can be found in this Site Administration block: Click Security and then click HTTP. Select the first check box next to HTTPS.
 - PayPal: This module enables you to set up a payment method through PayPal (www.paypal.com). You need to set up a PayPal account before you enable Moodle to take payments. PayPal provides you with links and icons that you can add to your Moodle page.
To enable PayPal plugins, follow the procedure in the preceding bullet, but instead of selecting Authorizing.net, select the PayPal check box from the Enable column, and then click the Edit link. This action takes you to the PayPal plugin module, where you select options for the course. (See Figure 13-15.) Make sure you click the Save Changes button.
Figure 13-14: Setting up an Authorizing.net pay gateway.
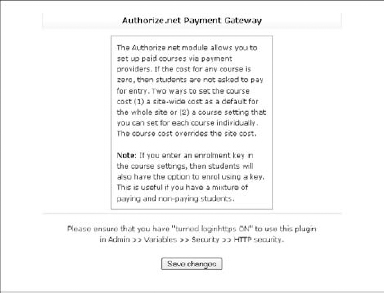
Figure 13-15: The PayPal settings page.

Course Default Settings
The default course settings determine how the course appears to all learners or any other user. The basic settings define the course front page that teachers access to start developing their courses. Teacher roles have a number of options to make minor changes to the course front page, which is discussed in Chapter 3; however, you can make changes here to give the teachers and course creator other layout options.
Course Request
In case you want any user account to be able to request new courses, Moodle enables you to set up the functionality. Just follow these steps:
- Click the Course Request link.
Moodle opens a Course Request page, as shown in Figure 13-16.
Figure 13-16: The Course Request settings page.
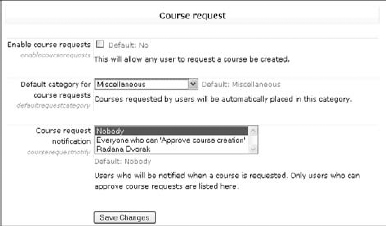
- Select the Enable Course Requests check box.
- From the Default Category for Course Requests drop-down list, select the category.
- From the Course Request Notification drop-down list, select who should be notified.
Note that only accounts with permission to register courses will be listed.
- Click the Save Changes button.
Moodle places a button for all users on the All Courses page. You can see the course requests on the Courses Pending Approval page. You need to check this page regularly.
Backups
The Backup page is the same as the backup from the course Administration block, which I cover in Chapter 14. Please refer to that chapter for a detailed explanation. It is covered in the course sections because teachers are able to back up without having administrative privileges.
There's one difference in the Backup on the Site Administration block: You can set automatically scheduled backups for all courses.