
![]()
Setup and Migration Guide
In the previous chapters, we have walked through the Office 365 features and spent a lot of time reviewing the planning requirements for moving your business to the cloud. The focus here is on the setup and migration. There are two points that we have raised in the previous chapters. These are 1) planning and 2) purchasing the correct subscription for your business. Successful migrations are about planning. When you move into production, the production side should be very mechanical - no surprises. The focus on this chapter is to extend the planning chapter with the “how to” approach in moving your business to the cloud. Included in this chapter is the 10-step migration process, along with separate sections covering onboarding users and e-mail to Office 365.
There are three versions of Office 365: Professional, Mid-Size Business, and Enterprise. The Professional version of Office 365 and the Mid-Size Business versions are preconfigured based on focus group feedback for a target market, with a one-size-fits-all approach and no subscription mixing options. The Enterprise version (Figure 4-1) provides full flexibility, which allows you to select the subscription based on the roles in the organization and controlling the overall deployment costs.

Figure 4-1. Office 365 Login Page (portal.microsoftonline.com)
The Enterprise version also provides a complete set of tools that are normally found in large corporations, but are needed for businesses of all sizes to control operating costs and to improve productivity. One of the nice features of the Enterprise version is the access to all of the software components for Microsoft Office desktop client suites (see Figure 4-2).

We do not recommend the Mid-Market version (M Plans) or Small Business Version (P Plans), unless your business fits into that target configuration. We have found that the overall subscription costs are lower due to the role matching of licenses to the business. The Office 365 Enterprise version includes unlimited administrative support. The Small Business and Mid-Size Business versions have limitations on the support, and in some cases, you are required to pay for support to resolve service issues.
Figure 4-3 shows the planning and deployment overview for moving to Office 365. We contrasted that with the information from Chapter 3, so you can see how we use the information from the planning phase for the deployment to Office 365. There are various paths you use to move your users to Office 365 – either manually or using Active Directory. If you are using Active Directory, you can use Directory Synchronization to move your Active Directory objects to Office 365. The migration steps that you follow to move to Office 365 are outlined in this chapter.

![]() Note You must have control over your DNS. If you do not have control over your DNS, you either cannot move to the cloud, or the process will be very time consuming.
Note You must have control over your DNS. If you do not have control over your DNS, you either cannot move to the cloud, or the process will be very time consuming.
Once you deploy Office 365 and Windows Intune, you'll find that the service is very cost effective and is a powerful tool to improve productivity. Office 365 includes many different services (Figure 4-4) that can be customized for your business and are configurable:
- Hosted Exchange
- Hosted SharePoint (Team Site)
- Lync
- Data Loss Prevention (DLP) (please refer to Chapter 9)

Configuring Office 365
Office 365 is simple to configure, as long as you have a plan in place that answers two questions:
- How do you plan to deploy the clients?
- How do you plan to move historical e-mail to Microsoft Online services?
- The simplest migration is a Cut Over Migration
- The middle choice is Simple Coexistence
- The most complex is Hybrid Coexistence
If you are planning to use Directory Synchronization (DirSync), please review Chapter 11 before you proceed further. The Directory Synchronization tool copies the user accounts from the on-site Active Directory and creates the accounts in Office 365. If you use the Directory Synchronization approach, you cannot manually add accounts. The process that we are describing below is a manual process for the creation of accounts.
This section describes a 10-step plan that you can complete in an evening or over a number of days. If you are using Directory Synchronization (DirSync) or Single Sign On (ADFS) then read Chapter 11 before proceeding.
- Validate your domain(s) to Microsoft
- Add additional Domain Name Service (DNS) Information
- Configure Lync
- Install PowerShell
- Load users and assign licenses
- Migrate e-mail
- Set mail flow
- Configure mobile services
- Configure external devices (copiers, scanners)
- Clean up
![]() Note Are you using Single Sign-on? If you are planning to implement Single Sign-on with Active Directory Federation Services (ADFS), see Chapter 11 before you enable Single Sign-On or Directory Synchronization.
Note Are you using Single Sign-on? If you are planning to implement Single Sign-on with Active Directory Federation Services (ADFS), see Chapter 11 before you enable Single Sign-On or Directory Synchronization.
Step 1: Validate Your Domain(s) to Microsoft
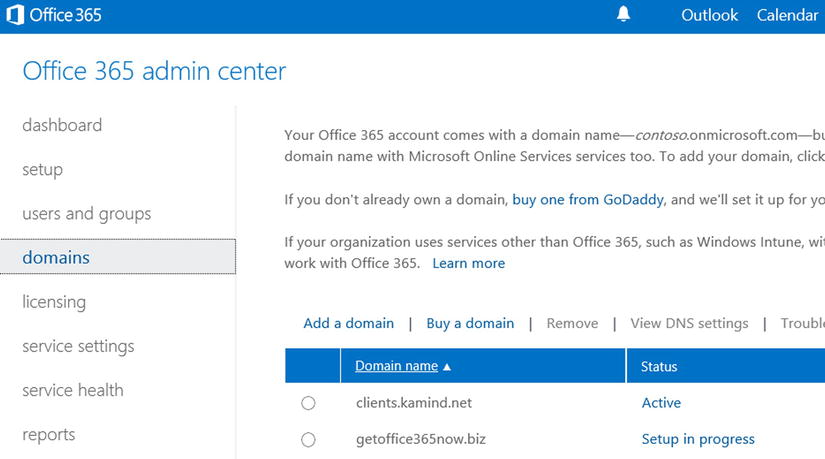
This step is required to show Microsoft that you control your domain name. Log in as an administrator (or your original SUPER ADMIN/ROOT account). You can sign in at office.microsoft.com or http://portal.microsoftonline.com. Click “Admin” (at the right next to your name). You are at the Office 365 Dashboard. On the left-hand side (See Figure 4-5), select “domains,” then select “Add a domain” to start the process of adding your domain to the Microsoft Online environment.
Click on “Specify a domain name and confirm ownership” (see Figure 4-6). In Figure 4-7, enter your Domain Name (getoffice365now.biz in this example) and click “next”. Office 365 will show Domain Confirmation information. Click Next.


Office 365 will examine your domain and provide you an automated way to set up your domain. In Figure 4-7, Office 365 detected that the domain we want to verify is on Go Daddy, so it has promoted us to use an automatic configuration of the domain and DNS records.
The Office 365 Domain Wizard will prompt you to select the service for verification. We normally select “general instructions.” However, you can pick the service, and the Office 365 service will provide instructions on verification of that domain to that service (Figure 4-8).

Once you select the DNS provider (or general instructions in our case), you can choose which method used to “verify” your domain (Figure 4-9). Normally you can use the TXT record method. Follow the directions on the screen: sign in to your Domain Registrar and add the TXT (or MX) record as specified on this screen. Figure 4-10 shows a Go Daddy TXT record and Figure 4-11 shows a TXT records at Network Solutions.


![]() Note Typically it takes about 15 minutes for your changes to take effect. However, it can take up to 72 hours for the record that you created to propagate through the DNS system.
Note Typically it takes about 15 minutes for your changes to take effect. However, it can take up to 72 hours for the record that you created to propagate through the DNS system.
Each domain supplier has different tools and processes to add a domain record. You can only add domain records if the domain is managed by the domain supplier. In the Go Daddy case, the name servers are at Go Daddy, so we are adding records in the Go Daddy servers. This is also the case for Network Solutions.
After you have configured the domain for validation, if the domain does not verify, use http://www.mxtoolbox.com to verify that the TXT records have propagated. Once the TXT records show up in mxtoolbox.com, you can validate the domain in Office 365. In Figure 4-11 we verify the record on mxtoolbox.com. The purpose is to check to see if the changed record in the DNS has replicated to the other World Wide Web DNS servers. These records will also replicate to Office 365. In our example, we are looking for the TXT record that we inserted into our DNS earlier. At MX toolbox we enter the command “txt:kamind.biz”. When the record shows up (see Figure 4-12), we can verify the DNS record in Office 365 and validate the domain. After the domain shows up on mxtoolbox, it should validate within an hour. If it does not validate, you will need to submit a ticket to Microsoft Online Services or contact a partner to help resolve the issue.

Once you have the record in the MX toolbox, then select “verify” in Office 365 (see Figure 4-12). If the domain verifies correctly, you will be provided with an acknowledgement that your domain is valid (Figure 4-13).

The next step (according to Microsoft) is to add users and assign licenses. We have found that it is better to complete the domain configuration (with the exception of changing the MX records) and add users after you have defined the domain Intune. After you click “finish” in Figure 4-13 , select “assign users,” then select the radio button “I do not want to assign users right now" – Figure 4-14).

After you select Next, select the domain purpose (Figure 4-15) - item #3 – to set domain intent.

Specifying the domain services is an important step (Figure 4-16). You are letting Office 365 know how you are planning to use the domain that you just validated. Normally you will choose Exchange Online. You will choose Lync Online if you have Lync in your plan (E1 or above) and you have set up this domain with the correct SRV records.

![]() Note “SharePoint Online” actually refers to the public facing web site that is included in Office 365 Plan E1 or above.
Note “SharePoint Online” actually refers to the public facing web site that is included in Office 365 Plan E1 or above.
After you complete the configuration of the domain intent, you will have an option to automatically configure Office 365 (and skip Step 2). Automatic configuration (Figure 4-17) only works if you are using a cutover migration. The MX records are changed using the automatic setup. We recommend the manual setup (see Step 2).

Step 2: Add Additional Domain Name Service (DNS) Information
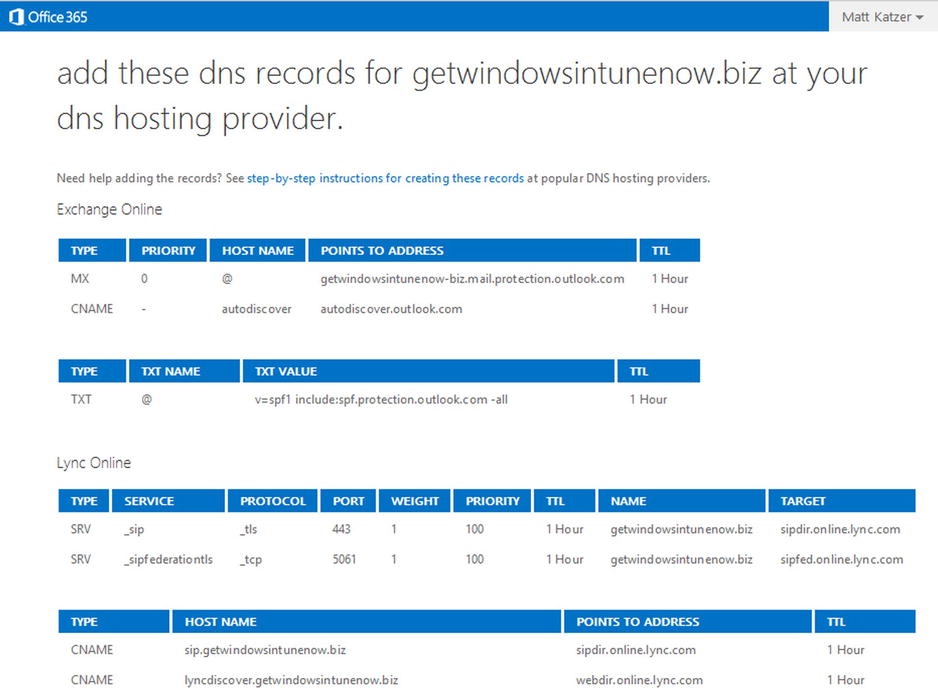
After your domain has been validated, it is time to add additional DNS information. You have chosen to bypass automatic setup, and manually set up the records. You need to add all of the records listed in Figure 4-18. In this step you are adding DNS records as follows:
- CNAME (alias or canonical name) records. These records are used to provide standard names to other Microsoft web services forOffice 365. You will be adding:
- “autodiscover” “autodiscover.outlook.com” to enable Outlook autodiscover
- “ lyncdiscover” “webdir.online.lync.com”
- “sip” “sipdir.online.lync.com”
- SPF (sender policy framework) record (a TXT @ record with text “v=spf1include:outlook.com∼all”). This record is part of an e-mail validation system designed to help prevent e-mail spoofing and phishing. This record will help prevent your outgoing e-mail from being considered “spam.”
- SRV (service record) records. These records specify information about available services. SRV records are used by Microsoft Lync Online to coordinate the flow of information between Office 365 services.
Depending upon the services you are supporting, you may need to delete the older DNS records.
![]() Note Do NOT change your DNS MX records or Autodiscover records at this time. When you change your MX records, you will stop the mail flow to your existing e-mail server. When you change Autodiscover, the Outlook clients will go directly to Office 365 for e-mail. We will change mail flow in Step 6 after we have added the users.
Note Do NOT change your DNS MX records or Autodiscover records at this time. When you change your MX records, you will stop the mail flow to your existing e-mail server. When you change Autodiscover, the Outlook clients will go directly to Office 365 for e-mail. We will change mail flow in Step 6 after we have added the users.
Do not add the MX or e-mail Autodiscover records to your DNS - do this in Step 6.
After you have added the rest of the DNS records you will need to validate these records. Select the domain (see Figure 4-19), then select “troubleshoot.” On the next screen select “more than 72 hours” then “next” to verify the DNS records. If your DNS is valid, all check marks will be green. If there are errors there will be red Xs. Fix the errors until you have green check marks. You may run into a situation where the DNS cannot be fixed. If this is the case, you will need to move your DNS to a new provider. Once the records have been validated, you can change the primary domain to the user account domain and add the necessary users to the account.

![]() Note If you are using Windows Intune, you will need to add the CNAME “enterpriseenrollment” to your DNS. See Chapter 7.
Note If you are using Windows Intune, you will need to add the CNAME “enterpriseenrollment” to your DNS. See Chapter 7.
Use the trouble shooting tools to correct the DNS problems. Always select more than 72 hours, so the automated tool provides useful information (see Figure 4-20). If you have red check marks, then correct those problems. The only red check marks you should have are for the mail records.

![]() Note The Office 365 automatic DNS tool will build the complete DNS records to match the Office 365 suggested configuration. This only works if you have loaded all of the users in step 2. The automated tool will set your MX record to Office 365. If you are using any other migration than a pure cut over, your mail flow will stop. We recommend that you load users as a manual process. If you have Active Directory (and Exchange 2007 or later) use Directory Sync to move your user objects.
Note The Office 365 automatic DNS tool will build the complete DNS records to match the Office 365 suggested configuration. This only works if you have loaded all of the users in step 2. The automated tool will set your MX record to Office 365. If you are using any other migration than a pure cut over, your mail flow will stop. We recommend that you load users as a manual process. If you have Active Directory (and Exchange 2007 or later) use Directory Sync to move your user objects.
Step 3: Configure Lync
When your Office 365 site is created, Lync is ready to operate within your intranet. As an administrator you need to decide if you want to open up Lync communications, federate the domain, and allow public instant messaging.
Lync “Domain Federation” allows your intranet to interact with other Office 365 customers and non-Office 365 e-mail addresses that support Microsoft Federation services. For example “Domain Federation” allows your users to see the presence of external vendors (see Figure 4-21).

The public instant messaging interface allows you to communicate within your intranet, with other Office 365 organizations that have federated with Office 365, and Live Messenger. Public IM connectivity is supported with Skype. At this time AOL and Yahoo messengers are not supported.
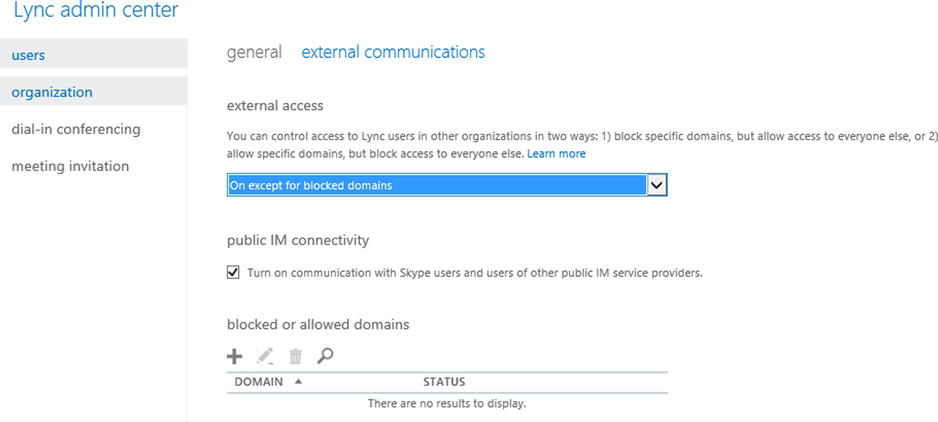
To enable these services, in the main admin dashboard, select “Lync” (figure 4-20), then select “organization settings” and the link “Manage Settings in the Lync Admin Center.”

In the Lync Control Panel (Figure 4-23) select “external communications.” Enable “Public IM,” and set “on except for blocked domains.” This action enables these services. “Enabled” is the recommended setting for both services. The default is off (disable).
Step 4: Install PowerShell
Earlier we briefly discussed PowerShell and the capabilities that it provides to you. This step is an optional step and it depends if you need the capability for your management of Office 365. The simplest way to install the latest version of PowerShell is to select Single Sign-on (see Figure 4-24) option.

Select step 3, “Install PowerShell” (See Figure 4-25). The PowerShell installation will verify the updates required to support the Windows Azure PowerShell. You are welcome to review step 1 and 2. However, the only option we are interested in is the installation of PowerShell on your desktop systems. Select the correct version (32 bit or 64 bit) for your system.

Typically, we recommend that if your organization has more than 20 accounts, you may find it more convenient to use PowerShell. This is a command interface in Office 365. In Chapter 8 we have offered additional troubleshooting steps and configuration options (such as shared mailboxes) using PowerShell. The account that you will use for PowerShell management is the Global Administrator user account. Users without global administrative privileges will not be able to use this feature.
Once you have install Office 365 PowerShell, launch the PowerShell module and enter the following commands:
Set-ExecutionPolicy RemoteSigned
$LiveCred = Get-Credential
Import-module msonline
Connect-MSOLService – Credential $LiveCred – Verbose
Get-MsolGroup
The results of running theses commands should be similar to Figure 4-26.

You have completed the base PowerShell setup, now use the above command to validate the installation. If the command above does not work, you have either installed the PowerShell GUI incorrectly, there is a lack of permissions, or you have not installed the desktop connector for Office 365. Using PowerShell requires administrative privileges.
Step 5: Load Users and Assign Licenses
We are ready to start loading or enabling users into Office 365. As part of the loading user process, we have decided that we will either push the software out to the clients (using Windows Intune deployment), or we will request that the clients download the new software from the Office 365 site. If you are using a test group, you will repeat this step until you are ready for production. Test groups are iterative; by this we mean that you will add additional users to the test group as you reach the production decision point. If the organization is small, you will cut over to Office 365. If the organization is large, then run the test group and resolve deployment issues.
The purpose of the test group is to validate deployment. Once you have validated the business goals of the test group, you will continue your Office 365 migration. Step 5 (and some follow-on steps) can be repeated until you are ready to cut over to production (see Figure 4-27).

Let’s review what we have completed at this point:
- The domain(s) that we want to use have been validated.
- Lync DNS has been configured.
- We have collected our users, security groups, test groups, etc. (see Deployment Options).
- If we are using DirSync, the disabled user accounts are loaded in Office 365.
- We have communicated with the test groups that are being deployed (scheduled).
- We have pushed out software to the clients or we have instructed users how to download the applications themselves.
Now we load/enable the first batch, or nth batch users into Office 365. There is no technical limit on how many users we can deploy. The deployment group size is a function of support, and how many support calls that you wish to tender, or to avoid because you had a good business process for deployment.
![]() Note If you choose to use directory Synchronization for loading users’ accounts (and the appropriate migration method), you configure the service at this point. See Chapter 11 for the steps to configure Directory Synchronization.
Note If you choose to use directory Synchronization for loading users’ accounts (and the appropriate migration method), you configure the service at this point. See Chapter 11 for the steps to configure Directory Synchronization.
THERE ARE THREE METHODS TO LOAD USERS
- Add each user (See “Onboarding Users” later in this chapter). This method is appropriate for a few users or a test group.
- Bulk-add users, using a specially formatted CSV spreadsheet with the user information. Use the bulk import option to load the information into Office 365. (See “Onboarding Users” later in this chapter).
- Enable Directory Synchronized users for access to Office 365 (See “Onboarding Users” later in this chapter).
Pick your method to load users to Office 365. Once you have selected your method (manual or using Directory Synchronization), you are ready to begin moving user data to Office 365. If you choose Directory Synchronization, you are restricted to use Microsoft Migration tools (if you have an exchange server in your Active Directory). After you have selected your loading-user approach, then you can begin the mail migration process.
![]() Note The different user loading processes are described later in this chapter, in the “Onbarding Users” section.
Note The different user loading processes are described later in this chapter, in the “Onbarding Users” section.
If you selected DirSync (option 3 above), you do not need to assign licenses until you begin the migration. Directory Synchronized objects from the on-site Active Directory appear as disabled users in Office 365 and no mailbox is created. Once the users object is in Office 365, you can manually assign licenses or bulk assign them with PowerShell. If you selected manual loading (option 1 or 2), you need to purchase licenses to create the mailbox for the user. It is not possible to load users as a disabled user in Office 365, if you use a manual process (option 1 or 2).
![]() Note If you are using a test group, Step 5 through 8 will be repeated in the test group evaluation. After you completed the test group, return back to Step 5 to begin the deployment of Office 365.
Note If you are using a test group, Step 5 through 8 will be repeated in the test group evaluation. After you completed the test group, return back to Step 5 to begin the deployment of Office 365.
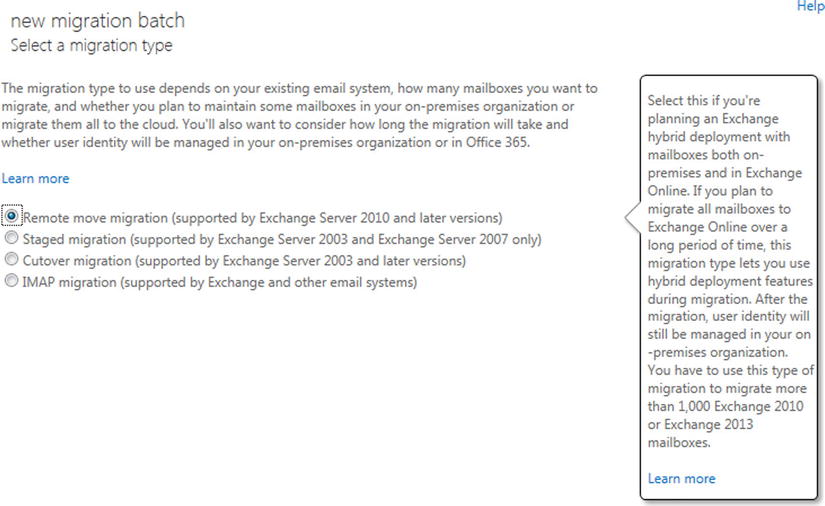
Step 6: Migrate E-mail
In Step 5, our method of loading users defines the toolset we should use for copying e-mail to Office 365 (this moving of e-mail is called migration). Depending on the method you selected, you can use Microsoft tools or external tools. The key decision factor in the toolset you use is based on Directory Sync integration (see Figure 4-28). If you use Directory Sync (DirSync), and there is an on-premises exchange server, you are required to use Microsoft migration tools. There are cases where you can use Microsoft DirSync and external tools, but we recommend that you consult a Microsoft partner if you use this approach.

Test Group or Staged Migration
Test groups are nothing more than a stage migration. Stage migrations take a lot of work and should only be used for a limited time and for a small number of users. When we discuss test groups, we are using those users to test our deployment processes. A test group is nothing more than placing a group of users on a different mail server that is separate from the existing organization. A test group will not have access to a common calendar or a common address list. It is for these two reasons that you want to use test groups for a very limited time with a definite set of objectives. A stage migration is nothing more than a test group.
![]() Note If the user accounts are POP or IMAP, stage migration is a viable option because there are no common shared resources (like calendar and address lists).
Note If the user accounts are POP or IMAP, stage migration is a viable option because there are no common shared resources (like calendar and address lists).
Client Configuration Changes for Test Group
If you are using a test group with an on-premises Exchange Server, you will encounter two problems: AutoDiscover (for outlook client) and the presence of the Exchange Server in the Active Directory. There are only manual workarounds to enable the clients to find the Office 365 mail server. Once you have deployed, you need to remove these “enhancements” to eliminate a future support problem in using Office 365. If you choose to manually configure outlook, you will still need to make these changes, since outlook will verify the connection via autodisocver everytime itis started.
These are the client steps required to support a test group if there is an on-premises exchange server:
- Add the Autodiscover record in the host file, located at <drive:>windows/systems32/drivers/etc
- Ping Auotdiscover.outlook.com.
- Add the record “autodiscover” with the address discovered above.
- Open up a command prompt and enter “ping autodiscover.” This should display the IP address you just entered.
- Add the registry fixes to ignore the Exchange server – Service Control Point. The registry entries required to be modified for the clients are listed below (see Microsoft KB article – 2612922).
- Navigate to the following registry key: HKEY_CURRENT_USERSoftwareMicrosoftOffice12.0OutlookAutoDiscover
- Set the following values for the Value Names listed below:
"PreferLocalXML"=dword:1
"ExcludeHttpRedirect"=dword:0
"ExcludeHttpsAutodiscoverDomain"=dword:1
"ExcludeHttpsRootDomain"=dword:1
"ExcludeScpLookup"=dword:1
"ExcludeSrvLookup"=dword:1
"ExcludeSrvRecord"=dword:1
Mail flow in a test group uses a combination of forwarders from the on-site server to Office 365. The on-site server will use the onmicrosoft.com as the forwarding address (see Figure 4-29). This approach works, and is useful for testing, but not a recommend practice. Test groups are not integrated into the on-premises exchange server.
When you add the users to Office 365 these users have an active e-mail address. This means that:
- E-mail that is sent to one of these new Office 365 e-mail accounts from outside Office 365 or from other Office 365 tenants will NOT be received until your MX records are configured and verified by Office 365.
- Any e-mail sent from one of these new accounts will be routed to your other new accounts. (E-mail to outside addresses will route as expected.)

We recommend that you configure mail routing as follows:
- Only load users that are using Office 365 (during test or evaluation).
- If you are using both the Office 365 service and an on-site Exchange Server you need to set your email Domain Type to “Internal.” You should have e-mail for these Office 365 users forwarded from the on-site Exchange Server to the Office 365 e-mail accounts using the “long” address user@<domain>.onmicrosoft.com.
E-mail Migration
E-mail Migration is nothing more than copying the e-mail from the old mail server to the new mail server. The mail is not destroyed in the process. We are just copying the e-mail messages (and other mailbox information) over to Office 365. There are different approaches to moving the e-mail to Office 365. Depending upon the approach you are using for migration, you may choose to “cut over the mail records before you move e-mail” or move e-mail, then cut over records. Typically the decision is based more on the source of the mail server and the size of the organization. There is no hard or fast rule on the migration of e-mail, with one exception: if you are running some type of coexistence (such as a stage migration), then place a mail forwarder (to the “long” name) in the older mail system before you start the migration. Once the MX records are moved there is no need to add a forwarder.
![]() Note Our policy on e-mail migration is to move at least the first 200 e-mail messages for each user (1 – 2 weeks), along with the contacts, calendars and folder structure into the new mailbox. The older e-mails can come later. We use Migration Wiz to move historical e-mail as our first choice in tools.
Note Our policy on e-mail migration is to move at least the first 200 e-mail messages for each user (1 – 2 weeks), along with the contacts, calendars and folder structure into the new mailbox. The older e-mails can come later. We use Migration Wiz to move historical e-mail as our first choice in tools.
There are four tools that you can use for e-mail migration. These are PST export/import, Third Party external tools (such as Migration Wiz), the Microsoft Office 365 Migration Tool, or moving mailboxes with Exchange Federation. Each tool has its fans and critics (see Table 4-1).
Table 4-1. Different Migration Methods
Description |
Pros |
Cons |
|---|---|---|
PST Migration |
Simple Free |
Email addresses are not complete Requires execution at a workstation Network bandwidth (copy up, and copy down) |
Migration Wiz |
Simple |
Costs $12 per mailbox to migrate |
Office 365 |
Free |
Complex to use (1 mailbox at a time) |
Exchange 2010/2013 |
License |
Requires AFDS and Exchange Federation (not supported with exchange 2007 or 2003) |
There are different deployment methods that you can use depending on how your data is kept. As an example, if you have been using POP mail, and all of your data is stored in PST, then you can only use a PST migration. There are no other options. If you mail is stored on a web server (such as on an Exchange Server), you can use the other tools for mailbox migration. We typically use Migration Wiz then use the Microsoft internal migration tool as a backup. If you have chosen to use Exchange Federation, you can only use the mailbox move for DirSync’ed accounts.
![]() Note To see the different steps in the migration, see section “Onboarding E-mail” later in this chapter.
Note To see the different steps in the migration, see section “Onboarding E-mail” later in this chapter.
We discuss the process for each of these approaches later in this chapter under “Onboarding E-mail.” The onboarding process will be similar to Figure 4-30.

Exchange Server – Mailbox changes
When you use the Microsoft migration tools, what the Microsoft tools do at the end of the data sync step is to convert the mailbox from an “Exchange Mailbox” to a Mail Enabled Users. What is really happening is that the exchange mailbox is converted to a contact and the existing mailbox is placed in a disabled state. When e-mail is received by the on-premises exchange server, the server looks up the contact and sends the e-mail to the destination. The contact for the user of the on-site exchange server contains the Office 365 long address ([email protected]).
Step 7: Set Mail Flow
At this point we are ready to set the mail flow based on our migration strategy. If you chose to cut over all users at one time (Cut over Migration), the Office 365 Global Address List (GAL) will contain all of the new user accounts. This limited GAL also applies to sharing calendars and free-busy status. If you choose to move users in groups (Simple Coexistence), the GAL will only contain those users that have been moved.
In our planning discussion, there are three possible migration plans:
- Cutover Migration: All users are loaded, MX and Auto Discover records are changed and Office 365 receives all e-mail.
- Simple Coexistence: Some users are loaded; e-mail is forwarded from on-premises servers to Office 365 (temporary).
- Hybrid Coexistence: On premises and Office 365 operate in tandem.
The Hybrid Coexistence migration is a complex migration and is addressed in Chapter 11. Hybrid Coexistence requires an IT migration specialist assist you in the migration to Office 365. The other two methods are described below.
This is also called a 100% conversion. Cutover means that you have loaded up the users, and you point the e-mail records to Office 365 servers. All historical e-mail is brought over in a post-migration process. This is the most common and simplest e-mail migration.
![]() Note If you have completed loading the users, you can change the DNS records to point to Office 365 services. These MX records are described in Figure 4-12.
Note If you have completed loading the users, you can change the DNS records to point to Office 365 services. These MX records are described in Figure 4-12.
This is an iterative migration. Cutover migration will happen at the point that all users are moved to the cloud. Simple Coexistence is used to train IT staff and to build experience using Office 365. In Simple Coexistence, a “test group” of users are migrated to Office 365, and those users that migrate do not have access to the Global Address list, and shared calendars of the other users who have not migrated. E-mail for converted users is forwarded from the on-premises or hosted e-mail server to their “long” e-mail address (discussed below) in the cloud. The iterative approach requires that only a portion of the users are loaded in Step 5, and the Domain Type is set to “Internal Relay” (see Figure 4-31).

To set the mail flow, you need to access the Exchange control panel access. To access the Exchange control panel select the following:
- Select “Office 365 in the admin center.
- Select “service settings.”
- Select “Mail option,” then select “don’t see what you are looking for… ,” and the “Manage Additional settings in the exchange admin center.”
The Domain Type is set to “Internal relay” (see Figure 4-31) until all of the users have been migrated. When the user migration has been completed, the domain is changed to “Hosted” and the MX records are changed to point to Office 365.
![]() Note If the domain is not set to Internal Relay, e-mail will not be forwarded from Office 365 to the on-premises mail server.
Note If the domain is not set to Internal Relay, e-mail will not be forwarded from Office 365 to the on-premises mail server.
When you initially purchase Office 365, one of the items created is the sub-domain “yourdomain.onmicrosoft.com.” This is a valid e-mail domain, and is the “long” e-mail address. You can e-mail to <user>@<yourdomain.onmicrosoft.com> and your e-mail will be delivered into your e-mail box. When you validate a domain and add a user account, the user account is created with two e-mail addresses: <user>@<yourdomain.onmicrosoft.com and <user>@<yourdomain.com.
Simple coexistence works as follows:
- E-mail is forwarded from the on-premises domain or other hosted e-mail address to your Office 365 “long” address (i.e. @yourdomain.onmicrosoft.com).
- When e-mail is sent from inside Office 365, Office 365 looks to see if the e-mail needs to be delivered to a migrated user (i.e. @yourdomain.com). If not, the e-mail is forwarded to the real e-mail domain (via the DNS MX records).
![]() Note After you have moved all of the users into Office 365 and changed the DNS so the MX records point to Office 365, change the domain from “Internal Relay” to “Authoritative” (see Figure 4-29). At this point your e-mail is 100% on Office 365.
Note After you have moved all of the users into Office 365 and changed the DNS so the MX records point to Office 365, change the domain from “Internal Relay” to “Authoritative” (see Figure 4-29). At this point your e-mail is 100% on Office 365.
Once you have moved all of the e-mail addresses to Office 365, the MX records are changed to point to Office 365 (see Step 2). When the MX records are changed, coexistence mode is completed, and you have implemented your cutover migration. That is all that is really needed to move users to Office 365 for mail flow.
Step 8: Configure Desktop and Mobile devices
The desktop configuration for mobile devices and user desktop is in Chapter 2: Using Office 365 and Windows Intune. There are different philosophies on when to configure these services. However, unless you want to manually configure these services, you cannot add them until you have changed the MX and auto discover records. Desktop services (outlook) require the auto discover record to be changed. Most mobile devices use the MX record to find the Office 365 mail server.
Depending upon the subscription (see Figure 4-32), the user will need to log into Office 365 and download the Office professional Plus software (located under the gear and “office 365 settings”) after you log into Office 365.

The installation process can be managed by any end user. The workstation setup guide is contained in Chapter 2. We designed Chapter 2 to contain all of the Office 365 end user configuration in one location.
The Office 365 supports different mobile devices. The software can be installed at any time, and is user driven (See Figure 4-33). To install the Office apps on your smart phone, go to the Office 365 web site, login, select the “software option” – under Office 365 settings), and install. You will receive a link in the e-mail on where you can download the information to your smartphone and configure the mobile device.

Complete information for end users to configure the device is in Chapter 2.
Step 9: Configure External Devices
External devices need to be configured (if there are any devices on your network). There are different ways that you can configure your devices to send e-mail to Office 365, either directly or through a SMTP server in your network. Chapter 10 has detailed instructions on device configuration for Office 365.
Step 10: Cleanup
The cleanup operation depends on what mail systems you have migrated to Office 365. If you are using a hosted e-mail system, or a non-exchange e-mail system, you need to contact the software supplier to determine if there is any special process needed to remove the third party mail server. Unless the e-mail server is integrated into Microsoft local active directory, usually there is no shut down sequence. This is not the case with an Exchange Server. An Exchange Server must be decommissioned to remove it from your local environment. To remove the Exchange Server, you simply uninstall the server. Seems simple, but to uninstall the server, you need to remove all users and delete public folders. The uninstallation wizard will walk you through the steps until the Exchange Server is removed; it is uninstalled.
![]() Note Do not power off the Exchange server once you have migrated to Office 365. The Exchange server must be uninstalled from the Exchange Server setup media. You must uninstall the Exchange Server software.
Note Do not power off the Exchange server once you have migrated to Office 365. The Exchange server must be uninstalled from the Exchange Server setup media. You must uninstall the Exchange Server software.
Your Office 365 is ready to be used. At this point verify the following:
- If you have Outlook clients that you have not installed Office 2013 or run the desktop upgrade for outlook 2007/2010, complete that task now. If you do not do this, outlook will stop working.
- Run the domain trouble shooting in Office 365 (select more than 72 hours) and make sure you have all green check marks. (See Figure 4-15). Correct the areas where you do not have green checkmarks.
- Verify that your Office 365 domain is set to Authoritative, and not shared (see Figure 4-31).
- Verify that you have placed a local DNS record in you on premise DNS server. You will need to add an “AutoDiscover” CNAME to your internal DNS, which points to autodiscover.outlook.com.
- Extend the 14-day delete holding time to 30-day delete holding time. Run the PowerShell command (see the administration Chapter 8 for information on how to run this command).
- Extend 30-day delete for a mailbox
Set-mailbox [email protected]–retaindeleteditemsfor 30
- Extend 30-day delete for the Organization
Get-mailbox | Set-mailbox –retaindeleteditemsfor 30
- Extend 30-day delete for a mailbox
- The default retention policies are not enabled until the archive is enabled. If you enable the archive on a user mailbox, the retention polices will begin to execute. Review the chapter on retention polices before you enable the archive.
- Verify that you configured Yammer to replace Office 365 newsfeeds for your company internal social site.
Congratulations! You are all set up for Office 365!
One of the problems associated with the DNS records are who is managing them. In some cases, this may be a web developer who is no longer in business. You may also have it registered with an e-mail address that you no longer use (or can remember). If you cannot access the DNS, how do you find out the records?
We use a site at “http://who.is.” This service will give you a good snapshot of the DNS records for the domain that you are moving (see Figure 4-34). We use this tool in conjunction with mxtoolbox.com. If you do not have access to the actual DNS zone file before you move, you need to use tools like “who.is” to collect the information before you move the service to a new registrar.

![]() Caution If you move the DNS from some suppliers, the web site may go offline.
Caution If you move the DNS from some suppliers, the web site may go offline.
There are three ways to load users: 1) Directory Synchronization, 2) the Office 365 Graphical User Interface or 3) using the bulk load process. The GUI is great for maintenance and small numbers of user accounts, but is not an effective tool for loading a large number of user accounts. If you chose to use Directory Sync and you have an on-premises Exchange server, you will need to use the Office 365 migration tools.

Bulk Loading Users through DirSync
DirSync links your on-premises Active Directory to Office 365. This allows you to import the existing e-mail addresses, contacts, and distribution list into Office 365, through a process called Directory Synchronization.
Figure 4-36 shows two types of objects: manually created objects “in Cloud” and DirSync objects from the on-premises server. There is no loading of users with Directory Synchronization.

There are two ways to manually load users: with the Office 365 Graphical User Interface or using the bulk load process. The GUI (Figure 4-37) is great for maintenance and small numbers of user accounts, but is not an effective tool for loading a large number of user accounts. The “single user add” process is explained in Chapter 10. The process that we will use below is the “Bulk add users” process.

Log in as an administrator (at http://office.microsoft.com or http://portal.microsoftonline.com), then select “users and Groups” (under dashboard, click the drop down “New,” and select “Bulk add”). The menu (Figure 4-38) has two options: add a single user, or “Bulk add users.”

The first step is to build, then select the CSV file with the appropriate users to be added. Download a blank CSV file to get the format. You can open this file in Excel (be sure to save it as a CSV file, without extra lines or columns), or edit it with the text editor.
We recommend that you use the optional fields and enter all of the data possible. If you are accurate at this step, it significantly reduces the amount of work necessary to manually fix user profiles.
After you have built the CSV file “Browse . . . ” to it, find the file that you created and open it. Click “next” (see Figure 4-39).

The users should pass verification. If not, repair the CSV file and try again (Figure 4-40). Click “next.”

Set sign-in status and set the user location (for all of the users being added - Figure 4-41). Click “next.”

Assign licenses (Figure 4-42). If you do not have enough licenses for the users you are loading, those users will not be loaded and will show up as an error. License assignment can be tricky if you are using different Office 365 Plans. It is best to load a small number of users to verify how the licenses are assigned. Assign licenses as required then load the next batch. Click “next.”


Change the send e-mail to [email protected] to document the users’ creation. This is a complete list and comes in handy if you need to bulk sign on the users and present the passwords. Click “create.”
Copy the temporary passwords back into your users spreadsheet (see Figure 4-44). You will need them to notify your users. Click “close.”

After you have loaded the user account to Office 365, you need to copy the e-mail from the current mail servers to Office 365. There are different ways to do this depending on the method you used for loading users. As an example, if you have an on-premises exchange server and have enabled DirSync, your only option is to sue the Microsoft migration tools. If you do not have an existing exchange server, you can use different migration tools to move mail to Office 365. The three methods discussed here are 1) PST migration, 2) third party tool migration and 3) using Microsoft Office 365 migration tools.
PST Mail Migration to Office 365
PST migration is the importing of the existing PST file into your Office 365 mailbox. A PST Export/Import is performed at each user’s workstation, with data from their Outlook. PST migrations are the simplest, but should be used as a last resort. When you migrate PST data, you need to export the old mailbox at the root, and import the data into Office 365 at the root. If the PST data already exists, then import the data at the level that you wish to see the data in Office 365.
![]() Note If you start a PST migration, you need to complete it. There is no real error checking on data import or duplicates. If you stop and restart a PST migration, you will have duplicate data.
Note If you start a PST migration, you need to complete it. There is no real error checking on data import or duplicates. If you stop and restart a PST migration, you will have duplicate data.
Typical user data in a PST contains all of the information in the mailbox, including e-mails, folders and subfolders, calendar, and contacts. To install the calendar and contacts into Office 365, you can either copy it manually over to Office 365 (drag ann drop), or overlay the Office 365 calendar and contract information using an export and an import data command, specifying the root inbox. Below are the two options for this command.
Export Outlook 2010 or 2013 Mailbox Information
Follow these steps below on exporting the PST data into your outlook. If you already have your PST files as an archive, refer to the import. When you export outlook information into a PST for import into Office 365, you must export the root mailbox.
- Start Outlook (Outlook 2010 or 2013). Use your on-premises Exchange Server Outlook profile (probably your default profile) for the export of PST mailbox information (Figure 4-45).
- In Outlook 2013: Click “File
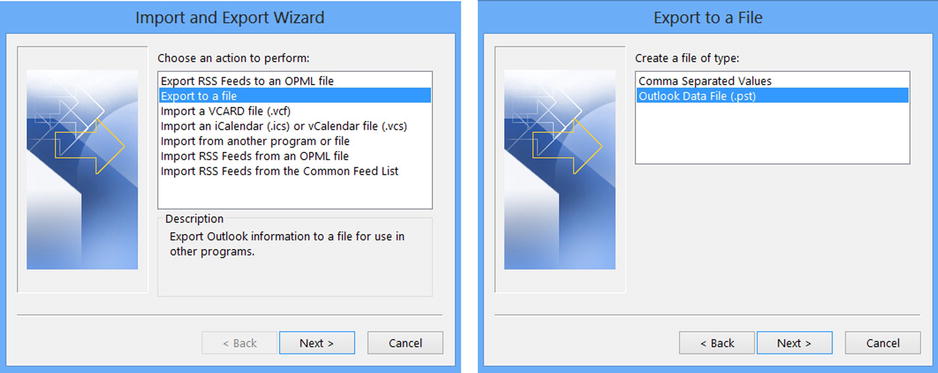
 Open Import” (this includes file export as well).
 - Select “Export to a file,” then “Outlook Data File (.pst)” as shown in Figure 4-46.
- Select the Mail location to export (normally you want to select the very top item: the mailbox account), and export options: a file name and normally “Replace duplicates with items exported” (Figure 4-47).
- Once you have exported the documents, write down the location where the PST file is located (Figure 4-47). The next step is to import the PST file.


Import Outlook 2010 or 2013 Mailbox Information
Follow the steps below to import your exported PST e-mail data into your Office 365 e-mail account. This is done by loading the existing mailbox on top of the Office 365 mailbox.
- Exit Outlook.
- Sign in to the user’s Office 365 account.
- Start Outlook with either a new profile or with the user’s Office 365 profile. (We normally call the new profile “O365” to distinguish it.)
- In Outlook 2010 (or 2013) Click “File Open Import”.
- Select “Import from another program or file".
- Select “Outlook Data File (.pst)” (or it may say “Personal Folder File (.pst)” as shown in Figure 4-48.
- Browse to the file to be imported (the one you exported above). Select “Do not import duplicates.” You will want to import the PST folder into the same structure as the export. As an example, if you export the .pst file as the root mailbox, you need to import it as a root mailbox (shown in Figure 4-49). You may import the e-mail account to a lower level (for example, if you are importing several e-mail accounts into one e-mail account).


The import process uploads the Outlook PST data to the Microsoft Office 365 Exchange Server. Your data will then be replicated down to your Outlook 2010. It is best that you import data using a high-speed data link, since the data will travel twice: up to Office 365 and back down to your Outlook local cache.
Third Party tool – Migration Wiz
Migration Wiz (www.migrationwiz.com) is the tool (Figure 4-50) that is used for most of the migration from either on premises or another hosted provider to Office 365. The tool is easy to use and allows thousands of mailboxes to move simultaneously. We recommend that you purchase the premium mailbox, which allow multiple error retries. The factor in how fast you can migrate is a function of the source speed of the server where data is being pulled from. As an example, if you are migrating form a Small Business server 2003 R2, we have found that you can only pull one or two mailboxes at a time.

Figure 4-51 shows the typical Migration speeds from a hosted service to Office 365.

Using the Migration Wiz tool is pretty easy. All you need to use the tool is the administrator privileges to the source mail account (in some cases you will need the user login and passwords) and the Office 365 administrative credentials (you need to be a global admin). Migration Wiz provides you with statistics so that you can gauge the speed of your mgiration (see Figure 4-51). The most difficult portion in using Migration Wizard is the configuration of the mailbox with the correct passwords. Remember that in Office 365 the user e-mail address and login are the same.
If you are using Migration Wiz with an on-premises Exchange Server, you will need to install either the registry changes to block service control point (SCP) lookup, or convert the mailbox to a mail-enabled user (MEU). The registry entries required to be modified for the clients are listed below (see Microsoft KB article – 2612922).
Office 365 Migration Tool
The Office 365 migration tool is designed to migrate up to 10 mailboxes at a time. Follow the steps below to access the admin screen to use the tool:
- Select “Office 365” in the admin center.
- Select “service settings.”
- Select “mail” option, then select “don’t see what you are looking for... ,” and the “Manage Additional settings in the Exchange admin center.”
Once you have selected this, you will see the screen in Figure 4-52. Select “Migration” then click the “+” sign, and select “Migrate to Exchange Online.” When a mailbox is migrated, the on-premises mailbox is converted to a mail enabled unit.

Your options with the Office 365 tool are limited to Exchange Servers (2003, 2007 and 2010) and IMAP. POP mail is problematic, since POP e-mail has just the e-mail and no folders. Typically, if you are using POP mail, you will most likely use a PST export/import, because the POP e-mail is stored locally. We always recommend that you use Migration Wiz as the first option. It is simpler to use. In our example, we are going to use the IMAP to import mail from a non-Exchange server, and we will need to build a CSV file for the usernames and passwords. To import using IMAP, select the IMAP option (Figure 4-53).
![]() Note If you do not have a third-party certificate, do not use the Microsoft Mail Migration tool. Use the Migration Wiz.
Note If you do not have a third-party certificate, do not use the Microsoft Mail Migration tool. Use the Migration Wiz.
Provide the credentials to import the user accounts into Office 365, and create a CSV file to load the users from the source server into Office 365 (Figure 4-54). The wizard assumes that the e-mail address of the source server is the destination e-mail address on Office 365. You will need to be a global administrator to use this tool.

After you have selected “run,” Office 365 will monitor the status and send you an e-mail when the migration is completed and will list the batch status (Figure 4-55).

After you have started the migrations, the next step is to install PowerShell. In some cases, you may need to install PowerShell early on if you have any problems with domain validation. In most instances, you will be using PowerShell under the guidance of the Office 365 support staff.
Chapter 2 contains the information necessary for the automatic configuration of Outlook. However, there are cases where this will not work and you will need to manually configure the Outlook desktop client. Office 365 uses Microsoft Exchange 2013 and no longer uses RPC or SSL (HTTPS) to connect to the exchange server through the client access server. The new structure uses exchangeGUID@<compnay.com> to connect e-mail services. Since there are no longer any mail servers to configure, you need to determine the ExchangeGuid ID as the server, and create the Exchange server name to manually configure the Outlook client. To manually configure the outlook client, follow the instructions below.
![]() Note At this point, we assume that you have downloaded Office 2013, and Outlook is configured to prompt for profile. You have tried to connect Outlook to Office 365 and it has failed to automatically connect. This manual process should only be used if you failed the automatic connection to Office 365.
Note At this point, we assume that you have downloaded Office 2013, and Outlook is configured to prompt for profile. You have tried to connect Outlook to Office 365 and it has failed to automatically connect. This manual process should only be used if you failed the automatic connection to Office 365.
Step1: Run the PowerShell command to retrieve the ExchangeGuid
Open up a PowerShell command session and run the following command for the users who cannot connect to Office 365. If you need instructions on the configuration of PowerShell, please refer to Chapter 8: Office 365 Administrator Guide. Use the results of this command to build the server name for each user in the format “[email protected]:”
Set-ExecutionPolicy RemoteSigned
$LiveCred = Get-Credential
Import-module msonline
Connect-MSOLService–Credential $LiveCred–Verbose
$Session = New-PSSession-ConfigurationName Microsoft.Exchange-ConnectionUri https://ps.outlook.com/powershell/-Credential $LiveCred-Authentication Basic–AllowRedirection
Import-PSSession $Session-AllowClobber
Get-Recipient | fl name, exchangeguid
Remove-PSSession $Session
Step 2: Configuration of Outlook
Change your Outlook profile to prompt for profile (see the section at the end of this note). At this point you have tried the automatic configuration (and verified that the auto discover records were setup correctly). The only option left is the manual configuration of Office 2013. To begin the manual configuration, start Outlook, and select “new” (Figure 4-56) to create a new profile.

If you wish to speed up the configuration of Outlook, log in to the web site http://office.microsoft.com before you start the manual connection process. Outlook uses a secured HTTPS connection, and will use the same connection that you enter for your browser. If the automatic configuration fails, create a new profile and select the “manual” button. In Figure 4-57, select “manual.”
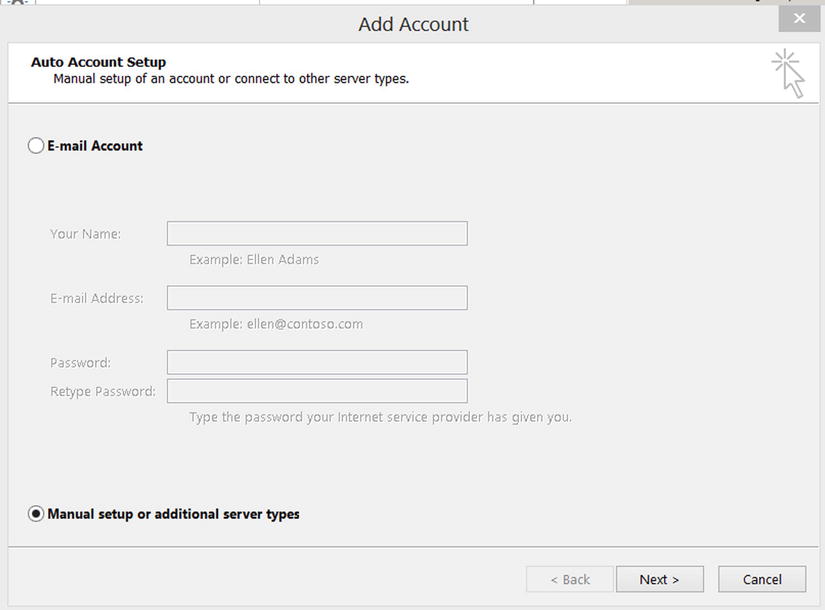
In Figure 4-58, select “Microsoft Exchange server or compatible service,” then “Next.”

In Step 1 above, we ran the PowerShell script to retrieve the ExchangeGuid. We appended the domain name after the ExchangeGuid to build the server name (in this format [email protected]). As an example, using the domain KAMIND.com, the server name would look like: [email protected]. Enter this: [email protected] for the server (Figure 4-59). The user name for Office 365 is the user e-mail address (the user Principal Name should be the same for Office 365). Select “More Settings” to enter the extended parameters of the connection to Office 365. Do not select “check name.”

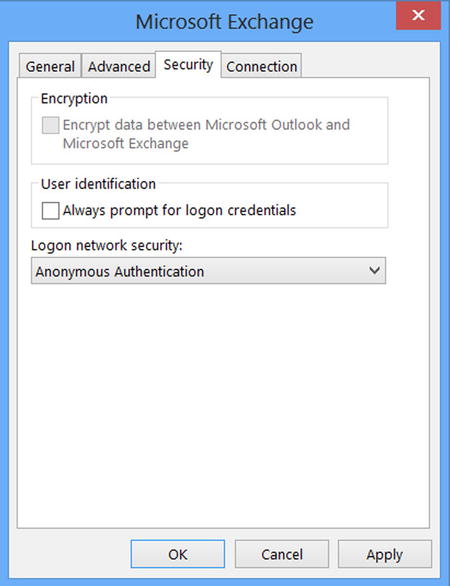
After you have selected “More Settings,” select the “Security” tab (see Figure 4-60), and clear the “Encrypt data between Microsoft Outlook and Microsoft Exchange” (you are using an SSL connection to access Office 365, so unchecking this does not expose you to risk since your data is encrypted via SSL). In the “Logon network security,” section select “Anonymous Authentication.”
Set the security to the proper values. Then select the “Connection” tab, and check the “Connect to Microsoft Exchange using HTTP.” Select “Exchange Proxy Settings” (see Figure 4-61) to set the connection properties.

Next, select the Exchange server proxy settings. Enter the following settings for Office 365 Exchange server (see Figure 4-62 and Table 4-2):

The parameters that you have changed are listed in Table 4-2.
Table 4-2. Correct setting for HTTPS connection to sever
Field |
Value |
|---|---|
Proxy server |
|
Principal name |
|
Connected Fast/Slow |
Check both check boxes (see Figure 4-7) |
Authentication |
Basic |
Select “Apply,” then “OK.” Enter the password when prompted. You will need to restart Outlook and then it should connect to Office 365. You will be requested to login to Office 365. Restart Outlook and select the new profile that you just created. You should see Outlook connect to Office 365 and download your profile.
If Outlook does not connect up, verify the parameters used in the manual connection. Usually the problem is that the server name is incorrect or that the user name is wrong. Verify the parameters and try again.
Reference Links
Office 365 seem simple, but they are complex. There are many different areas to retrieve information about how to migrate to Office 365. Listed below are the important links for migration.
Onboarding Checking tool
http://onboard.office365.com
Office 365 Migration videos
http://technet.microsoft.com/en-jm/video/office-365-jump-start-01-microsoft-office-365-overview-for-it-pros
Conversion of on-site user to mail enable user
http://community.office365.com/en-us/blogs/office_365_community_blog/archive/2011/12/02/convert-exchange-2007-mailboxes-to-mail-enabled-users-after-a-staged-exchange-migration.aspx
Office 365 Migratign and Managing your business in the cloud - Update
http://getoffice365now.com
Next steps
Your basic Office 365 systems have been set up and configured. At this point you are 100% functional and ready to move to the next steps. However, your work is not yet complete. There is much more to do depending on your Office 365 configuration. The key chapters that you need to review for your Office 365 deployment are:
- Chapter 5 – SharePoint Administration
- There are a lot of different features in Office 365 that the user can configure, which do not require support from the systems administrator. This chapter discusses how the administrator sets up the collaboration environment for Office 365 users.
- Chapter 7 –Windows Intune Administration
- The secret to an optimal Office 365 site is the management of the desktop to ensure that updates are current, and the user antivirus is functioning. Windows Intune is a desktop management tool that addresses these issues and reduces the administrators’ effort in desktop management, and improves the user’s experience.
- Chapter 8 – Office 365 Administration
- The administrator’s job is never complete. This chapter contains information for common tasks such as configuring SharePoint permissions, using different types of PowerShell scripts for configuration of the Office 365 sites and other tips and tracks what we use to make Office 365 work without any support calls.
- Chapter 11 – ADFS/Single Sign-On, Password Sync and Federation
- Federation Services is the integration of the Office 365 Exchange servers with on-site Exchange servers. Federation places the security and control in the hands of the on-site administrators and equipment. Integration requires on-site equipment to manage the cloud security.