
CHAPTER 18
Costing
Costing is the application that keeps track of the value of items in the manufacturing and supply chain. You can assign accounts to manufacturing transactions. Costing keeps the value of raw material, work in process, and finished goods in line with the value in the Oracle General Ledger. You can use the bills of material and routings to roll up the costs of raw materials, manpower, machine resources, and other factory overhead. It reports many types of variances to help you judge the accuracy of your purchasing and manufacturing standards. It allows many cost types to enable you to judge the impact of a supplier’s price increase and forecast standards for the next quarter. It supports many types of costing, including Standard, Average, LIFO, FIFO, and Periodic Average. It includes support for activity-based costing. The flow of cost through the factory is shown in Figure 18-1.

FIGURE 18-1. Flow of costs through the manufacturing organization
Setting Up Costing
To set up costing, you need to define the organizations within your enterprise. These organizations might be responsible for defining the costs for a number of facilities. For example, you might have a finished goods warehouse and a manufacturing warehouse located at the same address. You might wish for the costs defined in the manufacturing facility to be the same as the storage facility. You might also have a distribution facility at the other side of the country. The costs of transportation might be absorbed into the cost of inventory at the distribution center, meaning that the distribution center has its own costs. Item costs of any type are made up of a fixed set of cost elements and an unlimited number of sub-elements. The hierarchy of organizations for costing is shown in Figure 18-2.
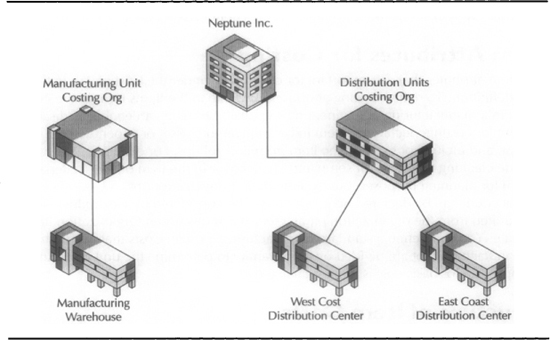
FIGURE 18-2. Costing organizations
Costing Organizations and Children Organizations
When you define an inventory organization, you can specify both an item master organization and a costing organization. Child organizations of the costing organization can share the costs of the costing master organization if they are all using standard costs and are not manufacturing plants (i.e., are not WIP-enabled). The costing master organization can be a manufacturing plant. Items in each of these organizations will be stored at the same cost, provided they have the Costing Enabled and Inventory Asset Value attributes controlled at the item level rather than the item organization level. Defining inventory organizations is discussed in Chapter 2. To update the costing organization, select Organizations I Parameters I Costing Parameters. You can set the costing method, the default costing sub-element, and a set of accounts for inventory valuation that will be defaulted to subinventories when they are created. To set the attributes control level to the Item Master, select Setup I Attribute Controls. Organizations using average costing cannot share costs.
Item Attributes for Costing
The item attributes that are important for costing are under the Costing tab in the item definition. To define costing attributes, navigate to the Items form in the Items menu in a manufacturing or engineering responsibility. You can enable or disable an item for costing, declare the item to be an inventory asset or expensed on receipt, and include or exclude the item from cost rollups. For example, you can include cleaning materials for setup and changeover in the item bills of material (BOM) for planning purposes, but exclude them from cost rollups. A Cost of Goods Sold account can be declared here, which will be considered by Flexbuilder. This is defaulted from the organization parameters and is always an Organization Item attribute. You can define a standard manufacturing lot size. Costs that accrue based on manufacturing lot are divided by this quantity to determine the unit cost. An example of a lot-basis cost is tooling changeover.
Structure of Item Costs
You can store many costs for an item. Costs are of a cost type. A full history of item costs and how they have changed is kept. Cost types might include projected cost, current engineering cost, target cost, as well as the Frozen Standard cost. The data model that supports item costs is illustrated in Figure 18-3.

FIGURE 18-3. Data model of item costs
Each cost is made up of five cost elements. It is these cost elements that are posted to General Ledger. Each cost element can have an unlimited number of cost subelements. For example, Neptune separates packaging and costs from equipment costs in the material cost element. Figure 18-4 shows how the cost is structured from costing organization down to cost sub-element.

FIGURE 18-4. Structure of item costs
Cost Groups
Cost groups are a partition of costs that were first introduced to enable project manufacturing environments. Cost groups ensure that the flow of costs for one group of projects can be completely separated from the flow of costs for another. Cost groups are now pervasive in the cost model. There are many other uses for cost groups. For example, a given item might have both new and remanufactured units in the same warehouse. Cost groups enable you to hold the remanufactured and new units at different costs. To define a cost group, navigate to the Cost Group form.
Cost Levels
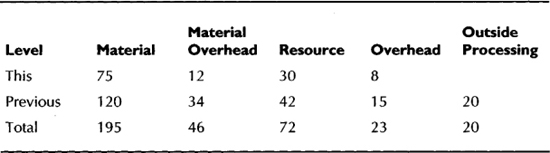
Rolled up costs are captured for an item and stored by cost element for the current level and previous levels. For example, if the bill of material structure for a desktop computer is five levels deep, the assembly would have the sum of levels one through four stored as previous level costs and level five would be this level’s costs. See Table 18-1.
Defining Cost Types
To define a cost type, navigate to the Cost Type. Give the cost type a name and description. For example, Neptune might have a cost type for target costs described as “Target costs to achieve corporate margin objectives.” You must define a default cost type for components of an assembly that do not have costs of this type defined to be used during cost rollup. You can allow this cost type name to be shared among organizations by checking the Multi-Org box. Once the cost is created, you can prevent updates to the cost with the Allow Updates flag. The rollup options include the ability to account for component yield in the rollup. For example, if 5 out of 100 personal digital assistants (PDAs) fail because the screens break in manufacturing, the cost of a PDA should account for the extra material needed to make 100 good ones. You can take a snapshot of the BOMs that were used to derive the costs by checking the flag of the same name. The BOM product uses BOM alternates to denote different types of bills. You could define a BOM alternate called Costing to snapshot the bills into. There are a number of flags that affect the level of detail in the cost rollup. Figure 18-5 explains how they affect t he costs that are rolled up from the material at a lower level to material costs at the higher level. You can also choose to keep the activity and operation cost breakdown from lower levels.
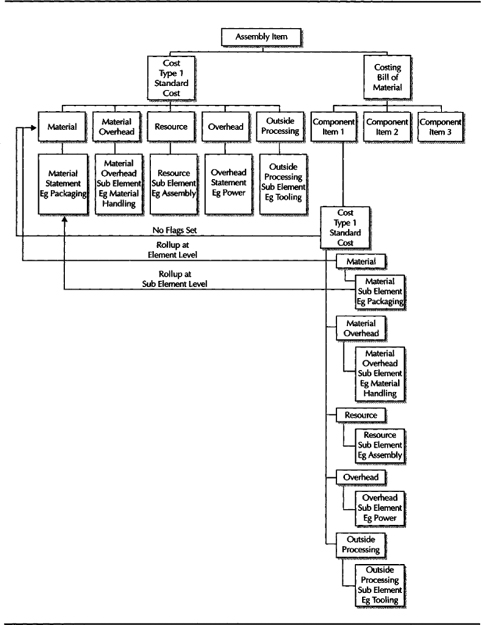
FIGURE 18-5. Levels of detail in rolling up costs
Cost Sub-Elements
Defining cost sub-elements involves material sub-elements and resource sub-elements.
Material Sub-Elements
Material costs can be broken down to further classify the material cost content. For example, you might wish to summarize the equipment and packaging costs of your products. Packaging costs might represent a significant opportunity for cost improvement for spares and consumables when material costs have been reduced. To define a material sub-element, navigate to the Material Sub-Elements form. Give the sub-element a name and description. You can associate the sub-element with an activity. This activity will be defaulted when the sub-element is used to define the item costs. The basis type defines how these costs accrue, on a per-item or per-lot basis. If the basis type is lot, the costs are divided by standard manufacturing lot size. If you are a Project Manufacturing user, you can associate the sub-element with an expenditure type.
Resources
Define resources in the Resource form. You can name the resource and define its basis type: lot or item. You define if the resource is charged to the job manually, as you might have with time cards, or automatically, as you might have with power. The resource can be declared as costed, and if it is, rates and overheads can be associated with it. You define the resource recovery account and the efficiency variance account on the resource. You can define the resources that are allocated based on the resource. For example, you can allocate maintenance department costs on resource value consumed.
If an outside party provides the resource, you define the item that you place on purchase orders (POs) when ordering the processing from them. The basis would then be on the transaction type of PO Receipt rather than WIP Move to accrue the charge. Outside processing costs are held in a different cost element.
Defining Overheads
The overhead definition adds indirect costs to the item. Material overhead is applied as product is completed or received. Resource overhead is applied as the job moves through the shop floor. Figure 18-6 shows how overheads are charged as work moves through the factory.
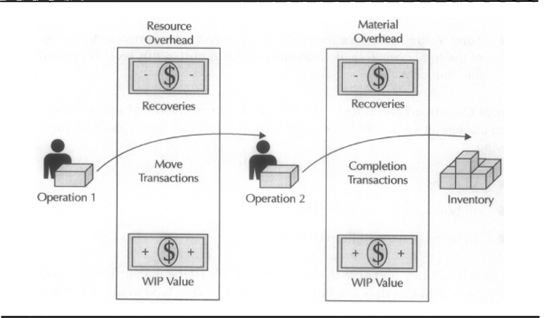
FIGURE 18-6. Overhead flow for resource and material overhead
To define an overhead, navigate to the Overheads form. You must select a cost element of Material Overhead or Overhead. The absorption account is the recovery account for the resource that will offset the charge to WIP when the resource is used. You can choose the basis type for how this overhead is charged. Basis types are as follows:
![]() Activity Used only for material overhead. The cost applied is the proportion of the cost pool for this activity that applies to this item.
Activity Used only for material overhead. The cost applied is the proportion of the cost pool for this activity that applies to this item.
![]() Item Used for all sub-elements. For material and material overhead subelements, you can apply a fixed amount per item completed or received. For resource and resource overhead, you can apply a fixed amount per move operation on the shop floor.
Item Used for all sub-elements. For material and material overhead subelements, you can apply a fixed amount per item completed or received. For resource and resource overhead, you can apply a fixed amount per move operation on the shop floor.
![]() Lot Used for all sub-element types. Costs are divided by the standard manufacturing lot size quantity.
Lot Used for all sub-element types. Costs are divided by the standard manufacturing lot size quantity.
![]() Resource Units Used for overhead and material overhead sub-elements. A fixed amount is applied per resource unit used in the manufacturing routing and is applied to item cost.
Resource Units Used for overhead and material overhead sub-elements. A fixed amount is applied per resource unit used in the manufacturing routing and is applied to item cost.
![]() Resource Value Used for overhead and material overhead sub-elements. A proportion of the resource value consumed in a manufacturing routing is applied to the item cost. Resource Units and Resource Values can be used for item costing, but they are not used in WIP valuation or accounting for value movements.
Resource Value Used for overhead and material overhead sub-elements. A proportion of the resource value consumed in a manufacturing routing is applied to the item cost. Resource Units and Resource Values can be used for item costing, but they are not used in WIP valuation or accounting for value movements.
![]() Total Value Used for the material overhead sub-elements. A percentage of the total costs less the material overhead cost at this level is applied to the item cost.
Total Value Used for the material overhead sub-elements. A percentage of the total costs less the material overhead cost at this level is applied to the item cost.
Material Overhead Defaults
To aid rapid entry of overhead information, you can set up default values for material overheads. You can set the defaults for the following:
![]() All items
All items
![]() All buy items or All make items
All buy items or All make items
![]() All items of a given Item Category
All items of a given Item Category
For each combination of Material Overhead Sub-Element, Item Type, Activity, and Default Basis, you can define a rate or amount. The item type in the user interface refers to the Make/Buy flag in the planning attributes on the Item Master. If the overheads are assigned on an activity basis, you can enter the number of occurrences of the activity and the number of units over which the cost pool should be allocated.
Defining Activity-based Costs
Activity-based costs are used where a high proportion of product cost is made up of the allocation of indirect costs. The more traditional approach of allocating these indirect costs is based on labor hours or material cost. It can unfairly burden profitable products that have high labor content and mask unprofitable products that are ordered in small batches or have many engineering changes, high support costs, or other factors that drive costs. It lets you use nontraditional cost drivers to get a clearer picture of an item’s true cost. For example, for service calls you can define an activity called “service,” calculate a cost for a service call, and allocate that cost using an activity. To define activities, navigate to the Activities form in the costing Setup menu. You can define the Name and Description of the activity. You can use the same activity names across all organization units by checking the Multi-Org flag.
You can define the basis on which the costs are allocated: item, lot, or activity. If the basis type is lot, the activity cost is shared for all items in the lot, therefore, the activity cost is divided by the standard lot quantity. For item basis, the activity cost is charged per item for material and material overhead cost elements and per operation move for resource and resource overhead. For activity, the cost pool is allocated in proportion to the transactions affecting the item. For example, you might decide to allocate the costs of the manufacturing engineering department. You might decide that these costs represent $100 per item, $500 per manufacturing lot, or $12,500 per engineering change.
It lets you break down or aggregate traditional costs differently. For example, you can break down machine time into setup versus run time (and thus highlight potential opportunities for cost savings by a setup time reduction program). You will be able to see the same machine broken into setup and run components, or you can aggregate setup time for all resources for a product.
Click the Activity Costs button to set up the budgeted cost pool and corresponding number of transactions. This determines the cost per activity for each cost type.
NOTE
Oracle also has an activity-based costing product in the Business Intelligence Suite. That product is also useful for service-oriented companies that might not have a notion of product that they wish to cost. It has a more flexible notion of Cost Object to which cost will be applied.
Defining and Viewing Item Costs and Transaction Values
For all costing conventions there are some common basic activities. These include the ability to define the item costs, view the costs for an item, and review the transactions with their values under the prevailing cost conventions.
Defining Item Costs
Defining an item cost is done in three sections. You associate the item with the cost type, create the cost elements for the cost type, and define some details for the item-cost type combination.
Associating a Cost Type with an Item
The cost information is built from the Item Cost form. When you invoke the form, a Find window appears. From both the Find window and the Results window, you can click the New button. The Results window displays a list of Item Cost Types and their costs summarized to cost element level. When you click the New button, you are defining a new Item Cost Type association.
Defining Item Costs
When you create a new cost type association, you must click the Costs button to start to create the costs for the item in the new cost type. The Rolled Up costs will appear in the lower portion of the form. You can add user-defined costs in the top part of the form. As you add a cost element, the default sub-element and activity will appear. You can define the basis of item, lot, or activity for how the cost is accumulated. For lot basis, the cost is allocated over the standard manufacturing lot size. For activity basis, you must click the Activity tab and record the number of times the activity is expected to occur and the number of units of the item being costed that will be affected. This yields the proportion of the cost pool for this activity that accrues to the item being costed. You can define a rate per activity or an amount per item for this cost sub-element.
Defining Cost Details
You can define details and controls for the costs of this item under this cost type. You can declare that these costs are defaulted from the cost type definition. This means that the cost controls are defaulted and user-defined costs cannot be entered. There is a flag that defines the item is an Asset Item. This means that the cost for the item will be held in inventory. If the item is an expense item, its costs are recorded in Profit and Loss on receipt. An example of an expense item might be spares for the lathe. The Based on Cost Rollup flag determines if the costs will be overridden during cost rollup. Turning the flag off essentially freezes the costs. The flag is defaulted as Yes for items defined as Buy items in their item-planning attributes.
The manufacturing lot size to use for costing purposes can be set here. Costs accrued on a lot basis are divided by this quantity. An example of such a cost might be Setup costs. If left blank, it defaults to 1. The shrinkage rate defines the components wasted or reduced during assembly. The material used in those components still needs to be planned for and costed. For example, a supplier to Neptune manufactures ink cartridges for the printers. The technical spec for the ink well is 10 milliliters of ink. The ink well is overfilled to 11 milliliters in production to ensure that 99.5 percent of cartridges pass QA.
The cost information summarized to cost element is displayed here for reference, as well as the Sales and Cost of Goods Sold accounts that will be used by the Auto Accounting and Flexbuilder.
Viewing Item Costs
From the item details you can view a breakdown of the costs for the item and cost type. Many different views of the costs are available. The unit cost and percentage of the total cost are always displayed. An example of the Cost Summary form is shown in Figure 18-7. The cost sub-elements are summarized by Cost Element for the Frozen Standard Cost Type for Item AS18947.

FIGURE 18-7 A sample Cost Summary
Activity Costs Views
You can view cost-driving activities and the resultant costs for an item and cost type by department, level, and operation.
![]() Activity by Department Shows activity, department, and description
Activity by Department Shows activity, department, and description
![]() Activity by Level Shows activity, costs at the current level, and costs at the previous level for the activities
Activity by Level Shows activity, costs at the current level, and costs at the previous level for the activities
![]() Activity by Operation Shows activity, operation sequence, and unit costs
Activity by Operation Shows activity, operation sequence, and unit costs
![]() Activity Summary Shows each activity and a summary of its costs
Activity Summary Shows each activity and a summary of its costs
Cost Element Views
The cost element views include analysis by activity, department, level, operation and sub-element.
![]() Element by Activity Shows element, activity, and activity name
Element by Activity Shows element, activity, and activity name
![]() Element by Department Shows element name, department, and description
Element by Department Shows element name, department, and description
![]() Element by Level Shows element name, current level costs, and previous level
Element by Level Shows element name, current level costs, and previous level
![]() Element by Operation Shows the element, operation sequence number, and unit cost
Element by Operation Shows the element, operation sequence number, and unit cost
![]() Element by Sub-Element Shows element, sub-element, and subelement name
Element by Sub-Element Shows element, sub-element, and subelement name
![]() Element Summary Shows element and a summary of costs for that cost element
Element Summary Shows element and a summary of costs for that cost element
Sub-Element Views
The sub-element view includes analysis by activity, department, level, and operation. They are listed here:
![]() Sub-Element by Activity Shows sub-element, activity, and description
Sub-Element by Activity Shows sub-element, activity, and description
![]() Sub-Element by Department Shows sub-element, department, and department description
Sub-Element by Department Shows sub-element, department, and department description
![]() Sub-Element by Level Shows current level and previous level costs by sub-element
Sub-Element by Level Shows current level and previous level costs by sub-element
![]() Sub-Element by Operation Shows sub-element, operation sequence number, and description
Sub-Element by Operation Shows sub-element, operation sequence number, and description
![]() Sub-Element Summary Shows sub-element and description with a total cost for each sub-element
Sub-Element Summary Shows sub-element and description with a total cost for each sub-element
Summary Views
The operations summary view shows costs at the current and previous levels for each operation sequence. The Costs by Level view shows total costs for the Current level and Previews level. The Total Cost summary just shows the total cost.
Cost Details
When checking every view, you can click the Details button. The exact information shown in the Details window will depend on the view. You can see each element and sub-element, unit, basis factor, rate, and amount per unit and the resultant unit cost. For each activity cost, you can see the activity name, basis, and cost per resource unit.
Costed Bill of Materials
You can also review the costs of each item on the BOM for an item by reviewing the costed Bill of Material. To review the cost of components, navigate to the costed BOM. Click the Item Costs check box in the Display group and choose a Cost Type. You can review a costed bill down several levels. A Costing tab will appear in the results. Fields on the tab include Costing Quantity, Unit Cost, and Extended Cost.
Cost History
You can view how the costs of an item have changed over time and the transactions that caused them to change. Cost history is different for standard and average costing. The Standard Cost History form shows history from cost updates. The View Item Costs for Cost Group (or Item Cost History) is available only for average, FIFO, or LIFO. To review item costs, navigate to the Cost History form. You can search for a list of items for which you want to trace cost history. You can choose to inquire on the cost elements for this and previous levels, or you can choose to inquire on the transactions that moved the cost by clicking the History button. From the cost history page, you can see the transaction and inventory, costs, and quantities. You can choose to see the cost broken out by cost element by clicking the Details button. By clicking the Graph button, you can see the movement of costs plotted over time.
Mass Editing Costing Information
You can edit costing information en masse by navigating to the Request Submission form and choosing Mass Edit Costing Information. You can edit activity and shrinkage rates and create new costs from average purchase order, receipt, or invoice price. You can also apply percentage or absolute amount. To mass-edit costing information, select Cost I Mass Edit Cost Information.
Copying Costs
You can move costs from one cost type to any other cost type apart from the cost type being used for transactions in that organization; so you cannot move costs to Frozen Standard if you are using this costing method for the organization. You cannot move costs to the Average Cost Type if you are using this costing method. There are several concurrent requests that move costs between cost types and organizations. These are as follows:
![]() Copy Item Costs Copies costs from one cost type to another
Copy Item Costs Copies costs from one cost type to another
![]() Copy Item Costs Across Organizations Copies the cost type to different organizations, where it can be separately maintained if necessary
Copy Item Costs Across Organizations Copies the cost type to different organizations, where it can be separately maintained if necessary
![]() Copy Overhead Costs Copies the overhead costs to the target cost type
Copy Overhead Costs Copies the overhead costs to the target cost type
![]() Copy Resource Costs Copies resource costs to the target cost type
Copy Resource Costs Copies resource costs to the target cost type
All these requests share the same parameters. You can merge new costing information with existing costs, update costs only where they are missing, or completely overwrite the target cost type with the source cost type. When moving costs between organizations, you can choose to create the same costing sub-element detail in the target organization, or you can summarize the sub-elements from the source organization into a single sub-element in the target.
Accounting for Value Movements
Within the costing system there are two main mechanisms for assigning accounts to value movements in costing. These are the category accounts for the inventory value and WIP Accounting Classes for the values in Work in Process.
Values in Inventory
As delivered, the e-business suite will value all inventory in a given subinventory using the same set of accounts for standard costing organizations and one set of accounts per costing organization for average costing. To define the accounting for a subinventory, navigate to the Subinventory form. You can implement product-line accounting by using the costing client extensions. Although you can set up category accounts for inventory and default WIP Accounting Classes for item categories, the defaulting of the accounts needs the client extension enabled. To define category accounts, navigate to the Category Accounts form. For standard costing organizations, the accounts are defined for a subinventory and item category. For average costing organizations, the accounts are defined for a cost group and a category. Accounts can be defined for Material, Material Overhead, Resource, Outside Processing, and Expense (for items that are expensed on receipt into this subinventory, for example, consumable floor stock such as wipes or lubricant).
Detailed examples on how to write client extensions to invoke product line accounting are found in the files CSTACHKS.pIs and CSTACHKB.pls. These files are located in the Cost Management top, admin/sql directory. These are template packages for the writing of client extensions.
Values in WIP
Values in WIP are defined in WIP Accounting Classes. The default discrete accounting class is defined in the Discrete tab in the Organization Parameters form. You can further refine the assignment of the WIP Accounting Class by assigning it to item categories in the Default WIP Accounting Classes for item categories form. You can assign the WIP Accounting Classes for Discrete Jobs and Repetitive Schedules. In an average costing organization, you can refine your assignment to both item category and cost group. When defining a WIP Accounting Class for an average costing organization, you can also choose how the costs are relieved from WIP: to allocate a proportion of the material and resources actually used or an allocation of the values in the BOM and Routing. An example of the WIP Accounting Classes form is shown in Figure 18-8.

FIGURE 18-8. WIP Accounting Class for a standard costing organization
Other Account Assignments
You can also assign accounts to other entities that will influence the cost of an item and the value of its movements. These include the following:
![]() Freight Carrier For shipping costs in interfacility movements.
Freight Carrier For shipping costs in interfacility movements.
![]() Shipping Lanes Defined in the Shipping Networks form, hold the Transfer Credit for the shipper and Purchase Price Variance for the Receiver. It defines the intercompany payables and receivables accounts to allow intercompany balance sheet eliminations. It also defines the account that holds the value of inventory while in transit.
Shipping Lanes Defined in the Shipping Networks form, hold the Transfer Credit for the shipper and Purchase Price Variance for the Receiver. It defines the intercompany payables and receivables accounts to allow intercompany balance sheet eliminations. It also defines the account that holds the value of inventory while in transit.
![]() Receiving Dock Defined in the Receiving Parameters form, holds the value of inventory received but not delivered or put away in inventory.
Receiving Dock Defined in the Receiving Parameters form, holds the value of inventory received but not delivered or put away in inventory.
Viewing Transaction Costs
You can view the cost of the transactions from many subsystems. To review transaction costs, navigate to the View Transactions menu.
Receiving Transactions
From the Receiving Transaction form, you can choose to review the Header or the Transactions. When in the Transaction window, from the Tools menu you can review the accounting information: the transaction type, account, debit and credit amounts in the functional currency, the currency that the transaction was entered, the conversion rate, and the order and shipment that is the source of the transaction. You can also review these entries as T accounts and activity summary from the accounting detail.
Material Transaction Distributions
You can search for material transactions based on transaction information such as transaction dates, source type, source, transaction type, and quantity. You can also specify if you wish to see costed transactions. You can search based on item information such as item number, revision, description, and item category. You can search based on inventory information such as subinventory, locator, serial number, lot, and supplier’s lot number. In the Results window, you can click the Distributions button.
The distributions show the date, account, transaction value, item, and transaction type, with the quantity and unit cost.
You can bypass the transactions and view the distributions directly from the Material Transaction Distributions. This gives the capability to search based on General Ledger (G/L) batch and account number, which are not available in the material transaction search.
WIP Value Summary
With the WIP Value Summary, you can review the value of the jobs and repetitive schedules that are completed, closed, or currently still in WIP. For each cost element, you can see the accounting code combination that it is held in G/L and the costs that have flowed into and out of the job. The outflow can be in costs relieved or variances. The net activity should be reflected in a balance in G/L. You can click the Distributions button to review all the distributions for the job. An example of the WIP Value Summary form is shown in Figure 18-9.

FIGURE 18-9. Example of a WIP Value Summary form
WIP Distributions
You can also review the WIP distributions directly by navigating to the WIP Transaction Distributions form. Search criteria include job, production line, assembly, distribution account, the item or item category being transacted, the operation, department or resource performing the transaction, and the transaction identifier or type.
Processing Costs
It is the cost processor that picks up the uncosted material and resource transactions. It updates the item cost, if appropriate, and determines the value for the transaction. It is the central processing engine in the costing system. If the cost processor is not running, there are no updates made. It is a concurrent program that you can set up to run at intervals. There is a separate cost processor for periodic costing. The periodic costing processor uses acquisition costs, including additional charges such as freight, customs, and insurance, to value receipts and returns. The Periodic Cost processor is run manually, by submission.
Costing Methods
The Oracle E-Business Suite is capable of supporting many costing methods and conventions. Costing methods include Standard and Average costing; cost layering methods of last in, first out (LIFO) and first in, first out (FIFO); and periodic methods of Periodic Average Cost and Periodic Incremental LIFO. The method you choose for your organization will depend on the legislative requirements of the country you are operating in, inflation in the economy, and the provision you wish to make for the replacement of goods sold.
Standard Costing
Standard costing values inventory and WIP at a standard value. All material transactions for an item are values at the standard cost. Any differences between the standard values flowing into manufacturing and the standard value of the material produced are recorded as variances in the period. Cost of sales in a period will be the standard cost of the goods sold plus any variances recorded in the period. You can model other costs in other cost types and update the frozen standard. Updating the frozen standard will cause a revaluation variance to be recorded when on-hand inventory is revalued.
Transactions processed from WIP can have an entry per cost element, or you can choose to combine the entries for cost elements that share the same account. For example, if the overhead and resource cost elements share the account manufacturing recoveries, you could choose to post both entries in one G/L transaction. The setting of the profile option would be CST: Account Summarization.
Setting Up for Standard Costing
Within the E-Business Suite you can create a new cost from the average purchaseorder prices and average invoice prices for your buy items and roll them up into a pending cost type, using Bills, Routings, Resources, and Resource Rates. The pending cost can then be moved into a frozen standard cost.
Setting Up Manufacturing Resources
The costs of resource used in the conversion of material are set up under the Bill of Materials application. For each resource, you define the rate per unit for each cost type. For example, you might be currently charging at the rate of $30 an hour for Frozen Standard Cost and $40 an hour for a cost type of Contract Labor.
NOTE
If you are using standard costing, you need to set the profile options CST:Recognize Period Variance and CST:Require Scrap Account to Yes.
Rolling Up Standard Costs
When you roll up standard costs, you will define to a cost type for pending costs. To roll up the costs, navigate to the Assembly Cost Rollup concurrent request submission. You can run this process with or without reporting the output. You can also perform a cost rollup that will only be printed and will not affect the Item Costs in the database. You can roll up just a single level, or you can roll costs from the lowest level to the top. You can choose to rollup a single item, a range of items, or all items assigned to an item category. You can choose to roll up zero cost items only.
NOTE
Inactive items will be excluded from the rollup unless you roll up a specific inactive item.
Component items will be included if they are effective on the bill of material for the assembly. There can be many bills of material for an assembly: one primary and many BOM alternates. One of these BOM alternates is the one that is used for costing. You might have used and frozen a different BOM alternate when the costs were rolled up than your current manufacturing bill of material. The date against which their effectivity is measured is a parameter to the request. The rollup can include pending changes to those Bills of Material if you want. You can see the cost impact of pending changes in product structures. You can also include items, bills, and routings that are currently in engineering to check if target costs are being met. You can specify the BOM and routing alternates to use in this cost rollup.
If you choose to print a report with the cost rollup, you can choose to see the quantities of component parts level by level or as a total for the assembly. You can also choose to include or exclude the sub-element detail for a more consolidated report.
NOTE
You can include the operations associated with a component that is of the item type phantom. You need to set the BOM parameters. Use Phantom Routings and Inherit Phantom Operation Sequence. Costs for the phantom are reported at the level of its parent in the rollup structure.
Updating Standard Costs
When costs have been created against a pending cost type, you can review the pending changes and then apply those new costs to the frozen standard to revalue inventory on hand, in transit, and on the shop floor. When the costs are updated, an entry is also made in the cost history table to allow a full audit of the changes made to inventory balances.
Reviewing Pending Cost Adjustments
This report shows the effect on inventory, in-transit, and WIP of changing the costs from the current frozen standard to the cost type you supply as a parameter. To review pending cost adjustments, navigate to the Pending Cost Adjustments report. You can review changes for item costs, or you can include changes to resource and overhead rates.
Updating Costs
When updating the standard cost, you create a new entry for the frozen cost type and revalue on-hand, in-transit, and WIP inventories. The changes in value are posted to a revaluation account in G/L specified in a parameter to the report. Costs can be shared between facilities, so a change in the costs in a cost master organization will be reflected in the inventory values of all child organizations.
NOTE
The cost update will not run until Job Close, Period Close, or G/L Transfer processes are running. There will be conflict in having some of the transactions valued at the prior value at some at the new value.
To update standard costs, navigate to the Update Standard Cost concurrent submission. This report gives you the option to save the quantities and costs involved in the update and report on it later. There is a report set defined, with a report for On-Hand, In-Transit, and WIP. To run the report set, navigate to Report Standard Cost Adjustments.
Viewing Standard Costs History
You can view the updates from a cost update online by navigating to View Cost History form. All cost updates, whether from the Define Item Cost form or the Cost Update Concurrent program, are displayed in this form. If you are currently logged in to the costing master organization, you can view the cost information for the costing organization and all its children organizations. If you are logged in to a child organization, you can see information for only that organization. You can search based on a specific item and date combination, or you can search for a specific cost update run.
In the search results, you can see the item, date, and unit cost for each item cost and a description of the update. There are tabs that display the cost element breakdown of the cost, the adjustment quantity for on hand, in-transit, and WIP, and the adjustment values.
Cost Flows in Standard Costing
The movement of material and flow of resources at an agreed engineering standard allow management to trap the differences between the expected flow of material and resources and the actual flow, and report the difference in the accounts. This is variance accounting. The variances identified under standard costing conventions in the E-Business Suite are as follows.
Purchase-Price Variance
Purchase-price variance is the difference between the standard cost of the item and the value received. The received value will by default be the value on the purchase order. The transactions will be as shown here:
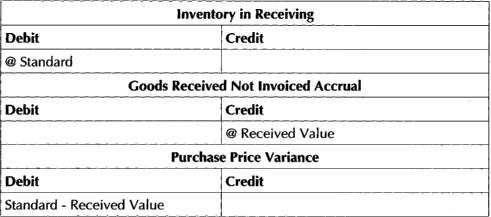
Invoice-Price Variance
Invoice-price variance is the difference between the received value and the invoiced value match in Oracle Payables. The transactions will be as follows:

Cycle-Count Adjustments
The standard cost of any quantity adjusted from or to on-hand balances during cycle count adjustments is charged or credited to cycle count adjustments.

Material-Usage Variance
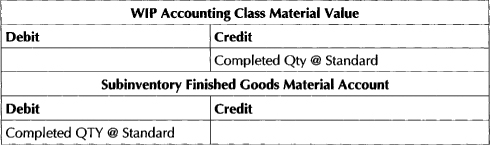
The standard cost of the differences in material quantities consumed versus quantities defined in the BOM for the manufacture of an assembly is charged or credited to material-usage variance. The transactions are as follows.


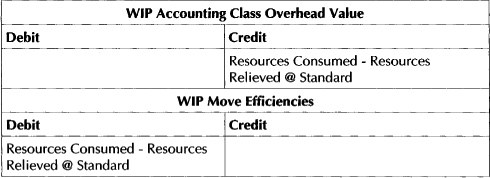
Move-Efficiency Variance
For overheads that are applied on move transactions, you can cause a variance by altering the operations in the routing from that used to calculate the standard cost. If you do this, a move-efficiency variance will occur. For example, if you had constructed the routing in the costed bill to include four operations, but through clever manufacturing cell design, the routing used in production has only three operations, a positive variance will be recorded on job completion. The transactions will be as follows:


Resource-Efficiency Variance
Resource-efficiency variances are created by more or less resources being charged to the job than are required on the routing used to arrive at the standard cost. For example, if the routing had required the printed circuit board to be glued into place, but the current design has press studs to secure them, then reduction in assembly time would be reflected as a positive resource-efficiency variance. You can generate an efficiency variance by charging more or less cost to the job, but you can also generate rate variance by charging resources with a different rate. There is a Standard Rate check box on the resource. If you check this box, resources will be charged to the job at standard rate. If you uncheck the box, you will be required to enter a rate for internal resources. Outside processing rates will be derived from the purchase order. Differences between the rates charged and standard rates will be charged to resource-rate variance.
NOTE
Rate and efficiency variances are reported in this account as the user can apply actual rates to the resource transactions on entry.
The transactions would be as follows:

![]() Rate and Account defined in BOM Resources.
Rate and Account defined in BOM Resources.

Revaluation Variance
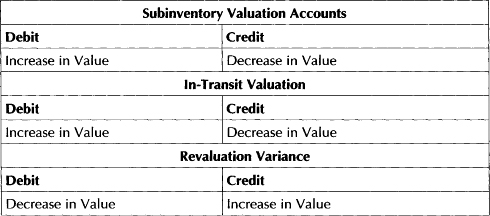
The revaluation variance is caused when the standard cost of an item with quantities on hand or in transit is changed. For example, if the cost of Xenium III processors drops due to the introduction of the Xenium Starfire V, the value of inventory on hand will fall, causing a negative revaluation variance but a positive purchase price variance on new receipts. At the same time, autoplacement machinery needs circuit boards to be manually reseated after the first five placements. This has been reflected in a new cost rollup, causing a positive revaluation variance but negative resource efficiency variances. The revaluation account is defined in the Standard Cost Update Parameters. The in-transit valuation account is defined in the Interorg Parameters available from the Tools I Inventory Parameters form. The transactions are as follows:
Average Costing
Average costing is a costing convention that updates the cost of an item with each receipt. It updates the cost to be the average of the quantity on hand and the previous average and the quantity received at the new price. Issues are made from inventory at the average price ruling at the time the material is issued. Receipts can be purchase-order receipts or WIP completions. For WIP completions, the receipt value is the material resource and overheads charged to the job at average cost.
NOTE
Average costing does not apply to repetitive scheduled items. If the cost conventions of the organization are average cost, you cannot define repetitive schedules in that organization.
Advantages of average-costing mechanisms are that any increase or decrease in price, quantity, or material and resources needed to manufacture an item are reflected against the item automatically. This essentially revalues quantities on hand and in transit with each receipt.
NOTE
Average costs cannot be shared among organizations. Each item has an average cost within each facility.
Under standard costing conventions, usage and price variances would be recorded as period costs, but not reflected against the items being manufactured. This has to be weighed against the control capability that standard costing gives.
Note that the following transaction processors should be run in online mode if you are using average costs:
![]() TP:INV:Transaction Processing Mode profile
TP:INV:Transaction Processing Mode profile
![]() TP:WIP:Completion Transactions Form
TP:WIP:Completion Transactions Form
![]() TP:WIP:Material Transactions Form
TP:WIP:Material Transactions Form
![]() TP:WIP:Move Transaction
TP:WIP:Move Transaction
![]() TP:WIP:Operation Backflush Setup
TP:WIP:Operation Backflush Setup
![]() TP:WIP:Shop Floor Material Processing
TP:WIP:Shop Floor Material Processing
Enabling an Organization for Average Costing
To enable average costing in an organization, navigate to the Organization Parameters form in the Inventory Setup menu and set the Cost Method. You need to define cost type that resource rates can be defined against in this organization.
Cost Flows in Average Costing
The following is an analysis of the way costs flow through the organization when it is operating under average-costing convention. The same events are described, but inventory movements in and of themselves are revaluing inventory. There is capability to trap variances, but the flow of cost is not dictated by an agreed engineering and costing standard. Items may be costed higher than expected, and those costs are held in inventory until product ships and costs flow into costs of goods sold.
Labor Charges
You can perform labor time entries manually through the resource transactions, or you can backflush the resource transactions. For manual transactions, the rates can be defaulted from either the employee the employee rates or from the resource rates associated to the cost type on the resource definition in BOM.
You can choose to charge the job with the actual rates and units, or you can set Autocharge to manual, recognizing the rate variance immediately. In the latter case, the entries are as follows:

Overhead Charges
For overheads that are based on resource units or resource value, the value charged to WIP will be based on the actual resource units and value used.

Component Issues
Components issued to the job will be valued at the average cost ruling at the time of the transaction. If a component item is issued to a job in several transactions, it is possible for them all to have different costs. The transactions would be as follows:

Material Overhead Charges
Material overhead is charged to the job according to the basis and overhead rate prevailing at the time. The rates may be changed at any time, but they will affect only future transactions and have no immediate effect on the item’s costs. Material overheads are recovered on completion and applied to finished assemblies. They are not applied to WIP. The transactions would be as follows:

Scrap Charges
There is an entry in the WIP Parameters that defines if a scrap account is required. The value of the assemblies up to the operation at which they are scrapped is moved to the scrap account from the elemental costs. If the scrap account is not defined for the assemblies, the costs follow the assembly into inventory. Even if you don’t require a scrap account, you can optionally enter one, which will relieve cost from the job at that point.
![]() Scrap Account Required
Scrap Account Required
![]() Scrap Account not Required
Scrap Account not Required
The scrap value remains against the cost elements. No accounting is performed.
Assembly Completions
The values relieved from WIP on assembly completion depend on the value set in the Completion Cost Source on the WIP Parameters and defaulted down to the WIP Accounting Class. The Completion Cost Source is either user-defined or system-calculated. User-defined relieves costs according to the cost elements of a cost type that you need to specify. Balances remaining at the end of the job are moved to inventory or variance accounts in the Job Closure transaction.
If you choose a Completion Cost Source of System Calculated, it must be further refined to be based on actual or standard resources. For actual resources, a proportion of the costs of the job are moved to inventory based on the quantity moved as a proportion of the quantity in the job. If you choose standard resources, resource costs are relieved from the job based on the routing. The transactions will be as follows:

On completion the inventory is revalued. The formula for the revaluation is as follows:
New Average = (Qty on Hand × Previous Average + Completion
Qty × Completion Cost) / (Qty on Hand + Completion Qty)
If you check the Final Completions flag, the final completion option can be set. If you choose a final completion option of Enabled, any balances remaining in the job will be spread over the quantity being completed if such balances are positive. If such balances are negative, you have consumed less material and resource than expected to produce the assemblies. The positive variances that this represents will not follow the items into inventory but will be reported in Profit and Loss. If you choose a final completion option of Disabled, the completions are costed according to the costing source of the WIP Accounting Class.
Returns from inventory to WIP are valued at the average completion value for assemblies on the job being returned to.
Job Closures and Variance Calculations
There are many ways to leave costs in the job when all pending completions have been done.
![]() If the completions from the job were not done as final completions.
If the completions from the job were not done as final completions.
![]() If there were more completions from the job than the scheduled quantity and you are relieving resources based on standard values.
If there were more completions from the job than the scheduled quantity and you are relieving resources based on standard values.
![]() A transaction was posted after all completions were performed.
A transaction was posted after all completions were performed.
![]() The job was cancelled with value accrued.
The job was cancelled with value accrued.
Positive job balances follow the assemblies into inventory. Negative job balances are reported in the variance accounts defined in the WIP Accounting Class.

Maintaining Average Costs
You can directly maintain the average cost of an item by navigating to the Update Average Costs form. You can enter a new average cost and have the system allocate the cost increase at the element level, or you can maintain the costs at the element level manually. You can also update item costs by a percentage. Costing also allows you to specify a change to the value of inventory on hand and have that drive a change in the average cost of those items. This might happen with an audit specifying a new value or material moving into an obsolescent stage in its lifecycle. The potential change to the value of the material is shown for each change. The average cost is also updated from many transactions:
![]() Invoice Price Variance Application You can apply invoice price variance back to items by navigating to the Transfer Invoice Price Variance to Inventory concurrent submission. This is one piece of the value movement that is not captured in a material movement and will not be reflected in the item’s average cost unless this process is run.
Invoice Price Variance Application You can apply invoice price variance back to items by navigating to the Transfer Invoice Price Variance to Inventory concurrent submission. This is one piece of the value movement that is not captured in a material movement and will not be reflected in the item’s average cost unless this process is run.
![]() Purchase Order Receipts These are valued at PO-line shipment values.
Purchase Order Receipts These are valued at PO-line shipment values.
![]() Inter Organization Receipts These are valued at cost from the sending organization plus freight and transfer credit.
Inter Organization Receipts These are valued at cost from the sending organization plus freight and transfer credit.
![]() Returns to Vendor These are valued at original PO receipt value.
Returns to Vendor These are valued at original PO receipt value.
Cost Layering Methods
With Release 11.i of the E-Business Suite, Oracle introduced LIFO and FIFO costing methods. These methods rely on keeping costs not only at the item and warehouse level, but also at the cost layer. The stack of receipts may be consumed from the top (LIFO) or the bottom (FIFO). The cost layer is a quantity of inventory at the same received cost. An illustration of the cost layers moving into and out of inventory value is shown in Figure 18-10.

FIGURE 18-10. Stack of cost layers
FIFO/LIFO costing conventions are well accepted within Generally Accepted Accounting Principles (GAAP). FIFO costing conventions will tend to value inventory higher and report profits higher in times of rising prices. Cost of sales will provide for the oldest purchase prices. It might not reflect the replacement cost of the inventory sold. LIFO costing conventions will tend to value inventory lower and report profits lower in times of rising prices. Cost of sales will provide for the most recent purchase prices. It might more closely reflect replacement cost of the inventory sold. A small data model of the structure of cost layers is shown in Figure 18-11.

FIGURE 18-11. Structure of cost layers
Every purchase or work in process receipt transaction causes a cost layer to be created. Some transactions will not cause a cost layer to be created. For example, a Miscellaneous Receipt transaction would be an inventory layer at the same cost layer as the previous PO receipt. The costs of the transaction at an element level are held in the Cost Layer Cost Details. The elemental breakdown of the inventory layer within the cost layer are held in the Cost Inventory Layer Cost Details. A transaction that consumes part of a cost layer has the cost layer consumed in the transaction cost layer cost details.
You cannot share LIFO/FIFO costs with other organizations, and you cannot apply LIFO/FIFO costing conventions to a repetitive schedule. If the costing convention of a facility is a layer cost type, you cannot create repetitive schedules in that organization.
The system maintains cost layers within WIP. As material is issued to a job, it is issued to its own cost layer.
Setting Up for Layer Costing
To use layer costing, you need to set the organization cost method to LIFO or FIFO. To do this, navigate to the Organization Parameters form in the inventory Setup menu. You need to define at least one cost type for resource rates to be defined against.
Value and Transaction Flow in Layer Costing
Most of the costs that flow into the job do so in much the same way as average costing; however, components are issued into WIP from their cost layer. That cost layer may hold costs at element level. These cost elements are moved to the job as previous level costs, though the structure of the Job values is very different. The job has cost layers in the same way that inventory has cost layers. As mentioned previously, receipts into inventory create new cost layers for both LIFO and FIFO costing. The following explains how transactions create cost layers and how they are consumed.
Creating Inventory Cost Layers
An inventory cost layer is a receipt or group of consecutive receipts for an item at the same received cost. Costs are moved into the cost layer in the following transactions and at the following values:
![]() PO Receipts Valued at PO-line shipment price
PO Receipts Valued at PO-line shipment price
![]() Assembly Completions Valued at job completion cost
Assembly Completions Valued at job completion cost
![]() Miscellaneous Receipts Valued at user-entered cost, or if not entered, at the latest received cost
Miscellaneous Receipts Valued at user-entered cost, or if not entered, at the latest received cost
![]() Inter-Org Transfers Valued at the cost from the shipping organization, plus freight plus transfer credit
Inter-Org Transfers Valued at the cost from the shipping organization, plus freight plus transfer credit
![]() WIP Component Returns Valued at the last layer issued to the job, irrespective of LIFO or FIFO cost basis
WIP Component Returns Valued at the last layer issued to the job, irrespective of LIFO or FIFO cost basis
![]() Positive Inventory Adjustments Valued at the latest received cost
Positive Inventory Adjustments Valued at the latest received cost
![]() RMA Receipts Valued at latest received cost
RMA Receipts Valued at latest received cost
Cost layers are consumed when the inventory quantity in them is issued, adjusted, sold, or returned to a vendor.
Creating WIP Cost Layers
A WIP cost layer is a component issue to the job. The material issued to the job is held as a stack of cost layers. Each cost layer keeps references back to the inventory layer from which it was issued. A component issue transaction can consume many inventory cost layers.
Consuming WIP Cost Layers
When an assembly is completed, the material cost is relieved from WIP. The Costs are taken from the top (LIFO) or bottom (FIFO) of the stack of Inventory Cost Layers for earliest (FIFO) or latest (LIFO) WIP cost layer. The component cost computation for assembly completions uses the same algorithm as for average costing.
View Transaction Cost Layers
You can view all the cost layers that make up an item’s layered cost. Navigate to the View Transaction Layer Cost form in the View Transactions menu. You can search by transaction dates, item, and transaction source. The Results window shows two regions. The first is a list of items and quantities. The second is a set of cost layers. The cost layers block shows the quantity and cost in the cost layer and the breakdown by cost element.
Updating Layer Costs
You can directly update the cost of a layer. Navigate to the Update Layer Cost form. An example of a cost layer for item AS62444 is shown in Figure 18-12. It shows a downward revision of the cost from $153-$ 140 for layer 1036, which has 25 units. You can update the cost of a particular layer. Navigate to the Layer Cost Update form. You must specify the date for the transaction and the account for the revaluation in the same way as other cost conventions. When you specify the item to be updated, you must also specify the layer that you are updating. Cost updates can be made by new cost, percentage change, or adjustment amount. The change in value is apportioned among the cost elements in proportion to their current values. The accounts used to hold those values is displayed in the Accounts tab and can be overridden.

FIGURE 18-12. Layer Cost update
Periodic Costing
The Oracle E-Business Suite also offers two periodic costing methods. These are methods for calculating a cost for the items from the transactions that have happened in a costing period. Costs are based on invoice prices or order prices for goods delivered but not yet invoiced in the period. Acquisition costs such as freight can be matched to the receipts. Costs are averaged for the entire period rather than on a transaction-by-transaction basis. Overheads are fully absorbed for the period because the cost pool to be applied is known. Therefore, the rate-per-basis unit can be determined and applied.
Costing requires that there is also a perpetual cost available to value transactions as they occur. You might want to use the periodic costs to set standards for your organization. In some countries, such as Italy, periodic costing is a legal requirement. For this reason, periodic costing is very focused on external reporting. Periodic costs can be shared between inventory organizations and costs groups that are part of the same legal entity.
There are some restrictions for using periodic costs:
![]() Cost types must be multi-org and not enabled for update.
Cost types must be multi-org and not enabled for update.
![]() The cost type for the periodic rates must be multi-org and updateable.
The cost type for the periodic rates must be multi-org and updateable.
![]() The cost group must have only one item master organization.
The cost group must have only one item master organization.
![]() Organization cost groups can have only one legal entity.
Organization cost groups can have only one legal entity.
Much of the functionality for periodic costing is centered around external reporting. This means that the legal and ownership organization groupings of cost group and legal entity play a much bigger role.
Important Concepts
There are some important concepts to introduce to let you understand how periodic costs are calculated. These are centered around whether the transaction has a value or whether the value is derived from elsewhere and where the organizational boundry is for deriving periodic costs.
Cost-Owned Transactions
These transactions have their own cost. Cost-owned transactions include the following:
![]() PO receipt
PO receipt
![]() WIP completion
WIP completion
![]() WIP labor/resource
WIP labor/resource
Cost-Derived Transactions
These transactions do not have their own costs. The average cost for these transactions will be computed. Cost-derived transactions include the following:
![]() Material issues
Material issues
![]() Returns to WIP
Returns to WIP
![]() Returns to vendor
Returns to vendor
Organization Cost Group
This is a group of organizations that share the same set of periodic costs. Transactions will be accumulated across all the member organizations to arrive at average costs.
Periodic Average Cost
Periodic average cost accumulates the value of inventory at the previous periodic average cost and adds it to the sum of all cost-owned transactions. It divides this value by the quantity in inventory at the start of the costing period plus the quantity received in the period. This is the average cost that all cost-derived transactions are valued at for the period.
Periodic Incremental LIFO
Periodic Incremental LIFO costing accumulates the value of all cost-owned transactions and divides it by the quantity received in the period. This is the average cost that all derived transactions are valued at for the period. If there is a quantity left in inventory at the end of the period, a cost layer is created for the period. The following period, the same process takes place. Only if the quantity issued on derived cost transactions exceeds the quantity of owned cost transactions received will prior periods cost layers be consumed. In this manner, the most recent costs are passed to costs of sale and the value of inventory is based on the oldest receipt costs.
Setup for Periodic Costing
There are a number of steps to set up an organization for periodic reporting. There is a separate setup menu for Periodic Costing, under the main Periodic Costing menu.
![]() Set Up Organization Cost Groups Set up an organization cost group and associate it with both a legal entity and an item master organization. To define cost group organizations navigate to the Setup menu underneath the Periodic Costing menu and open the Organization Cost Groups form.
Set Up Organization Cost Groups Set up an organization cost group and associate it with both a legal entity and an item master organization. To define cost group organizations navigate to the Setup menu underneath the Periodic Costing menu and open the Organization Cost Groups form.
![]() Set Up Cost types and Periodic Rates Cost Type This is done from the Cost Types definition form in the Costing Setup menu.
Set Up Cost types and Periodic Rates Cost Type This is done from the Cost Types definition form in the Costing Setup menu.
![]() Associate Cost Types to Legal Entities This is done from the Periodic Cost Setup menu.
Associate Cost Types to Legal Entities This is done from the Periodic Cost Setup menu.
![]() Set the Accounting Options for the Cost Type Association From here you can define whether the cost type should create accounting entries and the set of standard accounting rules it should follow. This is currently limited to U.S. Generally Accepted Accounting Principles (GAAP) and Brazilian Periodic Average Cost. This is done by clicking the Accounting Options button from the Cost Type to Legal Entity Associations form.
Set the Accounting Options for the Cost Type Association From here you can define whether the cost type should create accounting entries and the set of standard accounting rules it should follow. This is currently limited to U.S. Generally Accepted Accounting Principles (GAAP) and Brazilian Periodic Average Cost. This is done by clicking the Accounting Options button from the Cost Type to Legal Entity Associations form.
![]() Associate Accounts with Item Categories within a Legal Entity Cost Group For each costing item category, you can define a set of accounts with the organization cost group. Each organization cost group is defined within a legal entity.
Associate Accounts with Item Categories within a Legal Entity Cost Group For each costing item category, you can define a set of accounts with the organization cost group. Each organization cost group is defined within a legal entity.
Procedures for Periodic Costing
The following are the procedures for using periodic costs in an organization. The collection, the cost processor, and the Create Distributions run for a combination of legal entity, cost type, period, and cost group.
Collecting Costs
To collect costs, navigate to Periodic Acquisition Cost concurrent submission from the Periodic Cost menu. The cost collection engine sums the invoiced value, freight and special charges, and nonrecoverable taxes. The purchase-order price is used where no invoices have been matched to the receipt at period end. You can rerun the collection if invoices are matched at a later time. The received quantities are frozen as at period end.
Calculating Average Costs
To calculate the average cost for the period, submit the Periodic Cost Processor from the Periodic Cost menu. The process can calculate Periodic LIFO and Periodic Average Costs.
Creating Subledger Distributions
Entries are made into the manufacturing subledger if the accounting option Post to G/L is set to Yes. To create accounting entries according for the Organization and Cost Type, navigate to the Periodic Cost Distributions Processor in the Periodic Cost menu. You pass transactions valued at periodic cost by submitting the Transfer Periodic Cost Distributions to G/L concurrent request.
Reporting on Periodic Costs and Valuations
There are a number of reports that allow you to review the costs and valuation of inventory at periodic cost. These are listed here:
![]() Periodic Acquisition Cost Report Shows the acquisition cost of each receipt quantity in the period.
Periodic Acquisition Cost Report Shows the acquisition cost of each receipt quantity in the period.
![]() Periodic Incremental LIFO Valuation Report Shows the LIFO valuation for each item reported in the inventory balance in G/L. It is a very useful report for backing up year-end accounts.
Periodic Incremental LIFO Valuation Report Shows the LIFO valuation for each item reported in the inventory balance in G/L. It is a very useful report for backing up year-end accounts.
![]() Periodic Accrual Reconciliation Report Shows all the receiving transactions that are in the goods received accrual.
Periodic Accrual Reconciliation Report Shows all the receiving transactions that are in the goods received accrual.
![]() Periodic Accrual Write-Off Report Shows all the receipt transactions for which accrual has been written off.
Periodic Accrual Write-Off Report Shows all the receipt transactions for which accrual has been written off.
![]() Periodic Inventory Valuation Report Shows the periodic average cost of each item in inventory.
Periodic Inventory Valuation Report Shows the periodic average cost of each item in inventory.
![]() Periodic WIP Value Report Shows the value of jobs in the organization cost group at the end of the period.
Periodic WIP Value Report Shows the value of jobs in the organization cost group at the end of the period.
![]() Periodic Material and Receiving Distributions Reports Show the periodic cost of the material and receiving transactions both in summary and detail by account, account and item, or item and account.
Periodic Material and Receiving Distributions Reports Show the periodic cost of the material and receiving transactions both in summary and detail by account, account and item, or item and account.
![]() Periodic WIP Distributions Reports Show the periodic cost of WIP transactions, both in summary and detail.
Periodic WIP Distributions Reports Show the periodic cost of WIP transactions, both in summary and detail.
Period Close
Period close establishes closing values for each subinventory, transfers the value of transactions to G/L, and prevents transactions being posted to G/L for a period for which a trial balance has been struck. Costing and General Ledger share the same period definitions. A batch reference is created for the transactions created in the Inventory and WIP systems when they are transferred to General Ledger. This enables drill back from General Ledger to the Manufacturing Subledgers.
When you close a period, transactions will no longer be able to be posted to that period. You should ensure that there are no pending transactions in any of the following interfaces:
![]() Inventory and WIP Transaction
Inventory and WIP Transaction
![]() Cost Management Cost
Cost Management Cost
You should also ensure that all shipped Order Management orders are processed through inventory.
To close a transfer transactions to G/L, navigate to the Accounting Close Cycle menu and submit the Transfer to G/L concurrent submission. To close the period, navigate to the Inventory Accounting Period Close form. An example of this form with the closing values for June 1998 is shown in Figure 18-13.

FIGURE 18-13. Period Close with Subinventory values
When you have completed all the transfers, it is good practice to reconcile the inventory values in G/L with the inventory valuation from the costing system. It would be very good practice to ensure that any manual adjustments that you need to make to inventory balances in G/L do not go through the same accounts as that posted to from the costing system. You can use the summary account capability in G/L to aggregate the account reserved for automatic posting and any accounts used for adjustments. Reports that can be used for reconciliation include
![]() Inventory Value
Inventory Value
![]() Period Close Summary
Period Close Summary
![]() Material Account Distribution Detail
Material Account Distribution Detail
![]() Material Account Distribution Summary
Material Account Distribution Summary
If you are using average costing conventions within an organization, and therefore store all subledger balances in the same set of accounts, you can use the Inventory Subledger Report.
Summary
This chapter covered the organization structures for cost information and the structure of the item costs themselves. It reviewed the attributes in the item definition that influence costing and learned how to efficiently update large volumes of cost data.
This chapter showed you how accounts are assigned to inventory and WIP balances and where variances are charged. It examined the process of creating and editing costs and the many ways of viewing the item cost information. And it reviewed the ways that you can see transaction values flow through the organization.
This chapter examined the main costing methods of standard, average, layer, and periodic and what each cost type is best used for. Standard costing gives the best accountability and control for manufacturing and purchasing but does not reflect changes in purchase prices or manufacturing capability into inventory valuation. Average costing gives an arguably more accurate statement of inventory valuation but less accountability for any margin variation. Periodic costing is a fiscal view of inventory valuation that is mandated in some countries.
Finally, this chapter looked at how to close the period, post the transactions through to General Ledger, and reconcile the results.