
To start developing with Silverlight, you need to set up your development environment with a number of tools that enable you to develop for Silverlight, and install all the related programs and tools that are typically required for a standard business application project. This chapter will walk you through getting your development environment set up so you can start developing for Silverlight. Then we'll take a look at the project templates that are added to your development environment, and finally we'll explore the structure of a typical Silverlight application.
The best place to find all the tools you need to get started with Silverlight is the Microsoft Web Platform Installer 2.0, which you can download from here: www.microsoft.com/web/downloads/platform.aspx. You will find the tools that you require for Silverlight development in the Tools category on the Web Platform tab.
Alternatively, you can visit the Get Started page on the official Silverlight web site, at http://silverlight.net/GetStarted, which has links to the required downloads.
The following subsections give a breakdown of the various tools required (or recommended) for Silverlight development, and what each does.
Note
The following sections give you a starting point for what you should have installed in order to begin developing Silverlight applications; however, these are not all the tools you'll eventually need—additional tools will be introduced as required throughout the book.
Theoretically, you don't need an integrated development environment (IDE) to develop Silverlight applications, but that scenario is only for the most hardcore of developers. Any sane developer will use an IDE, and Visual Studio is arguably the best IDE available. Potential IDEs that support Silverlight development range from free upward, and their functionality and ease of use is generally proportional to the amount they cost (i.e., if you have the latest professional edition of Visual Studio, you will have the most functionality available to you and be far more productive). The Professional edition (or higher) of Visual Studio 2010 is your best option by far as an IDE for Silverlight development, as it has no limitations to constrain you, but there are some free alternatives if you wish to take that path, with the best option currently supporting Silverlight 4 development being Visual Web Developer 2010 Express. However, for the sake of simplicity, any instructions throughout this book will refer to the action to be taken in the professional edition of Visual Studio 2010.
Expression Blend could be described as a designer for XAML user interfaces and animations, although its capabilities have been extended from version 3 onward to include the ability to edit code. You could technically build an entire Silverlight application using Expression Blend only, but it's not designed to be used as such, and Visual Studio is much better suited for this purpose (Expression Blend is designed to be used primarily to target the user interface design).
Expression Blend is targeted toward designers (i.e., user interface, user experience, and graphics designers) as its users (rather than developers), with a focus on helping support and enhance the developer/designer workflow. This book is primarily focused on a developer audience; therefore, we'll spend most of our time in Visual Studio when designing user interfaces. Designing user interfaces is much easier in Visual Studio 2010 than it was in Visual Studio 2008, as Visual Studio 2010 now has a much better user interface designer than was previously available (which was essentially no designer at all). However, it is not as feature rich or powerful as what you'll find in Expression Blend (particularly when it comes to creating animations). If you're serious about creating advanced user interfaces, Expression Blend will be a very useful tool in your arsenal.
SketchFlow is a prototyping tool that you can use in designing your application (mapping out the flow of your screens and their layouts), from which a Silverlight (or WPF) project can automatically be generated. SketchFlow is a part of Expression Blend and targets user experience designers.
Expression Blend is not a free tool—it must be purchased as a standalone product or as a part of Expression Studio. There is a 60-day trial available from the Microsoft web site if you want to trial the tools before committing your hard-earned money. SketchFlow is bundled as a feature of Expression Blend. Expression Design (also a part of Expression Studio) can also be a useful tool to have (as a vector drawing program) as well, but neither tool is essential for Silverlight development.
Note
Both Visual Studio and Expression Studio are included in the MSDN Premium and the Expression Professional subscriptions (the Expression Professional subscription is a new type of MSDN subscription specifically targeting designers and web developers), which you may find to be the most cost-effective means of obtaining these tools. These subscriptions also include licenses for Office, Windows, and various other Microsoft software products, and are great value for your money. Startup software businesses less than three years old can take advantage of the Microsoft BizSpark program that provides you an MSDN subscription (with all these tools) and numerous other benefits for $100 when you leave the program—a fantastic way to get the tools for no initial investment. Details and eligibility requirements can be found at www.microsoft.com/bizspark.
Visual Studio 2010 comes with support for Silverlight 3 out of the box, but you will need to install Silverlight 4 Tools in order to develop Silverlight 4 applications. The Silverlight 4 Tools download includes the Silverlight 4 SDK, the Silverlight 4 developer runtime, WCF RIA Services, and support for Silverlight 4 in Visual Studio. Once these tools are installed, you will find new project templates available in Visual Studio for creating Silverlight applications.
WCF RIA Services provides a prescriptive pattern and framework for creating end-to-end Silverlight applications. The WCF RIA Services code generator "projects" your business object model on the server onto your Silverlight application along with shared business logic, and it provides the infrastructure that enables methods on the server to be called by your Silverlight application. We'll take a thorough look at WCF RIA Services in Chapter 5. This is now included as a part of the Silverlight 4 Tools installer, but there is an associated toolkit that you can install with additional features (most of which are still under development) if you wish.
The Silverlight Toolkit is a free and open source project hosted on CodePlex, developed and maintained by Microsoft. This is an ongoing project with regular releases that adds greatly to the available controls that you can use in your Silverlight project. The Silverlight 4 SDK only contains basic user interface controls (TextBox, Button, Canvas, Grid, etc.), so the Silverlight Toolkit provides a raft of more advanced controls, such as TreeView, Calendar, and Charting, among many others.
Blacklight is a similar open source project hosted on CodePlex, but unlike the Silverlight Toolkit it is a community-run project and does not attempt to overlap with the controls available in the Silverlight Toolkit. It's not listed on the Silverlight.net Get Started page, but you can get it from here: www.codeplex.com/blacklight.
Business applications (as described in Chapter 1) are data-centric applications—hence they (almost always) interact with some sort of database. You have unlimited options of databases to choose from—the database you choose has no bearing on your Silverlight application, as Silverlight applications can't read or write to a remote database directly—you need to provide a set of services to expose the data from the server to client applications. As long as you can communicate with the database in a standard .NET application, you can provide a way to allow your Silverlight application to communicate with it. For the purposes of this book, we'll be using SQL Server 2008 Express Edition as our database of choice, since it's free and reasonably full featured. In most business settings you would probably want to use the full SQL Server 2008 product, with which the code provided will work without any changes. Earlier versions of SQL Server would be acceptable too. You can download SQL Server 2008 Express Edition from www.microsoft.com/express/sql/download. Ensure (at a minimum) that you choose the Runtime with Management Tools option.
This is not a mandatory tool to obtain, but it's certainly recommended, as it is extremely handy when debugging your Silverlight application. Silverlight Spy, created by Koen Zwikstra of First Floor Software, allows you to inspect the internals of a Silverlight application (including its file structure, XAML visual tree, and styles), monitor its memory and processor usage, and monitor its network connector (among many other features). It also integrates with .NET Reflector (a free tool from Red Gate Software) to decompile the assemblies within the XAP file and view their code. From a debugging perspective it's an invaluable tool. Early versions of Silverlight Spy were free, but with its version 3 release it became a commercial product with a price attached. You can download Silverlight Spy from http://silverlightspy.com/silverlightspy and .NET Reflector from www.red-gate.com/products/reflector.
Once you have your development environment configured, you can begin creating your first Silverlight project. Open the New Project window in Visual Studio and take a look at the new Silverlight project templates by clicking the Silverlight folder (shown in Figure 2-1).

You will find six project templates in the Silverlight folder. Let's have a look at when and how you would use each of them.
This is a basic project template for Silverlight projects, which will simply include a single page to start with. Back in Silverlight 2, this was the only project template available to create a Silverlight application, and it didn't provide much to get started with (it was somewhat a blank slate). This might be useful for creating widgets, games, banners, advertisements, and video players, for example—when initial project infrastructure isn't particularly required. For business applications, on the other hand, you will find the Silverlight Navigation Application or Silverlight Business Application project templates a much better starting point.
When you create a project using this template, it will display a window allowing you to create a corresponding web application or web site to host your Silverlight project, and select a version of Silverlight for you application to target (as shown in Figure 2-2).

Technically, you can create a Silverlight application as a standalone project (when you run it, an HTML page will be automatically generated to host it, and it will run in the browser with a local file URL); however, there is little reason to do this, and you will have limited capabilities if you choose to do so. Whenever you create a Silverlight project, you will want to host your Silverlight application in a web application/site, and the web project will be set as the default project in your solution.
Silverlight 3 introduced a navigation framework that essentially provides an application framework for Silverlight applications. This project template implements the navigation framework and provides a good starting point for using it. We'll take a look at the features of the navigation framework in Chapter 4; however, this project template is ideal when you are creating an application (as opposed to a widget).
The Silverlight Business Application template is similar to the Silverlight Navigation Application template, but with a number of additional features. It automatically assumes you want a web application project, and links the Silverlight project and the web application project with WCF RIA Services. It includes login/registration screens and some built-in authentication functionality. In addition, all strings are stored in resource files so that the application can be easily localized and support different languages. This will be the template we will be basing our application upon.
Note
If you don't see the Silverlight Business Application project template in the New Project dialog, ensure that you have selected version 4 of the .NET Framework in the framework selection drop-down.
A Silverlight Class Library project is essentially the same as a standard class library project, but is marked for use in Silverlight projects (since Silverlight targets its own version of the .NET Framework). You would use this project template if you were creating a custom control library, reusable code library, or business logic library, for example. Because libraries cannot be run on their own, you won't be asked whether to create a web project to host it.
Note
It is worth noting that Silverlight projects cannot reference assemblies created targeting the full .NET Framework. However, projects targeting the full .NET Framework can reference Silverlight assemblies. Therefore, if you need to share a class library assembly between both types of projects, you are best off creating a Silverlight class library. Alternatively, you could create two projects (one for each project type) and link the files between them—a technique that may be useful if you have additional functionality that you want to add to the class library targeting the full .NET Framework not supported by Silverlight.
The default scenario for WCF RIA Services is that you create your business objects to share between the server and the client within your web project, and these will be replicated within your Silverlight project. However, this scenario doesn't create an ideal separate "middle tier" where your business objects are contained within a separate assembly and are reusable between applications. This is where the WCF RIA Services Class Library project template comes in. When you use this template, it creates not one but two separate projects (one for the server and the other for the client) that are linked. Also, the automatic business object replication is done between these two projects rather than your Silverlight and web projects, providing much more flexibility and enabling a much better structure for your solution. This will be discussed further in Chapter 5.
Create a new project using the Silverlight Business Application template, and compile/run it as soon as it's generated without making any changes to it. As you can see from Figure 2-3, you get a reasonable starting point for your application.
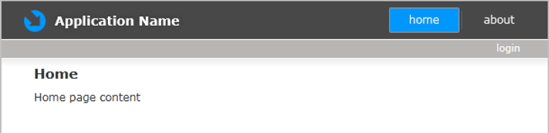
The project template has created a basic application with a Home page, an About page, a Login window, and a Register window. There's also an Error window that's displayed if something goes wrong. It is a very basic application, but a fantastic point to get started building your own application, as it provides some basic functionality that you can easily modify and work from.
When you click the About button, the Home page is unloaded from the content area of the application, and the About page is displayed in its place. Clicking the Back button will navigate back through the pages you've just viewed. When you navigate between pages, the title of the page (displayed in the browser's title bar) will change, and the URL in the address bar will change accordingly. If you try copying the URL from the address bar, navigating to a different page, and then pasting the other URL in the address bar and pressing Enter, you'll see that the application navigates back to that previous page. This is a concept called deep linking, and is part of the navigation framework. We'll take a thorough look through how the navigation framework works in Chapter 4.
When you click the Login button, a modal window will pop up for you to provide your login credentials (as shown in Figure 2-4). This window can be moved around the screen, and a dark semitransparent overlay will be added to your application to direct the user's focus toward this window (and stop mouse clicks from getting to the controls on the underlying page).

Clicking the Register Now button in this window will display a window allowing you to register as a new user (shown in Figure 2-5). This is an example of the DataForm control in action, which is very useful for creating forms for data entry in Silverlight that include data validation. If you put your mouse cursor over the little information symbol next to the password box, a tooltip will appear providing information about the type of validation that is applied to that field. Try entering a password that doesn't conform to the rules or entering an invalid e-mail address. See how the field validates the data entered and notifies you if the validation fails. A nonconforming password entered in the Password field will turn the label for that field red, while an invalid e-mail address entered into the Email field will turn its label red and also put a red border (with a red triangle at the top right) around the text box. If you put your mouse over the red triangle or move the focus to the field, a tooltip will appear indicating what validation rule was broken.

Register yourself as a user. When you do so, the application will create a SQL Server database with the ASP.NET membership tables, views, and so on, and attach to it as a user instance. You'll find the database file in the App_Data folder in the web application project (you may need to click Show All Files to see it, as it may not have been added to the project). In Chapter 8, we'll set it up to use the AdventureWorks database to store data in. While it's creating the user on the server, a little window will pop up (as shown in Figure 2-6) with an animation to show that the application is doing something (a type of wait indicator). This is an example of the BusyIndicator control, which lets you know that something is happening and you need to wait for it to complete.

Once the new user has been created, the user interface of the application changes to hide the Login button and show a Logout button instead, along with a welcome message displaying the friendly name of the logged-in user (e.g., "Welcome Chris Anderson").
So in summary, the default project template provides us with a business application–like user interface framework (with styling), some sample pages, and some security functionality. As you can see, this is pretty solid base on which to build your business application in Silverlight.
Note
By default, the process of debugging the web project will use the Visual Studio Development Server (code named Cassini) to act as a host for the web site, but you can change this to run under IIS if you so desire by opening the Web tab in the project properties and changing the settings as required.
Going back to our solution structure in Visual Studio, let's now see what it took to get this amount of application functionality and learn our way around a Silverlight project. Figure 2-7 shows the structure of the default solution in the Solution Explorer window created from the Silverlight Business Application project template.

As you can see, the project template has created a sizeable solution structure with a Silverlight project and a Web Application project. Note that the web project is the startup project in the solution—not the Silverlight application (this was touched on earlier). The web page hosting our application is downloaded to the client, which then downloads and runs the Silverlight application itself. The Silverlight project is linked to the web project in the solution to support this process. Because the client needs to download the application from the web site, the compiled application must be available for download from an accessible location within it. By default this location is the ClientBin folder. If you expand this folder (after the solution has been compiled for the first time), you'll find the Silverlight application (a XAP file). XAP files are discussed later in this chapter.
A link is required between Silverlight and the web projects in order for the compiled Silverlight project to be copied to the ClientBin folder in the web application project. This link is already set up when the solution is created from any of the Silverlight Application project templates, but if you open the properties for the web application project and look at the Silverlight tab (shown in Figure 2-8), you can see how this has been configured.

As you can see, the web project can be linked to multiple Silverlight projects if required, and this link will mean that whenever either the Silverlight project or the web project is compiled, the XAP file will be copied from the active configuration of the Silverlight project (i.e., Debug or Release) into the ClientBin folder. You can change the folder that each linked Silverlight project is copied to here if so desired, and you can also copy the XAP file to configuration-specific folders under this folder (e.g., ClientBinDebug and ClientBinRelease).
RIA Services generates code in the Silverlight project in order to enable you to communicate with the services defined in the web application project. If you click the Show All Files button for the Silverlight project in Solution Explorer, you will see a hidden folder called Generated_Code that will contain all the code that WCF RIA Services automatically generates to communicate with the services defined in your web project (as demonstrated in Figure 2-9).

Figure 2.9. The Generated_Code hidden folder
In order for the code generator to know which project to generate the code into, another link is required between the Silverlight project and the web application project (but in the reverse direction). Open up the properties for your Silverlight project and take a look at the Silverlight tab (shown in Figure 2-10).

At the bottom is the WCF RIA Services link field and a drop-down box to select the project to generate corresponding WCF RIA Services client-side code from; this defaults to the web project in the solution. When services are defined in the linked project, corresponding code will be generated in the Silverlight project to interface with them. Again, this will all be described further in Chapter 5.
Note
Never modify any of the generated classes, as these changes will be overwritten the next time the project is compiled.
There are also some linked resource files between the web application project and the Silverlight project. This enables the resource files (which are used to store localized strings such as validation error messages) to be maintained in one location and shared between the two projects.
The web project structure includes the following files (substitute ApplicationName with the name of your application):
ApplicationNameTestPage.aspxApplicationNameTestPage.html
These two pages can be used to host your Silverlight application (the user navigates to the page that downloads and hosts the Silverlight content), but both serve the same purpose—there's little difference (in terms of results) between the two. For now, we'll just use the HTML page and delete or ignore the ASPX page (see the "Recommended Project Template Modifications" section later in this chapter).
The Models folder (shown in Figure 2-11) contains a couple of files containing data transfer object (DTO) classes (User and RegistrationData) that will be used to pass data between the server and the client. The Shared subfolder in the Models folder contains a file (User.shared.cs) containing code to be shared between the server and the client (for which WCF RIA Services will generate corresponding code in the Silverlight project). Sharing code in this manner will be discussed in Chapter 5.

The Resources folder (shown in Figure 2-12) contains resource files (RegistrationDataResources.resx and ValidationErrorResources.resx) that are used to define strings used for localizing the application. As described earlier, these files are defined in this project and shared with the Silverlight project as linked files.

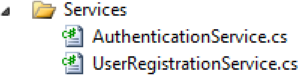
The Services folder (shown in Figure 2-13) contains files for two domain service classes (AuthenticationService and UserRegistrationService) that are used to implement the server-side security functions for the application. These classes expose data and operations to the client using the WCF RIA Services framework. Again, this will be discussed further in Chapter 5.
The GlobalSuppressions.cs file is a project suppression file used to define the messages that should be suppressed when using the Code Analysis feature of Visual Studio and should not appear in the violation list. The easy way to add violations to this file is to right-click the message in the Error List window, select the Suppress Message(s) menu item, and select the In Project Suppression File item from its submenu. Note that the Silverlight project also contains a GlobalSuppressions.cs file.
The Silverlight.js file contains various JavaScript functions to help install the Silverlight runtime (if it isn't installed), and help instantiate a Silverlight object in an HTML or ASPX page. Because this file has been "minified" to reduce its size when downloading, it is more or less unreadable, but in any case you should have no reason to modify it and should leave it as is. If you do want to read and/or modify it, you can format it to be more readable using an online tool such as the JavaScript Beautifier (http://jsbeautifier.org).
Let's move on to the structure of the Silverlight application. You'll notice that most of the files are actually XAML files—many of which have a corresponding code-behind file (having a .xaml.cs extension). XAML files are XML-based files that are defined as "markup files for declarative application programming." In simpler terms, one of XAML's primary functions is to define the structure and appearance of your application's user interface. I'll cover XAML in depth in Chapter 3. In the root of the application there are two XAML files: App.xaml and MainPage.xaml. These are two very core files in a Silverlight project, and each has a vastly different purpose.
App.xaml can contain the resources (such as styles) available globally in your application (in the XAML file), and handles application-wide events (in the App.xaml.cs code-behind file). The App class inherits from Application, and is set as the startup object for the application—you could say this class effectively represents the application itself. There is a Startup event (and an Application_Startup event handler already defined) on the App class that is raised when the application starts; this class allows you to initialize things such as global variables if necessary.
The Application_Startup event handler calls the InitializeRootVisual method, which configures the root node of the Silverlight application's visual tree (which will be discussed in Chapter 3, but in summary represents the hierarchy of objects forming the user interface). When you inspect this method, you will find that it assigns the BusyIndicator control to be the root node (resulting in its always remaining in the visual tree), and sets the control to disable its content while it's active. However, its content is assigned a new instance of the MainPage object, which really forms the basis of our user interface. The MainPage object is defined in MainPage.xaml, and could be considered the "master page" for the application into which "content pages" (aka views) are loaded.
Looking at the content of the MainPage.xaml file, you will find a Frame control that will host the views and the surroundings to this content area (such as the application header and menu). Because this page has been designed to be highly configurable through theme files, its XAML may appear to be a bit disorganized, but disregard that for now. The views to be displayed within the Frame control are located within the Views folder (shown in Figure 2-14)—with the sample views Home.xaml and About.xaml already defined for you.

In the Views folder you will also find the ErrorWindow.xaml file, which inherits from the ChildWindow class (to provide modal pop-up window behavior) and can be used to display any errors that occur to the user. For an example of using this class, take a look at the Application_UnhandledExceptions event handler in the App class, which uses it to display any error messages in the application that have not been caught by a try...catch block. The Login subfolder of the Views folder contains a number of controls relating to the user login and registration functionality already implemented in the application by the project template.
The Assets folder (shown in Figure 2-15) contains a number of files containing project assets (i.e., resources and dictionaries). The Styles.xaml file in the Assets folder is a resource dictionary containing the styles for the application theme (i.e., defining the visual appearance of the application). This resource dictionary is merged into App.xaml, making the styles available globally in the application. You could consider this file to be similar in concept to a Cascading Style Sheets (CSS) file in ASP.NET projects (or any HTML web site). A number of alternative application themes are available for download that you can drop into your project (overwriting the current Styles.xaml file) to instantly transform the visual appearance of the application. Customizing the application styles is detailed in Chapter 9. The Assets folder also has a Resources subfolder containing resource files used to define various strings used throughout the application (for localization purposes).

The Controls folder (shown in Figure 2-16) contains a class named CustomDataForm. This class, which inherits from the DataForm control (which will be discussed in Chapter 7), changes at runtime the TextBox control to a PasswordBox control for password fields, and exposes a collection publicly from the control of the fields that have been generated. It also includes the source for the BusyIndicator custom control (the BusyIndicator.xaml, BusyIndicator.cs, and VisualStates.cs files), which is used to indicate to the user that something is happening behind the scenes.

The Helpers folder (shown in Figure 2-17) contains a number of Extension classes and Value Converter classes that are used throughout the default project and may be useful when you start adding your own functionality.

The Libs folder (shown in Figure 2-18) contains a DLL that is referenced by the project, but is not a part of the official Silverlight assemblies. System.Windows.Controls.Data.DataForm.Toolkit.dll is an assembly from the Silverlight Toolkit that provides the DataForm control (as was demonstrated in Figure 2-5).
The Models folder (shown in Figure 2-19) contains three files: LoginInfo.cs, RegistrationDataExtensions.cs, and UserExtensions.cs. The latter two classes extend the partial classes generated by the WCF RIA Services code generator (adding additional client-side functionality and properties), while the LoginInfo.cs file contains the LoginInfo class that the DataForm control in the login window can bind to (particularly to add metadata to the properties, dictating how the corresponding data entry fields will be displayed in the form).

The Web folder contains no files, but does have a subfolder called Resources (shown in Figure 2-20), which links to the two resource files defined in the web application project, enabling the localization strings contained within them to be maintained in one location but used by both projects.

As you've seen, you get quite a reasonable starting point for a business application in Silverlight, but there are a few additional changes you are likely to want to make to the default template before you get started developing.
As described previously, the following files can be found in the web application project in your solution:
ApplicationNameTestPage.aspxApplicationNameTestPage.html
These two pages do much the same thing—there's little difference (in terms of results) between the two, so you only really need one of them. ASPX pages need to be processed on the server by ASP.NET, so unless you want to do some processing in the code-behind of the page (such as checking security credentials), you can simply use the HTML page instead. You can then delete the one you don't need. On the remaining page, right-click its entry in Solution Explorer and select Set as Start Page from the context menu to ensure it is automatically loaded in the browser when the project is run.
When you run the Silverlight project, you might expect that the Silverlight application would have the focus, but actually it's the web page that has the focus. Therefore, if the starting page in your application has a text box with the focus explicitly set to it when the page is loaded, you will see some strange behavior. The text box may not have focus automatically, or it might have focus but not show the blinking caret. We can resolve this issue by adding a little bit of JavaScript code to the web page.
Open the HTML page to inspect its contents (in Source view). There are some styles defined for the page, a linked JavaScript file containing support functions for installing Silverlight and creating the Silverlight object, a JavaScript function that is called when an unhandled error occurs in the Silverlight application, an object tag to host the Silverlight application, and an IFrame that is used as a part of the navigation framework to handle the browser history functionality. Add the following code directly below the onSilverlightError JavaScript function at the top of the page:
function appLoad(sender, args)
{
    var xamlObject = document.getElementById('silverlightControl'),

    if (xamlObject != null)
        xamlObject.focus();
}
Add this property to the Silverlight object tag:
id="silverlightControl"
And add the following line to the properties of the Silverlight object:
<param name="onLoad" value="appLoad" />
Run the project again and you will find that the text box now correctly has the focus. You can see the caret blinking, and typing (without clicking the application first) will populate the text box with the typed characters.
Note
If the change doesn't seem to have worked, try refreshing the page using Ctrl+F5, as the page may have been cached and not updated with the changes made.
At this stage, you might want to also add the following property to the Silverlight object:
<param name="Windowless" value="True" />
The purpose of this will be discussed in Chapter 14, where it is necessary in order to overlay the application with an IFrame to display reports within. There are performance impacts to setting this property to True, but as most business applications aren't graphicly intensive, this should not cause an issue. You are now ready to start working on your Silverlight project.
In the Silverlight project, open up the ApplicationStrings.resx file (under the AssetsResources folder). Find the ApplicationName resource and change its value to the name of your application. This name will appear in the header of the application when you run it.
When you compile a Silverlight project, it is all combined into a single file with a .xap extension. This file contains the assemblies, XAML files, and any other resource or content files associated with the project, which are bundled and compressed using the ZIP file format. This XAP file can then be hosted on a web server to be downloaded by client computers, and the application can then be run. You can prove this by simply changing the file extension from .xap to .zip and unzipping the file to inspect its contents.
Note
Some compression utilities (such as 7-Zip) add items to the context menu in Windows Explorer, which you can use to open the archive without needing to change the XAP file's extension. Alternatively, you can associate the .xap file extension with a compression utility such that you can simply double-click it to inspect its contents.
The easiest (and most feature-rich) way to inspect a XAP file, however, is to simply load it into Silverlight Spy (as shown in Figure 2-21) and inspect it that way.

Now you're set up and ready to start developing Silverlight applications. You should now understand how a Silverlight solution is structured, what features have already been implemented in the solution to get you started, and how the Silverlight and web projects are connected. In the next chapter, we'll take a look at the features and syntax of XAML, and how it helps you design and build a user interface for your application.