
Although Silverlight started as a sandboxed platform that only ran within a web browser window, it's grown to become a mature platform for building applications- that inevitably required a certain level of integration and interaction with the host operating system.
With the introduction of Silverlight 3, you gained the ability to run Silverlight applications outside the browser in its own window, launching it from an icon on the desktop or the start menu, and using it in much the same way as a standard (native) application. Now with Silverlight 4 you can also request elevated trust permissions to gain direct access to the file system and COM. This permits your applications to have a closer relationship with the host operating system, enabling a whole range of new capabilities and possibilities for your applications. You can take advantage of these new features to build more powerful and functional applications in Silverlight.
Let's take a look at how you can configure your application to run outside the browser, and interact with the host operating system much like standard (native) applications do.
Initially, Silverlight was designed to run inside a browser window, either as a "widget" on a web page, or filling the whole browser window as an application. However, Silverlight 3 introduced a major new feature that enabled Silverlight applications to be "installed" locally on the user's machine. Installing the application involves placing the .xap file in a permanent location within the user's profile (ie. outside of the user's browser cache), and creating shortcuts on the user's desktop and/or start menu to enable them to run it. When the user clicks/double-clicks on the shortcut, the application will open in its own window as if it were a standard/native application. This is known as Out Of Browser (OOB) mode, and we'll be referring to it throughout this chapter as such.
As the application is being "installed" within the user's profile, there is no need for the user who wants to install it to have administrative privileges, which simplifies the deployment of your application. Additional features (such as "toast" notifications) are enabled by running the application in OOB mode, and when the application is running in OOB mode you can request elevated trust permissions-opening up an even wider range of possibilities and features (discussed later in this chapter).
One of the biggest benefits however is that this feature works cross platform-specifically working on both Windows and OSX, making Silverlight now a great way of building cross-platform applications.
By default, your application is not configured for it to be installable and run in OOB mode. You need to explicitly turn this feature on, via the project's properties. Start by selecting the "Enable running application out of the browser" check box (as demonstrated in Figure 14-1).

You will now be able to click on the Out-of-Browser button below the check box, which will open up the window shown in Figure 14-2.
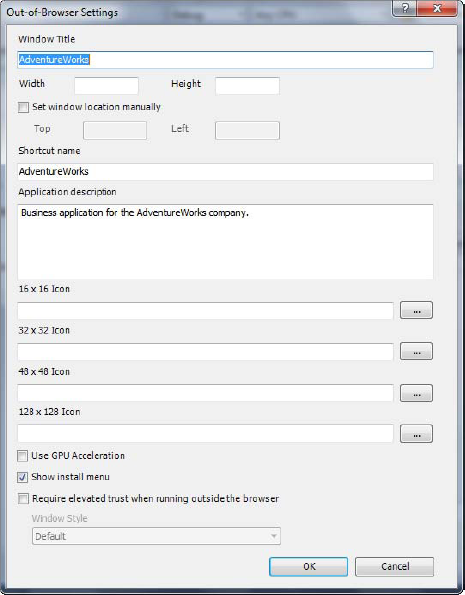
This dialog provides you with a variety of options that apply when the application is running in OOB mode. Despite being a mass of options, they can be broken up into three primary areas-window options, install options, and other miscellaneous options.
The window options enable you to specify the text that should appear in the title bar of the OOB window, and the window's initial width and height (it will default to 800×600 without these options set, and will be resizable unless you turn off the default window chrome by using custom chrome). By default, the application will center itself in the screen, but by selecting the "Set window location manually" check box you can specify exactly where on the screen you want your application to appear.
The install options enable you to specify the name of the shortcut that will be created on the user's desktop and/or start menu, a description of the application (that will appear in the tooltip on the application's shortcuts), and a number of icons of varying sizes. These icons will be used for the application's shortcuts, and will also be displayed in the install dialog, the title bar of the window, and as the taskbar/dockbar icon. If no image files are assigned to these settings, default Silverlight icons will be used instead.
Note
These icons should be assigned image files, not .ico files (as .ico is an image format specific to Windows). The Silverlight runtime will automatically create icons native to the host operating system from the image files as required.
The various other miscellaneous options include enabling GPU acceleration for cached compositions, whether an install option should appear in the context menu when the user right-clicks on the application, whether the application requires elevated trust when running outside the browser, and whether the application should use custom chrome (via the "Window style" option).
There are two ways that the user can install your application. One is by simply right-clicking anywhere in the application, and selecting the "Install XXX application on this computer..." option from the context menu (assuming this menu is enabled in the Out-of-Browser Settings dialog, which it is by default when the application is configured to be able to be installed and run outside the browser), as shown in Figure 14-3.

Note
This context menu will not be displayed for areas in the Silverlight application that handles the MouseRightButtonDown event (by setting the e.Handled property to true in the event handler), and implements a custom behavior for this action. It will also not be shown on elements that use the ContextMenuService (from the Silverlight Toolkit) to display a custom context menu.
Alternatively, you can provide your own friendlier install option within your application. Installing the application is as easy as using the following line of code somewhere in your application:
Application.Current.Install();
Note
You will need to add a using directive to the System.Windows namespace at the top of your file (as the Application class exists under that namespace).
As soon as the application is installed, it will automatically open and start running outside the browser.
Note
If the application is already installed and you attempt to call this method, an exception will be raised. Therefore you should always check whether the application is installed first before calling this method. How to do this will be covered in the next section.
One thing you need to note is that for the purposes of security, a call to the Install method must be in response to a user initiated event. In other words, you can only call this method in an event raised by some sort of user input (such as the Click event of a button for example). Attempting to call the Install method in a non-user input initiated event (such as the Loaded event of a control), will simply be ignored.
Note
You can also create a desktop installer and install the application that way too. This will be discussed in Chapter 15: Application Deployment.
Once the user has initiated the install action, the install dialog (shown in Figure 14-4) will appear, requiring the user to confirm the installation, and specify what icons they want created.

Note
If an icon was specified in the Out-of-Browser Settings dialog, it will be displayed in the dialog in place of the generic Silverlight application icon (with the generic icon displayed in Figure 14-4).
A different dialog will be displayed when elevated trust permissions are being requested. This dialog will be discussed later in this chapter.
You can determine whether or not the application is already installed by interrogating the InstallState property of the Application.Current object. This property returns an enumeration, with the following values:
NotInstalledInstalledInstallingInstallFailed
For example, the following code can be used to determine whether or not the application is installed:
bool isInstalled = (Application.Current.InstallState == InstallState.Installed);
You can determine when the installation status of the application changes by handling the InstallStateChanged event of the Application.Current object. Start by adding an event handler for the event:
Application.Current.InstallStateChanged += Application_InstallStateChanged;
and then implementing the event handler, like so:
private void Application_InstallStateChanged(object sender, EventArgs e)
{
    // Handle the state change as required here
}
Within this event handler you can interrogate the InstallState property of the Application.Current object in order to determine the new installation status of the application.
You can determine whether the application is running inside or outside the browser by interrogating the IsRunningOutOfBrowser property of the Application.Current object. For example:
bool isRunningOutOfBrowser = Application.Current.IsRunningOutOfBrowser;
If your application isn't designed to run inside the browser (such as if it requires elevated trust permissions) then you should use this property to detect whether the application is running inside the browser when it starts, and if so, send the user to a view where they can install the application.
Note
Unfortunately there is no way to launch the application in OOB mode from within the browser if it's already installed. Therefore, you will need to ask the user to do so manually if this is necessary.
When a Silverlight application is installed, a folder is created inside the user's profile folders to store it in permanently (outside of the browser's cache). This path will differ between operating systems, but on Windows Vista/7 you can view the installed Silverlight applications by typing the following path into the Windows Explorer address bar: %userprofile%AppDataLocalLowMicrosoftSilverlightOutOfBrowser. Each installed application has its own folder under this, containing the .xap file for that application, along with a number of associated files-such as a HTML page to host it, an icon, and some metadata files.
The sllauncher.exe executable is used to host the Silverlight application when it is running in OOB mode. It is passed the ID of an application to launch, like so:
sllauncher.exe appid
The application ID will match the name of the folder in the OOB store for that application. For example, the following command line demonstrates an example shortcut path to launch the application:
"C:Program FilesMicrosoft Silverlightsllauncher.exe" 1990526816.localhost
When running in OOB mode, you can get a reference to the application's main window like so:
Window window = Application.Current.MainWindow;
This window object provides you with a number of properties, methods, and events that enable you to interact with and manipulate it.
Note
Many of these properties and methods are needed particularly when you have turned on custom chrome. Custom chrome is discussed in detail later in the chapter.
Using the reference to the window, you can close it using its Close method:
Application.Current.MainWindow.Close();
You can detect when the window is being closed, and cancel it by handling its Closing event. Start by adding an event handler to the event:
Application.Current.MainWindow.Closing += MainWindow_Closing;
And then you can handle it (and cancel the window being closed) like so:
private void MainWindow_Closing(object sender, ClosingEventArgs e)
{
    if (e.IsCancelable)
    {
        MessageBoxResult result = MessageBox.Show("Are you sure you wish to quit?",
                                    "AdventureWorks", MessageBoxButton.OKCancel);
        e.Cancel = (result != MessageBoxResult.OK);
    }
}You can use the WindowState property of the window to maximize it, minimize it, or return it to normal. It accepts/returns an enumeration of type WindowState, which has the following possible values: Maximized, Minimized, and Normal. For example:
Application.Current.MainWindow.WindowState = WindowState.Maximized;
You can set the size of the window using its Width and Height properties:
Application.Current.MainWindow.Width = 600;
Application.Current.MainWindow.Height = 800;
You can set the position of the window using its Top and Left properties. However, at runtime you can only set these properties if the "Set window location manually" check box was selected in the Out-Of-Browser Settings window (shown in Figure 14-2), and they must be set before the end of the application's Startup event (after this, any changes to their values will be ignored).
You can set the window to be a topmost window (where it always appears on top of other windows regardless of whether or not it has the focus) by setting it's TopMost property to true. For example:
Application.Current.MainWindow.TopMost = true;
You can determine whether a window is active by interrogating its IsActive property, and you can activate it (i.e. bring it to the forefront of the various open windows and give it the focus) using its Activate method. For example:
Application.Current.MainWindow.Activate();
Note
You do not have access to the HTML DOM using the HtmlPage object when running outside the browser as you do when running inside the browser.
One of the issues with running in OOB mode is that you are no longer requesting the application from the server. Normally, when you browse to a Silverlight application (within a web browser), the browser will check if it has previously downloaded the .xap file (by checking for it in its cache). If it doesn't find it, then it will automatically download the .xap file from the server. If it does find it, will check with the server as to whether the cached version matches the version on the server (in other words it will check to see if it has the latest version already). If it does, then it will just use the cached version (saving the need to download it again). Otherwise it will download the new version (overwriting the now out of date cached version) before running it.
Note
You can see this behavior using the free Fiddler tool, which you can download from here: www.fiddler2.com.
However, when you are running in OOB mode, the .xap file is simply loaded from its installation location on disk, meaning that it will not be updated as new versions become available on the server. Therefore, a strategy needs to be implemented in order to ensure that the installed application is kept up to date. Luckily, Silverlight has some functionality built-in to help you do that.
You can check whether an update is available using the following line of code:
Application.Current.CheckAndDownloadUpdateAsync();
With this method call, the application will go back to the URL that it originated from and see whether an update is available. If an update is found, it will be automatically downloaded, and it will be installed just prior to when the application is next run. This action is performed asynchronously, and thus does not have a return value.
You can determine whether or not an update was found by handling the CheckAndDownloadUpdateCompleted event. Start by adding an event handler to the event:
Application.Current.CheckAndDownloadUpdateCompleted +=
    Application_CheckAndDownloadUpdateCompleted;
And then you can handle the event, like so:
private void Application_CheckAndDownloadUpdateCompleted(object sender,
                                        CheckAndDownloadUpdateCompletedEventArgs e)
{
    if (e.UpdateAvailable)
    {
        // Logic can go here
    }
}
Note
You can check if an error occurred when checking for an update by interrogating the Error property of the CheckAndDownloadUpdateCompletedEventArgs object passed into the event handler as a parameter.
If an update is found, it won't be installed until the application is next restarted. It's your decision as to whether to force the user to restart the application (perhaps by closing the window, as previously demonstrated), or allow them to continue working with the existing version.
You may choose to automatically perform a check for updates each time the application is started, or alternatively you can simply provide a "feature" that enables the user to check for updates at their leisure.
Note
When running the application in OOB mode with elevated trust (as described later in this chapter), the application will only automatically update itself if the application is signed. You won't see this behavior when the source of the update is localhost, as updates are permitted in this scenario for development purposes. However, once you deploy the application to production, it must be signed in order to be able to update itself. Application signing will be covered in Chapter 15: Application Deployment.
When you run your Silverlight project in debugging mode in Visual Studio, the application is run within a browser window. However, at times you want to debug your application while it is running in OOB mode. This is especially important when you want to debug features that require elevated trust-something that you can't do when the application is running inside the browser.
You can have the application launch in OOB mode from Visual Studio by:
Enabling OOB support for your Silverlight application (if it's not already set)
Setting the Silverlight project as the startup project for the solution (instead of the web project).
The Silverlight application will start in OOB mode with the debugger attached, enabling you to debug the application as required.
Note
Without OOB support configured for the application, simply setting the Silverlight project as the startup project will run it within the browser instead (using a file path). If you find that this is the case, and that the application is still running within the browser, check to ensure that you've configured to application to be able to be run in OOB mode.
You can also attach the Visual Studio debugger to an already running instance of the application running in OOB mode, and debug it in that manner. In Visual Studio, start by going to Tools
When you no longer want a Silverlight application installed on your machine, you can remove it in one of two ways. The first is by simply right-clicking anywhere within the application's window, and select "Remove this application" from the context menu. The other method is to use the operating system's uninstall application tool (such as Windows Vista/7's Programs and Features tool). The application will appear as an entry in that tool, and you will be able to uninstall it as you would any other application.
Note
There is no ability to uninstall the application through code.
A new feature that came to Silverlight 4 is the ability to display "toast" notifications. These are the little windows that pop up for a couple of seconds (usually in the bottom right-hand corner of your screen) to notify you of something that has happened in the application.
For example, Microsoft Outlook displays a toast notification when a new email is received, and TweetDeck (a popular Twitter client) displays a toast notification when a new tweet appears in your Twitter feed.
With this feature in Silverlight 4, you can implement the same sort of notification in your Silverlight applications. For example, you might like to display a notification when an order is placed in the system, or when a product is getting low in stock. An example of a simple notification window is shown in Figure 14-5.

Note
This feature only works when the application is running in OOB mode.
To display a toast notification, you create an instance of the NotificationWindow class, and assign it some content. Unfortunately, you cannot create a XAML file that inherits from the NotificationWindow class as it is sealed. You can however create a user control, and assign an instance of that to the NotificationWindow class's Content property, which is the strategy we will be demonstrating here. Before we do however, let's start by simply displaying an empty notification. To do so, you simply create a new instance of the NotificationWindow class, set the size of the toast notification window (it has a maximum width of 400 pixels, and a maximum height of 100 pixels), and then call its Show method (passing it the amount of time in milliseconds to display the notification), like so:
NotificationWindow toastWindow = new NotificationWindow();
toastWindow.Width = 280;
toastWindow.Height = 100;
toastWindow.Show(4000);
Running this code will result in a small window appearing in the bottom right-hand side of the screen, and automatically disappearing after 4 seconds. Note that these notifications can only be displayed for a maximum of 30 seconds (30000 milliseconds).
Note
Attempting to create an instance of the NotificationWindow class when running inside the browser will throw an exception, so always check to ensure that the application is being run in OOB mode before attempting to show a toast notification.
An empty notification window is of little use, so let's now display some content in it, which can be done by assigning a framework element to its Content property. The easiest way to implement the content of a toast notification is to create a user control in your project, design the content in its XAML file, and then assign an instance of the user control to the NotificationWindow's Content property. For example:
toastWindow.Content = new MessageArrivedNotification();
If your application is in the background, and is showing the notification window in order to get itself noticed, a good idea is to activate the main window when the notification window is clicked, and bring it to the front. You can implement this by handling the MouseLeftButtonDown event of the LayoutRoot, and activating the main window in the event handler:
private void LayoutRoot_MouseLeftButtonDown(object sender, MouseButtonEventArgs e)
{
    Application.Current.MainWindow.Activate();
}
It can also be a good idea to provide a way to close the notification window so that the user can dismiss the notification and continue working. The NotificationWindow object has a Close method, but you need that object to call the method on (which you don't have in the user control unless you want to trawl through the visual tree hierarchy to get it). The solution to this is to simply accept a NotificationWindow object in the user control's constructor (it can then stash it away as a member variable for later use), and pass this through when the object is being created.
toastWindow.Content = new MessageArrivedNotification(toastWindow);
You can then call the Close method on this object from within the user control as required.
Note
You may also wish to pass the constructor an object containing data that the notification window can display if required.
As you saw from some of the chapters earlier in this book, RIA Services provides an easy and elegant means for obtaining data from and persisting data to a server. However, what if a connection to the server is suddenly not available? Do you want all the users of your application to be forced to wait until they are (or the server is) back online again? Or do you want them to be able to continue working (as much as possible) in the meantime until a connection to the server is restored?
This type of scenario is known as "occasionally connected applications", and is generally handled by downloading and caching commonly used data from the server locally that the user may require when they are offline (and keep it updated)-with enough data to enable them to continue working until they get back online again. While the application is offline, it will need to cache the changes, additions, and deletions the user has made to the data, and synchronize these back to the server when the application is next online.
Note
In addition, you may wish to cache data on the client that rarely or never changes in order to reduce the amount of network traffic that passes between the server and the client.
Let's take a look at some strategies for caching data on the client, and catering for scenarios where the application may be going back and forth between connected and disconnected mode.
As a part of its sandbox, Silverlight doesn't allow you direct access to the user's file system (unless you are running with elevated trust-discussed later in this chapter), in order to protect your computer from rogue Silverlight applications. It does however provide you with a virtual file system known as isolated storage that enables you to cache data and files locally. As its name suggests, isolated storage is a virtual file system that is stored on disk, but isolated from the computer's main file system and that of other applications. Files can be maintained in this store within directories in the same way as you normally organize files in a file system.
Note
An isolated storage store is not specific to the browser that the user is running the application within. The same store is used between browsers and when running outside the browser-however each Windows user on the computer will have their own isolated storage store.
Isolated storage is partitioned into two sections-an application store, and a site store. The application store can be used to store files available to your application only, while the site store can be used to store files available across Silverlight applications originating from the same domain. Each isolated storage store is given a size quota that can be increased (with the permission of the user) if required.
Let's take a look at the various ways you can persist and retrieve data from an isolated storage store.
The easiest way to persist and retrieve data from an isolated storage store is by using the IsolatedStorageSettings class (that can be found under the System.IO.IsolatedStorage namespace). This class enables you to easily maintain a collection of settings in isolated storage as key/value pairs that can be maintained as a file in either of the two stores (application and site) discussed earlier. Instead of having to manage serializing and deserializing the settings to and from a file, this class abstracts that away from you so that you only need to maintain the settings as a collection of key/value pairs, and it will handle persisting and retrieving the collection to/from isolated storage for you.
The IsolatedStorageSetting. ApplicationSettings property provides a means to maintain settings in the application store, and the IsolatedStorageSetting.SiteSettings property provides a means to maintain settings in the site store. Both of these properties return an object of type IsolatedStorageSettings that is a wrapper around a Dictionary of type <string, object>. Both are used in exactly the same manner as a Dictionary (and hence each other), so you will focus on demonstrating maintaining application settings here.
Note
Apart from application settings, another perfect use for storing as settings is dictionary data (used to populate drop-down lists, etc). For dictionaries that rarely or never change, caching them in isolated storage will result in less network traffic needing to pass between the server and the client, and a much more responsive application that doesn't need to wait to load these from the server.
Each setting is a key/value pair, with the key needing to be a string, but the value able to be any type of object. To persist a value to isolated storage, you simply need to assign it to the indexer of this class, using the key as its index:
IsolatedStorageSettings.ApplicationSettings["Key"] = "Value";
Note
You don't need to use the Add method when adding a new setting to the dictionary. Simply assigning the value as demonstrated will take care of this (and save you the trouble of needing to determine whether the key exists in the dictionary and add/update it accordingly).
As mentioned, the IsolatedStorageSettings class is a Dictionary of type <string, object>, meaning that any type of object (not just strings) can be persisted as an isolated storage setting, and that object will be automatically serialized to (and deserialized when retrieving it from) isolated storage.
The changes to the settings are maintained in memory, and will be automatically saved to isolated storage when the application is closed. However, if the application (or the operating system) were to crash before this time, the changes made would be lost. Therefore you should call the Save method of the IsolatedStorageSettings object to explicitly save the current settings collection to isolated storage:
IsolatedStorageSettings.ApplicationSettings.Save();
Note
When you first try to access the settings, all the data stored as settings will be loaded from isolated storage into memory and deserialized. The more data that your store in the settings, the longer this will take, and the more memory it will use. Therefore it is recommended that you do not store an excessive amount of data as settings in isolated storage or this will have an adverse effect on the performance of your application (and potentially of the user's computer). An alternative is to serialize large collections/objects, and persist them as individual files within the isolated storage store instead. This will enable them to be loaded only when required, and disposed of (removing them from memory) once you no longer need them. How you do this will be discussed later in this chapter.
When you want to retrieve a setting from isolated storage, you will need to check that it exists first. You can use the Contains method to do this, and then retrieve its value (if it exists) using its key as the index, like so:
if (IsolatedStorageSettings.ApplicationSettings.Contains("Key"))
{
    string value = IsolatedStorageSettings.ApplicationSettings["Value"].ToString();
    // Do something with the value
}
Alternatively, you can use the TryGetValue method that bundles checking that the setting exists and retrieving its value if it does into a single task. With the out parameter being a generic type, it will also save the need for casting the returned object:
string value;
bool settingExists =
IsolatedStorageSettings.ApplicationSettings.TryGetValue("Key", out value);You can bind to isolated storage settings, by binding to them using indexed property binding, as was demonstrated back in Chapter 10: Advanced XAML and Data Binding. The following XAML demonstrates binding to a setting named "Setting1":
<TextBox Name="Setting1TextBox" Text="{Binding [Setting1], Mode=TwoWay}" />Due to the non-creatable nature of the IsolatedStorageSettings class (as it has a private constructor), you will need to assign the DataContext of the control (or a control further up in the object hierarchy) in the code-behind, as follows:
Setting1TextBox.DataContext = IsolatedStorageSettings.ApplicationSettings;
If you want to enumerate through the existing settings, the Keys property will expose what keys exist in the store, and you can then get their values as required:
foreach (string key in IsolatedStorageSettings.ApplicationSettings.Keys)
{
    object value = IsolatedStorageSettings.ApplicationSettings[key];
    // Do something with the value
}You can remove a setting using the Remove method of the dictionary, passing it the key of the setting to remove:
IsolatedStorageSettings.ApplicationSettings.Remove("Key");You can remove all the settings in a dictionary by calling its Clear method:
IsolatedStorageSettings.ApplicationSettings.Clear();
Isolated storage is a virtual file system, meaning that you can create directories and files within isolated storage in much the same way as you would with the operating system's file system. For example, you may wish to store images, documents, and even .xap files downloaded from the server (providing dynamically loaded content, as will be discussed in Chapter 15: Application Deployment) in isolated storage. Let's look at how to perform some of these tasks in an isolated storage store.
The first step is to open the store that you want to work with. To open the application store, you use the GetUserStoreForApplication method of the IsolatedStorageFile class. Alternatively, you will need to use the IsolatedStorageFile class's GetUserStoreForSite method to open the site store.
Note
For the purposes of this demonstration you will be working with the application store, but working with the site store is performed in exactly the same manner after opening the site store instead.
The following code demonstrates opening the application store:
using (IsolatedStorageFile store = IsolatedStorageFile.GetUserStoreForApplication())
{
    // Work with the files and directories in the store here
}Once you have opened a store you can create, move, and delete directories using the methods on the object instance you have of the IsolatedStorageFile class. For example, you can create a directory named "Images" like so:
store.CreateDirectory("Images");If you want to create a subdirectory named "Icons" within the "Images" directory, you will need to include the full path to create, as follows:
store.CreateDirectory(@"ImagesIcons");
You can determine whether a directory exists using the DirectoryExists method:
bool dirExists = store.DirectoryExists("Images");Note
You should attempt to keep the paths to your files as short as possible. The full path to the file, including the path to the isolated storage store on the disk, must be less than 260 characters. Exceeding this length will result in an exception being thrown. The number of characters available for your directory and file names will depend upon what operating system the user is running, so as a general rule, it's best to keep the paths of the files within the isolated storage store to a maximum of 70 characters in length.
The IsolatedStorageFile class provides a method to enable you to enumerate through the files and directories within an isolated storage store. For example, you can obtain a string array containing the names of the directories using the GetDirectoryNames method, like so:
string[] directories = store.GetDirectoryNames();
You will note that only the directories within the root of the store are returned in this example. To get a list of the subdirectories within a given directory, you need to pass in the path to that directory as a search pattern (followed by a wildcard). The following example demonstrates getting the names of the directories within the "Images" folder:
string[] directories = store.GetDirectoryNames(@"Images*");
Similarly, you can get a list of the files in the isolated storage store using the GetFileNames method:
string[] fileNames = store.GetFileNames();
As with getting the subdirectories within a directory, to get the files within a directory you will need to pass in the path to that directory as a search pattern, followed by a wildcard:
string[] fileNames = store.GetFileNames(@"Images*");
Various methods are provided to work with files, such as creating, copying, moving, deleting, and opening a file. For example, you can determine whether a file exists using the FileExists method:
bool fileExists = store.FileExists("Test.txt");The following code demonstrates writing a string to a text file in isolated storage:
using (IsolatedStorageFileStream fileStream =
    store.OpenFile("Test.txt", FileMode.Create))
{
    using (StreamWriter writer = new StreamWriter(fileStream))
    {
        writer.WriteLine("Text written from Silverlight");
        writer.Close();
    }

    fileStream.Close();
}
Note
You will need to add a using directive to the System.IO namespace in order for this and the following examples to work.
The following code demonstrates writing a byte array (named fileContents) to a file in isolated storage:
using (IsolatedStorageFileStream fileStream =
    store.OpenFile("Test.jpg", FileMode.Create))
{
    fileStream.Write(fileContents, 0, fileContents.Length);
    fileStream.Close();
}The following code demonstrates reading the contents of a text file from isolated storage into a string:
string fileContents = null;

using (IsolatedStorageFileStream fileStream =
    store.OpenFile("Test.txt", FileMode.Open))
{
    using (StreamReader reader = new StreamReader(fileStream))
    {
        fileContents = reader.ReadToEnd();
        reader.Close();
    }

    fileStream.Close();
}

// Do something with the file contentsThe following code demonstrates reading the contents of a binary file from isolated storage into a byte array:
byte[] fileContents = null;

using (IsolatedStorageFileStream fileStream =
    store.OpenFile("Test.jpg", FileMode.Open))
{
    fileContents = new byte[fileStream.Length];
    fileStream.Read(fileContents, 0, (int)fileStream.Length);
    fileStream.Close();
}

// Do something with the file contentsGenerally, you will be maintaining data in objects and collections within your application, and you may wish to persist this data to isolated storage. Rather than writing the data to a file using a custom format (and then needing to parse it and rehydrate the corresponding objects/collections when you want to load the data again), you can simply serialize/deserialize the data to/from XML, using the DataContractSerializer class to help you.
Let's say you have a collection of Product objects that you want to serialize to a file within an isolated storage store. The following code demonstrates serializing and writing a collection of Product objects to isolated storage:
using (IsolatedStorageFileStream fileStream =
    store.OpenFile("ProductCollection.xml", FileMode.Create))
{
    DataContractSerializer serializer =
new DataContractSerializer(typeof(List<Product>));
serializer.WriteObject(fileStream, productCollection);
}The following code demonstrates deserializing a collection of Product objects read from a file in isolated storage, and rehydrating the collection:
using (IsolatedStorageFileStream fileStream =
    store.OpenFile("ProductCollection.xml", FileMode.Open))
{
    DataContractSerializer serializer =
        new DataContractSerializer(typeof(List<Product>));
    List<Product> productCollection =
        serializer.ReadObject(fileStream) as List<Product>;

    // Do something with the collection

    fileStream.Close();
}When a Silverlight application is first run, it is given a quota of 1MB of space to use in its isolated storage store. This quota is assigned on a per-domain basis, meaning that the quota is shared between all the Silverlight applications originating from the same domain (even though each application has its own separate isolated storage store). Attempting to exceed this quota will result in an exception being raised.
Note
Whenever you work with isolated storage, you should place this code within a try/catch block in order to handle this possibility. Even if your application only expects to use a very small amount of isolated storage space, it can still exceed the quota, as the quota is shared between all applications originating from the same domain. Another application from the same domain may have used most of or the entire quota already, which will affect the amount of space your application has left to use.
You can determine how much quota you have free by checking the AvailableFreeSpace property of the IsolatedStorageFile object. This value returns the number of bytes still available for use in the isolated storage store:
long freeSpace = store.AvailableFreeSpace;
You can also retrieve the total quota assigned to the domain via the store's Quota property, and retrieve the amount of quote already used via the store's UsedSize property.
When a Silverlight application is installed to run outside the browser, its quota will be automatically increased from the initial 1MB to 25MB. However, you can request additional space at any time if it is required. This requires that the user provide permission for the domain to be assigned further quota by displaying a dialog (as shown in Figure 14-6).

To request additional quota, you can simply call the IncreaseQuotaTo method of the IsolatedStorageFile object, passing it the amount of space that you want (in bytes). For example, you can use the following code to request your quota to be increased to 50MB of isolated storage space:
bool increasePermitted = store.IncreaseQuotaTo(50 * 1024 * 1024);
The method returns a Boolean value indicating whether permission for the additional space has been permitted or denied by the user. Requesting a smaller quota than that already granted will throw an ArgumentException exception stating that "The new quota must be larger than the old quota", so be prepared for this scenario and put the call in a try/catch block (or make sure the value you are setting is greater than that of the store's Quota property).
Note
The call to the IncreaseQuotaTo method must originate from a user initiated event. In other words, you can only request additional isolated storage quota in an event raised by some sort of user input (such as the Click event for example). Attempting to request additional isolated storage quota in a non-user input initiated event (such as the Loaded event of a control) will simply be denied. This rule only applies when the application is running in sandboxed mode. When the application is running with elevated trust permissions (as described later in this chapter), this limitation is lifted.
Something to be aware of when writing data to isolated storage is that it is easily accessible by burrowing into the user's profile folders. The isolated storage store is maintained in a hidden folder with the exact same file/directory structure as they were created in the store, as demonstrated in Figure 14-7.
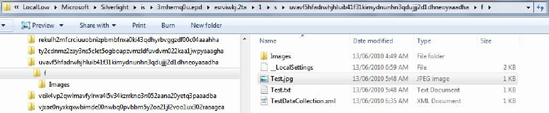
The location of the isolated storage stores on disk differs between operating systems, but in Windows Vista/7 you can find the area by typing "%userprofile%AppDataLocalLowMicrosoftSilverlightis" into the Windows Explorer address bar. When you write files to isolated storage, you are simply writing them to a folder somewhere underneath this path.
As you can see, from Figure 14-7, the path to the isolated storage store is somewhat obfuscated, but if you create a file in the isolated storage store with a unique name, you can find it fairly easily (and hence the isolated storage store) using the search functionality in Windows Explorer. You can then open the files and inspect their contents (and modify them) if you wish.
The point you need to note from this exercise is that nothing you write to isolated storage should be considered secure, and thus you should not write sensitive data to isolated storage, or assume that it can't be modified outside your application.
You may wish to consider encrypting your files in order to help prevent these sorts of issues if they are of concern to you. The following MSDN article should point you in the right direction for doing so: http://msdn.microsoft.com/en-au/library/dd153755(VS.95).aspx.
With a default quota of 1MB, depending on the type and number of files you want to cache in isolated storage, you may wish to consider attempting to make the most efficient use of the available space within isolated storage by compressing the files (saving the need to request additional quota from the user so soon).
Silverlight doesn't have any built-in compression routines, but you can use an open source library that provides this functionality instead. Two of the best options available to you are Silverlight ports of the SharpZipLib and DotNetZip projects. The SharpZipLib has a GPL license, whilst the DotNetZip has a less restrictive Ms-PL license.
You can download the Silverlight port of the SharpZipLib project from http://slsharpziplib.codeplex.com, however the DotNetZip project has no official port attempt (the original project can be found here: http://dotnetzip.codeplex.com). If you download the Document Toolkit Extensions project however, you will find a Silverlight port of both projects in it that is available here: http://documenttoolkit.codeplex.com.
Refer to the documentation of the project that you choose to use for details of how to use it.
Not available at the time of this writing, but worth looking into, is the Sync Framework for Silverlight. This is a framework for synchronizing data between a Silverlight application and the server, providing a range of new possibilities for occasionally connected Silverlight applications. Data will be maintained in a local store for use by the Silverlight application while it is offline, and changes in the data during the time offline will be synchronized back with the server once it's back online (and vice versa). The homepage for the Sync Framework on the Microsoft web site can be found at http://msdn.microsoft.com/en-us/sync/default.aspx.
Isolated storage provides a way for caching files on the client, but it is not a suitable means of caching data-it's certainly in no way comparable with the features that a database provides.
You could store a collection of objects in isolated storage as was demonstrated using the IsolatedStorageSettings class, but it's not a very efficient way of doing so if the collection is large. When you first attempt to get an instance of the application or site settings object, all of the settings will be loaded from isolated storage into memory. To get a single object would require loading all the settings into memory, and to simply insert/update/delete a setting would require all the settings to be loaded and then persisted back to isolated storage again.
We also discussed and demonstrated serializing objects as files to isolated storage as well, but for large sets of data this can be an inefficient means of maintaining the data also.
Unfortunately, Silverlight has no built-in client-side database engine to solve these problems, which can be an issue when it comes to implementing occasionally connected applications. There are a number of potential solutions however (of differing degrees of suitability), that will be discussed briefly.
Sterling is a lightweight object-oriented database that uses an extensible binary serialization engine, written by Jeremy Likeness. It maintains keys and table indexes for fast querying, and shows a lot of potential (it's currently in alpha at the time of this writing). You can get it from here: http://sterling.codeplex.com.
The Silverlight Database engine also serializes the tables and their data serialized to a file in isolated storage, but without the key and index support that Sterling provides. It is worth investigating if you want to provide a simple predefined means to persisting and retrieving data in isolated storage. You can get this library here: http://silverdb.codeplex.com.
SQLite is a popular database engine with a small footprint and an extremely permissive license and has been around for quite some time now. It is written in C, and ported to many environments (original project here: www.sqlite.org).
Noah Hart ported SQLite to C#, named C#-SQLite (found at http://code.google.com/p/csharp-sqlite), which runs against the full .NET Framework, but not Silverlight.
This project was ported to Silverlight by Tim Anderson as a proof of concept (not in a production-ready state), and can be downloaded from here: www.itwriting.com/blog/1695-proof-of-concept-c-sqlite-running-in-silverlight.html.
SQLite was a part of (the now deprecated, but still available and widely used) Google Gears, and this provides another possibility for use as a database engine and store. You can create and store data in a SQLite database using the JavaScript API provided by Google Gears. An example of doing so is demonstrated here: www.mojoportal.com/silverlight-google-gears-awesome-at-least-in-firefox.aspx.
Note
Since JavaScript is required to communicate with the database, it can only be used within the browser (in other words, it will not be accessible to applications running outside the browser).
Craig Dunn produced a proof-of-concept port of the Sharp HSql database engine to Silverlight (that was itself a port of the hsqdb database engine written for Java), and has made it available here: http://conceptdev.blogspot.com/2009/07/sql-in-silverlight.html.
As you can see from the descriptions of the previous database engines, the Silverlight Database (SilverDB) project doesn't really solve the problem and the Silverlight ports of the SQLite and Sharp HSql database engines are not considered production ready. There are however some commercial offerings that you may wish to consider:
Perst: is an open source database engine released under the GPL license, so it's not a commercial offering per se. However, for use in closed-source applications you will need to buy a license, in which case it becomes a commercial offering. The cost of a license isn't published.
You can purchase/download it from here: www.mcobject.com/perst.
Siaqodb: is a database engine targeting a number of platforms. A single developer license for its Silverlight edition (at the time of writing) is $US186.
You can purchase/download it from here: http://siaqodb.com.
EffiProz Embedded C# Database: is a database engine targeting both Silverlight and Windows Phone 7. A single developer license for its Silverlight edition (at the time of writing) is $US500.
You can purchase/download it from here: www.effiproz.com/product_sl.aspx
When your application is running in OOB mode and with elevated trust on Windows systems, you will have access to COM. You can take advantage of this by using the ADO COM objects, and interacting with the various database engines installed on the user's machine (such as SQL Server, SQL Compact, Microsoft Access, and so on.). This option is only available in the conditions previously mentioned, making it less than ideal, but does provide an option. Using the ADO COM objects will be discussed later in this chapter.
In order to effectively support occasionally connected scenarios, you need to be able to detect whether the application is online or offline and cater for the current state accordingly. You also need to be able to detect when this state changes (from offline to online) and start re-synchronizing cached data back with the server.
Silverlight has the built-in ability to detect network availability and any changes in it, and you can find the classes to help you do so under the System.Net.NetworkInformation namespace. You can use the NetworkInterface class to help determine whether a network connection is available, and you can use the NetworkChange class to notify you when this state changes.
For example, the following code determines if a network connection is available:
bool isNetworkAvailable = NetworkInterface.GetIsNetworkAvailable();
Note
This method may report that you have a connection available, but there's no guarantee that you actually have a connection to the Internet, or that the server you want to communicate with is accessible. It simply reports whether or not there is a network adapter available that currently has an IP address (it won't if it has no network connection).
You can monitor for changes in network availability by handling the NetworkAddressChanged event of the NetworkChange class, like so:
NetworkChange.NetworkAddressChanged += NetworkChange_NetworkAddressChanged;
private void NetworkChange_NetworkAddressChanged(object sender, EventArgs e)
{
    // Handle network state changed as required
}
Note
This event doesn't tell you whether a network connection is now available or not-merely that the IP address of a network adapter has changed. You will need to use it in conjunction with the NetworkInterface.GetIsNetworkAvailable method in order to determine the new network connection state.
Isolated storage is the means provided to store and retrieve data locally on the user's machine, but sometimes you need to read and write to actual files within the user's file system. For example, you may want to be able to save a file that was downloaded from the server, or upload a file to the server from the user's machine.
As part of the Silverlight sandbox, you can't read or write files directly from/to disk without user interaction (providing implicit permission to do so) unless you have elevated permissions (as will be discussed later in this chapter). In sandboxed mode however, the Open/Save dialogs provide this user interaction to read/write files by providing the user with a means to select what local files can be read or written to, and provides the permission to do so. Let's take a look at how you can use these dialogs, and the file based operations that they enable.
Note
Attempting to display an open or save file dialog must be the result of a user initiated action. In other words, you can only open an open/save file dialog in an event raised by some sort of user input (such as the Click event, for example). Attempting to display the open/save file dialog in a non-user input initiated event (such as the Loaded event of a control) would raise an exception. This rule only applies when the application is running in sandboxed mode. When the application is running with elevated trust permissions (as described later in this chapter), this limitation is lifted.
You can use the OpenFileDialog class (as shown in Figure 14-8) to display a dialog enabling the user to select a file to open. This will provide you with the permission to access the selected file, by returning one or more FileInfo objects (from the System.IO namespace) that enable you to open the file and read the data from it.

The code to display the open file dialog is as follows:
OpenFileDialog dialog = new OpenFileDialog();
bool? fileSelected = dialog.ShowDialog();

if (fileSelected.HasValue && fileSelected.Value)
{
    // Code to open and read the file goes here
}
The ShowDialog method is the code that actually displays the dialog, and returns a nullable Boolean indicating whether the user selected a file or cancelled the operation. This variable will be set to true if the user selected a file and then clicked the Open button.
Note
This method may throw an InvalidOperationException or SecurityException exception. Ensure that your code catches this exception and handles it accordingly.
You can limit the dialog to displaying files of only a given type (or types), by specifying one or more file filters using the Filter property of the dialog object. Unfortunately, the way to assign these filters is somewhat archaic, but aligns to what you may be used to when configuring file filters for dialogs in other technologies such as Windows Forms. For example, to limit files to just text files (in other words, files with a .txt extension), you can use the following syntax (before opening the dialog):
dialog.Filter = "Text Files|*.txt";
This string is split into two sections, separated by a pipe character. The first section denotes the text to display representing the filter in the drop-down list, and the second section denotes the actual filter to apply to limit the files displayed.
You can extend this filter to include a number of file types/extensions by separating the file extensions in the second section of the filter string with a semi-colon, as demonstrated below:
dialog.Filter = "Documents|*.doc;*.docx;*.rtf";
Alternatively, you can have multiple filters that the user can select from in the dialog, like so:
dialog.Filter = "Word 2002/2003 Documents|*.doc|Word 2007/2010 Documents|*.docx";
As you can see, another pipe character is used to separate each entry. If the first entry is not the one you want to use as the default selection, you can specify a different one using the FilterIndex property. This is a one-based index, so you would set this property to 2 in order to select the Word 2007/2010 Documents filter (in other words, the second filter) from the example above.
Once the user has selected a file, you can retrieve the FileInfo object that it has created. When running in sandbox mode, you will only be able to view limited information about the selected file. Attempting to access file properties such as its directory or its attributes will be denied, resulting in a SecurityException being thrown. You can get its name from the FileInfo's Name property, and its size from its Length property.
Note
You can't create an instance of the FileInfo class yourself (unless you are running with elevated trust, as discussed later in this chapter). Attempting to do so will result in a SecurityException, stating that access to the file has been denied.
The FileInfo object is assigned only limited permissions for the actions you can perform on it, but it does allow you to open the file and read its contents. There are two methods on the object that you can use to do so-the OpenText method, and the OpenRead method.
If you know that (or expect) the selected file to be a text file, you can use the OpenText method to read its contents. This method allows you to read the file by retrieving:
A given number of characters at a time
The contents line by line
The entire contents of the file in a single step
The latter two methods are the most common when dealing with text files, and are demonstrated in the following sections.
Reading the File Line by Line
To read the file a line at a time, use the ReadLine method:
string fileContents = null;

using (StreamReader fileStream = dialog.File.OpenText())
{
    while (!fileStream.EndOfStream)
    {
        fileContents = fileStream.ReadLine();
        // Do something with the line contents
    }

    fileStream.Close();
}
// Do something with the file contents
Reading the Whole File in a Single Step
To read the whole file in a single step, use the ReadToEnd method:
string fileContents = null;

using (StreamReader fileStream = dialog.File.OpenText())
{
    fileContents = fileStream.ReadToEnd();
    fileStream.Close();
}

// Do something with the file contentsWhen working with other non-text file types (such as images, documents, etc), you will need to use the OpenRead method to read their contents, as a byte array.
Reading the Whole File in a Single Step
The code below demonstrates reading the entire contents of a file into a byte array using the Read method:
byte[] fileContents = null;

using (FileStream fileStream = dialog.File.OpenRead())
{
    fileContents = new byte[dialog.File.Length];
    fileStream.Read(fileContents, 0, (int)dialog.File.Length);
    fileStream.Close();
}

// Do something with the file contents
Reading the File in a Chunks
You can read the file in chunks (also using the Read method), like so (especially useful when the file is large):
const int chunkSize = 4096; // 4kb blocks

using (FileStream fileStream = dialog.File.OpenRead())
{
    byte[] chunk = new byte[chunkSize];
    int bytesRead = 0;
    int position = 0;

    do
    {
bytesRead = fileStream.Read(chunk, 0, chunkSize);
// Do something with the chunk
position += bytesRead;
} while (bytesRead > 0);
fileStream.Close();
}Reading and Displaying an Image File
If you want to load an image to display in an Image control, the code is even simpler. The following code demonstrates populating a BitmapImage object with the contents of a file and assigning it to the Source property of an Image control (named imageControl in the code):
using (FileStream fileStream = dialog.File.OpenRead())
{
    BitmapImage image = new BitmapImage();
    image.SetSource(fileStream);

    // Assign the BitmapImage object to the Source property of an Image control
    imageControl.Source = image;

    fileStream.Close();
}By default, the user can only select a single file from the open file dialog. However, you can set its Multiselect property to true in order to enable the user to select multiple files at the same time. The File property will only return the first file selected, but you can use the Files property instead. That returns an array of FileInfo objects that you can loop through and read as required.
You can use the SaveFileDialog class (as shown in Figure 14-9) to display a dialog enabling the user to specify the name and location of a file to save, or select a file to overwrite. This will provide you with the permission to write to the selected file, by returning a FileInfo object that enables you to create the file and write data to it.

The code to display the open file dialog is as follows:
SaveFileDialog dialog = new SaveFileDialog();
bool? fileEntered = dialog.ShowDialog();

if (fileEntered.HasValue && fileEntered.Value)
{
    // Code to open and write the file goes here
}
You'll note that this is very similar to how the OpenFileDialog class is used.
Note
If the user enters invalid characters as the file name, this will raise a message box notifying the user as such, and the dialog simply won't accept a file name with these characters. However, on an Apple Macintosh, the dialog will accept these characters, but will consequently throw an ArgumentException. Ensure that your code catches this exception and handles it accordingly.
Like the OpenFileDialog class, you can set various filters to limit the files displayed in the dialog. If you specify one or more filters and the user does not enter an extension with the file name that they enter, then the extension associated with the selected filter will be automatically appended to the file name. If no filter is specified, or it is an All Files (*.*) type filter, then the value assigned to the DefaultExt property of the OpenFileDialog class will be appended to the file name instead (if provided).
Create a new (empty) file with the name and path provided by the user by calling the OpenFile method that creates and opens the file for writing. You will note that unlike the OpenFileDialog class (which has separate methods for reading files as text or binary), the SaveFileDialog class has only this single method. We'll discuss how to write text or binary data to the file shortly.
Unfortunately, you can't set a default name for the file in the dialog. You can however get the name of the file (excluding path information) from the dialog class's SafeFileName property.
To write text to the file, you need to create a StreamWriter from the stream returned from the OpenFile method. You can then use the Write or the WriteLine methods of the StreamWriter object to write text to the file as required.
using (Stream stream = dialog.OpenFile())
{
    using (StreamWriter writer = new StreamWriter(stream))
    {
        writer.WriteLine("Text written from Silverlight");
        writer.Close();
    }

    stream.Close();
}
Writing binary data to a file is actually easier than writing text because there's no need for a StreamWriter (or similar) to help you in doing so. You can simply use the Write method of the stream that's returned when opening the file to write the contents of a byte array to the file. The code below demonstrates writing the contents of a byte array named fileContents to the file that the user has specified it should be written to via the save file dialog:
using (Stream stream = dialog.OpenFile())
{
    stream.Write(fileContents, 0, fileContents.Length);
    stream.Close();
}New in Silverlight 4 is the ability for your application to act as a drop target for files that have been dragged from the desktop or Windows Explorer. This feature is even available when the application is running within a browser window. This provides another means for enabling you to open a file from the user's file system, without the user having to go via the open file dialog. For example, you might want to create a file uploader, where users can drag files onto your application and have them automatically uploaded to the server. This is just one of the potential uses that this feature can help provide.
The first step when implementing this feature is to decide where you want files to be able to be dropped within your application. For this simple demo, let's enable the user to drop a file on an Image control, and have that Image control display that file (if it is an image file). Unfortunately (despite supporting the required events), the Image control won't raise the drag/drop events when a file is dragged over and dropped on the control, but you can place it inside a Border control, which will raise these events for us instead.
Note
The Border control requires its Background property to be assigned a value, or its drag/drop events won't be raised either.
Therefore, the Border control in your view will be a drop target, and to enable it to accept dropped files, you need to set its AllowDrop property to true, and handle the drag/drop events that you require:
<Border Name="imageBorder" Height="300" Width="300"AllowDrop="True"BorderThickness="1" BorderBrush="Black" Background="White"Drop="imageBorder_Drop"> <Image Name="droppedImage" Stretch="Uniform" /> </Border>
Now, when the user drags a file from the file system over this control, the DragEnter event will be raised when the file is dragged within the bounds of the control, the DragOver event will be raised as the dragged file is moved over the control, and the DragLeave event will be raised when the file is dragged outside of the bounds of the control again. However, the event you are most interested in is the Drop event, which is raised when a file is dropped onto the control.
private void imageBorder_Drop(object sender, DragEventArgs e)
{
    // Code to open/read the dropped files goes here
}
The DragEventArgs object passed through to this event handler enables you to get the details of the files dropped on the control, using the GetData method of the IDataObject object that it exposes:
FileInfo[] files = e.Data.GetData(DataFormats.FileDrop) as FileInfo[];
Now you can loop through these files, opening them and reading their contents as required (in the same manner as demonstrated when discussing the open file dialog). The code below demonstrates opening a dropped file, ensuring it is an image file, reads its contents, and displays it in the Image control in your view:
if (files.Length != 0)
{
    // Ensure that the file is an image (by validating the extension)
    string[] validExtensions = new string[] { ".jpg", ".png" };

    // Note that you need a using directive to System.Linq for this line.
    // NOTE: Multiple files can be dropped on the application, we are
    // displaying only the first file.
    if (validExtensions.Contains(files[0].Extension.ToLower()))
    {
        try
        {
            // Open the file, read it into a BitmapImage object, and
            // display it in the Image control.
            using (FileStream fileStream = files[0].OpenRead())
            {
                BitmapImage bitmap = new BitmapImage();
                bitmap.SetSource(fileStream);
                fileStream.Close();

                droppedImage.Source = bitmap;
            }
        }
        catch { }
    }
}
Note that you will need to add using directives to the following namespaces to the top of your code file:
using System.IO;
usingSystem.Windows.Media.Imaging;
Note
Unfortunately, dropping files on a Silverlight application when it's running on an Apple Macintosh requires some workarounds in order to support the feature, and will only work in Safari (not Firefox). These workarounds are documented in the following MSDN article: http://msdn.microsoft.com/en-us/library/ee670998(VS.95).aspx
The user can use the standard Cut/Copy/Paste shortcut keys (Ctrl+X, Ctrl+C, and Ctrl+V) from within controls such as the TextBox and the RichTextBox to cut/copy/paste the selected text in the control to and from the host operating system's clipboard. However, if you wished to cut/copy/paste text to and from the clipboard programmatically (prior to Silverlight 4), you were out of luck.
Silverlight 4 finally introduced the Clipboard class (found in the System.Windows namespace) to enable you to do so. This class enables you to get the text currently on the clipboard (using its GetText method), set the text on the clipboard (using its SetText method), and query whether there is any text on the clipboard (using its ContainsText method).
You can get the text currently on the clipboard like so:
string clipboardText = Clipboard.GetText();
And you can set the text on the clipboard like this:
Clipboard.SetText("Some text");To check whether there is any text available on the clipboard:
bool clipboardHasText = Clipboard.ContainsText();
Note, however, that there are a few limitations and issues that you should be aware of. The first is that a dialog will appear, asking the user for permission to allow the application access to the clipboard (as shown in Figure 14-10). This permission dialog will only appear once, and will not appear again until the next time the application is run (although you can select the check box that says to remember your answer).
Note
If the user refuses the application permission to access the clipboard, an exception will be thrown. Therefore always remember to wrap your calls to the clipboard in a try/catch block.

Another issue to be aware of is that like displaying the open/save dialogs, the clipboard interaction must be user initiated. Attempting to interact with the clipboard in a non-user input initiated event (such as the Loaded event of a control) will immediately raise an exception (in other words, the dialog asking for permission will not be displayed-permission will automatically be refused). The only exception to this rule where this limitation will be lifted is when the application is running with elevated trust permissions (as described later in this chapter).
Note
If your application has elevated trust permissions when running in OOB mode, the Silverlight runtime will assume it has permission to access the clipboard, and skip displaying the permission dialog.
The other major limitation of the Clipboard class is that it only supports copying and pasting text to/from the clipboard. Other types of data (such as images) are not supported. The only way to copy an image to the clipboard would be to encode it as Base64 (an encoding commonly used to convert binary data to a text representation). However, no other application is likely to be able to recognize this, and thus doing so has very limited uses and benefits).
Note
Worth noting is that the DataGrid now has a built-in copy feature where you can select a number of rows, and press Ctrl+C to copy them to the clipboard (in tab delimited form). You can then paste them into another application, such as Microsoft Excel.
Three copy modes are available, and you can select which mode you want to support by setting the ClipboardCopyMode property on the DataGrid control. The modes are None (the user can't copy row data to the clipboard), ExcludeHeader (don't include the column headers as the first line of data), and IncludeHeader (do include the column headers as the first line of data).
Additionally, you can specify what data is copied for a column (if it should be different to what is displayed) using the ClipboardContentBinding property on the DataGridColumn, and you can also handle the CopyingRowClipboardContent event on the DataGrid, which is raised as each row is copied so that you can see what content is being copied to the clipboard (although you can't modify that content, limiting its uses).
You can set your Silverlight application to run in full screen mode if you wish (even when it is running inside the browser). This feature was designed to enable streaming video to be played full screen and for games, but you may find some uses for it in your business applications too. Let's take a look at how to do this.
The following code sets the application to run in full screen mode:
Application.Current.Host.Content.IsFullScreen = true;
Once the application is in full screen mode, the user can press the Escape key to go back to running normally. When the application enters full screen mode, it will briefly flash up a message notifying the user of this (as shown in Figure 14-11).

Alternatively, you can set the IsFullScreen property to false to return to normal mode programmatically. You will need to do this when enabling full screen mode when running with elevated trust, as the Escape key does not automatically exit full screen in that scenario.
As with opening an open/save dialog or interacting with the clipboard, setting the application to display full screen must be a user initiated action (in other words, you can only do so from a Click event or similar, where the event is raised in response to user input). Attempting to do so otherwise (such as in the Loaded event of a page/view) will result in the action simply being ignored.
If the application is running in OOB mode with elevated trust, this limitation is lifted. In this scenario, you can set the application to run in full screen mode from the application's Startup event, or from the Loaded event or constructor of a page/view (for example) if you wish. However, when doing so from the application's Startup event or the constructor of the RootVisual, you must use the BeginInvoke command when setting the IsFullScreen property to true such that it does so on the user interface thread (otherwise it won't work). The code below demonstrates how to do this:
Deployment.Current.Dispatcher.BeginInvoke(() =>
    {
        Application.Current.Host.Content.IsFullScreen = true;
});You can detect when the application has entered or left full screen mode by handling the FullScreenChanged event on the Application.Current.Host.Content object, like so:
Application.Current.Host.Content.FullScreenChanged += Application_FullScreenChanged;

private void Application_FullScreenChanged(object sender, EventArgs e)
{
    // Full screen changed logic goes here
}While the application is running in full screen mode, attempting to switch to another application will take it back out to running in normal mode (either in its browser window or out-of-browser window). You can prevent this behavior (so that it remains in full screen mode, but with the other window in front of it) using the following code:
Application.Current.Host.Content.FullScreenOptions =
    System.Windows.Interop.FullScreenOptions.StaysFullScreenWhenUnfocused;
After setting this option, when you next attempt to go into full screen mode, the user will be asked for permission to enable the application to remain in full screen mode regardless of other applications obtaining the focus (as shown in Figure 14-12).

This message won't be displayed when the application is running in OOB mode with elevated trust.
Note
Unfortunately, attempting to display an open/save dialog box will return the application to normal mode, even if the FullScreenOptions property is set to StaysFullScreenWhenUnfocused.
One of the primary limitations of full screen mode is that the majority of keyboard input is disabled. This behavior is intended to prevent a rogue Silverlight application impersonating the Windows lock screen (for example), where you may unintentionally enter your user credentials and have someone steal them from you. Mouse input will still work as normal in full screen mode, as will the following keyboard keys: the arrow keys (up, down, left, right), Space, Tab, Page Up, Page Down, Home, End, and Enter. As mentioned earlier, the Escape key is captured by the Silverlight runtime and exits the full screen mode.
Running with elevated trust lifts this restriction.
Prior to Silverlight 4, Silverlight applications could only run in a sandboxed mode (with partial trust). This is/was a protective measure used to prevent a rogue Silverlight application from damaging the user's machine. This was an essential security measure, but vastly limited the possibilities available when creating Silverlight applications. By restricting you to the sandbox, you couldn't interact with the user's machine. For example, you couldn't:
Read or write files from the user's file system (without their interaction via the open/save file dialogs)
Interact with hardware attached to the user's machine (such as printers, scanners, biometric devices, etc)
Query a local database engine (such as SQL Server)
Interact with other applications installed on the user's machine (such as Word and Excel)
For some business applications, these restrictions meant that Silverlight was not a suitable application development platform to meet their requirements.
Silverlight 4 however introduced a newly elevated trust mode that enabled Silverlight applications to break out of the sandbox (partially, at least) to help overcome a number of the prevailing concerns of Silverlight's usefulness as an application development platform. This mode is only enabled when the application is running outside of the browser, but enables your applications a much wider range of possibilities and potential uses by integrating with the host machine and operating system.
Let's go through some features of Silverlight 4 that are only available when running with elevated trust, but first you'll look at how to enable elevated trust and determine whether the application has elevated trust permissions or not.
Note
Despite having elevated trust, the application will not exceed the user's Windows privileges. Therefore, having elevated trust will not enable users to read or write to file paths that they have no access to, nor will they be able to perform actions via COM that their Windows privileges do not permit.
Enabling elevated trust in your application is a very simple process. In the Out-Of-Browser Settings window properties (shown previously in Figure 14-2), which you can get to via the project's properties, select the "Require elevated trust when running outside the browser" check box. Elevated trust is only available when running in OOB mode, so the location of this option makes sense. You'll note that with this option set, the install dialog is quite different from the one displayed without the option set (as was shown in Figure 14-4). Instead, the user will get a more severe looking dialog, as shown in Figure 14-13.
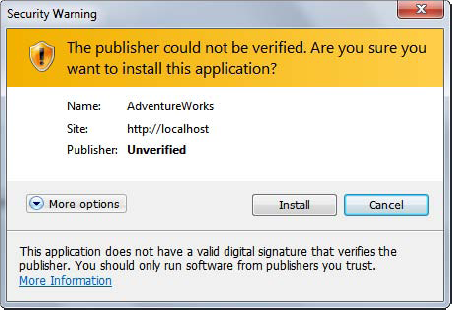
This dialog can be made a little friendlier by signing your XAP file. Doing so will change the warning at the top of the dialog to a simple question asking whether you want to install the application, and will also display the application's icon. XAP signing will be discussed in Chapter 15: Application Deployment.
Before invoking any functionality that requires elevated trust, you should ensure that the application is actually running with elevated trust permissions. Despite having set the option that it should do so, while it is running within the browser it won't have these privileges. It's only when the application is installed and actually running in OOB mode that the application will have the elevated trust permissions.
You can then determine whether the application has elevated trust permissions when it's running by checking the HasElevatedPermissions property of the current Application object, like so:
bool hasElevatedTrust = Application.Current.HasElevatedPermissions;
Whenever your application attempts to use features that require elevated trust, it should check this property first to ensure that it has permission to use them.
Note
Often, when an application makes extensive use of features that require elevated trust, it will insist that it be installed and run in OOB mode when accessed via a browser by simply displaying an install button. The means for implementing this was discussed earlier in this chapter.
Having elevated trust permissions opens up the user's file system to direct reading and writing (without the need to go via the open/save file dialogs), but only to the folders within the user's profile. Attempting to open a file (for reading or writing) from outside this location will result in a SecurityException being thrown, stating that access to the path is denied.
Note
If you find that you really need to read or write to files outside the user's profile folders (without requiring user interaction via the open/save file dialogs), you can actually bypass Silverlight's built-in file access functionality, and do so via COM instead (discussed later in this chapter). Of course, this will still only be permitted if the user's Windows permissions enable them to read or write to the paths you want them to read from or write to.
The classes that enable you to read from and write to the file system can be found under the System.IO namespace, and closely mirror those available in the full .NET Framework. For example, you will find the Directory, DirectoryInfo, File, FileInfo, and Path classes in this namespace that you can use when running with elevated trust. Despite many of these classes having methods that appear to allow you certain functionality, not all of these methods are actually implemented.
Let's take a look at some of the tasks you can perform on the file system when running with elevated trust permissions.
To access a file for reading or writing, you first have to determine the location of the file (a task performed by the user via the open/save file dialogs in the examples detailed earlier in this chapter). You only have access to the folders within the user's profile, but need to find out what the paths to these folders are. To do so, you can use the GetFolderPath method of the Environment class, passing it a value from the Environment.SpecialFolder enumeration that denotes the folder you are after. The code below demonstrates obtaining the path to the user's Documents folder:
string docPath = Environment.GetFolderPath(Environment.SpecialFolder.MyDocuments);
Note
Not all special folders listed in the Environment.SpecialFolders enumeration are accessible. For example, attempting to get the path to the machine's Program Files folder will result in a SecurityException being thrown, stating that access to the path is denied.
Once you've obtained a folder's path, you can enumerate through the files and directories within the folder.
To enumerate through the files within a folder, you can create a DirectoryInfo object (passing in the path to its constructor), and use the methods that it exposes. For example, you can enumerate through the files within the user's Documents folder like so:
string docPath = Environment.GetFolderPath(Environment.SpecialFolder.MyDocuments);
DirectoryInfo docPathInfo = new DirectoryInfo(docPath);
IEnumerable<FileInfo> docPathFiles = docPathInfo.EnumerateFiles();

foreach (FileInfo file in docPathFiles)
{
    // Work with the FileInfo object here as required
}
Note
When calling the EnumerateFiles method, you can also use its overloads to provide a pattern to filter the files that should be returned, and whether to return files from all the subdirectories below the folder as well.
Likewise, you can enumerate through the directories within the folder like so:
string docPath = Environment.GetFolderPath(Environment.SpecialFolder.MyDocuments);
DirectoryInfo docPathInfo = new DirectoryInfo(docPath);

IEnumerable<DirectoryInfo> docPathSubdirectories =
    docPathInfo.EnumerateDirectories();

foreach (DirectoryInfo directory in docPathSubdirectories)
{
    // Work with the DirectoryInfo object here as required
}
Note
Like the EnumerateFiles method, the EnumerateDirectories method also provides some overloads enabling you to supply a pattern filtering what directories should be returned, and whether to return directories from all the subdirectories below the folder as well.
You can return both files and directories within a folder in a single method call using the EnumerateFileSystemInfos method (in the same manner as described for the other two methods), which returns a collection of FileSystemInfo objects instead.
Note
You can also access corresponding methods from the Directory class (without the need to create a DirectoryInfo object first). Both means are completely valid, and the one you use will depend on your personal preference.
You can determine whether a file exists by using the Exists method on the File class. For example, the following code determines whether a file named "Test.txt" exists under the user's Documents folder:
string docPath = Environment.GetFolderPath(Environment.SpecialFolder.MyDocuments);
bool fileExists = File.Exists(Path.Combine(docPath, "Test.txt"));
In a similar fashion, you can determine whether a folder exists by using the Exists method on the Directory class. For example, the following code determines whether a folder named "Test" exists under the user's Documents folder:
string docPath = Environment.GetFolderPath(Environment.SpecialFolder.MyDocuments);
bool folderExists = Directory.Exists(Path.Combine(docPath, "Test"));
Note
Alternatively, you can create a FileInfo or DirectoryInfo object (passing in the name of the file/directory to its constructor), and check the Exists property on that instead.
You can read text or binary data from a file in the same manner as was demonstrated previously when discussing the open file dialog, after obtaining or creating a FileInfo object pointing to the file.
Elevating trust permissions opens up a number of other methods of reading data from a file that are somewhat easier to use than the previously described methods. From the File class, you now have access to the ReadAllText, ReadLines, ReadAllBytes, OpenText, and OpenRead methods. Each of these reduces the amount of code required to read data from a file. For example, the following code demonstrates reading the entire contents of a text file into a string:
string fileContents = File.ReadAllText(filePath);
As with reading data from a file, having elevated trust permissions opens up a number of other easier methods of writing data to a file. From the File class, you now have access to the WriteAllText, WriteAllLines, WriteAllBytes, OpenWrite, OpenText, CreateText, and Create methods. For example, the following code demonstrates writing "Hello" to a text file:
File.WriteAllText(filePath, "Hello");
The File class also exposes the AppendText, AppendAllLines, AppendAllText methods that enable you to append text to a file. If the given file doesn't exist, it will create it for you. For example, you may wish to keep a log file containing all of the errors experienced on the client for later analysis. These methods will enable you to implement that behavior. For example, the following code demonstrates appending "Hello" to a file:
File.AppendAllText(filePath, "Hello");
You can create a new folder within the user's profile via the CreateDirectory method of the Directory class. For example, to create a folder named "Test" under the user's Documents folder, you would use the following code:
string docPath = Environment.GetFolderPath(Environment.SpecialFolder.MyDocuments);
Directory.CreateDirectory(Path.Combine(docPath, "Test"));
Note
Alternatively, you can use the CreateSubdirectory method of a DirectoryInfo object to achieve the same outcome.
You can delete a file either via the Delete method of a FileInfo object, or the Delete method of the File class. For example:
File.Delete(filePath);
You can copy a file to a folder using either the CopyTo method of a FileInfo object, or the Copy method of the File class. For example:
File.Copy(sourceFilePath, destinationFilePath);
Moving a file is a very similar process, using either the MoveTo method of a FileInfo object, or the Move method of the File class:
File.Move(sourceFilePath, destinationFilePath);
Note
The Copy method has an overload with an additional overwrite parameter that enables you to specify that any existing file in the destination folder with the same name can be overwritten.
It's worth noting that once you are running with elevated trust permissions, you are able to access the file attributes (such as creation time, directory, etc) that you were unable to access from the FileInfo objects returned from the OpenFileDialog class when running in the normal sandboxed mode. However, even with elevated trust, selecting a file located outside the user's profile folders via the OpenFileDialog class will still deny access to its file attributes-file attributes will only be accessible if the file resides in the user's profile folders, regardless of trust level.
A somewhat controversial feature added to Silverlight 4 was support enabling COM automation. Most people's memories of dealing with COM are overwhelmingly negative (for the most part), and generally prefer that it remains just that-a memory. A more important argument against support for COM is that it is a Windows only feature-deviating away from Silverlight's cross platform nature.
Note
There has been discussion about implementing similar operating system integration for Macs in future versions of Silverlight, but none is available in Silverlight 4.
However, COM does underpin many of Windows features and that of a number of high profile Windows applications (such as those in the Office suite). Therefore, having COM support in Silverlight opens up a wide range of new possibilities for applications running with elevated trust, some of which will be discussed here.
Before attempting to call COM, you should perform a basic check to ensure that you are actually able to do so. In order to access a COM component, you must be running in OOB mode, with elevated trust, and on a Windows operating system. The IsAvailable property of the AutomationFactory class (found under the System.Runtime.InteropServices.Automation namespace) will return a Boolean value indicating whether these conditions are satisfied, denoting that the application is able to access COM automation.
bool canAccessCOM = AutomationFactory.IsAvailable;
Once you know that you have access to COM automation, you need to create or obtain an instance of the COM component you wish to automate. You can do so using either the CreateObject or the GetObject methods of the AutomationFactory class. You can use the CreateObject method to create a new instance of the COM object, and you can use the GetObject to obtain an existing instance of the COM object. For example, if you wanted to interact with a running instance of Word, you could use the GetObject method to get that existing instance (returning the most recent instance if there are multiple instances running), or you could use the CreateObject method to start a new instance.
In order to create or obtain a COM object instance, you need to know its programmatic identifier (most commonly known as its progID). Every COM component has a GUID that uniquely identifies that component, known and referred to as a CLSID. This is a unique identifier that the COM component is registered in Windows with. However, this CLSID is not particularly "human friendly", so each COM component has a corresponding meaningful string that can be used to access it by-its progID. For example, the progID to automate Word is Word.Application.
Note
In order to find the progID for a specific COM component, refer to its associated documentation.
Once you have obtained an instance of a COM object, you need to assign it to a variable. However, you have no assembly reference providing the types that you can cast the instance to (since you can't add any sort of reference to those types in Silverlight), creating a problem. Therefore, if you assign the instance to a variable of type object, the only way to call methods on the COM object and access properties is via reflection. Help is at hand however, with the dynamic keyword (new in .NET Framework 4 and Silverlight 4).
The dynamic keyword enables you to assign an object instance to a variable and, and call methods/access properties on that object-without needing to cast it to a particular type first. This is particularly useful when interacting with COM components, as you don't know their type, and cannot cast an object instance to one. Essentially, a variable's type is resolved at runtime (as opposed to the var keyword that resolves a variable's type at compile time)-a concept known as late binding.
Note
In order to use the dynamic keyword, you need to add a reference to the Microsoft.CSharp.dll to your project first.
Putting it all together now, let's create a new instance of a Word application (that has a progID of Word.Application):
using (dynamic word = AutomationFactory.CreateObject("Word.Application"))
{
    // Put code to interact with Word here
}
Note
As a general rule, you should use a using block as demonstrated above, in order to ensure that the instance is disposed of properly once you are finished interacting with it.
Obtaining an existing instance of Word is almost identical to the previous example, simply replacing the CreateObject method with GetObject instead:
using (dynamic word = AutomationFactory.GetObject("Word.Application"))
{
    // Put code to interact with Word here
}
Note
Attempting to obtain an existing instance of a COM object using the GetObject method will raise a generic Exception exception if no instance is currently running, stating that it failed to get an object instance for the specified progID.
One of the downsides of defining a variable as a dynamic type is that you don't get any help from IntelliSense in the Visual Studio code editor. Therefore, it may be worth writing the code somewhere where you do (such as creating an application using the full .NET Framework and using the Visual Studio Tools for Office to write the initial code, then translating it to run in Silverlight instead)-making the code-writing process much easier and less trial-and-error.
There's no way to tell if a COM component is registered on the system or not, without attempting to create or get an instance of the component. For example, you may want to interact with Word, but the user may not have Word installed on their machine (or may not have the right version of Word).
When attempting to create or get an instance of a COM component, a generic Exception exception will be raised, stating that no object was found registered with the specified progID. Therefore, always wrap your calls to COM components in a try/catch block, as there's no guarantee that the COM component will actually be available on the user's machine.
The Windows Script Host is a COM component built into Windows that is generally used to script and automate administrative tasks. It contains a number of COM objects that you can use to perform tasks such as running applications, reading from and writing to the registry, and creating shortcuts, to name a few.
For example, you can launch an application using the Run method of the WScript.Shell COM object. The following code demonstrates launching the Windows Calculator application:
using (dynamic shell = AutomationFactory.CreateObject("WScript.Shell"))
{
    shell.Run("calc.exe");
}A complete range of file system access functions are available via the Scripting.FileSystemObject COM component built into Windows, without the limitations imposed by Silverlight's built-in functions (that only enable you to access files and folders underneath the user's profile folders).
For example, the following code demonstrates obtaining the path to the user's Program Files folder (which it uses the Windows Script Host described previously to do), creating a sub-folder within that folder, and creating a simple text file in that sub-folder (none of this was possible with Silverlight's built-in file system access classes and methods):
using (dynamic shell = AutomationFactory.CreateObject("WScript.Shell"))
{
    // Get the user's Program Files path
    string programFilesPath = shell.ExpandEnvironmentStrings("%ProgramFiles%");

    using (dynamic fso =
        AutomationFactory.CreateObject("Scripting.FileSystemObject"))
    {
        string appPath = Path.Combine(programFilesPath, "MyApp");
        string filePath = Path.Combine(appPath, "Test.txt");

        // Create the folder if it doesn't exist
        if (!fso.FolderExists(appPath))
            fso.CreateFolder(appPath);

        // Create a text file within the folder
        dynamic file = fso.CreateTextFile(filePath, true);
        file.WriteLine("Hello");
        file.Close();
    }
}
Note
More information on how to use the FileSystemObject component can be found in the following MSDN article: http://msdn.microsoft.com/en-us/library/6kxy1a51(VS.85).aspx
As discussed earlier, you can automate Word by creating/obtaining an instance of it using its progID of Word.Application. The example below demonstrates creating a new instance of Word, adding a document, and inserting some text into it:
using (dynamic word = AutomationFactory.CreateObject("Word.Application"))
{
    dynamic document = word.Documents.Add();
    document.Content = "This was inserted by Silverlight";
    word.Visible = true;
}
You can automate Excel in a very similar fashion, by creating/obtaining an instance of it using its progID of Excel.Application. The example below demonstrates creating a new instance of Excel, adding a worksheet, and inserting some text into its first cell:
using (dynamic excel = AutomationFactory.CreateObject("Excel.Application"))
{
    dynamic workbook = excel.Workbooks.Add();
    dynamic cell = workbook.ActiveSheet.Cells[1, 1];
    cell.Value = "This was inserted by Silverlight";
    excel.Visible = true;
}
Integration with the Office applications is one of the more common uses that you will have for COM with your business applications in Silverlight. This will allow the user to extract data from the system and manipulate it for their own uses, such as producing reports and letters in Word, and charts in Excel.
Note
When automating the Office applications, always remember to set their Visible property to true, as they are hidden by default until you do so.
You can handle events raised by COM components using the GetEvent method of the AutomationFactory class. You pass the object and the name of the event to handle to this method, and it will return an AutomationEvent object, whose EventRaised event will be raised in turn when the COM object's event is raised.
For example, following on from the previous example of opening Excel and creating a new workbook, you could handle the BeforeClose event of the Workbook object returned from the excel.Workbooks.Add method, like so:
AutomationEvent beforeClosingEvent =
    AutomationFactory.GetEvent(workbook, "BeforeClose");

beforeClosingEvent.EventRaised += (s1, e1) =>
{
System.Diagnostics.Debug.WriteLine("The workbook is closing!");
};This will write a line to the Output window in Visual Studio when the workbook is about to be closed in Excel.
As discussed earlier in this chapter, there's no built-in client-side database that can be used by Silverlight to store data locally on the user's machine. However, COM automation enables you to read and write data to an existing database on the user's machine. For example, the following code demonstrates reading data from a local SQL Server database using ADO:
using (dynamic connection = AutomationFactory.CreateObject("ADODB.Connection"))
{
    using (dynamic rs = AutomationFactory.CreateObject("ADODB.RecordSet"))
    {

        string connectionString = @"Provider=SQLNCLI10.1;Data Source=.SQL2008;" +
                             "Database=AdventureWorks2008;Integrated Security=SSPI";
        connection.Open(connectionString);

        rs.Open("SELECT TOP 5 ProductID, Name FROM Production.Product", connection);

        while (!rs.EOF)
        {
            int productID = (int)rs.Fields.Item("ProductID").Value;
            string name = rs.Fields.Item("Name").Value;

            // Write out the data to Visual Studio's Output window
            System.Diagnostics.Debug.WriteLine("{0} - {1}", productID, name);
            rs.MoveNext();
        }

        rs.Close();
    }

    connection.Close();
}
And the following code demonstrates inserting a row into the database:
using (dynamic connection = AutomationFactory.CreateObject("ADODB.Connection"))
{
    using (dynamic command = AutomationFactory.CreateObject("ADODB.Command"))
    {
        string connectionString = @"Provider=SQLNCLI10.1;Data Source=.SQL2008;" +
                             "Database=AdventureWorks2008;Integrated Security=SSPI";
        connection.Open(connectionString);
command.ActiveConnection = connection;
command.CommandText = "INSERT INTO ErrorLog(ErrorTime, UserName, " +
"ErrorNumber, ErrorSeverity, ErrorState, ErrorProcedure, ErrorLine, " +
"ErrorMessage)" +
"VALUES (GETDATE(), 'UserName', 0, 0, 0, 'None', 0, 'Test Insert!')";
}
connection.Close();
}With Silverlight 4, you now have built-in access to the webcam, microphone, and printer, but what if you have other hardware devices attached locally that you want to access? If these hardware devices are accessible via a COM component then this is entirely possible. Windows also provides a generic automation layer for some device types that you can take advantage of to gain access to devices. For example, Windows includes an automation layer that enables access to the Windows Image Acquisition (WIA) platform, which provides access to imaging hardware such as cameras and scanners. Features of its associated COM component include enabling you to enumerate the connected cameras and scanners, and take pictures/scan images.
For example, the following code demonstrates displaying the Acquire Image dialog, and saving the acquired image to the user's Pictures folder:
using (dynamic acquireDialog = AutomationFactory.CreateObject("WIA.CommonDialog"))
{
    dynamic image = acquireDialog.ShowAcquireImage();

    if (image != null)
    {
        string path =
            Environment.GetFolderPath(Environment.SpecialFolder.MyPictures);

        image.SaveFile(Path.Combine(path, "ScannedImage.jpg"));
    }
}
Note
You can get more information about the WIA automation layer from the following MSDN article: http://msdn.microsoft.com/en-us/library/ms630827(VS.85).aspx
The built-in COM components demonstrated here provide a wide array of additional functionality that you can access from your Silverlight application, but there is also the potential for you to create your own COM component providing further native functionality, and have that downloaded and registered by your application (if the available Windows privileges allow it, or otherwise preinstalled by an administrator).
You can expose classes from projects targeting the full .NET Framework by making their corresponding assemblies COM-Visible. This would enable you to implement features not possible in Silverlight and make them available to Silverlight applications. An excellent article written by Elton Saulsberry on doing so is published here: www.codeproject.com/KB/silverlight/Silverlight4COM.aspx.
The downsides of this particular method is that it requires the user to have the full .NET Framework installed on their machine, in which case the application may be better completely implemented in WPF (for example). Alternatively, you may wish to develop the component using Visual C++ and ATL in order to avoid this requirement. You can find an old (but helpful) article written by C. Lung in 1999 on doing so here: www.codeguru.com/cpp/com-tech/atl/tutorials/article.php/c17.
When running your application in OOB mode, it will have the standard window chrome as determined by your operating system's display theme. However, this standard chrome can look quite out of place in comparison to the design of your application's user interface, and it would be nice to be able to implement your own custom chrome that is more integrated with your application's design instead. This wasn't possible in Silverlight 3, but it is now possible in Silverlight 4 when the application has elevated trust permissions.
When your application is configured to run with elevated trust, you can then select the Window Style option that you want to use from the Out-Of-Browser Settings window (shown back in Figure 14-2). The default option is Default (where your application is contained within the standard window chrome), but the other options available include No Border and Borderless Round Corners.
With the default chrome, a very basic Silverlight application running out of browser might look like the example shown in Figure 14-14.

By setting the Window Style option to No Border, you will get the output shown in Figure 14-15.

This is a very square window shape, whereas most windows these days have rounded corners. You can have a borderless window with rounded corners by setting the Window Style option to Borderless Round Corners. This will give you the output shown in Figure 14-16.

One of the issues that you will find when turning on custom chrome is that not only will your application no longer have a border, but also, it will no longer have a title bar either. This means that the user can no longer move the application around the screen, minimize or maximize it, close it, or resize it. You will now have to implement each of these features manually.
Minimizing and maximizing your application's window (ie. setting its state) is easy, as is closing it (each was discussed earlier in this chapter). Similarly, the ability to move and resize the window is also surprisingly easy to implement. Let's implement a custom title bar that enables the user to move the window around the screen, and a resize handle to enable the user to resize the window, as shown in Figure 14-17.

To enable the window to be moved, let's create a custom title bar using the following XAML:
<Rectangle Name="TitleBar" Height="15" Fill="#D8727272" VerticalAlignment="Top"
           MouseLeftButtonDown="TitleBar_MouseLeftButtonDown" />
Note that you are handling the MouseLeftButtonDown event on the Rectangle. You will use this event to initiate the window move, as per the following code:
private void TitleBar_MouseLeftButtonDown(object sender, MouseButtonEventArgs e)
{
    Application.Current.MainWindow.DragMove();
}
That's all there is to it. The DragMove method on the window will tell the window to move based upon the position of the mouse (relative to its current position), and it will automatically continue to do so until the left mouse button is released.
To enable the window to be resized, let's create a handle that will appear in the bottom right-hand corner of the window that the user can click and drag to resize it, using the following XAML:
<Path Name="ResizeGlyph" Data="M20,0 L20,20 L0,20 z" Fill="#D8727272"
      Grid.Row="2" HorizontalAlignment="Right" VerticalAlignment="Bottom"
      Height="20" Width="20" Cursor="SizeNWSE"
      MouseLeftButtonDown="ResizeGlyph_MouseLeftButtonDown" />
Note that you are handling the MouseLeftButtonDown event of the Path. You will use this event to initiate the window resizing, as per the following code:
private void ResizeGlyph_MouseLeftButtonDown(object sender, MouseButtonEventArgs e)
{
    Application.Current.MainWindow.DragResize(WindowResizeEdge.BottomRight);
}
This works in exactly the same way as moving the window, where the DragResize method on the window will tell the window to resize based upon the position of the mouse (relative to its current position), and it will automatically continue to do so until the left mouse button is released. Note that you need to specify (as the parameter to the DragResize method) what edge of the window the user is resizing, such that the resizing can be handled accordingly.
Running with elevated trust lifts a number of other restrictions imposed by the sandbox, including:
When attempting to communicate with a server that isn't the site of origin for the application (ie. communicating cross-domain), you no longer require a cross-domain policy file to be located in the root of that server in order to do so (as was detailed in Chapter 8: Securing Your Application).
Attempting to communicate with a server via sockets no longer requires a cross-domain policy file, Also, the application is not limited to only communicating over ports within the range 4502-4534 (as was detailed in Chapter 8: Securing Your Application).
As described earlier, most keyboard input was disabled while the application was in full screen mode. This will no longer be the case.
Consent messages will no longer be displayed when the application attempts to access the clipboard, switch to full screen mode, etc. However, the user will have to provide permission for the application to access the video and audio streams.
Copying to and pasting from the clipboard, displaying open/save file dialogs, and initiating full screen mode no longer need to be user-initiated actions.
Although elevated trust lifts a number of the restrictions placed on Silverlight applications, having elevated trust does impose one restriction on the application that is not placed on standard OOB applications.
Earlier in this chapter we discussed having your OOB Silverlight application check the server for an update, download it, and automatically update it the next time it is started. However, this poses a potential security risk to machines if the application has elevated trust permissions (simply due to the additional access to the user's machine granted to the application). A rogue application update could potentially be put in place designed to harm the user's machine. With the application having elevated trust, it could potentially do so.
Therefore, Silverlight applications having elevated trust will only be able to automatically update if the application is signed (this confirms that the update is sourced from the original application developer, and should therefore be safe to install). When the update has been downloaded, Silverlight will check that the signature of the original application matches that of the update, and will only install the update if they do.
Rather confusingly however, Silverlight applications with elevated trust will update if sourced from localhost, even if they aren't signed. This feature was implemented to make testing easier in a development environment, but can lead to frustration when developers deploy their application to a production environment and find out that it won't update (and don't know why).
Therefore, Silverlight applications with elevated trust should always be signed. Application signing is discussed in Chapter 15: Application Deployment.
System administrators may want to install the Silverlight runtime, but not permit Silverlight applications that request elevated trust permissions to be installed on the machine. This can be implemented via a Windows group policy setting, as detailed here:
www.microsoft.com/GetSilverlight/resources/documentation/grouppolicysettings
.aspx#TrustedApplications
As you can see, Silverlight provides a number of ways to interact with its host's operating system, providing read/write access to isolated storage, files, and the clipboard; installing on the machine and running in a similar fashion to a native application, and even breaking out of its sandbox to run with elevated trust permissions.
By enabling Silverlight applications to break out of the sandbox (and particularly with COM support), a wide range of new possibilities isopened up to applications developed in Silverlight 4. These possibilities narrow the gap between what is and isn't possible to achieve in Silverlight and WPF, and enables Silverlight to be considered for a wider range of development projects.