
Once you have developed your application in Silverlight, you then need to ensure that you deliver it in an effective manner to your users. One of Silverlight's advantages is that it makes it very easy to install and run applications on your end-user's computer. All that the user needs is a browser and a web connection. With just those two things you can have a "clean" PC up and running with a Silverlight application in a matter of minutes, with both the Silverlight runtime and the application deployed to the user's machine automatically (with their permission), and with no machine restarts necessary.
As we all know, first impressions are important. The first impression that the user will have of your application is waiting for it to download, and very possibly requiring the installation of Silverlight itself. Therefore, you need to ensure that they have the best experience possible, as their experience here can greatly shape their opinion and acceptance of the application.
This chapter will take you through how to deploy your Silverlight applications (to both the server and the clients), and we will also take a look at how you can improve on the default installation experience to help entice users to make the leap and install Silverlight (if they don't already have it) in order to run your application.
Depending on the nature of your Silverlight application, it may simply involve a client component (the Silverlight application itself), or it may include both server and client components (both a Silverlight application running on the client, and services running on the server). Both the server and the client components are deployed to the server, and it's the server that then deploys the client component(s) to the clients.
When you deploy a Silverlight application to the server, you are essentially deploying the web project (this consists of both the server and the client components). The process is essentially identical to deploying a traditional ASP.NET web application/web site to a server.
You have three primary options of deploying your application to the server. You can:
Simply copy the files to the server (and configure the web server manually),
Use Visual Studio's built-in publishing functionality, or
Create a setup program.
We'll take a look at these methods shortly, but let's first discuss the requirements for the server.
Silverlight applications (as a general rule) are downloaded from a server and therefore the server must be able to serve up the application to the client via web server software. In addition (depending on the various needs of your Silverlight application), the application may place additional demands on the server to serve it up data. Let's look at the requirements that your Silverlight application may place on the server, and what it needs installed to meet these needs.
One of the things that many people do not realize is that you do not need a Windows-based server (running Internet Information Services-better known as IIS) to host your Silverlight application. Silverlight is a client-based technology, and hence is executed on the client, not the server. Therefore, they simply need to be downloadable from a server, and will be run entirely by the Silverlight runtime on the client, requiring no special handling on the host server. This means that you could potentially host a Silverlight application on a Linux box running an Apache HTTP Server or Apache Tomcat server (for example), or even on cloud-based platforms such as Windows Azure. Essentially, any web server that can serve files over HTTP can be used to deploy Silverlight applications.
That said, as soon as you want to run ASP.NET based services on the server (such as those created using RIA Services) and have your Silverlight application communicate with these, the server needs to be Windows-based (as they will be written to run against the full .NET Framework), and running Internet Information Services (IIS). However, the Silverlight application itself still does not place any requirements on the server.
Note
If you don't have custom web services accompanying your Silverlight business application, but use existing services hosted elsewhere (such as on Windows Azure), then the application does not need to be deployed from a Windows-based server.
As the focus of this book has been around creating end-to-end business applications that use RIA Services, we will assume here that you are also deploying these services as a part of your server deployment. Hence the server must:
Be a Windows-based server
Be running Internet Information Services (IIS)
Have the .NET Framework 4 installed (full profile)
You can choose to deploy RIA Services to the Global Assembly Cache (GAC) so that it's accessible to all web applications, or you can distribute these as a part of your deployment. By default, the RIA Services assemblies referenced by your web project are not copied to your Bin folder, and hence are not deployed with your application when you publish your web site to the server.
To deploy RIA Services to the GAC, start by downloading the RIA Services installer from www.silverlight.net/getstarted/riaservices/. If you tried running this installer, you will probably find that it complains about requiring both Visual Studio 2010 and Silverlight 4 to be installed on the machine (neither of which the server will generally have). However, you can type the following line at the command prompt to perform a server install, which will only install the components required by a server:
msiexec /i RIAServices.msi SERVER=true
On a hosted server, you most likely will not be able to deploy the RIA Services assemblies to the GAC, but you can deploy the RIA Services assemblies required by your application along with it to its Bin directory. Simply select all the assemblies starting with System.ServiceModel.DomainServices in the Solution Explorer window for your web project, and set their "Copy Local" property (in the Properties window) to True. They will be copied into the Bin directory in your project, and deployed when you publish the web project to the server.
Note
If you encounter RIA Services related issues when attempting to run your Silverlight application, Saurabh Pant (a member of the RIA Services team) has a detailed blog post on troubleshooting these, which should be your first port of call: http://blogs.msdn.com/b/saurabh/archive/2010/03/16/ria-services-application-deployment.aspx.
If your services are deployed to a different location from where your Silverlight application will be downloaded from (this leads to cross-domain issues, as discussed back in Chapter 8: Securing Your Application), you will need to place the cross-domain policy file in the root of the web site containing the services in order for the Silverlight application to be permitted to access them. See Chapter 8 for more information on the required contents of this file and where it needs to be placed on the server.
The most primitive means of deploying your application to a server is by copying the required files to the required location (a process often referred to as xcopy, from the old DOS command), and configuring an Application in IIS to point to the folder that these files were copied to.
Copy all the non-code related files from the web project (the HTML file hosting the Silverlight plug-in, any JavaScript files, the web.config file, the ClientBin folder, the Bin folder, and so on.) to a folder on the server. This may be a new folder, or you can add to/update a folder containing an existing web site.
Note
The quickest way to determine what files are required to be copied to the server is to publish your project to a folder on your local hard drive (using the procedure detailed in the next section), and then copy all the contents of that folder to your server. When doing this, ensure that the "Items to deploy" option in the Package/Publish Web tab in the project properties has been set to "Only files required to run this application".
If you are creating a new web site, then you need to configure an Application in IIS. How you go about doing so will largely depend on the version of IIS that it will be running under, and the type of user interface available to you (i.e., either the Internet Information Services Manager, or a web-based user interface). Therefore, we will not go through a step-by-step process for this in detail, but it will follow the same process as configuring an ASP.NET 4 web site.
Visual Studio 2010 provides a feature enabling you to publish a web site in a myriad of ways to a server-both local and remote. Depending on the settings you are using, publishing a web site using Visual Studio will both copy the required files to a server, and create the Application for you in IIS (if it's not already configured). This feature makes it easy to deploy your project from right within Visual Studio.
Start by right-clicking on your web project in the Solution Explorer window, and select the "Package/Publish Settings" item from the context menu. This will open the Package/Publish Web tab in the project properties, and enable you to configure what will be deployed to the server as a part of the publishing process, and where on the server it will be published.
Once you have configured the settings appropriately, right-click on the web project in the Solution Explorer window again, and select the Publish item from the context menu. This will display the Publish Web dialog shown in Figure 15-1.
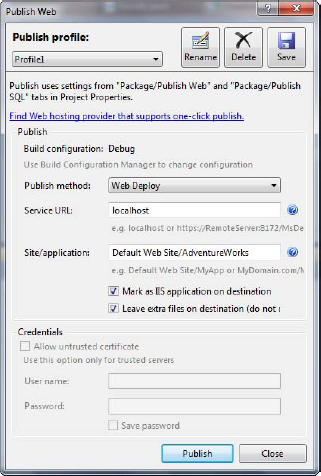
You can then configure how you want to publish your web site in this dialog, and click the Publish button to start the publishing process. It will copy the files used in your web project (that will include your Silverlight application), and will create the Application in IIS (if you have selected the "Mark as IIS application on destination" option in the Publish Web dialog.
Note
You can publish your project to the file system, and then xcopy these files to the server if required.
Instead of publishing the web site directly to the server, you can instead create a web package, which is essentially a .zip file containing your web site and configuration files dictating how the web site should be created under IIS on the server. You can then take this package and import it into IIS (either using the Internet Information Services Manager, or via the command line using the msdeploy tool).
Note
You can get more information about the msdeploy tool from here: http://blogs.iis.net/msdeploy/default.aspx
To create a package, right-click on your web project in the Solution Explorer window, and select the "Build Deployment Package" item from the context menu. This will immediately compile the web site into a package, using the settings configured in the Package/Publish Web tab in the project properties for the web project.
You can then open up the Internet Information Services Manager and import the package. This will install the files on the server, and create the Application in IIS. Alternatively, if you want to import the package via the command line, you can find instructions on doing so in a text file created in the same folder as the package.
If your application is to be a packaged product sold to companies who then install it on their own server, creating a setup program is the best way to provide it to your customers to install.
Add a new project to your solution, and use the Web Setup Project project template (you will find this under the Other Project Types > Setup and Deployment > Visual Studio Installer category).
In the Solution Explorer window, right-click on the setup project, and select Add
Select the setup project in the Solution Explorer window again, then go to the Properties window and assign values to the properties, as you require. Once you are done, you can compile the project.
You can test the setup program locally by compiling your project, then right-clicking on the setup project in the Solution Explorer window and selecting the Install item from the context menu.
One of the great features of Silverlight is that you can go from a "clean PC" (a machine without Silverlight installed or the application downloaded), to being up and running with the application in a matter of minutes. This makes Silverlight a very effective means of deploying applications to client machines. When the client navigates to a URL hosting a Silverlight application, you can structure the HTML page that hosts the Silverlight plug-in to notify the user if they don't have Silverlight installed, and point them to a link where they can download the Silverlight runtime and install it. Once the Silverlight runtime is installed, the HTML page will be automatically refreshed and the download of the application will begin, running it once the download is complete.
As you can see, deploying a Silverlight application to the client is a two-step process. The process involves:
Downloading and installing the Silverlight runtime (if it's not already installed)
Downloading the application if it's not already downloaded (or is not up to date)
Let's take a closer look at how this process works, how to customize it to create a more streamlined user experience, and other methods you could use to deploy the Silverlight runtime and your application to the users.
Let's start by taking a look at what happens when the user attempts to run your Silverlight application, but doesn't have Silverlight installed. Let's assume that no version of Silverlight is currently installed on the user's machine, and that they have navigated to the URL for your application. The user will be presented with a blank page, containing the image shown in Figure 15-2.

If you view the source of the HTML page that's used in your application to host the Silverlight plug-in (as was detailed back in Chapter 2: Getting Started with Silverlight), you will find the following lines of HTML in its body:
<object data="data:application/x-silverlight-2," type="application/x-silverlight-2"
        width="100%" height="100%">
    <param name="source" value="ClientBin/AdventureWorks.xap"/>
    <param name="onError" value="onSilverlightError" />
    <param name="background" value="white" />
    <param name="minRuntimeVersion" value="4.0.50401.0" />
    <param name="autoUpgrade" value="true" />
    <a href="http://go.microsoft.com/fwlink/?LinkID=149156&v=4.0.50401.0"
                                                    style="text-decoration:none">
        <img src="http://go.microsoft.com/fwlink/?LinkId=161376"
            alt="Get Microsoft Silverlight" style="border-style:none"/>
    </a>
</object>
If the browser does not know what the object is supposed to be (because the Silverlight plug-in hasn't been installed), it will ignore the object tag and simply display the content between the opening and closing object tags instead. The default HTML between the tags (in bold) simply displays the image you see in Figure 15-2, and when it is clicked on will download the Silverlight plug-in from the Microsoft web site.
Note
We'll look at improving this default Silverlight installation experience to make it somewhat friendlier and more enticing by swapping out this default "install Silverlight" HTML with your own content later in this chapter.
You will also note the following line in the head section of the HTML file:
<script type="text/javascript" src="Silverlight.js"></script>
This script contains a number of helper functions, such as automatically reloading the page once it recognizes that the Silverlight plug-in is installed, and additional functions to enable you to create a Silverlight object in a web page via JavaScript.
Once the Silverlight runtime has been installed, the page will be automatically refreshed, and the application will begin to download from the server (and be displayed once the download is complete).
Note
If an earlier version of Silverlight has been installed on the user's machine but your application is targeting a more recent version, the new version will be downloaded and installed automatically, but the user will have to restart their browser. The Silverlight plug-in is backward compatible, meaning that any Silverlight application written in a previous version of Silverlight will run without issues in a more recent version of the plug-in. Additional Silverlight versioning information can be found here: http://msdn.microsoft.com/en-us/library/cc265156(VS.95).aspx.
You saw in the previous section how easy it was to get set up and running with Silverlight on a clean PC. However, despite the ease that you can deploy your applications using Silverlight, the default experience isn't particularly ideal. Let's take a look at why you should customize the Silverlight installation experience, and how you can do so.
When a user navigates to your application, the last thing they want is something blocking their way (like the installation of a plug-in). Depending on their level of commitment to running your application, it opens up a barrier for the user, providing a decision point that may lead to them deciding to abandon the attempt and turn away. You really want to avoid this possibility at all costs.
Note
This is not such an issue with standard business applications that are running in corporate environments. The IT department will have bought into Silverlight as the technology running one or more of their applications, it is likely to have already been deployed to user's PCs, and the use of the application will have been mandated by the company management. However, there are many other scenarios where this issue should be considered. If you are providing your application as software as a service (SAAS) or a packaged product, then this will be an issue. Alternatively, if you have users working from home, it's important that you provide a low friction install experience for getting them up and running with your application.
Unfortunately, the default "Silverlight requires installation" experience does nothing to help the issue of getting user buy-in. The simple image and link (shown previously in Figure 15-2) fails at the following points:
It tells the user nothing about:
Your application or your business
Why your application needs Silverlight
Why they should install Silverlight
What the value that installing Silverlight provides
Instructions for timid users to walk them through how to complete the installation
It does not:
Provide any preview that demonstrates what the user will get on the other side of the installation process
Attempt to engage and entice the user, why it's worth going through the process of installing Silverlight in order to run your application
Maintain consistency with the rest of your web site or the Silverlight application. By not providing any visual consistency, its appearance will be jarring to the user, thus leading to a sub-optimal user experience
Make any attempt to ease any fears that the user might have
It does not provide any background information on Silverlight, such as:
Link to MS Silverlight site
What it will (or will not) do to their computer
What Silverlight is
Whether Silverlight can be easily uninstalled
How many major web sites use Silverlight, and that the user will gain access to these sites as well
Why the plug-in can be trusted (apart from the Microsoft logo). For all the user knows, this could be an advertisement designed to trick them into installing something malicious, or that they don't need/want
Why the user may not be able to install Silverlight on their machine. For example, they may be running an unsupported operating system or browser. In addition, that the user will need administrative rights on their machine to be allowed to complete the installation
You should personalize the installation experience, tailoring it to your business and the application, and entice the user to work through the minor impediment of not having Silverlight in order to run your application. Ideally, if you had a designer work on the design of your application, you should also have them design the Silverlight installation and application deployment process too, in order to maintain consistency in all three phases (Silverlight installation, application deployment, and application execution).
It's important to think like a user, and try to identify with them and their psychology when they first use your application. There are many classes of users, including those who will:
Click on and install anything that gets them where they want to go
Be fearful of using computers and what they install on them
Have short attention spans and give up quickly if they come to any sort of barrier
Take these behaviors into account and design your Silverlight installation experience accordingly.
Note
As the popularity of Silverlight grows, these initial installation issues will become less of a problem. However, you will need to support users with a freshly installed operating system (and therefore will not have Silverlight installed yet). Also, with the regular releases of new Silverlight versions, it's always likely that the user will be running an older version of Silverlight than what you are targeting. As discussed back in Chapter 1: Introduction, you can get a rough idea of the reach of a particular version of Silverlight at a site such as www.riastats.com. At the time of this writing, this site is reporting that a little over 60% of Internet-connected devices have a version of Silverlight installed, with the vast majority of these installs already being Silverlight 4.
The first step in customizing the Silverlight installation experience is to see what the user sees in the browser if they don't have Silverlight installed. You can either:
Uninstall Silverlight from your machine using the operating system's uninstall application tool (such as Windows Vista/7's Programs and Features tool), or
Simply disable the Silverlight plug-in in your browser of choice. For example, in Internet Explorer go to Tools

If you then open the Manage Add-ons dialog again and re-enable the Silverlight plug-in and close the dialog again, you will note that within a second or two the page will be automatically refreshed and your application will be loaded. This is thanks to the Silverlight.js file that is referenced in the HTML/ASPX page hosting your application (as was detailed earlier) and distributed with your application. When it detects that the Silverlight plug-in isn't installed, it will continually monitor for it until it is found (when the user has successfully installed the Silverlight plug-in), at this point it will automatically refresh the page in order to load your application. Therefore, all you really need to focus on is the designing an effective landing page.
To implement a custom-landing page, you simply need to replace the following lines of HTML between the opening and closing object tags (discussed earlier in this chapter) in the page that is hosting your Silverlight application with your own custom HTML:
<a href="http://go.microsoft.com/fwlink/?LinkID=149156&v=4.0.50401.0"
                                                    style="text-decoration:none">
        <img src="http://go.microsoft.com/fwlink/?LinkId=161376"
            alt="Get Microsoft Silverlight" style="border-style:none"/>
</a>
Ideally, you would replace it with some HTML that will help address each of the issues listed in the previous section (detailing why you should customize the Silverlight installation experience), but still retain the link to download the Silverlight runtime from the default HTML (not necessarily the image however). Try to retain as much consistency as possible with the rest of your web site structure and style, make sure the user knows what is happening and what they need to do, and brand it with your company and/or application.
Note that if you want to provide the users step-by-step instructions on installing Silverlight, each browser requires slightly different steps to be taken, and each display different dialogs. Ideally, you would recognize the browser type on the server, and provide the corresponding instructions accordingly. For this purpose, you can use the .aspx page (instead of the .html page), determine the browser type and version on the server (using this article as a guide: http://msdn.microsoft.com/en-us/library/3yekbd5b.aspx), and output your instructions to the page (between the opening and closing object tags) accordingly.
Note
It can be a good exercise to disable the Silverlight plug-in using the method described earlier, and investigate how other Silverlight applications customize their page notifying the user that they need to install Silverlight. You will note how much of a difference it can make to the Silverlight installation experience just by properly customizing this page. Good examples of custom Silverlight install experiences that are well executed include the www.Silverlight.net web site, and the Netflix Watch Instantly web site.
A great source of information regarding creating custom Silverlight installation experiences, and a must-read when creating your own, is the Silverlight Installation Experience Guidance whitepaper, which you can find a link to on this site: www.silverlight.net/learn/whitepapers/. This is an extremely detailed document that can be used to guide you in creating a functional and effective custom Silverlight installation experience, and also has a template (in the accompanying download) that you can use.
One of the issues in deploying the Silverlight runtime (particularly in enterprise environments) is that the user will need to be a local administrator on their machine in order to install the Silverlight plug-in (as is the case with any plug-in). If the user doesn't already have the Silverlight runtime installed on their machine and does not have local administration rights, they won't be able to install the Silverlight plug-in (and hence run your application).
Note
Worth clarifying, the user does need to be a local administrator on their machine in order to install the Silverlight runtime/plug-in. However, they don't need to be a local administrator on their machine in order to install a Silverlight application (to run outside the browser).
The Silverlight runtime can however be pushed out to users using the Microsoft Systems Management Server automated installation, or by setting up a group policy. Despite being for Silverlight 2.0, the Silverlight Enterprise Deployment whitepaper available from www.silverlight.net/learn/whitepapers/ is a very thorough and detailed guide for methods of deploying Silverlight in enterprise environments.
In Chapter 14: Out Of Browser Mode, and Interacting with the Operating System, we discussed how to install your Silverlight application to run outside the browser, in much the same way as a standard (native) desktop application. In some scenarios, you may find that web deployment of your application is not always suitable or even possible. In this case you will need to have a more traditional setup program that can be run on the client and install the Silverlight application as an out-of-browser application. You can do this using the silent install feature of the Silverlight launcher (sllauncher.exe).
Note
Unfortunately the Silverlight runtime has not been packaged into a merge module, so it can't be included as a part of your setup program, and will need to be installed separately. This method therefore assumes the client already has the Silverlight runtime installed. You can download the Silverlight runtime installer from the www.silverlight.net web site.
The sllauncher.exe application accepts various command-line parameters, which can be used to install/uninstall/run a Silverlight application.
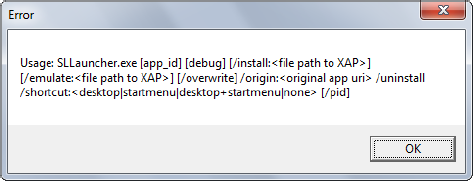
If you type the following line on the command line:
"%ProgramFiles%Microsoft Silverlightsllauncher.exe"
It will display the message box shown in Figure 15-3.
Note
These examples will only work under Windows, and you will need to change %ProgramFiles% to %ProgramFiles(x86)% when running under the 64-bit edition of Windows in this and the following examples.
This tells you what command-line parameters you can take advantage of to enable us to install the application on the machine. Of particular interest are the following options:
/install: the path to the XAP file (required)/origin: the URI specifying the site-of-origin for the application (ie. where it was downloaded from). Even though the application was not downloaded from the Web, this is a required parameter and must be assigned a URI/shortcut: what shortcuts should be created - start menu, desktop, both, or none (optional)/overwrite: when used will overwrite any existing version already installed (optional)
An example of installing an application using these options is below:
"%ProgramFiles%Microsoft Silverlightsllauncher.exe" /install:"AdventureWorks.xap"/origin:"http://localhost/AdventureWorks.xap" /shortcut:desktop+startmenu /overwrite
You can take advantage of this silent install feature in your own setup programs by adding the .xap file from your Silverlight project to your setup project, and creating a custom action to extract your .xap file to a temporary location and running sllauncher.exe with the appropriate command-line parameters to install it. A full explanation of this procedure however is beyond the scope of this book. Alternatively, a somewhat simpler option may be to deploy a batch file along with the application, which when executed, will install the application using the method described here.
After improving the Silverlight installation experience, the next step is to improve the experience for your users while your Silverlight application is being downloaded from the user. You are no doubt familiar by now with the blue spinning balls animation that is displayed while your application is being downloaded (as shown in Figure 15-4), which provides a generic indicator that something is currently happening. If after half a second the application is still downloading, Silverlight will automatically display this default loading animation until the application has finished downloading.

However, as with the default Silverlight installation experience, having no branding and no personalization displayed to the user after five seconds or more of waiting is not an ideal user experience. You can however replace this animation with your own custom one, commonly referred to as either a pre-loader or a splash screen.
An application pre-loader is essentially a XAML page that is requested from the server by the Silverlight plug-in prior to the application itself. Designed to be very small (much smaller than the application), it will be downloaded first and be displayed while the main application continues to download. Whereas the main application will be compiled and compressed into a .xap file, the pre-loader is not a part of the Silverlight project-instead it is a standalone XAML file (added to your web project) and is therefore not compiled into a .xap file. This also means that you can't write any code-behind against the CLR, however you can make use of the JavaScript API (as was used back in Silverlight 1.0) to control the user interface, which can be written in a .js file and downloaded along with the XAML file.
Let's take a look at how to create and test an application pre-loader.
To create your pre-loader, start by adding a new item to your web project, using the Silverlight 1.0 JScript Page item template (found in the Silverlight category), and name it AppPreloader.xaml. This template will actually create two files-a XAML file (with the name you specified in the Add New Item window), and a JavaScript file (with the same name as the XAML file, but with a .js extension).
Note
Follow through these instructions step by step, without jumping around, trying to compile, and so on. This is very important. Unfortunately, the process isn't particularly straightforward (until you fully know what you're doing), and not going through each step one at a time is likely to lead to confusion and frustration.
Once the file has been created and opened, you'll note that there is no XAML designer support. However, if you close the file and open it again, the designer will appear (but will display an error due to it not supporting the referenced default namespace used by Silverlight 1.0).
Delete the contents of both the XAML file and the JavaScript file, as it's just the files you need-not their contents. You will be using a different default namespace than that used in the XAML file created for us, and trying to use the default namespace from the item template will end up just creating problems and confusion for you. Likewise, none of the contents of the JavaScript file are required-you'll add your own code shortly.
Now add the following XAML to the XAML file:
<Grid xmlns="http://schemas.microsoft.com/winfx/2006/xaml/presentation"
      xmlns:x="http://schemas.microsoft.com/winfx/2006/xaml">

</Grid>
Note
There is no IntelliSense in the XAML editor as yet. This will come once the next step has been performed.
Click the "Reload the designer" button in the designer. Attempting to compile the solution now will result in the following error: "Project file must include the .NET Framework assembly 'WindowsBase, PresentationCore, PresentationFramework' in the reference list". With the designer open now, you can have these references automatically added to your project by simply dragging a TextBox from the Toolbox into the designer. Alternatively you can simply type an open angle bracket (<) in the XAML editor (with the designer open), which will have the same effect. You should now be able to successfully compile the project.
Now that you have the required files properly configured, you can start adding the content you want to display in the pre-loader. One of the most important points when creating a pre-loader is to try and keep it very small. As a general rule, try to keep it less than 5 percent of your application's total size, and no more than 10KB so that it can download and be displayed to the user as quickly as possible, even on slow connections.
Almost all pre-loaders display an indicator to the user showing the current progress of the application download. This enables the user to be aware that something is actually happening, and how much longer it may take. The Silverlight plug-in raises an event at a regular interval (that you can handle in the JavaScript file), reporting the current progress of the application download. The pre-loader should also display some branding for both the company and the application (one of the main reasons for undertaking this exercise).
Note
When implementing this pre-loader you will need to stick to using only the controls in the core Silverlight runtime. Essentially you are limited to using Silverlight 1.0 controls only. Controls available for you to use include the Canvas, Grid, StackPanel, InkPresenter, MediaElement, TextBlock, Image, Rectangle, Line, Ellipse, Path, Polygon, and Polyline. However, other controls such as the ProgressBar (which would be very useful in a pre-loader), Button, and so on are unfortunately not available.
Figure 15-5 demonstrates the pre-loader you will be creating.

As you can see, it displays an image with the company logo, tells the user what it's doing, and displays a progress bar and the progress as a percentage. The XAML required to create this pre-loader is below:
<Grid xmlns="http://schemas.microsoft.com/winfx/2006/xaml/presentation"
      xmlns:x="http://schemas.microsoft.com/winfx/2006/xaml">
    <StackPanel VerticalAlignment="Center">
        <Image Width="352" Height="111" Source="../Logo.png" />
        <TextBlock HorizontalAlignment="Center" Margin="0,10,0,5"
                   Text="Please wait - downloading..." />
        <Grid HorizontalAlignment="Center">
            <Rectangle Stroke="#FF5F91B4" Height="7" Width="454" />
            <Rectangle Fill="#FF5F91B4" Margin="2,0,0,0"
                    Height="3" Width="450" HorizontalAlignment="Left">
                <Rectangle.RenderTransform>
                    <TransformGroup>
                        <ScaleTransform x:Name="ProgressBarTransform" ScaleX="1"/>
                    </TransformGroup>
                </Rectangle.RenderTransform>
            </Rectangle>
        </Grid>

        <TextBlock Name="ProgressText" Text="0%"
                   HorizontalAlignment="Center" Margin="0,0,0,5" />
    </StackPanel>
</Grid>
Unfortunately the ProgressBar control isn't available for us to at this stage (as it's not in the core Silverlight runtime), so you need to create your own using the primitive controls available to us. You have a rectangle that forms the outer border of the progress bar, and an inner rectangle that is used as the progress indicator. The trick for this is that you create the progress indicator rectangle setting its width as it will be when displaying a value of 100 percent, but apply a scale transform that will be used to scale its width in proportion to the progress value it is indicating. By altering the transform's ScaleX property with values between 0 and 1 (in JavaScript code), you will be able to display the progress from 0 percent to 100 percent accordingly-providing an elegant way to implement the progress bar without needing to worry about calculating the required width in pixels in the JavaScript code. You've given the transform a name so you can refer to it in the code and adjust the scale accordingly (as you will see in the next section).
You will also note the use of the Image control. The Logo.png file it refers to is a file in the web project, and you are using a relative path to specify its location. Don't be concerned about the fact that the image doesn't appear in the XAML designer-it may not appear there, but it will appear when the pre-loader is being displayed at runtime.
Note
As with the advice given earlier, you should ensure that any images used are as small as possible, and keep the entire pre-loader and its resources under 10KB (if you can). You may like to try running the image through a tool that shrinks the size of images, as these can result in a drastic size reduction. Some of these tools are online tools (and therefore easy to try), such as www.imageoptimizer.net.
Now that you have the visual aspects of your application pre-loader in place, you need to update the progress being displayed. This involves updating both the progress bar indicator's scale transform, and the text displaying the progress as a percentage
The Silverlight plug-in has two events it raises that you can handle:
OnSourceDownloadProgressChangedOnSourceDownloadComplete
The OnSourceDownloadProgressChanged event will be raised on a regular basis, and you can use the progress property of the EventArgs object passed into the handler as a parameter to determine the progress. This will be a value between 0 and 1, so you can assign this value directly to the ScaleX property of the progress bar indicator's scale transform, and multiply it by 100 to display the value as a percentage.
The code below should be added to your JavaScript file in order to update the pre-loader when the onSourceDownloadProgressChanged event is raised:
function onSourceDownloadProgressChanged(sender, eventArgs) {
    var progress = Math.round((eventArgs.progress * 100));
    var ProgressBarTransform = sender.findName("ProgressBarTransform");
    var ProgressText = sender.findName("ProgressText");

    if (ProgressBarTransform != null)
        ProgressBarTransform.ScaleX = eventArgs.progress;

    if (ProgressText != null)
        ProgressText.Text = progress + "%";
}
Note
This event handler will be wired up in the next section.
The OnSourceDownloadComplete event is called once the application has completed downloading but is rarely used, as the application will load immediately after it's raised.
You now have your application pre-loader's design in place, and the code to update it when the application download progress changes, but now you need to actually wire both of these things up so that the Silverlight plug-in knows about them.
Start by opening up the HTML page that hosts the Silverlight plug-in. In the head tag, add the following reference to the JavaScript file:
<script type="text/javascript" src="AppPreloader.js"></script>
Now locate the Silverlight plug-in, and add the following two parameters to it:
<param name="splashscreensource" value="AppPreloader.xaml"/>
<param name="onSourceDownloadProgressChanged"
       value="onSourceDownloadProgressChanged" />
These two parameters connect everything together, and you're now ready to test it all.
Note
Ensure that the HTML or ASPX page you are modifying is actually the file set as the start page for your web project. Otherwise you may face some confusion wondering why the pre-loader isn't being displayed, when you are simply browsing the wrong file when you run your application.
Testing the application pre-loader may initially seem like a simple enough task, however it's a deceptively complex process. The issue is that when running your application locally, the download process will generally be extremely fast, and the pre-loader will not have time to actually be displayed (or will be displayed only momentarily). This obviously makes it difficult to test and debug. However, there are some tricks you can use to slow its display down. Let's take a look at some of these.
Note
You may often get errors such as "Failed to download the splash screen" or "Could not download the Silverlight application. Check web server settings" when debugging your application locally. Alternatively you may get a blank screen, with neither the pre-loader nor the application itself loading. This appears to be an issue with the application download in this scenario being faster than it takes to download and display the pre-loader. This should not be a problem in production environments however.
The easiest thing you can do to try and slow the downloading process and give your application pre-loader some time to be displayed is to add one or more large files to your Silverlight project in order to increase its size. The larger the project, the longer it will take to download. Simply add a large file to your project and set its Build Action property to Content (select the file in Solution Explorer, and then set the property value in the Properties window). This is a simple way of slowing the download process, but not particularly the most effective.
The application pre-loader is displayed until the RootVisual property of the Application object is assigned. Therefore, if you don't assign a value to this property, the pre-loader will continue to be displayed indefinitely.
In your Silverlight project, open up the code-behind for the App.xaml file, find the Application_Startup event handler method, and comment out the following line of code:
this.InitializeRootVisual();
Now when you run your project, the pre-loader will continue to be displayed, without displaying your main application. This trick won't help you in testing your progress bar, but will help in testing the look and feel of your pre-loader.
Note
Another option is to sleep the thread (using the System.Threading.Thread.Sleep method) for a fixed period immediately prior to initializing the RootVisual.
Fiddler is a web debugging proxy that intercepts all incoming and outgoing HTTP/HTTPS connections, enabling you to log and modify the traffic. You can use Fiddler to slow down the downloading of the application, giving us time to view and test the pre-loader.
Note
You can download Fiddler for free from www.fiddler2.com
When you open Fiddler, it will immediately start capturing the traffic. Select both the Simulate Modem Speeds and the Disable Caching options from the Rules
Unfortunately, simply running your application is not enough for this all to work. Fiddler bypasses capturing local traffic, but there is a trick that you can use to ensure that it intercepts your application. Change the use of "localhost" in the URL in your browser's address bar to "127.0.0.1." (the localhost loopback IP address, including the final dot). This will trick Fiddler into capturing the traffic, and you will find that the application now downloads slowly enough for you to adequately test your pre-loader. Once the application has loaded, you can simply refresh the page to have it downloaded again (as it will not be cached).
The next issue that you should target is the size of your application. As soon as you start referencing various assemblies and adding assets to your application, it can rapidly increase in size. It will depend on the nature of your application as to whether this is an issue you should be concerned about or not. In an internal corporate environment where the application will be downloaded from a server located on the local network, this is generally not a particularly big issue. However, if your application is being deployed over the Web, then it becomes something that you should pay closer attention to. The larger the application, the longer it will take for the user to download it and get it up and running, and the more bandwidth it will require (for both you and the user). It provides more of a barrier for the user to use your application, and gives them another reason to abandon the attempt. Let's take a look at some strategies you can implement to reduce the size of your application, or partition it into modules that can be downloaded on demand.
The first step you should take is to look at the size of your .xap file and decide on how acceptable its size is. You may want to use the feature of Fiddler, discussed previously, to simulate modem speeds in order to determine how acceptable the time it takes to download may be to various users.
The next step is to ensure you aren't referencing any assemblies or assets not actually being used by your application. If your .xap file is still large then it may be worth analyzing its contents (by changing its extension to .zip and unzipping it, as discussed previously in Chapter 2: Getting Started with Silverlight). Look for the largest files and determine if you can remove them or replace them with a suitable alternative.
One thing that you can do to partition you application into smaller pieces is to turn on assembly caching for your application. You will find this in the "Reduce XAP size by using application library caching" option in the project properties for your Silverlight project. What this will do is instead of creating a single large .xap file containing all the assemblies required by your application (that aren't a part of the core Silverlight runtime), it will move all the assemblies (that have an accompanying extension mapping configuration file, discussed shortly) out of this file and into separate .zip files, as you can see in Figure 15-6.

This will result in the .xap file becoming much smaller. It won't actually reduce the initial size of your application, but it provides a big advantage when it comes to deploying updates to your application. Without assembly caching turned on, each time you deploy a new version of your application, the user needs to download the entire application from the server again (including the assemblies referenced by your application that haven't changed).
By turning assembly caching on, when you deploy an update to the application to the users, only the .xap file containing the application itself will need to be downloaded again. The assemblies referenced by your application that remained unchanged will not need to be downloaded again because they will remain cached in the user's browser cache (unless they have been updated on the server too).
Some of the assemblies (such as that containing the DataGrid control) are quite sizable, so having these only downloaded when the application is initially deployed will result in much smaller updates.
Note
One of the big downsides of turning this option on is that it can't be used with applications configured to be installable and run outside the browser (that may or may not be a concern to you). Out of browser applications require all of their assemblies to be located in the .xap file (excluding those assemblies downloaded on demand, as described in the next section). If your application is configured to run outside the browser, trying to turn this option on will result in a dialog appearing, requiring you to decide on one option or the other. However, if your application is designed to run solely within the browser, then you should take advantage of this option.
The way that assembly caching works is that for each assembly referenced by the project that must be packaged with your application (for example, assemblies included in the core Silverlight runtime excluded), it will look for a corresponding external part manifest file in the same path from where it is referenced. These files have the same name as the assembly, but with a .extmap.xml extension instead of .dll. For example, you will find that the System.Windows.Data.dll assembly (that needs to be packaged with your application) has a corresponding external part manifest file named System.Windows.Data.extmap.xml. If you open this file, you will find the following contents:
<?xml version="1.0"?>
<manifest xmlns:xsi="http://www.w3.org/2001/XMLSchema-instance"
          xmlns:xsd="http://www.w3.org/2001/XMLSchema">
  <assembly>
    <name>System.Windows.Data</name>
    <version>2.0.5.0</version>
    <publickeytoken>31bf3856ad364e35</publickeytoken>
    <relpath>System.Windows.Data.dll</relpath>
    <extension downloadUri="System.Windows.Data.zip" />
  </assembly>
</manifest>
This essentially defines the path where the assembly can be found, and where it can download the package containing it. When an external part manifest file is found for an assembly, it will be excluded from the .xap file, and packaged into its own .zip file (with the name specified as the download URI).
Note
If the external part manifest file specifies an absolute URI, then the assembly won't be packaged into a .zip file. Instead, it will be downloaded from the specified URI instead of from the site from where the application is being downloaded. Note, however, that this is a cross-domain operation, and hence requires a cross-domain policy file put in place in the root of the site from where the package is to be downloaded. See Chapter 8:Securing Your Application for more information on implementing cross-domain policy files.
The AppManifest.xaml file in the .xap file will then reference it in its Deployment.ExternalParts section, so that the Silverlight plug-in knows what additional packages it needs to download before it can run the application.
If you inspect your .xap file's contents (by changing its extension to .zip and unzipping it, as discussed previously in Chapter 2: Getting Started with Silverlight), you may find that not all the assemblies have been packaged as external parts (excluding the core assembly for the application), and are still packaged in your .xap file-particularly assemblies that you created yourself. In order for an assembly to be cached, it must be signed with a strong name, and have an external part manifest file (as described in the previous section).
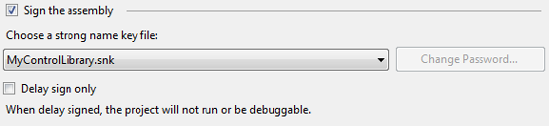
To sign your assembly with a strong name, open up the project properties for the project, and open the Signing tab. Select the "Sign the assembly" check box (as seen in Figure 15-7), select <New...> from the drop-down list, and enter a name and password for the strong name key file in the dialog that appears. The next time your application is compiled it will then be signed.
The next step is to create the external part manifest file. The easiest way to create this is to use the DevCorner ExtMap Maker Utility tool created by Alex Golesh, which you can download from http://blogs.microsoft.co.il/blogs/alex_golesh/archive/2009/07/16/small-utility-extmap-maker.aspx. This is a command-line utility that you can point to your assembly (passing the path to the assembly as its command-line parameter), and it will create a corresponding external part manifest file for you in the same path as the assembly is located. For example:
emm MyControlLibrary.dll
Put this in the binDebug and binRelease folders of your assembly before adding the reference to it to your Silverlight application, and then recompile the Silverlight application. You will find that the assembly is now created as a separate package for download.
Another way you can partition your application is by breaking it up into modules, each in their own assembly. These can be excluded from the main .xap package (minimizing the size of your main application), and downloaded only when (and if) they are required. For example, you may like to have separate modules for each functional area in your application, where users may only have permission to access one or two of those functional areas. Likewise, you may like to split the administrative functionality into another module, as only a subset of users will be permitted access to it.
There are a number of ways to modularize your application, and the method you decide to use will often depend on if you want to use a framework or not. Let's start by discussing some of the options available to you, and then look at implementing a simple means of modularizing your application.
You need to start by making a decision on whether you are prepared to use an existing framework in order to modularize your application, or create your own custom solution. Incorporating a framework can provide many benefits (in addition to the modularization), however it may also impose on the structure and design of your application-which, depending on the stage you are at in your development process, may or may not be an issue. They can also introduce additional complexity into your application and incur a significant learning curve. It will depend on the nature of both your application and your team as to whether you are prepared to undertake this process.
The most popular frameworks for implementing modularization in Silverlight applications include Prism and the Managed Extensibility Framework (MEF).
Prism is both a framework for creating modular applications, and corresponding guidance dictating patterns and practices for doing so. The application is partitioned into loosely coupled modules, which are run within regions in an application shell. This provides a set pattern for modularizing your application where the modules can then be deployed to the client as required.
You can find out more about Prism and download the framework from http://compositewpf.codeplex.com. You can read a great article about on-demand loading in Prism and Silverlight written by Nigel Ferrissey here: www.codeproject.com/KB/silverlight/sl3prismnav.aspx.
MEF is another popular choice, but has a different goal and focus to that of Prism. MEF is a framework for creating extensible applications and could essentially be considered a dependency injection framework (although that point is debated). Technically, MEF could be used in conjunction with Prism, replacing Unity that Prism uses as its dependency injection framework. Prism has a broader focus than MEF, with a focus on user interface composition that MEF does not have. MEF instead focuses on component discovery and composition in order to create extensible applications. You can take advantage of MEFs built-in, on-demand deployment capabilities using its DeploymentCatalog catalog.
You can find out more about MEF and download the framework from http://mef.codeplex.com, and find out more about using the DeploymentCatalog catalog from http://mef.codeplex.com/wikipage?title=DeploymentCatalog.
Since we haven't delved into these frameworks in this book, you may want to consider a simpler alternative that doesn't rely on a complex framework such as Prism or MEF, but simply works with the navigation framework as discussed back in Chapter 4: The Navigation Framework.
Using the navigation framework, you ideally need to be able to be able to split your application up with views and their corresponding logic in separate assemblies-when the user is navigating to a view in another assembly, to check whether that assembly is in the cache, and if not then download it. Once it is downloaded, the requested view within that assembly should then be displayed within the frame.
David Poll has an excellent method for doing this that he has documented on his blog here: www.davidpoll.com/2010/02/01/on-demand-loading-of-assemblies-with-silverlight-navigation-revisited-for-silverlight-4-beta/. He provides an easy way of implementing this behavior, which you can take advantage of yourself by referencing some assemblies he's created in your Silverlight project, and following the instructions he has provided in his blog post.
Note
The downloaded XAPs will be maintained in the browser cache using David's method, but you may want to consider adding them to the application's isolated storage store in order to maintain them permanently.
As briefly discussed back in Chapter 14: Out Of Browser Mode, and Interacting with the Operating System, when the user tries to install your application to run outside the browser with elevated privileges, it will display a rather stern warning in the install dialog (shown in Figure 15-8), stating that the publisher could not be verified. When you see this warning, it means that the application has not been signed.

Signing a XAP file involves obtaining a verified Authenticode code-signing certificate from a trusted certificate authority (CA). The process of obtaining a certificate is beyond the scope of this book, but you can find a thorough walkthrough written by Jeff Wilcox on his blog, available here: www.jeff.wilcox.name/2010/02/codesigning101/.
Note
A code-signing certificate is not the same as a SSL certificate.
In summary, you purchase a certificate from a CA, they will verify your identity, and (generally) within a couple of days they will issue you with a valid certificate. You can then export the certificate from your certificate store as a .pfx file, which you can then use to sign your XAP file.
Note
You only need to consider signing your application if it can be installed to run outside the browser and if it is requesting elevated trust permissions. Otherwise, signing your application will have no impact on its execution.
To sign your XAP file, open the Project Properties for your Silverlight application, and open the Signing tab, as shown in Figure 15-9.
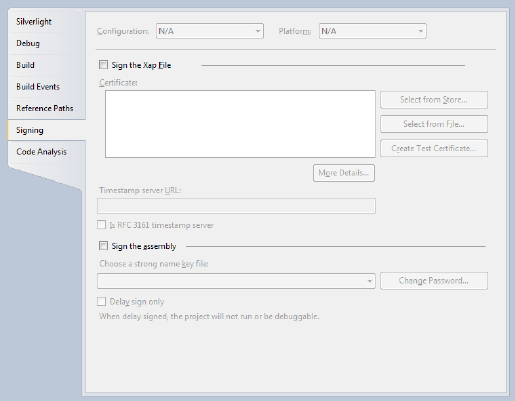
Select the "Sign the Xap File" check box (enabling that section of the tab), and click the Select from File button. Find your .pfx file and select it. Its details will appear in the Certificate box.
Note
Alternatively, if you don't have a certificate from a CA, you can create your own temporary certificate for use while you are testing the application. Click the Create Test Certificate button and enter a password in the two text boxes in the dialog that appears. This simple process will create a .pfx file for you and add it to your project for use during the compilation process.
The final step is to install the certificate as a Trusted Root certificate on your machine. Click on the More Details button, which will display the dialog shown in Figure 15-10.

If this dialog says that this CA root certificate is not trusted, then you will need to install it. Click the Install Certificate button, and click through the wizard to the screen shown in Figure 15-11.

Select the "Place all certificates in the following store" option, and click the Browse button. This will show the dialog shown in Figure 15-12.

Select the Trusted Root Certification Authorities store, and press OK. Finish the wizard, and the certificate will be successfully installed.
Now when you compile and run your application, you will get the much friendlier install dialog as displayed in Figure 15-13.

Note
One of the other key benefits of signing your application is that (as discussed back in Chapter 14: Out Of Browser Mode, and Interacting with the Operating System) in order for applications running in OOB mode to be updatable, the XAP file must be signed. The updates will work when the site of origin for the application is localhost, but they will fail once the application goes into production if it isn't signed. In addition, when the application is being updated, the certificate of the existing application must match that of the update (and the certificate must still not have expired) or the update will also fail.
In this chapter you've seen how to deploy your application to both the server and the client, and personalize the Silverlight install and application download experiences for the user to your company/application. Despite being fairly easy, adding personalization and branding to these aspects of the application is often overlooked by Silverlight developers. However, doing so can provide a more positive experience for the user and avoid confusion. Finally, partitioning your application effectively can be used to streamline the entire application deployment experience to the user, reducing both waiting times and user frustration.