
Up until now, this book has considered CSS files to be static assets. That is, what is requested from the server and delivered to visitors of your site is exactly the same in every instance. Although this is almost always the expected behavior and most performant way to implement CSS, it is possible to tailor the output of our CSS dependent on other factors and deliver different CSS to different users.
There are several reasons you might like to do this, some for the benefit of developers and some for the benefit of users. From the developer's perspective, it can be useful to use variables[84] or to dynamically populate CSS. For any repetitive code, such as colors or particular blocks of CSS, storing this once and maintaining it in one place makes for stricter and more rigid code that is easier and safer to modify. Where a CMS is driving your CSS for whatever reason, connecting to server-side components or databases may be necessary to populate the CSS or to build/output selectors. And some tools exist that use dynamic behavior to improve upon the language, and make development more productive.
From the user's perspective, some sites choose to offer the user the ability to customize the CSS presented to them, such as multiple color schemes or typography. This may be for purely aesthetic reasons or to address accessibility concerns such as poor eyesight or color blindness.
In this chapter you will learn about the following:
Several projects exist that intend to build upon CSS, and provide some of the features that many developers feel are missing. Variables, commenting styles, and shortcuts are common candidates for these to address. To use these features, the developer usually creates a file with a different file suffix and works within this file in the new syntax; then a compiler is employed to read this file and output a regular CSS file that may be parsed as normal. There are two big contenders in this space, LESS and Sass, and although they deal with many of the same issues there are important differences between them.
LESS is a preprocessor created by Alexis Sellie. It uses CSS-like syntax and offers many improvements upon CSS. We performed our tests on version 1.0.41. It is built-in JavaScript, so you can include a LESS file as if it were regular CSS (albeit with a different rel attribute), and less.js (from http://lesscss.org), and it will be compiled at page load.
<link rel="stylesheet/less" href="styles.less">
<script src="less.js"></script>
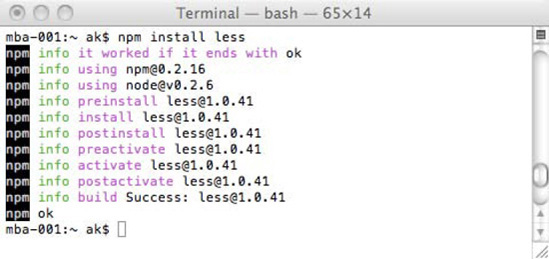
Using less.js, however, introduces a JavaScript dependency to CSS, so we recommend instead using the command-line compiler. The latest version of LESS is available for node.js (a server-side JavaScript framework for creating network applications). Get node.js from http://nodejs.org. Once you have that installed, the easiest way to get the LESS package, is with the Node Package Manager. Instructions on installing this are available at http://howtonode.org/introduction-to-npm. Finally, you can run this command to install the LESS package:
npm install less
The result is shown in Figure 9-1.
That's the end of the hard work.[85] It's installed. This installation gives you one primary tool: lessc—the LESS compiler. Using this is simple. You just run this file, pass it the path to the LESS file you want it to compile, and LESS will create a CSS file with the same name as the source file, but with a suffix of "css". By default, lessc will output to the stdout—directly outputted to the terminal (see Figure 9-2).

To output to a file, direct lessc to that file.
lessc style.less > compiled/style.css
You can also use the built-in minification by passing -x as an argument (see Figure 9-3).

This minification is not as effective as YUI Compressor—it's leaving the trailing semicolon for a start—so we recommend using another compressor in conjunction with this.
The command-line tool is one way to get started, but there are other friendlier ways we will look at in a moment. For now, let's look at the extra functionality LESS gives us in detail.
Often cited as one of the biggest missing features of CSS, variables can be very powerful and very useful. You can use variables to store any piece of information you expect to use multiple times and define it in one place. This means that changing this definition once will affect every instance in which we have used the variable. This is a very efficient and robust way of working. Any variable in LESS is prefixed with the @ symbol. Declaring variables in LESS is as simple as stating the name, a colon, the value, and a semicolon to end the line. Since the variables will never reach the final parsed CSS, the rules about which characters you can use are much simpler; you are building for one parser instead of many browsers.
Variables cannot be set again and again (they are not variable![86]). In fact, variables in LESS are constants. It is a common programming convention to use all caps for constants with underscores as word delimiters, and makes it very easy to visually locate the variables within your LESS files, but you should use whatever naming convention you and your team find most appropriate (many prefer to stick to CSS-like formats). Here's a basic example of variable usage:
@PRIMARY_COLOR: #faa344;

#content {color: @PRIMARY_COLOR;}
This, when compiled, emits the following:
#content {
  color: #faa344;
}
As you can see, LESS has its own ideas of how CSS should look: multiline indented with two spaces, and no vertical gaps between rules. Since the idea is that you would be developing primarily in LESS, the formatting of the output is of far less importance.
You can reuse your variables as many times as you like. LESS also understands the concept of scope, which means that you can declare the same variable in different contexts and have the value change only for that context. Any variable at the top level (outside of any selectors) is of global scope. Any variable declared inside a selector has that selector as its scope. A variable only exists within its scope and overrides any variable of wider scope. When referencing a variable, LESS will look within the scope local to the reference and then work its way up the chain to the global scope, using the first value it comes across. This might be easier to understand with an example.
This LESS:
@PRIMARY_COLOR: #faa344;

#content {
   @PRIMARY_COLOR: red;
color: @PRIMARY_COLOR;
}
#footer {
color: @PRIMARY_COLOR;
}...compiles into the following:
#content {
  color: red;
}
#footer {
  color: #faa344;
}
The first declaration of @PRIMARY_COLOR is outside any selectors; it is in global scope. The second declaration is in the context of #content. At this point, it overrides the first declaration, since that declaration has wider (less specific) scope. The second declaration only lives for as long as its context lives, so as soon as we close the braces for #content that variable is discarded, and we are left with our initial declaration instead. Where the same variable is declared multiple times in the same scope, all declarations but the first are ignored.
You can output multiple variables in one property by space-separating them, like this for the LESS:
@VERTICAL_MARGIN: 10px;
@HORIZONTAL_MARGIN: 15px;

#content {
   margin: @VERTICAL_MARGIN @HORIZONTAL_MARGIN;
}
It outputs the following:
#content {
  margin: 10px 15px;
}
But there is no current way to concatenate strings together—leaving no space results in LESS adding a space on your behalf. To demonstrate:
@VERTICAL_MARGIN: 10px;
@HORIZONTAL_MARGIN: 15px;

#content {
   margin: @VERTICAL_MARGIN@HORIZONTAL_MARGIN;
}
In this code, we removed the space between the output variable, but the result is the same:
#content {
  margin: 10px 15px;
}
In addition to colors, variables in LESS can really represent anything we might use as or within a value in CSS, from strings of text to numbers.
A mixin is a piece of code that is easy to reuse in another place. You could consider it similar to a function or method in JavaScript, or a way of inheriting properties from another CSS rule. Using mixins, it is possible to use a CSS rule within another. By using just the selector from a previous rule within another, all the properties from the referenced rule will be included.
This LESS:
.callToAction {
   color: #123;
}
#content {
   .callToAction;
}
...results in this CSS:
.callToAction {
  color: #123;
}
#content {
  color: #123;
}
It is worth noting that the original rule still exists in our outputted CSS. If you just intended this to be a reusable block of code that did not target any elements on its own, this would not be as efficient as you might like and would make for extraneous code in the output.
You can also use mixins in a similar fashion to functions or methods. This means you can pass values into a mixin and also have defaults for when nothing is passed. LESS calls these parametric mixins. To indicate that a mixin accepts parameters, you can follow it with brackets, with the names of the variables within the brackets. The variables should be comma-separated if there are more than one, and each should be followed with a colon and their default values if appropriate. For example, this LESS:
.box (@HEIGHT: 40px, @WIDTH: 40px) {
   height: @HEIGHT;
   width: @WIDTH;
}

#content {
   .box(20px,80px);
}
.callToAction {
.box;
}...compiles into this CSS:
#content {
  height: 20px;
  width: 80px;
}
.callToAction {
  height: 40px;
  width: 40px;
}
As you can see, this method has the added benefit of no longer outputting the mixin in our code! If we are aware of this, we can use this trick to make mixins that require no parameters to no longer appear in our output just by following their name with empty brackets, like so:
.callToAction () {
   color: #abc;
}

#content {
   .callToAction;
}
Which results in this CSS:
#content {
  color: #abc;
}
This method won't work with selectors more complicated than a single class name or ID, so you can't define a mixin with, for example, a tag name or descendent selector—it will cause an error. LESS is clever enough to know that any selector that contains no properties (or only variables) will not be outputted in the compiled CSS.[87]
Not specifying defaults, in effect, makes those arguments "required." If you reference a mixin that has no defaults set, and you don't pass values to it, this will cause an error.
Mixins are particularly useful for abstracting away experimental properties that are yet to be finalized in the specification. They are likely to have slightly different and convoluted syntaxes for different browsers and use vendor prefixes to separate them. Keeping these properties in separate modules makes them easy to amend as the specification and support changes, and have these changes reflected in the entirety of your code while minimizing human error and removing the need to write every vendor-specific version out each time you use it.
It is possible to nest rules within one another and for LESS to work its way up the chain of selectors to build the eventual selector for CSS. Again, an example:
#content {
   .callToAction {
      a {
         color: #321;
      }
   }
}
And the result:
#content .callToAction a {
  color: #321;
}
This is at the same time a blessing and a curse. By indenting and nesting, it is really easy to emulate the structure of our HTML, which can be a very intuitive way to work. However, the resulting selectors can be verbose and specific, which is unlikely to be the resulting CSS we had intended for. Here's a more complex example:
#content {
   .callToAction {
      a {
         color: #111;
      }
      p {
         color: #111;
      }
      div {
         color: #111;
      }
   }
}
And the result:
#content .callToAction a {
  color: #111;
}
#content .callToAction p {
  color: #111;
}
#content .callToAction div {
  color: #111;
}
Not only is this CSS more specific than it probably needs to be but it also could have been accomplished more efficiently with multiple comma-separated selectors, like so:
#content .callToAction a, #content .callToAction p, #content .callToAction div {
  color: #111;
}
This method also encourages you to write CSS specific to certain elements rather than reusable classes, which is an inefficient way of writing CSS. Unless you are using this method to group mixins or variables (covered later in the "Namespaces" and "Accessors" sections), or you are using a class name or ID as a namespace, we do not recommend using nested rules in this way.
It is possible to mix nested rules and properties, like so:
#content {
   position: absolute;
   p {
      color: red;
      a {
         color: blue;
      }
   }
}
And the result is the following:
#content {
  position: absolute;
}
#content p {
  color: red;
}
#content p a {
  color: blue;
}
You can also nest pseudo-classes, which is a great use for this feature. By simply including the colon and the pseudo-class, you can generate several lines in one go. The uncompiled LESS:
a {
   :hover {
      color:blue;
   }
   :visited {
      color:red;
   }
   :link {
      color:green;
   }
   :active {
      color:yellow;
} }
...and the resulting CSS:
a :hover {
color: blue;
}
a :visited {
color: red;
}
a :link {
color: green;
}
a :active {
color: yellow;
}You can also use the & combinator to output the entire selector within your nested rules, and properties. This is particularly useful for chaining class names:
#content {
.callToAction {
color: red;
&.disabled {
color: gray;
}
}
}Results in:
#content .callToAction {
  color: red;
}
#content .callToAction.disabled {
  color: gray;
}
However, if you try to use the & combinator to place the parent selector after the current selector, LESS will rearrange those selectors:
#content {
   body & {
      color:blue;
   }
}
It becomes the following:
#content body {color: blue; }
This is almost certainly not your intent (you would expect the selector to be body #content). Provided that you understand the potential negative impacts of nested selectors, they can be very useful.
LESS allows us to perform basic mathematical operations on values and have those evaluated before outputting the CSS. The operations available are addition, subtraction, division, and multiplication (there is no modulus operator). Here's a quick example of these in action:
@BORDER_TOP: 1 + 1;
@BORDER_RIGHT: 1 - 1;
@BORDER_BOTTOM: 2 * 2;
@BORDER_LEFT: 6 / 2;
.callToAction {
border-top:@BORDER_TOP;
border-right:@BORDER_RIGHT;
border-bottom:@BORDER_BOTTOM;
border-left:@BORDER_LEFT;
}The result is the following:
.callToAction {
border-top: 2;
border-right: 0;
border-bottom: 4;
border-left: 3;
}It is important that the operator (+ or -) has a space before and after it (other whitespace characters cause errors), or else the results can be somewhat unpredictable when performing operations on variables. LESS can also apply these operators to units. Only one unit needs to be present in the equation, and LESS will assume that unit for all others. Trying to perform calculations with multiple units will cause an error and will fail to compile.[88] Here's an example:
@BORDER_TOP: 1px + 1px;
@BORDER_RIGHT: 1 - 1px;
@BORDER_BOTTOM: 2em * 2;
@BORDER_LEFT: 6 * 20%;
.callToAction {
border-top:@BORDER_TOP;
border-right:@BORDER_RIGHT;border-bottom:@BORDER_BOTTOM; border-left:@BORDER_LEFT; }
The result is as follows:
.callToAction {
border-top: 2px;
border-right: 0px;
border-bottom: 4em;
border-left: 120%;
}Note that % is treated as a unit, and does not act as a modulus operator[89] nor is it used to find a percentage of the other value in the calculation. Note also that LESS continues to append the unit even for values of zero (where it is unnecessary) when using its built-in compression, but an additional minification script could remove this.
You cannot perform operations on simple string values, but LESS is clever enough to perform calculations like this on colors (including HSL and HSLA colors), although it converts them to hex. Actually, the current version even converts RGBA and HSLA colors to hex when using them within calculations, losing the alpha channel altogether, so we recommend against this. The author has promised this will be fixed in the next release. It is not possible to perform calculations against a named color because LESS would treat it as a string of characters, not as a color—in fact with the addition operator, LESS attaches the named color after the first with a space, which is very unlikely to be your intended result. When using colors in calculations, LESS breaks them into their components, evaluates the calculation against each component, and then reattaches them. You can even use more than one color in a calculation, and LESS will evaluate the red, green, and blue channels independently (or hue, saturation, and lightness). It is also possible to use variables within operations. Again, here's an example:
@BORDER_TOP_COLOR: #aabbcc / 2;
@BORDER_RIGHT_COLOR: @BORDER_TOP_COLOR + #111;
@BORDER_BOTTOM_COLOR: rgb(13,26,39) * 2;
@BORDER_LEFT_COLOR: rgba(10,20,15,0.1) + @BORDER_RIGHT_COLOR;
.callToAction {
border-top-color:@BORDER_TOP_COLOR;
border-right-color:@BORDER_RIGHT_COLOR;
border-bottom-color:@BORDER_BOTTOM_COLOR;
border-left-color:@BORDER_LEFT_COLOR;
}And the compiled code is the following:
.callToAction {
border-top-color: #555e66;
border-right-color: #666f77;
border-bottom-color: #1a344e;
border-left-color: #708386;
}As you can see, the entire alpha channel for @BORDER_LEFT_COLOR has been lost. You need to be aware of this impediment when using operations with colors.
You can employ these methods to lighten or darken colors, and use a single primary variable to create shades of that color. This is a very powerful method for generating color schemes based upon only a few initial colors.
Newly introduced in LESS, some built-in functions exist for manipulating color:
lighten(color, amount)

darken(color, amount)
saturate(color, amount)
desaturate(color, amount)
spin(color, amount)
fadein(color, amount)
fadeout(color, amount)
For each of these, LESS will convert the color to the HSL color-space before applying the transformation. It will then convert the color back to hex for the result, unless the opacity is less than 100%, in which case it will convert it to RGBA. Here's an example of these color functions in use:
@COLOR: #aabbcc; @COLOR1: lighten(@COLOR, 10%); @COLOR2: darken(@COLOR, 10%); @COLOR3: saturate(@COLOR, 10%); @COLOR4: desaturate(@COLOR, 10%);
@COLOR5: spin(@COLOR, 10);
@COLOR6: spin(@COLOR, −10);
@COLOR7: fadeout(@COLOR, 50%);
@COLOR8: fadein(@COLOR7, 25%);
a {
color: @COLOR;
:link {
color: @COLOR1;
}
:visited {
color: @COLOR2;
}
:hover {
color: @COLOR3;
}
:active {
color: @COLOR4;
}
.callToAction {
:link {
color: @COLOR5;
}
:visited {
color: @COLOR6;
}
:hover {
color: @COLOR7;
}
:active {
color: @COLOR8;
}
}
}And the result:
a {
color: #aabbcc;
}
a :link {
color: #cad5df;
}
a :visited {
color: #8aa2b9;
}
a :hover {
color: #a3bbd3;
}a :active {
color: #b1bbc5;
}
a.callToAction:link {
color: #aab5cc;
}
a.callToAction:visited {
color: #aac1cc;
}
a.callToAction:hover {
color: rgba(170, 187, 204, 0.5);
}
a.callToAction:active {
color: rgba(170, 187, 204, 0.75);
}This is a great demonstration of how a single color can be used to generate an entire color scheme. There are also built-in functions to extract the individual HSL channels called (predictably) hue(), saturation(), and lightness(). You can use these functions to build colors based upon the channels of other colors. Any of these functions can be combined with others. Here's an example:
@COLOR1: #123;
@COLOR2: #456;
@COLOR3: #789;
@NEW_COLOR: lighten(hsl(hue(@COLOR1),saturation(@COLOR2),lightness(@COLOR3)), 10%);
a {
color: @NEW_COLOR;
}And the result, with our new color, is the following:
a {
color: #8ea1b4;
}It is possible in LESS to group properties together in nested mixins (namespaces) and reference those properties as groups by using the > character. This can be useful for encapsulating and keeping code tidy. As always, this is easiest to demonstrate with examples:
#box () {
.square {
width:80px;
height:80px;
}
}.content {
#box > .square;
}...and the result:
.content {
width: 80px;
height: 80px;
}This technique can be very useful, although it has been somewhat crippled since earlier versions of LESS, in which you could access individual properties and variables within namespaces. It is possible to nest namespaces as many levels deep as you like.
LESS also enables C-style, single-line commenting as well as block commenting, however only CSS style comments are outputted in the compiled CSS unless you are using the built-in minification. Here's a quick example:
/*
A regular CSS block level comment:
*/
#content {
color: black; //A single line C-style comment
}And the result:
/*
A regular CSS block level comment:
*/
#content {
color: black;
}LESS supports the @import directive to directly include files within others. You can include CSS files or LESS files in this fashion. When including LESS files, the file suffix is not necessary. For this example, we'll need to demonstrate the contents of several files:
style.less:
@import "style2";
#content {
color: red;
}footer {
color: red;
}
@import "style3.css";style3.css:
header {
color: red;
}Compiling style.less now results in the following:
@import "style3.css";
footer {
color: red;
}
#content {
color: red;
}Note
Notice anything? LESS is clever enough to realize that when we use @import with a CSS file rather than a LESS file we do not intend for it to combine these files and leaves our code as it was. But better than that, LESS understands that @import commands need to be at the top of a file, and has moved it on our behalf. Previous versions of LESS were even clever enough to realize that where multiple selectors have the same content and are directly adjacent to one another, it should comma-separate the selectors and group them together—this behavior appears to have disappeared, sadly.
This method is very useful for keeping features separate. Any variables or mixins declared in any of the LESS files are available to others, including that one. This makes it easy to create, for example, a single configuration file of variables used to drive the rest of the LESS code. It is important to remember that building that configuration file would result in an empty CSS file because there would be no standard CSS code within it. You must always compile the lowest-level file that includes the others to build the correct CSS. This means compiling that file even though there are no changes to it.
Using the included compiler is just one way you can create CSS files from their LESS counterparts. If you are using node.js, the node package can be used directly within your node.js applications.[90] For those who prefer a graphical user interface (GUI) to the command line, an application called Less.app is available for OSX at http://incident57.com/less/, which has the ability to watch folders or files, and automatically compile (see Figure 9-4).

There are also plugins for popular IDEs, text editors, and web frameworks such as Apache, Grails, PHP (http://leafo.net/lessphp/), and .NET (http://www.dotlesscss.org/). Using these plugins can make it possible to have LESS compiled for you at read-time (when the user tries to access the file), so you need not compile manually, and caching avoids performance worries.
Unfortunately, there are downsides to LESS. Although easy to learn, there are few developers out there who are familiar with LESS. You need to implement it strictly and educate your developers: any developer accidentally modifying CSS code directly will lose changes with the next compilation. The nested rules (for example) can make it difficult to control the specificity of selectors. And, worst of all, when trying to debug your CSS in Firebug or any other web inspector, the files you are inspecting (the outputted files) will not relate to your source files in any intuitive fashion (line number will not match, selectors may not appear the same, and so on) unless you are using LessPHP.
Tip
If you are using LessPHP, a Firebug add-on called Fireless (https://addons.mozilla.org/af/firefox/addon/fireless-for-firebug/) will enable you to debug your LESS code, provided you enable the LessPHP "debug_info" option.
Also, the code and behavior have been modified dramatically between versions, with no change log or documentation explaining what has changed or how to modify your existing code to cope with these changes. If you are using a port of LESS such as LESS.app, LessPHP, or .Less, the interface and code can differ greatly between versions because the port will need to be updated with each code revision and may take a while to catch up. Read "Evaluating Third-Party Preprocessors" later in this chapter for more information on how these critiques can apply to any third-party code you use in your development process.
That said, LESS is an attractive and fun way to write CSS. However, the issues we have mentioned make it very difficult for us to recommend it for a production system; if functionality and implementation changes so severely with no recorded justification and bugs creep into the system, it indicates there is no kind of regression testing taking place—this is not the sort of thing you want to be beta testing on a high-traffic website. Read more about LESS at the official website http://lesscss.org/.
Sass stands for Syntactically Awesome Stylesheets, which—as acronyms go—is certainly promising. Sass has been around longer than LESS and is already on its third revision. Because Sass is so mature, it seems a little unfair that we covered LESS first, especially since their syntaxes are now so alike. However, uptake of LESS has been faster due to its similarity to CSS and mixins. That said, the developers of Sass were quick to follow suit, and did so graciously and respectfully.
The original syntax of Sass is indented in a Haml-style.[91] In this syntax, whitespace, such as indentation and carriage returns, is important and implies ancestry and structure. Although Python developers love this (Python also considers whitespace part of its syntax), many other developers are used to the freedom of using whitespace as they please to format their documents. We will neatly sidestep that discussion, and instead say that as of SASS 3, the syntax has been replaced with something called Sassy CSS (SCSS).
SCSS is similar to LESS in that it is structured exactly like CSS, and every valid CSS file will also be a valid SCSS file. Visually, the difference between the old syntax (.sass files) and the new (.scss files) is that the newer has braces, whereas the older simply has indentation; and the newer ends rules with semicolons, whereas the older used carriage returns. Functionally, using Sass is very similar to using LESS, but the documentation for Sass is much more comprehensive, and there are many functions that are not available in LESS.
Sass, like the original version of LESS, is built in Ruby, so to install it you first need Ruby installed. If you are using Windows, you can get the installer from http://rubyinstaller.org/downloads/; if you have OS X it is already installed. Then, to install Haml (which includes Sass) type this in at the command line (see Figure 9-5):
gem install haml

You're done. You may need to add Ruby to your PATH variable—if this were true, you would have been alerted to this when you ran the above command. The Sass command to compile files to CSS is called sass. Again, you can use it on a single file:
sass style.scss style.css
If you fail to provide the output file as an argument, the results will be simply outputted to the stdout (see Figure 9-6).

You can watch a file for changes to automatically generate the compiled CSS, with slightly different syntax:
sass --watch style.scss:style.css
Or you can watch an entire folder and output any changes in that folder to another, like this:
sass --watch path/sass:path/css
In this instance, the new files are named with the same names as the original files, but with the suffix changed to .css.
On the whole, Sass offers more functionality than LESS. Whereas LESS's documentation is simplistic and lacking, the documentation for Sass is comprehensive and well written. To that end, we refer you to their documentation at http://sass-lang.com/docs/yardoc/file.SASS_REFERENCE.html and will concentrate on many of the major features and differences, since to do otherwise would simply be duplicating their content. We will be focusing on the SCSS syntax, rather than the less CSS-like, older methods.
Variables use a slightly different syntax in Sass. Originally, creating variables used the following syntax:
!variable = value
Since the move to a more CSS-like syntax, this is deprecated. The new style is similar to LESS, but uses a dollar symbol as the prefix:
$variable: value;
Sass also gives you the ability to include variable values directly in the output (known as "interpolation"), which allows you to concatenate variables or even use them in selectors. This is achieved by surrounding the variable name with braces and prefixing it with a hash symbol. The following SCSS:
$id: product;
$property: color;
$value: green;
#content .#{$id} {
#{$property}:#{$value};
}...compiles to the following:
#content .product {
color: green; }This makes variables a lot more versatile in Sass than in LESS. By default, Sass also always formats the output on multiple lines, indented with two spaces, with the final closing brace on the last line rather than on a new line. Also unlike LESS, Sass understands Boolean (true or false) values for variables. This enables you to use conditional logic, which you can read about later in this chapter.
Tip
Sass actually supports four different output formats: compact, compressed, expanded, and nested. If you are using the command line, you can choose which to use with the --style switch, like so:
sass test.scss test.css --style compressed
The Sass compression is very good, and implementing this and @import directives can be more than enough to emulate a build script that concatenates and minifies.
In Sass, variables are actually variable rather than constant (which is why in our examples we are naming them in camel case rather than uppercase). You can change the value of a variable as many times as you like:
$color: red;
$color: green;
$color: blue;
#content {
color: $color;
}...compiles to:
#content {
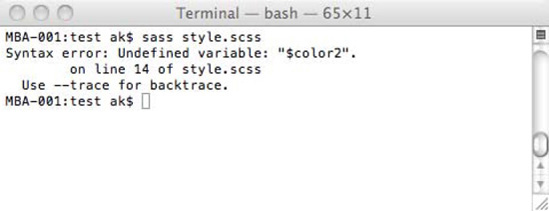
color: blue; }Scoping of variables also works differently in Sass. Since there is no way to differentiate between creating and modifying a variable, once a variable has been created any attempt to create a variable with the same name in any scope more specific than the initial scope will modify the variable rather than create another. However, scope is still honored in that variables created at a certain scope will not be available at scopes less specific. This is easier to explain with an example:
$color1: red;

#content {
   $color1: green;
   $color2: blue;
   color: $color1;
   background-color: $color2;
}

.callToAction {
   color: $color1;
   //The following line is commented out, since it would cause a compilation error.
   //$color2 has not been created in the scope of this block.
//background: $color2; }
#content {
  color: green;
  background-color: blue; }

.callToAction {
  color: green; }
In this instance, referencing $color2 within .callToAction would result in a compilation error, since $color2 has not been created in that scope (see Figure 9-7).
Note that if the command-line compiler encounters an error, Sass will create an empty file rather than ignoring the command altogether.
Nested selectors in Sass work exactly as in LESS, with one notable difference: Sass uses the & combinator correctly when placed after the current selector. This SCSS:
#content {
   a {
      .callToAction & {
         color: red;
      }
      &.externalLink {
color: blue;
}
}
}... compiles to the following:
.callToAction #content a {
  color: red; }
#content a.externalLink {
  color: blue; }
Sass behaves as we would expect in this instance, whereas LESS would have output #content a .callToAction instead.
Both LESS and Sass will not output rules with no properties. They both happily output identical property and value pairs within the same selector, however:
#content {
   color: red;
   color: red;
}
...compiles to:
#content {
  color: red;
  color: red;
}
As you can see, it reformats the code, but does nothing to minimize unnecessary code. The same applies for the compressed version of the code, both with Sass and LESS.
Something sorely missing from LESS is conditional logic, and looping behavior (described in the next section), which Sass provides more than adequately. If and else clauses are supported. You would use braces to contain the SCSS to evaluate; and @if, @else and @elseif as the conditional commands. A very simple example is as follows:
$christmas: true;

@if $christmas {
   #content {
      color: red;
   }
} @else {
   #content {
      color: black;
   }
}
The resulting CSS is as follows:
#content {
  color: red; }
You can also use the if statements within selectors, just around individual properties. The standard operators are supported:
| equal to |
| not equal to |
| less than |
| greater than |
| less than or equal to |
| greater than or equal to |
| used to combine multiple parts of a condition |
Here's a simple example:
$lines: 10;

#content {
   @if $lines < 10  {
      height: 20px;
   } @elseif $lines == 10 {
      height: 40px;
   } @elseif $lines > 10 {
      height: 60px;
   }
}
The result is the following:
#content {
  height: 40px; }
Although this can make the SCSS dramatically more complex and difficult to read, it also makes the variables, and Sass as a whole, much more powerful.
Sass supports two methods for looping: @for and @while. For simple iterations from one number to another, @for is the most appropriate. The syntax is simple and involves declaring a variable and defining the beginning and ending points of the loop. The variable can be used as normal during each iteration. Here's an example:
@for $counter from 1 through 3 {
   #product#{$counter} {
         color: green;
   }
}
The resulting CSS is the following:
#product1 {
  color: green; }

#product2 {
  color: green; }

#product3 {
  color: green; }
Sass also supports "from n to n" rather than "from n through n," which simply means that the variable must be less than, instead of equal to, the final digit. In our example, this would have given us two iterations rather than three.
The @while looping is for more complex iterations in which you might like to increment by more than one step for each iteration of the loop, for example. The loop will continue until the condition evaluates to false. Again, the syntax is simple:
$counter: 1;
@while $counter <= 6 {
   #product#{$counter} {
      color: green;
   }
   $counter: $counter + 2;
}
Here's the result:
#product1 {
  color: green; }

#product3 {
  color: green; }

#product5 {
  color: green; }
These kinds of control directives are a very welcome addition to Sass (and are notably missing from LESS).
Sass gives you the ability to append a selector to a previous rule—if the selector only has one element—with the @extend keyword. Although the selector to be appended can be of any complexity, the rule it is being applied to must not have any nested selectors. The following code demonstrates this:
.box {
   width:80px;
   height:80px;
}

div#content.main {
   color: red;
}

#content #product {
   color: black;
}

.redBox {
   @extend .box;
   color: red;
}
#content div a.callToAction {
   @extend div#content.main;
   text-decoration: underline;
}
.productBox {
   //The following line would cause an error
   //@extend #content #product;
}
It compiles to the following:
.box, .redBox {
  width: 80px;
  height: 80px; }

div#content.main, #content div a.callToAction {
  color: red; }

#content #product {
  color: black; }

.redBox {
  color: red; }

#content div a.callToAction {
text-decoration: underline; }
You can extend several rules in one declaration. If we had uncommented the marked line, the error would have been as follows:
Syntax error: Can't extend #content #product: can't extend nested selectors
        on line 22 of style.scss
  Use --trace for backtrace.
Although complicated, this technique can be powerful. However, you must be careful if dealing with specificity issues, since Sass rearranges the order of your selectors when extending, and it is easy to place selectors in the file in places earlier than you may have intended.
Mixins follow a slightly different format in Sass. Whereas in LESS, almost any simple selector can be used as a basic mixin, in Sass selectors are created with the @mixin keyword and a unique name, and referenced with the @include keyword, keeping the mixins and rules very separate. In some ways this could be considered less flexible, but it also encourages modular code, makes for code with clearer intent, and avoids some issues you could face otherwise (for example, mixins being output in the eventual CSS when unnecessary or trying to reuse blocks of CSS as mixins with complex selectors). Here's an example:
@mixin border {
   border: solid 1px black;
}

#content {
   @include border;
}
The output follows:
#content {
  border: solid 1px black; }
It is also possible to pass arguments to a mixin in Sass, just as in LESS, but omitting a required argument will cause a clearly identified error. Here's a real-life example:
@mixin borderRadius($radius) {
   -moz-border-radius: $radius;
   -webkit-border-radius: $radius;
   border-radius: $radius;
}

#content {
   @include borderRadius(5px);
}
#product {
   @include borderRadius(15px);
}
.callToAction {
//The following line would cause an error
//@include borderRadius;
}It compiles to the following CSS:
#content {
  -moz-border-radius: 5px;
  -webkit-border-radius: 5px;
  border-radius: 5px; }

#product {
  -moz-border-radius: 15px;
  -webkit-border-radius: 15px;
  border-radius: 15px; }
If we had uncommented the marked line, the following error would have occurred (in the stdout) since there was no default value set for the $radius parameter:
Syntax error: Mixin borderRadius is missing parameter $radius.
        on line 15 of style.scss, in `borderRadius'
        from line 15 of style.scss
Use --trace for backtrace.Like LESS, Sass supports mathematical operations on colors. Sass understands all color formats, including named colors (LESS does not), and works correctly with alpha channels. Sass also exposes many color-specific functions, which are not available in LESS. First, there are color accessors that allow you to expose particular properties of a color variable:
red(color)
green(color)
blue(color)
hue(color)
saturation(color)
lightness(color)
alpha(color)
Although hue(), saturation() and lightness() are all available in LESS, the other color accessors are peculiar to Sass.
Using these individual pieces that make up complete colors enables you to build colors based on specific properties of another color, which can be a very advanced technique for building color schemes based on a few primary colors.
We will show a few quick examples with these properties in action. First, we will dissect a named color and use the component parts to build an RGBA color. Here's the SCSS:
$color: red;

$red: red($color);
$green: green($color);
$blue: blue($color);
$alpha: alpha($color);

#content {
   color: rgba($red, $green, $blue, $alpha);
}
Here's the compiled CSS:
#content {
  color: red; }
Interestingly, Sass opts to output this as a named color, which is actually the most efficient thing to do and least open to interpretation. It does this with all colors that can be resolved to named colors, which sometimes is more confusing when reading the outputted CSS, but you would be developing in SCSS so this should not present a problem except when debugging.
In fact, Sass will always convert colors to whatever it deems as the most efficient output. Where possible, it will output them as named colors. Failing that, it will use hex colors. Finally, if there is an alpha channel it will output RGBA. Here's another example:
$color: rgb(1, 2, 3);

#content {
color: $color;
}
$color: rgba(1, 2, 3, 0.5);
#product {
color: $color;
}
$color: hsla(90deg, 50%, 50%, 0.5);
.callToAction {
color: $color;
}#content {
color: #010203; }
#product {
color: rgba(1, 2, 3, 0.5); }
.callToAction {
color: rgba(128, 191, 64, 0.5); }This is an interesting decision on the developers' part and important to be aware of. It is a commendable one as it usually makes for the most efficient output.
Sass also provides you with color mutators: functions that modify the value of a color variable. We will list each of them with a brief description:
Although the equivalents of lighten(), darken(), adjust-hue(), saturate(), desaturate(), opacify(), and transparentize() are all available in LESS; the other color mutators are unique to Sass.
With these functions (and the color accessors we previously mentioned), very sophisticated color manipulation and calculation can be achieved. You could generate an entire color scheme or lighten/darken colors for the purposes of creating gradients, and so on. As always, here's a simple example:
$color: blue;

#content {
   background-color: $color;
   color: complement($color);
}
Here's the result:
#content {
  background-color: blue;
color: yellow; }Sass supports @import, exactly as LESS does, with two minor differences. Sass will not move @import commands to the top of the file, which while hardly a glaring omission, is a shame since it results in invalid CSS where the @import rule will not be applied. Of course, if your intent is to directly include the CSS as part of your output, you only need to rename the file suffix to .scss (or .less for LESS files). If you use a command like the following:
@import "style.css";
Sass will convert it to the following:
@import url(style.css);
LESS will not do this. It is an unimportant change, since both syntaxes are acceptable according to the CSS 2.1 spec. However, the resulting CSS is larger by three characters. Since @import commands are not prolific in CSS (and we advise against them), we do not feel this is anything to be concerned with.
Sass has many other features, and if you intend to use it as part of your development process, you should read through the extensive and well-written documentation and become well versed with them.
There has been greater uptake with LESS than Sass—perhaps because it is simpler and has looked like CSS from the beginning—so finding staff, application support, and plugins that work well with it is likely to be easier. There is no denying that Sass is more powerful, however, and if you are choosing to use one of these preprocessors you should weigh up the pros and cons of each.
Although less prolific than LESS, methods for compiling Sass at read time with Apache exist, as well as plugins for most major extendable IDEs, and Ruby gems. Whatever your server setup, you will be able to incorporate Sass into it somehow should you wish to do so.
You can read more about Sass at http://sass-lang.com/.
Although there is a feeling of friction against moving toward either of these technologies (LESS or Sass) from many CSS developers because they think it would pose too big an undertaking, this is really an unfounded critique. Since they both support CSS-style syntax, it should be a simple task to rename your original CSS file as .less or .scss and add in new functionality as you see fit. The real criticisms should be the modifications to your build process, the difficulties in debugging, the dependency on a third party and the extra skills required. However, within your organization you may feel these issues are acceptable in return for the many benefits these technologies give you.
Before using any kind of third-party code as part of your development process, a thorough investigation should be undertaken to ensure this code is appropriate and safe for use. Although it is easy to get excited about the capabilities of libraries, frameworks, or preprocessors, once they are implemented it can be costly and difficult to change them later on. It is therefore vital to research them thoroughly first, and make sure the team is onboard with the decision to use them.
Some things to consider are as follows:
If you are not answering yes to most of the questions with regard to the technology you are evaluating, you should think hard about whether implementing this technology would be a source of technical debt in the future, and if the problem you are trying to solve could not be better addressed with other methods.
As we have mentioned before, all current browsers don't care what suffix your CSS files have.[96] As long as you serve the files containing your CSS with the right mime type (text/css), the browser will happily read it and go about its everyday business. This means that you can use your server-side technology of choice to give you the same kind of capabilities that the preprocessors do, and more. You could use PHP to connect to a database, populate variables from there, and insert them directly into code; or write your own ASP.NET color manipulation functions. As long as you reference a file that includes CSS and provide the correct mime type, this will work.
An example implementation is large websites with many sub-brands. Although the CSS is largely the same, the server can generate several versions of the CSS file with different color schemes populated from a database. The database could be populated via a CMS, resulting in a consistent automated layout from website to website, and color schemes that could be produced by publishing departments rather than developers.
You could also use this technique to provide different CSS in different situations. You could detect the department (e.g. finance, HR, IT, etc) a user works within, for example, and provide different CSS to them based upon a querystring or database entry. You could also provide the user CSS unique to them—although this technique is very difficult to cache server-side, and has performance and bandwidth implications. It would be better to offer the user CSS options or color schemes, and provide them one of a limited amount of CSS files (or querystring configurations) with shared URLs, so that the results can be effectively cached.
The same downsides that occur with LESS and Sass apply here, perhaps to a greater extent. When trying to debug your CSS, the line numbers will not tally with your source code, and selectors may look completely different between your source and resulting file. That said, the ability to use variables or databases to maintain your code can be a great way of allowing nontechnical people, such as your publishing or content team, to modify the aesthetics of your website, and custom code will give you a lot more control over the output. Another downside, of course, is that it is difficult to hire cheap or lower-end developers since the learning curve is steeper and they cannot become productive immediately.
As always, whether or not to implement this style of CSS generation depends upon your specific scenario.
As we have mentioned previously, it is possible to use build scripts to manipulate your CSS, usually for reasons of performance. Although you could run these scripts manually, it is useful to be able to run them in an automatic fashion for deployment to other environments. Typically an organization should have four primary environments (and maybe several of each):
Development
Integration or QA
Staging
Production
When using version control, it is typical to push your changes to the main repository only when you are confident that they will work as expected. Once you have committed them, the first thing you are likely to want to do is to deploy them to the Development environment.
While it is possible to simply connect to the appropriate server, fetch the latest versions of your files from the source control repository and then manually run any build scripts, this is time-consuming and therefore not an efficient way to work.
Continuous integration (CI) systems deal with this shortcoming. A server might be set to automatically detect changes in the repository—either via polling after predefined intervals, or by hooks within the version control system. Whenever changes are detected, the server fetches the new versions of the files and then the project is built. When the project has been successfully built, it is then deployed automatically to the Development environment.
There are several advantages to this methodology:
Any tests can be run after the project is built, but before deployment. This means that if you have tests that can be run client-side, you could build to a temporary environment, run the tests on the server automatically—potentially in many operating systems and browsers—and choose not to deploy to the Development environment if there is a problem or failed test. This is known as breaking the build. (You can read more about testing in Chapter 10.)
All users are alerted to any build problem. If someone has broken the build, some kind of notification system can let all the other developers know, and a conversation can take place about who should fix it and how it should be fixed. Other developers should not commit to the repository until after the issue is resolved.
The same system can be used to manually (or automatically) deploy to the other environments.
Often a traffic light system is used, in which a small application resides in the user's menu bar or system tray. It lights up green if the build is building successfully or red if it is broken.
If you have elected to incorporate build scripts for minifying or concatenating your code, CI can run these for you whenever it is set to deploy. However, you should try to include the ability to enable some kind of debug mode (as described in the next chapter)—at least in the Development environment—so that when tests fail or issues are found, they are easy to resolve.
Another test you might run is to see whether or not the resulting files of your site validate, or whether there are any build warnings. You would probably still choose to deploy in this scenario, but it would be pertinent to notify the developer who checked in the file that caused the warnings.
CI encourages all kinds of great habits in developers. If it is combined with automated testing, it can make code much more robust and save many wasted hours—as well as alerting developers and testers to problems earlier.
Rather than just minifying and concatenating a predefined list of files together, front-end engineer Jade Thomas has come up with her own methodology that solves many problems in one go. Choosing just to target WebKit with browser-specific vendor extensions in her CSS, the build script parses and duplicates these properties with all the other vendor-specific versions of the same property, giving an abstracted method of dealing with changes in the spec and adding more vendor-specific extensions as they come along. Next, a series of custom-defined vendor prefixes are set for versions of IE such as -ie6-, -ie7-, and so on (not -ms- because that already exists) that the build script can parse and output as the appropriate hacks for that browser.
But now, the clever part. Instead of outputting hacks, the build script actually outputs one file for each version of IE, and one file for all other browsers. These files can then be served to the appropriate browser with conditional comments, so that every browser gets only the code intended for it. A preprocessor such as LESS or Sass could emulate some of this behavior, but not nearly as well. The benefits of this method are significant:
The original file works without being built (on WebKit)—this means when we debug we can still see what line the offending CSS is on.
When vendor prefixes are supported in validation tools, our CSS would actually validate![98]
No hacks in the output, ever.
Modified versions of the build script could output versions for IE without modifying line numbers, again making debugging easy.
Each browser makes only a single HTTP request.
Browser-specific code for each property lives side by side, making maintaining these files easy.
Sadly, there is no version or documentation for this technique available publicly, but we encourage you to consider emulating this behavior if your processes justify it.
When serving any kind of dynamic file, caching can become an issue. If you are providing files that are preprocessed, but otherwise static and served to many users, you just need to configure your web server to consider these files cachable (and you can still use versioning—described in the previous chapter—to effectively bypass the cache when necessary). If these files are processed at any point in reaction to the user, rather than before the fact, these files can also be cached via different mechanisms. However, it is better for your users that you proactively prepare any files like this before they are requested. This means that no single individual bears the brunt of the performance implications, and the servers undergo predictable (rather than inconsistent) stress.
Where files are modified on the fly (perhaps on a per-user basis), and too many potential variations exist for it to be reasonable to create these files in advance, caching becomes impractical from the server side (although the browser can still cache the content), so performance hits are unavoidable. To combat this, you can try to limit the potential variations, cache the variations that get the most traffic, or ensure that your web server has no problem with the extra load. In that situation, Edge Side Caching can help minimize the burden. Edge Side Caching is currently only usable within (X)HTML markup, but we mention it here for your interest and because it may be relevant to your chosen caching strategy.
Edge Side Caching uses a simple markup language called Edge Side Includes (ESI) to dynamically request only certain sections of the response and serve the rest as static content. This needs to be implemented and parsed by some kind of CDN or caching server so that the user hits it and is returned the correct response. Several organizations have implemented it, and it can be a very effective technique for performant websites.
Note
See the list of vendors that support ESI at http://en.wikipedia.org/wiki/Edge_Side_Includes.
An ESI Language Specification was submitted to the W3C in August 2001, which has not been responded to. However, response and uptake of ESI has been positive, and if you want to use it, it is mature and simple enough to present minimal risk. A very simple piece of ESI markup would be something like this:
<esi:include src="http://yourcompany.com/uncachable.content"/>
Varnish[99] supports ESI, as does Akamai and many other CDNs and caching servers. You can read more about ESI at http://www.w3.org/TR/esi-lang.
This chapter explained some of the many ways you can have dynamic and self-building CSS files or responses. These techniques are not always appropriate and incur a productivity hit when hiring new staff, but in the right situations can make development a lot simpler and more pleasant. If they are appropriate for your website, and you have considered the downsides of these methods, you should not be worried about implementing them.
The next chapter concerns itself with debugging and testing, and will teach you what you need to know to find this balance and be certain you are making the best of your resources, as well as locating issues with your code and fixing them.
[84] Discussions on including CSS variables in the specifications are underway, and have been for some time. The latest (personal) draft from Tab Atkins Jr can be read at http://www.xanthir.com/blog/b4AD0.
[85] The original version of LESS was built in Ruby and was far simpler to install—especially on OS X, which already includes Ruby. In fact, LESS switched to node.js officially after the first draft of this chapter was finished! This demonstrates that LESS is still under active development.
[86] Exactly as in eXtensible Stylesheet Language (XSL), in which variables are not variable and are therefore named really, really badly.
[87] arlier versions of LESS let you include any selector that existed in the document, regardless of how many elements made up the selector.
[88] This is unlike the proposed calc() function in CSS3 (supported by the latest beta releases of Firefox—using the -moz-cal() vendor prefix—and planned to be supported by IE9), which is clever enough to mix units, since it is evaluated when the page is being rendered rather than beforehand. Read more about that here: http://www.w3.org/TR/css3-values/#calc.
[89] The modulus operator is used to find the remainder after a division operation.
[90] Read more about using LESS within node.js at http://lesscss.org/#-client-side-usage.
[91] Haml is a concise templating language for HTML. Read more about Haml at http://haml-lang.com/. As of version 3.1 Sass will be available separately from Haml.
[92] Calculating the hue of a color is very complicated and requires the use of some reasonably advanced mathematics. You can read more about hue at http://en.wikipedia.org/wiki/Hue.
[93] For reasons of backward compatibility with previous versions of Sass, the function opacity() is exactly the same as alpha().
[94] For reasons of backward compatibility with previous versions of Sass, the function fade-in() is exactly the same as opacify().
[95] For reasons of backward compatibility with previous versions of Sass, the function fade-out() is exactly the same as transparentize().
[96] The same goes for other file types, such as images, JavaScript, or fonts.
[97] "Exploratory testing" describes unscripted testing, where the tester relies upon their knowledge to "mess around" with the site looking for unexpected results or bugs.
[98] The latest version of the W3C CSS validator (http://jigsaw.w3.org/css-validator/) allows you to show vendor prefixes as warnings, rather than errors.
[99] Varnish is a great piece of software that dramatically improves the caching capabilities of many web servers. Read more about it at http://www.varnish-cache.org/.