K2 blackpearl provides tools that allow designers the ability to quickly and easily deploy processes into development, staging, and production environments. These tools to deploy K2 solutions between environments have immensely simplified the deployment process; however, there are many considerations that must be accounted for. There are multiple ways K2 processes and SmartObjects can be deployed. It's as easy as clicking through a wizard or as advanced as using the K2 API to fully automate the deployment. The K2 deployment platform is built using Microsoft's MSBuild framework providing flexibility that allows development teams to customize, extend, and automate the deployment of K2.
K2 blackpearl has streamlined tasks for deploying processes and SmartObjects into environments. For example, the K2 platform provides the Environment Library server, which contains environment contextual configurations (such as server connection strings) that can be used for a process definition. When deploying processes, the designer has to choose which environment that will be deployed to, and all of the configuration data associated with the selected environment will be deployedwith the process. Using the Environment Library server allows designers to easily move processes between development, staging, and production environments because they no longer have to manually go through process and change hardcoded configurations. Think of the K2 Environment Server as a .config file management server; however, there are no configuration files as all the data is stored in a database.
Additionally, K2 blackpearl provides features that will package processes and SmartObjects for deployment without requiring designers to create custom deployment projects. These deployment packages can be created and deployed using a wizard, the command line, or K2 blackpearl's API. Plus; once the deployment package is created, it can be used to deploy to any environment without having to rebuild it. Allowing this level of deployment granularity enables development teams to remain agile in the delivery of solutions. This chapter will discuss the mechanics of how to deploy a K2 process and SmartObjects, using the deployment wizard, command line, and the API.
The Environment Library server will be discussed in detail covering how environment variables are defined, how they are used within a K2 process, and how these values are deployed to the K2 blackpearl Workflow server.
This chapter covers the following topics:
Standard deployment of a K2 blackpearl process and SmartObject
Deployment considerations for K2 blackpearl solutions
Environment Libraries, String Tables, and how they should be used in a process
Deploying K2 blackpearl processes and SmartObjects using a MS Build package
Deploying SmartObject Services
Deploying K2 blackpearl processes and SmartObjects using code
The K2 platform provides the ability to create deployment packages, which are used to deploy solutions to the server. When using a tool like Visual Studio, a deployment package is created automatically after a successful build. Developers in Visual Studio have become accustomed to creating .NET deployment projects to deploy their solutions; however, this is done for free with K2. The generated deployment packages are built using the MSBuild assemblies from Microsoft and are deployed using the MSBuild infrastructure. This is the only way to deploy a K2 process or SmartObject. They are not deployed like a Web page or a SharePoint Feature, where the files are moved onto a server. All of the K2 project files are deployed directly into the K2 blackpearl server.
It is very important to note that K2 deployment packages are scoped to only deploy the K2 processes and SmartObjects, and will not deploy all things used by the K2 process or SmartObjects. For example, a custom database, a SharePoint site, a Web service, or an ASP.NET Web application will not be deployed as part of a K2 deployment package. However, an InfoPath form or custom DLL library referenced by the Visual Studio project will be deployed.
The simplest way to deploy a K2 project within Visual Studio is to right-click the project name in the solution explorer and then click the Deploy menu item. This will build all of the dependant projects, the K2 project, and, if there are no errors, the Deployment Wizard will begin. Errors will appear in the Error List window. The same Deployment Wizard is used in all K2 blackpearl designer environments (Visual Studio, K2 Studio and Visio). Figure 10-1 shows the first screen of the deployment wizard.

The next step in the wizard is the Server and Project Settings step. In this step there is an Environment drop-down, which is used to select the environment the project will be deployed to. The Workflow Management Server and SmartObject Server drop-downs are next, and they are used specify the destination of the deployment. These will be configuration values that are stored in the Environment Library and, in most scenarios, there will only be one value in the drop-down (unless there are multiple K2 blackpearl servers in an environment). Finally, there are fields that allow the person performing the deployment to enter in a custom Version Nameand Description for the deployment. This information is displayed in the K2 Workspace for later reference about the deployment. Figure 10-2 shows the screen for this step in the wizard.

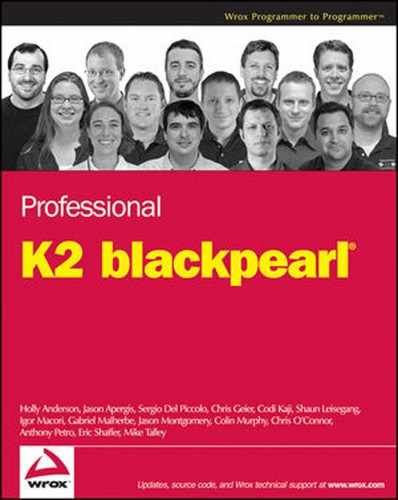
The next step in the process will display a listing of all of the processes and SmartObjects that will be deployed. No action can be taken at this point to add or remove processes and SmartObjects as they had to be removed before doing the deployment. Figure 10-3 shows this step in the deployment wizard.
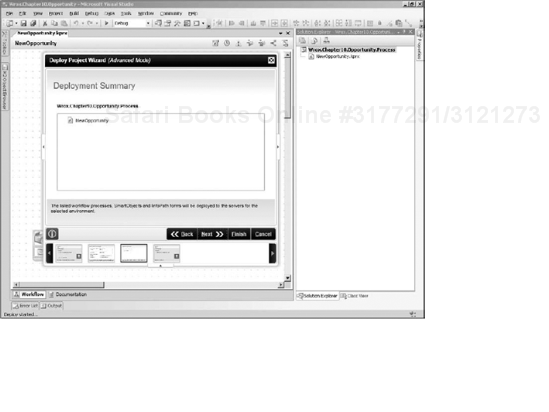
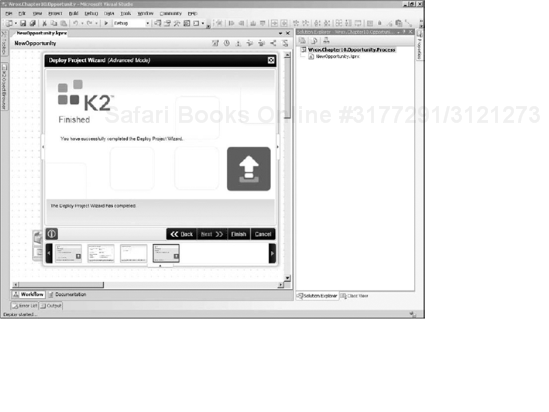
Once the environment has been selected, the process can be deployed by clicking the Finish button (see Figure 10-4). If this is the first time the process has been deployed, the only thing left to do is go to the K2 Workspace and assign permissions to the process so that users can startinitiating process instances. The steps to deploy a K2 solution are relatively simple and both developers and nontechnical designers can execute them.
This Deployment Wizard that was run in Visual Studio will be the same wizard that is run in other K2 blackpearl design environments such as K2 Studio and Microsoft Visio. In essence, what the Deployment Wizard is doing is running the MSBuild file so that the designer does not have to do a deployment using the command line. The MSBuild file is created whenever a project has been successfully built. This chapter will primarily focus on building and deployment using Visual Studio; however, much of the steps used are very similar within other designer environments.
It is very important to understand that K2 blackpearl processes and SmartObjects use a declarative model and are not compiled. Declarative programming means that the code describes "what something is like" instead of "how to create it." A well-known example of declarative programming is HTML, where it is used to describe what a Web page should contain, but it does not describe how HTML will be displayed on a screen. An application like a Web browser is responsible for displaying the HTML. The same analogy can be made for K2 processes and SmartObjects. Both of their definitions are basically an XML document that is deployed to the K2 blackpearl server, which is responsible for running a process based on logic described in the process definition (the .kprx file). When a solution is built, the process and SmartObject definitions will be verified to ensure that they are well formed and that code used or referenced can be compiled (like a server-side code event). The .NET code user in the process will be compiled at run time.
Since K2 blackpearl is declarative, process definitions that have been deployed have the ability to be modified on the K2 blackpearl server after deployment. More importantly, a process definition can be modified for a running process instance. For example, there could be a scenario in which data needs to be saved to a database and there are hundreds of process instances currently running on the server. Because the process definition is declarative, a developer can modify the definition of running process instances and then allow them to finish using the modified definition that will save data to a database. Developer and administrative tools to support this capability are planned for a future release of K2 blackpearl.
Before a process can be deployed to the server, the K2 blackpearl platform will perform verifications to ensure that process dependencies are in place that cannot be discovered during a build. For example, when building a process, checks will be made to ensure that there are no model declaration errors. However the build cannot check to see if referenced SmartObjects have been deployed to the environment in which the process will eventually be deployed.
Knowing this, there are two steps involved with the deployment of a K2 process. First, the design environment will build the project that creates the MSBuild instructions used by the Deployment Wizard. Second, based on the selected environment, the design environment will check to make sure that all of the necessary server components can be connected, all SmartObjects are generated and deployed, roles that are used have been created, and referenced SharePoint sites and libraries exist. Although this validation in the second step will not check for items such as Web services, ASP.NET sites, dynamically created SharePoint sites, or library locations, and databases. Therefore, a deployment plan should be devised to ensure all components and dependencies are in place before making a process available to business users.
The Environment Library solves the challenge of managing configurations; however it will not validate their presence. It is good practice to ensure that all of dependencies are deployed prior to deploying the K2 process. If the deployment process is complex, due to the number of components that are used by the process, a fully automated build can be created to ensure that all dependencies are verified.
Once the deployment to K2 blackpearl is complete, there are several ways to verify its success. A simple way to verify that a deployment was successful would be to look at the bottom-left corner in Visual Studio to check if "Deploy succeeded" is displayed on the status bar. Another method is to go the K2 Workspace. Within the K2 Workspace, there is a Management Console page, which can be navigated to from the main menu bar. In the Management Console, the K2 server tree should be opened; it contains a node called Workflow Server. In the Workflow Server node, a subsequent node called Processes exists (see Figure 10-5). This is where all processes that have been deployed to the server are listed. Processes are grouped by K2 Process Project because a single project can have more than one process. For first-time processes, a new tree node for the project is available, which can be expanded to view the processes for the project.

The Process tree node can be further expanded to view a Versions node. Upon selecting the Versions node, the Versions screen will be displayed, listing all the versions of the process that have been deployed to the server (see Figure 10-6). For each process that has been deployed, a label and description are visible, both of which can have custom text entered at the time of deployment. Additionally, there is a Source column with a Download link that allows for the download of the source code of that particular version. Note that for many reasons this does not replace the need for using source code control tools. This only provides a simple way to access code that has been deployed to the server.
Finally, there is a column named Default, which controls which process version will be used when new processes are instantiated. When a new process is deployed, that version will be set as the default process that all new instances will use. It is possible to change which process is set as the default, for example, if an issue occurred with the newer process version and a prior version needed to be used until a resolution was discovered. Only one process version can be designated as the Default process at any given time; however, the K2 blackpearl server supports the execution of process instances on many versions all at once. It is currently not possible to take a running instance and change which version it runs under. So running process instances will not use the new process definition that was deployed; they will continue to run and must complete the version of the process they were started on. Figure 10-6 shows process versions.

It will be possible in the future to modify the process definition of a deployed process directly on the server without having to redeploy the entire process. This will support the ability to add new activities and events to a running process instance if a change must be implemented before the process instance is completed. This is typically referred to as "in flight" changes. For example, this option can be leveraged if an issue is discovered with the process, and the change must be made for all running instances. Typically, it is not possible to stop running instances and create new process instances using a new process version. When this feature becomes available for K2 processes, the changes should be kept to a minimum because it could lead to version control challenges if the changes are not kept in sync with process versions that are in source control. If there is a tactical reason why this should be done, a best practice is to modify the existing process version directly on the server, return to development, add the same change, test it, then redeploy everywhere as a new version of the process. These sorts of changes are to be treated as tactical and thought of as a new version of the process. With this functionality, the K2 platform will provide a powerful capability to fix issues in an ad hoc fashion.
When executing these types of changes, extra care needs to be taken into planning before changes are made. Understanding how these changes could affect external actors to a process, such as a database or SharePoint site, can introduce unanticipated challenges. For example, a new required database field is added. If there are five versions of a process that have been deployed, where each version has several running instances, adding a new required field in the database field will generate errors on insert because those process do not have data for the new required field. In this case, all versions of the process will need to be independently updated with the same exact change to support the insertion or updating of the new value. There are many ways that this could be resolved, but users should recognize that making these sorts of changes in an ad hoc fashion can and will be complicated. It is important to plan changes to the process and address the ways that they affect external dependencies.
Before deploying a process it is good to plan out the organization of the processes and SmartObjects that will be deployed. It is considered good practice to separate processes and SmartObjects into different projects. This is so because SmartObjects are considered to be reusable data entities that span processes or even extend outside the scope of K2. Knowing that dependencies should be minimized between processes and SmartObjects, it would be a good approach to separate them into their own projects.
Changing the name of a process or SmartObject in Visual Studio will not change the name of the ones that have already been deployed. If the name were changed, the process will be deployed with the new name, but the old one will still remain. This is to support process instances that are running on older versions. If that process refers to a SmartObject using the old name, a run-time exception will occur if the name cannot be found. Knowing this, it is extremely important to devise a naming schema for the processes and SmartObjects before they are deployed. Careful analysis should be made to understand and project future needs as creation of poorly named processes or SmartObjects may lead to confusion later on. A good practice is to use a namespace in the name of the K2 project, just as many people do with their .NET code library Visual Studio projects. A good example would be Company.Department.K2ProjectType.ProjectName(ACME.HR.Process.EmployeeOnboarding and ACME.HR.SO.EmployeeOnboarding). Then, assign good names to the processes and SmartObjects that reside within the project. Regardless of what naming standard is used, make sure that a good, consistent one is adopted.
Note that K2 project/process names and SmartObject names must be unique. This is again why it is important to implement a strong naming convention.
Errors can occur upon deployment, and it can be challenging to understand the details of the error even though the design environments will give you an error message. One simple way of doing this is to run the MSBuild package that is created as part of the process or SmartObject build in a command window where all of the logs for the deployment will be visible.
If Visual Studio is being used to deploy the K2 process or SmartObject go to Tools, Options from the main menu. Then, in the Options window select, Projects and Solutions, then General in the tree, and check "Show Output window when build starts." Then select the Build and Run node, and select Diagnostic from the MSBuild project build output verbosity drop-down. This will show all of the same logs that would be seen if the MSBuild package is being executed via the command line.
Finally, another way to investigate issues is to run the K2 blackpearl server in command-line and watching log statements. To do this, first stop the K2 Service using the Service Console. Then from the Start Menu go to All Programs, K2 blackpearl, K2 blackpearl server, right-click the menu item and then click Run As. In the Run As window, enter the username and password of the service account that the blackpearl server runs under. The K2 server will subsequently start up using the service account. Redeploy the process and watch the logs in the command-line window to determine where the error may be occurring. Closing this window will stop theK2 server and it must be restarted again in the Service Console.
Do not use this operation on a production K2 blackpearl server during peak times of usage.
The Environment Library is an integral component of the K2 platform. Introduced to assist designers in designing processes and managing deployments across development, staging, and production environments, the Environment Library is another server component within the K2 platform. The purpose of this server is to store configuration values that are unique to each server environment. K2 provides several tools that allow both administrators and designers to manage these configurationvalues. These configurations, referred to as environment variables, can represent items like a K2 server connection string, a database server connection string, a Web service URL, a SharePoint site name, a document library name, or an escalation period of time. By using these environment variables, designers can drag-and-dropconfiguration values into event wizards to eliminate hardcoded values in the processes.
Environment variables are not mapped to the business process that references them. The concept behind environment variables is that they are a reusable library of configurations that are available to all processes. Because they are reusable, administration of environment variables is easier. A common scenario is that there may be several processes that would reference the same database, for example, a Custom Relationship Management (CRM) database. And in each environment (development, staging, production) the CRM database will be located on a different server. When using the Environment Library, only one connection string variable needs to becreated, and then any process can use that variable. If the connection string for the CRM database were to change, all of the processes using the variable would be updated at once.
It is good practice to use as many environment variables as possible in a process definition because K2 provides a myriad of wizards and each and every field in these wizards is configurable. An ellipse button is located next to almost every field in a wizard, and when clicked, it will display the Context Browser. In theContext Browser, the designer simply selects an environment variable, and then it will be referenced by the process. Many of the wizards have fields for the name ofa document library, name of a SharePoint site, URL address, document names, destination users, e-mail body configurations, InfoPath form library, and the list goes on.
It would not be correct to assume that every field in the wizard should use the environment variable either. At times, it is more appropriate to use SmartObjects or roles, which are dynamic and can read from external data sources. Environment variables cannot read from any other location other than the Environment Library. Environment variables can be used for more than just database connection strings and URLs. There may be a dollar threshold on a Line Rule of $500,000 dollars, and this value may change on a regular basis. Instead of hardcoding this, an environment variable may be a good alternative, which can simply be changed without having to redeploy the entire process if the threshold changes (to $750,000, for example). Later on, it would even be better to store such a value in a rules engine and not in the Environment Library. It is important to reinforce that making a process as configurable as possible will help enable the deployment of the K2 process to different environments and its ability to adapt to business changes.
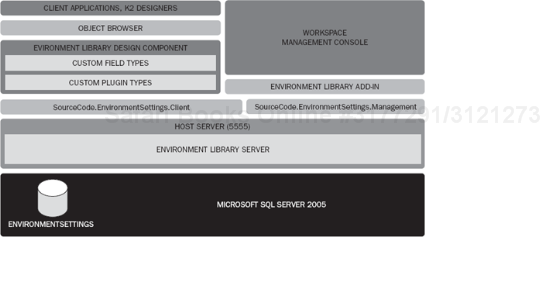
As previously mentioned, the Environment Library is a server component with several different tools that are available to manage it. All of the environment variables are stored in a SQL Server database and designers have the ability to manage the values within the Environment Library server using K2 Studio, Visual Studio, and K2 Workspace. Figure 10-7 shows an architectural diagram of the Environment Library Server.
Within the K2 Environment Library, there are templates, fields, and environments. Before diving into how these are created and used within a K2 process, it isprudent to define what they are. A template is a logical grouping of fields. A field is a property that can be added to a template which will have a value assigned to it. A template and its fields are analogous to a .NET configuration XML file. Environments are instances of the template and distinct values are assigned to the fields within each environment. For example, development and production URLs to a SharePoint site will be different; however, there is logically only one SharePoint site that the process needs to use. The process will reference the template's field and depending on which environment the process is deployed to, it will use the corresponding value to connect to the SharePoint site.
There are several reasons why the Environment Library has been set up in this fashion. First, since the Environment Library is a server component of the K2 platform, the environment fields are reusable across business processes. To reiterate, there is a high likelihood that a root SharePoint site address will be the same across many K2 processes. This configuration can be reused and defined once, instead of being defined for each and every process. Second, using environments allow process designers to set up all of their fields in a single place and do not have to manage different configuration files in multiple physical locations. Third, since the Environment Library is centrally defined, administrators can create controlled configurations that allow less technical designers to use configurations without requiring them to know how to correctly enter a connection string.
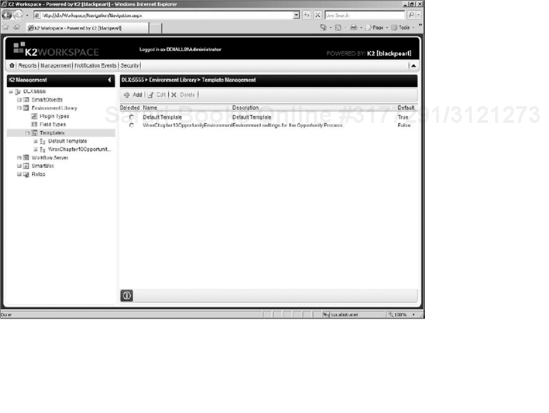
To create a new template, the designer must go to the K2 Workspace and open the Management Console. Within the K2 server node, there is a node called Environment Library where the designer can create a new template. By default a template called Default Template will be created (see Figure 10-8).

Expanding the Environment Library node will show a node called Templates, which when clicked, will open the Template Management page. A designer can add a template by clicking the Add button and providing a distinct name and description. The designer will need to indicate if the template is the default one. Only one template can be designated as the default template, and the default template will be the template selected when a new process is being created. In this case, a new template will be created for the Opportunity process (see Figure 10-9).
It is good practice to give the template a strong name. Especially if the template is being created to support a specific process(es). Following the example that was introduced earlier
ACME.HR.Environment.EmployeeOnboardingwould be a proper name. Special characters like a dot are not allowed in a template name.
After a new template has been created, template fields must be added. This is done by expanding the WroxChapter10OpportunityEnvironment node and selecting theTemplate Fields node, which will open the Field Management screen (see Figure 10-10). Notice that there are several fields that have been created by default. They are called Field Types, and it is possible to create more of them by going to the Field Types node. Many Field Types are requiredby K2 blackpearl and must have values because they will be used by the event wizards. For example, the Mail Server field will be used in E-MailEvents, the Web service URL is used in all InfoPath Client Events, and SmartObject Service is used in SmartObject Events. Adding new fields on this screen is again asimpleprocess; the following fields have been added: Opportunity Site, Opportunity Library, and Opportunity File Name. These fields will now be added to every environmentthat is created from this template and will be set with the default values assigned here.
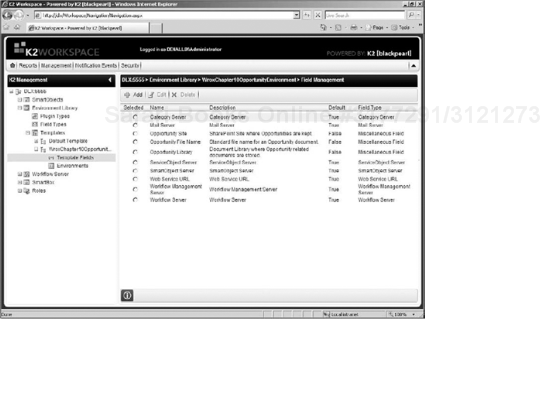
In this example, the type for the new fields has been set to Miscellaneous Field and none of them have default values marked as true. Marking one as true would mean that if there are multiple fields of Miscellaneous Type, the one marked true will be the default one used. This does not make sense for the Miscellaneous Type but would be applicable to the Web Service URL field type. This field type is used by the InfoPath Client Event, and whenever the InfoPath Client Event is added to a process it will use the Web Service URL field that is marked as default. If there was a second field of Web Service URL type, it would not be used by the InfoPath Client Event unless the designer was to manually change the event.
Once both templates and fields have completed, new environments can be created for the Opportunity template by selecting the Environments node, which will open the Environment Management screen. New environments can be added on this screen, and one environment can be designated as the default environment for the template. In Figure 10-11, two environments were created, one for development and one for production.
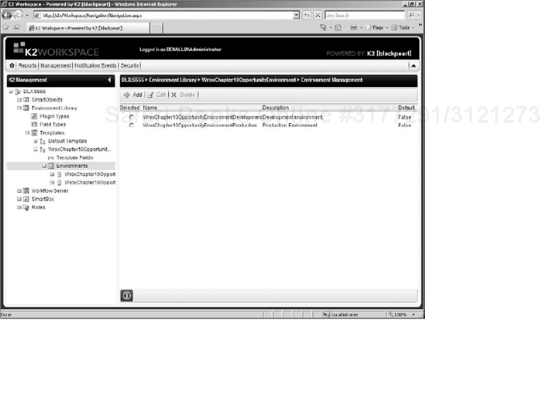
It is good practice to give the environment a strong name. Following the example that was introduced earlier,
ACME.HR.Environment.EmployeeOnboarding.Developmentwould be a proper name. Special characters like a dot are not allowed in a template name.
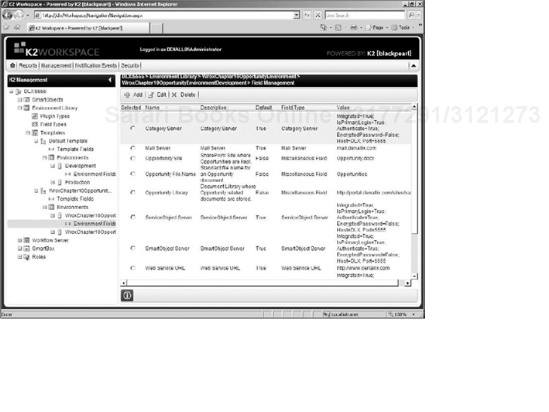
After the environments have been created, all of the fields for each environment need to be filled in with data. Figure 10-12 shows the screen where environment field values are managed. It is important to fill in the fields with data before using them inside any of the K2 design environments, as these values will be used and referred to during design. New fields can be added directly to an environment, which will result in a new field being created for the template; subsequently, the new field will appear on every environment for the template. However, changing the value of a field in an environment will only set that value for that environment. The following is a view of the Field Management screen for the development environment. Once this is complete, the Environment Library can be used to compose processes.
The Environment Library can be used in all K2 design environments, and it is extremely easy to use them. Another great thing about the Environment Library is that a technical developer or administrator can set up templates in an Environment library. Then a designer, who may not be technical, can reference environment fields for their workflows and not be concerned with the details of how to create something like a connection string.
Before working with an Environment Library, a designer must select which environment they want to use. When a new project is created, the default Environment Library will be selected. The Environment Library can be changed using the K2 Object Browser, which shows the current environment displayed at the top. In Figure 10-13 in the K2 Object Browser all of the Field Types from the Environment Library Server are listed as a node in the tree. Within each node will be all of the environment fields of that type.

If a new sales related process needs to be created, one of the new environments should be selected. To select the new development environment, the new Opportunity template must first be selected. Select the drop-down next to the current environment name and an option will appear to select the template (see Figure 10-14).
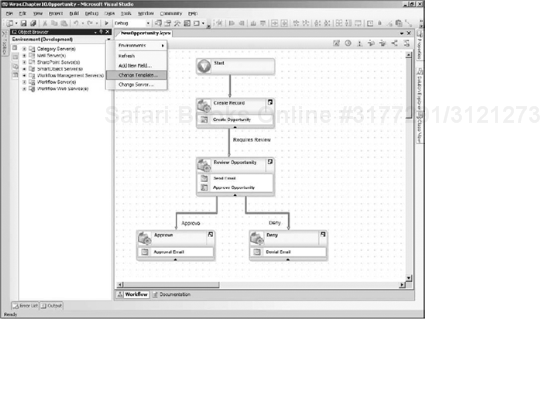
If Visual Studio was open while a new template or an environment was created, that template or environment will not be visible until the Object Browser is refreshed. There is a refresh option shown in Figure 10-14. The environments will be refreshed every time the K2 design environmentis opened.
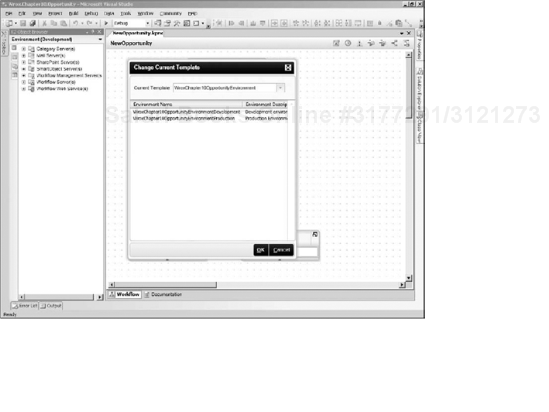
Upon completion, the Change Current Template dialog will appear where the designer can select a template and the environment they want to work with (see Figure 10-15). In this case, the opportunity template and development environment are selected.
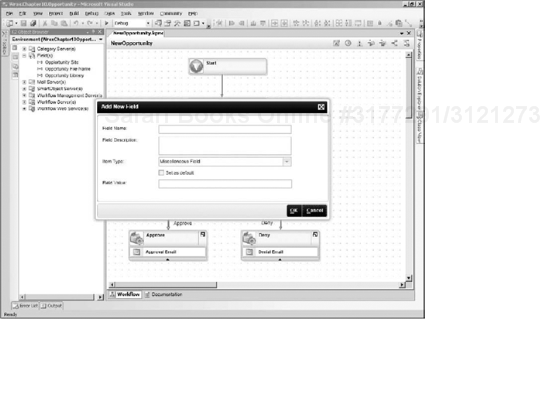
It is possible to create environment fields using the K2 Object Browser in Visual Studio, but it is not possible to create new templates and environments, which can only be done inside the K2 Workspace. To add a new field, right-click any of the nodes and then click the add field option. This will open the Add New Field dialog (as shown in Figure 10-16). Fill in the name, description, field type, default, and field value as appropriate. When this is done, the new field will be added to the template so that all environments will have the new field. However, the value that was entered will only apply to the environment in which Visual Studio is running. If a new field was added while using the development environment, the value would be set for the development environment only. The production environment would have the new field, but its value would be blank and needs to be set.
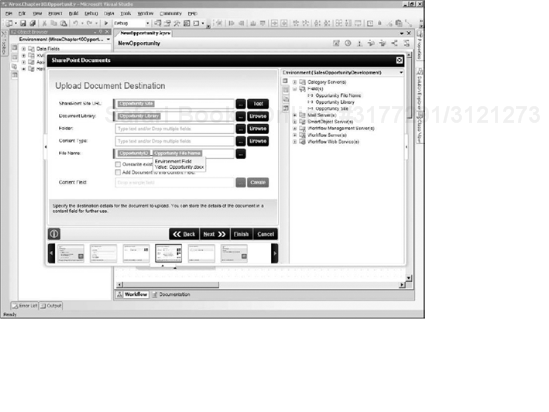
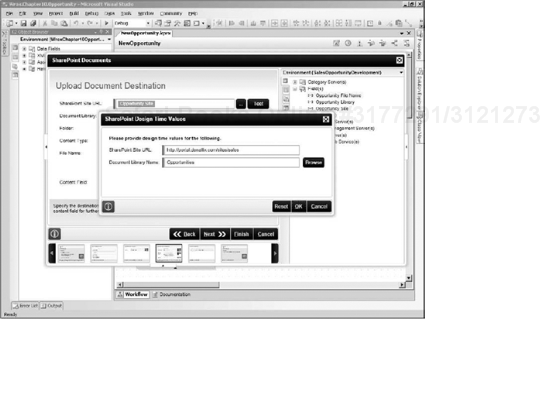
Using environment fields in an event wizard is just as simple as selecting which environment to use. Figure 10-17 shows the Upload Document Destination step of the SharePoint Documents event wizard. To select an environment field, click an ellipse next to any field and the Context Browser will open. The designer will simply select a field and then drag-and-drop, it into a field of the wizard. Environment fields are visually identified by a K2 Field Part, which is the green highlight of the environment field name in the wizard. Holding the mouse over the green highlighted area will show the value that is stored in the Environment Library.
In some wizards, the designer will be required to enter design-time values if the values from the environment fields cannot be resolved. For example, this could happen on a SharePoint site URL that does not yet exist because it is generated by the process. If something similar were to occur, the following window will be prompted for the designer to enter a design-time value for the event for design time only. Figure 10-18 shows the window the designer will have to use to enter a value for design-time purposes only.
After a process has been deployed, the values in the Environment Library are no longer used and values in the String Tables are used by running process instances. During the deployment of the process, the values for the environment are copied into a String Table, and by default, the String Table will be given the same name as the environment. To view the String Table, go to the K2 Workspace by drilling-down to the process and then selecting the String Table node under the process name (see Figure 10-19). All of the values for the String Table are visible and can be edited by selecting the field and then pressing the Edit button.

Figure 10-19 also shows a node called String Table that is located under the Workflow Server node. This is provided because String Table values can be reused between many processes. Instead of going to the process node to modify a String Table value, an administrator can go to this node and modify the String Table values. Wherever the String Table values are modified the modified, value will be applied to all processes that use the String Table.
There are several things that must be understood when managing String Table data. First, String Tables are not used during the design of the process; instead, the Environment Library is used. For example, Visual Studio will connect to the SmartObject Server to get a list of SmartObjects. This connection will be based on the template and environment that Visual Studio is currently running under, not the value in a String Table.
Second, values changed in the String Table will not be reflected in the Environment Library. If values are changed in the String Table, when a process is redeployed the values from the Environment Library will overwrite the values in the String Table. It is highly recommended that if changes are made to a production process's String Table, those identical changes be made immediately in the respective production environment's Environment Library. Remember, all changes to the String Table will affect all processes that use the same String Table name. Be sure that changes to the String Table will not inadvertently cause a run-time error. This will not be an issue if it is planned for ahead of time.
Third, String Table fields can only be edited, they cannot be deleted, nor can new ones be added. As well, String Table values cannot be removed once they have been deployed because all deployed process versions use the same String Table. If a String Table value could be removed, this could cause run-time errors for process instances that are running under a different version.
Fourth, to access values stored in a string through a K2 server-side code, the following can be done. Note that the name of the String Table does not matter because there can only be one String Table that can be used by the process.
K2.StringTable["ENVIRONMENT FIELD "]
To access the String Table from an external application such as an ASP.NET Web page, the following code can be used. The application will require a reference to the SourceCode.Workflow.Management namespace. In this case, the name of the String Table needs to be referenced.
WorkflowManagementServer server = new WorkflowManagementServer("blackpearl", 5555);
server.Open();

StringTable stringTable = server.GetStringTable("Production");
Fifth, knowing how String Tables work is very important, especially when managing processes that are running in a production environment. String Table values can be shared across processes based on the name of the String Table. The name of the String Table originates from the name of the Environment Library environment. For example, the Default template had an environment named Production. All processes deployed with the Production environment will use the same String Table. This makes management of configuration values extremely easy. For example, if a SharePoint URL needs to be changed an administrator does not need to go to every deployed process and make the change. The administrator only has to do it once and all of the processes using the String Table will be affected.
The concept of the String Table was first introduced with K2.net 2003 and was carried over to the K2 blackpearl platform. In K2.net 2003, String Tables were a key/value pair; data was defined on the K2 process definition only and were not reusable across processes. This is not the case anymore. At times, it was very helpful to have process-specific configurations that are not shared between processes. For example, there may be a configuration field called Archive Folder, and in different processes the name of that folder may be diverse.
Supporting the ability to have process-specific values is not possible for an Environment Library unless a process-specific Environment Library is created. A process-specific Environment Library is just a standard Environment Library that will only be used by one process. One way to get around creating multiple Environment Libraries would be to give environment variables more qualified names like Finance Archive Folder and Human Resources Archive Folder; however, these fields will now be visible in both processes' String Tables. This can become confusing because administrators will not expect to see Finance configurations in a Human Resources process and vice versa. Another issue that could arise is, down the road, a SharePoint site may need to be partitioned such that Finance and Human Resources are on different site collections using different URLs. If both processes are using the same String Table value for the SharePoint site, the URL data will be stored in the wrong location. Coming full circle, it is important to understand the long-term plan for a process to ensure that it is sustainable, and sometimes the best way to do that is not to use shared Environment Libraries across processes.
It is not possible to use multiple environments or String Tables for a process; there can only be one environment used during deployment. It would not be possible to create a global Environment Library and then a process-specific Environment Library, and have the process use both.
After gaining an understanding of the Environment Library and String Table, a couple of best practices can be determined. It is very important to plan what type of process is being created. First, if the process needs to use configurations and it is acceptable for it to share many of the configurations of other processes, use a single shared template and environment. When K2 is first installed, a template called Default is created with two environments, called Development and Production. More fields and environments can be added with the understanding that all processes using these will share the same values. Second, if there is a need for process-specific configurations, it is recommended that a separate Environment Library template be created, and within the new template, that new environments be created with a strong name as demonstrated earlier.
Environment Library and String Tables are provided by the K2 blackpearl framework to facilitate deploying solutions from environment to environment. Now it is time to take a deeper look into the MSBuild package that is used to deploy processes and SmartObjects. Deploying process and SmartObjects using K2 design tools like the K2 Designer for Visual Studio, the K2 Designer for Visio, or K2 Studio may not always be possible. It is very common that development and production environments may reside on completely different segregated networks where developers and designers are not given permission to use those networks. Even if permission rights are granted, designer tools will not be installed on the machines to deploy processes or SmartObjects. As well, a K2 process may only be a small piece of a larger solution, and custom deployment solutions may need to be created using .NET build projects or installation tools such as InstallShield or Wise. To address the need to deploy a solution outside a K2 Designer, the K2 blackpearl platform supports deployment using the MSBuild utility, which can be executed through a command line.
Creating a deployment package for a K2 project in Visual Studio is simple. Navigate to the solution explorer in Visual Studio, right-click the project, and then click Create Deployment Package. This will generate just the files necessary for a deployment. The files are:
[K2 project name].exe: This file contains all of the source code for a K2 Process project, and this file is what will be ultimately deployed to the K2 blackpearl Workflow server. The files can be extracted from the
.exeby double-clicking it. This file can later be downloaded from the K2 workspace once it has been deployed. A K2 SmartObject project will not have this file created because.sodxfiles will be deployed to the K2 SmartObject server.[K2 project name].dll: As mentioned earlier, there is no compiled code for a process however a
.dllfile is created because it is required by the build operation. This file will be used in the future to contain localized resources for a project, such as names for an activity or SmartObject.Deployment folder: Contains all other files needed for the deployment.
Within the Deployment folder there are the following files:
ProjectDeployments.targets: Contains steps for deploying a K2 project.
[K2 project name].msbuild: Provides the MSBuild build engine instructions on what to build and how to build it. This file will be generated by the K2 design tool.
[K2 project name].resources: .NET resources file.
Bin: Contains any DLLs that are referenced by the K2 project.
Resources: Contains resource files that are used by the K2 project.
After creating a deployment package these files can be used to deploy a package to an environment using the MSBuild.exe tool, which is part of the Microsoft .NET Framework 2.0 installation.
After generating the MSBuild deployment package using any of the K2 design environments, to deploy the package using the MSBuild utility, do the following. First, go to the \[Project Folder]obj[Build Type] folder and get [K2 project name].exe, [K2 project name].dll and the Deployment folder. These files need to be copied to the destination environment. It is not required that these be actually deployed on the K2 blackpearl server; they just need to be deployed from a computer that has the .NET 2.0 Framework in the same environment where the K2 blackpearl server is running. Second, once these files have been copied to the destination location, the MSBuild utility can now be used to deploy the K2 blackpearl project. The user doing this must have permissions to deploy a solution to the K2 blackpearl server.
There are several properties that can be used with the MSBuild command-line tool to control how the K2 blackpearl project is deployed.
Deploy_Processes: Deploys the process to the server and by default it is true. If this is set to True, TestOnly must be set to False.
Create_Notifications: Deploys the notifications that are part of a process.
Create_Workflow_Smart_Objects: Deploys Workflow SmartObjects for all client-side events and a SmartObject for the process(es) in the project.
Create_Workflow_Reporting_SmartObjects: Deploys Reporting SmartObjects for every process, activity, and event in the project.
TestOnly: Used to conduct a test deployment but will stop short of deploying the process and SmartObjects to the server. If this is set to True, the
Deploy_Processesproperty must be set to False.Deploy_SmartObjects_And_Associations: Deploys SmartObjects and Associations that have been created between them.
Environment: Name of the environment that will be used.
To run the build, go to Microsoft.NETFrameworkv2.0.50727 in a command window and run the MSBUILD command. It is recommended that the command be run in test mode first to see if there are any issues. Upon successful completion, run the command to do the actual deployment.
To run the deployment in test mode run the following command:
MSBUILD "[FileName]" /p:TestOnly=True;Environment=[Environment]
MSBUILD "C:Chapter 10DeploymentWrox.Chapter10.Opportunity.Process.msbuild"
/p:TestOnly=True;Environment=SalesOpportunityDevelopment
Once the test command succeeds, run the next command to actually deploy the solution.
MSBUILD "[FileName]" /p:Environment=[Environment]
MSBUILD "C:\Chapter 10DeploymentWrox.Chapter10.Opportunity.Process.msbuild"
/p:Environment=SalesOpportunityDevelopment
The [FileName] property for the MSBuild command is the path for the .msbuild file, which will be located within the \[Project Folder]obj[Build Type]Deployment folder. The [Environment] property is the name of the environment from the Environment Library that will be used for the deployment of the solution. The name of the environment and its value must be in the .msbuild file, which is generated from the current template and environment that cached in Visual Studio at the time the Create Deployment Package option was selected.
There are some other interesting files and information that designers should know about that are created under the \[Project Folder]obj[Build Type]Deployment folder. Probably the most important file is the .msbuild file. This file contains the instructions for the deployment of the process and when changed, can affect the deployment of the solution. First there are XML nodes for the properties that are used for the MSBuild command line. If no value is specified in the command line, the values specified in the .msbuild file will be used.
<PropertyGroup>
    <Deploy_Processes></Deploy_Processes>
    <Create_Notifications></Create_Notifications>
    <Deploy_SmartObjects_And_Associations></Deploy_SmartObjects_And_Associations>
    <Create_Workflow_Smart_Objects></Create_Workflow_Smart_Objects>
    <Create_Workflow_Reporting_Smart_Objects>
    </Create_Workflow_Reporting_Smart_Objects>
</PropertyGroup>
<PropertyGroup>
    <TestOnly></TestOnly>
    <Environment></Environment>
</PropertyGroup>
Going down a bit further into the .msbuild file, there will be XML for each environment for the template that is being used with the K2 project. Notice that all of the values were copied out of the Environment Library and placed in this file. If necessary, these values can be changed directly in this file before deployment.
<PropertyGroup Condition="$(Environment) == 'Production'">
    <EnvironmentFields>
        <Root Name="Production" xmlns="">
            <Field Name="Mail Server" Value="mail.denallix.com" />
            <Field Name="Web Service URL" Value="https://DLX:443" />
<Field Name="Workflow Management Server"
Value="Integrated=True;IsPrimaryLogin=True;
Authenticate=True;EncryptedPassword=False;Host=DLX;Port=5555" />
<Field Name="Workflow Server"
Value="Integrated=True;IsPrimaryLogin=True;
Authenticate=True;EncryptedPassword=False;Host=DLX;Port=5252" />
<Field Name="SmartObject Server"
Value="Integrated=True;IsPrimaryLogin=True;
Authenticate=True;EncryptedPassword=False;Host=DLX;Port=5555" />
<Field Name="ServiceObject Server" Value="Integrated=True;IsPrimaryLogin=True;
Authenticate=True;EncryptedPassword=False;Host=DLX;Port=5555" />
<Field Name="Category Server" Value="Integrated=True;IsPrimaryLogin=True;
Authenticate=True;EncryptedPassword=False;Host=DLX;Port=5555" />
<Field Name="SharePoint Sales Site URL" Value="" />
</Root>
</EnvironmentFields>
</PropertyGroup>After <PropertyGroup>, there will be nodes for <DeploymentLabelName> and <DeploymentLabelDescription>. Both of these nodes can be filled in with custom information about the deployment. The rest of the .msbuild file contains information about all of the files that are part of the deployment, which should not be modified. Regenerating the .msbuild file from Visual Studio is the safest thing to do if major modifications need to be made. There are various other resource files that are located under \[Project Folder]obj[Build Type]Deployment, which are XML definitions of the processes or SmartObjects themselves. It is again recommended not to modify the file and to rerun the Create Deployment Package option in the Visual Studio Solution Explorer.
It is possible to create pre- and postdeployment tasks using the MSBuild framework. For example, a K2 process may use a SharePoint document library, and if that document library is not created at run time an error can occur if it is not there. To avoid having to manually create the document library in SharePoint before the process is deployed, predeployment tasks can be added to the MSBuild to create the document library. This could be done simply by creating an MSBuild task that will call the stsadm tool, which would use a SharePoint Feature to create a document library on a designated SharePoint Web site. Creating this task is outside of this book, but it is possible.
A very common postdeployment task would be to assign permissions to a process so that it can be used immediately, for example, the SourceCode.Workflow.Management.WorkflowManagementServer object, which can retrieve a list of all the processes that have been deployed to a server. Then, once a deployed process has been located, a ProcSetPermissions object can be created. This is where users can be given permission to a process and then updated back into the process object on the K2 server. The K2 blackpearl SDK has more specific instructions on how to do these operations and how to incorporate them in the K2 blackpearl MSBuild.
To add pre- and post-MSBuild tasks, the .target files used by K2 need to be modified. When the K2 blackpearl design environment is installed onto a development computer, the following MSBuild target files will be created under \Program FilesMSBuildSourceCodev1.0. These target files contain instructions that are used by the MSBuild framework to deploy a solution:
ProjectDeployment.targets: Used to deploy a K2 process or SmartObject project template
ProjectSystem.targets: Used to do the core deployment of a K2 project
Workflow.WizardSDK.targets: Used to deploy a K2 blackpearl Wizard
When a deployment package is created in a K2 design environment the ProjectDeployment.targets file will be copied to the \[Project Location]obj[Build Type] folder. This MSBuild instruction file can be modified to include pre- and postdeployment instructions to add new targets to both <PreDeployDependsOn> and <PostDeployDependsOn>, but never modify the <CoreDeployDependsOn>, which is owned by the K2 blackpearl platform.
<Project xmlns="http://schemas.microsoft.com</url>/developer/msbuild/2003">
  <PropertyGroup>
    <PreDeployDependsOn></PreDeployDependsOn>
    <PostDeployDependsOn></PostDeployDependsOn>
    <CoreDeployDependsOn>PreDeploy;Deploy;PostDeploy</CoreDeployDependsOn>
  </PropertyGroup>

  <Target Name="InitDeploy" Outputs="$(TestOnly);$(Environment)" >
    <CreateProperty Value="$(TestOnly)">
      <Output TaskParameter="Value" PropertyName="TestOnly" />
    </CreateProperty>
    <CreateProperty Value="$(Environment)">
      <Output TaskParameter="Value" PropertyName="Environment" />
    </CreateProperty>
  </Target>
  <Target Name="PreDeploy" DependsOnTargets="$(PreDeployDependsOn)"/>
  <Target Name="PostDeploy" DependsOnTargets="$(PostDeployDependsOn)"/>
  <Target Name="CoreDeploy" DependsOnTargets="$(CoreDeployDependsOn)"/>

  <!-- Custom targets -->

</Project>
Changing the <PreDeployDependsOn> and <PostDeployDependsOn> in the ProjectDeployment.targets file in the \Program FilesMSBuildSourceCodev1.0 folder will affect every deployment package that is created on that development machine. However modifying the ProjectDeployment.targets file in the K2 project folder will only affect the single project. Most commonly the ProjectDeployment.targets file would be updated in the K2 project folder because pre- and postdeployment instructions will be project specific. Creating MSBuild instructions is outside of the scope of this book, but this shows where custom ones would be added.
Never modify any of the instructions that are in the
ProjectSystem.targetsandWorkflow.WizardSDK.targetsfiles because they are owned by the K2 blackpearl platform and can be updated by future releases.
It is important to note that environments and String Tables are not dependent on each other. Templates and environments need to be created only on a development server and do not have to be created on staging or production K2 blackpearl servers. This is because environment fields are only used in the K2 Designers. When the process is successfully built, the environment fields from the current template are pushed into the MSBuild package that is created by the K2 designer. This MSBuild package will contain all of the environment field values for the template. Then when it is deployed, the values from the MSBuild package are stored in the String Table.
Commonly on a development server there will be an Environment Template with all of the environments such as development, staging, and production with all of the correct values stored. When the MSBuild package is created, all of the files in the Deployment folder need to be simply copied to the correct server, and then the MSBuild package will be deployed via the command line.
The environment field values can be changed directly in the MSBuild package, but it is recommended that if that is done, go back to the K2 Workspace and make the associated change there too, so subsequent builds of the MSBuild package will have the correct environments in place. However, never change the name of an environment field in the MSBuild package because the process definition will have a reference to the name. If the name were to change and the process definition were not updated an exception would occur during deployment. If the name of an environment field must change, go to the K2 Workspace, modify the name of the environment field, and then open the K2 process and rebuild it. This will find all of the places where the old environment field name is used. Change the process to use the renamed environment field, then rebuild and deploy the process.
It is possible to exclude items from a deployment. This can be done by right-clicking the item in the Visual Studio Solution Explorer and selecting the Exclude from Build menu item. This will put a red X mark next to the item, indicating that it will not be part of a deployment. This must be done before the project is built and the subsequent deployment package is created. This is important because the item will not be built as part of the project and will not be included in the MSBuild deployment instructions. This is why it is not possible to exclude items from the deployment wizard. The deployment wizard is just a nice front user interfacefor running the .msbuild file for users who are not going to deploy using the command line. It is not a recommended solution to exclude items by modifying the .msbuild file directly as there can be dependencies that are required at run time. If something needs to be excluded, the item should be excluded by using Visual Studio, rebuilt, and then deployed.
Using the K2 blackpearl API, developers can author custom SmartObject Services that can be used for SmartObject methods. Once the service has been written, they need to be deployed and registered with the K2 blackpearl server. There are three basic steps to initially deploy a SmartObject service:
Build the SmartObject Service DLL.
Register the SmartObject Service with the K2 server.
Create an instance of the SmartObject Service.
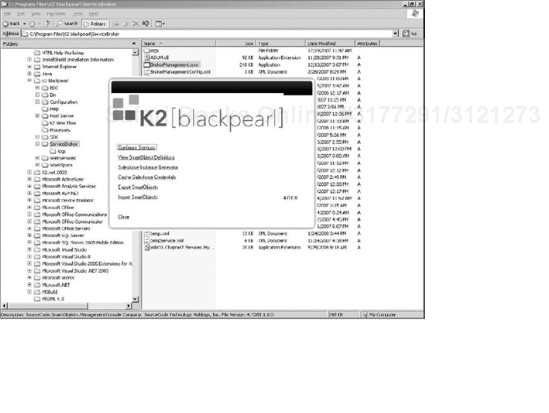
The SmartObject Service is nothing more than an assembly (.dll file) that is compiled and placed in the \Program FilesK2 blackpearlServiceBroker directory. All SmartObject Services will execute from this directory. First, obtain the .dll file for the service and add it to this location. Second, once the .dll has been added to this location, use the BrokerManagement.exe to register the K2 SmartObject Service with the K2 server. The BrokerManagement.exe application is also located within the ServiceBroker folder. Figure 10-20 shows the Service Broker Management tool.
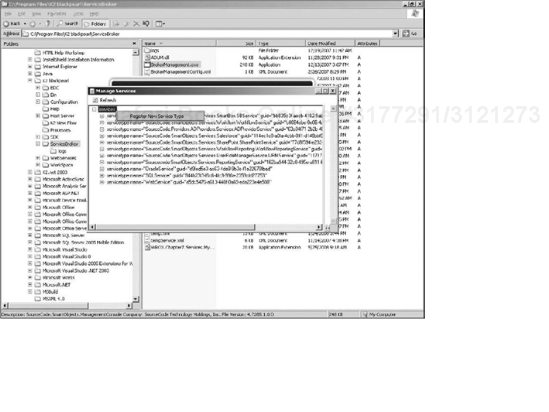
When the BrokerManagement.exe application has been started, press the Configure Services link, which will open the Manage Services window. There is a tree of all services that have been registered with the K2 server. To add a new one, right-click the Services node, and select the Register New Service menu item (as shown in Figure 10-21).
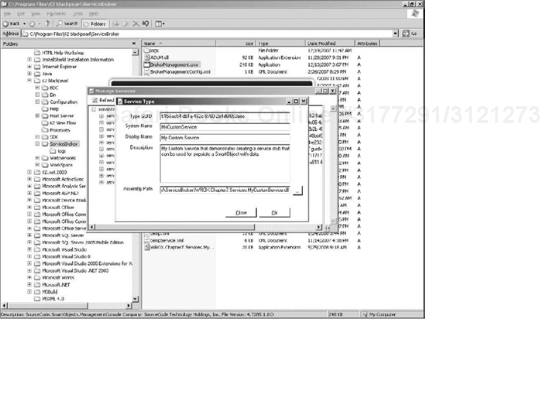
This will open the Service Type window (shown in Figure 10-22), where metadata associated with the service must be entered. The Type GUID is generated and does not need to be changed. The System Name must be a unique value across all of the services and a Display Name and Description should be provided. Finally, press the ellipse next to the Assembly Path field, which will open a file window to the ServiceBroker directory and the directory's.dll. Once this is done, the SmartObject Service will be registered.
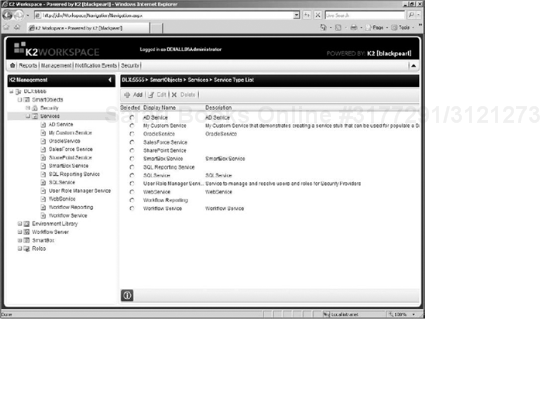
A service instance will need to be created for a new service that has been deployed. The service instance is used by the SmartObject method to populate its properties with data. To add a service instance, an administrator will need to go the K2 Workspace, and in the Management Console, open the SmartObjects node. Figure 10-23 shows the SmartObject service types that have been registered with the SmartObject server.
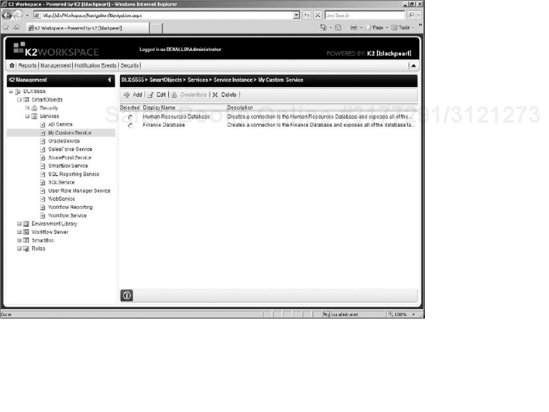
To create a new service instance, select the SmartObject Service node, which will then open a window listing all of the service instances that have been created (as shown in Figure 10-24). Clicking the Add button will open the Service Instance Configuration screen, where all of the configuration values for the service can be entered. Custom configurations that were created in the service will be displayed and must be filled-in if they are required. As well, a unique system name and display name must be entered for the service. Once this is completed, the SmartObject service can be used with SmartObjects.
If a SmartObject uses a service method that has not been deployed, the SmartObject cannot be deployed. The SmartObject service must be deployed first, and then an instance of the SmartObject service must be created using the same name as the instance for where the SmartObject was created. So if the K2 development server has a SmartObject instance called CRMService, then the production server will need a similar service instance name of CRMService.
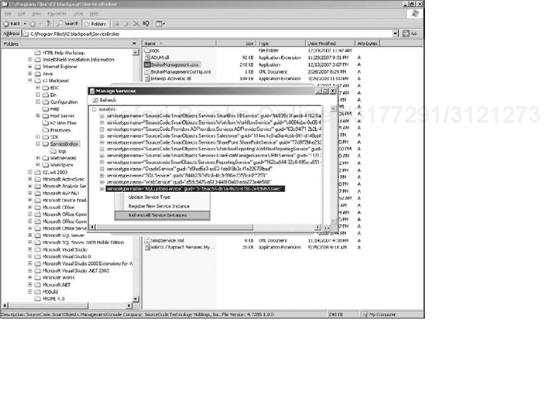
Updating a SmartObject Service is not too different from the steps to deploy the SmartObject Service; however, the K2 Service must be stopped so that the updated .dll can be reregistered with the server. To update the SmartObject Service, stop the K2 Service using the Service Console, then move the new.dll into the ServiceBroker directory and then restart the K2 Service in the Service Console. Finally, the BrokerManagement.exe application must be used again to update all of the running instances in order to use the updated .dll. As Figure 10-25 shows, click on the Configure Services link in the BrokerManagement.exe, find the SmartObject service, right-click it, and then select the Refresh All Service Instances menu item.
If there is a farm of K2 blackpearl servers, this process will have to be done manually on each server in the farm, even if they are load balanced. There is currently no utility that will push this out to every server on the farm. However the service instances that are created in the K2 Workspace will be load balanced.
SmartObject definitions are deployed to the SmartObject Server in a similar fashion as processes are deployed to the Workflow server. The designer can use thedeployment wizard or use the same MSBuild commands to deploy SmartObjects as they would for processes. The .sodx file is an XML file that contains the definition of the SmartObject such as all of the fields, methods, and SmartObject Service instances that it will use. This XML file is managed and version controll by the SmartObject server. When deploying SmartObjects from one server to another, some extra steps may be required. SmartObject Servicesare deployed to a SmartObject Server and then instances of those SmartObject Services can be created using the K2 Workspace Management Console. The SmartObject Service instances have methods, which are referenced by the SmartObject definition created in a K2 design environment. The SmartObject Service instance is referenced bya GUID, which is contained in the .sodx file. This GUID was generated by the SmartObject server when the service instance was created. When a SmartObject is redeployed, for example, from a development to a staging environment, the GUID of the SmartObject Service instance will need to change. This is because even though the SmartObject Service instance has been created in both environments, even with the same name, the GUID will be different. This is required by the K2 SmartObject framework to ensure that there are no conflicts between SmartObject Service instances that reside on different SmartObject servers.
If a .sodx file is moved from one environment to another, and this GUID is not changed, an error will occur during deployment similar to the following:
"Deploy smartobjects: Task error: SmartObjectServer Exception:
Dependency could not be created. Parent does not exist in this
environment. Check Data property of exception."
To resolve the issue, the .sodx file must be modified. This error will not occur for all SmartObjects that are moved from one server to another. When K2 blackpearl is initially installed, some SmartObject Service instances will be created by default like the SmartBox and Active Directory. These Service instances have a controlled GUID, which will be the same across all servers. SmartObjects that use these Services will not encounter this error. However, Service instances that are dynamic — like many of the ones on the K2 black market — will counter this issue when it is moved from one server to another.
If the default Service instances were to ever be removed and then added back again, this error could occur.
Open the .sodx file in a tool like Notepad. There will be section of XML similar to the following (all of the GUID values will be different):
<ServiceElementDefinition>
    <Guid>4af9d395-06ad-4eae-a5ea-47bc51eac146</Guid>
    <Name>serviceinstance</Name>
    <Value>e5609413-d844-4325-98c3-db3cacbd406d</Value>
</ServiceElementDefinition>
The Value node must be updated to the SmartObject Service instance on the environment that this SmartObject is being deployed to. To find the correct GUID value go to the BrokertManagement.exe application that is located in \Program FilesK2 blackpearlServiceBroker. Run this application and select Configure Services. When the Manage Services window opens, drill- down in the services instances node and select the correct one to which the SmartObject should be mapped. For example, there will be a serviceinstance node similar to the following:
<serviceinstance name="SmartBoxService"
type="SourceCode.SmartObjects.Services.SmartBox.SBService"
GUID="d9fed5tf-ac63-4de0-9b3c-f1e22678ferr">
The GUID from the serviceinstance node needs to be updated to the Value node of the .sodx file for the SmartObject:
<ServiceElementDefinition>
    <Guid>4af9d395-06ad-4eae-a5ea-47bc51eac146</Guid>
    <Name>serviceinstance</Name></co>
    <Value>d9fed5tf-ac63-4de0-9b3c-f1e22678ferr</Value>
</ServiceElementDefinition>
Once this is done, the SmartObject can then be successfully deployed to the new environment. Remember that if this is a composite SmartObject, meaning that more than one SmartObject Service is used by the SmartObject, then all serviceinstance GUIDs will need to be updated.
There is a tool on the K2 blackmarket called the ServiceObject GUID Updater. This utility application, supported by the community, will complete all of these steps. It also has a batch feature that is helpful when there are a large number of SmartObjects that need to be updated. As well, K2 plans on releasing some more tools to support this as part of their design environments.
It is possible to create deployment packages and deploy K2 Processes and SmartObjects through code using the K2 blackpearl Deployment framework, which utilizes MSBuild assemblies. This is the same API that is used to provide build functionality within the various designer environments. Using it allows for development teams to create fully automated build scripts or even go as far as creating a continuous integration environment. There are two major steps that must be done to completely deploy a K2 project through code:
Create an MSBuild file that contains all of the instructions necessary to deploy a K2 project. This would entail retrieving all the environment variable values from the Environment server and setting switch statements that would have been done in the command line as previously shown.
Deploy the K2 project to the K2 blackpearl server.
The following code will demonstrate how K2 blackpearl projects can be deployed using code. In this example, a simple Visual Studio Console project will be created and the following libraries must be referenced:
Microsoft.Build.Engine
Microsoft.Build.Framework
SourceCode.EnvironmentSettings.Client
SourceCode.Framework
SourceCode.Workflow.Design
SourceCode.HostClientAPI
Create a class named K2BuildUtility and add the following using statements:
using SourceCode.EnvironmentSettings.Client;
using SourceCode.Framework.Deployment;
using SourceCode.ProjectSystem;
using SourceCode.Workflow.Design.EnvironmentSettings;
using SourceCode.Hosting.Client.BaseAPI;
To accomplish the task of deploying a K2 project through code, the K2Build class will have two methods called DeployK2() and CreateDeploymentPackage(). Starting with the DeployK2() method, the first thing is to create an object of Project type. This class requires the path to the *.k2proj project file, where a process and/or SmartObjects will reside. Once the project has been loaded, the Project must be built to ensure there are no errors in the process or SmartObject definitions. After building, a DeploymentPackage object must be created and saved, which will create the actual MSBuild file that was discussed previously. The final step is to call Execute() on the package, which will deploy the K2 project to the K2 blackpearl server.
public static bool DeployK2(string EnvironmentServer, string DestinationTemplate,
                  string DestinationEnvironment, string ProjectPath, string
                  OutputPath) {
    bool success = false;

    try
    {
        Project project = new Project();
        project.Load(ProjectPath);

        DeploymentResults results = project.Compile();

        DeploymentPackage package = CreateDeploymentPackage(EnvironmentServer,
            DestinationTemplate, DestinationEnvironment, project, false);
        package.Save(OutputPath, "K2 Deployment Package");

        results = package.Execute();
        success = results.Successful;
    } catch (Exception ex) {
        throw ex;
    }

    return success;

}
The CreateDeploymentPackage method was separated from the DeployK2 method because a deployment package may sometimes be the only item that needs to be created. After you make a connection string using the SCConnectionStringBuilder, the Environment Library server isloaded using an EnvironmentSettingsManager object. The EnvironmentSettingsManager object can be used to do anything needed to the Environment Library server, such as creating new templates or environments. However, all that is needed here is to load the EnvironmentSettingsManager, using the both the ConnectToServer and InitializeSettingsManager methods, which will establisha connection to the Environment Library server. Calling the Refresh method will actually load the values from the Environment Library server intothe object.
public static DeploymentPackage CreateDeploymentPackage(string EnvironmentServer,
        string DestinationTemplate, string DestinationEnvironment,
        Project Project, bool TestOnly) {

    //Create connection string to environment server
    SCConnectionStringBuilder cb = new SCConnectionStringBuilder();
    cb.Host = EnvironmentServer;
    cb.Port = 5555;
    cb.Integrated = true;
    cb.IsPrimaryLogin = true;
    cb.Authenticate = true;
    cb.EncryptedPassword = false;
    string envionmentServerConnection = cb.ToString();

    //Retrieve the environments from the server
    EnvironmentSettingsManager environmentManager = new
        EnvironmentSettingsManager(true);
    environmentManager.ConnectToServer(envionmentServerConnection);
    environmentManager.InitializeSettingsManager(true);
    environmentManager.Refresh();
Once EnvironmentSettingsManager has been loaded, both EnvironmentTemplate and EnvironmentInstance instances can be referenced. All the field values will need to be extracted and added to the deployment package. After referencing each, the EnvironmentInstance object contains all of the field values that will be used to populate the String Table. To get these values from the Environment Library server to the String Table, a DeploymentPackage object needs to be created using the Project.CreateDeploymentPackage() method.
//Get the template and environment objects.
EnvironmentTemplate template =
        environmentManager.EnvironmentTemplates[DestinationTemplate];
EnvironmentInstance environment =
        template.Environments[DestinationEnvironment];

//Create the package
DeploymentPackage package = Project.CreateDeploymentPackage();
When the DeploymentPackage object has been created, a DeploymentEnvironment object will need to be created, using the AddEnvironment() method on the DeploymentPackage object. The DeploymentEnvironment will need to take all of the values from the EnvironmentInstance.EnvironmentFields collection and set it into DeploymentEnvironment.Properties collection. This will ultimately put all of the values into the MSBuild file, which will later be copied to the String Table accessible through the K2 Workspace.
//Set all of the environment fields to the package
DeploymentEnvironment deploymentEnv =
       package.AddEnvironment(environment.EnvironmentName);

foreach (EnvironmentField field in environment.EnvironmentFields) {
    deploymentEnv.Properties[field.FieldName] = field.Value;
}
Finally, some of the miscellaneous properties of the DeploymentPackage object must be set prior to deployment. The name of the environment being used must be set using the SelectedEnvironment field. This can be any string value and does not have to be the same name as the environment. This value will be used as the title for the String Table; recall that all String Tables that share the same name will share the same values. Both DeploymentLabelName and DeploymentLabelDescription are not actually required; however, it is recommended that they be used to add some description indicating which process or SmartObjects are being deployed. The TestOnly property will control whether the process definition will actually be deployed to the server. Last, both the SmartObjectField and WorkflowManagementServerField connection strings need to be added to the DeploymentPackage, which are retrieved from the EnvironmentInstance. Setting both of these values is extremely important because these values are used to tell the MSBUILD where to deploy the process and SmartObjects.
//Set fields on the package
package.SelectedEnvironment = DestinationEnvironment;
package.DeploymentLabelName = DateTime.Now.ToString();
package.DeploymentLabelDescription = "Template: " + DestinationTemplate + ",
        Environment: " + DestinationEnvironment;
package.TestOnly = TestOnly;

//Get the Default SmartObject Server in the Environment
EnvironmentField smartObjectServerField =
        environment.GetDefaultField(typeof(SmartObjectField));
package.SmartObjectConnectionString = "$Field=" +
        smartObjectServerField.DisplayName;

//Get the Default Workflow Management Server in the Environment
EnvironmentField workflowServerField =
        environment.GetDefaultField(typeof(WorkflowManagementServerField));
package.WorkflowManagementConnectionString = "$Field=" +
        workflowServerField.DisplayName;

return package;
}
Once both DeployK2() and CreateDeploymentPackage() have been completed, the following code can be used to deploy a process or SmartObjects project to the K2 server. In this case, the name of where the Environment server is located is called DLX. The configuration data in the production environment of the Default Template is being used. The location of the K2 project is specified and the output of the MSBuild files is also specified.
K2BuildUtility.DeployK2("DLX", "Default Template", "Production",
    @"C:ProjectsProcess.k2proj", @"C:ProjectsBuild");
This example showed only how to deploy a K2 process and SmartObject. The same API can be used to deploy SmartObject Services.
You have learned about all of the aspects associated to deploying a K2 process. Even though deploying a K2 process can be a very easy task, forethought needs to be made to ensure that maintainability and sustainability are ensured. Using the Environment Library as shown can streamline deployments. Planning must be incorporated into the way that the Environment Library is used; otherwise, it can become a dumping ground for configurations that are not relevant from one process to another. The architecture of process and SmartObject deployment and how K2 blackpearl utilizes the MSBuild framework to deploy process-driven applications to the server illustrates the extensibility and power of the K2 platform.
The next chapter now turns to working with InfoPath and ASP.NET forms.