Mike Talley
In the previous chapter we took a look at the K2 blackpearl features that integrate with SharePoint through the browser, such as the administration pages, the K2 Web Designer for SharePoint, the K2 Worklist Web part, as well as the SmartObject integration. In this chapter we'll turn our attention to the K2 SharePoint integration at design time through the SharePoint wizards available in the other K2 Designers, including what you can do with them and some tips on getting the most out of the K2 SharePoint process and event wizards. We will also take a more careful consideration of the enterprise scenarios enabled by the K2 integration. This chapter covers the K2 blackpearl features you can use to create advanced workflows for SharePoint, including:
Process and SharePoint event integration
Controlling SharePoint content
Administering SharePoint
Enterprise Scenario: Web Content Management
Enterprise Scenario: Using Search Results
Enterprise Scenario: Creating Content Management Rules Using the Records Center
Enterprise Scenario: Interacting with Business Applications and External Databases through the Business Data Catalog (BDC)
Let's take a step back and look at all of the SharePoint-related wizards offered with K2 blackpearl. Many of the wizards included in the K2 Designers are there for administrative purposes, such as creating sites, lists, and libraries, and for managing content. In Chapter 9 we introduced all of the wizards available in K2 blackpearl, but here we will look at only the SharePoint-related wizards and give you some ideas on how to use them. There are two wizards, namely SharePoint Records Management and SharePoint Publishing, that rely on MOSS features that may not be enabled due to site configuration or a WSS-only installation. These wizards will still appear in the K2 Designers.
We start with the two process wizards:
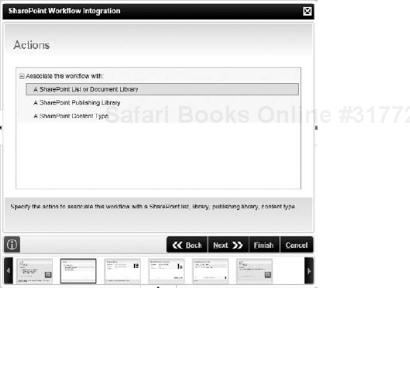
This wizard allows you to associate a K2 blackpearl workflow with a SharePoint list or library, a publishing library, and a SharePoint content type as shown in Figure 13-1. It uses standard K2 blackpearl SharePoint forms for instantiating and actioning the workflow, so it looks and feels much like an out-of-the-box SharePoint workflow. In combination with this wizard, the SharePoint Workflow Integration Client Event Wizard is used to populate the workflow task form with the actions a user can take at a particular point in the process. The available actions are also based on the rights a user has to perform those actions — if users do not have the rights, then that action is not made available by the K2 server.
Associating a workflow with a list or library allows you to start the workflow automatically when an item is added to the list or library, and you also have the option of allowing users to start the workflow manually. If you do not specify the manual option, the workflow will not appear in the list of workflows in SharePoint that can be manually started. These options are not mutually exclusive either, so you can have an automatic workflow that can also be manually started.
Associating a workflow with a content type is a particularly powerful mechanism for ensuring that a workflow is automatically started or can be manually instantiated wherever that content type is used in the SharePoint site collection. As your SharePoint implementation grows, having workflows associated with content types allows for the workflow implementation to scale much more easily than if you target specific document libraries. In other words, associating a workflow with a document library is a 1-to-1 relationship, whereas associating a workflow with a content type allows you to have a one-to-many relationship with content wherever it resides on your site collection.
For more information about SharePoint content types, see "Introduction to Content Types" on MSDN (
http://msdn.microsoft.com/en-us/library/ms472236.aspx).
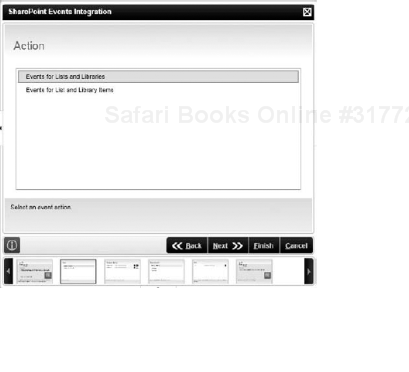
This wizard allows you to instantiate a workflow based on events in lists and libraries, whether that is the structural change to the list or library itself, or an item-level change within the list or library. For example, the first option in this wizard (as shown in Figure 13-2) allows you to instantiate a workflow when a column is added, removed, or updated in a SharePoint list or library. The second option allows you to instantiate a workflow based on a number of different events, for example when an item is added, a document is attached to an item, an item is checked-in, or when a file is converted. For each of these event levels — at the list or library structural level or at the items level — a workflow can be instantiated based on one or more events in the specified list.
When you choose integration with lists or library events, the available events include:
Field Added: Occurs when a field is added to the list/library
Field Deleted: Occurs when a field is deleted from the list/library
Field Updated: Occurs when a field is updated in the list/library
When you integrate with list or library items, the available events include:
Item Added: Occurs when items are added to the list/library
Item Attachment Added: Occurs when attachments are added to a list item in the list/library
Item Attachment Deleted: Occurs when attachments are deleted from a list item in the list/library
Item Checked-In: Occurs when items are checked-in to the library
Item Checked-Out: Occurs when items are checked-out from the library
Item Deleted: Occurs when items are deleted from the list/library
Item File Converted: Occurs when files are converted in the list/library
Item File Moved: Occurs when items are moved from the list/library
Item Unchecked-Out: Occurs when items are unchecked-out from the library (changes discarded)
Item Updated: Occurs when items are updated in the list/library
The next step of the wizard is the Metadata Mapping and Folio page, where you can store metadata about the list in a K2 field for later use in the workflow. If you wanted to associate a single workflow with multiple lists and libraries, choose Advanced Mode on the wizard welcome page.
Remember that SharePoint events are mainly suited for automatic workflow processes, not ones that can or should be manually started by users or require some sort of user interaction before the process can begin. If you do require user interaction, use the SharePoint Workflow Integration Process Wizard instead. The SharePoint Events Process Wizard is particularly useful when you always need to start a task when a change is made to the structure of a SharePoint list or library, or an item is added, deleted, or changed. Although the use of SharePoint events' integration is not limited to administrator auditing and alerting, it is particularly useful for these types of scenarios, and they represent workflows that are simple to create. Note that, because of potential negative performance implications, only asynchronous SharePoint events are supported with K2 SharePoint events' integration, which means that certain types of workflows, such as approvals, do not work well with the SharePoint events' integration because the user action has already occurred before an administrator is assigned a workflow task. In other words, there is no mechanism to capture the event and send it for approval. The workflow begins when the event is completed.
Once they are deployed, you can view and manage the K2 SharePoint integrated events by using the K2 Events Integration link in the Site Administration section of the Site Settings page. You can also manage all K2 SharePoint integrated workflows by using the K2 Workflow Integration link in the Site Collection Administration section on the same page. Both of these links are highlighted in Figure 13-3.

We now turn our attention to the rest of the SharePoint wizards included with K2 blackpearl. These are the event wizards that allow you to perform specific actions with SharePoint entities. One or more events can be added to each K2 activity.
We've already discussed the SharePoint Workflow Integration Client Event Wizard, so we won't be covering that one again. The rest of the wizards do not have a user interface (UI) associated with them; rather they are tools that allow you to do something in SharePoint based on the process you are creating, whether that is moving, copying, or deleting a document; creating a site or a list in a site; or assigning permissions for someone to access a particular SharePoint list. These are just a few examples of what you can automate using K2 blackpearl. Many of these options are also available with K2 blackpoint. We'll break these wizards down into two categories — Administration and Content Management.
This class of wizards allows you to automate SharePoint tasks that are typically associated with site designers, site owners, and site and site collection administrators. The power of these three wizards is evident for those readers who already have a SharePoint implementation that has spread like wildfire in their environment and are looking for something to control and manage SharePoint:
SharePoint does not have many features in this regard and K2 blackpearl brings the ability to automate site provisioning, list and library creation, and user permissions.
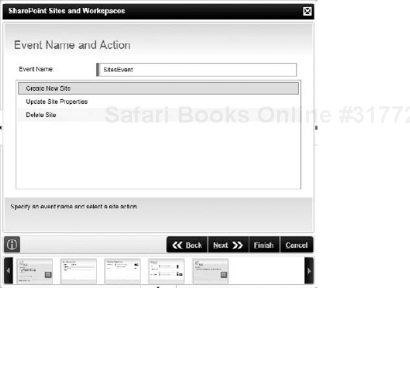
This wizard allows you to create and delete SharePoint sites and even update a site's properties, as shown in Figure 13-4. The sites you can create are based on the available site templates in your SharePoint site collection, whether those are out-of-the-box SharePoint templates or custom templates that are installed by an administrator. Note that when updating site properties you are not allowed to change a site's template, only the site properties such as title and description.
Using this wizard, you could create a process for site requests, for example, that takes information such as the requested site's title, description and template, and routes that to an appropriate person for approval. Once the request is approved, the site would be automatically provisioned with the template specified in the request form. Combining this with the SharePoint List and Libraries and the SharePoint User Management Wizards, you could also extend this process by creating a company-standard document library and giving all domain users read access to the site.
This wizard allows you to create, update, and delete lists and libraries, as shown in Figure 13-5. Even though the wizard uses the term "List" in each of the actions, since SharePoint libraries are actually just a special type of list, you can use this wizard to create, update, and delete document libraries as well. Note that updating list properties does not allow you to change an existing list's template.

As you step through this wizard, you can specify a type of list to create. Again, this is based on the types of lists that are available on the SharePoint site, including custom list types that you have defined. Out-of-the-box SharePoint lists include announcements, calendars, issue tracking, tasks, and links, as well as libraries for documents, forms, wiki pages, and data connections.
Keep in mind that you use this wizard to create both lists and libraries, but to actually create items within a SharePoint list, you use the SharePoint List Items Event Wizard. To create documents within a SharePoint document library, use the SharePoint Documents Event Wizard.
This wizard is perhaps the most difficult wizard to understand of all K2 wizards. It is difficult in part because SharePoint security is complex. There are rights, which are the basic things that a user can do. Then there are groups of rights that are referred to as permission levels, and this is what you will see at first glance when managing permissions within the SharePoint UI. These rights can be assigned to individual users or to groups of users, and they can typically be managed at any point within a site collection, from the top all the way down to an individual item in a list or document library. You also have the option, when creating a new SharePoint site, list, or list item, to break the permission inheritance on that SharePoint entity. The SharePoint User Management Event Wizard is just as complex, if not more so.
Figure 13-6 shows the first main page of the SharePoint User Management Event Wizard.
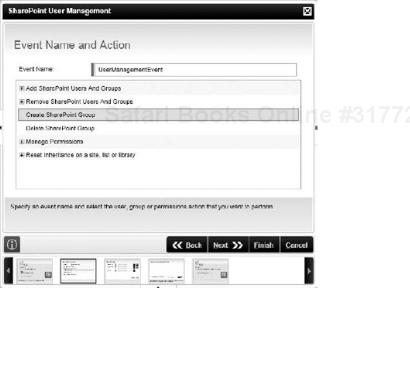
With this wizard you can perform many SharePoint administrative tasks, such as:
Create or Delete a SharePoint Group.
Give SharePoint Users or Groups access to a site, list, folder, list item, or to another group so that you have nested groups.
Remove SharePoint Users or Groups from a site, list, folder, or item.
Reset the permission inheritance on a site, list, folder, or list item. As you are setting rights, you can also break inheritance at whatever level you are currently configuring.
The SharePoint User Management Event Wizard is one of the only wizards that automatically chains itself, meaning that you can have two user management events that are tied to each other and cannot be individually deleted. This is necessary, for example, when creating a group. Creating it is typically only half of what you need to do with that group. You also must assign some permissions, or rights, to that group. This is where the second instance of the wizard will be used. The wizard is smart in that it will automatically launch itself again when you click Finish the first time through. It will also preselect what action to take because it has some context about what you just did in the previous SharePoint User Management Event Wizard, which makes using the wizard the second time through a bit easier. If you get confused when using this wizard, think about how you would have to manually configure users, groups, and permissions in the SharePoint UI, and then revisit the wizard.
For more information about SharePoint rights and security, see "Introduction to controlling access to SharePoint sites and site content" (
http://office.microsoft.com/en-us/sharepointserver/HA102553721033.aspx) on Microsoft Office Online.
The content management event wizards allow you to perform actions on content in SharePoint, whether that is information stored in a list, in a document, in a publishing page, or in the Records Center. We've also included in this section the Search Results Wizard because it is more commonly used when automating content management tasks than SharePoint administration tasks.
This wizard allows you to create, update, copy, and delete list items in a SharePoint list or library, as shown in Figure 13-7.

You'll also notice two options under Update List Items, which also apply to Copy List Items and Delete List Items. These are important options to understand because they can greatly increase the power and dynamic nature of your process design:
SharePoint List Item: You will attach the event to a specific item in a SharePoint list or library.
From Content Field: This is where the power and flexibility is represented because you can update an item from data stored in the process. This allows you to gather information in a K2 data field or even as the result of a SmartObject query, and then use that data to update, copy, or delete a list item.
This wizard, as shown in Figure 13-8, allows you to take many different actions with SharePoint documents, such as:

As with the List Items Wizard, you can perform many of these actions either directly on a document stored in SharePoint, or with a document stored on the file system or in a K2 field. The K2 field option allows for greater power and flexibility because it allows you to specify a document that is stored in a K2 field or in a SmartObject.
The SharePoint Documents Event Wizard allows you to do anything with a SharePoint document that you can do through the UI and more, including checking it in, checking it out, and undoing a document check-out. In addition to that, you can also retrieve the metadata, or properties on a document, which can be stored in a K2 field for later use.
This wizard allows you to create and delete records in a SharePoint Records Center as well as to place a record on hold or remove a hold from a record, as shown in Figure 13-9. It also allows you to create and delete record holds. A record hold is a container for SharePoint records that may be subject to litigation, audits, or investigation. A hold overrides a record's information management policy and prevents the record from expiring or being deleted. This ensures that the contents of the record are protected and can be reviewed by legal staff in order to remain in compliance with regulations or ongoing legal matters.
For more information about records and record holds, see "Introduction to the Records Center site" (
http://office.microsoft.com/en-us/sharepointserver/HA101735961033.aspx) and "Create a hold to suspend records" (http://office.microsoft.com/en-us/sharepointserver/HA101735981033.aspx) on Microsoft Office Online.

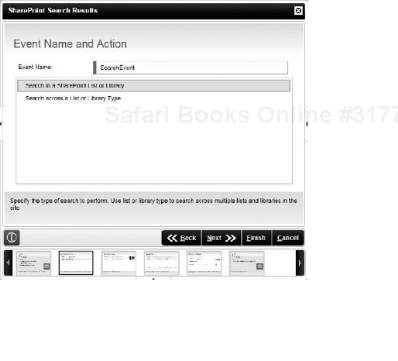
This wizard allows you to perform a SharePoint search in a specific list or library, and to perform a search across multiple lists and libraries of the same type, as shown in Figure 13-10. When searching across lists or libraries of a specific type, you can also specify the scope of the search. The default scope is the current site as specified in the wizard, but you can expand that scope to include the current site and all subsites, or you can search across the entire site collection.
Using the SharePoint Search Results, you can specify fairly complex Boolean logic in the Search Filters page. These criteria can be based on dynamic data stored in the process or from the result of a SmartObject query. You can also limit the number of results based on a hardcoded number or data stored in the process. But perhaps the most powerful aspect of this wizard is that it enables you to store the search results in a content field. If you think about it, what good are search results to an automated process if those results can't be used for anything? Storing the results in a content field allows you to use them later for something else, such as copying those documents to a different location, providing a list of search results in an e-mail notification, or putting those list items or documents into the Records Center. Combining the Search Results Event Wizard with other SharePoint event wizards allows you to automate some fairly complex tasks that involve multiple items from a site, a site and its subsites, or the entire site collection.
Note that the SharePoint Search Results Event Wizard uses the Collaborative Application Markup Language (CAML) search technology included with all versions of SharePoint, not the standard WSS or MOSS Enterprise Search technology. Using CAML allows K2 to consistently search and do comparisons on SharePoint metadata, which is not something that is easy to accomplish with the other search technologies. However, there may be cases where you want to use the WSS or MOSS search engines. To do this, call the SharePoint Web services using the WSS search (
http://<servername>/_vti_bin/spsearch.asmx) or MOSS search (http://<servername>/_vti_bin/search.asmx) Web services. For more information about these Web services, see "Enterprise Search Query Web Service Overview" (http://msdn.microsoft.com/en-us/library/ms543175.aspx) on MSDN.
This wizard allows you to perform multiple actions with the SharePoint Publishing features, including:
Create, copy, move, delete, and check in publishing pages.
Get and update publishing page content.
Create and update reusable content.
The first page of the wizard, shown in Figure 13-11, allows you to select what you want to do with the SharePoint Publishing features.

If you are unfamiliar with what these SharePoint features allow you to do, see "Introduction to Web content management" (
http://office.microsoft.com/en-us/sharepointserver/HA102406301033.aspx) on Microsoft Office Online which gives a great overview of how you can use these features.
With the SharePoint Publishing Event Wizard, you can automate the publishing of Web content, using the power and flexibility of the K2 platform to add more intricate workflows capabilities to the out-of -the-box SharePoint functionality. You can also leverage K2 process data and SmartObject queries to create more dynamic content for those pages.
A scenario-based example of using the SharePoint Publishing Event Wizard is included in the "Using Web Content Management" section later in the chapter, but also keep in mind that when you create a publishing page with this wizard you can also store that content in a K2 content field for later reuse.
This section covers the following aspects of the K2 SharePoint integration, including scenarios for illustrating how they might be used in an enterprise:
Web Content Management
Search Results
Records Center
The Business Data Catalog (BDC)
BDC does not have a wizard in any K2 designer because it is a SharePoint run-time integration point for K2 blackpearl. It is less about content management than it is about content delivery, because you can deliver information that is stored in SmartObjects directly into SharePoint through the BDC. We'll discuss a scenario in a moment to illustrate the power of this feature.
SharePoint offers a wide range of features for Web Content Management, allowing users to create intranet and Internet sites that include tools for content publishers and editors. Out-of-the-box, MOSS features a publishing workflow that content editors can use to control and approve content published to a publishing site. K2 blackpearl extends this and the entire publishing feature set by allowing customized publishing workflows for building highly articulated processes that more closely resemble the reviewing and approval needs of enterprises.
MOSS includes two different site templates that automatically activate the SharePoint publishing features, but they can be enabled on any SharePoint site, including the team site template, by activating the publishing features. To enable these features, browse to the Site Settings through the Site Actions menu, and then click on Site Features. On this page, enable the Office SharePoint Server Publishing features by clicking on the Activate button as shown in Figure 13-12.
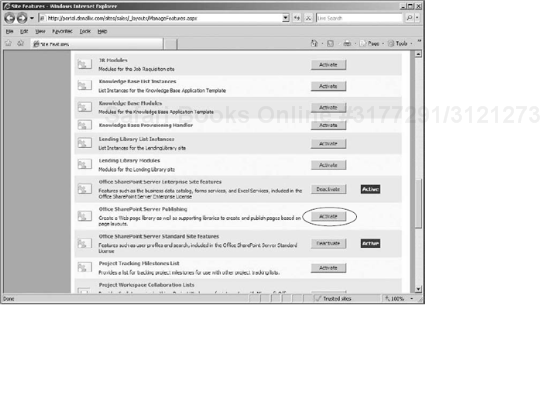
After enabling the publishing features, the entire site is automatically updated and the Web content management features are available for use. For example, the command Create Page is now available on the Site Actions menu. Use this to create new Web pages linked to specific page Layouts and to manage content with the Web Content Management tools. You will also notice that updating SharePoint pages includes document check-in, an optional approval step, and a publishing step that is different from the standard SharePoint page-editing process.
Suppose that you want to create a process for publishing new company press releases. You want to enable an editor to choose a proper page layout and the correct review and approval rules prior to publishing.
Start a new K2 Workflow project in the K2 Designer for Visual Studio and drag the SharePoint Publishing Event Wizard from the Visual Studio Toolbox to the K2 design canvas.
Check the Run this wizard in Advanced Mode checkbox and then click Next.
Type a name for the event in the Event Name field, select the action Create Publishing Page, and then click Next.
Type the URL address where the press release will be published and mark the optional Content Field. Alternatively, you could use an Environment Library value or data from the process to dynamically determine the location.
The Advanced mode of the wizard also allows you to set a configuration for Page Scheduling, which is useful if you want to automatically publish the content at a particular date and time.
After clicking Next, browse the Page Layouts and choose the one you prefer, and then insert a Name and optional Title and Description as shown in Figure 13-13. After you are finished, click Next.
The wizard will then ask you to specify or extend the publishing page metadata.
Click Finish to complete the event.

At this point you could add more publishing events to the same activity, such as the Copy Publishing Page or Move Publishing Page actions. This would be useful if you required two different sites for redacting and publishing press releases. The first one would be available on the intranet for editors to preview how multiple pieces of content from different sources looked together on a single page, while the second one would be located on your company's Internet portal, the final destination of every press release.
You could also create an activity to convert press releases. For example, if your editors typically write their press releases using a Microsoft Word template, you could select the Create Page using Converter action to create a new Web page for publishing based on the Word document. In the wizard you would specify the MOSS document conversion service and use the From Word Document to Web Page converter.
Create Reusable Content is a very important action to be aware of as well. Using this action, you could automatically create textual and graphical content that editors could reuse on several different press releases, pages, or on the portal itself, depending on how your intranet, extranet, or Internet sites are configured.
SharePoint search comes in a few different flavors and can be the cause of some confusion. SharePoint offers two different search engines in WSS:
CAML search conforms to SharePoint's query schema to search lists for data. CAML search is a declarative search that is similar in concept to a SQL full-text search. CAML queries are also used in rendering list views.
MOSS search is a more powerful search engine that can crawl content, perform indexing, and be scheduled. MOSS extends the SharePoint search service with more options for service configuration, such as incremental crawling, best bets, and the ability to index non-SharePoint content. It is a powerful search engine that can crawl the following sources of content:
SharePoint content
Web content (intranet and Internet)
File shares
Exchange Server public folders
Any content exposed by the BDC
IBM Lotus Notes databases
The search crawler is able to recognize and create indexes for Microsoft Office documents and Web formats, allowing users to execute full-text searches. With the installation of IFilters for specific file types, recognizing these files and indexing their content can be extended, allowing for full-text searches on other formats such as PDF, TIFF, ZIP, and any other file type for which there is an IFilter available.
Again, as we mentioned in a note earlier in the chapter, remember that the SharePoint Search Results Event Wizard uses the Collaborative Application Markup Language (CAML) search technology included with all versions of SharePoint, not the standard WSS or MOSS Enterprise Search technology.
Suppose that you would like to manage offer documents prepared by the several Sales offices in the company and store them in a single document library to review offers accepted by customers.
The first solution that comes to mind is the creation of a workflow for each and every Sales Offers document library for every Sales team site around the country. The workflow periodically polls the Offer Status field on the documents, copying documents that have an Offer Status of Accepted to a central document library. A different workflow would consolidate the information and the single consolidated document would be replicated back to each Sales team site.
Alternatively, you could manage offers by using a custom SharePoint content type used within each Sales Offers library on every Sales team site. The workflow could search offer documents across the entire site collection, looking for Accepted offers without needing to take into account how many Sales team sites and Sales Offers libraries there are.
Both solutions would have the same results, but the second option would be more flexible. The first solution is very effective when you can't define a specific content type and in situations where the SharePoint sites are spread across several different site collections or servers.
We can build the first option using the SharePoint Search Event Wizard:
Drag the SharePoint Search from the Visual Studio Toolbox onto the K2 design canvas.
After the initial welcome step, the wizard will ask you to type an Event Name and choose one of the two available Actions (refer back to Figure 13-10):
Search in a SharePoint List or Library.
Search across a List or Library Type.
Select the action Search in a SharePoint List or Library, and then click Next.
Specify the SharePoint Site URL and the Sales Offers library on the Sales team site, and then click Next.
Click Add to insert Search Filters — the field or fields to check for a specific value or variable managed through the workflow (see Figure 13-14) as the value Accepted in the Offer Status field.
At this point in the wizard, you could add other search filters and combine them together to build your query. You have the option to specify Boolean logic and order of operation on your search filter clauses on the same page where you add them.
Clicking Next brings you to the final page of the wizard (see Figure 13-15), where you are able to create the content field in which to store the search results. This is the field you will use later in the process to do something interesting with the results of the search.

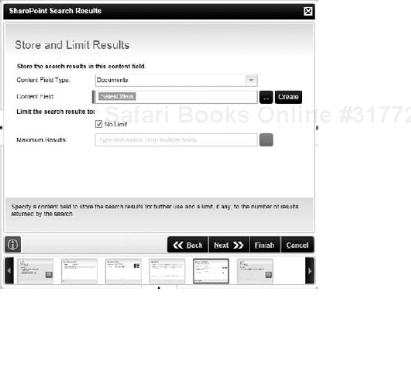
On this page you also specify the type of item you are storing, such as documents, list items, records, or publishing pages, and the number of maximum results that you want to keep. Limiting the search results is a good idea if you are searching across the entire site collection. In this scenario, we are creating a workflow for each Sales Offers document library, so limiting the number of results is not an issue. In fact, limiting the results would potentially cause Accepted sales offers to be missed, so you must be aware of how you are using search results and the type of scenario you are using this wizard for in order to achieve the right results.
At this point the search results are stored in the SalesOffers content field. Adding a SharePoint Documents event to the same activity but after the search event would allow you to copy those stored documents to a central location for consolidation. Document consolidation, depending on how your environment is set up, could be a manual process for a sales manager or an automated process if you had the ability to automate this step. SharePoint document conversion may work for this step, converting each Word document into a Web page for later updating. Or you could create reusable content for each document, and then combine those on a single page. Both of these options can be automated with the SharePoint Publishing Wizard.
From there, you would simply create an event to copy the Word or consolidated Web page to each Sales site, using an event per Sales site in order to handle multiple copies of the information.
Other options for using the SharePoint Search Wizard include sending records to the Records Center, which is accomplished in a similar way to the search scenario here, but instead of using the content field of stored documents to copy to a centralized site, you would send the documents to the Records Center, which we will cover next.
One of the features available in MOSS is the site template called Records Center,[11] a repository for records that you can define rules for document routing, retention and disposal of SharePoint content.
SharePoint allows you to implement more than one Records Center site within your intranet portal, which gives you the flexibility to define a greater number of repositories to use for different archiving and auditing criteria, and answering legal and procedural law requests related to document storage and retention.
Note that there is a special Records Center URL field that should be configured in the Environment Library, so that it is prepopulated in the wizards and used consistently across processes. For more information about using the Environment Library, see Chapters 10 and 15.
A record could be represented by any piece of information in SharePoint. Usually files, such as Word documents or Excel spreadsheets, are good candidates for becoming records. But records could also be something such as an e-mail message or an instant messenger chat. Every information element that could support actions and decisions in a business process could be considered a record.
One of the Records Center features is called a hold. Holds are exceptions to normal archiving rules in a Records Center. They are useful tools when it comes to overriding expiration policies, as could be required in compliance audit situations.
The Records Center uses SharePoint content types, one of the most important SharePoint features. Content types allow you not only to define descriptive metadata for specific content in a consistent way but also to create workflows, templates, and policies for information lifecycle management in the organization. You could use content types to specify information types and their proper routing and storing policies in a consistent way.
Imagine that your corporate office defined new rules for controlling the company's Sales department expenses. Every piece of information related to these costs is now to be archived in anticipation of a possible audit.
An approach might be to have a SharePoint developer create a new feature that could find the documents classified by specific rules and move them into the repository where they are now required to be stored. A similar solution could be developed by people with a deep understanding of the SharePoint API and experience developing SharePoint solutions in Visual Studio.
However, with K2 event wizards you could easily reach these objectives without specific SharePoint development knowledge.
The two actions in the SharePoint Records Management event wizard would be used to define activities for records management:[12]
Sending a document to a Records Center site
Managing holds
To send a document to a Records Center site:
Drag the SharePoint Records Management event wizard from the Visual Studio Toolbox to the workflow design canvas.
The first page of the wizard will describe all the possible objectives and offer the Advanced mode option. The second page allows you to specify a name for the activity and to choose which action to execute.
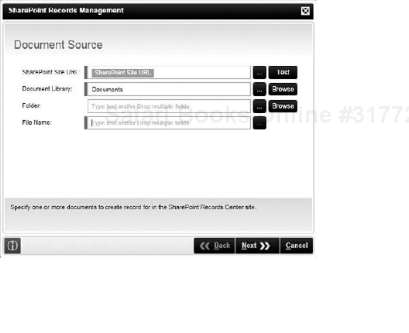
If you want to create records starting from specific SharePoint documents, choose the action Create a Record and then From SharePoint Document, filling in the required fields as shown in Figure 13-16. You must define the SharePoint Site URL, specifying the site where documents are stored, a reference to the Document Library, the optional Folder name, and the document File Name.
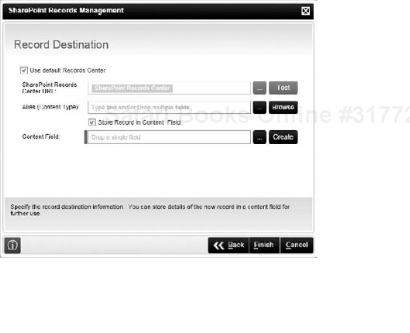
After you have found the elements you want to send to the Records Center, click Next. On the page that appears, you can choose a Records Center other than the default, and if you want to store the resulting records in a Content Field, as shown in Figure 13-17. Do this if you need to use them later in the process.
To create a hold activity:
Drag another SharePoint Records Management Event Wizard to the workflow design canvas, placing it directly underneath the previous records management event.
After specifying an Event Name, choose the action Create Hold and then click Next.
Specify a Record Source, defining the SharePoint Records Center URL. The Hold ID will be used as soon as a hold is released and will include the Title, Description, and Managed By fields (as shown in Figure 13-18).

You could also combine activities created through the SharePoint Search Event Wizard as previously described. You could build an activity to search for documents with a particular status, such as an expense report that has been approved. Then you could define and execute an action in the workflow to send the approved document to the Records Center.
Like other SharePoint event wizards, running the SharePoint Records Management event wizard in Advanced mode allows you to specify multiple documents, content fields, or a combination of the two, to create as records, add to a hold, remove from a hold, or delete. The same is true for holds, and by running the wizard in Advanced mode you can create multiple holds in the same event.
One of the most important MOSS Enterprise features is the Business Data Catalog (BDC). It can be used to import external line-of-business (LOB) information into SharePoint from applications such as K2 blackpearl and SAP, and data sources such as SQL and Oracle.
Once you define the BDC application within the SharePoint Shared Services Provider and create the associated XML application definition file, you can import your data source as shown in Figure 13-19.
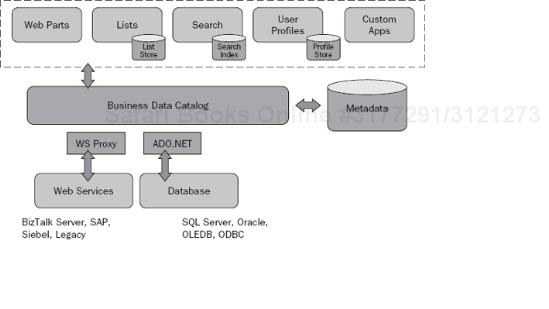
BDC applications are generally used in SharePoint for:
Viewing business data through Business Data Web parts
Integrating business data in lists and libraries through business data fields
Searching business data via the MOSS search engine and Business Data Search content sources
Any K2 blackpearl SmartObject could also display data through the BDC. The power in displaying this information through the BDC is twofold: First, it automatically creates the XML application definition for you, which can be a complex process. Second, and perhaps more powerfully, data that is encapsulated in SmartObjects can represent:
Data about a process, such as that used in reporting
Data that is consumed or generated within a process, including LOB data
Data that is surfaced to other nonprocess applications through SmartObjects
When you integrate SmartObject data through the BDC, you create solutions that allow any data contained within a SmartObject to be surfaced in SharePoint without the need for custom development work. For more information about SmartObjects, see Chapter 7.
Out-of-the-box Service objects provided by K2 blackpearl allow you to import data from the following data sources:
Active Directory
SharePoint
Salesforce.com
K2 blackpearl (process reporting)
Refer to Chapter 7 for developing custom SmartObject Services to encapsulate data from other sources through SmartObjects. See Chapter 23 for more information about surfacing data from SAP using K2 connect.
The integration process between SmartObjects and BDC starts with creating one or more SmartObjects with the K2 Designer for Visual Studio. Workflow Reporting SmartObjects can be automatically created for processes. Deploying a SmartObject or Workflow project is the first step, and once it is deployed, creating the BDC application through the K2 for SharePoint tab in the SharePoint Central Administration site is the second step.
Once SmartObject data is integrated with the BDC, the MOSS search engine indexes that data and returns it in the standard search results pages or search Web parts. Keep in mind that SmartObject data that should not be exposed to everyone using MOSS should not be surfaced through the BDC.
Several SmartObjects show data useful for creating reports about process performance, such as number of instances number, average duration, and other information captured by the workflow reporting SmartObjects. This data could be easily used through Business Data Web parts to quickly build process control and monitoring interfaces, which provide information similar to the kind that process portals display.
One of the other advantages offered by Business Data Web parts relates to the execution of data queries through mini-applications. This allows you to link and show data through a Master/Detail view. Rendering these Web parts can also be also customized through XSLT modification and customization, using the tool pane in SharePoint, so a customized view of your process data, or any data encapsulated by SmartObjects, can be highly customized.
To configure a K2 BDC application:
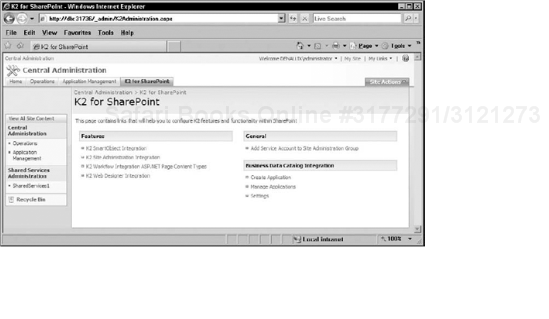
Open the SharePoint Central Administration site, and click the K2 for SharePoint tab, as shown in Figure 13-20.
Create a new SmartObject BDC application by clicking the Create Application link in the Business Data Catalog Integration section.
The Create K2 BDC Application page allows you to choose the SharePoint Shared Service (if there's more than one in your SharePoint Farm) and the SmartObject you wish to use (the list of SmartObjects will help you understand how powerful this integration is).
After choosing a SmartObject, the Create K2 BDC application will display the fields to use as Input Parameters elements. You could also define optional Associations with other SmartObjects to include in the same SmartObject BDC application.
The last option on the Create K2 BDC Application page enables search crawling (Application Indexing), allowing you to configure settings for the MOSS search engine. Read the warning carefully because you don't want to expose sensitive SmartObject information in search results.
After creating the K2 BDC Application page, you can modify its options through Central Administration K2 for SharePoint by using the Manage Applications link. The K2 Settings link allows you to set K2 Server Settings and retrieve information related to SmartObjects.
BDC Permissions should also be configured. Remember that users accessing SmartObject data through BDC applications need authorization for each application. This setting is found on the BDC management pages in the Shared Services administration site. There are detailed instructions for creating applications and setting this right in the K2 blackpearl Help files.
There are several practical examples that you can imagine related to business data retrieved through SmartObjects and integrated through use of the BDC. In our scenario we're going to surface customer data in SharePoint that resides within a custom Customer Relationship Management (CRM) system.
Our goal is to have a SmartObject "linked" to business data.[13]
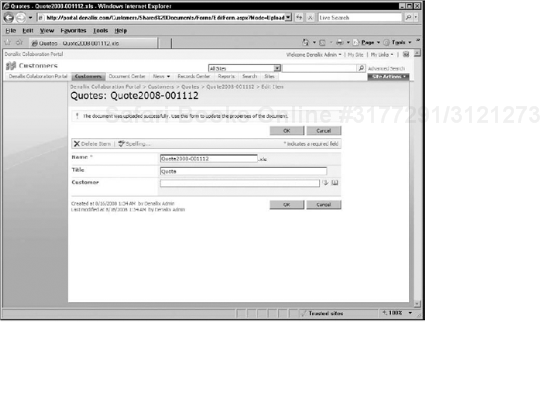
The K2 for SharePoint page in the SharePoint Central Administration site allows you to create a K2 BDC Application linked to the Customers SmartObject.
After creating the SmartObject BDC application and defining user access and authorization, the BDC application can be found in the Business Data Catalogs Applications section located within the Shared Services Administration site, as shown in Figure 13-21. This is where you can explore application settings and available fields.

Once the application is created and authorization is set, users can use the Business Data Web parts and other features described in previous paragraphs to access the SmartObject data.
To test the BDC application:
Add a Business Data List Web part to a portal page.
Click on the Open the tool pane link to select the Customers SmartObject BDC application.
Confirm that data is shown by clicking OK at the bottom of the tool pane.
Click Exit Edit Mode to complete the operation.
After opening the page, launch a data query using the related toolbar in the Business Data List Web part.
You could also configure a specific Search Content Source to index customer data and make it available through the MOSS search engine.
Metadata based on the customer information could also be added as properties for lists and libraries, which is very similar to adding a custom column to a SharePoint list or library. For instance, you could add data about a customer with an associated offer stored in a document library. To do this:
Browse to the library and choose the Create Column command from the Settings menu.
Use the page Create Column to choose a Column name, and then select the Business Data option as the column type.
Select the BDC application instance in the bottom part of the page through Additional Column Settings, and find the field that you wish to use as library column.
After creating the new field, upload a document into the library.
You will notice that the new Customer field (see Figure 13-22) can be queried much like the SharePoint People Picker control; it allows you to browse for and resolve SharePoint users in the same way. Business Data columns allow you to do the same with LOB data (in this case, data that is coming from a CRM system, through a K2 SmartObject and the BDC, and finally into SharePoint).
The new column also allows you to create different views to sort, filter, or group documents based on the customer name. This provides not only the flexibility to display information but also the consistency with how the customer name appears in SharePoint and your CRM system.
The integration between SharePoint and Microsoft Office System applications allows you to use information retrieved through SmartObject BDC applications in Office documents. To use this feature, access the Document Information Panel or use Quick Parts in applications such as Microsoft Word 2007 (see Figure 13-23). Combining data in this way allows users to see business data and other SharePoint metadata right within the application, which is particularly useful in certain scenarios. You can also customize the Document Information Panels because they are actually InfoPath forms that surface this information. For more information on this, see the Document Information Panel Overview on MSDN (http://msdn.microsoft.com/en-us/library/ms550037.aspx).
You could also use the new field containing business information in any potential workflow, as the customer information is now just another column in your library.

There are a limitless number of scenarios for encapsulating LOB information with SmartObjects, surfacing that data in SharePoint through the BDC, and using that integration to display information in ways that, in the past, would have required a significant amount of time and resources. With SmartObjects and the enterprise features of SharePoint, these scenarios become no-code solutions once you have the service layer created from K2 to your back-end server.
Refer to Chapter 7 and Chapter 23 for more information about SmartObject Services and SAP integration, respectively.
One of the last MOSS enterprise features that we'd like to briefly touch on is InfoPath Forms Services (IPFS). IPFS allows InfoPath form templates to be converted and displayed as Web pages within SharePoint. In-depth coverage of InfoPath forms is included in Chapter 11, along with the benefits of using InfoPath compared to ASP.NET forms. If you are using SharePoint, InfoPath forms are the easiest and most convenient way for displaying a custom UI and listing available actions for a process user.
Note that even if you don't have the MOSS enterprise features, you can still work with InfoPath forms on SharePoint. You will not, however, be able to render forms as Web pages. K2 blackpearl also integrates with the Microsoft Office Forms Server 2007, a separate SKU that includes only IPFS for InfoPath form rendering in the browser. Since this SKU is separate, it cannot be added on to MOSS like the enterprise features can.
The biggest benefit that IPFS brings to the table is the ability to fill out InfoPath forms without needing InfoPath 2007 installed on every computer. Though InfoPath 2003 and SharePoint Portal Server had some great integration, the integration between InfoPath 2007 and MOSS is even more powerful with IPFS, allowing you greater number of possibilities to build complex workflows. K2 blackpearl introduces several important features to help you add rich user interfaces via InfoPath forms, whether those are browser-based or client-only forms. These features include:
Multiple views per form, multiple forms per process: allowing you the flexibility to reuse the same form for starting and actioning a workflow, or multiple forms if necessary
Dynamic action querying for user tasks: eliminating the need to update the form when actions change
SmartObject integration: allowing you to add data from SmartObjects to the InfoPath form, which in turn allows for better decision making
Automatic deployment, versioning and source management: enabling you to treat the InfoPath form as part of the process and not worry about how it will be deployed, versioned, and checked in to source control
These are the high-level benefits of using InfoPath 2007 forms with your SharePoint workflows. For more information and some caveats about using them, refer to Chapter 11.
As you discover SharePoint's rich and powerful features, you will appreciate the deep integration that K2 blackpearl brings to the table, allowing you to extend and increase your investment in SharePoint.
If you've purchased the Enterprise CAL, you can use every single SharePoint-related event wizard available in the K2 Designer for Visual Studio and the K2 Designer for Visio. These allow you to create no-code solutions to manage SharePoint sites, lists, and libraries, and to control content, all through processes that can provide an immediate and increased return on investment.
If you are just beginning your SharePoint implementation and have never used it before, we hope we've given you some appreciation of the benefits that SharePoint can bring to your organization, and some ideas on how you can use K2 to increase those benefits. If you are a SharePoint expert, we hope that we've given you some new ideas to use when employing SharePoint solutions.
In the next chapter you will take a look at the different K2 Designers available and how they can be used for collaborative process design.
[11] For further information about Microsoft Office SharePoint Server 2007 Records Center, visit the Web site http://go.microsoft.com/fwlink/?LinkId=84739.
[12] K2 accesses SharePoint Records Center information through a specific Web service you can reach from the URL http://yourportal/Records/_vti_bin/officialfile.asmx. Important: You should check if the K2 blackpearl service account has the proper permissions to access it.
[13] Visit the K2 and SAP Web page at http://www.k2.com/en/displaycontent.aspx?id=107 to find extensions that allow easier integration between K2 and SAP. Also take a look at Chapter 23. If you need guidelines to help you in using Microsoft Dynamics and other platforms, visit the K2 blackmarket at http://k2underground.com.