K2 blackpearl provides a bridge connecting people and line-of-business (LOB) systems by utilizing SmartObjects. However, even with K2 blackpearl, business users have a difficult time getting to data in complex systems, such as SAP. Users want to read and write SAP data, without involving SAP experts. They want to be able to use SAP data in applications and workflows, view the data in reports, and access it all in a reusable and manageable way. Solutions that provide this type of functionality can be costly and time-consuming. K2 connect for SAP provides the ability to access SAP quickly, giving business users a solution that meets all their needs.
K2 connect for SAP is an add-on component to K2 blackpearl that provides a user-friendly interface for developers to model business entities against an SAP environment without having to write code. The entities can then be surfaced for use within K2 processes, reports, forms, .NET-based applications or Web services, and other applications such as Microsoft Office SharePoint Server. K2 connect decreases development time and improves developer utilization by allowing the SAP experts to work with familiar SAP components such as business application programming interfaces (BAPIs), and provides .NET developers with objects that they can easily access and use within their applications.
The initial release of K2 connect supports accessing SAP R/3 4.6c environments and higher. In subsequent releases, K2 connect will be extended to support any LOB adapter built on Microsoft's WCF framework SDK.
This chapter will focus on K2 connect for SAP, specifically covering the following topics:
The architecture of K2 connect and how it fits in to the K2 blackpearl platform
Creating Service Objects using K2 connect and the K2 Service Object Designer
Creating a K2 SmartObject based on a Service Object created with K2 connect
Advanced topics in K2 connect for SAP
K2 connect for SAP is an add-on component to K2 blackpearl that provides additional functionality to the K2 blackpearl platform for integrating with SAP environments. Specific integration points are described in the following sections.
SAP provides several interfaces for integrating external applications with an SAP environment. These interfaces include the SAP Remote Function Call (RFC) protocol as well as NetWeaver. The standard adapters that come with K2 connect for SAP support both RFC and NetWeaver. Figure 23-1 shows how K2 connect for SAP interacts with an SAP environment. Notice that just like the SAP GUI, K2 connect sits as a remote application, not installed on the SAP server itself. Using either the RFC adapter or the WSDL adapter, K2 connect interacts with SAP to retrieve information from any BAPIs, such as EmpInfo or CustMaster in this example, that are exposed via RFC or NetWeaver.
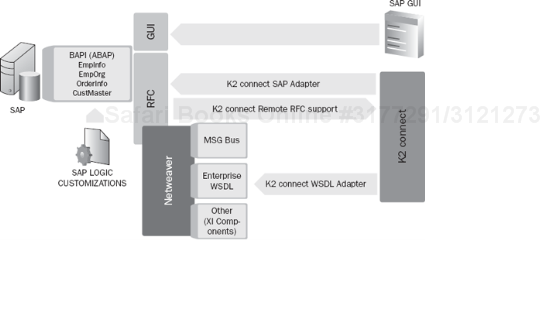
Any customizations made to the BAPIs in your SAP environment will be available via K2 connect because the K2 connect adapters make use of standard SAP functions to access the data. In addition, because K2 connect is using standard interfaces, you don't have to worry about users accessing SAP data or functions they aren't allowed to see. The K2 SSO framework ensures that each user is authenticated based on his credentials and only exposes information and functionality that is available to the user as determined by SAP.
K2 connect is an add-on component to K2 blackpearl that extends the Service Object Broker by adding an additional server that can handle the logic of more complex LOB systems, like SAP. Subsequent releases of K2 connect will provide native support for WCF adapters, providing integration with other LOB systems such as Siebel, Customer Relationship Management (CRM), and Oracle databases.
Figure 23-2 shows how the K2 connect server fits into the overall architecture of K2 blackpearl. As depicted in the diagram, K2 connect Server runs as part of the SmartObject Broker inside of the K2 Host Server. Functionality provided by K2 connect allows developers to build Service Objects that can then be used by developers, architects, or business analysts to build SmartObjects that can be used across multiple applications, providing end users with access to the LOB information that is relevant to them. Using either the Runtime API or the Authoring API, K2 surfaces the information retrieved by K2 connect to any K2 user through a variety of mechanisms. K2 Worklist users and K2 Forms users may view the information via the K2 Worklist, K2 reports, or within a form; and K2 developers may use the information to build a process or report using one of the K2 designers.

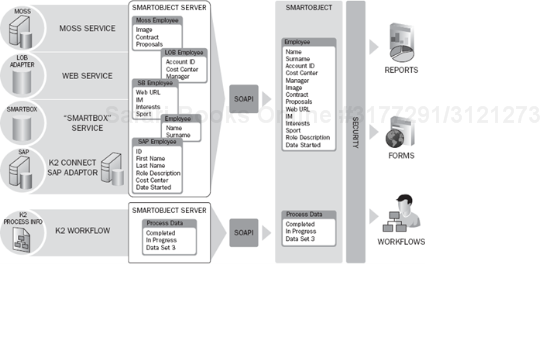
When K2 connect is used to access an SAP environment, the SAP data and methods are exposed in the K2 SmartObject server as a Service Object. At that point, developers can use the K2 SmartObject Designer to model business entities, using the SAP information. The business entities, or SmartObjects, can comprise data from a single SAP BAPI, multiple SAP BAPIs, or even a combination of data from SAP and another LOB system. Figure 23-3 shows an example of how employee information from multiple back-end sources, including SAP information surfaced through a K2 connect adapter, can be combined using the SmartObject Designer and SmartObject API to create a single employee SmartObject. The SmartObject data is then available for use in applications, forms, and reports.
For more information about building SmartObjects and using them in K2 blackpearl applications, see Chapter 7.
K2 connect for SAP uses the K2 Service Object Designer to provide a developer access to the available BAPIs in SAP. The K2 Service Object Designer is an add-in component to Microsoft Visual Studio, allowing developers to work in a familiar environment. To open the K2 Service Object Designer, open Microsoft Visual Studio from Start
A new, empty K2 project is created. To create a new Service Object, right-click the project name in the Solution Explorer. Select Add
If the K2 Service Object Designer Explorer does not open, select View
The K2 Service Object Designer provides three main areas of functionality.
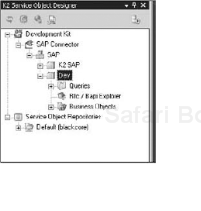
The first is the Development Kit, which provides access to the SAP environments that have been configured in K2 connect. SAP Business Objects are surfaced through this interface in a tree view (see Figure 23-5), and any saved queries that have been built against SAP are available as well.
The second area of functionality is the Service Object Repository (see Figure 23-6), which provides access to all the Service Objects that have been deployed to the K2 connect server.
Finally, The K2 Service Object Designer provides access to several administrative functions accessible via the icons at the top of the window.
The following table describes the buttons that make up the K2 connect administration functionality available in the K2 Service Object Designer:


Button | Name | Description |
|---|---|---|
Refresh | Refreshes the information displayed in the K2 Service Object Designer. | |
Configure Destinations | Opens the K2 connect Destination Explorer where new SAP connections can be configured. | |
Settings | Opens the settings configuration for the K2 Service Object Designer. | |
K2 blackpearl Settings | Opens the settings for the K2 blackpearl server. | |
Start/Stop K2 connect Server | Starts or stops the K2 connect Server. |
The K2 Service Object Design Canvas (see Figure 23-7) provides the visual interface for modeling the Service Object against available SAP information. Details about how the design canvas is used will be covered in the next section.
The following example walks through the basic steps for creating a Service Object with K2 connect. This example will use the Personnel Information Business Object in SAP to create an object that will return Employee information. We will use the GetList method of the object to return a list of employees along with specific properties about that employee. The GetList method is a read-only method in SAP, but it is important to note that K2 connect can use any BAPI method as long as it has been exposed for use via RFC or NetWeaver. This functionality allows a developer to build applications that not only read information from SAP but are also able to create and update information in SAP.
Create a new empty K2 project by selecting File
Once the project has been created successfully, a Service Object file needs to be added to the project. In the Solution Explorer, right-click the project name and select Add

The information you need to retrieve about an employee is in the Personnel Information Business Object. This example will use the GetList method of the object to return information about the employee. The following steps will configure the method for retrieving information within the Employee ServiceObject:
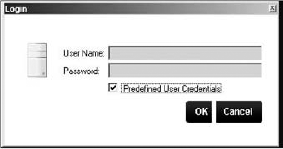
In the K2 Service Object Designer, expand the SAP Connector section and select the SAP environment to connect to. A prompt for entering credentials to connect to the SAP server will open.
Enter credentials or select the Predefined User Credentials checkbox (see Figure 23-9) to access SAP.
Expand the Business Objects node and navigate down to Application Components

Expand the Methods node. All of the available BAPIs in this Business Object are displayed. This example will use the
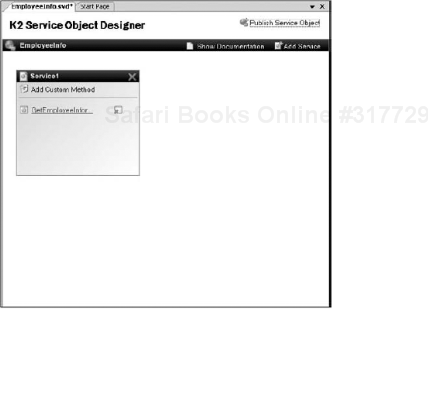
GetList(BAPI_EMPLOYEE_GETDATA) method. Click the BAPI name and drag it over to the K2 Service Object Designer Canvas to add the method to the Service Object. The project should now look like the image shown in Figure 23-11.Rename the service by double-clicking Service1 and entering
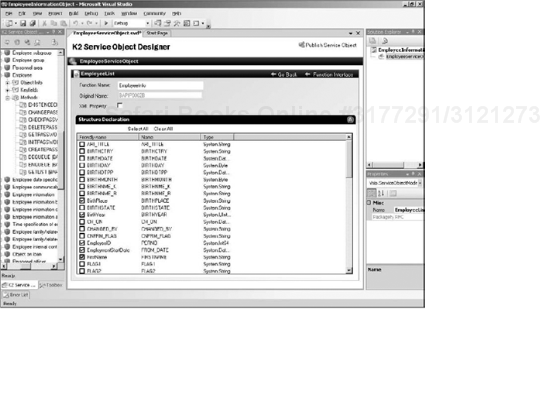
EmployeeList.Configure the
GetListmethod by clicking theGetListlink. Change the Function Name to a friendlier name, such asGetEmpList.Configure the input and output parameters for this method. In the Function Interface section, all the parameter fields for this method are listed. The Direction column indicates whether the parameter is an input parameter, is an output parameter, or can be used as both an input and output parameter. Click Clear All to deselect all the parameters and then select the fields that are relevant to this example as indicated in the following table:
Parameter
Action
DATE0Check the
Date0field. This field is a required input parameter for theGetListBAPI method.Click the Friendly Name, and update the name to
InputDate.
FSTNAME_MCheck the
FSTNAME_Mfield. This field will be used as one of the search parameters to narrow the returned results.Click the Friendly Name, and update the name to
InputFirstName.
LASTNAME_MCheck the
LASTNAME_Mfield. This field will be used as one of the search parameters to narrow the returned results.Click the Friendly Name, and update the name to
InputLastName.
PERSONAL_DATACheck the
PERSONAL_DATAfield. This field is a return parameter that will return the employee information data.Click the Friendly Name, and update the name to
EmployeeInfo.Notice that the type for this field is not a simple type such as string, but rather a BAPI table ID. This indicates that this field returns a table of data that can be accessed via the Show Structure link.
Click the Show Structure link. Change the Function Name to
EmployeeInfo.Click the Clear All link. Once again, select only the fields relevant to the particular Service Object being worked on.
EmployeeInfo BIRTHDATECheck the
BIRTHDATEfield.Click the Friendly Name, and update the name to
BirthDate.
EmployeeInfo BIRTHPLACECheck the
BIRTHPLACEfield.Click the Friendly Name, and update the name to
BirthPlace.
EmployeeInfo BIRTHYEARCheck the
BIRTHYEARfield.Click the Friendly Name, and update the name to
BirthYear.
EmployeeInfo FIRSTNAMECheck the
FIRSTNAMEfield.Click the Friendly Name, and update the name to
FirstName.
EmployeeInfo FROM_DATECheck the
FROM_DATEfield. This field represents the employee's employment start date.Click the Friendly Name, and update the name to
EmploymentStartDate.
EmployeeInfo LAST_NAMECheck the
LAST_NAMEfield.Click the Friendly Name, and update the name to
LastName.
EmployeeInfo PERNOCheck the
PERNOfield. This field represents the employee's ID in SAP.Click the Friendly Name, and update the name to
EmployeeID.
After selecting the fields in the
EmployeeInfotable, the project should look something like Figure 23-12. Notice that BirthPlace, BirthYear, EmployeeID, EmploymentStartDate, and FirstName are all checked.Click Function Interface to return to the previous screen of parameters. The list of input/output parameters should look something like the one shown in Figure 23-13, with Date0, EmployeeInfo, InputFirstName, and InputLastName all checked.


After selecting the parameters that will be used when calling the GetEmpList method, the Service Object is now ready to be deployed. Additional methods or other Business Object information could also be included in the Service Object at this point, but to keep things simple, no additional information will be added.
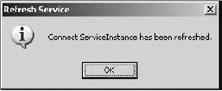
Click the Publish Service Object link in the upper-right corner of the K2 Service Object Design Canvas. This will publish the Service Object to the K2 server so that it can be consumed by other users. When the Service Object has been published successfully, you'll see the message shown in Figure 23-14.
Once a Service Object is created and published to the K2 server via the K2 Service Object Designer, it is now available for use within any K2 SmartObject. In this example, the EmployeeServiceObject created in the previous example will be used to create a new Employee SmartObject.
Open the EmployeeServiceObject project created in the last example.
Add a SmartObject to the project by right-clicking the project name and selecting Add
In the dialog box that opens, select K2 SmartObject. Name the new SmartObject Employee. This SmartObject will be based on the SAP information that was added to the EmployeeServiceObject, so the default methods created for this SmartObject need to be removed.
Click Advanced Mode in the K2 SmartObject Designer.
In the SmartObject Methods section of the designer, click Remove All to remove the default methods.
To add a method, click Add in the SmartObject Methods section. The SmartObject Method Wizard opens.
In order to set parameters that are passed into the ServiceObject method, the wizard needs to be run in Advanced Mode, so click the checkbox next to Run In Advanced Mode and click Next.
On the Method Details screen, give the method a name of Get Employee List, and change the type to List. The properties should look like those shown in Figure 23-15.
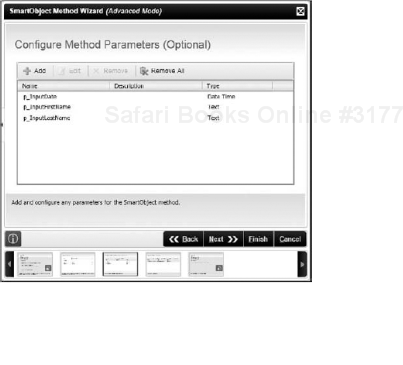
On the Method Parameters screen, the parameters that will pass information into the ServiceObject need to be created. Per the previous example, there are three input parameters that need to be configured. Information for each parameter is included in the following table:
Parameter Name
Parameter Description
Parameter Type
p_InputDateMapped to
InputDatefield on ServiceObject method. Required by SAP.Date Time
p_InputFirstNameMapped to
InputFirstNamefield on ServiceObject method.Text
p_InputLastNameMapped to
InputLastNamefield on ServiceObject method.Text
After adding the parameters, the Method Parameters screen should look like the one shown in Figure 23-16.
Now the SmartObject method needs to be associated with a corresponding method within a ServiceObject. In this case, the
Get Employee Listmethod will use theGetEmpListmethod from theEmployeeServiceObject. On the Service Object Methods screen, click Add. Click the ellipsis button next to the Service Object Method field.In the Context Browser window that opens, drill-down into ServiceObject Server(s)
All of the input parameters and properties from the
ServiceObjectmethod are updated in the interface and can now be associated with parameters on properties on the SmartObject.First, assign the input parameters by clicking the Assign button for each parameter and following the information in the following table:
Service Method Parameter
Map to Type
SmartObject Property Name
p_InputDateSmartObject Method parameter
p_InputDatep_InputFirstNameSmartObject Method parameter
p_InputFirstNamep_InputLastNameSmartObject Method parameter
p_InputLastNameFor the remaining properties, corresponding SmartObject properties will be created.
Click EmployeeInfo_EmployeeID in the return properties section, and select Assign.
Click the Create button. In the SmartObject Property Name field, enter Employee ID.
Click OK, and then click OK again.
For each additional return property, follow the same steps to configure each SmartObject property, using the information provided in the following table.
Service Method Property
SmartObject Property Name
EmployeeInfo_EmploymentStartDateEmployment Start Date
EmployeeInfo_LastNameLast Name
EmployeeInfo_FirstNameFirst Name
EmployeeInfo_BirthPlaceBirthplace
EmployeeInfo_BirthYearBirth Year
When all properties have been mapped, click OK to close the window. The Service Object Methods screen should resemble the one shown in Figure 23-18.
Complete the wizard by clicking Next and then clicking Finish.


At this point, the Employee SmartObject can be saved and deployed to the K2 server. To deploy the SmartObject, right-click the EmployeeInformationObject project and select Deploy. The deployment wizard opens allowing the selection of the deployment environment. In this example, deployment will be to the development environment, so click Finish to continue with the deployment process.
Deployment status is displayed in the bottom-left corner of the Visual Studio environment. The deploy is successful when Deploy succeeded is displayed.
The Employee SmartObject can now be used to surface SAP data in any number of applications. The data can be surfaced in an InfoPath or ASP.NET form, a report built with K2 Report Designer, as part of a K2 workflow process, included in another .NET-based application (such as SharePoint Server), or queried directly via the .NET Data Provider for K2 SmartObjects. For more information about using K2 SmartObjects in these different applications, see Chapter 7.
In the previous example, K2 connect for SAP was used in a simple scenario to surface employee information from SAP. However, the same basic steps can be followed to provide much more complex functionality based on your organization's needs. Calling multiple BAPI methods from a single Service Object, updating or creating data in the SAP environment, and filtering BAPI results are all possible using the K2 Service Object Designer within K2 connect for SAP. And, all of these tasks can be done without the need to write a single line of code. Specific examples for each of these advanced scenarios can be found in the Developer's Guide that comes as part of the K2 connect for SAP product documentation.
In this chapter, you have been introduced to K2 connect for SAP, an add-on component to K2 blackpearl that provides an interface for modeling business entities against SAP without having to write code. We discussed the architecture of K2 connect and how it fits into the K2 blackpearl platform.
An overview of the K2 Service Object Designer and Design canvas was provided before delving into an example on how to build a simple Service Object using K2 connect for SAP to surface employee information from SAP and how to use that Service Object in a K2 SmartObject to integrate into any application, such as forms, reports, K2 workflow processes, or other .NET-based applications.
Finally, advanced topics in K2 connect were briefly touched upon to provide you with insight into the many possibilities that are opened up with K2 connect for SAP.
By reducing the amount of code necessary to access SAP and by providing easy to use tools, K2 connect for SAP decreases development time and allows business users to access relevant SAP information in a reusable and simple manner.