Planning an effective approach to a K2 blackpearl solution from an environment perspective is the key to successful delivery. The nature of the solution, size of the audience, and your development approach play a role when selecting the required environments. Capturing non-functional requirements often dictate the project approach. This approach will in return help formulate a strategy that can be applied when setting up an effective environment.
Planning and deploying a successful K2 blackpearl project is not only about having a running server. Methodology, solution footprint, and technology dependency will dictate environment requirements.
When picking a strategy, consider some of the following factors:
The project and development methodology: Are you involved in a large waterfall style development where specification and construction cycles are long and delivery positioned at the end of the project, or are you required to deliver short, continually integrated development cycles?
The infrastructure footprint of the solution: Is your solution a standalone development with minimal dependencies on external infrastructure, or is the list of systems, data sources, and technologies your solution depends on as long as the list of requirements?
Continual development and maintenance: After you have delivered the solution are there subsequent phases to the project or will continual support and incremental development be required?
Corporate policy: Are your developers allowed to wander around productions systems at will, or does a corporate policy or compliance issues require that environments are isolated and governed by strict staging and deployment procedures?
For completeness, this chapter will cover some common environments required for turnkey solution development. We will introduce four environments and cover the use of them in a test-driven development methodology. We will indicate what variations are available for each environment if the methodology is not test driven.
Specifically, this chapter covers the following topics:
Project methodology and the impact it has on the required methodology and development approach
Planning and implementing K2 blackpearl environments
Development best practices including source control, versioning, and release management
Debugging and monitoring suggestions
K2 blackpearl development projects can differ in size. Development can be done by a single person or a team of developers and infrastructure specialists.
As an example, it is possible to use K2 blackpoint to develop, test, and deploy a solution into SharePoint using only a production server. Using the end-user design surfaces of K2 blackpoint, there might be no requirement for a development environment to be introduced. Developing a solution where there are multiple disciplines involved is likely to include a development methodology that will require a host of environments to be configured. These will include an area for a developer to build the solution and an area to execute development testing. Before deploying the solution, it will be necessary to gain acceptance and mitigate production risks, typically at some staging environment before deploying the final solution into the production environment.
The selection of your environment should be appropriate to the requirements. Creating and maintaining environments takes time and money. Avoid an overly complex configuration. Likewise, not covering all the environments for your requirements could be problematic and might result in a low-quality or untested solution reaching the production system.
This chapter will focus on creating an effective development, testing, and staging environment and will assist in picking the strategy most applicable to your requirements.
When we do whiteboard planning sessions with project stakeholders, the focus naturally remains on capturing and understanding functional requirements. We remain focused on statements like "if the amount is more than $1,000.00 then the system should route approval to a director," or "when the purchase order is approved, the system should update the financial record in our accounts system."
Non-functional requirements can be as important in a project as the functional requirements: statements like "the system should run on this version of Windows" or "our aim is to improve the rate of purchase order approvals threefold by introducing this system" or even "we will require that phase 1 is released to production while phase 2 is continuing to be developed and tested." These requirements have an impact directly on what environments will be required.
A checklist of non-functional requirements should include the following:
Project methodology including details of planning, building, testing, and deployment strategy
Construction team considerations, including team size, location, structure and standards for source control, release management, and continual integration testing
Expected system performance, testing, and measurements
Data growth, capacity planning, data retention, and reporting requirements on historical data
Technology required, including the versions of platforms, systems, operating systems and dependent systems, or data sources
Security, access restrictions, encryption, authentication, and authorization models
Client platform including browser versions, mobile device access, and bandwidth restrictions
Postdeployment development, support, and maintenance requirements
Having a view of these requirements will enable the team to design and implement an effective development and testing strategy and commission the required environments. We will focus on some common environment configurations and how you can best use them with K2 blackpearl.
In this section we want to cover four common environment configurations. Not all scenarios will require four environments and some might require more, including an environment for performance, load, or security testing.
This chapter covers each of the four most common environments and explains how your project approach and development methodology dictate what environments you should consider and how they should be configured.
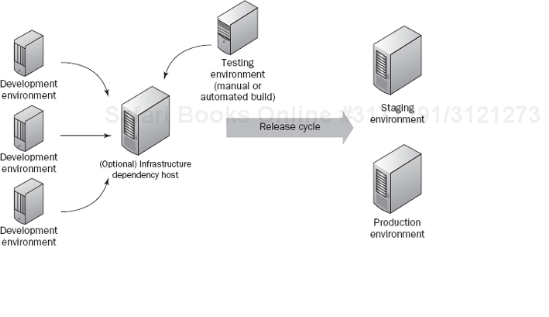
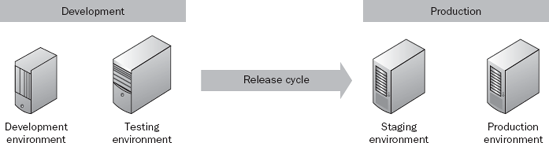
We will categorize our environments into two main areas; development and production. The development area includes a development and testing environment. Production includes a staging and production environment. Figure 6-1 indicates the location of a four-environment setup. They include:
A development environment, including an infrastructure dependency host. This environment should be a standalone, sandboxed environment that allows a developer to build the solution with access to test or offline instances of dependent infrastructure and integration points.
Testing environment, including automated building, deployment, and testing strategies.
Production environment and best practices for production.

Within the development environment, business analysts and developers should have the freedom to construct the solution having all the required tools available. The development and testing environment needs to reflect the infrastructure that will be available in production. By sandboxing the development and testing environment, changes and experiments in these environments can be isolated from other development environments and importantly, the production environment.
A sandbox is a testing (or virtual) environment that isolates untested code changes and outright experimentation from the production environment or repository, in the context of software development, including Web development and revision control, and by extension in Web-based editing environments including wikis.
In BPM solutions a company's dependency on a stable and running production environment should not be underestimated. A workflow solution can span a wide audience, and instability in a production environment can have a far reaching impact on your business. As important as it is for a company to have online systems, it is just as important for these systems to adjust to changing business needs. All business solutions will need maintenance in the form of upgrades or issue fixing. These are contradicting requirements, and a staging server that operates within the production environment will allow project and business system sponsors to mitigate the risk of making changes to a production system without impacting the production system.
It is important to realize that a staging environment is not a development platform. A complete strategy should allow development to test freely and production risks to be mitigated by staging.
Figure 6-2 shows the deconstruction of the development area where multiple development environments share a common infrastructure. The testing environment that is used for incremental build releases and development testing also shares this environment.
The release cycle is executed when a stable and tested build is released from the testing environment onto the staging environment.
This is one of the most important parts of an infrastructure. Development should not be hampered by infrastructure and access issues. Developers should have an environment that replicates access to everything they will need to have a productive construction experience. The setup should reflect the environment that the solution will run in. Dependent infrastructure that is replicated in the development environment will allow you to mitigate any integration risks early in the development cycle.
By sandboxing the development environment, developers can build the solution without impacting each other or the production environment. An ideal solution is to create a virtualized development environment prior to project kick-off. By building a virtual development environment template, it allows you to make multiple copies of the environment for different team members without having to reinstall and configure all the developer tools required. This could speed up the process of getting new developers joining the team ready to work and ensuring that everybody uses the same environment.
Using a virtualization technology the development team can build and use a virtual environment that can be reused for projects that require the same setup and infrastructure. It is a useful practice to store copies of each virtual environment for use in future development projects.
A typical development environment should include technology components as determined from the non-functional requirements. Version mismatch during development will create problems during staging and testing, if the development environment's version does not match the version used in production.
A recommended developer environment should include the components listed in the following table:
Operating System | Windows Server 2003 |
|---|---|
K2 blackpearl, including development tools | Latest (or applicable for solution maintenance) of K2 blackpearl server Visual Studio 2005 or 2008[a] K2 blackpearl Visual Studio components SQL Server 2005 and SQL Reporting Services SharePoint and InfoPath components as required |
Infrastructure components | Active Directory .NET 2 and 3.0 or .NET 3.5[b] Microsoft Office SharePoint Server 2007 (or Windows SharePoint Services 3.0) if required InfoPath or InfoPath Forms server if required |
Source control client Automated build tools Testing tools for unit testing and scenario testing | |
Visual Studio 2005 debug tools | |
Any dependent infrastructure and systems identified during your non-functional requirements gathering | |
[a] Support for Visual Studio 2008 is expected in the fourth quarter of 2008. [b] Support for .NET 3.5 will be available with Visual Studio 2008 support. | |
For a small development team, this is an effective way of building a solution that might contain multiple dependent components. However, for larger teams it might become ineffective to create a full development environment for each team member. Restrictions could include software licensing requirements or practical limitations of a virtualized environment. A development server that will host dependent infrastructure components will allow a team to work with local components where possible and shared components that cannot be virtualized or require a group effort around configuration. As an example using a single Active Directory instance in development will ensure that changes made to Active Directory are available to all developers.
Figure 6-3 shows multiple development environments that share a common set of infrastructure components on an infrastructure Host Server.
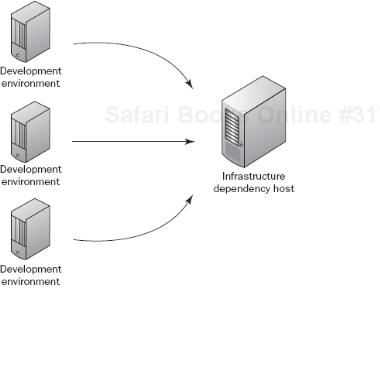
Some other infrastructure components that could be shared include database servers, directory services, document management systems, and service bus endpoints.
In the automated build section of this chapter, we will look at how to create tools that will ease configuration in a development environment where infrastructure components need to be kept in sync on the development environments.
A member of our team once said that the first question when interviewing a technical candidate for a development job should be about source control.
Managing a successful development methodology cannot be done without proper source control and version management. The overriding motivation for source control adoption is code management (versioning, backup, change tracking, etc.) and not necessarily the requirement for team working. Even a single developer should adopt a source control discipline for these reasons.
BPM solutions are complex and often include components other than code. In order to manage your development cycles; introduce effective source control tools and policies in your development environment. K2 blackpearl solutions are no exception and with the integration of K2 blackpearl Designer for Visual Studio being available inside the integrated development environment (IDE), source control is made easy. A few strategies exist and some best practices recommend that you create a separate Visual Studio solution for your workflow components. Refer to Chapter 9 to learn about creating a solution in Visual Studio.
Once a solution is under source control, managing changes to a solution is easy. Other features include version and build label management, check-outs, source code history, and blame (depending on your source control provider).
Blame is the ability of a source control provider to store the responsible team member for each line of committed source code in the source control repository.
Figure 6-4 shows a solution under source control and lists the available options offered by the source control client.
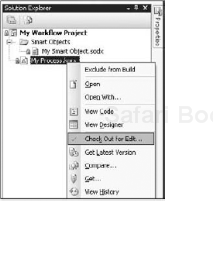
Because process definition (.kprx) files and SmartObject definition (.sodx) files are large XML structures that include logic, layout, and documentation about the entity, it is recommended that you enable exclusive check-out when editing these files. Automatic merging is often unsuccessful when multiple developers worked on the same entity.
The K2 blackpearl project file (.k2proj) file contains deployment information including the deployment label and version description. For this reason it is required that this file is also exclusively checked out when deploying the solution to the K2 blackpearl server. To avoid developers competing for a single project file when under source control, break your K2 blackpearl solution into smaller projects under a single solution file if required.
When deploying a solution to the K2 blackpearl server, the server will automatically store a copy of your source code and a description of your version. For more information on workflow and SmartObject deployment, refer to Chapter 10.
The version description should be used together with your source control service to link a specific version of a process back to code base and other solution components. Figure 6-5 shows how a developer is exporting a process version to the K2 blackpearl server and indicating the description of the version to be related to a specific functional requirement.
To view the Server and Project Settings step in the deployment wizard (see Figure 6-5), run the Deploy Project Wizard in Advanced Mode.

This version comment will apply only to the K2 blackpearl process and SmartObjects exported. To link the changes back to the rest of the code base, use the code labeling or check-in comments feature of your source control client. This will create a link between a specific version of your process and the rest of the solution under source control.
How this environment is used will differ, depending on the size of your team and the development methodology. Later in this chapter we explore different methodologies and how the testing environment can used to benefit them.
The use of a testing environment in development is equivalent to using a staging environment in production, as shown in Figure 6-6 (which repeats the four-environment setup shown in Figure 6-1). It is a risk-mitigating environment.
In a test-driven methodology, the testing environment is normally an instance of your development environment. It allows testers and developers to do integration testing on a clean instance of your infrastructure. Depending on the testing methodology, automating the setup and execution of test scenarios on your testing environment will reduce manual effort required to test a solution.
The reason that the testing environment should be separated from development is to create a blank environment prior to deployment and testing. Development environments might include configurations that are not available on the testing environment. This will immediately become clear once the solution is deployed. By creating a separate environment for testing, you ensure that infrastructure skew that might happen on a development environment (as developers fiddle with the database or other services on the development environment) does not create a false sense of security that your solution is actually working the way it will when it is configured on a blank server. The effort required for moving a solution from a development environment should not be underestimated. The introduction of a testing environment and using a complete deployment package to deploy to the testing environment will mitigate this risk early in your project.
In the absence of a testing environment, it is possible to execute unit testing only on your development environment and not have a dedicated testing environment. In this scenario, you would use the staging environment to execute integration and acceptance testing, as outlined in Figure 6-7.

Test-driven development and the automated execution of those tests can greatly improve the quality of your solution and minimize the effort spent on testing. Current industry standards dictate that 40 to 50% of the man-hours spent on development be spent on testing. We have found that more is required for BPM solutions. The reasons for this are that business process automation is human driven and greatly dependent on the external infrastructure components over which the business process is executed. Because these external infrastructure components are normally only available in the production area, the testing effort required during staging can be disproportionally large. We often see testing efforts equivalent to or greater than the development effort.
A workflow with human steps in it is time-consuming to test. A user will need to start the workflow and then confirm that each subsequent human step is routed to the correct person, and that each of those steps is presented as required. This includes confirming that e-mail notifications were sent, tasks were allocated correctly, the user interface renders the data correctly, and that the required actions available can be taken.
Just imagine a user requirement in your workflow that states a person should get a task only 2 hours after the workflow started. Your testers will become master foosball players! By automating testing, you can save a lot of time.
The K2 blackpearl client API is a .NET assembly that gives the developer access to the run-time features of the K2 blackpearl Workflow server. By using the K2 blackpearl client, API developers are able to create automated test scenarios that can be executed unattended. This approach allows you to treat the testing of your workflow process like testing a code module using a unit testing approach.
The K2 blackpearl client API exposes the following core functionality:
Simulate different named connections to the K2 Workflow server.
Instantiate and start a new process instance.
Find a process instance based on the instance ID of the instance.
Interact with the data stored inside a process instance.
The client API is normally used to build custom functionality, such as a custom worklist or a user interface that interacts with K2 blackpearl. However, the functionality exposed by the client API allows you to build tests that simulate the activity that users or a system would perform against a workflow solution. We refer to this as scenario testing.
The following section provides an example of how to automatically execute steps in a workflow and simulate user interaction using the K2 blackpearl client API.
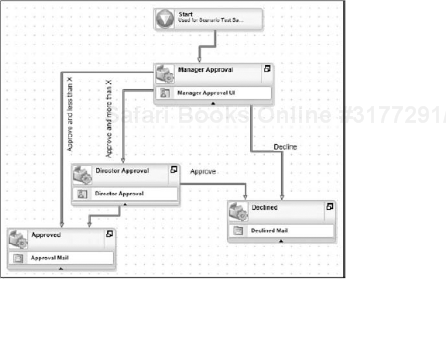
Consider the following scenario: Payment is requested for a supplier, and all requests must be approved by a manager. If the request is for more than $1,000.00, a director's approval is also required.
The resulting workflow in Figure 6-8 represents the solution to this use case. Once the solution is built and deployed, the only way to test this would be to manually execute the workflow and run four different scenarios to cover all the possible outcomes of the workflow:
The amount is less than $1,000.00, and the Manager approves the request.
The amount is less than $1,000.00, and the Manager declines the request.
The Manager approves an amount more than $1,000.00, and the Director also approves the request.
The Manager approves an amount more than $1,000.00, and the Director declines the request.
This is a simple solution but with four different scenarios to test. By adding another requirement that allows the Director to route the approval back to the Manager, you have at least eight scenarios to test, effectively doubling the testing effort required. This effort contributes to the cost of the project because it's labor intensive. By automating these scenarios, developers can execute a scenario unattended to assess if the solution meets the requirements. It also helps to validate that a change to the solution did not introduce other bugs, by acting as a regression test.
We can now look at using the K2 client API to write an automated test. The scenario to be tested is to ensure that the Director's Approval activity is active and that the Director has a work item if the purchase request is more than $1,000.00.
First, we start the workflow by using the K2 blackpearl client API, and then we simulate actions on the workflow, using the client API, in the same way that the the workflow would execute under human interaction.
01 internal void MyTestScenario()
02 {
03   // start a process instance
04   int myProcessID = StartMyProcess(1500);
05
06   // do the manager approval
07   ManagerApproveMyProcess(myProcessID);
08
09   // check if the process is at directors approval
10   Assert.IsTrue(ProcessAtDirectorsApproval(myProcessID));
11 }
In this scenario, line 4 creates a new instance of the workflow and sets the purchase request amount to $1,500.00 and returns the ID of the workflow. This ID is used in the subsequent steps to distinguish this instance of My Process on the K2 blackpearl server.
Using the K2 blackpearl client API, we can break the code executed by line 4 down into the following call on the client API:
// create a connection that supports IDisposable
using (Connection myConnection = new Connection())
{
  try  {
    // open a connection to the local server
    myConnection.Open("127.0.0.1");

    // create a process instance using the full name of the process
    ProcessInstance myProcess =
        myConnection.CreateProcessInstance(@"My Workflow ProjectMy Process");

    // set some data in the process instance
    myProcess.DataFields["Amount"].Value = amount;

    // start the process instance and return the instance ID
    // to ensure the process is in a stable state, set the sync
    // parameter to true. for async systems, this should
    // be left at the default value.
    myConnection.StartProcessInstance(myProcess, true);
    return myProcess.ID;
  }
  finally  {
    // release the connection to the K2 workflow server
    myConnection.Close();
  }
}
Note that we start the process instance using the connection instance. We also pass a Sync parameter of true into the StartProcessInstance method. This ensures that the StartProcessInstance method returns only once the process instance has reached a stable state (client event, end of process, or process is in error state). This pattern should be used only if you require this specific functionality. Under normal circumstances, the process instance on the K2 server should be allowed to execute asynchronously. For this reason, the default value for the Sync parameter is false.
Line 7 does the manager approval step and routes your instance to the Directors Approval activity. Line 10 checks if the instance is indeed at the Directors Approval activity, and the test scenario creates a unit test failure if this is not the case.
Also note that this automated test code does not test any back-end integration. It executes the workflow instance and checks that the desired path is followed within the workflow by simulating a specific scenario. Although an effective test, this should not replace unit testing that needs to be executed on back-end integration points even if the path in the workflow does interact with a back-end system.
Unit testing frameworks such as Microsoft Unit Testing Framework or nUnit are great tools for creating test scenarios that can be automatically executed during the automated build cycle. This section illustrates a sample scenario test using custom .NET code.
This code can be downloaded from the book's Web site at www.wrox.com.
To reduce the effort involved in keeping the testing environment up to date, consider creating an automated build and deployment package for your solution. Automated building and deployment tools can help with this strategy. Examples include Visual Studio Team System and CruiseControl.NET. An effective automated building and deployment tool should be able to extract the latest source files from your source control service, build the solution, and deploy the different pieces of the solution in your testing environment. It should also be able to automatically execute your test scenarios and report on the outcome of each test scenario.
When deploying a solution to a clean testing environment, other items also need to be configured. Automating these tasks will assist in creating a fully automated testing environment. Use the following checklist to consider that items should be configured during deployment:
Active directory users and groups
Application database and application data
Integration points, including XML Web services and Windows Commutation Foundation endpoints
SharePoint sites, lists, libraries, content types, users, and groups
Other infrastructure endpoints that your solution will depend on or integrate with
The K2 blackpearl Designer for Visual Studio allows you to create a deployment package. This deployment package can be executed unattended on your target environment. To create a deployment package, select Create Deploy Package from the context menu of the K2 project in Solution Explorer. This will allow your operations team to deploy the workflow and workflow dependencies without the Visual Studio .NET dependency.
Some items are not included in the deployment package and need to be manually configured on the server. Take note of the following:
Although String Table entries are deployed for a specific environment, the environment configuration is excluded from the package.
Roles used by your process are not included in the package. These need to be configured on the environment before running the package.
Time zones specific to your environment are not included in the package.
You can use MSBuild to deploy your package. To comply with deployment policies or corporate governance, some organizations create a clear boundary between the development and production environments. To comply with these policies, it's important that your whole solution can be packaged and deployed unattended. Because K2 blackpearl's compilation and deployment processes are executed by MSBuild, you can create a full MSBuild package that can build and deploy your solution unattended.
A production environment should be stable and scalable according to the non-functional requirements of the solution. This section will cover recommendations on how a production environment should be configured to allow for redundancy and scalability. To mitigate risks before deploying to production, a staging environment is required.
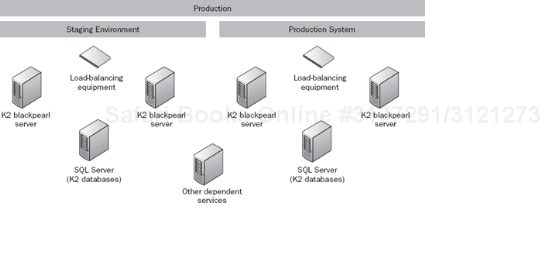
A production environment will place certain requirements and restrictions on a solution that might not exist within the development and testing environment. To indentify and test these restrictions, a staging environment is used. The staging environment should be an exact duplicate of the production environment. This includes any requirements for security, load balancing, redundancy, and infrastructure configuration.
If, for example, a hardware load balancer will be used for production, attempt to have the same hardware and configuration on the staging environment (as shown in Figure 6-9). Certain items of a solution can only be tested with the real thing, and there are obvious differences between hardware and software load balancing. The risk of introducing problems in production is greatly mitigated by having an environment where final acceptance of a solution can be made.
Some restrictions and requirements exist in a production environment. These restrictions should be noted and planned for prior to deploying a solution in production. Ensure that the following items are considered:
Security: Is the production environment a distributed installation of your solution? Will the application code, forms generator, K2 blackpearl server and databases all be available on a single machine or will they be installed on different servers with specific security restrictions between the servers?
Configuration: The solution configuration settings for development are normally different from those for production. Ensure that all configuration values used during development can be extracted and that the production values can be applied when transferring the solution to production. Using the K2 blackpearl Environment tables and templates, common configurable settings can be extracted from the solution. Chapter 10 provides a detailed overview of how to set up different environment templates to represent the various environments you have configured.
Encryption and data security: Your solution might have to encrypt configuration files or data sent between interfaces. This requirement should be reflected in development and testing on the staging environment.
Rights: During development assume limited rights to K2 blackpearl server components and process access. By starting with maximum rights available, effort might be required to limit these rights during production. By taking a "grant as required" approach during development, you will end up with the smallest footprint of rights required for production.
Redundancy and scalability: Your development environment will not represent the real strain that your solution will be placed under. Equipment and infrastructure that address redundancy and scalability should be tested in the staging environment. A good rule is to always design any solution with redundancy and scalability in mind. Develop your solution assuming that horizontal and vertical scaling will be required even if it is not stated as a non-functional requirement at design time.
Review Chapter 5 and implement a stable and scalable production environment along the guidelines set out during the requirements-gathering phase of your solution. Bad solution design can lead to performance problems that can be hard and expensive to fix postproduction. Throwing hardware at a problem is not always possible, and even then the problem might not go away. Capturing performance metrics during requirements gathering and implementing proper design approaches during development for good performance can mitigate these risks in production.
An effective development strategy should include mechanisms to monitor and debug code during development. It must be possible to debug parts of your BPM solution. Every part of a BPM solution should be able to report on its health by outputting and reporting on exceptions that occur within the solution. This section will cover mechanisms for debugging, error reporting, and logging.
Chapters 19 and 20 provide coverage of the features available on K2 blackpearl for error logging and error reporting.
The Workspace provides a details overview of your process status, allowing you to monitor the health of a process. The Process Overview report reports on all active and completed processes and indicates if a process is in an error state (as shown in Figure 6-10).
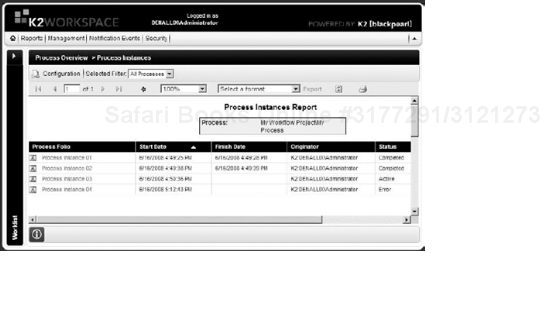
Two instances are currently running, one instance is complete and one is in an error state. Processes going into an error state provide some information to the developer other than the description of the exception that was generated.
When a process instance does go into an error state, the Error Profile in the Workspace will report the error message (as shown in Figure 6-11). By adding an exception-handler to the process all relevant business data and state can be logged for further debugging. This will assist in finding the source of the error as discussed in the next section.
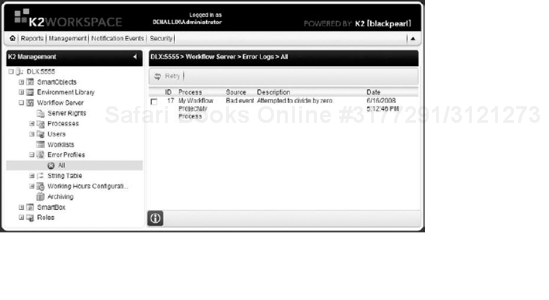
Process instances that generate an exception in any part of the process will result in the instance being suspended by the K2 server. The server reports the state of the current instance, the location of the error, and the details of the error in the K2 Workspace.
By adding an exception rule to a process and capturing and reporting as much information as possible, you can review the details to find the source of the problem. The details can be reported to the server log file (see the next section of this chapter "Running the Server in Console Mode") or to a custom log repository.
Hint: A common exception-handler I normally add to my own processes sends me a support e-mail, including everything I might need to know to find the source of the problem. In this way, I'm notified of the error and error details before the client has even realized something's gone wrong.
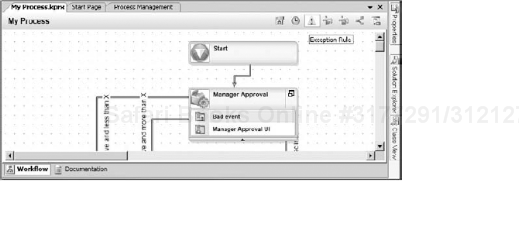
To add an exception-handler to your process, use the Exception Rule property of the process (as shown in Figure 6-12). The purpose of the exception rule is to recover from the error but it is also a great location to report on the error. If the error cannot be recovered, the exception should be logged and thrown.
To output information from the inside of a process, you can add the following code to any process component:
K2.ProcessInstance.Logger.LogDebugMessage("Event Name", "Log Message");Process health reporting and auditing is a powerful way of tracking problems when something goes wrong. Having your process report on its internal state is a good way to accomplish this.
A good practice is to design your process to be modular. In other words, if a specific step or rule in your workflow needs external data or needs to configure data prior to executing, it should do that at the location that the data is needed. If the specific module then fails, reexecuting the module from the K2 Management Console will ensure that all steps required are retried. This approach also makes moving the current execution point in the process instance easier.
The K2 blackpearl server is capable of outputting detailed information about the execution of running processes. By default, this log is written to the install folder of the server.
Developers and testers can have a real-time view of the server output by starting the K2 blackpearl server in console mode. To run the server in console mode, ensure that the K2 blackpearl Service is stopped and then run the server application by starting the K2Server.exe process directly from Windows Explorer (as shown in Figure 6-13). The server will start in a console, and all information normally written to the server log files will be visible in the console.

Real-time monitoring of activity on the K2 blackpearl Host Server is a powerful way of debugging run-time issues during the development phase of a project.
Refer to Chapter 19 for details about the logging framework configuration file. This file controls the level of detail that is logged to the Host Server console.
Various debugging mechanisms exist for K2 blackpearl. This section will cover some of the basic techniques for enabling developers to debug K2 blackpearl components.
A K2 blackpearl solution consists of various code components. They include items such as:
Process components, including server events, destination and Line Rules, and exception rules
Custom server events
Custom service brokers
Because the execution of these components is hosted by the K2HostServer.exe process, the process needs to be attached to Visual Studio. This allows the developer to set breakpoints and stepover code.
To be able to set breakpoint or stepover code, the K2 blackpearl server process needs to be attached to Visual Studio. Figure 6-14 shows how to attach the K2 blackpearl server process to Visual Studio by selecting the Debug

Using performance monitors allows developers and infrastructure owners to report on the health of the K2 blackpearl server (review Chapter 19 for a detailed list of performance counters available).
In theory, an effective project strategy and environment configuration sounds great. In practice, it requires planning time and effort. Projects differ greatly; some require a single business analyst to put together a business-facing workflow, while others use a solution development consisting of many team members covering various disciples. Hopefully, this chapter has given you a good start toward planning your own approach to a K2 blackpearl solution.