K2 allows for rapid development of process-driven applications using a multitude of tools. Workflows can easily be designed using canvases that allow for graphical development through dragging and dropping of activities. These activities are made up of events and can be joined through connectors known as lines. The graphical output is an illustrated process that is easy to understand, hiding any code that may be required.
Because the solution development lifecycle requires a team comprised of different skills, K2 has developed workflow designers that are aimed at different roles within the team. The K2 Designer for Visio is aimed at the business analyst using a tool that they are familiar with, Microsoft Office Visio 2007. The K2 Designer for Visual Studio is aimed at developers who are not intimidated by Microsoft Visual Studio, and similarly the K2 Designer for SharePoint is aimed at SharePoint business users developing in SharePoint. The folks at K2 have also created a fourth designer, the K2 Studio for developers who do not have Microsoft Visual Studio.
This chapter focuses on creating a workflow using the K2 Designer for Visual Studio. The K2 Designer for Visual Studio is the most sophisticated of the workflow designers, providing an extensive feature set. It allows for the creation of simple workflows, SmartObjects, and complex process-driven applications. Understanding how to use the K2 Designer for Visual Studio creates the necessary foundation required for the development of your applications, regardless of the Designer used.
For more information on using alternative design tools like SharePoint and Visio see Chapters 13 and 14.
This chapter covers workflow implementation using the K2 Designer for Visual Studio. Specifically it:
Introduces the K2 Designer for Visual Studio IDE.
Covers the fundamentals required to construct the workflow: activities, events and lines.
Examines the wizards included for integration into back-end systems.
At the time of writing the K2 Designer for Visual Studio supports Microsoft Visual Studio 2005. The folks at K2 have informed me that a release for Visual Studio 2008 is planned and should be available by the time this book is published.
Open the K2 Designer for Visual Studio by choosing Start

There are four K2 templates available when creating a new project, each described in more detail in the following table:
Template Name | Template Function |
|---|---|
K2 Empty Project | Creates a new empty K2 Project. |
K2 SmartObject Project | Creates a new K2 SmartObject Project with a K2 SmartObject (see Chapter 7 for more information on SmartObjects). |
K2 Workflow Project | Creates a new K2 Workflow Project with a new process. |
K2 Wizard Project | Creates a new K2 Wizard Integration Project. |
Select the K2 Workflow Project and give the project the following name: InformationRequest. Click OK.
A new solution file (InformationRequest.sln) will be created. A subfolder will be created containing the K2 project file (InformationRequest.k2proj) and process file (Process1.kprx).
In the Solution Explorer, right-click the process file (Process1.kprx), and rename it InformationRequest.
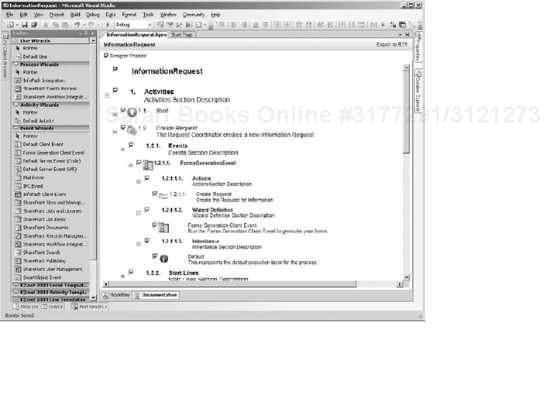
The K2 solution and workflow project are created and a new process file is created. Figure 9-2 shows what the Visual Studio IDE will look like.

Visual Studio contains the following K2 artifacts.
If the K2 Studio Designer toolbar is not shown by default, using the Visual Studio menu, navigate to View
The following table describes the buttons that make up the K2 Studio Designer toolbar.
Button | Name | Description |
|---|---|---|
Align to Grid | Aligns the selected items to the grid. | |
Align Lefts | Aligns the selected items to the left. | |
Align Rights | Aligns the selected items to the right. | |
Align Bottoms | Aligns the selected items to the bottom of the grid. | |
Align Tops | Aligns the selected items to the top of the grid. | |
Center Horizontally | Centers the selected items horizontally. | |
Center Vertically | Centers the selected items vertically. | |
Decrease Horizontal Spacing | Decreases the horizontal spacing between the selected items. | |
Increase Horizontal Spacing | Increases the horizontal spacing between the selected items. | |
Decrease Vertical Spacing | Decreases the vertical spacing between the selected items. | |
Increase Vertical Spacing | Increases the vertical spacing between the selected items. | |
Make Same Size | Alters the size of the selected items so that they are all the same size. | |
Make Same Height | Alters the height of the selected items so that they are all the same height. | |
Make Same Width | Alters the width of the selected items so that they are all the same width. | |
View Code | Shows the XML version of the process | |
Lock Controls | Locks the selected objects on the design canvas. | |
Toggle Line Mode | Switches drawing mode from selection to line drawing. Line drawing can also be accomplished by alternate-click drawing. | |
Collect Copy | Copies an image to the clipboard of items that are selected using a selection box. | |
Connect Activities | Connects the selected activities with Line Rules. | |
Deploy | Builds the process and starts the Deploy Project Wizard. |
The K2 Object Browser displays K2 objects and user-defined objects available to the developer during the development process. These objects include third-party line-of-business (LOB) systems or K2 Objects created by the developers. The K2 Object Browser is shown in Figure 9-4.

The following table describes the tabs contained by the K2 Object Browser:
Browser | Description |
|---|---|
Environment | Allows for the configuration and maintenance of the working environments of K2 blackpearl. It lists the various servers and services available for configuration and use by the workflow. It also allows the developer to toggle between the various environments, for example, Development, Staging, and Production. |
User | Lists all of the Users, Groups, and Roles available for use by the workflow. The Users and Groups information is hosted in Active Directory, while roles can be created using the Management Console in the K2 Workspace. |
Process/Activity Data | Allows for the management of all Process and Activity Data within the workflow. Simply put, Process Data contains data that is available to the workflow for the entire duration of the process instance. Activity Data contains data that is only available during the course of the activity being completed. |
Workflow Context | Manages the process instances, activities, activity destinations, events, and lines. |
The Environment Browser is used to manage the servers and services that host the K2 Platform resources. A default development environment is used to populate with the desired servers and services used during the development phase. Additional environments can be created that represent the other physical environments, for example, staging and production. This makes it simple to switch between the different environments. Figure 9-5 shows the Environment Browser.
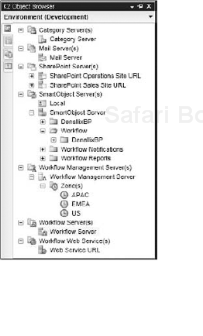
The following table describes the servers and services contained in the Environment Browser:
Server/Services | Description |
|---|---|
Category Server | Provides the hierarchical system for deploying processes and SmartObjects as well as for categorizing reports and notifications. |
Mail Server | The mail server(s) used by the environment to send e-mail notifications. |
SharePoint Server | The SharePoint(s) server used by the environment. The SharePoint server node can be expanded to display the lists, document libraries, and so on as subnodes. |
SmartObject Server | Displays the SmartObjects from the SmartObject server and the local environment. The SmartObject nodes can be expanded to display their methods as subnodes. |
Workflow Web Service | Displays the Workflow Web Service(s) connection details. |
Workflow Management Server | Displays the Workflow Management Server(s) connection details. |
Workflow Server | Displays the Workflow Server(s) connection details. |
To toggle between the environments click on the downward arrow next to the tab name, in this case Environment (Development). Select Environments, which expands to a submenu that lists all of the available environments. Select the desired environment.
The User Browser exposes all of the Active Directory Users and Groups. While the default provider is Active Directory, other options exist. One that is simple to use is the SQL User Manager. It is installed when K2 blackpearl is configured in the form of a database called K2SQLUM. It is permissible to edit the data within this database to set up your users and groups. The provider used to connect to the User Browser is also extendable allowing developers to create a custom user provider. This is useful should you want to connect to a LOB system that manages your users. The User Browser is shown in Figure 9-6.
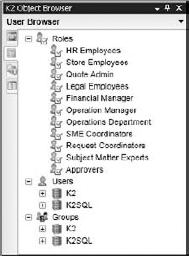
The following table describes the contents of the User Browser:
User | Description |
|---|---|
Roles | K2 Roles (defined in the K2 Management Console) |
Users | Active Directory Users |
Groups | Active Directory Groups |
The Process/Activity Browser exposes all of the data fields and XML Fields that have been defined for the processes and activities. It also exposes the SmartObject Associations and References. Figure 9-7 shows the Process/Activity Data Browser.
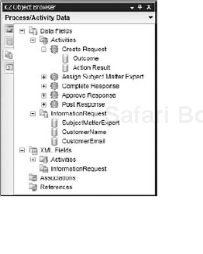
The following table describes the contents of the Process/Activity Data Browser in more detail:
Data | Description |
|---|---|
Data Fields | Data Fields contain custom information related to an activity or process. The activities and processes are displayed as nodes, which in turn can be expanded to display the data fields as subnodes. |
XML Fields | XML Fields contain custom XML nodes related to an activity or process. The activities and processes are displayed as nodes, which can be expanded to display the XML fields as subnodes. |
Associations | Associations provide the mapping between SmartObject properties and process data fields. |
References | Provides a way to add references to SmartObject methods to more easily use SmartObject properties throughout the design of the process. |
To add new data fields, right-click the desired Activity, Process, Associations, or References node, and select Add.
The Workflow Context Browser exposes the workflow instance related fields, as shown in Figure 9-8.
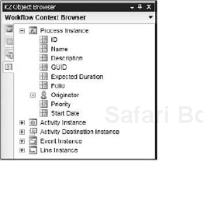
The following table describes the contents of the Workflow Context Browser in more detail:
Instance | Description |
|---|---|
Process | Displays the process instance properties as subnodes. |
Activity | Displays the activity instance properties as subnodes. |
Activity Destination | Displays the activity destination properties as subnodes. |
Event | Displays the event instance properties as subnodes. |
Line | Displays the line instance properties as subnodes. |
The K2 Toolbox contains K2 blackpearl wizard and components. The following table describes the Toolbox contents in more detail:
Items | Description |
|---|---|
Default Line | Used in connecting activities to each other. Contains business logic used to control the process flow between activities. |
InfoPath Integration | Provides the ability to incorporate one or more InfoPath form templates into the workflow to be used as a user interface for workflow actors. |
SharePoint Events Process | Provides the ability to associate a workflow process with SharePoint list and library events. |
SharePoint Workflow Integration | Provides the ability to integrate a K2 workflow with SharePoint workflows. K2 blackpearl workflows can be started using the SharePoint browser and Office applications in addition to the K2 Workspace. |
Activity Wizards | |
Default Activity | Provides a container for workflow events. Events within the activity are processed in the order that they have been added. Events can be moved up or down within an activity. |
Event Wizards | |
Default Client Event | Defines the user interface for actors to participate in the workflow, for example, a pointer to a Web page. |
Forms Generation Client Event | Creates a client event and a Web form for user interaction. |
Default Server Event (Code) | Provides the ability to have a code module that runs on the K2 server. |
Default Server Event (WF) | Provides the ability to have a Windows Workflow Foundation (WF) module that runs on the K2 server. |
Mail Event | Creates an e-mail that will be sent by the K2 Server to the relevant parties. |
IPC Event | Creates an Interprocess Communication (IPC) connection between multiple workflow processes. |
InfoPath Client Event | Creates an interaction between the process activities and InfoPath forms used as the user interface for workflow actors. |
SharePoint Sites and Workspace | Configures SharePoint sites and workspaces, allowing the workflow to manipulate the sites and workspaces. This includes creating and deleting sites and workspaces. |
SharePoint Lists and Libraries | Configures SharePoint lists and libraries, allowing the workflow to manipulate the lists and libraries. This includes creating and deleting lists and libraries. |
SharePoint List Item | Used to create, update, delete, and load metadata from SharePoint lists. |
SharePoint Document | Configures SharePoint Document Library items, allowing the workflow to upload, delete, move, copy, and load documents from the library. |
SharePoint Records Management | Configures SharePoint Records Center items, allowing the workflow to send a document to the center, place, and release holds on documents, and delete records. |
SharePoint Workflow Integration Client | Creates an interaction between the process activities and K2 SharePoint forms used as the user interface for workflow actors. |
SharePoint Search | Creates a result set of SharePoint documents and/or list items based on search criteria to be used in a workflow process. |
SharePoint Publishing | Used to create, move, copy, and remove a published page within SharePoint. |
SharePoint User Manager Server | Used to add and remove SharePoint users and groups. It also manages permissions and resets inheritance. |
SmartObject Event | Used to execute any SmartObject method, read or write. |
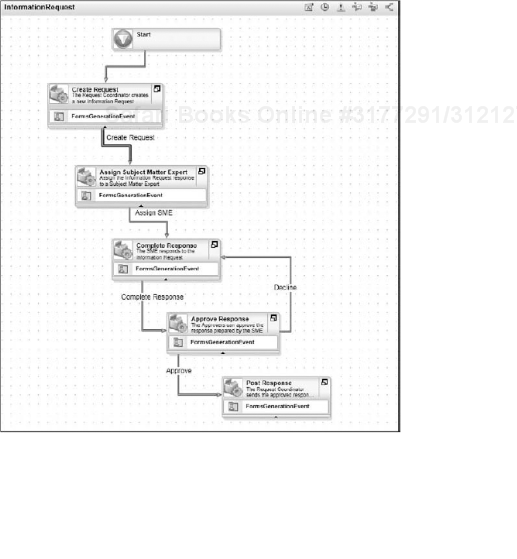
The workflow that we are going to use for the duration of this chapter is an automated way of dealing with information requests received by a firm and how they deal with responding to the requests. This is a common practice at many large enterprises that need to conform to legislative requirements or stringent corporate governance policies.
In most cases when a developer has to start developing a process-driven application such as this, they work from a workflow diagram of the process. Figure 9-9 shows the workflow design that we're going to use to create our first process-driven application using K2 blackpearl.
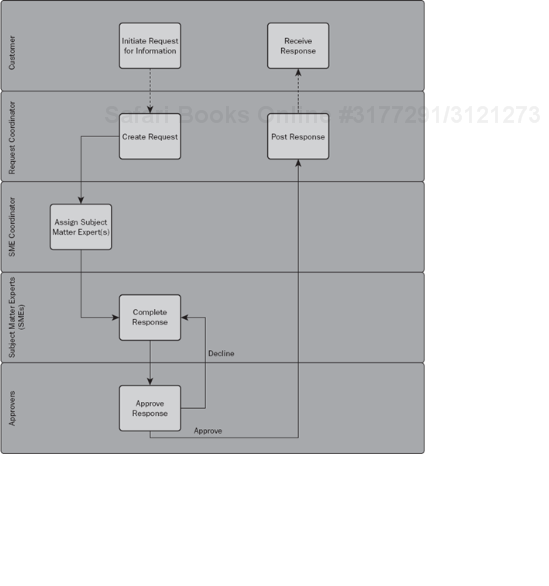
The following table explains the workflow and its activities in more detail:
Activity | Actor | Description |
|---|---|---|
Initiate Request for Information | Customer | The Customer will initiate a request for information from the enterprise. This can be done manually through an e-mail, a telephone call, or a Web site. We can even have the Web site kick-off the workflow, but for now we'll keep it simple and assume that the Customer will contact the Request Coordinator through e-mail. |
Create Request | Request Coordinator | Once the Request Coordinator receives the request, they enter the customer's information and start a new instance of the workflow. |
Assign Subject Matter Expert | Subject Matter Expert (SME) Coordinator | The workflow will create a new task for the SME Coordinator to assign a Subject Matter Expert who will respond to the Information request. |
Complete Response | Subject Matter Expert | Once the SME Coordinator has assigned the Subject Matter Expert, a new task will be generated for the Subject Matter Expert to complete a response. Once the SME has completed the response, they mark the task as completed and submit it. |
Approve Response | Approver | A new task is generated for the Approver to approve the Subject Matter Expert's completed response. The Approver has the option to approve or decline the task. If they approve, then a new task is generated for the Request Coordinator to post the response. If they decline, a new task is generated for the Subject Matter Expert to complete their response. |
Post Response | Request Coordinator | Once the Approver has approved the Subject Matter Expert's completed response, a new task is generated for the Request Coordinator to post the completed response to the customer. Once this has been completed the process ends. |
Receive Response | Customer | The Customer receives the response from the enterprise regarding their request for information. |
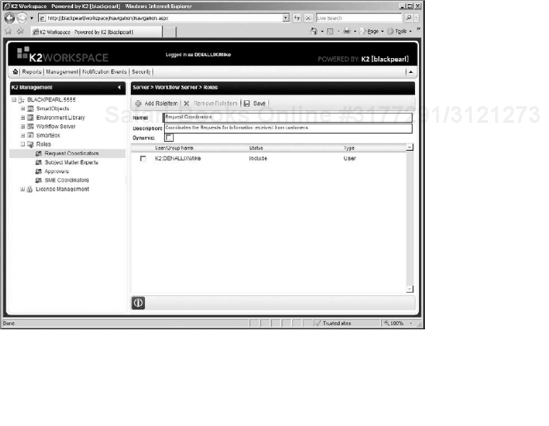
The process has a number of roles that each actor falls into as they complete their task. K2 blackpearl provides a way of creating roles and adding users or groups to each role. These roles can be managed from the Management Console and negate the need for Active Directory Groups to be created. Roles contain RoleItems, which are made up of Active Directory Users or Groups, SmartObject queries, or users and groups from a custom user provider. The SQL user provider is supported out of the box, and roles can include or exclude users from multiple user providers.
We're going to add Active Directory Users to our roles. To add the role, navigate to the K2 Workspace (Start
Add the following four roles with RoleItems:
Role Name | Description | RoleItems to Add |
|---|---|---|
Request Coordinators | Coordinates the Requests for Information received from customers. | Mike (Active Directory User) |
SME Coordinators | Assigns the Subject Matter Experts to Requests for Information. | Anthony (Active Directory User) |
Subject Matter Experts | Subject Matter Experts responsible for completion of Information Request responses. | Codi (Active Directory User) |
Approvers | Approves responses to Information Requests prepared by Subject Matter Experts. | Mike (Active Directory User) |
The end result should look like Figure 9-10.
One approach that can be taken to initially test the workflow in a development environment is to add your Active Directory User account as the only RoleItem on each Role. This means that you are the only actor on all of the process activities, and as you step through the activities, the next task generated will be assigned to you. This provides a great way to test the logic of your application. However, when setting up the quality assurance (QA), staging, and production environments, make sure to add different users to Roles.
Another approach is to add the different users to the Roles as outlined previously in the chapter. When you need to test the workflow, either log in as different users (which can be time-consuming) or right-click on Internet Explorer and select Run as the option. Type in the user credentials you're impersonating, and click OK. This launches the browser in the context of that user.
Data fields are variables within the running workflow. There are two levels of data fields: Process and activity data Fields.
Data fields are added from the K2 Object Browser. To create data fields:
On the K2 Object Browser, click on the Process/Activity Data tab.
Expand Data Fields, and right-click the Information Request process. Select Add.
A new Add Data Field dialog is displayed. In the Name textbox enter SubjectMatterExpert, select String in the Data Type drop-down list, and click OK.
The Add Data Field dialog is shown in Figure 9-11.
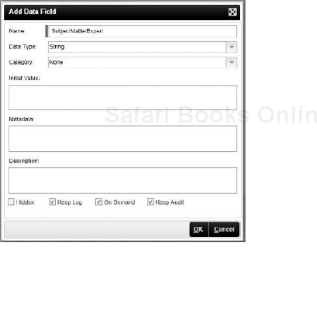
We are going to use this data field to dynamically route a process activity later in the chapter.
Now that Roles have been defined, it's time to add the process activities to the K2 Design Canvas. Activities act as containers for one or more events. Where there are multiple events, the events are processed in the order that they have been added to the activity, and all need to be completed prior to the activity being completed.
There are a few ways of adding activities to the canvas.
First, you can drag an event onto the canvas from the K2 Toolbox and a Default Activity is automatically added for you. The wizard for your event is launched as well.
Second, you can drag a Default Activity onto the design canvas from the K2 Toolbox Activity Wizards section. You need to manually launch the Default Activity Wizard.
Third, using your mouse, right-click and hold, then draw an upside-down V (see Figure 9-12). This adds a Default Activity to the design canvas for you. This approach of adding activities or events (M for a Mail Event, S for a Default Server Event) is called mouse gesturing. It provides a fun and novel approach to modeling.

When building out the workflow, you can take a couple of approaches:
One is to build each activity individually, adding all of the required events to it and linking activities to each other with Line Rules as you go (more about Line Rules later in the chapter).
A second is to build all of the activities first, add events to them, and then link all of them at the end.
How you develop your process-driven application will depend on your preference. In order to explain the concepts behind each object (activities, events, Line Rules, and so on) we'll adopt the second approach. Let's get started.
Drag a Default Activity from the Activity Wizards section of the K2 Toolbar onto the design canvas.
Hovering over the activity with your mouse, click the bolt icon (shown in Figure 9-13) in the lower-right side of the activity to run the default wizard.
This launches the Activity Wizard, which allows for setting the activity-related properties. We're going to set a couple of the general activity properties and the Destination Rule. General Properties are shown by default (Figure 9-14 shows the Activity General Properties tab of the wizard).
On the General Properties tab, set the Name to Create Request and the Description to The Request Coordinator creates a new Information Request.
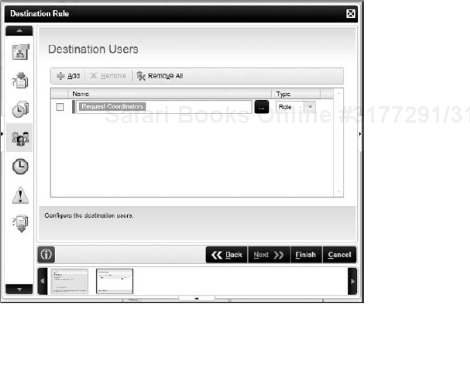
Next, we're going to add a Destination User. The Destination User is the user, group, or role that will be assigned the task at run time. Navigate to the Destination Rule tab by clicking on the Destination User icon (shown in Figure 9-15) in the icon bar on the left-hand side of the wizard.
Click the Add button to add a new Destination User. Click the ellipses (. . .) button to bring up the Context Browser, as shown in Figure 9-16.
Navigate to the User Browser (the second tab on the left, shown as selected in Figure 9.16), expand the Roles, and select Request Coordinators. Click the Add button in the bottom right of the Context Browser. You should end up with what's shown in Figure 9-17.
Click the Finish button on the wizard. This closes the wizard.


You will have noticed that we have set only a couple of the properties on the activity. For more information about all available properties consult the K2 blackpearl documentation or click the blue i (help) button.
Now that we have added our first activity, we are going to add the rest of the activities as outlined in the following table:
Tab | Value |
|---|---|
Activity #2 | |
General |
|
Destination Rule |
|
Activity #3 | |
General |
|
Destination Rule |
|
Activity #4 | |
General |
|
Destination Rule |
|
Activity #5 | |
General |
|
Destination Rule |
|
To recap, so far we've added the activities required for the workflow, given each a name and description, and set their Destination Rule. The next step is to add events to each activity.
We're going to start off simple by adding a Forms Generation Client Event to each activity. This event allows us to incorporate client forms for use with each activity. The form is generated as part of the wizard execution process, producing a template or form as a type of framework that can be altered to suit the user requirements.
Customized, audience-specific form templates can also be produced, and these are consumed at design time by the Forms Generation Client Event as part of the design-time process.
For more information on customizing the client forms see Chapter 11.
It's time to get started.
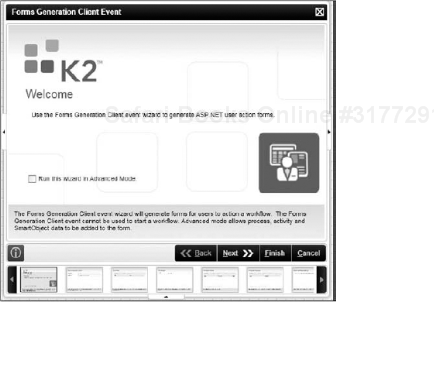
Drag a Forms Generation Client Event to the Create Response activity. This starts the Forms Generation Default Client Event Wizard (shown in Figure 9-18).
Ensure that the Run this wizard in Advanced Mode checkbox is not checked. Advanced Mode provides another step to configure in the wizard. In this case, it gives you the ability to alter the default Workflow Server and Workflow Web Services URL configured in your Environment Library. For more information about all available properties consult the K2 blackpearl documentation or click the blue i button. We're good with the default values, so click the Next button.
On the Form Name and Location page, the page name is auto-generated by the wizard and can be renamed for improved usability. Enter Create_Request as shown in Figure 9-19. The Internet URL textbox contains the Web Service URL configured in your Environment Library by default.
Click the Next button, and on the Form Data step add in two data fields. To add the data fields, click the Add button. A new Add Data Source dialog is displayed; click on the ellipses (. . .) button. This will display the Context Browser. Click on the Process/Activity Data tab and expand the data fields node. Right-click on InformationRequest process and select Add. A new Add Data Field dialog is displayed. It's the same dialog you saw in Figure 9-11 earlier in the chapter.
Enter two new data fields with the following properties as set out in the following table:
Data Field Name
Data Type
Initial Value
CustomerName
String
n/a
CustomerEmail
String
n/a
You will notice that these are the same steps used earlier in the chapter when the SubjectMatterExpert data field was added from the K2 Object Browser in Visual Studio. The same functionality is available to you from the wizard.
Once both data fields have been added and selected, the wizard should look like Figure 9-20.
Click the Next button to display the Form Layout step. Use the default value of Blank Page. The wizard will list any custom user pages that have been added to the generated forms parent directory.
For more information regarding custom user pages and the generated forms parent directory, see Chapter 11.
Click the Next button to configure the Actions. Actions determine the response that can be given at run time by the actor. Two types of actions exist, Finish and Update. An action of type Finish results in the activity being processed and completed, while an action of type Update merely saves the activity.
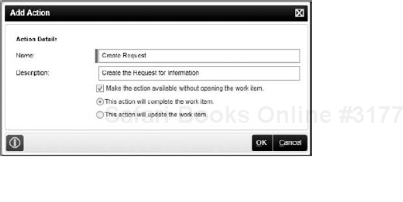
Click the Add button. This displays a new dialog prompting you to configure the Action. In the Name textbox, type Create Request. In the Description textbox, type in Create the Request for Information.
Ensure that the Make the action available without opening the work item checkbox is checked. Also, select the This action will complete the work item radio button. (For more information about all available properties consult the K2 blackpearl documentation or click the blue i button.)
The completed form should look like Figure 9-21.
Click the OK button. The completed step should look like Figure 9-22.
Ensure that the Generate corresponding outcome(s) for listed action(s) checkbox is checked. This automatically creates the outcome corresponding to your action.
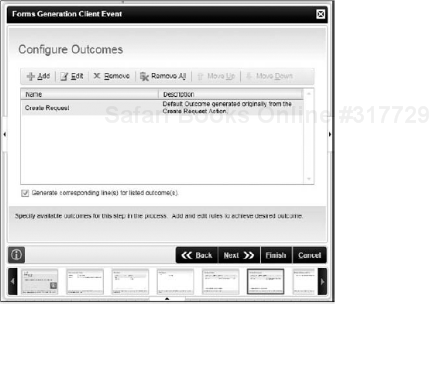
Click the Next button to display the Configure Outcomes step. An outcome has been automatically generated for you. Outcomes determine the flow of the process. The completed step should look like Figure 9-23.
You will notice that the name of the outcome corresponds with the name of the action. This can be verified by looking at the Description field, which states that the default outcome has been generated from the action with the corresponding name.
Ensure that the Generate corresponding line(s) for listed outcome(s) checkbox is checked. This will automatically create the Line Rules corresponding to our action.
Click the Next button to display the Events Notifications Settings step; click Next without checking the Event Notification Settings checkbox.
Click the Next button to display the Finished step. Click the Finish button to end the wizard.


Now that we have added our first event, we can go ahead and add a Forms Generation Client Event to the rest of the activities as outlined in the following table:
Instructions | |
|---|---|
Assign Subject Matter Expert Activity | |
Form Name and Location |
|
Form Data |
|
Form Layout |
|
Configure Actions | Add a new action:
|
Configure Outcomes |
|
Event Notification Settings |
|
Complete Response Activity | |
Form Name and Location |
|
Form Data |
|
Form Layout |
|
Configure Actions | Add a new action:
|
Configure Outcomes |
|
Event Notification Settings |
|
Approve Response Activity | |
Form Name and Location |
|
Form Data |
|
Form Layout |
|
Configure Actions | Add the following two new actions:
|
Configure Outcomes |
|
Event Notification Settings |
|
Post Response Activity | |
Form Name and Location |
|
Form Data |
|
Form Layout |
|
Configure Actions | Add a new action:
|
Configure Outcomes |
|
Event Notification Settings |
|
Line Rules are used to connect one activity to another and dictate the flow of the process. Line Rules have the ability to store rule logic. The logic is simply a condition or set of conditions under which the Line Rule evaluates to true. By default, Line Rules return true. These sets of conditions translate into business logic, directing the workflow process to the appropriate destination users.
You need a Line Rule to connect the Start Activity to the first activity in the example process, Create Request. There are a couple of ways you can add this Line Rule.
First, you can click on the Default Line in the K2 Toolbox under the Line Wizards section. Once selected, while holding down the right mouse button, draw a line from the Start activity to the Create Request activity.
The second way of connecting these activities is to hold down the alternate (typically right) mouse button and draw a line from the Start activity to the Create Request activity. This negates the need to use the Default Line in the toolbox.
You might notice that the Create Request activity has a Line Rule attached to the bottom of it. This was created by the Forms Generation Client Event Wizard. You need to connect these Line Rules to their respective activities. Hover the mouse over the Line Rule where the arrow is and click and drag it to the Assign Subject Matter Expert activity. This ensures that the Create Request activity will flow to the Assign Subject Matter Expert activity once it has been completed.
It's time to take a quick look at the logic behind this Line Rule. You can view the logic by right-clicking on the Line Rule on the canvas and selecting Properties. The first tab shows the Line General Properties. Click on the second icon in the icon menu on the left (as shown in Figure 9-24).
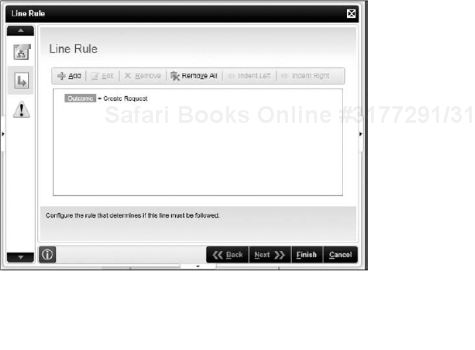
You will notice that a Line Rule has been added for us. This was done using the Forms Generation Client Event Wizard. You have the ability to add more rules to the line from here if needed.
However, it's time to get on with connecting the activities. Connect the activities to each other using the lines as follows:
Initial Activity | Line | Subsequent Activity |
|---|---|---|
Assign Subject Matter Expert | Assign SME | Complete Response |
Complete Response | Complete Response | Approve Response |
Approve Response | Approve | Post Response |
Approve Response | Decline | Complete Response |
Now that the activities are connected, the design canvas should look like Figure 9-25.
You are now ready to build and deploy your K2 Workflow project. You should note, however, that while our goal in this chapter is to create our first workflow, the deployment steps outlined in this section deal specifically with the default deployment on your development environment. Chapters 5, 6, and 10 go into further detail regarding deployment strategies and deploying to multiple environments.
Let's get deployed:
Right-click on the InformationRequest solution in the Solution Explorer and select Build. The Build status will be updated in the bottom left of the Visual Studio Status Bar. Once the build is successfully completed, the status will say Build succeeded.
Right-click on the InformationRequest project in the Solution Explorer and select Deploy. This will build the project again and initiate the Deploy Project Wizard.
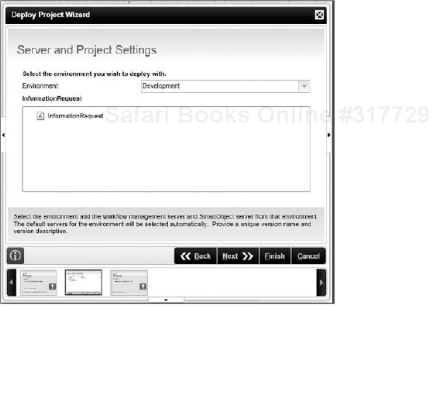
Click the Next button to display the Server and Project Settings step as shown in Figure 9-26:
The Environment drop-down list includes the environments that you are able to deploy to. This may include Development, QA, Staging, and Production depending on your setup. For this example, select the default value: Development.
Click the Next button and click the Finish button to commence deployment. The deployment status will be updated in the bottom left of the Visual Studio Status Bar. Once deployment is successfully completed, the status will say Deploy succeeded.
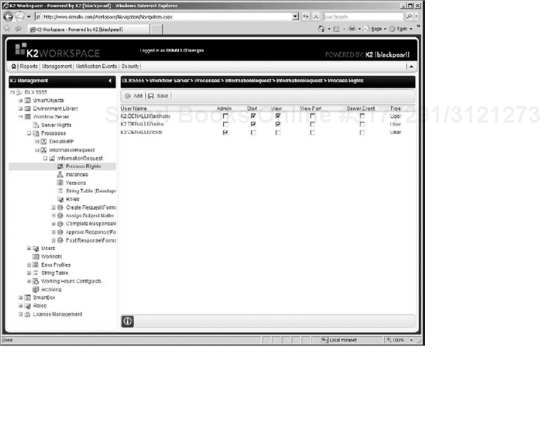
The workflow has now been successfully deployed to the Workflow server. Next you need to set the Process Rights.
Setting the Process Rights ensures that the process can be accessed by the workflow actors. The following table explains the permissions available:
Permissions | Description |
|---|---|
Admin | Allows the user to start and view a process in the Workspace. It also allows the actor to manage the process from the Management Console. |
Start | Allows the user to start a process. |
View | Allows the user to view all instances of a process without being an actor in the workflow. This is handy for seeing process reports. |
View Participate | Allows the user who has been designated as a Destination User to view and participate in the process. They will only be able to view the process and activity data once the activity that they are assigned to has reached them. |
Server Event | Asynchronous server events wait for a callback from the external system to finish the server event. The user account used by the external system must be granted Server Event permissions for it to be allowed to finish the server event. |
To set the Process Rights you either add the user's Active Directory User account or an Active Directory Group that the user may belong to. The following steps set the Process Rights for users in the example:
Navigate to the Management Console in the K2 Workspace.
Click on the Workflow Server.
Click on Processes.
Click on InformationRequest process.
Click on InformationRequest below the process.
Click on the Process Rights tab.
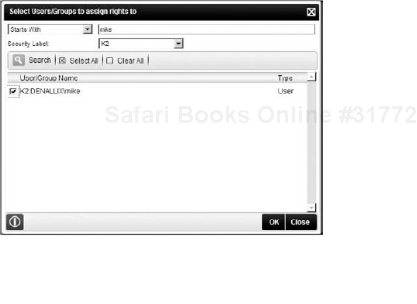
Click the Add button, which opens the Select Users/Groups to assign rights to dialog displayed in Figure 9-27.
Search for your user, check the checkbox next to their name, and click the OK button. Add their Process Rights accordingly. For the example, add the following users and set their permissions accordingly:
Username
Permissions
Codi
Admin
Mike
Start, View
Anthony
Start, View
Click the Save button to persist the permission settings.
Your Management Console should look like Figure 9-28.
Now that the workflow has been implemented you are ready to step through your process-driven application. This allows you to test for logical errors in the workflow and gives you an opportunity to see what the workflow participants will experience as they complete their tasks.
To initiate the workflow, you're going to log on as Request Coordinator, Codi. Alternatively, you can right-click on Internet Explorer and run as Codi.
Navigate to the Management Console in the K2 Workspace

Click on the Instances tab, and click the Start New button in the pane on the right-hand side of the screen.
A Create New Process Instance dialog is displayed. Uncheck the Use Date checkbox and enter IR 1 as the description for the process instance in the Folio textbox. Say that you want to enter some values regarding the customer who made the Request for Information. Click the Load Data Fields button. It loads the process data fields and gives you the opportunity to set their values. Check the two data fields called CustomerName and CustomerEmail. Enter in Joe Customer and [email protected], respectively. The dialog should look like Figure 9-29.
Click the Start button to create the new process instance. The process instance has created a new activity for Mike to create the request.

When Mike navigates to his K2 Workspace, he will see that he has a new Create Request task. Mike's K2 Workspace should look like Figure 9-30.

There are two ways for Mike to complete his task.
Hover over the Folio of the task, IR 1. A small black arrow appears (see Figure 9-31). Click the arrow, and a context menu appears. Click on the Action(s) menu item, and all possible actions are displayed. In this case there is only one, Create Request. To complete the task, click on the action.
Click on the Event Name for the task, in this case Create Request. This will open a new instance of your browser with the Web page displayed (the page generated by the Forms Generation Client Event Wizard).
The Create Request action appears in the context menu on the Worklist because we checked the Make the action available without opening the work item checkbox when configuring the actions of the Forms Generation Client Event. In a case where you did not do so, you would need to click on the Event Name in the Worklist to open the Web form.
To complete this task, you can use the page generated by the Forms Generation Client Event. Click on the Event Name, and the client-generated page opens in a new browser window. There are a couple of important things to note here:
First, the two process data fields that were populated when creating the instance of this process are displayed. As Mike looks over the form he realizes that the e-mail address was entered incorrectly. Go ahead and change it to be
[email protected]. When the form is submitted, the data field will be updated with the new value.The second thing to note is that the form has an Actions drop-down list containing all available actions. In this case there is only one, Create Request.
Mike's form should look like Figure 9-32.
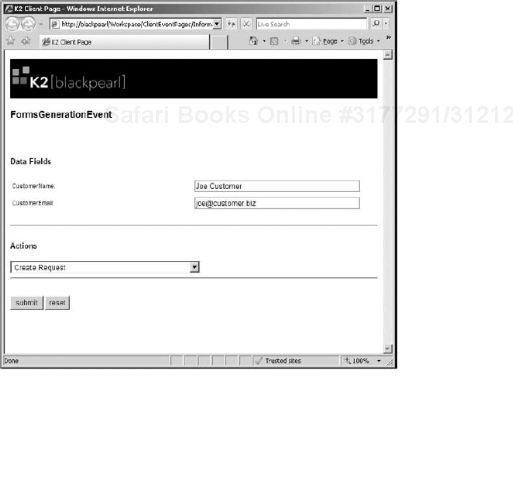
Select the Create Request action, and click the Submit button. As soon as the task has been completed, the client page displays a message confirming that the Worklist item action has been completed.
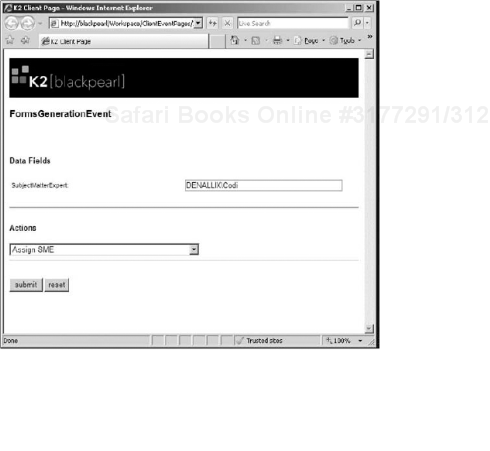
The workflow creates a new Assign Subject Matter Expert task for Anthony. You can complete the task as Anthony by opening a browser under his credentials. Navigate to his task on the K2 Worklist, and click on the Event Name to launch the client form. The form associated with this task has a textbox where you can assign a Subject Matter Expert to complete the response. Anthony enters DOMAIN Codi (enter your domain before the user's name) and selects the Assign SME action from the Actions drop-down list. His form should look like Figure 9-33.
The process now creates a new task, Complete Response, for Codi. Remember, the reason this task is going to Codi is because you set the Destination User for this activity to be the value from the SubjectMatterExpert data field. This is an important concept, as you can imagine how powerful this can be. You can have a drop-down list containing several users who are part of a group, and the actor completing this task can select a person at run time.
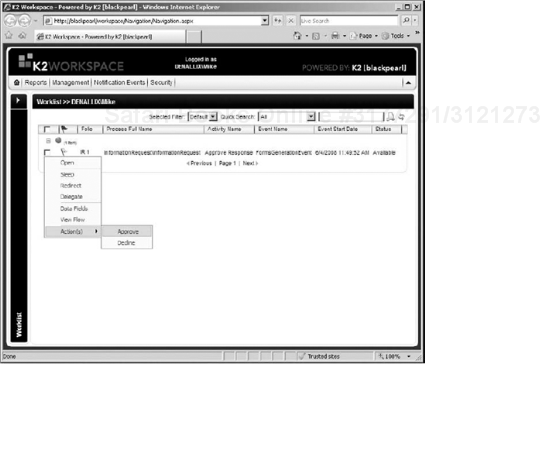
Log in as Codi and complete her task. Once this task has been submitted, a new Approve Response task is created and assigned to Mike. Take a look as the action available to Mike from his K2 Workspace. Notice now there are two actions available, Approve and Decline, as displayed in Figure 9-34.
Depending on Mike's actions one of two outcomes can occur. If he Declines the response, then the workflow is routed back to Codi so that she can have another attempt at completing the response. On the other hand, if Mike approves the response, the workflow is routed to the next activity, Post Response.
Approve the response. A new Post Response task is created for Mike. As soon as Mike has completed the task, the workflow instance has been completed. There you go, one process-driven application later, and you've hardly broken into a sweat.
One useful feature of the K2 Designer for Visual Studio is the Documentation Designer. Look on the bottom left of the design canvas, and you can see a couple of buttons. The first is the Workflow button that displays the K2 Design Canvas. The second, the Documentation button, displays the Documentation Designer. Click on the Documentation button. Figure 9-35 shows the Documentation Designer.
Ensure that the designer is enabled by checking the Designer Enabled checkbox on the top of the Documentation Designer.
The designer lists the workflow Activities, Events, and Line Rules. Each section can be expanded and collapsed. There is a checkbox next to each section that indicates whether to include the section in the documentation or not. To generate the documentation, click the Export to RTF button in the top-right corner of the designer. It opens a Save As dialog allowing you to select a location to save the file to. Figure 9-36 shows the generated RTF file.
While you still need to go and complete the documentation for it to make sense, this provides you with a good starting point, ensuring that you don't leave out any of the important details.

In this chapter, you've had a chance to become familiar with the K2 Designer for Visual Studio. We introduced you to the K2 wizards and used them to create a new automated workflow using their step-by-step approach. You have seen how to create activities and add events to them, as well as how to join the activities through Line Rules. We walked you through adding roles, setting user permissions, and adding destination users to your activities.
You have now seen how easy it is to create simple client forms for workflow interaction without even writing any code. You initiated a new instance of the workflow, and accessed and altered process data. You used the Document Designer to easily create the documentation related to our process.
Most importantly, you can do all of this without having scratched the surface of K2 blackpearl. As you read through the rest of the chapters, you can think back to this chapter and how you can extend the power of K2 blackpearl even further.
The next chapter now turns to a discussion of deploying your processes and SmartObjects.