One of the newest and most significant features of the K2 platform is SmartObjects. SmartObjects provide process designers the ability to provision data from line-of-business (LOB) data sources in a drag-and-drop fashion. Now that data is more accessible, business users can make more informed and better decisions in their workflows. Also, business processes can be built using SmartObjects, which focus on management of data itself. The SmartObject framework is not scoped to K2 blackpearl; SmartObjects can be used with all applications that participate in a process, even disparate ones on different platforms. When using SmartObjects, designers now have the ability to gain access to data that resides in Active Directory, SharePoint, SQL Server, Oracle, SAP, and so on and to build business objects using data harvested from these locations. The SmartObject framework is also extremely flexible, as it provides the ability to create composite views from any LOB application. For instance, a designer may create a composite employee SmartObject that uses data from both Active Directory and a human resources database.
In addition to providing a framework in which data services can be written, K2 blackpearl provides a designer tool that allows for rapid construction of SmartObjects. There are visual design tools for building, deploying, and maintaining SmartObjects. These tools literally enable a designer to author fully functional SmartObjects in minutes. When authoring K2 blackpearl processes, designers have the ability to drag-and-drop data and use it within the process. SmartObjects are designed to be completely decoupled and deployed independently from the K2 process. Since SmartObjects are separate from the process definition, with time, a catalog of SmartObjects for the enterprise is created. This catalog of SmartObjects can be reused in future K2 processes or referenced in other LOB applications. This will create continuity between enterprise applications because now business objects are defined outside of the applications that use them.
This chapter:
Discusses the history of K2 prior to SmartObjects and provides insight as to why SmartObjects have become an indispensible component when writing new workflows.
Discusses the architecture of SmartObjects along with how they may be created, customized, and leveraged within a K2 process.
Explores the SmartObject API to show you how it can be used in custom code such as an ASP.NET Web page.
Gives an introduction in writing custom SmartObject Services that can be used to access data in any LOB database.
SmartObjects were introduced into the K2 platform to solve the challenge of provisioning data to make business decisions. K2.net 2003 was the version prior to the release of K2 blackpearl. To access data in K2.net 2003, you had to build custom data services from scratch, and it was common that designers would not create reusable data access frameworks. There were event templates for SQL Server and Web services in K2.net 2003; however, designers quickly started to build custom frameworks and code libraries to gain access to this and other data. These services would be used for many things, such as making Line Rule decisions, setting destination users, and creating business logic for escalation rules to name just a few. Custom data access layers are typically vertically aligned to the process and not reusable in other processes. This required significant time in every project plan to gain access to data, increasing the level of effort for the project. K2 recognized this as a missing piece of the puzzle. K2 was providing a powerful business process automation modeling tool, but there was no support for retrieving business data just as easily. Potentially every piece of data in the entire enterprise is a candidate for usage inside of K2 workflow. With the introduction of the SmartObjects framework, this hurdle has been overcome.
Along with challenges in reading data from LOB databases, K2.net 2003 also had challenges with publishing data it had captured for enterprise reporting. Commonly rich business data about the business process would be captured within the K2 server, but it was challenging for nontechnical designers to get the data back out. Much of the process data would be embedded directly within the process and stored in the K2 database as process or activity fields. Developers were faced with the challenge of getting that data back out of the K2 database. The K2 process database does use SQL Server; however, its database schema is geared towards supporting a workflow server rather than a reporting database. Designers would believe that data stored in the K2 process database was redundant and inefficient when, in fact, it was doing things like protecting transition boundaries between concurrent threads of process and activity instances. Designers for K2.net 2003 solutions realized this and started externalizing all business data to a custom database, thus allowing the K2 database to do what it does best, manage a workflow server. This was recognized as a best practice for K2.net 2003 and still is a good practice for K2 blackpearl. As already mentioned, process designers had to build up custom frameworks again to persist data to these external custom databases, increasing the level of effort for projects. With SmartObjects, designers no longer have to spend nearly as much time building these data access layers as the SmartObject infrastructure provides all the plumbing to hook into external data sources in a consistent and reusable fashion.
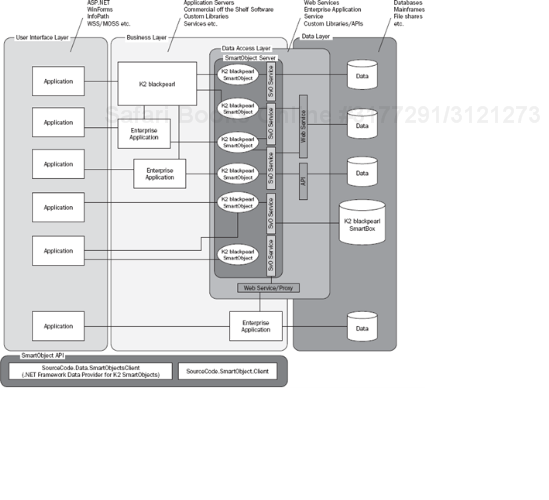
Before diving into how to create and use SmartObjects in a process, it's valuable to understand where they fit within the enterprise architecture. Simply put, there are three traditional layers for application architecture: the user interface, business, and data layers, as shown in Figure 7-1. The K2 blackpearl platform resides in the business layer. The K2 blackpearl platform allows you to visually organize business events that will be raised in a specific order based upon business rules. Traditionally, K2 provided many accelerators (wizard templates) that allowed designers to hook into user interface layers using events like InfoPath, SharePoint, ASP.NET, and so on. Designers would simply use these wizards, provide the necessary configurations, and deploy the process. However, that was only half of what was needed. What was missing was designers did not have a framework to rapidly integrate K2 processes and LOB data to make business decisions.
Figure 7-1 is a contextual diagram that shows where K2 blackpearl and the SmartObjects reside in a layered view of an enterprise's architecture. The diagram is generic and is not meant to cover every permutation of how data can be provisioned using the K2 SmartObject framework. Also, it does not account for the various layers that may reside within an enterprise application or Web service. This diagram does demonstrate how K2 SmartObjects can be used as an enterprise facade to access all data across the enterprise.
Chapter 17 discusses Single Sign-On that is provided by the SmartObject framework.
The K2 blackpearl Server in Figure 7-1 is part of the business layer. This is because it executes all of the business rules and process definitions that are used to build enterprise applications and services. Based on these process definitions, the K2 blackpearl server collects rich data associated to the execution of these business process such as who were the assigned participants, who took action (which can be a person or system), what actions were taken and in what order, and how long it took to complete the process. This data can then be used to improve the business processes, introduce efficiencies, and resolve bottlenecks.
In the standard three-tier architectural model, a thin layer, often referred to as the data access layer, resides between both the business and data layers. The data access layer, shown in Figure 7-1, commonly contains all infrastructure logic to enable the exchange of data to LOB data. The data access layer focuses on managing transactions of data and does not contain business contextual logic (that is, business rules are not applied there). The SmartObject framework provides this data access layer, which is sometimes written from scratch. There are two important concepts within the SmartObject framework shown in the data access layer. They are SmartObject Services and SmartObjects themselves.
SmartObject Services are the data providers that implement actual connections to data sources and perform operations against them.
SmartObjects define business entities that use the service methods.
Having the SmartObject framework significantly reduces the amount of time required to implement a solution, allowing more time to be spent on business process modeling. This is because a standardized framework, an interface, and tools are provided to both designers and developers.
One of the advantages of using the SmartObject framework is that it forces designers to create highly decoupled data access layers. It is not uncommon for developers to violate the tenants of a custom data access layer by slipping in business contextual logic into the wrong place. SmartObject Services can be developed without knowledge of the SmartObject that will use it. SmartObjects are not dependent on the SmartObject Service because SmartObject Services must be published using standard interface guidelines. SmartObjects can easily map from one service to another without concern for where the data originated from or where it is going to. SmartObject Services serve primarily as a facade to LOB data, and SmartObjects are both scalable and maintainable over their lifetimes. For instance, an organization can create a SmartObject that uses a SmartObject Active Directory Service to expose data. If the organization were to change its direction and store data in a Human Resources database, the SmartObject would simply have to change its mapping to a different SmartObject Service that has access to the Human Resources database. None of the calling applications in the business or user interface layers would have to change their implementation unless the new Human Resources application had different business rules (that is, new required data, different data types, or so on).
SmartObjects also create more agile business processes. Without SmartObjects, it becomes challenging to create business rules that are dynamic. For instance approval tasks can be assigned dynamically based on external data such as a purchasing database. The purchasing database may have data that knows which purchasing officer must approve purchase orders, according to the types of parts being ordered. If you use SmartObjects, the process logic to assign approval tasks is not hardcoded.
Another important concept within the SmartObject framework is composite SmartObjects, which are shown in Figure 7-1. It is very common when building a process that data to be used originates from many different places. For a SmartObject, some data could originate from an enterprise resource planning (ERP) system, while other data originated from a SharePoint list. The decoupled nature of the SmartObject framework provides the ability to build SmartObjects that use all of these data sources. A very common scenario would be retrieving employee data from both Active Directory and a Human Resources database. Another common scenario would be a SmartObject that can save data across a purchasing and inventory databases in a single transaction. SmartObjects allow for the ability to create methods that use multiple services and hide from you the fact that many data repositories are being used.
However, the SmartObject framework is not intended to be a data brokerage server like Microsoft BizTalk. If there are really complex transactions, you can create a SmartObject Service that calls a BizTalk Orchestration that has been published as a Web service. Then the complexity of a BizTalk can be hidden by the SmartObject Service. Also, if there are complex data reads from multiple ERP systems, it would be highly recommended that you create a data warehouse and then create a SmartObject to read from the data warehouse.
SmartObjects are not scoped either to the K2 or .NET platforms either. All SmartObjects can be executed as a Windows Communication Foundation (WCF) endpoint or even executed using K2's SmartObject Method execution Web service that InfoPath uses. This now enables K2 processes to be initiated from other platforms and allows K2 processes to coordinate operations across platforms.
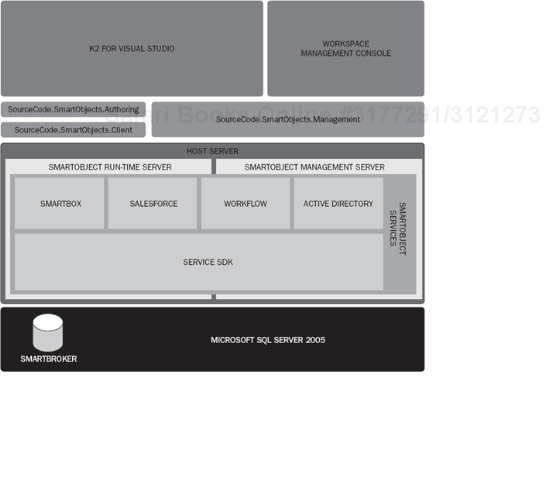
Figure 7-2 shows all of the components of the K2 SmartObject architecture. K2 Visual Studio and the K2 Workspace use the same APIs to work with SmartObjects. The SmartObject APIs access the SmartObject server, which is one of the many servers hosted with K2 platform. There are two SmartObject servers:
The Management Server, which is responsible for loading SmartObject Service and SmartObject instances
The Run-time Server, which is responsible for the execution of the SmartObjects with LOB applications
Figure 7-2 shows a few SmartObjects services like SmartBox, Salesforce, Workflow, and Active Directory; however, additional SmartObject Services can be added to the server over time. The Service SDK is the framework SmartObject Services must implement so that they can be hosted with the SmartObject server. Finally, the SmartObject Host Server uses a SQL Server database to manage all of the SmartObject Service instances and their definitions.
The following are the current out of the box SmartObject Services provided by K2 blackpearl. This list will expand with future planned releases of K2 blackpearl:
SmartBox: When you are using the SmartBox, all SmartObjects will have a dedicated database table generated in SQL Server with columns for each property defined for the SmartObject. This service provides the ability to rapidly store data using SmartObjects.
SharePoint: This service supplies methods to support operations on lists and libraries that are located within a SharePoint site. This service is extremely useful because now SharePoint data is being exposed without having to go to SharePoint Web services or API. Since SmartObjects can be used with the .NET Framework Data Provider for K2 SmartObjects, data within SharePoint is now easily accessible.
Active Directory: This service provides several methods to read information from an Active Directory schema. Methods such as looking up user detail information, finding a user's manager, or getting all users in a group are provided.
K2 blackpearl: This service provides access to representations of K2 workflow data as business objects.
Salesforce.com: This service provides access to data and methods available in Salesforce.com.
The K2 community also supports several SmartObject Services through the K2 Underground Web site (www.k2underground.com). This list will grow, but here are some of the more popular services:
Dynamic SmartObject Services: This service dynamically reads the schema of a custom SQL Server database and provides methods for each table in the database.
Dynamic SQL Stored Procedure Service: This service dynamically reads the definition of each stored procedure on a SQL Server database and provides methods to execute the stored procedures.
Dynamic Web Service: This service dynamically reads the definition of a Web service and creates a method for each Web method on the Web service.
SharePoint Users in Groups ServiceObject: This service exposes SharePoint User Groups for SmartObjects.
Office Communication Server Service: This service allows for the creation of a SmartObject to send notifications via Microsoft Office Communications Server 2007.
SmartObject Service Provider for Oracle: This service dynamically reads the schema of a custom Oracle database and provides methods for each table in the database.
Dynamic SmartObject Service: This service dynamically builds a service using existing SmartObjects as the data source. This can be used to create inheritance between SmartObjects.
The approach taken to design a SmartObject is similar to designing a database. Even though SmartObject has the word Object, which is associated with object-oriented principles, concepts such as inheritance, overloading, overriding, and polymorphism do not apply. Think of SmartObjects simply as a business objects or entities. Remember the SmartObject will use SmartObject Services to populate it with data, and the SmartObject is not concerned with data origination.
We're going to use as an example a business opportunity assessment process that requires automation, and K2 blackpearl is selected to manage the process. In this process, an Account Executive identifies an opportunity and must gather information prior to a meeting with the Business Development Director, the Program Director, and the Project Manager. The goal is to obtain sign-off before the Account Executive is allowed to author a proposal for services. To support this process, a few simple SmartObjects need to be created.
First, a SmartObject needs to be created for the company for whom the proposal will be written.
Second, an
OpportunitySmartObject needs to be created to capture specific information associated with the opportunity.Third, an
OpportunityEmployeeSmartObject is needed to retrieve information for the participants in the workflow.
Figure 7-3 shows a model of this example. In this model, a Company SmartObject will have associations to many Opportunities, while an Opportunity will be associated to a single Company. The Opportunity SmartObject will have associations for each of the OpportunityEmployee SmartObjects that participate in the workflow.

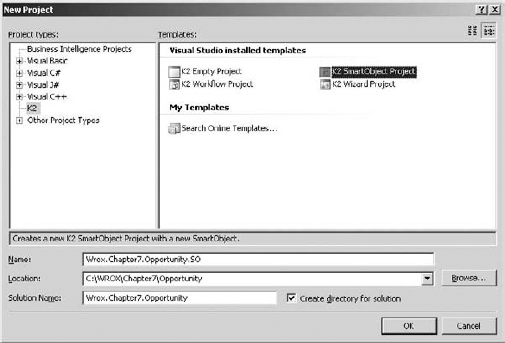
Creating SmartObjects is simple when you use the K2 Designer for Visual Studio or K2 Studio. For the purpose of this example, Visual Studio will be used and it assumed that readers have a developer's understanding of how to use Visual Studio. Figure 7-4 shows New Project window from Visual Studio. To start making SmartObjects, you need to create a new Visual Studio project using K2's SmartObject Project Template. In the New Project window, select K2 in the Project Types tree and then select K2 SmartObject Project template.
Naming conventions are very important and should not be an afterthought. Typically, when writing C# code libraries, developers adopt the namespace into the name of the project, which subsequently names the .dll the same. The same approach should be taken for a SmartObject project. A good project naming convention would be
CompanyName.Division.ProcessName.SmartObjectProjectName. However, this may not always apply because the SmartObjects being defined may have a global context. The point is to recognize that the same naming standard approach should be taken because these SmartObjects will be deployed centrally to a K2 server. The name of the SmartObject must be unique, and it is highly likely that SmartObject names will conflict as more and more are created.
Once the SmartObject project is created, a new default SmartObject file called SmartObject1.sodx will be in the project, as shown in Figure 7-5. Notice that in the visual design interface, you can add properties and methods to the SmartObject. First, rename the default SmartObject by going to the Name textbox and changing SmartObject1 to Company. Note that after changing the name of the SmartObject, the filename of SmartObject1.sodx changes to Company.sodx.

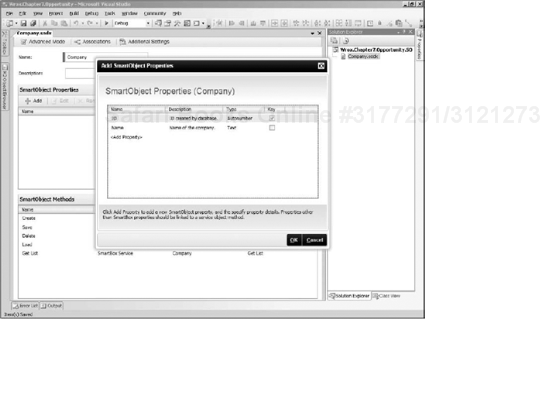
You now need to add properties to the Company SmartObject using the Add SmartObject Properties window shown in Figure 7-6. Think of properties as fields in a database table, because in many instances that is exactly what they will be. Properties are things like first name, last name, and e-mail. Keeping this simple, you'll add an ID and a Name property to the Company SmartObject. To add the property, click the Add button, and the Add SmartObject Properties window appears. Then enter ID into the Name column, enter an optional description, and then select the Autonumber type from the drop-down. This automatically checks the Key column. Making the ID column autonumbered ensures that the ID property is populated with a unique number generated from the database. Add the Name property in the same manner; however, make the type Text.
There are many data types that can be selected. The supported data types for a SmartObjects are as follows:
Data Types | SmartBox Data Type (SQL Server 2005) |
|---|---|
|
|
|
|
|
|
|
|
|
|
|
|
|
|
| |
|
|
|
|
|
|
|
|
|
|
To create an Opportunity SmartObject, right-click the project, select Add New Item, select SmartObject type, and give the SmartObject the name of Opportunity.sodx. Once the new SmartObject has been created, add the following properties to the Opportunity SmartObject:
ID (Autonumber)
CompanyID (Number)
Name (Text)
Point of Contact (Text)
Account Executive (Text)
Business Development Director (Text)
Program Director (Text)
Project Manager (Text)
Estimated Project Value (Decimal)
Estimated Project Start Date (Date Time)
Comments (Memo)
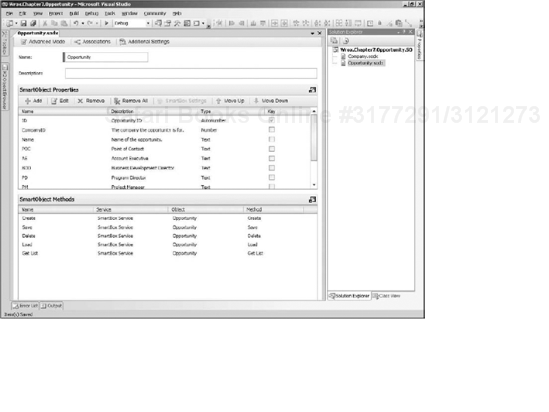
Figure 7-7 shows the completed Opportunity SmartObject. Take note of how quick it was to design both the Company and Opportunity SmartObjects. Code was not needed, and both are ready to be used anywhere once they have been deployed. Since these SmartObjects are using the SmartBox Service by default, when they are deployed, tables are generated in the SmartBox database, and data can be retrieved from and written to these tables.

If you review the requirements for this opportunity process, you will see it was stated that there is a relationship between Company and Opportunity. An association can be created between both the Company and Opportunity SmartObjects. An association can be created immediately if both SmartObjects are in the same project. It is possible to create associations between SmartObjects in different projects; however, they both must be deployed first. When creating an association between Company and Opportunity, it does not matter which SmartObject is selected in the designer as both will have their definitions updated. If the SmartObjects were in a different project, understand that the definition of the second SmartObject will be updated on the server and that you will need to synchronize that SmartObject definition with the other project. To create an association, click the Associations button, and the Add SmartObject Associations window appears. Figure 7-8 shows the Add SmartObject Association window.

Click the Add button and the Association Wizard appears (see Figure 7-9). Click the Next button, and find the SmartObject to associate to by clicking on the ellipse. The Context Browser appears. This is where the designer can drill down and find the Company SmartObject. Initially, the Context Browser shows only SmartObjects that have been deployed to the server. A node called Local appears for SmartObjects that are in the project that have not yet been deployed.

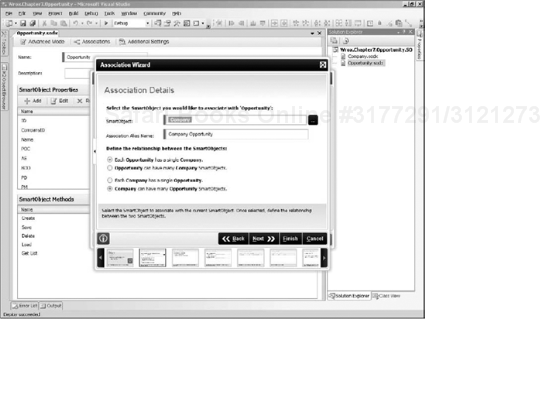
Once you select the Company SmartObject, the association cardinality between it and the Opportunity can be defined (see Figure 7-10). In this case, the "Each Opportunity has a single Company" and "Company can have many Opportunity SmartObjects" should be selected, in essence creating a one-to-many relationship between Company and Opportunity SmartObjects similarly to what would be done in a database constraint with a primary and foreign key.
The next step in the wizard is where the Association Type between the Company and Opportunity can be selected. Figure 7-11 shows there are two options: Automatically associate SmartObjects or Manually associate SmartObjects on existing properties. If the first option is selected, the wizard creates new properties on the SmartObject to create a foreign-key relationship between the Company and Opportunity SmartObjects. However, automatic association is not needed because the CompanyID property has already been created on the Opportunity SmartObject. In this case, the manual option should be selected.

Figure 7-12 is the Association Mappings step of the wizard, where the CompanyID property of the Opportunity SmartObject needs to be mapped to the ID property of the Company SmartObject. Click the Assign button and a prompt appears with all of the properties from the Company SmartObject. Select the ID property. Through this action, an association between the Company and Opportunity SmartObjects is created.

Now you have seen how simple it is to create an association between a Company and an Opportunity SmartObject. If you noticed, creating associations is similar to creating a foreign-key relationship between two tables in a database. Creating associations between SmartObjects is a good practice because these associations can later be leveraged in such things as the Report Designer in the K2 Workspace.
By default, all SmartObjects are configured to use K2's SmartBox Service, which is based on SQL Server. The SmartBox database is a single database instance that is created when K2 blackpearl is first installed and configured. When SmartObjects are deployed, the SmartBox database has a table dynamically generated for each SmartObject. By default, SmartBox SmartObjects are configured to use five methods:
Create: Runs a create SQL statement.
Save: Runs a select SQL statement and returns a single column of data.
Delete: Runs a delete SQL statement.
Load: Returns a select SQL statement returning a single record.
Get List: Returns a select SQL statement and returns many records.
Figure 7-13 shows all of the methods for a SmartObject that is initially using the SmartBox Service. Note the Service column states which SmartObject Service type it is using, and the methods are shown, too.
It is important to understand the inner workings of the SmartBox database with SmartObjects. The dynamically generated database table for the SmartObject is updated every time the SmartObject is redeployed. When new properties are added to the SmartObject, a new column is created on the existing table. If the data type or name of a SmartObject property were to change, this would result in a new column being created in the database. If a property is ever removed, the existing column in the database table is not deleted. This is to support version control of the SmartObject that uses the SmartBox. The SmartBox makes no assumptions on what processes or applications are using it, and it ensures that all callers of the SmartObject can continue to use it even though its data model may have changed.
The SmartBox is a fantastic tool that allows you to create SmartObjects without having to consider how to build a database and a data persistence tier to store the data. Even if you are nontechnical, you are empowered with the ability to create data objects and start hooking them into your workflows.
SmartObjects that use the SmartBox are scalable from a performance perspective. Using SmartBox SmartObjects saves significant time in a project plan, literally taking the time down to minutes to create a SmartObject and having it use data from SQL Server. Also, SmartObjects using the SmartBox are backward compatible with all versions of callers that may use them.
However, there are some tradeoffs that must be considered when using the SmartBox versus a traditional database design approach.
First, the table names and columns cannot be controlled and cannot be changed to adhere to naming conventions that may be instituted within an organization.
Second, data tables cannot be organized logically based on their context. Usually, when you are building an application, a new database is created for the application. Typically, an accounting system only has accounting data in the database. When you are using the SmartBox, all data is stored in the same database, regardless of its business context.
Third, database administrators may have specific security mandates they put on a database such as "all data must be accessed through a stored procedure and not from a table directly." This is not the case with the SmartBox.
Fourth, custom databases cannot be used with the SmartBox, and only one instance of the SmartBox database can be created. There are plans to greatly improve this in future releases.
These tradeoffs are not limitations to the SmartObject framework, just to the SmartBox implementation itself. The primary goal of the SmartBox is to empower you to quickly hook into an external database and use it within your K2 processes. A secondary goal of the SmartBox is to support composite SmartObjects. For instance Active Directory (AD) may not contain all the data needed to make a business decision, and changing the schema of AD may not be possible. A similar example would be an application server that has a database, but the database schema is "owned" by the software vendor and cannot be changed (that is, they will not support the software if any changes are made to their database schema). The SmartBox is designed so that you can get around this issue by creating composite SmartObjects that use both AD and product data with SmartBox data.
There are several other SmartObject Services that are provided by K2 and the K2 community that provide the ability to work with enterprise data. For instance, a SharePoint SmartObject Service provides access to much of the data within SharePoint, and you can build SmartObjects for them in the same manner as building a SmartObject that is using the SmartBox Service. In the case of a SmartObject using the SharePoint SmartObject Service, a SmartObject treats a SharePoint list like a table of data. As mentioned before, SmartObject Services can be custom written to access products like SAP, Oracle, SQL Server, Business Objects, COGNOS, and so on. There are literally no limitations on where the data can originate from or go to because the SmartObject Service platform is built on a facade pattern.
For this example, to support the requirements for the Opportunity process, you need to create an OpportunityEmployee SmartObject. This SmartObject could use the SmartBox; however, much of the data needed, such as the e-mail address, Active Directory account, first name, and last name are already stored within an Active Directory. K2 provides an Active Directory SmartObject Service with methods that can be used to retrieve data from the Active Directory.
To create a new employee SmartObject that will use Active Directory, add a new SmartObject to the project and name it OpportunityEmployee. By default, all new SmartObjects use the SmartBox. Therefore, the first step is to configure the SmartObject so that it does not use the SmartBox. As shown in Figure 7-14, clicking on the Advanced Mode button in the SmartObject Designer allows you to reconfigure the SmartObject so that it does not refer to the SmartBox. After clicking the Advanced Mode button, two things change:
First, a column is added to the SmartObject Properties called SmartBox. This provides the designer the ability to mark which properties of the SmartObject will use the SmartBox and which properties will not. It is possible that a SmartObject may have some data originate from the SmartBox, while other data originates from other locations.
The second change is that a toolbar is added to the SmartObject Methods section that allows you to add other SmartObject Service methods. Notice that, by default, all of the methods for the SmartObject are configured to use the SmartBox.

The first thing you need to do for the OpportunityEmployee SmartObject is to add properties. Add the properties shown in Figure 7-15 to the SmartObject, and make sure that the SmartBox checkbox is not checked. This ensures that the SmartBox is not used because these data fields should be mapped from Active Directory.

The OpportunityEmployee SmartObject needs three methods, one to get employee details, one to get an employee's manager, and another to get all users in an Active Directory Group. Since this SmartObject is not using the SmartBox, the default methods should be removed by clicking the Remove All button in the toolbar of the SmartObject Methods section.
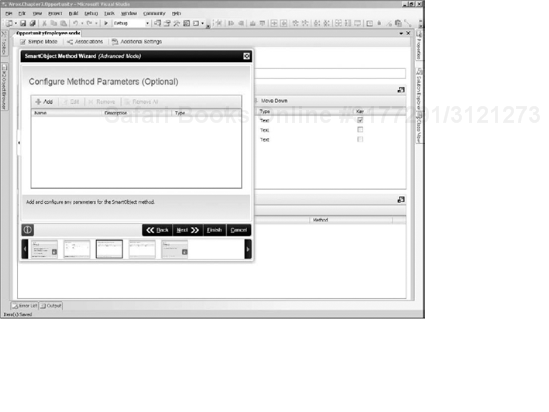
To populate the OpportunityEmployee SmartObject with data, you must configure it to work with the Active Directory SmartObject Service method. The first method loads all the data based on the primary key of the SmartObject. The primary key of the OpportunityEmployee SmartObject is a text field that will contain the Active Directory account name of the employee. The Active Directory SmartObject Service method uses the account name to retrieve detail information such as full name and e-mail address. A new method is added by clicking the Add button, which starts the SmartObject Method Wizard (see Figure 7-16). When the wizard begins, select the checkbox to run the wizard in Advanced Mode. This wizard then runs in Advanced Mode to show all configuration screens that are part of the wizard. When you are creating SmartObjects that require custom parameters or composite SmartObjects, you need to run the SmartObject Method Wizard in Advanced Mode.

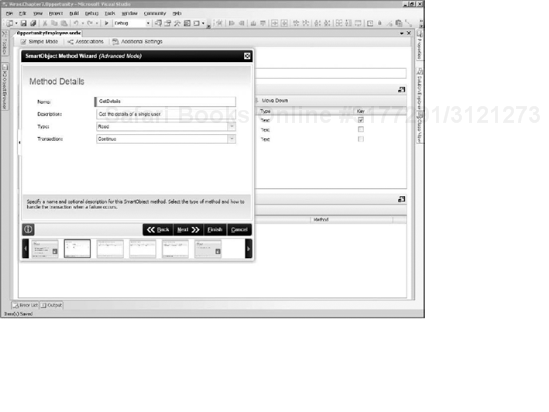
Figure 7-17 is the Methods Details step of the wizard. Here is where you set the Name of the method to GetDetails and the Type to Read. There are several other method types you can select, for example, Create, Update, List, Execute, and Delete. This type must correspond to the type of service method that is selected. It is not possible to select a Read type if the service method is an Update type. The default value for the Transaction field should be set to Continue, since this is a Read method. If an exception occurs during execution of the transaction, the Transaction field controls the behavior of the method. If this method is an Update or Delete method, where complex commits must succeed across multiple service methods, the Transaction type can be set to Rollback. However, the SmartObject Service must implement rollback procedures in order to support this.
The Configure Method Parameters step of the wizard is used to add parameters, which are used to provide values from the SmartObject in a SmartObject Service method (see Figure 7-18). This step will be shown only if the wizard is running in Advanced Mode, and it is optional. You should use this step when you have a value that is not a property of the SmartObject and must be provided to a SmartObject Service method. In the case of the GetDetails method, the ID property of the OpportunityEmployee SmartObject will have the account name, so this step does not need to be used. Press the Next button to go to the next step in the wizard.
The Service Object Methods step of the wizard is where the configuration to the Active Directory Service occurs. Currently, there are no methods that have been assigned to the SmartObject. Figure 7-19 is the screen where methods can be added by clicking the Add button.

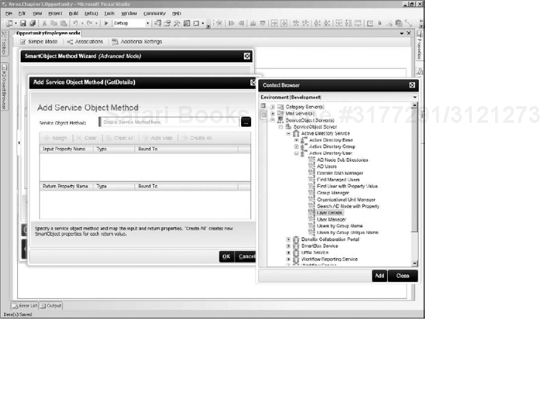
The Add Service Object Method window appears as shown in Figure 7-20, and this is where you can select a SmartObject Service method to be used by the SmartObject. Clicking the ellipse next to the Service Object Method field opens the Context Browser. In the Context Browser there is a node called the ServiceObject Server(s) that shows all of the SmartObject Service instances running on the server. Among others in Figure 7-20, there is an Active Directory Service, a SharePoint Service instance called Denallix Collaboration Portal, and a SmartBox Service Instance. Within each Service instance are Service Objects. In the case of the Active Directory Service instance there is the Active Directory Base, Group, and User Service Objects. Service Objects are no more than a logical grouping of Service Object methods. In the case of the Active Directory User Service Object, there are methods associated to getting user information from Active Directory. To get data about the user, in the Context Browser, open the ServiceObject Server(s) node, drill down to the Active Directory Service, open the Active Directory User node, and add the User Details method. This method then returns the core data associated with a user who is stored in Active Directory.
Clicking the Add button closes the Context Browser, and the Input and Output Properties of the method are filled in. Figure 7-21 shows all of the input and output parameters of the User Details Service Object method. The parameters of the Service Object method need to be mapped to the OpportunityEmployee SmartObject properties. The Auto button maps all of the method properties to SmartObject properties if they have the same name. In this case, clicking the Auto Map button maps only the e-mail property, and the other ones have to be manually mapped. The Account Name input property has a star next to the name to signify that it is required and must be mapped or populated with data.
There is also a Create All button. If this button were clicked, a property would be generated on the SmartObject for each and every Input and Return parameter of the Service Object method. This is useful if the properties of the SmartObject were not defined prior to adding the Service Object method or if there are lots of parameters that need to be read into the SmartObject. The one disadvantage of this is that the properties of the SmartObject will have the same name as those of the Service Object method parameters, which may not always be desirable.

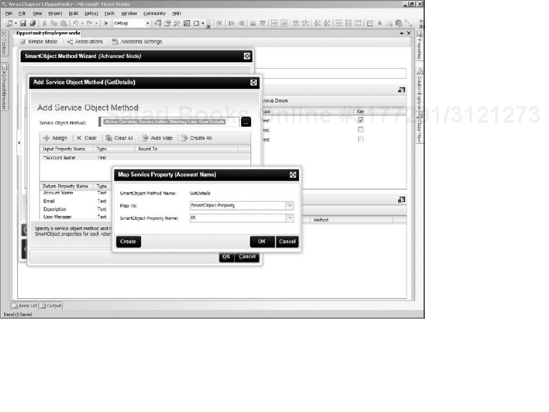
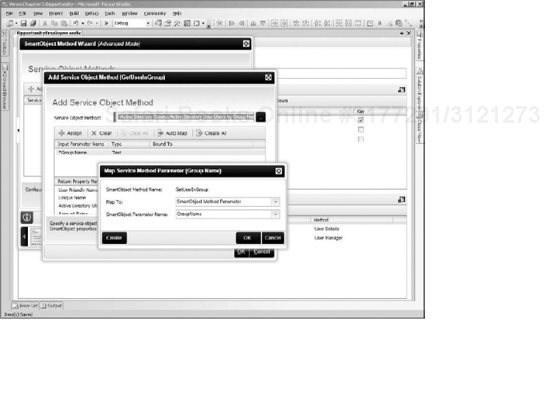
To map the ID and the display name, select the property and then click the Assign button in the toolbar, which opens the Map Service Property window (see Figure 7-22). The Map To field is used to map where the data will be pulled from. Data can come from a SmartObject method parameter, a SmartObject property, a system value, or a specific value that can be hardcoded. In this case, select SmartObject Property in the Map To field, and in the second drop-down, select the property on the SmartObject. The Account Name parameter needs to be mapped to the ID, while the User Friendly Name parameter must be mapped to the Name. Once this is done, the Add Service Object window should be closed. After these mappings have been completed, the wizard is finished, and the SmartObject can query and update data from Active Directory.
At the K2 Underground Web site there is a tool called the Amazing K2 SmartObject. What this does is generate SmartObjects-based SmartObject Service method definitions. This can save you several manual steps if there are lots of fields that needed to be mapped to the SmartObject.
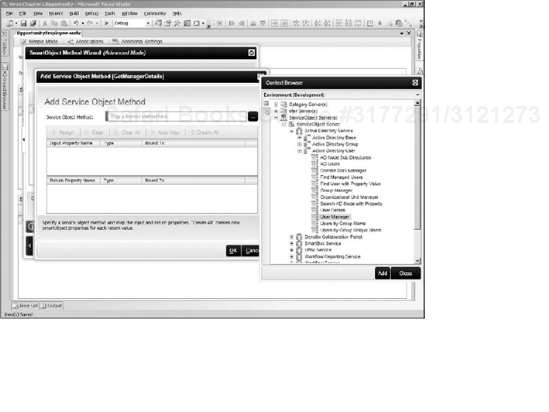
The second method that you need to add is a method that gets a user's manager from Active Directory. This may not make sense for every organization because Active Directory may not be the place where this type of data is stored. Also, depending on the business process that will use the SmartObject, an employee may have different managers. To add this method, click Add Method on the SmartObjects Methods toolbar and name the method GetManagerDetails. Complete the same steps as laid out in the GetDetails method; however, when you are selecting the Service Object method, select the User Manager method from the Active Directory service (see Figure 7-23). Complete the same prior mapping and complete the wizard.
It is important to point out that in the
GetDetailsmethod, the User Details service method does return a User Manager property. This cannot be used because it returns the display name of a manager from Active Directory, not the account name. The account name is needed to make that person a destination user in a process activity.
The third method you are going to create retrieves all users in an Active Directory group. This method is very similar to the GetDetails method. Again, click the Add button to start the SmartObject Method Wizard and run the wizard in Advanced Mode. Name this method GetUserInGroup and in the Type drop-down, select List. List must be chosen because this method is going to return more than one record. In contrast to the earlier methods, this time the Configure Method Parameters step of the wizard must be used. In this case (see Figure 7-24), you need to add a parameter for the name of the Active Directory group. The name of the Active Directory group is not a property of the OpportunityEmployee SmartObject, and because of this fact, the parameter must be added. As shown in Figure 7-24, a parameter named GroupName is created.

When you are configuring the Service Object method, this time select Get Users by Group Name service method and map all of the properties in the same fashion as the prior two methods. The one exception is that the Group Name input parameter needs to be mapped to the SmartObject method parameter called GroupName that was created in the previous step. Figure 7-25 shows the parameter window that is used to set the group name into the SmartObject Service method.
Once you have completed all of the steps, the SmartObject should be similar to the following Figure 7-26. In the SmartObject Methods section, only the three methods that were created are configured. From here, you can see the name of the OpportunityEmployee method and what SmartObject Service method it is mapped to.

The purpose of this section was not to just show you how to connect a SmartObject to an Active Directory SmartObject Service; it was to show you various ways in which a SmartObject can call a SmartObject Service method. This section covered only SmartObject Services that were performing Read transactions; however, all other method types would be done in the same manner. What this SmartObject Wizard method facilitates is the configuration of how values are moved back and forth between a SmartObject and a SmartObject Service data provider.
One of the value-adds of using SmartObjects is that creating SmartObjects that connect to multiple data sources is a trivial task. SmartObjects are completely decoupled from the implementation, and K2 blackpearl provides an extremely flexible design environment that allows you to easily model business entities. You are required to use the SmartObject service facade to retrieve data.
Historically, developers had to create solution-based data access tiers, and they would rarely be consistent in their implementation. In these solutions, developers would commonly create complex mapping tools that would map properties of an object to columns in a database table. One common way of doing this is using an XML file and using reflection to get all of the data out of the objects so that they could be committed to a database. Even worse, most of the time, there would be no mapping code, and the logic to write to one table or another would need to be hardcoded. These are typically called Object Relational Mapping (ORM) tools. Sometimes a third-party tool would be purchased, open-source frameworks like Hibernate would be used, and now Microsoft provides LINQ and Entity as part of .NET 3.5.
The SmartObject framework is inherently not an ORM; it is a framework to build data service facades that provision data. The SmartBox Service implementation does provide a lot of the features present in ORM. The value proposition of SmartObjects is their ability to integrate with K2 processes in the visual designer. There is no reason why a SmartObject Service cannot be written using LINQ or some other third-party ORM. It does introduce a new layer into the architecture; however, not all data sources will be accessible by LINQ. Using SmartObjects creates a consistent interface for retrieving data and using that data in K2 processes. Notice that while these SmartObjects were being created, there was no mention of the K2 process, the user interface, or any other tier of the architecture. This demonstrates that this is truly interface-driven development.
A mentioned earlier, a very common example for creating a composite SmartObject is when an OpportunityEmployee SmartObject may need to retrieve data from both Active Directory and a Human Resources database. Figure 7-27 shows a SmartObject that has a method called GetDetails that is reading from two different SmartObject Service methods. To create composite SmartObjects, you simply select the GetDetails method of the OpportunityEmployee SmartObject in the designer, and in the wizard add another service method that connects to the Human Resources database. When GetDetails is called, both the Active Directory and the HR database are used to fill the SmartObject, effectively creating a view from disparate locations. The only thing that is required is a common field across both the Active Directory and the Human Resources database. There is nothing done specifically to make the SmartObject a composite one; it is just termed composite because it has a method that uses multiple service methods.

By contrast, associations, which were introduced earlier in the chapter, are not the same as creating a composite SmartObject. Associations are simply a reference created between two SmartObjects, similar to a foreign-key relationship between two database tables. With SmartObjects associations, you can build relationships between SmartObjects; however, they are not enforced at the database layer because the SmartObject may not be using a database to load data. The SmartObject's associations are enforced by the SmartObject server. The nice thing about this is that SmartObject associations can be created across data sources that may reside on different platforms.
Performance must be taken into consideration when modeling both composite SmartObjects and associations. If you understand that the SmartObject data access layer is executing the filtering and joining of data, it may not be wise to retrieve hundreds of thousands of records from various data sources and join them together in SmartObjects. SmartObjects should not be positioned as a way to get around making an investment in a data warehouse. Keep in mind that the purpose of SmartObjects is to provision data and provide developers a quick way to access data and perform operations on that data.
Another powerful attribute of SmartObjects is their ability to support a dynamic and agile environment. Because SmartObjects provide a plug-and-play environment, if the data source of the SmartObjects needs to change, applications using the SmartObject will not be affected. For instance, if it is decided that both the Company and Opportunity SmartObjects should be connected to a Customer Relationship Management (CRM) database, the SmartObjects can simply be modified to use a SmartObject service that accesses the CRM database.
After a SmartObject has been deployed, you can download the SmartObject's definition directly from the SmartObject server, modify it, and then upload it back to the server. This can be accomplished by going to the SmartObject in the K2 Object Browser, right-clicking the SmartObject, and clicking the Save as Local menu item. The .sodx file that was deployed to the server can then be saved locally and modified. It is important to still be using a source code control application to manage the .sodx files.
SmartObjects can be deleted from the server using the K2 Object Browser. Again, right-click on the SmartObject, select delete, and it is removed. It is again important to plan on how the delete of the SmartObject may affect applications that are referencing it.
SmartObjects can be used anywhere inside of a K2 process when data is needed. They can be called upon to accomplish a ton of activities; from calling the methods to performing a standard operation like saving data or making a Line Rule decision. This section covers a few common ways in which SmartObjects can be used within a K2 process.
Figure 7-28 shows a simple K2 process that needs to be wired up to use SmartObjects. There are some very simple business rules that need to be implemented.
First, an Opportunity record needs to be created in a database using a SmartObject.
Second, if the expected amount of the Opportunity will be greater than $500,000, the manager of the account executive needs to be notified and make a decision whether to approve or deny the Opportunity. To implement this:
A SmartObject Event will be used to create a record in the database.
The Line Rule from the Create Record activity to the Review Opportunity activity will be modified to retrieve the Opportunity dollar amount and check to see if it is greater than $500,000.
The Send Email Event in the Review Opportunity activity will be used to retrieve the e-mail address of the Account Executive's Manager.
Finally, the Destination Rule for the Review Opportunity activity will be updated to retrieve the Account Executive's Manager in order to assign the Approve Opportunity worklist item to that user.

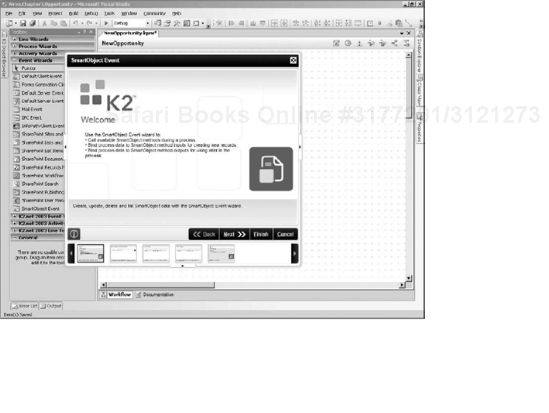
To use a SmartObject Event in a K2 process, drag-and-drop a SmartObject Event onto the design canvas from the toolbox, as shown in Figure 7-29. This starts a SmartObject Event Wizard, as you can see in the figure. A SmartObject Event allows the designer to run any method of a SmartObject. A SmartObject Event can be used to get data, create a new record in a database, and update or delete data. Remember, though, SmartObject methods are not scoped to doing just database operations. SmartObject methods can be a proxy to other enterprise services. The SmartObject Event supports the execution of any SmartObject method.
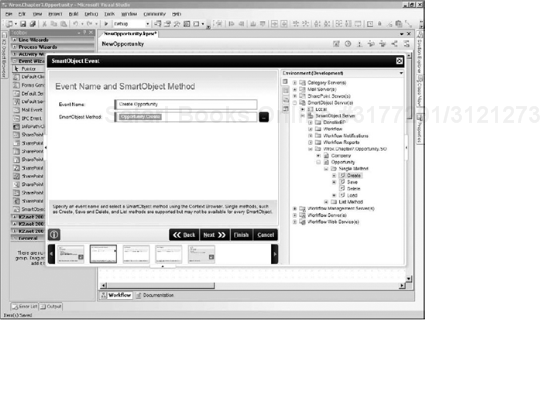
To start, change the name of the event to Create Opportunity and then click on the ellipse next to the SmartObject method, which opens the Context Browser. This is where the designer searches for the SmartObject method. In the Context Browser, open the SmartObject server(s) node and drill down to the Opportunity SmartObject, select the Create method, and press the Add button. Figure 7-30 shows that the Opportunity.Create method has been selected.
When you move to the next step in the wizard, all of the parameters of the SmartObject method will be visible, and this is where you can set values. You can select a parameter of the SmartObject method and then press the Assign button. Figure 7-31 shows the Assign Mapping window where a value can be set. You can then click the ellipse to open the Context Browser and select any data field that is available in the K2 process. For example, XML from an InfoPath form, Process or Activity fields, another SmartObject, or a static value can be set.

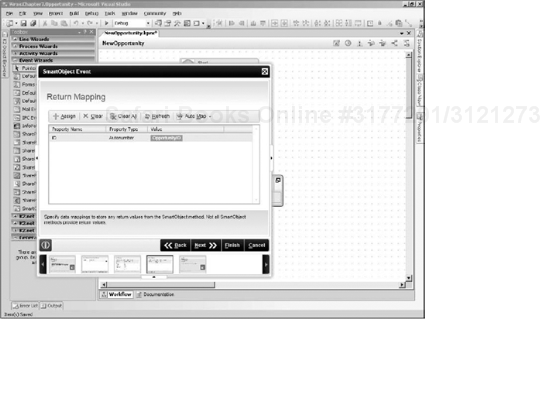
Once all of the input parameters have been set, the next step in the SmartObject Event configuration is the Return Mapping screen. This allows you to take any values returned and store them locally in the process. Since this event is using the Opportunity Create method, the auto-generated ID of the new SmartObject is returned. This value should be stored in the K2 process so that it can be used later for update or read operations. In this case, assigning the Opportunity ID to a process field can allow for this SmartObject to be loaded later using that ID. Figure 7-32 shows that the OpportunityID field of the process has been mapped to the ID return value.
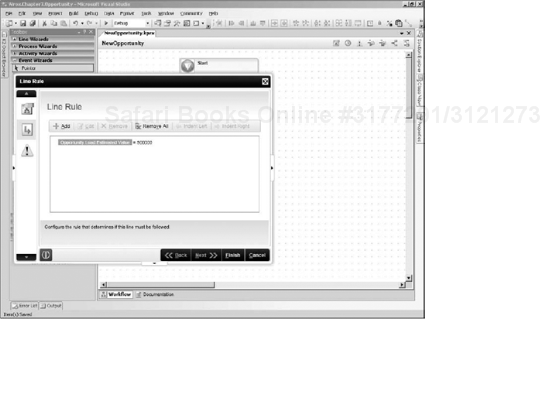
In the example you are using, if the amount of the Opportunity is greater than $500,000, the Review Opportunity activity must be executed. To do this, the Line Rule is modified to get the Opportunity SmartObject, using the ID that was earlier stored in the K2 process field. To implement this, right-click on a line, select Properties, go to the Line Rule tab, and click the Add button to open the Add/Edit Rule window. Figure 7-33 shows the Line Rule window that has no rules specified yet.

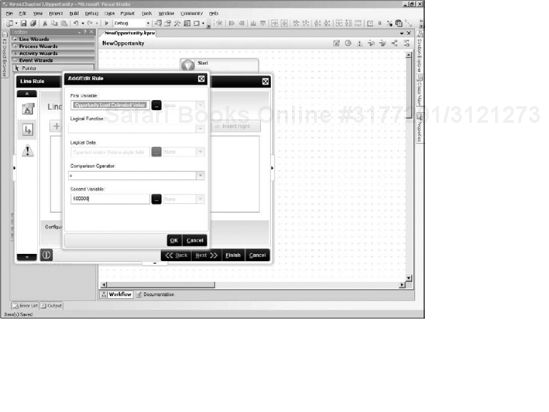
Figure 7-34 shows the Add/Edit Rule window where designers and design conditional logic statements are visually displayed. In this case, the Opportunity SmartObject amount needs to be retrieved and then checked to see if it is over $500,000. To do this, click the ellipse next to the First Variable to open the Context Browser. Use the Context Browser to locate the Opportunity SmartObject, select the Estimated Value property underneath the Load method, and click the Add button.

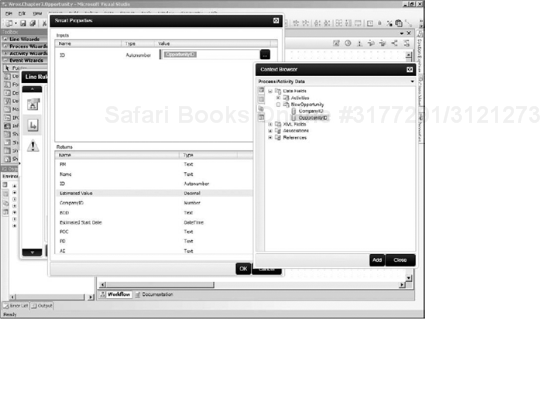
This opens the Smart Properties window, allowing you to set the Key identifier fields of the SmartObject shown in Figure 7-35. In this case, you need to set the ID of the Opportunity. In the Inputs section of the window, press the ellipse next to the ID to open the Context Browser. Instead of finding a SmartObject, select the Process/Activity Data tab and get the ID of the Opportunity SmartObject that was saved earlier. Click the Add button and then click the OK button on the Smart Properties window. Now the Opportunity ID that was saved earlier is being used to look up the Estimated Project Value.
To complete the rule in the Add/Edit Rule window, simply finish the form to check if the value of the Opportunity is greater than $500,000 (see Figure 7-36). If you wanted to make sure that the $500,000 value was not hardcoded, you could load that value from another SmartObject or from an Environment field.
It is a best practice to avoid hard-coding values wherever possible in a business because the business process can always change. If a change was to occur and a value like this was hardcoded, the entire business process would have to change, and then be redeployed. And that still does not account for running process instances that may have to be restarted so that they will adhere to the new rule. However, if the value were dynamic, all that would need to be changed is the amount.
Once this form is complete, click the OK button and the Line Rule has now been configured to retrieve data using a SmartObject.
Figure 7-37 shows a completed Line Rule that has been configured to use a SmartObject method. Notice that the Opportunity.Load.EstimatedValue is displayed. This communicates which field of the SmartObject method is used to compare to the dollar amount of $500,000.
This section shows how you can use a SmartObject to have an e-mail sent to the Account Executive's Manager who is responsible for the Opportunity. Figure 7-38 shows the E-mail Settings window of a Mail Event. Click the ellipse next to the To field to open the Context Browser, and drill down to the OpportunityEmployee SmartObject. Click the GetDetails method, select the Email property, and then click the Add button. This will retrieve the e-mail address for a user; however, this is not complete.

After you select the e-mail address property, the Smart Properties window opens (see Figure 7-39). This is where you must set the Account Executive Manager's ID. To get that value, you must find the Account Executive for the Opportunity. Click the ellipse next to the ID field in the Inputs section to open the Context Browser. This time, go to the OpportunityEmployee SmartObject again and select the ID field for the GetManagerDetails method.

When you select the ID of the Manager, another Smart Properties window opens (see Figure 7-40). In this window, again go to the ID field and click the ellipse, but this time, go to the Opportunity SmartObject to find the Account Executive for the Opportunity. Locate the Load method, click the AE field, and then click the Add button. At this point you have the e-mail address for the Account Executive's Manager, but you have not set the Opportunity.

A third Smart Properties window appears (see Figure 7-41), and in this window, you need to set the Opportunity ID from the K2 process. This time for the ID field, click the ellipse to open the Context Browser and find the OpportunityID in the Process/Activity Data tab. Click the Add button.

Click the OK button on all the Smart Properties windows to complete the lookup of the Account Executive's Manager based on the OpportunityID of the process. Assigning the destination user for the Review Opportunity activity requires the same steps to get the Account Executive's Manager e-mail address; however, instead of selecting the e-mail address, the ID should be selected.
These configuration steps are similar to writing a SQL join clause where the OpportunityEmployee and Opportunity SmartObjects are joined together to find a specific value. This demonstrates the real power of using SmartObjects inside of a K2 process. You have a visual experience where you can configure the K2 process to obtain data to make business decisions. In the E-Mail Event configuration example, you can use SmartObjects to obtain data across multiple data sources and have the data access layer completely hidden from you. In this example, Active Directory and SQL Server databases were used together to retrieve an e-mail address.
SmartObjects are not just used by the designers as a way to access data in a K2 process; SmartObjects are used throughout the K2 platform. For instance all of the reports in the K2 blackpearl Workspace use SmartObjects. Also, when a K2 process is deployed, SmartObjects are dynamically generated using the process definition. These SmartObjects are able to perform operations on the process like starting a new process instance. There will be other SmartObjects that are created geared specifically towards supporting reporting on the K2 process. This section discusses SmartObjects as they relate to the process.
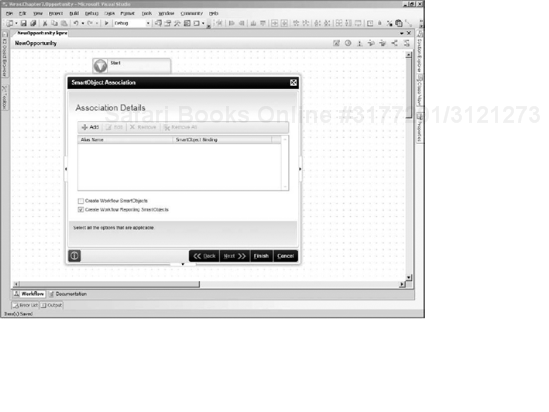
When a process is deployed to the K2 server, K2 provides an option to dynamically generate SmartObjects based on the definition of the process. To control whether these SmartObjects are created, click on the SmartObject Association icon above the process canvas and the SmartObject Association window appears, as shown in Figure 7-42. There are two checkboxes, the first is Create Workflow SmartObjects and the second is Create Workflow Reporting SmartObjects, which is checked by default. The Reporting SmartObjects option is checked by default to support reporting in the K2 Workspace. If this is not checked, reports for the process are not supported. The Workflow SmartObjects checkbox is not checked because they are not required unless you have external applications that are going to be created to call the K2 process.
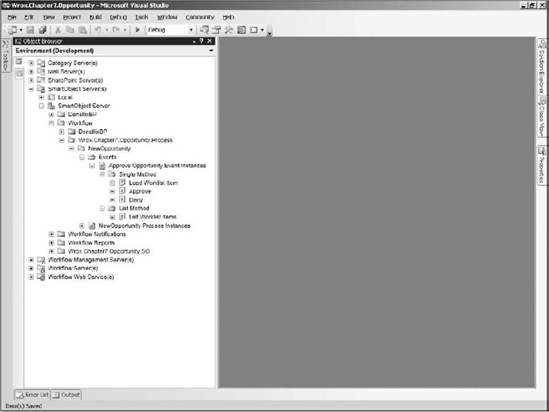
Checking the Create Workflow SmartObjects and then deploying the process results in SmartObjects being dynamically generated based on the process definition. Figure 7-43 shows the K2 Object Browser where SmartObjects can be found. The Workflow SmartObjects are located underneath the Workflow node in the SmartObjects Server(s) node of the K2 Object Browser. There are a few types of SmartObjects that are created. First, a Process Instance SmartObject is created, which has a Start Process method. All of the process data fields are exposed along with the Folio and the Process Instance ID.

Figure 7-44 shows the Events folder, which is underneath the Process SmartObject folder. Only client-based events are created; none of the server-side events are exposed through a SmartObject. For every Event Instance SmartObject, there is a List Worklist Items method and a Load Worklist Item method as well as methods for each Action that is configured for the client event. In Figure 7-44 the Approve Opportunity Event Instances SmartObject has been created. There are the two Worklist methods and a method for each action that can be taken on the client event. The methods for the actions are dynamically generated each time the process is deployed.
These Process and Event Instance SmartObjects provide the ability to perform standard operations that external applications may need to refer to. For instance, a custom ASP.NET dashboard page or a SharePoint Web part can start a K2 process and show all Worklist items based on these methods. In addition, these custom Web pages can use these SmartObject methods to allow users to complete actions. This can be done through the K2 API. However, an interesting point to highlight is that SmartObjects can be exposed as Windows Communication Foundation (WCF) endpoints, which are discoverable through Universal Description Discovery and Integration (UDDI). This would then allow these methods to be called from non-Microsoft platforms.
If the Create Workflow Reporting SmartObjects checkbox is checked, SmartObjects used for reporting are generated when the process is deployed. To view the Process Reporting SmartObjects, go to the K2 Object Browser and find the Workflow Reports folder underneath the SmartObject server(s) node, as shown in Figure 7-45. Within that folder, open the Workflow Solutions folder. Underneath that is a folder for each and every K2 solution deployed. Underneath the solution folder is a process folder that has activity and event folders that correspond to all the activities and events defined on the process (whether they are server-side or not).

Note that if the process has lots of activities and events and the reporting SmartObjects are being created, the deployment of the process will slow down. Removing the creation of these SmartObjects allows the deployment to go quicker, but reports will not work for the process if they are removed.
Figure 7-46 shows the generic reporting SmartObjects in the K2 Object Browser. These SmartObjects expose all of the data from the K2 process database.

Process SmartObjects can be associated with other SmartObjects that have been deployed. For instance, the OpportunityProcess SmartObject could have an association to the Opportunity SmartObject using the OpportunityID process field. To add an association to the Opportunity SmartObject, go to the SmartObject Association window by clicking on the SmartObject Association icon at the top of the process design canvas. Figure 7-47 shows the SmartObject Association window where new associations can be created to existing SmartObjects.

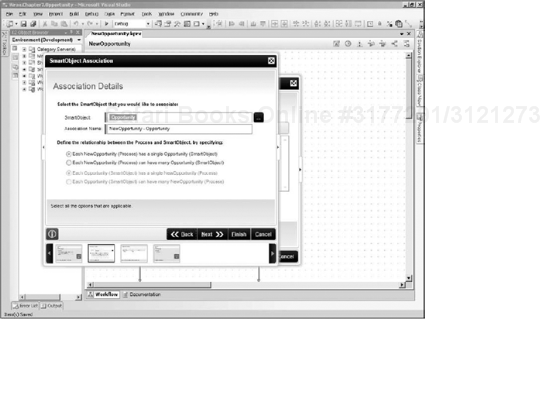
When the SmartObject Association window opens, click the Add button to find the Opportunity SmartObject using the SmartObject Association Wizard. On the Association Details step, click the ellipse next to the SmartObject field and use the Context Browser to find the Opportunity SmartObject (see Figure 7-48). Once the Opportunity SmartObject has been selected, a relationship is defined between the process and the Opportunity SmartObject. For this relationship, the process should be related to a single Opportunity SmartObject (that is, a one-to-one relationship).
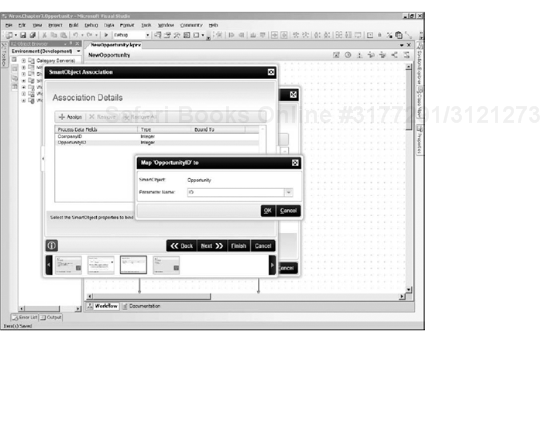
On the next Association Details step of the wizard, it lists all of the process fields that have been defined for the process. The OpportunityID field is used to bind the relationship to the OpportunityEmployee SmartObject. This effectively creates a join between the Opportunity and Process Opportunity SmartObjects. Figure 7-49 shows the OpportunityID being used to do a join to the Opportunity.ID.
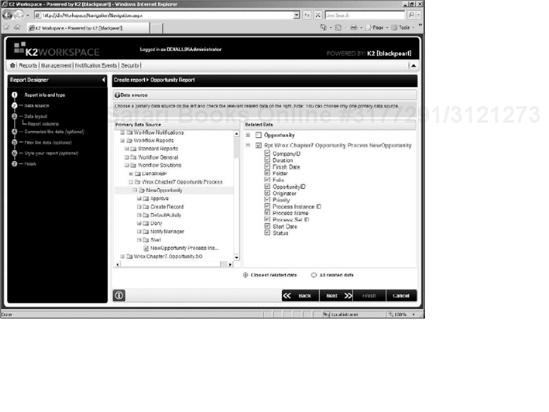
An association has now been created between the Opportunity Process and the Opportunity SmartObjects in the same way the Company SmartObject was associated to the Opportunity SmartObject. This is advantageous when executing reporting within the K2 Workspace. For instance in Figure 7-50, when you are selecting a Process Instance SmartObject in the report-building tool in the K2 Workspace, the Opportunity SmartObject is available, allowing for easy report building.
SmartObject process references can be added to a K2 process. This allows you to pick a SmartObject method that will be used many times throughout the process. There are several advantages for referencing SmartObject methods in this manner. One advantage is the SmartObject method can be quickly selected without having to use the Context Browser. Another advantage is that it creates performance efficiencies if the SmartObject method is used multiple times within a single event. If a SmartObject reference is not used, each time the SmartObject method is referenced in an event, a distinct call is made. This is important because if a SmartObject method is called in an event 20 times, there will be 20 concurrent calls made to the K2 server. That may not seem burdensome, but if there are many process instances running concurrently, and the SmartObject Service is using a data connection that cannot handle high volumes, the server can become flooded. This will not occur when a SmartObject reference is used because it will make a single call per event.
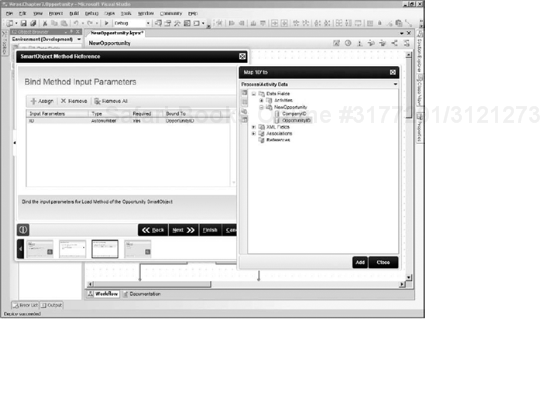
To make the reference to a SmartObject method, go the K2 Object Browser and select the Process/Activity Data tab. Right-click the References node, click Add, and the SmartObject Method Reference Wizard opens, as in Figure 7-51. On the SmartObject Details tab, find the Opportunity SmartObject method and click the Load method.

In the Bind Method Input Parameters step of the wizard (see Figure 7-52), find the ID parameter of the Opportunity SmartObject's Load method and bind it to the process's OpportunityID data field. The SmartObject Reference to the Opportunity Load method is completed, and it can be used throughout the K2 process.
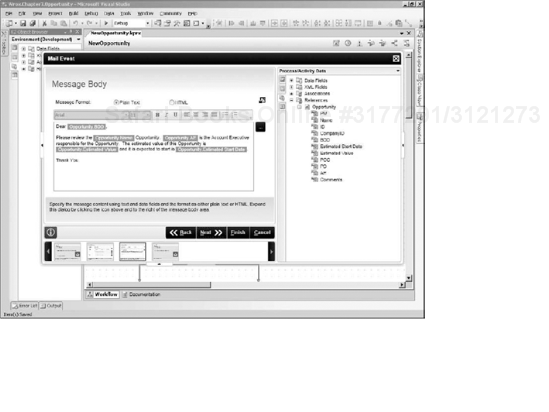
Using the SmartObject Reference to the Opportunity Load method is simple. For example in Figure 7-53, in an E-Mail Event body, open the Context Browser and go to the Process/Activity Data tab. Open the Reference node and drag-and-drop the return parameters from the Load method into the body of the e-mail. Before using the SmartObject Reference, make sure the OpportunityID has been populated. Otherwise, a run-time error will occur because the Opportunity SmartObject has not yet been created.
Up to this point, SmartObjects have been used to perform operations within a K2 process; however, SmartObjects can be easily referenced outside of K2. When you are automating a business process using K2, it is very common to have several external applications integrated with K2, such as a custom ASP.NET Web site, a Web service, or even a Windows application. Since K2 provides a data access layer that is used in the K2 process, there is no reason why it could not be reused within other applications. Using the same data services adds consistency and logic reuse throughout the entire solution. Using the SmartObject API is not difficult to learn for .NET developers because it uses many design patterns found in data access layers such as ADO.NET.
Before discussing how SmartObjects are used in code, you need to know that they are not cached. The SmartObject framework loosely follows a Proxy pattern where SmartObject methods point to SmartObject Services. Most of the time the SmartObject Services are a simple pass-through to retrieve or commit data. SmartObjects provide the ability to define entities that use the SmartObject Services. When loading a SmartObject, understand that the SmartObject is loaded when the method is executed. If data for SmartObjects needs to be cached, the SmartObject Service can be implemented to support a caching pattern or the data source itself can implement some form of caching.
However, it would be incorrect to compare SmartObjects to the Business Data Catalog (BDC), which is provided in the Microsoft Office SharePoint Server (MOSS). There are some limitations of the BDC, limitations that are not shared by SmartObjects. First, the BDC is a component of MOSS that can be used to consume read-only external data. When data exposed through the BDC is indexed by MOSS's Enterprise Search, a user performing a search will not retrieve real-time results. Users get only the data results from the last time the BDC content source was last indexed by the MOSS Search Server. Second the BDC cannot easily support insert, update, and delete operations, which is not the case for SmartObjects.
SmartObjects can be indexed as part of the Enterprise Search of MOSS. Within the Central Administration of MOSS is a K2 tab where SmartObjects can be selected and an Application Definition File (ADF) is generated. This ADF file contains Entity definitions that are used by BDC.
Creating a SmartObject instance is a relatively simple task that is started by adding references to both the SourceCode.SmartObjects.Client and SourceCode.HostClientAPI libraries found in the Global Assembly Cache. The following code creates an instance of a Company and Opportunity SmartObject. The logic flow is that a Company SmartObject is created first and then the auto-generated identifier is used from the Company in the Opportunity SmartObject.
SmartObjectClientServer server = new SmartObjectClientServer();

try
{
    //Make the server connection    SCConnectionStringBuilder cb = new SCConnectionStringBuilder();
    cb.Host = "DLX";
    cb.Port = 5555;
    cb.Integrated = true;
    cb.IsPrimaryLogin = true;

    //Create the connection
    server.CreateConnection();
    server.Connection.Open(cb.ToString());

    //Get the Company SmartObject definition
    SmartObject company = server.GetSmartObject("Company");

    //Set properties
    company.Properties["Name"].Value = "Denallix";

    //Create the SmartObject
    company.MethodToExecute = "Create";
    server.ExecuteScalar(company);

    int companyID = Convert.ToInt32(company.Properties["ID"].Value);
//Get the Opportunity SmartObject definition
SmartObject opportunity = server.GetSmartObject("Opportunity");
//Set properties
opportunity.Properties["CompanyID"].Value = companyID.ToString();
opportunity.Properties["POC"].Value = "Catherine";
opportunity.Properties["Name"].Value = "K2 Opportunity";
opportunity.Properties["AE"].Value = "Ethan";
opportunity.Properties["BDD"].Value = "Caroline";
opportunity.Properties["PD"].Value = "Winston";
opportunity.Properties["PM"].Value = "Becky";
opportunity.Properties["Estimated_Value"].Value = "500000";
opportunity.Properties["Estimated_Start_Date"].Value =
DateTime.Today.AddYears(1).ToString();
opportunity.Properties["Comments"].Value =
"This is a big opportunity with a new client.";
//Create the SmartObject
opportunity.MethodToExecute = "Create";
server.ExecuteScalar(opportunity);
}
catch (Exception ex)
{
throw new Exception(ex.Message);
}
finally
{
server.Connection.Close();
}In the code, a connection string to the SmartObject server must be created using the SCConnectionStringBuilder helper class. This class provides all the properties needed to build a connection string. Once the connection string has been created, a connection object is created using the CreateConnection() method of the SmartObjectClientServer object. The connection string from the SCConnectionStringBuilder object is passed into the Open() method.
Now that the connection has been made, the definition of the SmartObject needs to be loaded. This definition is retrieved from the SmartObject server. Once the definition has been retrieved, a method can be selected and executed. The SmartObject is then populated with instance data from the SmartObject server. There is a GetSmartObject() method on SmartObjectClientServer class that is used to retrieve the SmartObject definition. The GetSmartObject() method takes the name of the SmartObject. Once the SmartObject definition has been returned, properties can be set on the SmartObject. Properties are accessed through the Properties collection on the SmartObject.
Take note that when you are using a SmartObject that is using the SmartBox Service, the properties that have spaces in their names are replaced with an underscore.
Once all of the properties have been set, it is time to create data. The MethodToExecute property of the SmartObject is used to designate which method should be called. In this example, the Create method for both the Company and Opportunity is called. Finally, the method is executed by calling the ExecuteScalar method on the SmartObjectClientServer object. The SmartObject must be passed into ExecuteScalar, which sends the data and method to the SmartObject server to be executed. Once the method is complete, a new record should be created in the SmartBox database. In this code sample, notice that after the ExecuteScalar method is called for the Company SmartObject, the ID property is referenced. This is because the database has generated the ID, and it was returned from the Create method.
Other methods of the SmartObject can be executed in the same fashion. This would include operations such as update, delete, or read. As mentioned before, when you are performing these operations, you find no indication that the K2 SmartBox database is used. Regardless of whether SQL Server, Oracle, Active Directory, or some other data source is used, it is hidden by the SmartObject. You may also encounter instances during the lifecycle of the application that the data source may move. Such an occurrence will not affect the preceding code because the SmartObject method can simply be modified to use a different service. For instance data may originally be pulled from Active Directory but later a Human Resources database might be created to house all Active Directory data and more. To reference the Human Resources database the SmartObject method is modified to call the correct SmartObject Service, but this code here doesn't have to change.
In the previous section, you saw how data was created using the SmartObject API; however, the same operation can be done using the .NET Framework Data Providers for K2 SmartObjects. This is done by adding a reference to the SourceCode.Data.SmartObjectsClient library located in the Global Assembly Cache where K2 Studio tools have been installed. This is the same library that is used for reporting in the K2 Workspace. There are actually two ways the SmartObject can be created. One way is by executing a SQL statement; the second is by making a stored procedure call. Pay careful attention to the fact that this is not an actual SQL statement or a stored procedure. SmartObjects may or may not be using a relational database, for example, like Active Directory or a mainframe.
The two important classes used to perform these operations are SOConnection and SOCommand. The SOConnection is responsible for creating a connection to the SmartObject server, while the SOCommand is responsible for executing a command. The following code creates an Opportunity SmartObject instance, using the SQL statement approach.
SOConnection conn = null;
SOCommand cmd = null;

try
{
    //Make the server connection
    SOConnectionStringBuilder cb = new SOConnectionStringBuilder();
    cb.Server = "DLX";
    cb.Port = 5555;

    //Create connection and command
    conn = new SOConnection(cb.ToString());
    cmd = new SOCommand();
    cmd.Connection = conn;
//Insert Opportunity
cmd.CommandText = "INSERT INTO [Opportunity] (CompanyID, POC, AE, BDD, PD, PM, " +
"Estimated_Value, Estimated_Start_Date, Comments)" +
"VALUES (@CompanyID, @POC, @AE, @BDD, @PD, @PM, " +
"@Estimated_Value, @Estimated_Start_Date, @Comments)";
//Set properties
cmd.Parameters.Add(new SOParameter("CompanyID", companyID));
cmd.Parameters.Add(new SOParameter("Name", "K2 Opportunity"));
cmd.Parameters.Add(new SOParameter("POC", "Steve"));
cmd.Parameters.Add(new SOParameter("AE", "Justin"));
cmd.Parameters.Add(new SOParameter("BDD", "Nick"));
cmd.Parameters.Add(new SOParameter("PD", "John"));
cmd.Parameters.Add(new SOParameter("PM", "Helen"));
cmd.Parameters.Add(new SOParameter("Estimated_Value", 500000));
cmd.Parameters.Add(new SOParameter("Estimated_Start_Date",
DateTime.Today.AddYears(1)));
cmd.Parameters.Add(new SOParameter("Comments",
"This is a big opportunity with a new client."));
//Create SmartObject
cmd.ExecuteNonQuery();
}
catch (Exception ex)
{
throw new Exception(ex.Message);
}
finally
{
conn.Close();
}The SOConnection object is created using a connection string from the SOConnectionStringBuilder helper class, and then the SOCommand object is created using the SOConnection object. The Insert statement is very similar to SQL and is set into the CommandText property of the SOCommand object. Notice that in place of a table name is the name of the SmartObject, and instead of referring to column names, the properties of the SmartObject are used. Actual values are then set using the Parameters collection of the SOCommand object.
Finally, the ExecuteNonQuery method of SOCommand object is called, executing the insert statement. Update, delete, and select operations can all be executed in a similar fashion.
As previously indicated, the other technique of using the .NET Data Provider is to insert the Opportunity SmartObject using a stored procedure call. The following code gives an example of that technique.
SOConnection conn = null;
SOCommand cmd = null;

try
{

    //Make the server connection
    SOConnectionStringBuilder cb = new SOConnectionStringBuilder();
    cb.Server = "DLX";
    cb.Port = 5555;

    //Create connection and command
    conn = new SOConnection(cb.ToString());
    cmd = new SOCommand();
    cmd.Connection = conn;

    //Insert Opportunity Method
    cmd.CommandText = "Opportunity.Create";
    cmd.CommandType = System.Data.CommandType.StoredProcedure;

    //Set properties
    cmd.Parameters.Add(new SOParameter("CompanyID", companyID));
    cmd.Parameters.Add(new SOParameter("Name", "K2 Opportunity"));
    cmd.Parameters.Add(new SOParameter("POC", "Terri"));
    cmd.Parameters.Add(new SOParameter("AE", "Raymond"));
    cmd.Parameters.Add(new SOParameter("BDD", "Gene"));
    cmd.Parameters.Add(new SOParameter("PD", "Ethan"));
    cmd.Parameters.Add(new SOParameter("PM", "Caroline"));
    cmd.Parameters.Add(new SOParameter("Estimated_Value", 500000));
    cmd.Parameters.Add(new SOParameter("Estimated_Start_Date",
                        DateTime.Today.AddYears(1)));
    cmd.Parameters.Add(new SOParameter("Comments",
                        "This is a big opportunity with a new client."));

    //Create SmartObject
    cmd.ExecuteNonQuery();
}
catch (Exception ex)
{
    throw new Exception(ex.Message);
}
finally
{
    conn.Close();
}
In this code, the only differences are with the SOCommand object. The CommandText property is set to Opportunity.Create, which calls the Create method of the Opportunity SmartObject (format [SmartObject Name].[SmartObject Method]). Also, the CommandType property is set to CommandType.StoredProcedure. Again, any method (regardless of type) on a SmartObject can be executed in this fashion, regardless of whether the SmartObject is using a database or not.
The code for reading a single Company SmartObject is similar to the code presented earlier to insert a Company SmartObject. The following code will get a single Company SmartObject and then retrieve all of the Opportunities for the Company.
SmartObjectClientServer server = new SmartObjectClientServer();

try
{
    //Make the server connection
    SCConnectionStringBuilder cb = new SCConnectionStringBuilder();
    cb.Host = "DLX";
    cb.Port = 5555;
    cb.Integrated = true;
    cb.IsPrimaryLogin = true;
    server.CreateConnection();
    server.Connection.Open(cb.ToString());

    //Get the Company SmartObject definition
    SmartObject company = server.GetSmartObject("Company");

    //Set properties
    company.Properties["ID"].Value = companyID.ToString();

    //Get the SmartObject
    company.MethodToExecute = "Load";
    server.ExecuteScalar(company);

    //Write out Company Values
    foreach (SmartProperty property in company.Properties)
    {
        System.Diagnostics.Debug.Write(property.Name + "=" + property.Value);
    }

    //Get a list of Opportunities for a company
    SmartObject opportunity = server.GetSmartObject("Opportunity");

    //Set properties
    opportunity.Properties["CompanyID"].Value = companyID.ToString();

    //Get the SmartObjects
    opportunity.MethodToExecute = "GetList";
    SmartObjectList opportunities = server.ExecuteList(opportunity);

    //Write out Opportunities for the Company
    foreach (SmartObject companyOpportunity in opportunities.SmartObjectsList)
    {
        foreach (SmartProperty property in companyOpportunity.Properties)
        {
            System.Diagnostics.Debug.Write(property.Name + "=" + property.Value);
        }
    }
}
catch (Exception ex)
{
throw new Exception(ex.Message);
}
finally
{
server.Connection.Close();
}Again, a SmartObjectClientServer object is created, the Company SmartObject definition is retrieved, and the ID property of the Company SmartObject is set. The MethodToExecute property is set to Load, and the ExecuteScalar method is called, populating the Company SmartObject with data. The Company SmartObject uses the SmartBox service to dynamically build a query using the fields that have been set prior to the call of ExecuteScalar. In this case, a query would be built using the ID and the value that was set. Retrieving a collection of Opportunity SmartObjects for a Company SmartObject is a similar approach; however, instead of calling the ExecuteScalar method, you call the ExecuteList method to return a collection called SmartObjectList.
In the previous example the SmartObject properties were used as a filter for the selection of SmartObjects. A more effective way of doing this is by using the SourceCode.SmartObjects.Client.Filters namespace. In the following code, a query has been set up to retrieve all Opportunity SmartObjects for a company greater than a specified amount.
SmartObjectClientServer server = new SmartObjectClientServer();
try
{
//Make the server connection
SCConnectionStringBuilder cb = new SCConnectionStringBuilder();
cb.Host = "DLX";
cb.Port = 5555;
cb.Integrated = true;
cb.IsPrimaryLogin = true;
server.CreateConnection();
server.Connection.Open(cb.ToString());
//Get Opportunity Definition
SmartObject opportunity = server.GetSmartObject("Opportunity");
//Get the List Method
SmartListMethod getList = opportunity.ListMethods["GetList"];
opportunity.MethodToExecute = getList.Name;
//Find all Opportunities for a specified company
Equals companyEqual = new Equals();
companyEqual.Left = new PropertyExpression("CompanyID", PropertyType.Number);
companyEqual.Right = new ValueExpression(companyID, PropertyType.Number);//Find all Opportunities greater than a specified amount
GreaterThan amountGreater = new GreaterThan();
amountGreater.Left = new PropertyExpression("Estimated_Value"
PropertyType.Decimal);
amountGreater.Right = new ValueExpression(amount, PropertyType.Decimal);
//Get the Opportunities for a Company Greater than a specified amount
And and = new And();
and.Left = companyEqual;
and.Right = amountGreater;
//Apply the filter
getList.Filter = and;
//Get the data
SmartObjectList opportunities = server.ExecuteList(opportunity);
//Write out values
foreach (SmartObject companyOpportunity in opportunities.SmartObjectsList)
{
foreach (SmartProperty property in companyOpportunity.Properties)
{
System.Diagnostics.Debug.Write(property.Name + "=" + property.Value);
}
}
}
catch (Exception ex)
{
    throw new Exception(ex.Message);
}
finally
{
    server.Connection.Close();
}First the Opportunity SmartObject definition is retrieved and then the GetList method of the SmartObject is referenced using a SmartListMethod object. Then an Equals filter object is created, which has both a PropertyExpression and ValueExpression objects set to it. The PropertyExpression object is used to reference the ComapnyID property of the Opportunity SmartObject, while the ValueExpression contains the value that will be searched on. The next filter used is a GreaterThan filter, which checks to see if the Estimated_Value is greater than a certain amount. Once both of the filters have been created, they are put together in an And filter, which is set into the Filter property of the SmartListMethod object. Then the SmartObjects can be retrieved just as before by calling the ExecuteList method.
There are several more types of logical filters that can be created. The available logical filters are And, Contains, EndsWith, Equals, GreaterThan, IsNull, LessThan, Not, Or, and StartsWith. One advantage of writing code in this manner is that the code is more intuitive than the code presented in the previous section. This type of filtering can be done only on list methods, so a Load type method does not supporting filtering.
In essence what the code example is doing is building up a traditional SQL statement similar to:
Select * From Opportunity Where CompanyID = X And Estimated_Value < Y
But this SQL statement is logical because this SQL statement will not actually get built and executed. However, both the SmartObject Services and the SmartObject server use the defined filter to whittle down the results returned. First, if the SmartObject Service implements filtering, this means that it applies the filter set to the SmartObject method as previously shown. For example, to apply the filter the SmartObject service would dynamically generate SQL based upon the filter provided. The SmartBox Service does this by adding the filter to the SQL statement before it calls the database. The second place where filtering is applied is on the SmartObject server when the data is returned from the SmartObject Service. SmartObject Services return data in the form of an ADO.NET DataTable, which the SmartObject server can apply the filter to.
As alluded to earlier in this chapter, if there are significant amounts of records that could be returned, it would be better to do the filtering lower down the call stack directly on the database and not rely on the SmartObject server to do this filtering.
The following code again shows how to get the Company and Opportunity SmartObject, this time using the .NET Data Provider.
SOConnection conn = null;
SOCommand cmd = null;

try
{
    //Make the server connection
    SOConnectionStringBuilder cb = new SOConnectionStringBuilder();
    cb.Server = "DLX";
    cb.Port = 5555;

    //Create connection and command
    conn = new SOConnection(cb.ToString());
    cmd = new SOCommand();
    cmd.Connection = conn;

    //Opportunities for a Company
    cmd.CommandText = "SELECT [Company].Name AS CName, [Opportunity]
.Name AS OppName, " +
        "[Opportunity].Estimated_Value " +
        "FROM [Company], [Opportunity] " +
        "WHERE [Company].ID = [Opportunity].CompanyID " +
        "AND [Company].ID = @ID";
    cmd.Parameters.Add(new SOParameter("ID", companyID));

    //Get data
    SODataReader reader = cmd.ExecuteReader();
while (reader.Read())
{
//Write out Opportunities for Company
System.Diagnostics.Debug.Write(
"Company Name=" + reader["CName"].ToString() + " " +
"Opportunity Name=" + reader["OppName"].ToString() + " " +
"Value=" + reader["Estimated_Value"].ToString());
}
}
catch (Exception ex)
{
throw new Exception(ex.Message);
}
finally
{
conn.Close();
}In the preceding code, the CommandText property is set with a Select statement where the SmartObjects and its properties are treated as database tables and columns. Notice in this example, a join between the two SmartObjects is made, and the column names use an alias. This time, the ExecuteReader method is used, returning a SODataReader that can be iterated over. To use the Select command, the SmartObject must have a method of List type because it is expected that a Select command will return a collection of data. However, there are limitations (see the note following this paragraph) surrounding the use of the .NET Data Provider as this is not a SQL-based language. If there is a complex query that needs to be written to retrieve data, it would be better to write a custom service that could execute those queries through a real stored procedure call.
When working with SmartObject methods with custom parameters, you must do a few steps differently. Earlier in this chapter, a SmartObject called EmployeeOpportunity was created using the Active Directory SmartObject Service. There was a method called GetUsersInGroup, which has a parameter called GroupName. The following code calls that method:
SmartObjectClientServer server = new SmartObjectClientServer();

try
{
    //Make the server connection
    SCConnectionStringBuilder cb = new SCConnectionStringBuilder();
    cb.Host = "DLX";
    cb.Port = 5555;
    cb.Integrated = true;
    cb.IsPrimaryLogin = true;
    server.CreateConnection();
    server.Connection.Open(cb.ToString());
//Get SmartObject Definition
SmartObject opportunityEmployee = server.GetSmartObject("OpportunityEmployee");
//Set properties
opportunityEmployee.ListMethods["GetUserInGroup"].InputProperties["GroupName"]
.Value = groupName;
//Get the SmartObjects
opportunityEmployee.MethodToExecute = "GetUsersInGroup";
//Write out users in the group
SmartObjectList opportunityEmployees = server.ExecuteList(opportunityEmployee);
foreach (SmartObject so in opportunityEmployees.SmartObjectsList)
{
foreach (SmartProperty property in so.Properties)
{
System.Diagnostics.Debug.Write(property.Name + "=" + property.Value);
}
}
}
catch (Exception ex)
{
throw new Exception(ex.Message);
}
finally
{
server.Connection.Close();
}This code is very similar to methods presented earlier except for the setting of the parameter value. In those examples the parameters were set directly onto the Properties of the SmartObject instance. In this case, the InputProperties property is used to set the GroupName parameter. The InputProperties property is accessed through the ListMethods property because the method returns a collection of SmartObjects. The ExecuteList method is called by using the SmartObject, but this method returns a SmartObjectList collection.
In the previous sections, you saw that both the SQL and stored procedures can be used to execute SmartObject methods; however, this is not the case with SmartObjects that have custom parameters. If there is a required parameter for a SmartObject method using SQL with the K2 .NET Data Provider, an exception is thrown. In the following code the GetUsersInGroup method of the OpportunityEmployee SmartObject throws an exception stating that the GroupName parameter has not been set.
SOConnection conn = null;
SOCommand cmd = null;

try
{
    //Make the server connection
    SOConnectionStringBuilder cb = new SOConnectionStringBuilder();
    cb.Server = "DLX";
    cb.Port = 5555;

    //Create connection and command
    conn = new SOConnection(cb.ToString());
    cmd = new SOCommand();
    cmd.Connection = conn;

    //Get Users in Group
    cmd.CommandText = "SELECT * FROM OpportunityEmployee " +
         "WHERE GroupName = @GroupName";
    cmd.Parameters.Add(new SOParameter("GroupName", groupName));

    SODataReader reader = cmd.ExecuteReader();

    //Write out values
    while (reader.Read())
    {
        System.Diagnostics.Debug.Write(
            "ID"].ToString() + " " +
            "Email=" + reader["Email"].ToString());
    }
}
catch (Exception ex)
{
    throw new Exception(ex.Message);
}
finally
{
    conn.Close();
}
Putting the GroupName parameter into the where clause will not work because the GroupName parameter is not a property of the OpportunityEmployee SmartObject. Only SmartObject properties can be used in SQL. However, the .NET Framework Data Provider for K2 SmartObjects can use a stored procedure to execute a SmartObject method with a custom parameter. The following code sets the groupName value into the Parameters collection of the SOCommand object. This then sets the group name into the SmartObject OpportunityEmployee.GetUserInGroup custom parameter correctly.
SOConnection conn = null;
SOCommand cmd = null;

try
{
    //Make the server connection
    SOConnectionStringBuilder cb = new SOConnectionStringBuilder();
    cb.Server = "DLX";
    cb.Port = 5555;

    //Create connection and command
    conn = new SOConnection(cb.ToString());
    cmd = new SOCommand();
    cmd.Connection = conn;

    //Get Users in Group
    cmd.CommandText = "OpportunityEmployee.GetUserInGroup";
    cmd.CommandType = System.Data.CommandType.StoredProcedure;
    cmd.Parameters.Add(new SOParameter("GroupName", groupName));

    SODataReader reader = cmd.ExecuteReader();

    //Write out values
    while (reader.Read())
    {
        System.Diagnostics.Debug.Write(
            "ID"].ToString() + " " +
            "Email=" + reader["Email"].ToString());
    }
}
catch (Exception ex)
{
    throw new Exception(ex.Message);
}
finally
{
    conn.Close();
}SmartObject Services are the conduit for provisioning data from data sources into SmartObjects. A SmartObject Service is simply a class that must override several methods that are K2 blackpearl SmartObject server requirements. The implementation of these methods can be simple or complex as needed. This section delves in detail on how to create a stub for a SmartObject Service but does not go into the details of an actual implementation for getting data from a data source.
Chapter 10 covers the deployment of SmartObject Services.
An alternative to developing a custom service as described in this chapter is to use code attribution in a class library that is used to communicate with the LOB system. For more information about how to do this, see the articles "Developing a Custom Service" (
www.k2underground.com/files/folders/technical_product_documents/entry21898.aspx) and "Creating Custom SmartObjectsServices Part 2" (http://k2distillery.blogspot.com/2008/09/creating-custom-smartobjects-part-2.html).
To create a SmartObject Service, first create a code library project in Visual Studio and then add a reference to SourceCode.SmartObjects.Services.ServiceSDK, which is located in \Program FilesK2 blackpearlHost ServerBin. Once this library is referenced, right-click the reference in Visual Studio Solution Explorer, go to properties of the reference, and change Copy Local property from True to False, then add a reference to the System.Transactions library. Once both of the libraries have been added, create a class that inherits from ServiceAssemblyBase. There can only be one class of ServiceAssemblyBase per code project. All classes that inherit from ServiceAssemblyBase must override the following methods: GetConfigSection(), DescribeSchema(), Execute(), and Extend().
public class MyCustomService : ServiceAssemblyBase
{
    public MyCustomService()
    {
    }

    public override string GetConfigSection()
    {
    }

    public override string DescribeSchema()
    {
    }

    public override void Execute()
    {
    }

    public override void Extend()
    {
    }
}The GetConfigSection() is a method used to define configuration values for the service instance after it has been deployed. It is similar to a configuration file that is used by an instance of a SmartObject Service. Defining configuration keys is very important because the location of a data connection may change over time. If the service needs to make a connection to a database or Web service, that connection information could be defined in this method.
public override string GetConfigSection()
{
    this.Service.ServiceConfiguration.Add("Server", true, "Default Value");
    return base.GetConfigSection();
}
In this implementation, the ServiceConfiguration property is accessed from the base, and a key and default value are added. Also, configurations can be marked as required. When the service instance is created, it can require that the field be populated.
There are reasons why a config file should not be used with SmartObject Services. A SmartObject Service may be implemented in a generic fashion so that many instances of the service can be created. But because each SmartObject Service instance is different from every other, these configuration values are stored on a per service instance basis (that is, the values are not shared between service instances). An example would be the Active Directory SmartObject Service. By default, an instance of that service is created when K2 is installed, and it sets the LDAP path configuration to the current domain. However, some companies have multiple Active Directory Domains. So, this service has a configuration to specify the LDAP path, making it possible to have different service instances for each Active Directory Domain.
The DescribeSchema() method defines the public interface for the SmartObject Service. The first thing that should be added to the DescribeSchema() is the description of the service. This information is then presented to developers when they are searching for a service to use with a SmartObject method. In the following code, the name and description are assigned to the service.
public override string DescribeSchema()
{
    //set base info        this.Service.Name = "WroxCustomService";
    this.Service.MetaData.DisplayName = "Wrox Custom Service";
    this.Service.MetaData.Description = "Custom service for Wrox.";
After this has been set, one-to-many ServiceObjects need to be created. ServiceObjects are no more than a logical grouping of methods. Think of them as a class definition. For the ServiceObject, the display properties are values that are shown to the developer when they are creating a SmartObject. The Active property of the ServiceObject must be set to true for it to be used. In the following code, the service is called the "Wrox Stub Service".
//Create the service object
ServiceObject so = new ServiceObject();
so.Name = "WroxCustomServiceObject";
so.MetaData.DisplayName = "Wrox Stub Service";
so.MetaData.DisplayName = "Use for Wrox stub service.";
so.Active = true;
this.Service.ServiceObjects.Add(so);
Next, property definitions are created, using the Property object. Property objects are used to define the input and output parameters for service methods. Two properties are defined in the following code block, the first is an integer and the second a string. The properties must be added to the SmartObject list of properties.
//Create field definition
Property property1 = new Property();
property1.Name = "MyField1";
property1.MetaData.DisplayName = "My Field 1";
property1.MetaData.Description = "My Field 1";
property1.Type = "Integer";
property1.SoType = SoType.Number;
so.Properties.Add(property1);

//Create field definition
Property property2 = new Property();
property2.Name = "MyField2";
property2.MetaData.DisplayName = "My Field 2";
property2.MetaData.Description = "My Field 2";
property2.Type = "System.String";
property2.SoType = SoType.Text;
so.Properties.Add(property2);
Finally, once the properties have been created, you can define methods. Property objects have to be created first because all of methods reuse Property objects. The Method class defines things such as the name, metadata, type, required properties, and input/output properties. The method type enumeration has the following method types: Create, Read, Update, Delete, List, and Execute. In the following code, Load and List methods are created, and both require the integer as an input parameter. In addition, both methods return the integer along with a string value. Once the method object has been created, you must add it to the ServiceObject object methods collection.
//Create Load method
        Method method1 = new Method();
        method1.Name = "Load";
        method1.MetaData.DisplayName = "Load";
        method1.MetaData.Description = "Load a single record of data";
        method1.Type = MethodType.Read;
        method1.Validation.RequiredProperties.Add(property1);
        method1.InputProperties.Add(property1);
        method1.ReturnProperties.Add(property1);
        method1.ReturnProperties.Add(property2);
        so.Methods.Add(method1);

        //Create List method
        Method method2 = new Method();
        method2.Name = "List";
        method2.MetaData.DisplayName = "List";
        method2.MetaData.Description = "Load collection of data";
        method2.Type = MethodType.List;
        method2.Validation.RequiredProperties.Add(property1);
        method2.InputProperties.Add(property1);
        method2.ReturnProperties.Add(property1);
        method2.ReturnProperties.Add(property2);
        so.Methods.Add(method2);

        return base.DescribeSchema();
    }
This implementation is building up a static list of methods; however, the list of ServiceObjects, Methods, and Properties can be created dynamically. For instance, this method could read a database or Web service schema and dynamically generate the entire interface. This is a common practice with many of the SmartObject Services that are provided by K2 or the K2 community.
The Execute() method of the ServiceObject Service has the implementation code to perform an operation. The following code shows a basic implementation of the Execute() method. When a method is called from a SmartObject, the Service.ServiceObjects collection is filled with the ServiceObjects that were called. The same is true for the Methods collection of the ServiceObject. Currently, these two collections are only ever filled with a single ServiceObject and a method. It is good practice still to iterate over the collection because future enhancements may support more.
The implementation of this Execute() method loops over these two collections and determines what code should be executed. In the catch block of this code, the ServicePackage object of the base class is used to return an error message to the caller and flags the transaction as being unsuccessful.
public override void Execute()
    {
        try        {
            //Loop over called ServiceObject(s)
            foreach (ServiceObject so in Service.ServiceObjects)
            {
                switch (so.Name)
                {
                    case "WroxCustomServiceObject":
                        //Loop over the method(s) that were called.
                        foreach (Method method in so.Methods)
                        {
                            switch (method.Name)
                            {
                                case "Load":
                                    LoadMethod(so, method);
                                    break;
                                case "List":
                                    ListMethod(so, method);
                                    break;
                                default:
                                    throw new Exception(
                                      "Service method undefined");
                            }
                        }
                        break;
                    default:
                        throw new Exception("Service Object Not Found");
                }
            }
        }
catch (Exception ex)
{
string errorMsg = Service.MetaData.DisplayName +
" Error >> " + ex.Message;
this.ServicePackage.ServiceMessages.Add(
errorMsg, MessageSeverity.Error);
this.ServicePackage.IsSuccessful = false;
}
}The ServicePackage object has another property called the ResultTable. This should be populated with all the data that needs to be returned to the SmartObject. A ResultTable table is a System.Data.DataTable that simply needs to be filled with data. In the ListMethod(), the ResultTable is initialized by calling InitResultTable(), and then the ResultTable can be filled with data (this topic is outside the scope of this chapter).
In the LoadMethod() method, the ResultTable is initialized by calling InitResultTable(); however, in this example, all of the values are set to the properties of the ServiceObject. Once all of the values have been set into the ServiceObject, the values need to be moved to the ResultTable. This can be accomplished by calling BindPropertiesToResultTable(). From there, the K2 SmartObject infrastructure takes the ResultTable, sends it to the SmartObject, and fills the SmartObject with the data.
//This method shows how return a single row of data, this would
//be used for Read and Create methods (when calling Create you will
//want to return primary key of new record)
private void LoadMethod(ServiceObject so, Method method)
{
    //Add in code here to retrieve data from any external data source and
    //load it into the result set for this method.
    so.Properties.InitResultTable();
    so.Properties["MyField1"].Value = 1;
    so.Properties["MyField2"].Value = "Comments";
    so.Properties.BindPropertiesToResultTable();
}
The ListMethod() is called when a collection of data needs to be returned. In this method the ResultTable is accessed directly from the ServicePackage and can be filled with data. This could have been done in the previous method.
//This method shows how to return a collection of data using a DataTable.
//This would be used for a List method
private void ListMethod(ServiceObject so, Method method)
{
    so.Properties.InitResultTable();
    DataTable resultTable = this.ServicePackage.ResultTable;

    //Write code to fill the ResultTable with data.
}This method is not used by most implementations. The purpose of this method is to perform operations that can modify the service instance without requiring the service instance to be stopped and restarted. For example, Extend() is used with the SmartBox Service. Designers can modify a SmartObject definition in a design environment, and then when it is deployed to the K2 server, the Extend() method is called. The SmartBox implementation of the Extend method modifies the SmartObject Service methods and parameters similar to the code written in the DescribeSchema() method. The Extend() method must also be executed at the appropriate time, which in the case of the SmartBox is during deployment.
public override void Extend()
{
    //No implementation required.
}K2 SmartObjects provide a flexible architecture in which data can be used inside and outside of K2 processes to make business decisions. The SmartObject Services framework is extensible and can be used to access any LOB data source within an enterprise. K2 blackpearl provides the visual design tools that allow you to quickly model SmartObjects and use them within your workflows and applications. With these tools significant time can be gained back into a project plan allowing designers to focus more on implementing business processes.
The next chapter focuses on how to plan on building process-driven applications using K2 blackpearl processes and SmartObjects. The chapter will concentrate on all the considerations you as a designer need to take before authoring a process. At the end of that chapter and with this information from the SmartObject chapter, you as a designer will have enough information to author your first workflow (which is covered in Chapter 9).