
When we started this book, we wanted to make sure that everyone who read it came away with some good information, not only from the information contained within each chapter but also from the insight each author provides. That in great part explains why the authors were chosen to participate. They come from a variety of fields and have a variety of experiences that should help you take advantage of the K2 platform. To further this idea we have collected various tips, tricks, and "how-to" information from a broader audience, including K2 employees from around the world and community representatives who have discovered some great time-saving techniques. Some of these things you may have seen before on various K2 blogs. Others will be new. We hope you find many of them useful.
By Joseph Dunagan, K2 Consultant
Sometimes you need to get the value from an element within a K2 XML field. This is usually done within a server event. In the following example, I needed to retrieve a URL from a K2-generated XML field. This specific example should work if you do not expect repeating values in the Items node. For scenarios where repeating values are selected, you would need to change the XPath.
// get the full XML from the K2 XML field
string strXML =  K2.ProcessInstance.XmlFields["SPEventsField"].Value;
// set the XPath to the desired node
string strXPath =  "/Items/Item/URL";
// use the helper class to retrieve the value for this element
// (as set in the XPath) for this XML
string strValue =  SourceCode.Workflow.Common.XmlHelper.GetXPathValue
(strXML, strXPath);
By Joseph Dunagan, K2 Consultant
It is common for an InfoPath-based process to require the use of a notes field that allows users to add to but not edit the notes history. This is a snap with a couple of rules and one hidden text field.
On the InfoPath form, create three textboxes and one button. All textboxes should be multiline. In my case I named them:
NewNote
NotesHistory
CarriageReturn
SaveNewNote (button)
The NotesHistory textbox should be the largest (perhaps 8 or 10 lines; the full width of the form), as it will display all prior notes. This textbox should be set to read-only in its control properties.
I typically make the NewNote textbox large enough for two lines of text (the full width of the form).
The SaveNewNote button should be placed after the NewNote textbox and before the NotesHistory textbox accompanied by a note to the effect of "New notes will only be saved by clicking this button."
The CarriageReturn textbox should be hidden and have its default value set in the function builder to:
Type an open quotation mark (").
Hold down the Control key and press the Enter key.
Type a close quotation mark (").
Finally configure a rule for the SaveNewNote button, including the following Actions:
Set a Field's Value

Set a Field's Value
This button will successfully update the NotesHistory with the new note at the top preceded by the current date.
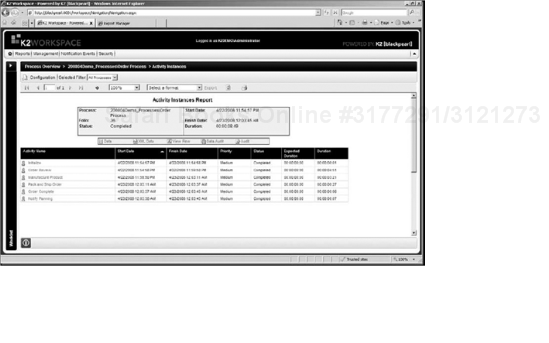
Often you need to access the data that appears within the out-of-the-box K2 Workspace reports from some other custom application. The standard K2 reports are based on a number of SmartObjects that are built into K2, and you can use those same SmartObjects to access the report data.
The first thing is to know what built-in SmartObjects are available and understand the data that you are looking for. You can see the list of SmartObjects in the K2 Object Browser as shown in Figure A-1

So if you wanted to get the data from the Activity Instances Report, as shown in Figur A-2, you would find the Activity Instances SmartObject.
You can use the SourceCode.SmartObjects.Client API to programmatically retrieve information from this SmartObject.
The following is a code sample where I have created a method that accepts a SmartObject name and Process Instance ID and retrieves the data. For the purposes of simplicity of this demo, I am simply doing a Response.Write to the ASPX page instead of doing something fancier with the data.
private void GetReportData(string strSmartObjectName, int nProcInstID)
{
    SourceCode.SmartObjects.Client.SmartObjectClientServer serverName =
        new SourceCode.SmartObjects.Client.SmartObjectClientServer();
    SourceCode.Hosting.Client.BaseAPI.SCConnectionStringBuilder connectionString =
        new SourceCode.Hosting.Client.BaseAPI.SCConnectionStringBuilder();
    // build a connection string
    connectionString.Authenticate =  true;
    connectionString.Host =  "localhost";
    connectionString.Integrated =  true;
    connectionString.IsPrimaryLogin =  true;
    connectionString.Port =  5555;
    // open a K2 Server connection
    serverName.CreateConnection();
    serverName.Connection.Open(connectionString.ToString());
    try
    {
// get a handle to the SmartObject
SourceCode.SmartObjects.Client.SmartObject smartObject =
serverName.GetSmartObject(strSmartObjectName);
// specify which method will be called
smartObject.MethodToExecute = "List";
// specify input parameters for the method
smartObject.Properties["ProcessInstanceID"].Value = nProcInstID.ToString();
// call the method
SourceCode.SmartObjects.Client.SmartObjectList oSmOList =
serverName.ExecuteList(smartObject);
// iterate each smartobject in the collection and do
// something with the data
foreach (SourceCode.SmartObjects.Client.SmartObject oSmO in
oSmOList.SmartObjectsList)
{
// for the purposes of this example, I'm
// just dynamically building out a string
string strRecord = "";
foreach(SourceCode.SmartObjects.Client.SmartProperty oProp
in oSmO.Properties)
{
strRecord += oProp.Name + ": " + oProp.Value.ToString() + ", ";
}
Response.Write(strRecord + "<br/>");
}
}
catch (Exception ex)
{
}
finally
{
// close the connection
serverName.Connection.Close();
}
}When I invoke this method in with the following parameters:
GetReportData("Activity_Instance", 4782);I see the following (see Figure A-3), which from a data point of view matches up to the Workspace report.

Obviously this is just a simple example showing how to interact with these SmartObjects. There are other things that you can do with them. For one, if you don't want to write any code, you could use the .NET Data Provider for K2 SmartObjects to bind the results to a control. You can also integrate these objects into InfoPath forms if desired.
Additionally a very useful way to interact with these SmartObjects, and any SmartObjects for that matter, is to use the Amazing SmartObject Tool, which is freely available on the K2 blackmarket (http://k2underground.com/k2/ProjectHome.aspx?ProjectID=47) and is included in K2 blackpearl 0807. I highly recommend this tool for anyone developing or working with SmartObjects. (Note: You must create a member account at the site to be able to see the tool.)
By Bob Maggio, K2 Architect
One of the lesser known new features of the expanded Destination Rule functionality of K2 blackpearl is the ability to very easily base destination users from a repeating XML node that contains a User ID. In K2 2003 this required a bit of coding in the Destination Rule for each Activity for which you wished to do something like this. With K2 blackpearl this is now a drag-and-drop experience in the process design canvas. This can be a very useful feature in a schema-driven process development effort.
In this example I will show how an InfoPath form can be leveraged to capture a list of users that will then become the basis for the next step's Destination Rule.
Create an InfoPath form and InfoPath-integrated K2 process as normal.
Design the form as per normal.
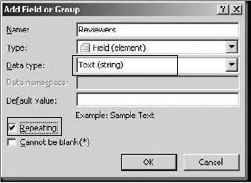
Add a new repeating Text (string) element to the Main data source, as shown in Figure A-4 (in this example I've named the field "Reviewers").
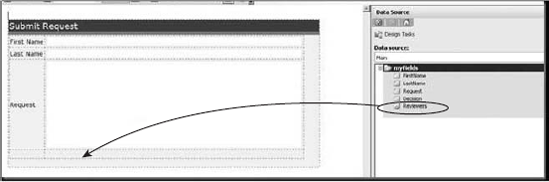
I then drag out the repeating text field onto the desired InfoPath view as shown in Figure A-5.
In this example I then did the following:
Selected Repeating Table when prompted.
Changed the textbox to a drop-down List.
Added content to the drop-down list to allow users to select reviewers from an easily readable drop-down list (with actual DomainuserID as the hidden value), as shown in Figure A-6.
Save and close the InfoPath form.
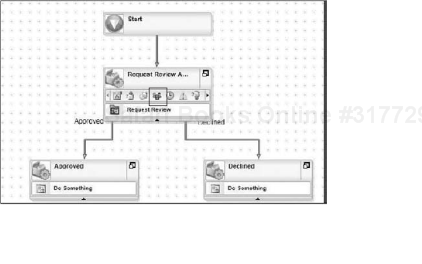
You should now be back at the Process design canvas and see the message as shown in Figure A-7.
Click OK and then click Finish.
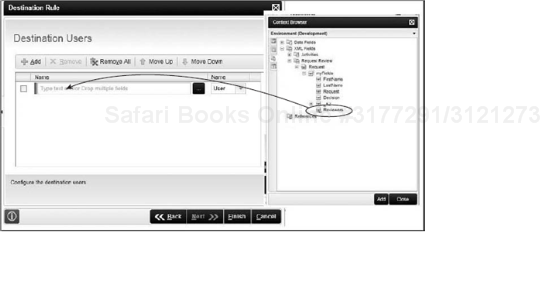
In this example, we then want to change the Destination Rule for the desired activity by clicking on the Destination Rule icon as shown in Figure A-8.
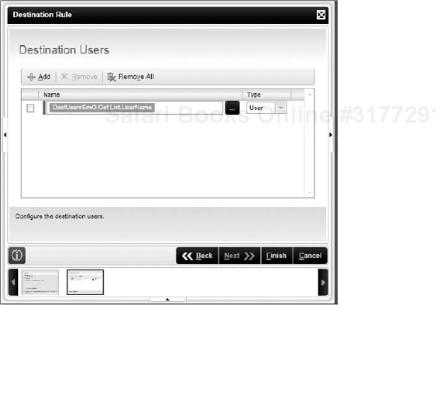
With the Destination Rule window open, navigate to the Destination Users window, as shown in Figure A-9.
Click the Add button.
Click the ellipse (. . .) button.
Navigate to the Process/Activity Data tab within the Context Browser, and then expand the XML Fields node until you find the Reviewers node.
Either drag-and-drop the Reviewers node (see Figure A-10) or select the node and click the Add button.
Once this has been selected, it should look like Figure A-11.


Now if you deploy the process and then open the form, you can select multiple users (see Figure A-12:

When the process hits the Destination you set up, it will create task rights for each user that appears in that reviewer repeating section. If you review the Activity Instance Destinations Report for this instance, you will see that the three users you selected in the InfoPath form are now destination users for this activity, as shown in Figure A-13.

A question that is sometimes asked is "What is the difference between stopping and starting, and sleeping within K2?"
Start and Stop reside at the Process Instance level and are accessible in the K2 Workspace Management tooling or SourceCode.Workflow.Management API, both of which require Admin permission. Stop puts an active process instance into a state of "Stop", which prevents it from executing, meaning, for example, that Client Events can't be actioned and escalations won't fire. The process instance is still alive in the sense that it resides in the K2Server transaction database, as opposed to just the K2ServerLog/reporting database. You can equate this to a pause in the process. Start essentially resumes the process, like pressing play after pausing a movie.
Sleep, on the other hand, is functionality available in the K2 Worklists or through the SourceCode.Workflow.Client API, and it operates upon individual worklist items, not at the process instance level. When you sleep a worklist item, it simply changes the status for that specific worklist item to a status of "Sleep". When you sleep a worklist item, you must give K2 a duration or specific date and time to awaken it at, so it doesn't sleep forever.
So what does this mean? By default, the worklists in the K2 Workspace and SharePoint Web part filter out worklist items in a status of Sleep so they won't appear until they are awoken. However, you can change the filter to display these if you'd like. As for escalations, sleep doesn't have any impact on them. In my testing activity, event escalations still fire for a worklist item I have in sleep.
By Bob Maggio, K2 Architect
A question was posed recently as to what the "Allow any user to finish this Client Event" checkbox means within a Client Event within K2 Process Designer within Visual Studio (for K2 blackpearl) and K2.net 2003 Studio.
The purpose of "Allow any user to finish this Client Event" goes back to at least K2.net 2003. In my experience this is a rarely used feature, but it can be useful under the correct business requirements.
By default (which means this option is not checked for a Client Event), when a worklist item is attempted to be opened, K2 will validate that the person opening it has the right to do so. If this field is checked, anyone with access to the serial number can potentially open it because K2 will not validate the person opening the task against who it is assigned in the Destination Rule. The thing to keep in mind is that if this option is checked, you still need a destination user because the task will only appear on the Destination User(s) worklist and e-mail notifications will be sent only to the destination users. However, everyone has the physical ability to open and action the task if they know the correct way to access it.
Here is a simplified example. If you have an activity with a Client Event with this "Allow any user to finish this Client Event" option checked that targets John Smith as the destination, and you have e-mail notifications turned on, when the process runs, it creates a worklist item for John Smith (as in it will appear in John's worklist) and sends John an e-mail with the URL to the ASPX page in it. However, John could then forward someone else the e-mail and that other person could click the link and action the item. If this option had not been checked, John could certainly forward the e-mail notification to someone, but when the URL was clicked by that other person, K2 would compare that person's credentials against that of the targeted destinations for this worklist item. Since they would not match, K2 would not permit the task to be opened.
As mentioned, this isn't used too frequently, but I have seen it used in certain situations when someone wanted to assign a task to a primary user, but also wanted to let everyone potentially action the task because those others controlled other aspects of the UI.
By Bob Maggio, K2 Architect
Recently I was asked the following question: "Let's say I have a custom assembly that I include in the workflow project. Later, my requirements change, and I produce a new version of both the workflow and the assembly. Does K2 blackpearl handle the versioning of my custom assembly? In other words, can workflows using the original assembly run side-by-side with the new version?"
The short answer is yes; it behaves exactly as described. The long answer is described in this section to help in better understanding how K2 works.
When you add a reference to a K2 process, the DLL file itself is serialized as binary data to the K2Server database each time you deploy the process. Thus, this DLL is now associated with this specific process definition version. The first time the process is used, K2 server extracts all DLLs (K2-generated and referenced DLLs) to the K2 work folder. This is typically located at C:Program FilesK2 blackpearlHost ServerBinWork.
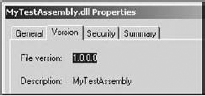
For example, I created a process that referenced a .NET assembly called MyTestAssembly.dll. The first time I used this process, it created a folder called C:Program FilesK2 blackpearlHost ServerBinWorkProc241. Note the number 241 relates to the ID for the process definition version.
If I look in this folder, I see what's in Figure A-14.

Here you see all the stuff K2 generates as well as my .NET assembly. Don't be fooled by the date of the .NET assembly. Remember it had been serialized to the database as binary data, so when K2 lays it back down on the disk, it will always have a new date stamp. If I look at the version info on my DLL, I see what's in Figure A-15.
Now I go and change my DLL and rebuild it. As part of the change, I changed my DLL version to 1.1.1.1. I then reference in my K2 process and then redeploy. Now if I look at my Work folder, I see what's in Figure A-16.
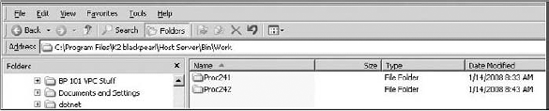
Notice that we now have two folders side-by-side. Proc241 was my original version, and Proc242 is the new one. If I browse to Proc242, I see what's in Figure A-17.
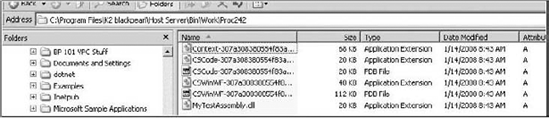
This looks pretty much the same as what was in Proc241; however, if I look at the version of my DLL, I see the new one (Figure A-18.

Thus, they should run side by side without issue.
Things were handled very similarly within K2.net 2003, so if you are on a legacy project, the same knowledge can be applied.
By Johnny Fang, K2 Solutions Manager
This problem came up the other day, and I thought this might be useful to share. The scenario is that when you do a batch selection or quick approval action from the worklist, the outcome is not recorded in the form's audit history. Of course, the process audit history will have it, but in certain cases, the user does not have access to the process history information.
So if you wanted to store the outcome in the InfoPath form data, basically you have to update the value directly within the Succeeding Rules of the client activity.
Here's an example. Edit the code of your succeeding rule. You can get the final outcome by putting this snippet of code inside the Succeeding Rule. Add a using statement for System.Xml and see the code between the comments. You will have to change the variables to your own form and namespace.
public void
Main(Project_282cb15964ee4ab397715563ff6641a6.SucceedingRuleContext_
369ef228d5e54527b7116b0583eabd22 K2)
        {
            if (SucceedingRuleHelper.AnyOutcomesEvaluatedSuccessfully(K2))
            {
                AllInfoPathTasksFinished(K2);
                K2.SucceedingRule =  true;
               // begin custom code
                XmlDocument xmlDoc =  new XmlDocument();

                xmlDoc.LoadXml(K2.ProcessInstance.XmlFields["TestForm"].Value);

                XmlNamespaceManager namespaceManager =
                        new XmlNamespaceManager(xmlDoc.NameTable);

                namespaceManager.AddNamespace("my",
xmlDoc.DocumentElement.GetNamespaceOfPrefix("my"));
xmlDoc.SelectSingleNode("my:myFields/my:myDataField",
namespaceManager).InnerText =
K2.ActivityInstance.DataFields["Outcome"].Value.ToString();
K2.ProcessInstance.XmlFields["TestForm"].Value = xmlDoc.OuterXml;
// end custom code
}
else
{
InfoPathTaskFinished(K2);
K2.SucceedingRule = false;
}
}If you are using the Plan Just Once option, you should note that there is only one Activity Instance created with one or more slots tied to it. So if you want to enumerate through the list of actions, here's a code snippet to do this:
for (int i =  0; i < K2.ActivityInstanceDestination.ActivityInstance
                .WorklistSlots.Count; i++)
            {
                Console.WriteLine("Action Result: " +
                        K2.ActivityInstanceDestination.ActivityInstance
                        .WorklistSlots[i].DataFields["Action
                        Result"].Value.ToString());
                Console.WriteLine("Destination User: " +
                        K2.ActivityInstanceDestination.ActivityInstance
                        .WorklistSlots[i].User.Name.ToString());
}By Johnny Fang, K2 Solutions Manager
In K2 blackpearl, when you are using the SharePoint Document Template, various functions are supported, such as uploading and downloading documents (multiple documents in Advanced Mode), check-in, check-out, updating of metadata, and so on.
The challenge here is if you need to do this for multiple documents (that is, check-in and check-out), how do you do it? There is no out-of-the-box functionality, but that doesn't mean it cannot be achieved. The following steps show you how, and this technique applies to all functionalities in the Document Template Wizard, including uploading, downloading, and updating of metadata; undo check-out; check-in; and check-out.
Create the document wizard functionality. In this example, I will be doing recursive check-in of documents based on a Process data field (FileName) passed in. The value stores the documents I want to check in, and the separator ";" is used to distinguishe the various file names, for example:
"doc1.pdf;doc2.pdf".Go to code view of the event and make the changes to the code as follows.
Note that only the changes are shown, not the entire code snippet:
foreach (XmlNode checkInItem in checkInItems)
{
    foreach (string docName in
K2.ProcessInstance.DataFields["FileName"].Value.ToString().Split(';'))
    {
    if (bool.Parse(checkInItem.SelectSingleNode("UsePartOfProcessItems").InnerText))
    {
     //....
     checkInSet +=  "<DocumentName>" + docName + "</DocumentName>";
    //....
     }
     else
     {
    // ....
     checkInSet +=  "<DocumentName>" + docName + "</DocumentName>";
    // ....
     }
     }
}
By Shaun Leisegang, K2 Presales Manager
Here are some pointers when you are using the Connection object. This object is part of the Base API from which each API inherits (SmartObjectClientServer, SmartObjectManagementServer, and so on).
The following subsections show some sample code based on three scenarios in which you can connect to the server from the API.
This is the most expensive way of using connections and results in the most overhead. After each Open method on the Connection object, the call is authenticated on the server, and this is what causes the most overhead. This scenario is typically used in a stateless environment where user context does not exist between method calls, for example, Web apps with no sessions.
SmartObjectManagementServer _mgmtServer =
                new SmartObjectManagementServer();
            SmartObjectClientServer _clientServer =  new SmartObjectClientServer();

            string _conString =
                "Integrated= True;IsPrimaryLogin= True;Authenticate= True;
                EncryptedPassword= False;Host= blackpearl;Port= 5555";

            SCConnectionStringBuilder _connBuilder =
                new SCConnectionStringBuilder(_conString);

            #region Scenario 1 - Connection for Each operation

            //Get SmartObject List...
            _mgmtServer.CreateConnection(_connBuilder.ToString());
            _mgmtServer.Connection.Open(_connBuilder.ToString());
            SmartObjectExplorer smoExplorer =
                _mgmtServer.GetSmartObjects(SmartObjectInfoType.System);
            _mgmtServer.Connection.Close();


            if (_clientServer.Connection = =  null)
                _clientServer.CreateConnection();
            _clientServer.Connection.Open(_connBuilder.ToString());
            SmartObject smo =  _clientServer.GetSmartObject
                (smoExplorer.SmartObjects["UMUser"].Guid);
                _clientServer.Connection.Close();

            if (_clientServer.Connection = =  null)
                _clientServer.CreateConnection();

            smo.MethodToExecute =  "Get_Users";
            smo.ListMethods[smo.MethodToExecute].Parameters["Label_Name"].Value =
                "K2";

            _clientServer.Connection.Open(_connBuilder.ToString());
            SmartObjectList userList =  _clientServer.ExecuteList(smo);
            _clientServer.Connection.Close();

#endregionThis is a much more efficient way of using connections. You can share the Connection object between APIs, thereby making it easier to manage the connection.
SmartObjectManagementServer _mgmtServer =
                new SmartObjectManagementServer();
            SmartObjectClientServer _clientServer =  new SmartObjectClientServer();

            string _conString =
                "Integrated= True;IsPrimaryLogin= True;Authenticate= True;
                EncryptedPassword= False;Host= blackpearl;Port= 5555";

            SCConnectionStringBuilder _connBuilder =
                new SCConnectionStringBuilder(_conString);

            _mgmtServer.CreateConnection();
            _clientServer.Connection =  _mgmtServer.Connection;

            _mgmtServer.Connection.Open(_connBuilder.ToString());
            SmartObjectExplorer smoExplorer =
                _mgmtServer.GetSmartObjects(SmartObjectInfoType.System);
            SmartObject smo =  _clientServer.GetSmartObject
                (smoExplorer.SmartObjects["UMUser"].Guid);
            smo.MethodToExecute =  "Get_Users";
            smo.ListMethods[smo.MethodToExecute].Parameters["Label_Name"].Value =
                "K2";
            SmartObjectList userList =  _clientServer.ExecuteList(smo);

_mgmtServer.Connection.Close();If your calling client has state and can manage sessions, this is the way to use it with the Connection object. The session connection timeout on the server can be set. However, it does apply to the entire server, which means all servers hosted on that server. The default time is 20 minutes. If a session times out and you make an API call without authenticating (Authenticate=true), you will get an exception.
This approach is the most efficient way of handling connections, provided that you have session state.
SmartObjectManagementServer _mgmtServer =  new SmartObjectManagementServer();
            SmartObjectClientServer _clientServer =  new SmartObjectClientServer();

            string _conString =
                "Integrated= True;IsPrimaryLogin= True;Authenticate= True;
                EncryptedPassword= False;Host= blackpearl;Port= 5555";

            SCConnectionStringBuilder _connBuilder =
                new SCConnectionStringBuilder(_conString);

            _mgmtServer.CreateConnection();

            _clientServer.Connection =  _mgmtServer.Connection;

            _mgmtServer.Connection.Open(_connBuilder.ToString());
            string sessionID =  _mgmtServer.Connection.GetResumableSessionCookie();

            SmartObjectExplorer smoExplorer =
                _mgmtServer.GetSmartObjects(SmartObjectInfoType.System);
            _mgmtServer.Connection.Close();

            //Time elapse...

            SmartObject smo =  null;
            try
            {
                _connBuilder.Authenticate =  false;
                _clientServer.Connection.Open(_connBuilder.ToString());
                _clientServer.Connection.ResumeSession(sessionID);
                smo =  _clientServer.GetSmartObject
                    (smoExplorer.SmartObjects["UMUser"].Guid);
                _clientServer.Connection.Close();
            }
            catch (Exception ex)
            {
                Console.WriteLine(ex.Message);
            }

            //Some more time elapse...

            if (smo !=  null)
            {
                SmartObjectList userList;
                try
                {
                    smo.MethodToExecute =  "Get_Users";
                    smo.ListMethods[smo.MethodToExecute].
                        Parameters["Label_Name"].Value =  "k2";
                    _clientServer.Connection.Open(_connBuilder.ToString());
                    userList =  _clientServer.ExecuteList(smo);
                    _clientServer.Connection.EndSession(sessionID);
                    _clientServer.Connection.Close();
                }
                catch (Exception ex)
                {
                    Console.WriteLine(ex.Message);
                }
}By David Loomis, K2 Consultant
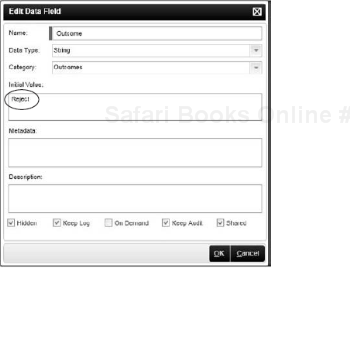
Here's a simple way to set a default outcome for an escalation so the workflow will take to your chosen activity when the escalation fires. I've seen many approaches to accomplish this, but I think this one is the easiest.
Say you have a Client Event (this technique can work with a server or an IPC event with some adjustment) where the user has two choices: Approve or Reject. If the user takes no action after a certain amount of time, you want to automatically take the reject choice.
Open the K2 Object Browser and go to the Process/Activity tab.
Expand Data Fields
Right-click and edit the Outcome field.
In the Initial Value field, put the outcome you want to use when the activity expires (Reject in this example, as shown in Figure A-19.
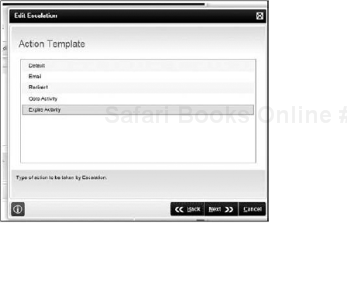
Set the activity escalation for the appropriate time and then on the Action Template screen choose Expire Activity, as shown in Figure A-20.
That's it. When the activity expires, it will take the outcome specified in the initial value. Using this technique, you can also take a path that is not one of the choices given to the user. For example, you can set the initial value of the outcome to Expire and then set up a Line Rule that will branch to activities you want to perform when the user takes no action.
By Harvinder Dhami, K2 User
You create an empty process in your current solution. When you need to IPC to a process that does not exist in the current project, use the data field in the process name in the IPC Wizard. When you click Next, the wizard will ask for a design-time value for IPC. Use the empty process (or any process) here.
When your process runs, populate the data field with the correct process (Projectprocessname). This way you can use any process as an IPC even if that does not exist in your current solution.
By David Loomis, K2 Consultant
Most K2 developers are familiar with asynchronous IPC events, but fewer are familiar with asynchronous server code events. Although the names sound similar, the two events are quite different. An asynchronous IPC event allows you to start a subprocess and let it continue independently of the main process. An asynchronous server code event is the server-side equivalent of a Client Event. Just like a Client Event, an asynchronous server event allows the process to wait an indefinite amount of time for some action before continuing.
Imagine a workflow where there is a handoff of some task to an external system that takes an unknown amount of time (days or weeks) to complete. Rather than continuously polling the external system for an answer that may take a very long time, the workflow can simply wait until a notification is received. Suppose that a car dealership has developed a K2 process for handling customer orders for custom built-to-order automobiles. The dealership workflow will gather the customer requirements, get appropriate approvals, and then communicate (perhaps using a Web service) with a factory order system that uses BizTalk to process orders. At this point, the factory order system simply acknowledges receipt of the order. The K2 process must wait while the factory order system kicks-off a whole bunch of manual and automated processes in different systems to schedule the car for assembly. The actual completion date for the car depends on such things as factory schedule, the number of other requests pending, and availability of custom parts. When the vehicle has been completed, the factory order system invokes a Web service (or some other mechanism) to tell the dealership's K2 server to continue the process. Once the K2 process continues, an activity can notify the customer that the vehicle is ready for delivery.
An asynchronous server event is just the tool you need for this situation. How does an asynchronous server event differ from the normal synchronous Code Event? When the workflow engine encounters a Synchronous server event it executes the event and then continues the workflow. In an Asynchronous event, the workflow engine executes the event and then stops. When you first drag a server code event onto the workflow design canvas, by default it is synchronous. A server code event can be changed from synchronous to asynchronous by adding one line of code to the event as shown in Figure A-21.
To notify the workflow the event is complete a key piece of information must be made available to the external system: the serial number of the activity containing the asynchronous server event. Every activity (whether you use it or not) has a serial number that uniquely identifies it. A serial number is similar to the correlation ID used in message queuing. This serial number allows you to use the K2 API to open the correct server item and complete the event using the Finish method of ServerItem.
You can also use the ServerItem class to set process and activity level fields to transfer information back into the workflow. This code could be invoked from a .NET assembly, a Web service, or whatever approach best matches your situation; just add a reference to the SourceCode.Workflow.Client assembly, as shown in Figure A-22.
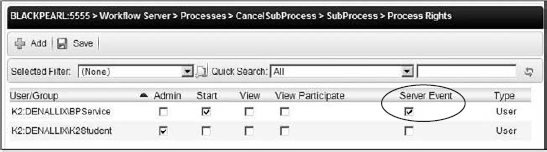
The identity used to connect to the K2 server needs to be assigned the right server event for the process in the Management Console (see Figure A-23.
A common design scenario for workflows is the need to be able to cancel asynchronous IPC processes at any time in response to some action in the main workflow. This scenario typically occurs when the originator decides to cancel a request that has started several independent subprocesses to perform part of the work.
An asynchronous server code event and some other components will be used to implement one possible solution. The basic idea for the solution is that whenever an asynchronous IPC event is started, it will write out information about itself to a SmartObject. When the subprocess ends, it removes the entry. If the main process needs to end, it simply scans the SmartObject for all the currently running subprocesses that belong to it and tells them to finish. The Asynchronous server event will be used in the subprocess to wait for the signal from the main process.
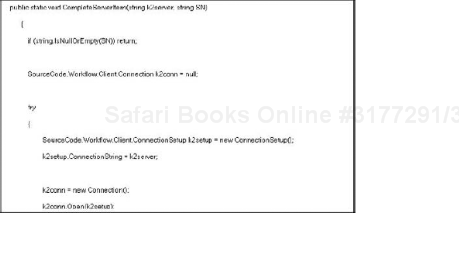
The standalone example that is discussed in this section of the appendix is called "CancelSubTask" and is available in the code download for this book available at www.wrox.com. There are no Web pages for the Client Events; action them using the K2 Worklist. The sample contains two projects: a K2 project and a .NET class library. The K2 project contains two simple workflows (MainProcess and SubProcess) and a SmartObject, ActiveSubProcesses. MainProcess calls SubProcess to do some simulated work using an asynchronous IPC event, passing its process ID. The main process goes on to do some simulated work consisting of a single Client Event. When MainProcess is complete, it signals any subprocesses that are still running to finish.
The class library implements a DLL containing the CompleteServerItem method discussed previously. Complete code is included so you can modify it for your needs. This assembly has been added to the workflow as a project reference, but you could also build a common library of workflow routines like this and deploy them to the Global Assembly Cache. Another option would be to place this code in a Web service.
ActiveSubProcesses is a very simple SmartBox SmartObject. This SmartObject will contain one row for each currently active subprocess. When the subprocess is entered, it puts a row in this table, and just before it exits it removes the row. The ID field is an autonumber field used as a unique identifier. The ParentID is the process ID of the calling process, while the SubTaskEventSN contains the serial number of an asynchronous Client Event. See Figure A-24.

At least one value must be passed in from the calling process as a process-level data field: the process ID of the calling workflow. When the main process wants to find any active subprocesses it has started, it can simply request from the SmartObject any rows that match its own process ID.
There are two parallel paths from the start of the subprocess; since both Line Rules from Start are true, both paths will be taken. One path (on the left side of Figure A-25) is the normal workflow path that does the actual work of the subprocess. In this example the work is simulated by a single Client Event, but there could be many activities on this path performing the main functionality of the workflow. The other path (on the right side of Figure A-25) contains the logic that waits for the cancel signal from the main workflow. No matter which path completes first, they both go through the Exit activity to remove the entry from the SmartObject.
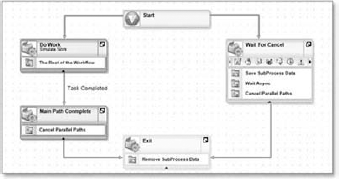
This activity waits for a cancellation signal from the parent process. It writes out the serial number of the current activity to the ActiveSubProcesses SmartObject along with the ID of the parent process in the Save SubProcess Data SmartObject event. This path then waits for external action in the Wait Async asynchronous server code event. This path will wait forever until the action is performed or the path is canceled.
When the user completes the Client Event in the main workflow, it moves on to the Cancel Sub Processes activity. This activity invokes the CompleteServerItem method described previously for each subprocess in ActiveSubProceses where the ParentID field matches the MainProcess ProcessID. The advanced Destination Rule for the Cancel Sub Processes activity is set to "Plan Per Slot (no destinations)" and the slots are populated by passing the SubTaskEventSN field from the list method of ActiveSubProcesses.
The Cancel Sub Processes activity contains only one server code event that invokes CompleteServerItem method (see Figure A-26). Each slot of the activity receives the SubTaskEventSN in its instance data (see Figure A-27.

When this method is invoked, the asynchronous event Wait Async in the subprocess will complete and the next event, Cancel Parallel Paths, will execute. This event simply invokes the GotoActivity method of the process to jump to the Exit activity. Ordinarily, it would be bad practice to use the GotoActivity method to control the logic of the workflow, but it does have one useful side effect: It cancels any parallel paths of execution within a process, that is, it causes the normal workflow path to be immediately canceled and the Exit activity begins. The Exit activity has only one SmartObject event that removes the information about this activity from the ActiveSubProcesesses SmartObject.
Although the code for the GotoActivity is very simple, you can download the GotoActivity Event Wizard sample from blackmarket to do this without code at
www.k2underground.com/k2/ProjectHome.aspx?ProjectID=29. Again, be sure to create a member account to access the site if you haven't already.
If the normal path completes before a cancel signal is received from the main workflow, it too invokes the GotoActivity method to jump to the Exit activity and cancel the alternate path. If the alternate path is not canceled, it will continue waiting forever, and the subprocess will not finish.
The asynchronous server event can be used to cause a workflow to wait indefinitely until the event is finished via an API call. While waiting, the workflow can be dehydrated so it consumes very little system resources. This behavior can be useful when the workflow must wait for the completion of some long-running external process. This technique can also be used to help coordinate asynchronous subprocesses.
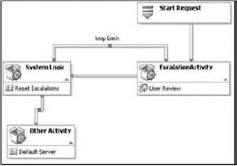
I came across a query as to how to make escalation configurations dynamic in K2. The user wanted escalations to be reset when a process data field is changed. He wanted to do this in a Client Event so that the user interface would have update and submit buttons, and as the user made changes to the fields and updates the form, the relevant escalations would be reset accordingly. If the user did not do this within the escalation period, of course, the escalation would fire. If the user makes the update, escalation resets, the next update is expected to happen, and eventually the user submits and completes the event. The process then moves to the next activity.
K2's escalations are bound to an activity at the time of the creation of the activity instance. So the escalation timer value cannot be altered during run time. This means that the way to reset an escalation configuration is to expire the activity and reinstate it.
So how do we achieve what the user wanted?
If you create an activity with a single Client Event and configure the escalation in that activity, then you can create another activity with a server event immediately following the previous escalation activity. You can write code in that server event that can look at what needs to happen based on the updates made in the previous Client Event and set up some data fields with appropriate escalation timer values. Then you can loop back into the escalation activity (when required) and use these data fields to reconfigure the escalation.
The process map will look something like Figure A-28.
You will also need to create some process data fields; make them hidden and not audited.
In the user interface that corresponds to the Client Event, you can put in some code that will redirect the page to the user's next worklist item from the same process instance, and they will see the same page now with the updated values but belonging to another Client Event.
The code for this redirect will look as follows:
con.Open("k2server");
WorklistCriteria crit =  new WorklistCriteria();
crit.AddFilterField(WCField.ProcessFolio, WCCompare.Equal,
"folio_of_my_process_instance");
crit.AddFilterField(WCField.ProcessFullName, WCCompare.Equal,
"project\processname");
crit.AddFilterField(WCField.ActivityName, WCCompare.Equal, "activity_name");
crit.AddFilterField(WCField.EventName, WCCompare.Equal, "event_name");

Worklist wl =  con.OpenWorklist(crit);

if (wl.Count > 0)
{
url =  wl[0].Data;
}
Con.close();
Page.Redirect(url);
Of course, the server event in the activity that follows the escalation activity will have to work out the relevant logic to set the correct escalation timers and Line Rules. Still, you have achieved what you needed to do.
By Russell Forster, K2 Consultant
Today I discovered a feature within K2 blackpearl, the ability to loop through a list of items and execute a set of events for each item, without having to write a line of code!
A simple Order Processing example can illustrate my business case. For demonstration purposes I assume an Order has multiple Order Items. A K2 Process (Process Order) instance has been started for an individual order. While running this process, we need to spawn a subprocess (Process Order Item) for each Order Item.
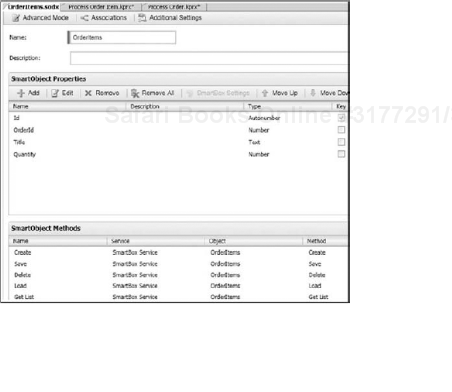
I have created a SmartObject (SmartBox) called OrderItems (Figure A-29), which has a List Method returning all Items for a given Order.
To see how this looks in K2 see Process Order and Process Order Item processes in Figure A-30.
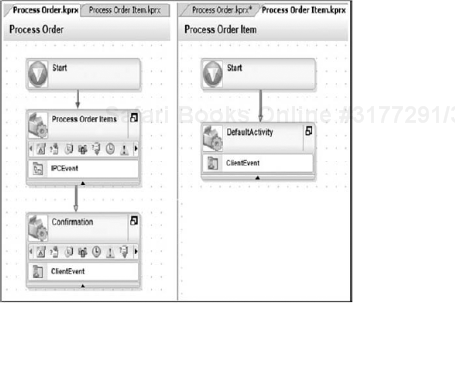
The Process Order process has one data field:
OrderId (Number)
The Process Order Item process has two Data Fields:
OrderId (Number).
OrderItemId (String) — Note this has to be a string because K2 will pass this value into the process.
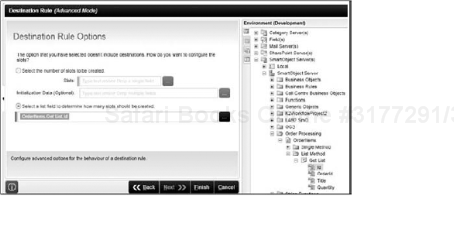
You are going to start an instance of Process Order Item for each Item returned by the SmartObject. Within the Process Order Items, set the Destination Rule Option to be Plan per Slot (no destinations).
Select the Id field from the OrderItems SmartObject's List method (see Figure A-31.
Important: The field you select here will be used to identify each loop instance.
Pass the OrderId (Process Data Field) as an Input for the SmartObject (Figure A-32.
Click Finish.
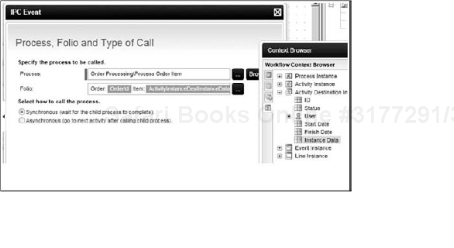
Now when you configure the IPC event, you are able to get the OrderItem's Id Field by accessing the Activity Destination Instance/Instance Data (String). See Figure A-33.
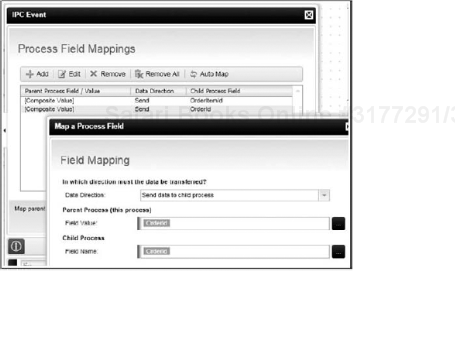
You then map the required fields (see Figure A-34 and Figure A-35.
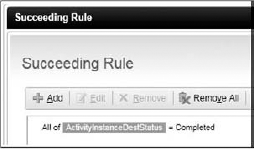
A final step is to configure the Process Order Items Activity Succeeding Rule to ensure all instances have completed by ensuring that All ActivityInstanceDestStatus are now equal to completed as shown in (see Figure A-36.


By Frank Wu, K2 Consultant
The K2 event SharePoint Sites and Workspaces allows the creation of sites under an existing parent site. When the SharePoint site or workspace exists already (they only need to be created once) and when you are calling the CreateWorkspace() method of class K2SPWebs, a typical exception gets thrown as follows:
Server was unable to process request. --->
Microsoft.SharePoint.SPException: The Web site address "/MyTestSite" is
already in use. ---> System.Runtime.InteropServices.COMException
(0x800700B7): The Web site address "/MyTestSite" is already in use. at
Microsoft.SharePoint.Library.SPRequestInternalClass.CreateWeb(String
bstrUrl, String bstrTitle, String bstrDescription, UInt32 nLCID, String
bstrWebTemplate, Boolean bCreateUniqueWeb, Boolean bConvertIfThere,
Guid& pgWebId, Guid& pgRootFolderId, Boolean bCreateSystemCatalogs) at
Microsoft.SharePoint.Library.SPRequest.CreateWeb(String bstrUrl, String
bstrTitle, String bstrDescription, UInt32 nLCID, String
bstrWebTemplate, Boolean bCreateUniqueWeb, Boolean bConvertIfThere,
Guid& pgWebId, Guid& pgRootFolderId, Boolean bCreateSystemCatalogs) ---
End of inner exception stack trace --- at
Microsoft.SharePoint.Library.SPRequest.CreateWeb(String
bstrUrl, String bstrTitle, String bstrDescription, UInt32 nLCID, String
bstrWebTemplate, Boolean bCreateUniqueWeb,
A resolution for this issue is to apply exception handling and add a try. . .catch block around the createWorkspace() method call. To do that, follow these steps:
Right-click on SharePoint Sites and Workspaces Event Wizard
Right-click on the box CreateSite
Expand the section for
CreateSite_Executecodeand add atry ... catchblock as shown in the following.//This the code to be used to check whether or not an exception is //thrown by the "CreateSite method in the method itself private void CreateSite_ExecuteCode(object sender, EventArgs e) { try { using (K2SPWebs k2SPWebs = new K2SPWebs()) { K2Uri k2Uri = new K2Uri(_siteURL); k2SPWebs.Url = k2Uri.FormatURI(true) + "_vti_bin/K2SPWebs.asmx";k2SPWebs.Credentials = _adCredentials.GetCredentials(_siteURL); k2SPWebs.CreateWorkSpace(_newServerRelativeURL, _title, _description, _webTemplate, _useUniquePermissions, false, _useNavigationInheritance); AddToProcessField(k2Uri.FormatURI(true), _newServerRelativeURL); } } catch (Exception E) { Console.WriteLine("<<<<<<<<<<<<<The " + _newServerRelativeURL.ToString() + " site already exists>>>>>>>>>>>>>"); } }Build and deploy the project.

By Blake Carrigan, K2 Consultant
When using an InfoPath in a process, you may need to display the name of the process instance originator on certain views of the InfoPath form. However, the process originator is not stored in the _K2 group of fields injected into the form template by K2. This can be accomplished fairly easily using a few lines of code in a default server event as follows:
Add a text field to your InfoPath form that will be used to display the process instance originator name. In this example, the field is called
ProcInstOriginator. Make sure to edit the InfoPath form from within the K2 for Visual Studio environment by running the InfoPath Process Integration Wizard and selecting Design.In the very first activity of your process, add a Default Server Event (Code) as the very first event.
Right-click on the server event and select View Code
Add the following code to the
Mainmethod://Get the process originator from the K2 context object string strOriginator = K2.ProcessInstance.Originator.Name.ToString(); //Get the value of the xml field that represents the InfoPath form string strXmlField = K2.ProcessInstance.XmlFields["InfoPathXMLFieldName"].Value; //Specify the xpath to the ProcInstOriginator element string strXmlXPath = "myFields/ProcInstOriginator"; //set the ProcInstOriginator in the xml field based on the xpath. Returns the // updated xml field value string xmlString = SourceCode.Workflow.Common.Utilities.XMLFieldMod.SetXMLValue (strXmlField, strXmlXPath, strOriginator); //Assign the new xml field value back the InfoPath process xml field K2.ProcessInstance.XmlFields["InfoPathXMLFieldName"].Value = xmlString;Note that, in this example, the process XML field name,
"InfoPathXMLFieldName", needs to be replaced with the appropriate value for the XML field name that represents your InfoPath schema. ThestrXmlXPathvariable will also need to be set to the appropriate XPath for the element that will be used to display the originator name.Deploy the process.
After you deploy the process and start a new instance, any InfoPath views that contain the ProcInstOriginator field will display the process originator name.
By Blake Carrigan, K2 Consultant
When K2 blackpearl server is initially installed, the STMP server (e-mail server) is specified in the Configuration Manager Wizard. If the default STMP server needs to be updated post-installation, it is important to understand the difference between the SMTP server configuration information used for a mail event versus the Event Notification mechanism used for a Client Event, in order to update the STMP server in the appropriate place.
E-mail notifications for a Client Event are implemented as notification events that get handled by the K2 blackpearl server Event Bus. The SMTP server used for notification events can be changed by running the Configuration Manager on the K2 blackpearl server. At the E-mail Server Configuration screen, enter the new e-mail server name and complete the Configuration Manager wizard. Alternatively, it is possible to manually update the smtpServer setting in the following section of the Sourcecode.Smartfunctions.Configuration.config file on the K2 blackpearl server without having to run Configuration Manager.
<sourcecode.smartfunctions.configsections.sfconfigsection
connectionstr= "SFDBConnection" soServerName= "blackpearl"
soServerPort= "5555" dependencyServerName= "blackpearl"
dependencyServerPort= "5555" useDependencyServer= "true"
sfDependencyClass= "a9345270-a429-4eea-9124-fbe6bc7d2350"
soDependencyClass= "9812f4ea-75c9-48c1-83db-578fcce0cbc7"
smtpServer= "blackpearl" smtpFrom= "[email protected]" />
This file is located in C:Program FilesK2 blackpearlHost ServerBin for a default K2 blackpearl installation. The K2 blackpearl server Service must be restarted for the change to take effect.
A mail event on the other hand is not implemented as a notification event and thus does not get triggered by a specific event that occurs in the K2 system. It simply executes as part of the normal process flow.
The STMP server used by a mail event is configured in the mail event wizard when it is run in Advanced Mode. By default, this is set to the Mail Server environment variable. Unless this has been overridden by hardcoding the server name in the event wizard, to update the STMP server for a mail event simply modify the Mail Server environment setting for the appropriate environment via the of the K2 Object
Browser in Visual Studio. The environment settings can also be modified from the Management Console in Workspace.
Note that the process will need to be redeployed at which point the Mail Server String Table entry that gets used at run time will be updated accordingly. To avoid redeploying the process, you can update the String Table entry for the Mail Server manually via Workspace.
By Blake Carrigan, K2 Consultant
It may be desirable to include the link for a worklist item in the message body of a mail event rather than using a Client Event notification. By default, a Client Event notification contains a link to the worklist item for each destination user, which includes the serial number on the query string. When configuring a mail event, you must manually build the link to the worklist item in the mail message body. However, the required SN query string parameter (the serial number) is not directly accessible in the Mail Event Wizard.
The serial number is associated with a worklist item and is unique for each destination user of an activity containing a Client Event. It consists of the ProcessInstanceId and ActivityInstanceDestinationId in the form of [ProcessInstanceId]_[ActivityInstanceDestinationId].
A mail event that precedes the Client Event can be used to send e-mail containing a link to the worklist item by building out the URL for the worklist item in the message body. The URL requires the serial number as a query string parameter and will look something like this:
http://[server]:[port]/[path]/[pagename].aspx?SN= [ProcessId]_
[ActivityInstanceDestId]
In this example the [ProcessId] and [ActivityInstanceDestId] for the SN query string parameter can be added to the message body using the Workflow Context Browser tab of the K2 Object Browser. The [server], [port], [path], and [pagename] will need to be replaced with appropriate values for your environment.
In addition, the serial number can be obtained in the code behind a server event that precedes the Client Event, using the K2 context object. For example, it could be assigned to an activity level data field as follows:
K2.ActivityInstanceDestination.DataFields["SerialNumber"].Value =
    K2.SerialNumber.ToString();
When you are using the Plan Just Once Destination Rule option, there will be only one ActivityInstanceDestination resulting in a single worklist item that is shared by all the destination users. Thus, the serial number will be the same for all destinations.
When you are using the Plan per Destination option, there will be an ActivityInstanceDestination for each destination user, and each user will have a unique serial number. In this case all events that precede the Client Event will be executed once for each user, so data that is unique to the destination user such as the serial number should not be saved to a process level data field.
By Blake Carrigan, K2 Consultant
The worklist item for a SharePoint Workflow Integration Client Event points to the Workflow status page in MOSS called WrkStat.aspx. This page contains the links for the actual Task List items in SharePoint that allow the user to action the worklist item. All the data needed to build the URL for the WrkStat.aspx page is available in the SPIntegrationData process XML field immediately after the process starts.
You may need to include this URL in a mail event rather than use a client notification event. The query string parameters for the WrkStat.aspx page can be obtained from the SPIntegrationData field to build out the URL for this page as follows:
http://[mossserver]:[port]/[sitepath]/_layouts/WrkStat.aspx?List= [SPInt
egrationData_ListId]&WorkflowInstanceID= [SPIntegrationData_WorkflowId]&
ItemUniqueId= [SPIntegrationData_ItemUniqueId]&taskListId= [SPIntegration
Data_TaskListId]
The values between the brackets for the query string parameters correspond to the SPIntegrationData process XML field elements and can be added to the message body using the Process/Activity Data tab of the K2 Object browser. [mossserver], [port], and [sitepath] will need to be replaced with appropriate values for your environment.
Note that the list item ID(s) for the actual task items created on the SharePoint Task List specified in the SharePoint Workflow Integration Process Wizard are not stored in the SPIntegrationData field.
By Blake Carrigan, K2 Consultant
Before using SmartObjects in code or in a K2 process, test them using the Amazing K2 SmartObject tool available in the blackmarket section of K2 Underground: www.k2underground.com/k2/ProjectLanding.aspx. Again, be sure to create a member account to access the site if you haven't already.
This tool can be used to execute your SmartObject methods and verify they are functioning as expected before implementing them in an application. It can be extremely useful for isolating and addressing problems specific to your SmartObjects before using them in code, in an InfoPath form, or in a complex K2 process.
Or simply use the tool to explore and understand SmartObjects you may not be familiar with such as the out-of-the-box Workflow Reporting SmartObjects.
It also provides capabilities for creating SmartObjects, deleting SmartObjects, registering Service Types, registering Service Instances, and more. This tool is invaluable for anyone using SmartObjects.
By Blake Carrigan, K2 Consultant
To get a list of every user and action executed against a given process instance or a specific activity use the Activity_Slot_Data Workflow Reporting SmartObject that is installed with K2 blackpearl. Often there is a need to display this information on a form at run time for an active process instance, or it may be needed for reporting and auditing of completed and/or active process instances.
The Activity_Slot_Data SmartObject has a Destination property that will always get populated with the destination username that actioned the worklistItem. It uses a name-value pair to store the action taken by the user. The Data_Name property will be set to the name of the activity data field used for the action result, which by default is Action Result. The Data_Value property will be set to the name of the action taken by the destination user. It can be filtered by ProcessInstanceId and/or ActivityInstanceId. Note that this SmartObject does not include a property for the specific activity name, so the Activity_Instance_Destination SmartObject should be used to obtain this information.
Take note that the Activity_Slot_Data SmartObject does not include a complete list of all destination users for a given activity, just the slot data. For example, assume a situation where an activity has five destinations and two slots. When the activity is complete, the slot data for the activity will consist of two entries, each containing the name of the destination user and the action taken by that user.
The following is a simple code example of how the slot data can be accessed for all activities of a given process instance using the SourceCode.SmartObjects.Client namespace. It requires a reference to SourceCode.SmartObjects.Client.dll and SourceCode.HostClientAPI.dll:
// Create a SmartObject ClientServer Object
SmartObjectClientServer soServer =  new SmartObjectClientServer();
SCConnectionStringBuilder cb =  new SCConnectionStringBuilder();

// Build the connection string
cb.Host =  "blackpearl";
cb.UserID =  "Administrator";
cb.Password =  "password";
cb.Port =  5555;
cb.Integrated =  true;
cb.IsPrimaryLogin =  true;

// Open the connection to the K2 Server
soServer.CreateConnection();
soServer.Connection.Open(cb.ToString());
// Get a handle to the 'Activity_Slot_Data' SmartObject
SmartObject soASD =  soServer.GetSmartObject("Activity_Slot_Data");
//Specify the method
soASD.MethodToExecute =  "List";
// Limit the results to a specific process instance
soASD.Properties["ProcessInstanceID"].Value =  "5593";

// Execute the list method and display the Destination user and Action Result for
// each slot
SmartObjectList smoASDList =   soServer.ExecuteList(soASD);
for (int i =  0; i < smoASDList.SmartObjectsList.Count; i++)
{
    if (smoASDList.SmartObjectsList[i].Properties["DataName"].Value = =
         "Action Result")
    {
        Console.WriteLine("----------------------------");
        Console.WriteLine("Destination Name: " +
            smoASDList.SmartObjectsList[i].Properties["Destination"].Value);
        Console.WriteLine("Action Result: " +
            smoASDList.SmartObjectsList[i].Properties["DataValue"].Value);
    }
}By Blake Carrigan, K2 Consultant
It is possible to determine the destination users for an activity at run time if the Destination Rule planning option is set to Plan per destination. This can be done via code behind the Client Event or a server event that precedes the Client Event. The user information is available via the K2.ActivityInstanceDestination.User object, which has properties for the username, FQN, e-mail, and so forth. The following example shows how the destination FQN can be obtained from code in a server event:
K2.ProcessInstance.Logger.LogInfoMessage("", "Destination User FQN: " +
    K2.ActivityInstanceDestination.User.FQN.ToString());
This example simply illustrates how to access the destination user information by writing it to the K2 logging targets that have been enabled to log messages of type Info. The data could easily be saved to a repeating node of a process XML field for use on a form, and so on.
When you are using Plan per destination, an ActivityInstanceDestination is instantiated for each user, meaning the events that precede the Client Event will execute once for each destination. Thus, saving destination user data to a process-level data field should be avoided as it will be overwritten each time the server event executes. The process data field will ultimately be populated with the data from the last destination user.
If roles are being used and the Destination Rule is configured to use the Create a slot for each role option,
K2.ActivityInstanceDestination.User.FQNwill resolve to the role name.
It is not possible to obtain destination user information when using the default planning option of Plan just once because there is no user context. In this case, there is a single ActivityInstanceDestination that belongs to K2Server and no specific destination user. Attempting to execute the preceding code results in an "Object reference not set to an instance of an object" exception, causing the process instance to go into an error state.
However, when you are using Plan just once, it is possible to access the worklist slot data at run time. This can be done via code in a server event following the Client Event to determine the user and action taken by that user:
for (int i =  0; i <
K2.ActivityInstanceDestination.ActivityInstance.WorklistSlots.Count; i++)
{
    K2.ProcessInstance.Logger.LogInfoMessage("", "Destination User FQN: " +
        K2.ActivityInstanceDestination.ActivityInstance.WorklistSlots[i]
        .User.FQN.ToString());
    K2.ProcessInstance.Logger.LogInfoMessage("", "Action Result: " +
        K2.ActivityInstanceDestination.ActivityInstance.WorklistSlots[i]
        .DataFields["Action Result"].Value.ToString());
}
The Server Event code will run once immediately after the Client Event evaluates to true and will display the user and action taken by that user for each slot configured in the destination rule. The slot data will always contain the name of the destination user, regardless of whether roles are being used.
One side note regarding Plan, because this comes up quite frequently: When you are using a mail event with this option, the Destination User checkbox in the mail event will be disabled, since the single ActivityInstanceDestination belongs to the K2 server and not to a specific destination user.
The preceding WorklistSlots example can also be used when you are using Plan per destination, but the server event that follows the Client Event will execute once for each slot, immediately after the worklist item is actioned, rather than executing just once. Again, this is because each user has an ActivityInstanceDestination, and when the worklist item associated with it is complete, the Client Event evaluates to true. So, in a multislot situation after the first slot is complete, the preceding code example will display the slot data for that one slot. When the second slot is complete, it will display the slot data for both the first and second slots, and so forth.
By Blake Carrigan, K2 Consultant
By default, when a process is deployed from K2 for Visual Studio, process-specific Workflow Reporting SmartObjects, each with a List method, will be created for the process, each activity, and each event defined in the process. Every time the process is deployed, a new version of each SmartObject is created.
In an environment such as a development environment where these SmartObjects may never be needed, they can be disabled to reduce the time it takes to deploy the process. When you are deploying processes that contain many activities and events or deploying multiple processes at once, disabling the Workflow Reporting SmartObjects for each process can provide a noticeable improvement in deployment time.
Deployment of the Workflow Reporting SmartObjects is configured for each specific process. With the process open in K2 for Visual Studio, from the process toolbar at the top of the design canvas, click the SmartObject Association icon. In the SmartObject Association dialog uncheck the CreateWorkflow Reporting SmartObjects checkbox and click the Finish button. This will prevent the creation of the Workflow Reporting SmartObjects for future deployments.
When the process is ready for deployment to the production environment, the Workflow Reporting SmartObjects can be enabled again as necessary.
By Blake Carrigan, K2 Consultant
K2 blackpearl provides several advanced techniques for configuring destinations. One such technique involves populating the destination set using a SmartObject. Rather than adding specific individual users to the destination, it is possible to set the destination to the Get List method of a SmartObject; specifically to a SmartProperty that returns the destination usernames in a format that is supported by the security provider being used.
The following example does not go into the details of creating and populating a SmartObject but illustrates how a destination can make use of a SmartObject that calls the Get List method to return usernames:
Run the Destination Rule Wizard for the desired activity.
At the Destination Users screen click the ellipsis to load the K2 Object Browser. Note that if the Destination Rule Wizard is run in Advanced Mode, at the Destination Sets screen it is necessary to select the appropriate destination (or add a new one), and click Edit to access the dialog where destination users can be added.
From the Environment tab expand the SmartObject server(s) node.
Expand the SmartObject server node.
Drill-down to and expand the SmartObject that stores the destination usernames.
Expand the List Method node.
Expand the node for the Get List method. Note that the list method may have been named something other than Get List when the SmartObject was created.
Select the SmartProperty that stores the usernames that will populate the destination as shown in Figure A-38.
Click the Add button, and the Smart Properties screen will be displayed.
If necessary, specify input values to filter the results returned by the Get List method and click OK. The destination Name will be set to the SmartProperty name, and the type will default to User as seen in Figure A-39.
Complete the Destination Rule Wizard.

When you are using the default security provider installed with K2 blackpearl that supports Active Directory, the SmartObject can return usernames in any of the following formats:
[Label]:[Domain][User]
[Domain][User]
[User]
When the security label is not specified, the default security label is assumed. For a default installation of K2 blackpearl, the default security label is K2 and is associated with the Active Directory security provider.
When using a SmartObject that returns role names, make sure to set the Type to Role rather than User. As of this writing, using a SmartObject that returns group names is not supported. In addition, the SmartObject should not return a combination of users, groups, and roles.
By Blake Carrigan, K2 Consultant
Mouse gestures can be used to speed up the workflow design process. Rather than dragging an activity or event from the Visual Studio toolbox and dropping it onto the design canvas, the mouse can be used to create the activity or event by holding down the right mouse button and drawing the appropriate letter on the design canvas. For example, drawing an "O" will create a default activity where the "O" was drawn.
It is also possible to use mouse gestures to create events on existing activities by drawing the appropriate letter on the activity.
The following is a list of Mouse Gestures that can be used on the process design canvas:
Mouse Gesture | Activity/Event Created |
|---|---|
C | Client Event |
M | Mail Event |
O | Default Activity |
P | InfoPath Process Wizard/InfoPath Client Event |
S | Default Server Event (code) |
W | Default Server Event (WF) |
By Blake Carrigan, K2 Consultant
Sometimes it is necessary to get or set the value of a process or activity XML field element in a running process instance. This can be done in code behind a server event using classes in the .NET System.Xml namespace, but can be simplified by using the SourceCode.Workflow.Common namespace. It includes helper classes with static methods that can be used to get and set K2 XML fields.
The following is an example of how this can be done in code behind a server event:
Create a new K2 process in Visual Studio and define a process XML field called SampleXMLField. By default an XmlDocument element will be created.
Right-click on the XmlDocument element and select Add.
In the Add XML Field or Group dialog, add a new field (element) called SampleXMLElement with a data type of String, and click OK.
Right-click on the process XML field node, SampleXMLField, and select Edit.
Select the Initial Value tab, click the Generate sample XML file button, and click OK.
Add a default server event (Code) to the design canvas and draw a line from the Start activity to the DefaultActivity associated with the server event.
Right-click on the serverevent and select View Code
Add the following code to the Main method of the serverevent:
// Set the value of a process xml field element using the XMLFieldMod class

// Retrieve the current value of the xml field
string strXml =  K2.ProcessInstance.XmlFields["SampleXMLField"].Value;
// Write entire xml string to the console to see the initial value of the
// "SampleXMLElement"
Console.WriteLine("XML Field value: " + strXml);
// Set the xpath for the element to be updated
string strXPath =  "XmlDocument/SampleXMLElement";
// Set the new value for element value based on the xpath.  Returns the updated xml
// field value.
strXml =
    SourceCode.Workflow.Common.Utilities.XMLFieldMod.SetXMLValue(strXml,strXPath,
    "TheNewValue");
// Assign the new xml field value back the process level xml field
K2.ProcessInstance.XmlFields["SampleXMLField"].Value =  strXml;

// Get the value of a process xml field element using the XmlHelper class

// For illustration purposes, set the strXml variable to null and retrieve it again
strXml =  null;
strXml = K2.ProcessInstance.XmlFields["SampleXMLField"].Value; // Get the value of the element that was set based on the xpath string strElemValue = SourceCode.Workflow.Common.XmlHelper.GetXPathValue(strXml, strXPath); //Display the value in the K2 Server console to confirm it displays "TheNewValue" Console.WriteLine("SimpleXMLElement Value: " + strElemValue.ToString());Save the project and deploy it.
Note that if you start a process instance while the K2 server is running in console mode, you should see output similar to the following when the server event executes:
XML Field value:<XmlDocument xmlns:xsi= "http://www.w3.org/2001/XMLSchema-instance"> <SampleXMLElement>SampleXMLElement1</SampleXMLElement></XmlDocument>SimpleXMLElement Value:TheNewValue
By Blake Carrigan, K2 Consultant
If you've ever used K2.net 2003, you are probably aware there is no mechanism for retrieving the K2 Studio process file from the K2 database for an exported process. If the process is lost and no backups are available, to export a new version of the process definition would require rebuilding the process from scratch. If you find yourself in a similar situation with K2 blackpearl where the K2 Workflow project source files are no longer available, there is hope.
Each time a K2 blackpearl process is deployed, the project source files are also deployed to a binary field in the _proc table of the K2Server database. The binary file contains the K2 for Visual Studio project file (.k2proj) along with the specific process file (.kprx). For an InfoPath process, the InfoPath form templates are also included. If the project contains SmartObjects, the .sodx files are not included as part of the project source deployed to the database.
Workspace provides an interface for downloading the binary project source file as follows:
From the Management tab select Management Console.
Expand the appropriate K2 blackpearl server node.
Expand the Workflow server node.
Expand the Processes node.
Expand the desired project and process.
Select the Versions node.
In the right-hand pane all versions of the process that have been deployed to the K2 server will be listed. Click the download link for the desired version of the process definition to download the compressed executable file.
Once the project is downloaded and extracted, it can be opened in Visual Studio and redeployed as a new process version.
By Blake Carrigan, K2 Consultant
When you are using an InfoPath Integration process with Forms Services, form submission failures typically result in the following generic message displayed in a message box: "An error occurred while the form was being submitted."
To effectively isolate and troubleshoot this issue, you need to determine the underlying error. There are a couple of possible ways to obtain the actual exception details.
Review the SharePoint logs on the MOSS front-end server(s).
By default, the SharePoint logs are located in
C:Program FilesCommon FilesMicrosoft Sharedweb server extensions12LOGS, but the location can be confirmed via SharePoint Central Administration. In order to capture Forms Services events in the SharePoint logs, you must enable the diagnostic logging for the Forms Services categories in Central Administration.Given that large volumes of data can be written to the SharePoint logs in a short period of time, the best way to troubleshoot a form submission problem is:
Reproduce the problem.
Open the most current SharePoint log.
Search from the bottom of the log up for Forms Server or Forms Services looking for exceptions and warnings.
The following is an example snippet of a warning logged for a form submission failure. In this case, it's clear that the problem is a result of the user not having Start permissions for the process:
Warning  Form submission failed. (User: K2DEMOadministrator, Form
Name: TipsTricks, IP:, Request:
http://moss.k2demo.local/_layouts/Postback.FormServer.aspx, Form ID:
urn:schemas-microsoft-com:office:infopath:TipsTricks:-myXSD-2008-09-
08T20-04-31, Type: DataAdapterException, Exception Message: The remote
server returned an error: (500) Internal Server Error.
System.Web.Services.Protocols.SoapException: Server was unable to
process request. ---> System.Exception: The process cannot be started
due to the following reason: 24408 K2:K2DEMOAdministrator from
192.168.1.103:7 does not have rights to Start Process
TipsTricksTipsIPProc1Process1
Often if the error is not specific to Forms Services, if possible, it can be useful to temporarily configure the form library to use the InfoPath client rather than the Web browser, to obtain a more meaningful error message. Rather than the "generic" error you get when using Forms Services, you will get a dialog that contains the underlying exception details, as shown in the Figure A-40.

In this example, if you were to scroll to the right, you would see the same underlying exception message that was logged to the SharePoint logs that you saw previously.
This technique is advantageous in that it is not necessary to dig through the SharePoint logs in an attempt to find the exception.
By Chris Geier, K2 Program Manager
I have been asked many questions about our SharePoint integration but none more often that of questions about forms in our SharePoint integrated workflows. During the building of these types of processes you have the option to use a few different types of forms, including automatically generating ASP.NET pages. People often wish to customize the look and feel of these pages beyond what is exposed in the wizards. Fortunately, this is much easier than you think.
When running through the SharePoint Workflow Integration Wizard, make sure that you select ASP.NET as the form technology and generate new ASP.NET pages as the form location. For the rest of the process, run through the wizards as you normally would. After you have your process built, go to where you have saved your project in the file system. You will see a new directory there, which is named CSWebsiteWI by default. Within this directory you will see the pages that K2 blackpearl has generated for you. You can open each one of these files in Visual Studio or even SharePoint Designer. Once it is open in your editor of choice, you can add graphics, change the look and feel, add other fields, use the K2 API, or do virtually anything you need to do. Awesome isn't it?