Mike Talley
Microsoft characterizes SharePoint as one of the fastest-selling Microsoft products in the history of the company. Sometimes it's qualified as the fastest-selling server product. In 2008, sales of licenses for SharePoint hit the magical number of $1 billion per year and joined Windows and Office as a heavyweight champion of software sales.[9] Over 100 million SharePoint licenses have been sold. The bottom line is that SharePoint is popular.
It's popular because it allows people to easily collaborate. It's popular because SharePoint, like many Microsoft products, provides the day-to-day functions that many information workers need. It's popular because it's relatively inexpensive, especially if you only need the free Windows SharePoint Services (WSS). It's popular because there's an entire industry that sells templates, solutions, training, and custom development services on top of SharePoint. It's popular because it's powerful.
The K2 blackpearl integration with SharePoint is extensive. If you have only WSS, you get a powerful in-browser interface to build workflows. You also get a mechanism to use data from SharePoint in other applications through SmartObjects. You get list, library, site, and user management. And you get search results that can be used later in the process. K2 blackpoint, which can be thought of as the subset of K2 blackpearl features that integrate with SharePoint, is available if you don't need the other features of the K2 platform. And you can upgrade from K2 blackpoint to K2 blackpearl if that becomes a requirement for your business.
If you have Microsoft Office SharePoint Server (MOSS) 2007, you get more functionality and K2 integration, including publishing, records management, InfoPath browser forms plus all of the standard WSS integration.
While SharePoint includes built-in workflow capabilities based on the Windows Workflow Foundation (WF) and is great for many simple workflows, it does not provide an enterprise-ready platform for automating business processes without a significant amount of development work. Even when adding SharePoint Designer 2007 or Visual Studio into the mix, the workflows that you can create are not readily reusable and cannot provide the extra functionality that an enterprise needs, such as out-of-the-box reporting, dynamic task assignment, and task redirection and delegation. Again, you can accomplish this, but it means more development work. You are also missing security and management building workflows in SharePoint Designer or Visual Studio, but you can accomplish these with more development work. In the end, building with WF requires a significant amount of development work to get to the enterprise-ready state. With K2 blackpearl, the extra, enterprise-class features are already there, and most of your process development is done in a drag-and-drop, visual, and declarative way. If you have to go into code, you will see your WF schedules behind the K2 canvas and can modify, insert, and delete them as you need to.
In this and the next chapter, we will discuss K2 blackpearl features, but as far as the SharePoint integration is concerned, many of the features are also available in K2 blackpoint, which is a less expensive version of the SharePoint-related features of K2 blackpearl. Since it's based on K2 blackpearl, K2 blackpoint processes can be upgraded to K2 blackpearl when the need arises. So keep this in mind as you read this chapter. Anytime we mention K2 blackpearl, the feature is probably in K2 blackpoint as well.
This chapter covers the following topics:
Key aspects of SharePoint
The differences between WSS and MOSS
How K2 integration works
K2/SharePoint integration features
The K2 Web Designer for SharePoint
The K2 Worklist Web part
K2 SharePoint/SmartObject integration
Creating a workflow in the K2 Web Designer for SharePoint
Scenarios enabled by K2 blackpearl
For the purposes of this chapter and the next, we will cover some basic features at a high level. This is not meant to be a complete picture of the features of SharePoint but rather an introduction to some key SharePoint concepts that will help put the K2-integrated features in context.
The highest level object in the SharePoint world is the Web application. There is a one-to-one mapping between the Web Application, the Internet Information Services (IIS) Web site, and the SharePoint content database. The next-highest level object is the site collection. It is just what it sounds like — a collection of sites. These can be top-level portals, individual team sites, project workspaces, records centers or publishing sites, just to name a few. Technically speaking, when you create a new site collection you're actually not creating any sites, just the container in which sites can be placed.
A site collection is a useful construct in SharePoint because it allows a group of sites to be treated as a single entity. For example, backing up a site collection makes it simple to backup and restore a set of related sites. Of course you can also back up individual sites if you want.
Sites within a site collection are hierarchically related, meaning that a single top-level portal may have many different child sites, and each of those child sites may have additional child sites of their own, and that list of sites can go on and on. Typically, at the top level you should limit the number of sites to around 125 for SharePoint. For the total number of sites in a site collection, try to limit it to 2000 sites. For whatever reason, 2000 is a magic number in SharePoint because if you start approaching 2000 items in a single SharePoint place — be that sites in a site collection, lists, and libraries in a site, items in a list or library — you risk running into some performance problems. SharePoint scales very well, and many times you will find that you can go beyond these limits quite easily, but keep that number in the back of your head when planning SharePoint site collections. One rule that you can bank on is that if you believe your single Web application database will grow beyond 100GB, try to spin off some of your sites into a new site collection. Break it down by Controlled sites, such as a company's portal structure, and Uncontrolled sites, such as those used for collaboration. Or break it down by regions, or by subsidiaries. Remember, however, that sharing data across site collection boundaries is not easy without a product like K2. For more information about this, see the topic "Plan for software boundaries" on TechNet (http://technet.microsoft.com/en-us/library/cc262787.aspx).
Sites within a site collection can also readily share information, since the content types, permissions, navigation, and security are typically inherited from the parent. You can choose to not inherit the parent's properties when creating new sites. That can be very useful, for example, when building out departmental sites, but the hierarchical relationship will still remain within the site collection. This inheritance of permissions, at least, goes right on down to individual items within a list or library, including folders. Just as when managing permissions on an NTFS file share, you should probably try to manage permissions at the highest level possible (closest to the first folder on the drive, or the first site in the site collection), and use groups and not individual users. But like NTFS, SharePoint allows you to control things on an item-level basis if needed. You can always revert the permissions to inherit from the parent again if you find it getting unmanageable.
Content types are also shared across site collections. They allow you to track metadata and associate workflows and other custom actions with particular pieces of content, as long as you develop those workflows in Visual Studio if you aren't using K2. Everything that you see in SharePoint is associated with a content type, and content types can inherit from each other. If you're familiar with object-oriented programming, content types are very similar in that a content type may inherit a set or properties, or in SharePoint terms "columns," from its parent content type but then extend that content type to include more properties. For example, a Document content type may have a property of Author, while the Chapter content type that is based on the Document content type has Author as well as Title and Page Count.
Content types are used throughout SharePoint to create documents and list items, update properties on content, and to search and locate information based on those properties. The more granular you can make your content types based on your company's core content, the more useful your SharePoint implementation becomes. Keep in mind that content types are shared at the site collection level (but child content types can also be scoped to a lower-level site if required), so if you have multiple site collections you probably don't want to create the same content types multiple times.
A related concept to content type is site column, which can be thought of as the vertical axis to the content type's horizontal axis. It allows you to manage standard data across multiple lists and libraries, on a property-by-property basis. This is useful at times, but plays a secondary role to content types in most implementations. Multiple content types can be associated with a single list or library, meaning that unlike previous versions of SharePoint and the Office Web Server, documents of different types can be stored alongside each other in the same document library but retain their metadata.
From a SharePoint user perspective, lists, and libraries are the main areas of work in SharePoint. A list tracks information and a library is a place to put documents. Under the covers they are actually the same thing with a slightly different display. Items are added to a list and files are added to a library. Each can have multiple properties based on the type of data being tracked, but basically a document is a type of list item that has a file type associated with it.
In previous versions of SharePoint, before the concept of a content type was introduced, the only way to track data associated with a document or list item was to add them as columns to the library itself. You can still do this with WSS 3.0 and MOSS, but using content types based on your company's information architecture is much more scalable and useful. However, it does take some pre-planning or SharePoint rework if you already have SharePoint running wild in your environment.
WSS 3.0 and MOSS 2007 are built in a modular fashion so that functionality can be added or removed from a particular site or site collection in a very simple and elegant way. This is enabled by two infrastructure features called Solutions and Features. That may sound confusing to call Features a feature of SharePoint, but that's essentially what it is because a SharePoint Feature allows you to package up a set of SharePoint items, such as a library template, a document, a menu item, and a workflow definition, and deploy that as a single package to a SharePoint site. You can also remove that set of items as a group, making the extension of SharePoint much easier to manage.
A SharePoint Solution is a deployable, reusable package that can contain a set of Features, site definitions, and assemblies to apply to sites, and that you can enable or disable individually.
So that is SharePoint at a glance. These are the most important aspects to understand about SharePoint when it comes to deploying and managing it, and for understanding where the K2 integration comes in. Everything else in SharePoint is just a riff on these core concepts.
SharePoint is actually two products, Microsoft Windows SharePoint Services 3.0 (WSS) and Microsoft Office SharePoint Server (MOSS) 2007, whose differences are often unknown, underestimated, and most often misunderstood.
WSS is the free, entry-level Web-based solution that allows information sharing and collaboration services. MOSS extends the features and services offered by WSS, bringing an enterprise-ready feature set to the collaboration foundation provided by WSS.
WSS provides site provisioning and content management, including features for document storage and document management like metadata, versioning, check-in/check-out, mobile device support, and the Recycle Bin, as well as other collaboration features such as alerts, blogs, and wikis. WSS also includes definitions for a number of different sites, including the Team Site, Document Workspace, Blank Site, Blog, Wiki, and Meeting Workspaces.
MOSS Standard includes the following additional features:
Internet Portals and Web content management. This functionality is partly derived from the retired Microsoft Content Management Server 2002 product and integrated with MOSS.
Enterprise Portal features, with tools for content design and navigation, as Site Directory, Target Audiences, My Sites, and Social Networking.
Enterprise Search tools, through a powerful and fully customizable search engine.
Content lifecycle management, both for Documents and Records.
Other features of MOSS include RSS feeds, a site directory, a site manager, audience targeting, and extra templates and Web parts.
There are a number of features in MOSS, which are known as Enterprise features because they are included in the Enterprise client access license:
InfoPath Forms Services (IPFS): Allows users to display Microsoft InfoPath 2007 forms in a Web browser.
Excel Calculation Services (ECS): Allows users to publish Excel workbooks to SharePoint sites and perform calculation-intensive operations on a dedicated server. A feature called Excel Web Access displays a spreadsheet in a Web browser.
Business Data Catalog (BDC): Allows users to integrate SharePoint with external databases and Web services to add line-of-business (LOB) information. A handful of BDC Web parts are used to browse business data, and MOSS search is able to return this information along with standard SharePoint information.
Business Intelligence (BI): Allows users to create digital dashboards and data reporting solutions based on SharePoint and line-of-business information surfaced through the BDC, by employing the BI Web parts, ECS, the Report Center, and Key Performance Indicators (KPIs).
Knowing which features are part of WSS and MOSS is necessary for a better understanding of the integration between SharePoint and K2 blackpearl. Many K2 features and wizards work with WSS, but there are a few that work only with MOSS.
The K2 blackpearl installer detects which version of SharePoint you have and installs either the K2 for SharePoint (MOSS) or the K2 for SharePoint (WSS) component. The WSS component includes the following features:
K2 Web Designer for SharePoint
SmartObject wrappers for SharePoint data
SharePoint Workflow integration
SharePoint Events integration
Sites and Workspaces management
User management (permissions)
List and Libraries
Documents and List Items
Process Portals (see the following note)
Search Results
Administration Components
K2 Worklist Web part
At the time of this writing, Process Portals is a K2 feature that is in beta. They are subsites that include a series of preconfigured Web parts that enable administration and management of K2 processes from within SharePoint. They will not be covered in detail in this chapter or the following chapter.
The MOSS component includes the following features:
SmartObject integration with the Business Data Catalog
InfoPath Forms Services
Publishing sites and pages
Record management
We will not cover every integration point in detail. The SharePoint wizards available in the K2 Designer for Visual Studio and the K2 Designer for Visio will be covered at a high level in Chapter 13. The K2 Help files provide extensive information about the SharePoint integration, including in-depth information about each wizard, what they do, and how to use them, as well as how to configure and manage the K2 SharePoint integration.
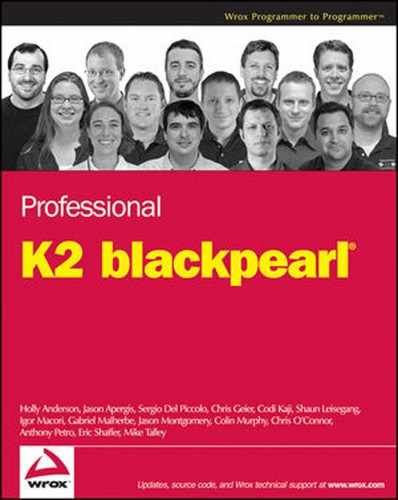
When the K2 for SharePoint component is installed and configured, a new tab called K2 for SharePoint appears in the SharePoint Central Administration site, as shown in Figure 12-1. This page is deployed as a SharePoint feature, much the same way that most of the K2 integration features for SharePoint are deployed.
From this page you can manage the K2 integration features for content site collections. Content sites are simply site collections that contain SharePoint sites, such as portals, team sites, meeting workspaces and the like, and are unlike sites that are used for Central Administration and the Shared Service Providers. Note that it is not possible to deploy K2 integration features to a particular site in a site collection. You can turn off some of the features individually on the site collection, but that will turn off the features for the entire site collection.
You may be asking "So what do the K2 Integration features provide?" Here is the full list:
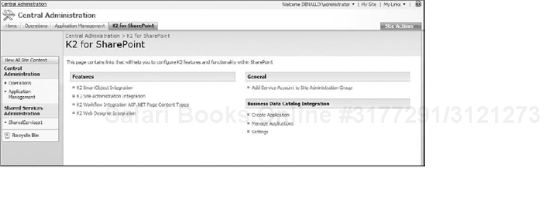
K2 SmartObject Integration: Allows SharePoint data to be wrapped with a SmartObject, and publishes the Update K2 SmartObject Service definition menu item as pictured in Figure 12-2.
K2 Site Administration Integration: Adds the administration links on the Site Settings page.
K2 Workflow Integration ASP.NET Page Content Types: Adds the ASP.NET instantiation and task forms to SharePoint for use with SharePoint Workflow Integration processes.
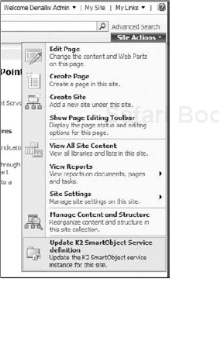
K2 Web Designer Integration: Adds the K2 Web Designer link, as shown in Figure 12-3, and the K2 Web Designer for SharePoint design canvas. For more information about working with the K2 Web Designer for SharePoint, see Chapter 14.

When you deploy a K2 SharePoint Workflow Integration process to a SharePoint site, it will also show up as a feature in the Site collection features page and in the K2 Workflow Integration page, both of which can be found in the Site Collection Administration section of the Site Settings page. There are other K2 features that are displayed in the Site collection features page, but be careful not to deactivate these features here, but rather use the K2 Workflow Integration page for managing workflows. Note that it would be a good practice to name your process in a standard way in order to make managing them easier, especially as the K2 Workflow Integration list grows. In the Site Administration section, you are able to manage K2-integrated SharePoint Events. This integration allows processes to start when an item is added to, updated, or deleted from a SharePoint list or library. The additional links in the Site Settings page allow you to manage workflows and features as needed.
The K2 Worklist Web part is managed as a solution instead of a feature, and is displayed on the Solution Management page of SharePoint Central Administration. Browse to this page by clicking the Operations tab, then the Solution management link in the Global Configuration section of the Operations page. This solution allows you to deploy the K2 Worklist Web part to any SharePoint site collection, even the site collection that hosts My Sites so that users can see their K2 Worklist on their personal My Site.
The K2 features that work with SharePoint communicate with the K2 Server through Web services that are hosted on the same IIS server where the K2 Workspace is installed. Under the RuntimeServices folder, there are two Web services in particular that are used in SharePoint scenarios. The first one, SharePointService, allows the K2 features to pass information between SharePoint and the K2 server. For example, the K2 SharePoint Integrated Workflows maintain tasks in the K2 Worklist as well as in the SharePoint task list. Information about the task is written to SharePoint through the K2 SharePoint Web service. This integration is provided so that SharePoint users do not have to browse to a different location to view their tasks, and it is the same way in which the out-of-the-box SharePoint workflow tasks are maintained. However, users can manage their tasks with either the K2 Worklist in Workspace, the K2 Worklist Web part (in SharePoint), or the SharePoint task list.
Other Web services that come into play when working with SharePoint are InfoPathService and OpenInfoPathTask. The first service allows InfoPath forms, either client-based or browser-based, to communicate with the K2 server to retrieve available actions, SmartObject data, and to submit a task form, among other things. The second one allows an InfoPath task to be opened.
For more information about working with InfoPath forms, see Chapter 11.
The remaining section on the K2 for SharePoint page in Central Administration allows you to create a BDC definition for SmartObject data, which is covered in Chapter 13.
Let's take a closer look at the K2 SharePoint integration features and how they might be used. The administration of these K2 features will not be covered beyond what has been mentioned. The other features, such as the in-browser workflow designer, the worklist Web part, and the SmartObjects integration will be covered in detail here.
The best way to introduce the features of the K2 Web Designer for SharePoint is to step through a simple process. You can try this on a SharePoint site of your own that has the K2 Web Designer available, or just follow along with this section. Either way, you will be able to discover how powerful this tool is by seeing it in action.
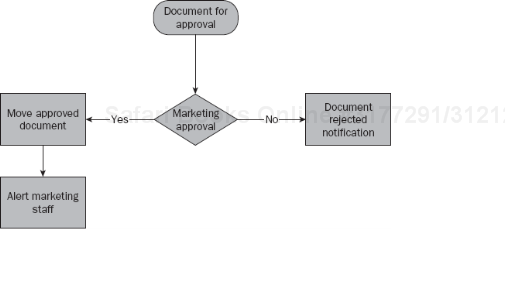
The example scenario is a hypothetical approval process for creating a brochure of products and services offered by a fictitious company.
Everything starts from the Work document library, a storage place for all textual and graphical elements that will be part of the brochure. Every element is going to need approval by the Marketing department.
The workflow manages approval of each element. Once approved, these elements are moved into a second document library containing every approved asset. From this point they are sent to artists and art directors who actually create the brochure, and they must be informed when new assets are ready. In the meantime, if the Marketing and Communication department refuses an item, the workflow sends a notification to the author informing him that the item he submitted was not approved. This scenario is shown in Figure 12-4.
The first steps set up the environment for the workflow:
Define a framework for records and data.
Create the two document libraries (one for work-in-progress assets and the other for approved materials).
Determine a metadata structure (for example: author, brochure references, status).
These tasks are typically done before you start designing the actual workflow. Now, you can turn to actually designing the workflow:
When you've created a document library for work-in-progress assets (called Brochure Materials in the example), open the library and start the K2 Web Designer by clicking the menu item on the Settings menu.
Click the New Process button on the K2 Web Designer page to start the designer. The K2 Web Designer first asks you to specify a Name and an optional Description for the new process in the Process Properties dialog.
This dialog also allows you to define if the process could be manually started by the user. This is a useful option when the library is a working environment where assets will be created, updated, and informally reviewed, and your goal is to let the user start the workflow with a voluntary action when the item is ready for formal approval. You can also choose to automatically start the process when a document is created or modified. In the example scenario, this option is set to its default value, Start Process Manually (see Figure 12-5).
Once it is completed, click OK.
In the K2 Web Designer, click the Approve — Decline template from the Outcome Templates in the Sidebar and drag the element onto the design canvas.
You are asked to specify Activity Properties. Type a Name and an optional Description for the activity (in this case, we named it Marketing Approval), and then click Next.
In this step, you will find the predefined actions in the template. You could customize the workflow by adding further actions or by modifying the existing ones. In our scenario, the two available actions, Approved and Declined, are enough to reach the final objective.
Nothing else will be modified, so click Next.
Every defined action is associated with an Outcome. Click on one of the actions, and then click Edit to customize its behavior (as shown in Figure 12-6).
An action could be customized depending on the environment, but you can also define specific Outcome Rules. For example, in some scenarios you could define rules allowing the process to move forward only when it is approved by two of the three reviewers. But you're not going to do that now.
Click Cancel on this dialog, and then click Finish to confirm your Outcome settings and return to the design canvas.


The design canvas shows the workflow, including the activity you just added and the outcome lines leading from the activity to blank boxes. This allows you to drag two more activities in the two Approved and Declined boxes.
Because of the business logic previously defined, when a document is approved it will be moved into the approved assets library. At the same time, artists and art directors are informed that new assets are available.
Open the Wizards section of the Sidebar and select the action Move Document from Document Wizards, then drag the element in the Approved area.
When you start a wizard, in the Activity Properties dialog you are asked to specify the activity Name (in our scenario, it's Move Approved Documents). You can also add an optional Description and then click Next.
Choose the destination document library (named Brochure Approved in our scenario), as shown in Figure 12-7, and then click Next to define optional Activity Outcomes.
In our process, an e-mail notification is subsequently sent to the Marketing department after moving the approved document. So click Add to insert a new Activity Outcome (named Notify), and then click Finish to complete the wizard.
Once again, in the design canvas, you will see a new line and blank box leading from the Approved activity.

To add the e-mail notification feature:
Drag the Send Mail Wizard from the Sidebar onto the Notify area. The wizard Activity Properties dialog window asks you to specify a Name (Marketing Alerting in our scenario) and an optional Description.
Click Next to start building a template for the e-mail message.
Drag the object Process Originator Email from the Object Browser to the From field to define the sender.
Insert the e-mail address of the receiver in the field To (you can use any e-mail address, even a distribution list such as [email protected]) and an optional Subject.
Now you can write the body of the message, alternating fixed text aspects and optional dynamic elements that are dragged into the message body from the Object Browser (as shown in Figure 12-8). When finished writing your e-mail, click Next to define further process options or click Finish to complete the wizard.

To complete the process, you need to define what should happen if the proposed assets are declined. Following the initial analysis, the originator should be notified by e-mail.
Drag the wizard Send Mail from the Sidebar into the Declined area and repeat what you did previously to create the message.
Use the marketing office e-mail address as the sender and drag the object Process Originator Email in the To field from the Object Browser, then complete the message with a descriptive Subject allowing receivers to easily understand that assets have been declined.
You could also add some useful dynamic elements to the message, such as the document Title or its URL, to make identification easier. This is particularly useful if many assets are submitted. Through the Object Browser you could find several elements identifying a document or its author, which is the same metadata in the document library.
Click Next to define further options or click Finish to complete the wizard.
The final step of the workflow is defining who will approve the assets:
Notice the exclamation mark next to the Marketing Approval block. Click on the icon to access the Destinations window and define the destination users who will approve the assets.
Click Add to search for users.
Select the option Add users to favorites (as shown in Figure 12-9), if you want to add them in the Favorites list in the Sidebar to make similar actions quicker in the future.
Click Save at the top of the Sidebar to save the process, as shown in Figure 12-10.
Click Deploy at the top of the Sidebar to make the process available and executable in the SharePoint library.


During the process deployment operation, the K2 Web Designer Build Process Wizard checks if the workflow is complete and warns you about issues or omissions. You should remember that the framework on which SharePoint is based requires at least a Tasks list in the site where the process will be executed as well as a Workflow History list. Both are required by the workflow.
When you design your workflow, you specify how the process will start. While it could be started automatically, we chose to start this particular workflow manually due to the manner in which the assets are created.
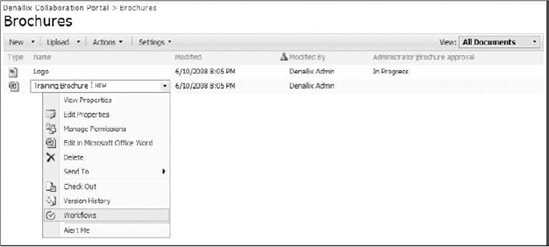
To manually execute a workflow associated to a list or a document library, choose Workflows from the item or the document context menu (as shown in Figure 12-11). On the next page you see a list of available workflows; click the workflow you want to start. Note that if every workflow associated with the list or library is an automatically invoked workflow (for example, the manual option is not specified), the Workflows context menu will not appear. However, once the workflow is running, it will be displayed to the right of the item in the main view of the list or library.
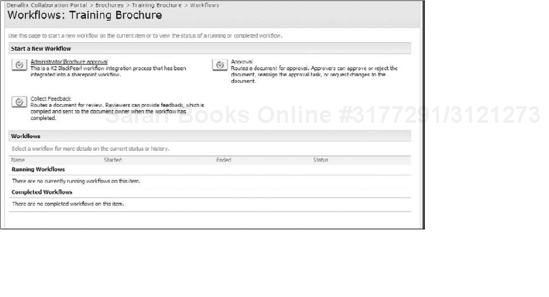
The Workflows page, which is a standard SharePoint page, allows you to start a new instance of a workflow by choosing among the available ones. You can also check if other workflows are currently running and see further details about the workflow.
The Workflows page, as shown in Figure 12-12, allows you to perform the following actions:
Create new workflows, starting from a workflow template associated to a list or a library.
Access the current status/workflow history.
Check which workflows are currently running.
Check which workflows are complete.
After choosing the workflow you want to start, you can set specific workflow template options. For example, you can set the destination users if the option Users Can Be Specified During Runtime was checked during the workflow creation.
After starting the workflow, remember that you can use the status in the document library for the current status of the workflow, the Workflows page in SharePoint, or the View Flow page in K2 Workspace for a more graphical and real-time view of the current process.
Integration between K2 and SharePoint is not limited to the K2 Web Designer for SharePoint. There are several other K2 Designers that allow SharePoint integration, including the K2 Designer for Visual Studio, the K2 Designer for Microsoft Visio 2007, and the soon-to-be-released K2 Studio. These designers share the common wizard interface, which includes many SharePoint-specific wizards. The wizards are divided into four different types for easier understanding.
Note that you can find the process wizards listed below in the Process Wizards section of the Visual Studio Toolbox, and the rest of the wizards (Client Events, Administration Events, and Content Management Events) are located in the Event Wizards section of the Toolbox.
Process Wizards
Client Events
SharePoint Workflow Integration Client Event: Allows the standard K2 blackpearl task form to be used to action a workflow task.
InfoPath Client Event: Allows an InfoPath form associated with a SharePoint library to be used to collect data and action a workflow task. Note that you can also use the InfoPath client event without SharePoint.
Administration Events
SharePoint Sites and Workspace: Allows the creation and deletion of sites and Workspaces.
SharePoint Lists and Libraries: Allows the creation and deletion of lists and libraries.
SharePoint User Management: Allows the creation, deletion, and updating of user and group rights.
Content Management Events
SharePoint List Item: Allows the creation, deletion, and updating of list items.
SharePoint Document: Allows the creation, deletion, copying, moving, and updating of documents in document libraries, even across SharePoint site collections.
SharePoint Records Management: Allows documents to be put on hold and moved to a Records Center.
SharePoint Search: Allows search criteria to be used to return results that can be used later in the process.
SharePoint Publishing: Allows the creation, deletion, and updating of publishing sites and pages.
These wizards and tools are described in Chapter 9, but in the next chapter, Chapter 13, we will describe each wizard in more detail and give you some ideas on how and when you might want to use them.
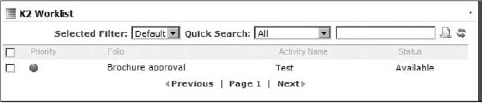
One of the most effective solutions to improve usability and integration between K2 and SharePoint is using the K2 Worklist Web part on a SharePoint page. This allows users to access the Tasks list in a more simple and straightforward way than by using the SharePoint task list. See Figure 12-13.
Remember that the K2 Worklist is available within K2 Workspace as well, where you could find some extended features to control the process.
Installing the K2 Worklist Web part is managed in the same way as installing any SharePoint solution:
Browse to the SharePoint Central Administration: Start

Click the Operations tab.
On the Operations page, click the Solution Management link. If the status of k2worklistwebpart solution is already Deployed, you don't have to perform any other actions (skip the step that follows).
If that status appears as Not Deployed, click the solution name and then click Deploy Solution. Confirm your action by clicking OK. Note that you must have administrative rights on the SharePoint server to perform this action. If you do not, check the available Web Part list in SharePoint, and if you do not see the K2 Worklist Web part, contact your SharePoint administrator.
The K2 Worklist Web part is like any other SharePoint Web part. It can be added to any part of a page that supports Web parts, which is just about every page in SharePoint sites. To add the K2 Worklist Web part to a page (if you have the necessary permissions):
Click on Site Actions and then select Edit Page to access the page layout.
Choose the Web Part Zone available in the page layout where you want to add the K2 Worklist Web part, and then click on the Add a Web Part button to open the Add Web Parts window.
Expand the All Web Parts group by clicking on the plus (+) sign.
Scroll through the list of the available Web parts to select the K2 Worklist Web part in the group Miscellaneous (Tip: Look for the only Web part with the green icon). Click Add to add the K2 Worklist Web part to the page. See Figure 12-14.
Save your modification to the page by clicking Exit Edit Mode under the Site Actions menu (not shown in the figure).
Click Publish on the Editing Toolbar near the top of the page if you're using SharePoint Publishing features. Note that this action may be associated with an optional approval process.
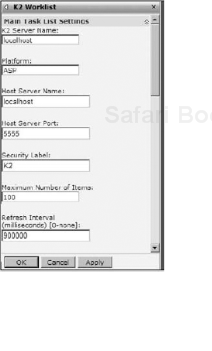
Once you have added the K2 Worklist Web part to the page, you must configure its connection to the K2 server.
To configure Web part connectivity, click on the down arrow on the top-right corner of the K2 Worklist Web part and then click Modify Shared Web Part.
Check your K2 environment connectivity settings from Main Task List Settings in the Web Part task pane as shown in Figure 12-15.
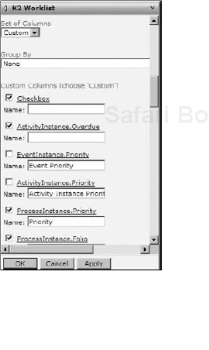
Configuration of the K2 Worklist Web part is handled in a very similar way to configuration of the worklist available in the K2 Workspace. Choose your preferred settings from the Task List Columns section on the Web part task pane. If you select Custom on the Set of Columns drop-down menu, you can choose which columns you want to show and the labels you want to use to display that information on the K2 Worklist Web part, as shown in Figure 12-16.
You can also configure the Group By option, which allows you to manage grouping of tasks — simplifying the user's view of their current tasks. If you think the Web part will show long task lists, enable the Paging option. With Paging enabled, only a few elements will be loaded each time with the Web part, improving performance.
When you have finished configuration, click OK to confirm your settings.
Publish your page once again (if necessary), using the Publish button on the Editing Toolbar.

The third and final K2 integration feature that we will discuss here is perhaps the most powerful. Before you explore this feature, make sure that you understand SmartObjects. If necessary, review Chapter 7, which covers what SmartObjects are, how a Service Object relates to a SmartObject, how they can be used, and how the K2 platform can be extended with them.
In the context of SharePoint, just about any piece of user-defined data contained within a site can be wrapped in a SmartObject. If you pause to think about how you can use SmartObjects in processes, even in a process that has no SharePoint integration, you will start to understand the possibilities of using this feature in new scenarios. Beyond processes, you can imagine an application that has no process elements at all, such as a Web site based on SmartObject data, and realize that with this feature — SharePoint data wrapped and exposed through SmartObjects — SharePoint can become a repository for business data that is used elsewhere in your organization. If you don't already use SharePoint in this way, you might consider trying this with a limited scenario. Users find SharePoint so easy to use that they will want to store their data there, but in the past it has been difficult to reuse that data. With the SmartObject integration, that becomes a lot less difficult.
Not only can you retrieve data from SharePoint through a process or through the SourceCode.SmartObjects.Client API, you can also use the .NET Data Provider for K2 SmartObjects interface. This is a standard ADO.NET component that you can add to any .NET project. The provider allows you to query and update data that is encapsulated by any SmartObject, including those exposed through the SharePoint Service Object.
Installing the SharePoint SmartObject integration feature allows the SharePoint Service Object to create an instance for the SharePoint site where it is deployed. The proper installation of the K2 SmartObjects feature can be verified by:
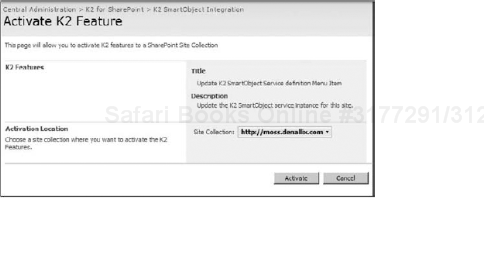
Accessing the SharePoint Central Administration site (Start
Clicking the K2 for SharePoint tab and then clicking K2 SmartObject Integration.
Choosing the Site Collection you want to verify. If you need to activate K2 features, click the Activate button (as shown in Figure 12-17).
Once the feature is deployed to a site, the context menu on the Site Actions drop-down menu will appear, as shown back in Figure 12-2. If you make changes to the SharePoint site from this point forward, such as adding a new list to the site, it may be necessary to update the SmartObject definition to expose that list through the SmartObject services layer. To do this, click the Update K2 SmartObject Service definition menu item.
There are many ways you can use the K2 blackpearl integration with SharePoint to enable new scenarios for your company's operations. In the earlier section on SmartObjects, we discussed one important scenario — exposing SharePoint data through ADO.NET and SmartObjects — and now we want to illustrate other ways of using the integration features. Since SharePoint is such a ubiquitous server platform used in many different capacities, it is impossible to list every possible scenario that K2 blackpearl (and K2 blackpoint for that matter) can be employed. But this section provides a small list to get you thinking about some of the possibilities.
The following sections describe some of the scenarios that could be managed through processes. These are just a few examples of what can be accomplished with SharePoint and K2 blackpearl. In Chapter 13, we'll cover more specific information about each wizard and how to use them.
SharePoint does not really have any native processes that allow users to request a new site. There are some products that allow this very scenario, but with a handful of the administration-focused K2 SharePoint wizards that are available with K2 blackpearl, namely the Sites and Workspaces, User Permissions, and Lists and Libraries, you can create a process to manage and control this common request. You could extend this process further to retire a site via a process once it has lived beyond its intended timeframe.
Even though SharePoint has a Send To menu option on which you can add the Records Center of a site collection, it requires users to send individual files to the Records Center. Using K2 blackpearl, you could perform a search for files that match a current status, even filtering those records based on the metadata of the content, and send that entire batch of documents to the Records Center in an automated manner. You could also create and delete records Holds in an automated fashion, allowing you to respond to legal or audit requests in a traceable, timely manner.
Using the content management features of SharePoint, you could setup a process that aggregates related content from disparate LOB systems, including SharePoint, and publish that information to a SharePoint publishing page. This could be set up to run on a schedule, as part of a process that is initiated by an action that a user must first take, or by the creation of a new item in a SharePoint list or library. You could also use process-based publishing to move pages to different environments, such as from Staging to Production, and update external data connections in the process.
Having deep integration with InfoPath 2007 and the option to publish forms that will work in the browser means that starting processes and actioning them doesn't require custom forms to be created every time. The flexibility offered with InfoPath forms and InfoPath Forms Services means that business users that are slightly technical can manage their own process forms.
One example of using SharePoint to manage business data is using a SharePoint list. The list contains Project Manager contact information for every customer in your organization. Even if your customer data is stored in a separate, line-of-business system (perhaps because project management duties change on a frequent basis), you don't want to update that dedicated field in the LOB system. Keeping it separate and in SharePoint allows the group manager to regularly review and update the information. With the SmartObject feature in SharePoint, you can build a SmartObject containing the customer project manager information and expose that to any .NET application in your organization. This would be a simple implementation, but perhaps you need to incorporate multiple fields from the LOB database into that SmartObject. You would develop a custom service or use one of the out-of-the-box services, depending on the LOB system, for communicating with the LOB system. Adding those SmartObject methods to the SharePoint SmartObject in order to return data from both SharePoint and the LOB system in a single composite SmartObject would allow data from SharePoint and another LOB system to be exposed, managed, and updated through a single interface.
We've covered some of the scenarios enabled by the integration between K2 blackpearl and SharePoint, and the list is by no means exhaustive. There are other operational benefits that come with the integration between K2 blackpearl and SharePoint integration that may not be obvious. The following sections describe the main ones.
By default, you don't get much in the way of process versioning when deploying new SharePoint workflows using SharePoint Designer or Visual Studio beyond what you do as a developer to version your assemblies. With K2 blackpearl, each time you deploy a process, the version is updated and every new instance will use the new version. However, already running instances will continue to use the older version of the process until they are completed.
With the upcoming release of Process Portals, you can manage security, see running instances, troubleshoot errors, and even get a graphical representation in real-time of the process in SharePoint. This series of Web parts allows all of the process-based administration that you would normally find in K2 Workspace but through the familiar SharePoint interface.
Although SharePoint offers workflow history logs (usually by using the standard Workflow History list), they are not very useful — not even when viewed using Excel pivot tables. K2 adds two key features related to reporting that greatly improve this scenario. First, workflow reporting SmartObjects can be created for every process deployed to a K2 server, including those that integrate with SharePoint. Second, the K2 Report Designer tool in K2 Workspace is a rich environment for creating standard RDL-compliant reports, so the integration between K2, SQL Server Reporting Services, and SharePoint becomes that much easier. And with the option to export these reports to SQL Reporting Services, combined with the SharePoint and SQL Reporting Services integration, enterprise-class reports can be made available within SharePoint for tracking every process in an organization. This is similar to Process Portals but also allows any amount of customization that is required by the business for making better business decisions and optimizing processes based on real-time information.
Using the K2 Worklist Web part, SharePoint can be used as the central place where users can see a list of their tasks. It is a great improvement over the simple task lists that SharePoint typically uses to assign tasks. While these task lists can be spread over main sites in SharePoint farm, the K2 Worklist consolidates all K2 blackpearl tasks in one place, offering much more information and context to the user as well as the ability to batch action related tasks with a few clicks, greatly improving user productivity.
Although Microsoft is making improvements to the Business Data Catalog, it is not easy to integrate data in SharePoint from LOB systems. Using K2 SmartObjects, creating the BDC definitions does not require any code or manipulation of long XML files to surface this information in SharePoint.
SharePoint is a powerful platform from Microsoft that provides many features necessary for collaboration. When combined with K2 blackpearl, SharePoint becomes a powerful platform for process-driven application development. With K2 blackpearl, SharePoint can become or replace many other enterprise application platforms.
The next chapter will focus on taking advantage of the K2 SharePoint integration features that are available in both WSS and MOSS, including:
An overview of each SharePoint wizard, including what they can be used for and some business scenarios for using them
The Records Center
The Web content management (Publishing) features
The Business Data Catalog
We will also cover some scenarios around using the above features as well as the SharePoint Search Results Wizard. The other SharePoint wizards included with K2 blackpearl and K2 blackpoint are covered extensively in the K2 Help files, so that should be your first point of reference when determining what a particular option on a wizard page can be used for.
[9] "SharePoint Joins the Microsoft Pantheon" by Scott Bekker. Redmond Channel Partner, June 1, 2008.http://rcpmag.com/columns/article.aspx?editorialsid=2640
[10] For further information about SharePoint licensing, visit these Web sites:
www.microsoft.com/sharepoint/howtobuy/default.mspx
https://partner.microsoft.com/US/licensing/licensingchoices/40048861