This chapter will do two things:
Introduce you to the main components that compose a K2 blackpearl environment
Guide you in the routine maintenance and administration of these components
Each component serves a specific role and ensuring that these components are operating correctly is an important task for a K2 administrator. This chapter is not an installation guide nor is it a troubleshooting guide. Please refer to the product documentation for installation and troubleshooting information.
As a K2 administrator it is important to have a basic understanding of the underlying architecture of the K2 blackpearl server.
At its core the K2 blackpearl server is a service that runs on a Microsoft Windows 2003 server. The service leverages standard Microsoft technology such as the .NET Framework 3.0, Microsoft Message Queuing (MSMQ), Microsoft Distributed Transaction Coordinator (MSDTC), Internet Information Server (IIS), Microsoft SQL Server 2005, and Microsoft SQL Reporting Services.
The K2 blackpearl Service is architected as a pluggable Host Server. This pluggable framework allows the services that support the K2 environment to be developed and managed individually as well as providing a core set of interfaces for the other services to leverage. The framework is also open to developers to build their own services, which provides for a high level of extensibility.
An example of where this can be useful is with authentication providers. K2 blackpearl ships with two authentication providers (Active Directory and a SQL table–based provider) however an additional provider can be developed and plugged into the Host Server framework.
Figure 15-1 illustrates the high-level architecture of the Hosted Server framework.

The following table provides a brief overview of each of the services that run within the Host Server environment:
Service | Description |
|---|---|
SmartObject Server | Handles the interaction with business entities or SmartObjects in the K2 environment. |
SmartObject Management | Handles the management of SmartObjects in the K2 environment. |
Workflow Server | Responsible for the interaction with and execution of the running process instances in the K2 Environment. |
Workflow Management | Handles the workflow specific management interfaces in the environment. |
Responsible for logging workflow events to the logging database. | |
Management | Handles the general K2 management interfaces in the environment. |
License Management | Responsible for managing K2 licenses. |
SmartFunction Server | The rules engine for the K2 environment. It handles the maintenance and execution of business rule entities. |
Environment Library | Manages the interaction with the environment variables that are used when deploying K2 processes in multiple environments. |
Event Bus | Responsible for the event system in the K2 environment. This includes server-level events as well as process- and SmartObject-level events. |
Event Bus Scheduler | Responsible for the scheduling event system in the K2 environment. |
Event Bus Management | Responsible for the management interfaces surrounding the Event Bus scheduler. |
Dependency Server | Manages the dependencies between various artifacts (Processes, SmartObjects, SmartFunctions, Environment Variables, and so on) in the K2 environment. |
Category Server | Manages categorical information for the K2 environment. |
URM Server | The URM (User Rights Management) server is responsible for authentication and authorization in the K2 environment. |
Communication to and from the Host Server is through a TCP/IP connection on port 5555. The workflow service utilizes a TCP/IP connection on port 5252.
It is important to ensure that any firewalls that sit between the K2 blackpearl server and any component or application that needs to connect to the server are configured to allow communication on ports 5555 and 5252.
The service can be managed through the standard Windows service console. The recommended approach is to run the service as a domain service account rather than as the local service account. The service account needs to have "log on as a service rights" to the server, and it is recommended that this account also be a local administrator on the server. If your security policies do not allow a service account to be a local administrator, please consult the K2 blackpearl Getting Started Guide for information on how to configure the specific permissions required.
The Workspace Management Console is home to the management applications used by system and process administrators to configure everything from the K2 platform to roles per process and user permissions.
When you load the Management tab, the Column Bar contains each management application (see Figure 15-2).
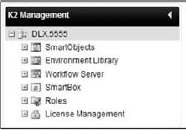
Most K2 administrative tasks are handled through the Workspace Management Console, and the first part of this chapter covers these administrative functions. However, there are some components in the K2 environment that are administered in different applications, such as the K2 components for SharePoint discussed in the "K2 SharePoint Component Administration" section later in this chapter.
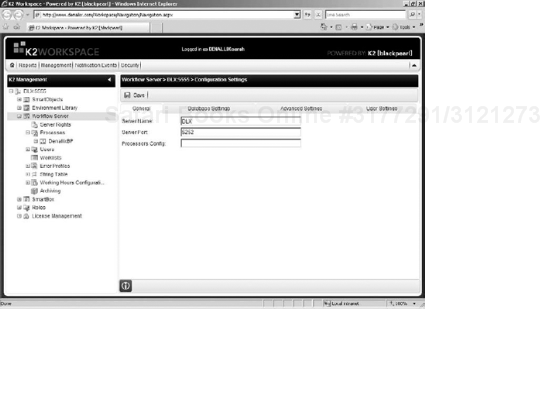
The first job of a K2 administrator is to ensure that the administrative application is properly configured. These general administrative settings can be configured for the workflow server through the Workspace Management Console. To access these settings, right-click the Workflow Server heading and select Edit Settings. The following table explains the settings that can be configured:
Tab | Description |
|---|---|
General | Used to configure the general server setting, including the server name and port. |
Database Settings | Used to configure the database and log database settings, including name and authentication settings. |
Advanced Settings | Used to set more advanced properties, including thread counts, Microsoft.Net Framework version, Trace settings, and Managed Users settings. |
User Settings | Used to configure user setting including allowing anonymous users and running dynamic queries. |
The General tab (see Figure 15-3) has settings to point to the appropriate K2 Workflow Server and port. Typical administration will not require changing these settings. There is also a setting for Processors Configuration. This setting applies to processor based licensing models where you would need to specify which processor(s) the K2 workflow server will utilize. For example, if you have a single CPU K2 license on a dual-CPU machine, you need to enter either 1 (to specify that K2 will use processor 1) or 2 (to specify that K2 will use processor 2).
The Database Settings tab configures the database connections for the workflow server. The K2 blackpearl installation will configure this information for you, but if you migrate your databases or wish to change how the workflow server authenticates connections to the databases, this is the interface where you can make those changes.
The Advanced Settings tab has some additional settings for the workflow server. The following table provides a brief description of each of the settings on this tab:
Setting | Description |
|---|---|
Thread Count | The number of threads used by the workflow server for process execution. |
Thread Priority | The priority of threads used by the workflow server for process execution. |
Framework Version | The .NET Framework version used by the workflow server for process execution. |
Trace | Legacy setting for configuring server logging. |
File | Legacy setting for configuring the server logging file name. |
IPC Retry Count | The number of retry attempts the server will make for failed Interprocess Communication calls. |
IPC Retry Interval | The interval (in minutes) between retry attempts for failed Interprocess Communication calls. |
Display Worklist of Managed Users | If this setting is checked users who have direct reports as defined within Active Directory will be able to see and manage the worklists for those users. |
Worklist Remove | Legacy setting not used by K2 blackpearl. |
Default Platform | The default worklist platform used by the server. |
The User Settings tab defines settings related to authentication such as whether or not to allow anonymous connections or to be able to use dynamic queues. The other settings are specific to the User Management interface to use with the workflow server and should not be modified unless a custom user management interface has been developed to replace the default interface.
Each K2 blackpearl server in your environment requires a valid license key to operate. The license keys are based upon a system key which is a unique machine specific key that is generated by an internal K2 algorithm. Most license keys are perpetual and will only need to be set up once during installation. There are, however, some situations where license keys will need to be updated. For example, if your server hardware changes, then the system key could potentially change and invalidate your existing license key. Another example is if you make changes to your licensing agreement. If you have a 30-day trial key and then purchase licensing you would be able to update your trial key and not have to reinstall the software.
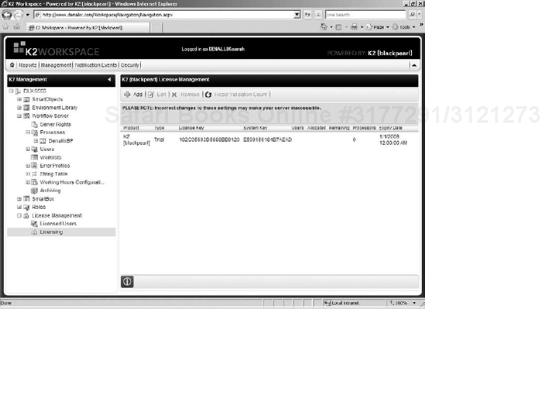
The License Management interface is available in the Management section of the K2 Workspace. The License Management interface (see Figure 15-4) is where you can view and edit your license key.
To edit your license key:
Select the key from the list and click Edit.
A window pops up where you can enter your new license key.
Click OK to apply the changes.
The K2 server will need to be restarted for the license key changes to take effect.
There is also a section under License Management called Licensed Users. One of the licensing models available for K2 blackpearl is Named User Model. This interface allows an administrator to see what users are consuming K2 licenses and also remove licenses for users who no longer need access. If you have a Named User license, the number of licenses that have been allocated and the number of licenses that are remaining will be displayed in the licensing interface along with the license key. To remove a license for a user, simply check the box next to the name of the user you wish to remove and click Remove (see Figure 15-5).
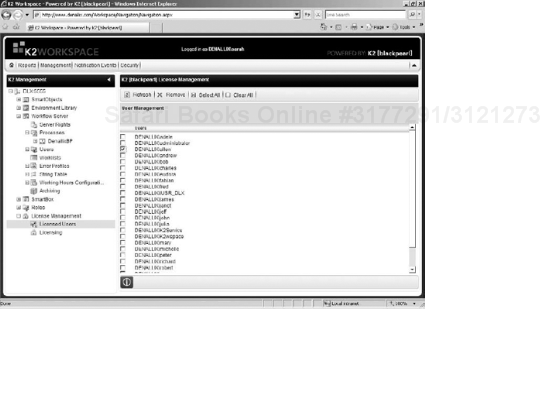
You will notice that there is no interface for adding users. Users receive licenses automatically when they log in to the K2 Workspace or into an application that connects to K2.
The Environment Library at its most basic level is a collection of name-value pairs or fields that process designers can use during the design of processes to simplify deployment to multiple environments. The String Table is the run-time reflection of the Environment Library. For each library template multiple environments can be configured (for example, development, staging, and production). When a process is deployed, the designer selects one of the preconfigured environments, and the values associated with that environment are used to deploy to the selected environment and are also deployed along with the process as String Table values to be used during the execution of the process.
In this section, we will cover the basic administration surrounding the Environment Library. For information about best practices and the usage of the Environment Library when designing a process, please refer to Chapter 10.
In the management section of the Workspace under the Environment Library heading, there are three main management sections:
Plugin Types allow for additional functionality to be surfaced in the K2 Object Browser (see Figure 15-6). For example, you can dynamically drill through the structure of a SharePoint site in the K2 Object Browser because of the functionality surfaced by the SharePoint Server Plugin. Typical administration will not require the adding, deleting, or editing of these plugin types, but the interface is available for administrators to perform these functions.

The Field Types section is the global list of the types of fields available to be consumed by the Environment Library templates. Each Field Type is associated to a Plugin Type and has a setting to determine if the Field Type should be added to a template by default. Typical administration will not require adding, deleting, or editing field types. If a new plugin type is added, the field types that the add-in exposes will need to be added to the Field Type list.
The Templates section is where administrators and properly privileged developers can define a set of templates and then for each template define the various environments associated with that template. The reason for having multiple templates is that there could be a scenario where there are multiple distinct K2 environments. For example, you might have a development and production environment specifically for the HR department, but the Finance department might have a development, testing, staging, and production environment that is completely separate from the HR department. In this case, a template could be configured for HR and a different template could be configured for Finance. A process designer would then choose the appropriate template in the K2 Object Browser and have the proper environments available.
For best practices information on configuring your environment templates, please refer to Chapter 10.
To add a new template:
Click Add in the Template Management section.
Give the template a Name.
Click OK.
Once you have a new template, you can configure which field types are available for this template through the Template Fields management interface (see Figure 15-7).

For each template, you can define the various environments that are available. To add a new environment:
Click the Add button in the Environment management interface for the template (see Figure 15-8).
Give the environment a name, and click OK.

Now the new environment will available for configuration.
The last step is to assign values to the Environment Fields. This is also where an administrator can modify the values for an environment. For example, if the production SMTP server changes from smtpserver1 to smtpserver2, an administrator would need to change the value for the production Environment Library.
To assign values to the environment fields or change existing values:
Select the field in the environment that you would like to modify, and click Edit.
Enter the value into the value field, and click OK to save the changes.
It is important to note that the Environment Library is only used during deployment if the values need to be updated during run time; they will need to be edited through the String Table interface that is found under the process management section.
If an environment value changes, it is the administrator's job to update the Environment Library as discussed above to ensure that proper values are used during deployment and also to update the String Table value on the appropriate K2 server so that the proper value is used during run time.
To update the String Table value:
Connect to the appropriate K2 server though the management interface. In the case of the SMTP server changing in production, connect to the production K2 server.
Under Process Management, click to expand the String Table heading, and select the appropriate String Table. You can edit the fields from this interface.
Roles play an important part of the K2 blackpearl environment because with a role you can manage task participation separately from the process definitions. A role can contain any combination of users and groups that are surfaced through the installed authentication providers. In a standard K2 blackpearl installation the authentication providers include Microsoft Active Directory and a custom SQL table–based authentication provider known as the K2SQLUM. The basic idea behind the K2SQLUM is to allow non–Active Directory users to participate in K2 processes.
In addition to directly specifying users and groups from the authentication providers, you can make use of a SmartObject method that returns a user or users. In this way, you can make the definition of the role dynamic. A common usage of the SmartObject capability is to have a role populated from the contents of a SharePoint list. A SmartObject can be created to return the items of the list, in this case users, and add them to the role.
Role management is surfaced through the Workspace Management Console under the Workflow Server heading. A list of configured roles will be displayed beneath the Roles heading. See Figure 15-9.

You can edit an existing role by selecting it from the list or add a new role by right-clicking the Roles heading and selecting add a new role. The role management interface allows you to specify a name and description for that role. You can also mark whether the role is to be dynamic or not. A dynamic role will reevaluate the role membership whenever users in that role refresh their worklist.
The most common administrative task for a role is to modify the role membership. You can remove role items by checking the boxes next to the items you wish to remove and clicking Remove RoleItem.
To add a role item, click Add RoleItem. This opens an interface with two tabs: Users and SmartObjects. The Users tab allows you to search for any users or groups from any of the installed authentication providers. Once you locate the role items, check the boxes next to the items you wish to add and select whether these role items should be included in or excluded from the role.
The exclusion capability allows you to define a role, for example, where all users from group A are included as a part of the role except for user B. Without the exclusion capability you would only be able to achieve this same result by specifically adding each user individually from group A except for user B, and then you lose the ability to have the role dynamically add additional users that are added to the group.
The SmartObjects tab allows you use a return property from a SmartObject call to populate the role. This can be useful if, for example, you want to populate the role with usernames that are stored in a SharePoint list or some other back-end system that you have a SmartObject for. The usernames that are returned will need to validate against the installed authentication providers in order for tasks to be delivered to the users.
Once you are finished making changes to the role, click OK, and then be sure to click Save to save your changes.
When a role is used by a process designer in a process definition, an additional interface for the role is created under the Roles management section for that particular process. The purpose of this interface is to allow you to set the refresh rate of nondynamic roles or manually refresh the role membership. A refresh rate of 0 indicates a dynamic role where the role is refreshed whenever members of the role refresh their worklist.
Refresh rates should be managed carefully as each refresh action for each role will make a connection to the authentication providers and reevaluate the membership. Depending upon the number of roles and the size of the groups this can put a strain on the resources of both the authentication provider and the K2 server. It is typically recommended to have nondynamic roles refresh at most once a day. The administrator always has the capability to manually refresh the role from this interface if necessary.
No, this section will not help you maintain that elusive work-life balance as the title appears to suggest, but it will help manage when escalations and start rules execute for processes that can potentially span the globe. Escalations and start rules in K2 processes can be configured to fire after a period of time has elapsed. These concepts are discussed in more depth in Chapter 8 of this book, but an escalation is essentially a way that a process designer can raise an event when a task or process is taking too long to complete. A start rule is a way for a process designer to delay a step in the workflow for a period of time. Working hours were created to avoid having these types of events fired during non-working hours. The functionality allows an administrator to specify time periods in which the escalation/start rule clock is running. It even allows time zones to be configured so that a process designer can specify which time zone to utilize for a particular escalation or start rule. Administrators and process designers will need to work together to determine that this is all configured properly for the various business scenarios.
As an example, a task that is delivered to a user in Australia should probably not escalate based upon a U.S. time zone because that would likely not correspond to a valid Australian working hour. There may be cases, like a 24x7 support center, where escalations should not be constrained to a specific timeframe and a zone would need to be configured to cater to this scenario.
Working Hours configuration is a relatively straightforward process. In the Workspace Management Console under the Workflow Server heading there is a Working Hours Configuration section. A list of configured Zones will display under the Working Hours section.
To create a new zone, right-click the Working Hours Configuration heading and select Add New Zone. This will open the zone configuration interface (see Figure 15-10).
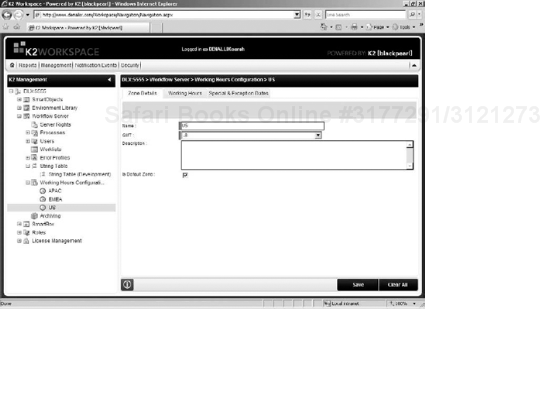
On the Zone Details tab, you can specify the time zone (GMT) and give the zone a Name and Description. Additionally you can mark if the zone is the Default Zone. The Default Zone will be used for escalations and start rules when the process designer does not specifically select another zone.
On the Working Hours tab, you are presented with a calendar that is divided into 30-minute blocks. Clicking or clicking and dragging the blocks selects those blocks to be active working hours. Active working hours are denoted by green blocks and non-working hours by black blocks.
On the Special & Exceptions Dates tab, you can specify holidays and other date-time ranges to exclude from the working hours zone.
To save your changes to the new zone, click Save at the bottom of the page. The zone will now be available to process designers to use when specifying escalations and start rules. Once you have created the new zone, you can now add users and groups to this zone through the Working Hours Access interface under the Users section of the Workspace Management Console. To add or remove users and groups from a time zone, select the desired time zone from the drop-down list and use the Add and Delete options.
If a user is defined as a part of a particular time zone through the Workspace, then that setting overrides the default time zone for Client Event escalations. For example, if the process designer configures an escalation to use the default time zone on an activity that contains a Client Event, and the user who receives the task at run time is a member of a zone other than the default zone, the escalation will run according to the user's time zone.
As an administrator, it is important that you get a real-time view of the status of process instances that are executing on the server. Through the management interface, there are two ways to get a status view of process instances. You can drill-down to a specific process through the Workspace Management tool and use the instances interface, which will auto-filter for that specific process or you can right-click the Processes heading and select Manage Process Instances. The latter will show all process instances on the server if no filter criterion is specified. Both interfaces will show the same basic information regarding the state of the process instances.
Another way to get status information about process instances is through the reporting interfaces discussed in Chapter 20. Unlike the management interface the reporting interface is a read only view of the process and does not allow for any process instance manipulation.
The status field identifies what state the process instance is in. The following table identifies the various states and what they mean:
Status | Description |
|---|---|
Active | The process instance is waiting for external input. Typically, this means that a task item has been assigned and the process will continue when the task has been completed. |
Running | The process instance is actively executing process code. Server events and rule logic fall into this category. A process instance should not typically remain in the running status for very long unless the process contains extensive code-level processing. |
Stopped | Process instance execution has been paused by an administrator through the management interface. |
Error | The process instance has entered an error state. |
Completed | The process instance has completed. (This status is filtered out of the process management interface but will show up in the process reports.) |
Deleted | The process instance was deleted and the reporting information was maintained. (This status is filtered out of the process management interface but will show up in the process reports.) |
From either interface there are a number of actions that you can take for selected process instances. The following table describes these various actions:
Action | Description |
|---|---|
Start | The Start action will resume a stopped instance. The Start action will work only for stopped instances. Along the same lines the Stop action will pause execution of a process instance and will only work for active and running instances. |
Delete | The Delete action will delete the process instance. When you select to delete a process instance you will be asked whether you want to keep the log entries or not. Deleting the log entries will delete all reporting information about the process instance. Keeping the log entries will keep the reporting information for the instance but show the process in a deleted state. |
GoTo | The GoTo activity action allows you to move a process instance from its current activity to any other activity in the process definition. This functionality is useful for manually redirecting process flow; however, it does bypass standard process logic and can have unexpected results. For example, if you skip over a step that retrieves values from a back-end system and then the next step uses those values for rule processing, the values could be invalid and cause the process to go to an error state. Much as in programming languages, Goto logic should be used sparingly and with caution. |
Start New | Start New is available only if you go to the instances section for a specific process. This functionality is provided as a test harness for initiating process instances without having to develop an interface. The test harness even allows you to enter data field values for testing purposes. To start a new instance of a process, click the Start New button. This will open an interface where you can specify a folio, specify to start synchronously or asynchronously, and provide data field values. Once you have provided the necessary information, click Start to start the new instance. |
K2 blackpearl has the ability to run multiple versions of the same process at the same time. This allows process designers to deploy new versions of process without affecting the existing running instances. At a high level, a process instance runs against the version of the process that it was started against until completion, even if a new version of the process is deployed before the existing instance has completed. A complete version history of all deployed processes is maintained by K2 and surfaced to administrators through the management section of the K2 blackpearl Workspace. To view the version history of a specific process through the Workspace, navigate to the process by drilling-down through the Workflow Server and Processes sections to the specific project folder. Once you locate the process expand the process heading and select the Versions section. See Figure 15-11.
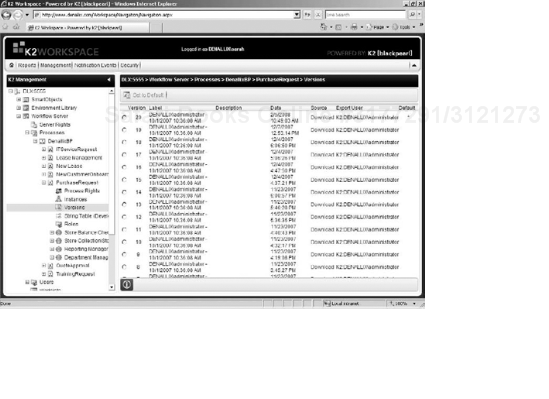
As shown in Figure 15-11, information is stored about each deployed version of the process. The following table has a description for each of these columns:
Setting | Description |
|---|---|
Version | The number identifier for the version of the process. |
Label | The name given to the version of the process by the person who performed the deployment. |
Description | A description given to the version of the process by the person who performed the deployment. |
Date | The date and time the process version was deployed. |
Source | A link that allows the version development files to be downloaded from the server. |
Export User | The user ID of the user that exported the version of the process. |
Default | A flag to specify which version of the process will be started by default. |
There is one main administrative task that can be done from this interface and that is to set the default process version flag, which determines which process version will be used for new instances. The K2 workflow.client API does support passing a version parameter, which overrides the default flag and allows developers to initiate a specific version of a process.
This interface also allows an administrator to download the source files for any deployed version of the process. This is a handy feature in a disaster situation, where the source files on the process designer's machine are lost. It is not, however, a substitute for source control because it only stores deployed versions of the process, not versions saved through the K2 Designer interfaces.
The K2 blackpearl server catches any unhandled exceptions that occur during the execution of process instances. Any process instance that produces an unhandled exception is put into an error state. This halts the execution of that instance and allows the server to continue processing other instances without having to stop everything until the error is resolved. In this section we will briefly discuss the error management capabilities in the Workspace and in Visual Studio. For more information on error logging, please refer to Chapter 19.
A K2 administrator can view a list of all process instances that are in an error state through the Management section of the Workspace. The Error Profiles interface (see Figure 15-12) is located beneath the Workflow Server heading for the desired server.

Notice that beneath the Error Profiles heading you find a number of error profiles listed. An error profile allows an administrator to configure a filtered view of the errors. The default error profile is the All view, which shows all the errors on the system.
It can be helpful to create an error profile for each deployed process. This way you can deal with errors on a process-by-process basis.
To configure a new error profile right-click the Error Profiles heading in the tree view and select Add New Error Profile. A Create New Error Profile page appears.
The Properties tab allows you to give your profile a Name, specify a Processes filter, and select a date range filter.
The Specific tab gives you a list of checkboxes for types of errors. By checking the box for an error type, you are selecting to include that error type in your profile. Deselecting the checkbox for an error type excludes that error type in your profile.
It is generally not recommended to deselect error types for your profiles unless you are planning to create a filter for each error type. It would be frustrating to know that a process is in an error state but not be able to find the error due to a filter condition.
Once you have configured your error profile, click Save to save the profile.
To view the new profile (see Figure 15-13), simply click the profile (in our example, RepairErrorExample).

As shown in Figure 15-13, the Error Profiles view shows you the process ID, the Process name, the Source event name, and the error Description. Clicking Retry reruns the event that generated the exception for each process instance that is selected in the list. This functionality is helpful for resolving issues like timeouts or file locking.
The Workspace is a great place to ascertain the state that a process instance is in, but it is not a debugging platform. Any issues that require process instance manipulation will need to be dealt with in the K2 Process Management utility within Visual Studio. This tool allows a process instance that is in an error state to be opened, manipulated, and redeployed. Because this capability requires knowledge of the process design and could require code level modifications, a process developer is better suited to perform these repairs than a typical K2 administrator. However, we will briefly cover this capability because it is a powerful tool for resolving run-time errors.
The K2 Process Management utility can be accessed in Visual Studio through the View menu (see Figure 15-14). The utility has three windows:
Environments
Error Profile
View Flow

The Environments window on the left side allows you to select the error profile that you wish to view. The error profiles displayed in this browser are the same profiles that are surfaced through the Workspace Management Console. Selecting a profile in the Environments window populates the Error Profile window on the top right with a list of errors for the selected profile. Selecting a specific error populates the View Flow window on the bottom right to show you a graphical representation of the process instance.
When an error is selected, two options are available.
You can retry the event, which is the same functionality that is surfaced in the Workspace Management Console.
You can open the process instance in the process designer and edit the event item that is causing the problem.
To illustrate the repair error functionality, the process shown in Figure 15-14 is a one-step process with a server event. The code behind the server event attempted to perform a divide-by-zero operation and entered an error state.
We can open the process instance and modify the code.
Once we have completed our corrections, we can redeploy the instance and validate that the instance is no longer in an error state.
Figure 15-15 shows the process now has an additional version associated with it. The changes we made to the process were deployed as a new version, and the instance that was in an error state was reexecuted against the new version of the process.
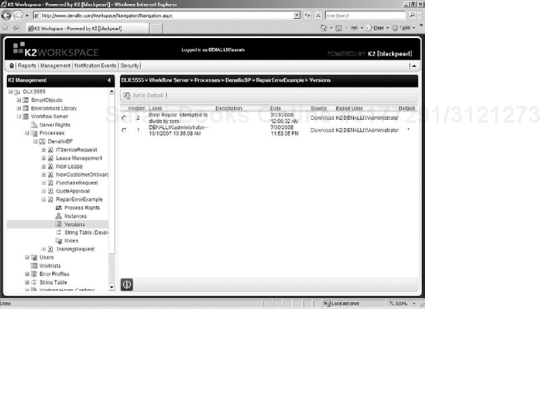
The only process changes that are currently supported through the repair error interface are changes to the event that caused the error. All other process changes will be ignored.
Repair-error functionality is powerful, but it is important to understand exactly what is happening behind the scenes. When you repair an error, you are directly manipulating the process definition that is stored in the K2 server. These changes do not update the design files that the process designer used to originally deploy the solution, since those files are stored either on the developer's machine or in a source control system. What this means is that if the process designer does not go back and repair the problem in the source files or download the repaired definition from the K2 server, the next version that they deploy will re-introduce the error.
Think of it like a document library. If you take a document that is stored locally on your machine and upload it to a document library and then somebody repairs a spelling mistake in the document stored in the document library, your local copy is out-of-date and uploading the document again will reintroduce the spelling mistake.
K2 users have the ability to manage task items that are assigned specifically to them. K2 administrators on the other hand have the ability manage all task items on the system. This functionality is useful for circumstances where task items are incorrectly assigned to users that are in some way unavailable or unable to redirect the task items. It is also a quick way for an administrator to see how much work is allocated to each user on the system and potentially redirect items to balance the work load.
The Worklists Management interface is located under the Workflow Server heading of the Management Console in the K2 Workspace (see Figure 15-16).
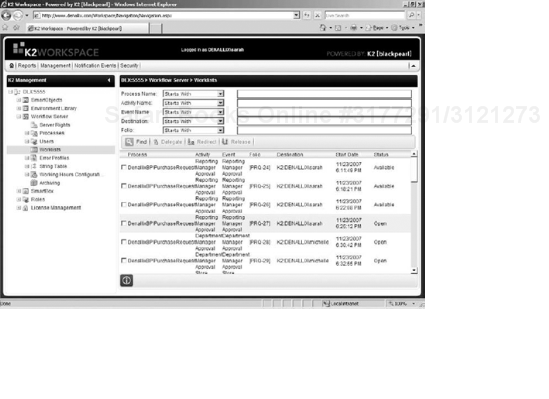
From this interface a K2 administrator can perform a filtered search of all worklist items that are currently available on the system. You can filter by Process Name, Activity Name, Event Name, Destination, and Folio. For each filter you can specify the type of search comparison from the drop-down list. To see an unfiltered list of task items, leave all the filter criteria blank and click Find.
There are three actions that an administrator can take for selected task items:
Delegate
Redirect
Release
Delegating a task item allows additional defined users to view and perform selected actions on the task item. To perform a delegation:
Select the task or tasks you wish to delegate, and click Delegation. This will bring up a search interface where you can search for users to delegate the task to.
Once you have searched for and selected the delegated user(s), click Next.
On the next screen, select the actions you wish to allow the delegates to perform, and click OK to complete the delegation action.
Redirecting a task item removes the task for the current user and gives the task to the redirect user. To perform a redirect:
Select the task or tasks you wish to redirect and click Redirect. This brings up a search interface where you can search for users to redirect the task to.
Once you have searched for and selected the redirect users, click OK to complete the redirect action.
Releasing a task item changes the status of the task item from Open/Allocated to Available. This is useful in limited destination slot scenarios where the task does not require that every user in the queue complete the task — for example, when you have a task that is assigned to 10 users but only 1 user out of those 10 needs to complete the item. When the first user opens the task item, the status of the task item for that user is changed from Available to Open. For the other nine users, the task item status is changed to Allocated, which effectively removes the task from their list. Releasing the task item will give the item back to the queue of 10 users and allow another user to open the task item. You can only release tasks that have an Open status. To perform release actions, select the task or tasks that you wish to release and click Release.
SmartObject Services are used to create an interface between the K2 platform and business data, whether that be in databases or line-of-business (LOB) systems. As such, SmartObject Services include services that can connect to Microsoft SQL Server, Oracle, SalesForce, Active Directory, and generic Web services among others. These services are application protocols that expose other application properties and methods for use within the K2 platform.
Services are made up of Service Instances and Service Objects. The Service Instances represent the business objects and Service Objects, the properties and methods of the business objects. The services exposed through the K2 platform are the same services that are available in the systems that they originate from and are not recreated.
Some services come standard with the installation of K2 blackpearl. Custom services can be written to interface to other systems and LOB applications. See the K2 Documentation for a detailed list of services that come standard and how to write custom services.
The SmartObjects Services are administered from the Workspace Management Console (see Figure 15-17).

Please refer to Chapter 10 for more information on managing SmartObject Services.
The databases are the most critical components in the K2 blackpearl environment. All state information about completed and running process is stored in the databases. Additionally, all versions of all deployed process definitions and all SmartObject definitions are stored in the databases. The ability to effectively restore a K2 blackpearl environment hinges on being able to restore the databases. Having a good backup strategy for the databases is crucial. In fact it is so crucial that we have dedicated an entire chapter to it. For more information, see Chapter 18.
In this section we will cover archiving, which is the other main database maintenance task. There are two main databases that the workflow engine uses:
K2Server
K2ServerLog
The K2Server database is the transactional database where active and running process instances live. The K2ServerLog database is, as the name suggests, the log database where all the reporting about process instances lives. Archiving focuses on the log database. Unlike the transaction database, the log database will consistently grow over time as more and more process instances are run. At a certain point you will either run out of space for that database or the reporting performance will decrease due to the size of the database. In either of these two cases, the answer is archiving.
The archiving process is fairly straightforward. The first thing you need to do is to create a blank database on the database server where the K2ServerLog database lives. You will be able to move the archive database post-archiving, but the archiving process requires that the databases be on the same server.
The creation of a new database for archiving purposes will require you to add this database to your disaster recovery plan. For more information on this, please refer to Chapter 18.
Now that you have your archiving database created, you can navigate to the Archiving application in the Workspace Management console under the Workflow Server heading.
The first thing that the application will ask is how to connect to the database server where the K2ServerLog and Archive database reside. Provide the server name and credentials, and click OK.
To set up the archive, select your K2ServerLog database, provide a date range for instances to be archived, and Select the archive database. The blank archive database will now be updated with the proper tables and structure. After the database is properly formatted, you can click Archive to perform the archive task. Depending upon the amount of data being archived, this process could take some time. It is best to perform this task during off hours because it could degrade reporting performance.
The process of restoring archive data back to the main reporting database is exactly the same as archiving except that you click Restore, which will take the date range reporting information out of the archive database and put it back into the standard reporting database.
The Workspace is the out-of-the-box Web interface for K2 blackpearl. Chapter 20 will introduce you to the various sections of the K2 blackpearl Workspace and show you how to leverage the Workspace functionality. The purpose of this section is to understand the administrative tasks required to keep the Workspace application up and running.
The K2 blackpearl Workspace is a .NET 2.0 Web application that runs on Microsoft Internet Information Server (IIS) and utilizes AJAX programming techniques for a rich user experience.
The Workspace Web application is configured as part of the K2 blackpearl installation. However, it is important as an administrator to understand some of these configuration settings in case they ever need to be manually configured.
All administration of the Workspace application itself is done through IIS. You can access the IIS administration tool by clicking Start and navigating to Administrative Tools. Here, you will find the IIS Manager application.
The location of the Workspace application will depend upon the settings used during installation, but the default location is under the Default Web Site node. To access the Workspace Web application settings, right-click the Workspace node in the tree view and select Properties. This opens the Workspace Properties dialog box.
The Virtual Directory tab shows several settings. These settings are described in the following table.
Setting | Description |
|---|---|
Local Path | This setting points to the Workspace Site directory under the K2 blackpearl installation path. |
Application Name | This specifies the name of the application and if changed affects the URL link to the Workspace site. |
Execute Permissions | This setting specifies the execute permissions and should always be set to Scripts and Executables to ensure proper Workspace functionality. |
Application Pool | This specifies the application pool that the Workspace application runs under. We will discuss the application pool in more depth later. The default application pool for the Workspace is the K2 blackpearl application pool. |
On the Directory Security tab, make sure that the Authentication and Access Control is properly configured. Click Edit under the Authentication and Access Control section to see the details.
The proper configuration for the Workspace when using Active Directory as the default authentication provider is for only Integrated Windows Authentication to be checked. If Enable Anonymous Access is checked, it will cause authentication problems because the Workspace will not be able to apply any of its security policies.
The ASP.NET tab allows an administrator to change what version of the .NET framework to use for the application. The Workspace is a .NET 2.0 application and should always have that framework selected.
In addition to the settings in IIS, there is a configuration file associated to the Web application (web.config) and it is stored in the installation directory under the Workspace site folder.
Normal administration will not require editing the web.config file, but this file does contain a set of environmental keys and connection strings that point to things like the Reporting Server, the K2 server services, the K2 Web services, the K2 SQL databases, and Active Directory. If there are environmental changes that affect the location of these components, then you'll need to manually edit the web.config or rerun the K2 blackpearl Configuration Manager.
A set of Web services is also installed with the K2 blackpearl Workspace and lives under the Runtime Services application in IIS (see Figure 15-18). These services are instrumental in the integration with Microsoft InfoPath and Microsoft Office SharePoint Server and provide other functionality for the Forms Generation Client Event and Out of Office functionality.
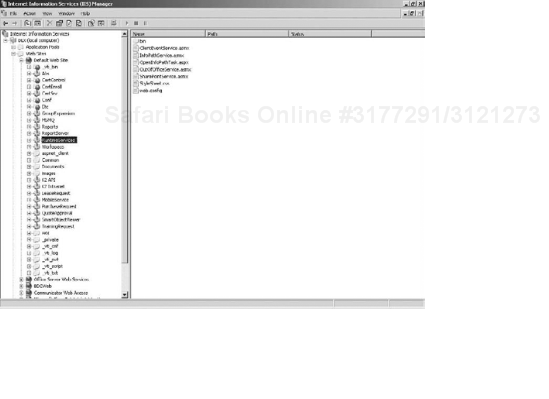
The settings for the Web services application should be identical to the settings of the Workspace application except that the Local Path should point to the WebServices/RuntimeServices directory in the K2 blackpearl installation folder.
The Web Services application also has a configuration file (web.config) in the Runtime Services directory. Normal administration will not require editing the web.config, but there are two settings regarding InfoPath integration that can be set through this configuration file:
Submit Asynchronously: This is a flag to set whether an InfoPath submit action should be synchronous or asynchronous.
<add key="SubmitAsynchronously" value="false"/>
Start Workflow Asynchronously: This is a flag to set whether an InfoPath start workflow action should be synchronous or asynchronous.
<add key="StartWorkflowAsynchronously" value="true"/>
The K2 blackpearl installation will create an application pool (named the K2 blackpearl Application Pool) for the Workspace and Runtime Services to run under.
The K2 blackpearl Application Pool can be managed like any other application pool in IIS. The Key setting for the Workspace application pool is the identity that the application pool uses to run the Web sites.
The recommended approach is to us a domain service account to run the K2 blackpearl Application Pool. For correct operation of the K2 Workspace, this account needs to be a member of the IIS_WPG local server group and needs modify rights to the %SYSTEMROOT%Temp folder. Additionally, the account needs content manager rights in SQL Reporting Services in order to publish any custom Workspace reports to reporting services.
Workspace logging may be required when troubleshooting issues like authentication. The log files that IIS generates are located in the WINDOWS/System32/LogFiles folder. In this folder, you find a folder for each Web site on the server. Folders are identified by W3SVC<site id>. For example, the default Web site has a site ID of 1 so the folder is W3SVC1.
K2 blackpearl reporting is surfaced through the Workspace, but all of the out-of-the-box reporting is Microsoft SQL Reporting Services–based, which means that the reports and the data sources live on the Reporting Services server. This is important to understand as a K2 administrator because there are different interfaces for maintaining the reports than are used for maintaining the Workspace application.
General usage of the out-of-the-box reports will be discussed in Chapter 20.
The K2 blackpearl Installation and Configuration Manager installs and configures all of the out-of-the-box reports in SQL Reporting Services. Typical K2 administration will not require making any changes to the reports or their properties, but it is important to understand where the reports reside and what properties are available.
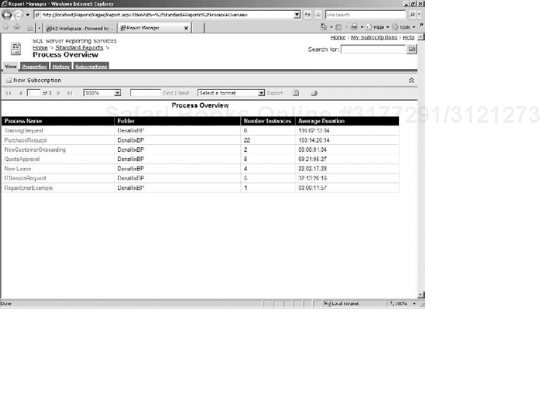
The out-of-the-box K2 blackpearl reports are installed on the Reporting Services server under a Standard Reports folder (see Figure 15-19).

Two main reports, the Process Overview report and the Process Definition report, are surfaced directly beneath the Standard Reports folder. All other reports live under the Hidden folder. When viewed within Reporting Services by an administrator, each report has four tabs available for managing the report (see Figure 15-20).
View: The View tab allows you to view the report as you would through the report view within the K2 Workspace or any other application with a report viewer.
Properties: The Properties tab allows you to see and change certain properties about the report. All the functionality surfaced through the Reporting Services interfaces is standard Reporting Services capabilities. We will discuss a couple of the capabilities as they pertain to the proper configuration of the K2 reports, but we will not dive into every aspect of Reporting Services administration.
The Properties tab features several configuration pages. General is the default page. From this page, you can modify the Name and Description of the report. More importantly, you can open the report for editing. Since all of the out-of-the-box K2 reports are simply reporting services reports, administrators can modify the reports to suit their needs whether these needs are aesthetic changes or more complex, query-level changes.
If you need to confirm that a report is using the proper data source, you can do that through the Data Sources page under the Properties tab. For all out-of-the-box K2 reports the data source should point to the
Data Sources/BLACKPEARLdata source.The K2 blackpearl reports are designed to be real-time reports, but SQL Reporting Services does have the capability to do report caching. Report caching can be configured under the Execution page of the Properties tab. You can configure a caching on a time interval or by a defined schedule.
K2 blackpearl has a security mechanism for determining who has access to see what data through the out-of-the-box K2 reports. If, however, you need to define who can run what reports, you can do that through the Security page. In order for the K2 Workspace to properly leverage the K2 reports, it is important for the account that runs the application pool for the K2 Workspace to have Content Manager access to all the K2 reports.
History: The History tab allows you to view any report snapshots that have been generated for the report. The
BLACKPEARLdata source uses Windows Integrated Security and does not store credentials, so you may find that you are unable to create report snapshots for the out-of-the-box K2 reports.Subscriptions: The Subscriptions tab shows current subscriptions for the logged-in user. As with the history snapshots, you may find that you are unable to create report subscriptions because the
BLACKPEARLdata source uses Windows Integrated Security rather than storing specific credentials.
All of the out-of-the-box K2 reports utilize the BLACKPEARL data source, which is installed under the Data Sources folder (see Figure 15-21).

Typical K2 administration will not require any modifications to the data source. However, to ensure proper configuration of the data source, we will cover a number of the configuration properties and security settings.
The Properties tab features several important settings (see Figure 15-22). For proper report operation, ensure that the settings are configured as shown in the following table:
Property | Value |
|---|---|
Name | BLACKPEARL |
Enable this Data Source | checked |
Connection Type | SOURCECODE |
Connection String | Server=[YourK2ServerName];Port=5555;AutoAlias=false |
Windows Integrated Security | Selected |

Much like the reports themselves, the data source has security to determine what users have access to use the data source. Because we use Windows Integrated Security for the data source, any user that will need to be able to run any of the K2 reports will need browser access to the data source. It is also important to ensure that the account that runs the application pool for the K2 Workspace has Content Manager access to the data source.
K2 blackpearl has extensive out-of-the-box integration with SharePoint Server and Windows SharePoint Services.
All management of K2 blackpearl integration with SharePoint Server and Windows SharePoint Services is done through a K2 for SharePoint administration page (see Figure 15-23) that is added to SharePoint 3.0 Central Administration.

The General settings section of the K2 SharePoint administration page has one setting that allows you to add the K2 server service account to the site administration group (see Figure 15-24). This setting allows the K2 Server Service account to have the proper permissions to execute actions on the site collection. For example, the K2 process designers allow a user to specify that a SharePoint site be created as a part of a process. During execution of this process the K2 server service account connects to the K2 SharePoint integration Web services that are installed on the SharePoint server and executes the command to create a new site. If the K2 server service account does not have permissions to create sites then this action will fail. It is an important part of K2 SharePoint integration setup to add the K2 server service account to the site administration group.

Part of the integration of K2 into SharePoint is a number of SharePoint features that can be enabled for your site collections.
K2 SmartObject integration is a feature that adds a menu item to the Site Actions menu. The menu item, Update K2 SmartObject Service Definition, allows a K2 ServiceObject for the site to be automatically created. This gives a SmartObject designer the capability to leverage SharePoint content on that site through the SmartObject layer.
To enable K2 SmartObject Integration, click the K2 SmartObject Integration link on the K2 for SharePoint administration page, which takes you to a page where you can activate or deactivate the feature for the specified site collection (see Figure 15-25)

K2 Site Administration Integration is a feature that adds K2 feature administration links to the Site Settings for sites within a site collection. For example, this feature gives you the ability to manage processes that are bound to SharePoint events or manage K2 SharePoint integrated processes.
To enable K2 Site Administration Integration, click the K2 Site Administration Integration link on the K2 for SharePoint administration page, which takes you to a page where you can activate or deactivate the feature for the specified site collection.
K2 Workflow Integration ASP.NET Page Content Types is a feature that allows K2 SharePoint Integrated processes to use the K2 task completion pages that inherit from the out-of-the-box SharePoint task completion pages.
To enable K2 Workflow Integration ASP.NET Page Content Types, click the K2 Workflow Integration ASP.NET Page Content Types link on the K2 for SharePoint administration page, which takes you to a page where you can activate or deactivate the feature for the specified site collection.
K2 Web Designer Integration is a feature that adds the K2 Web Designer capability to sites within the specified site collection. The K2 Web Designer is accessed by going to a list or library in a site and selecting the K2 Web Designer from the Settings menu (see Figure 15-26).

To enable K2 Web Designer Integration, click the K2 Web Designer Integration link on the K2 for SharePoint administration page, which takes you to a page where you can activate or deactivate the feature for the specified site collection.
The K2 Business Data Catalog section of the K2 for SharePoint Administration page allows administrators to create and manage K2 BDC applications. BDC applications can be created from any existing K2 SmartObjects. Chapter 13 provides more details on how to create BDC applications.
To manage deployed K2 BDC applications, click the Manage K2 BDC Applications link from the Business Data Catalog section of the K2 for SharePoint Administration page. This takes you to the management page (see Figure 15-27), where you can see a list of K2 BDC applications for the selected site collection. From this interface you can delete any unwanted applications by selecting the application and clicking Delete.

There are two configuration settings on the settings page for the Business Data Catalog integration section. The settings, K2 Server Name and K2 Server Port, are set up as a part of the K2 installation and are used by the K2 BDC applications to connect to the appropriate K2 server and execute the BDC SmartObject methods.
K2 blackpearl provides a Web part for viewing and interacting with task items that are assigned to users by K2 blackpearl processes. To utilize this Web part on SharePoint pages, you will first need to deploy it.
To deploy the K2 Tasklist Web part, navigate to the Operations page in SharePoint 3.0 Central Administration, and click the Solution Management link under the Global Configuration section. Click the K2worklistwebpart in the list of Web parts (see Figure 15-28).

Then click Deploy Solution (see Figure 15-29).
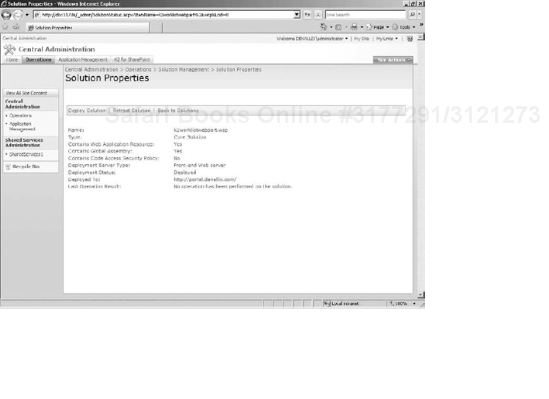
The K2 Worklist Web part will now be available for users to add to their SharePoint sites. If for any reason you need to retract the deployment of the K2 Worklist Web part, you can come back into this interface and click Retract Solution.
The K2 blackpearl Configuration Manager is an environment configuration utility. The Configuration Manager is used during installation to configure the environment for the first time, but it can also be used post-installation to make environment-level configuration changes.
To start the Configuration Manager navigate to the K2 blackpearl folder in the All Programs section of the Windows Start menu and select K2 blackpearl Configuration Manager.
The Configuration Manager uses a wizard interface to guide you through the configuration process. The following table illustrates the changes that can be made through this interface:
Modification | Description |
|---|---|
Update License Key | An alternative to the Workspace interface for updating a K2 server license. |
Workspace Web Site Location | The Web site where the Workspace is or should be installed. |
Workspace Application Pool Account | The account under which the Workspace application is run. |
SQL Reporting Services Web Site Name | The Web site where reporting services are installed. |
SQL Reporting Services Web Site Virtual Directory | The virtual directory on the reporting services Web site where reporting services are installed. |
Host Service Port | The port which the Host Service uses for communication. The default is |
Workflow Service Port | The port which the Workflow Service uses for communication. The default is 5252. |
E-mail Server Name | The e-mail server that the Workflow Service will deliver task and e-mail notifications through. |
Database Locations | The locations of the various K2 databases. |
K2 Administrator Account | The account that should have administrative privileges to the K2 environment. |
K2 Service Account | The account under which the K2 blackpearl Service should run. |
Configuration Manager changes require a server reboot before taking effect.
In this chapter we covered the main components that make up a K2 blackpearl environment and the routine administration associated to these components. We started by looking at the K2 blackpearl Service and how it is a pluggable Host Server that provides flexibility and extensibility. Next, we took a look at the management capabilities surrounding the service, from license management, to error handling, to role management. We also discussed database archiving and the management capabilities for the K2 SharePoint integration components. Finally, we took a look at the Configuration Manager as a way to make high-level configuration changes in the environment.
The next chapter will take a look at security and permission administration in the K2 blackpearl environment.