To ensure success, every process-driven application project should be carefully planned to ensure each effort meets its objectives. This chapter will walk you through the steps to ensure that you can build successful processes. The purpose of this chapter is to define the main K2 components and how they fit into effective process design. In previous chapters, you learned about how to gather business requirements, including the data requirements. In this chapter, you'll get back to the business process that you are automating!
This chapter covers the following topics:
Defining your process, including selection criteria for candidate processes and how to effectively diagram your process
Process design principles, including happy and alternate paths
The "Who," including actors and roles
The "What," including activities, events, actions, and outcomes
The "How," including Line and Activity Rules
The "When," including escalations and notifications
Advanced process design, including the Spider Workflow approach
It is important to note that we discussed the data requirements with SmartObjects in Chapter 7. In other words, we talked about the business objects before we talked about the process surrounding those entities. A process is meaningless if the right data is not displayed at the right time to the user who needs to make a business decision.
The first step in defining your process is to select one. It is important to narrow down that process to its most simple form. For example, while your end goal may be to automate the entire Employee on-boarding process, start with baby steps. Break down that process into the subprocesses, the ones that can be easily defined. It is important to scope your process just as you would any other development engagement, with clearly defined goals and a small enough scope to be successful. Once you've automated your first process, then you can keep adding processes to your library and will eventually have all your business processes automated.
In order to select the appropriate process to start, there are a few criteria that should help you navigate your business processes to find the one to start with. Always remember, any business process automation initiative should have major impact to the end users, to the people who will be using this process. Look for those low hanging fruits first, the applications or processes that people hate to do but must as part of their jobs. By tackling a process that people are unhappy with, you will be able to convert the masses to the business process automation way of life.
Good candidates for process automation involve the following:
Large number of participants: Look for a business process that impacts a large number of users, or a process in which a large number of people participate throughout the process lifecycle.
Large number of instances that must be tracked: Look for a business process that happens frequently, and where each instance needs to be tracked or reported on. A process that happens once a year probably is not a good candidate to begin with. Instead, look for a process where multiple people start an instance on a daily basis, where they need to know the status of the request or where other people, such as Legal or Audit, need to have visibility into the process.
Geographically dispersed participants: Paper-based processes always break down or become more complicated when participants in the process are in different offices, perhaps even different continents. Look for processes that involve faxing documents, or scanning and e-mailing documents for approval.
Processes that last over long periods of time: For long-running processes, it is always difficult to remember where the form currently is in the process, who has it, what needs to be done next, and so on. These are prime candidates for automation, as having a reporting mechanism or an escalation process to remind people that a process instance is stalled and waiting for action can really help drive the process to completion.
Costly mistakes: Any process that could result in legal ramifications, including fines, or degradation of the business' reputation are also good candidates. Business process automation helps drive consistency and repeatability of a process, thereby ensuring a level of compliance that is not always possible with paper forms or an ad hoc process.
In addition to these criteria, process automation also helps hide the business process from end users. For processes that are particularly complicated, end users do not need to understand the complexities or the various systems that are involved with the business process. Instead, they know how to interact with the process using the forms you build, they know how to get information out of the process using the reports, and that's all they really need to know.
After you've selected the process you are going to automate, find out who the Subject Matter Experts (SMEs) are from the various touch points in the business and schedule a meeting to start down this path. At this point in time, you may want to introduce the K2 technologies, but you may want to just start with a discussion around the current business process, what works and what doesn't work, and then start digging deeper into the mechanics of the process.
Whenever a discussion begins about a business process, someone usually grabs a whiteboard marker and starts drawing boxes and lines on a whiteboard. Or maybe someone cracks open Visio and starts drawing boxes during a meeting. While this is a key step, and usually starts people thinking about how the process works today, and maybe even how it should work in the future, we propose a new way to look at defining your process.
There are really three key considerations when automating a business process:
Data: Without having the proper data or business entities exposed to the users, they cannot make decisions. Without knowing what information needs to be displayed to the users, you cannot design your forms. Without understanding who needs to see what and when, you cannot define your process. That's why in Chapter 7 you learned about SmartObjects and how to expose your business data into the K2 platform. There are some main concepts to keep in mind, however, as you are drawing out your process. At this point, we really don't care where the data lives. Only that it exists and that people need it to do their jobs. We do care about getting the right data to the right people at the right time. And, we do care if that data should be read-only or if it needs to updated or changed as part of this process.
Forms: Without really understanding the people, or actors, who will participate in your process, you cannot define how they will need to interact with the data via forms. You will learn about the different forms technologies in Chapter 11, but at this point you will need to define how people will interact with the data, whether in reports, via e-mail, or through an online form. Forms are really just a way to display and capture data. And because we want to get the right data to the right people, we need to understand the security and validation that needs to be present in this form. While reports are not traditionally thought of as forms, a report is just a read-only set of data. Make sure that while you are thinking of how people interact with the data, you do not overlook the reporting requirements as well. Be sure to capture all the data you could possibly need to report on later, or to help you slice and dice the data in the reports.
Process: The last key to the puzzle is how the data flows between groups of people and/or systems. All the process really does is play traffic cop, routing the appropriate data to the appropriate people in the correct order. Each step in the process should add value to the end user. After a step has been completed, you should never have to return because of missing or invalid data.
This chapter will focus on the details and concepts surrounding the process definition. In order to effectively design an automated process, you will need to have these concepts in your toolbox, to pick and choose from where appropriate.
At this point in the process design phase, a good exercise could also be to get all the stakeholders and SMEs in a room and pass around a piece of paper which represents the form. Have them pass it back and forth in the order in which that form needs to travel. Have the business analyst document the order and the interactions, the "who" and the "when." Look for where the process could be improved, where things could be given to more than one person at a time for approvals. Look for redundant steps. Look for where the same person has touched the form multiple times, could these be combined or reordered to reduce redundancy? If data is missing and filled in later, could it be found and incorporated into the process earlier to streamline the process?
During this exercise, the SMEs may realize that they do not know the process as well as they thought. And that no one person knows the process from end to end. That is why these meetings are critical, so that all the information and requirements can be gathered in order to automate the complete, and correct, business process.
Complimentarily to the whiteboard approach, you are in effect designing the activity flow of your process. You start drawing boxes and lines as you start breaking down your business process into logical components. Each block corresponds to an activity in K2. We will define these terms in more detail a little later, but for now, when you are drawing boxes think of them as activities. You can start defining your process at this high of a level, but the more detail that you start capturing in your design, the easier it will be for all your stakeholders to buy into the fact that the process design is correct.
From the whiteboard, it is important to document your process into a diagram. There are several types of diagrams that are used for defining business processes. While your organization may have a template or a preferred method, we will introduce these diagrams to add into your automation toolbox.
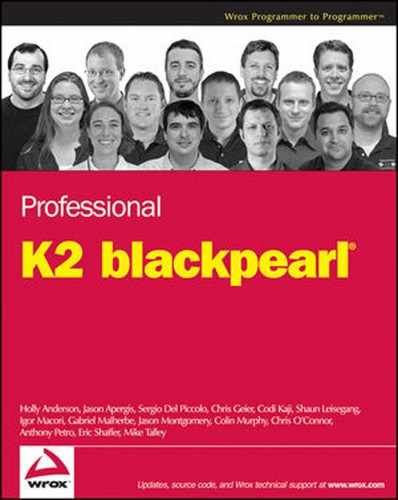
The process diagram shown in Figure 8-1 depicts a typical block diagram representing a business process. The type of process represented by the diagram is not important. The manner in which the process is documented makes all the difference in the world to those employees involved.

Many organizations use the BPMN (Business Process Modeling Notation) standards for creating process flow diagrams. An example of a BPMN diagram is shown in Figure 8-2. While this may have more detail than the block diagram shown in Figure 8-1, it is still just boxes and lines, with some start and endpoints defined. It is still generalized, and still places people a distance from the process, as if they were outsiders looking in.
The people involved in the process can perceive the block diagram as a representation of their value. Any modifications to this diagram, either addition or subtraction, can be received as threatening.
Psychologically, the block diagram is distant and generalized. It invokes a third-person perspective in conversation. Common phrases such as "the process should do this," or "the process should contain that," create a distance between the process and the process participants. This distance makes it difficult to understand the process from the perspective of the people involved.
It is important to use whatever method works best in your organization, whatever people are familiar with for documentation and for understanding the business process. However, because blocks and lines do not translate conceptually into people's minds of tasks and actions, we have found that changing from blocks to people icons is more effective in business process automation efforts.
By placing more significance on the people who are involved with the process rather than the activities in the process, you can achieve a greater level of buy-in from the stakeholders. By recognizing that processes involve people, and that people are a business's greatest asset, you can place the same level of importance on the actors in the process as on the actual tasks they are performing. These processes now become people-focused, or human-centric, instead of task-based.
The pawn diagram shown in Figure 8-3, places a focus on the process participants and the roles they play within the process. This diagram approach replaces the typical block diagram shapes with a symbol to which all business users can easily relate: a person.
Please take note that because the figures in this book are in black and white, we've used different shading and fills to differentiate between and among the pawns in those figures that have them in this chapter. Ordinarily, the different pawns would be represented by using different colors to easily see where each role plays a part in the process.
It is important to understand that process automation isn't simply about implementing the K2 blackpearl technology. It is about managing process participants' securities and insecurities surrounding their role within the process. To the average employee, the word "automation" can conjure up negative thoughts; especially if they value their role within the process and are held accountable and responsible for the output. Most often process participants feel more comfortable discussing a process they understand, rather than a technology that they do not.
Changing blocks to pawns serves as an effective communication pattern among participants because it is a nonintrusive and nonthreatening approach to understanding requirements, and it places the importance on people within the process, rather than the technology being implemented. Only people can optimize and think of new ways of streamlining processes; the technology only enables this. While IT is usually more excited about the technology, the process owners are much more interested in how the process will change and the role they will be playing in its automated state.
By starting with the people who participate in the process and automating the features and functionalities of the system around them, you can create a valuable paradigm shift. Process owners begin to take responsibility of their role within the process. They stop speaking in the third person, (for example, "the process should do this"), and begin to speak in the first person. You'll begin to hear, "In order for me to approve this item, I need the following information," or "After I submit this information, it should be your job to review it and provide feedback." This shift in perspective allows participants to take ownership of the process. They can begin to see how the purpose of automation technology is to help them improve the process.
Furthermore, by switching to first person references, the process designer can start to identify the various roles and workflow participants that will be actors in this process. These actors can be translated into roles or groups based on job function. A pawn should not represent a single person in an organization but rather the role that person plays within the business process. When creating the pawn diagram, you stop thinking about the boxes and start thinking about the actors who perform the tasks, which helps you design the process and implement it that much faster.
These pawn diagrams play a key role for several reasons:
Identifying the touch points for the various actors helps you customize training and communications to those specific audiences.
Testing can use these diagrams to ensure that the process is being routed correctly to the appropriate person or role.
Validating that the process design is fully captured and is accurately represented by the diagram with all stakeholders.
While you were defining your process by drawing blocks and lines on the whiteboard, you started to define the process using either a serial or parallel process without even recognizing it. These types of process definitions just define how the activities are routed, and we will discuss them in depth next.
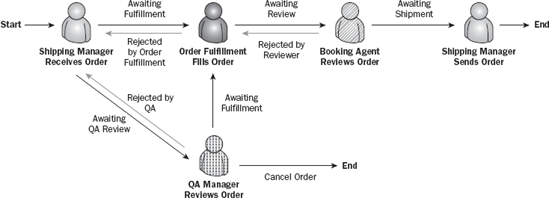
A serial process is the simplest form of routing data. Serial routing is defined as a combined set of sequential steps executed in order; one right after the other. Data passes through the process one step at a time and cannot skip steps. Serial processes should be the default approach to process definition. A serial process is shown in Figure 8-4.

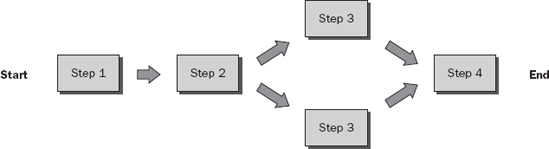
A parallel process differs from a serial process because data can be simultaneously routed to multiple destinations within a single step in the process. A parallel process is often more complex to implement than a serial process because parallel processes require complex data manipulation to split and merge data according to specific business rules. Do not let the complexities of the parallel process definition hinder your intent to implement such a process. K2 blackpearl technology is designed to handle complex data manipulation with ease. An example of a parallel process is shown in Figure 8-5.
There are multiple types of parallel processes. Each parallel process is designed to improve the flow of the process in a unique way. Many times, a parallel approval activity can be handled using the built-in capabilities of the Destination Rules, which will be discussed later. For now, as you are drawing your diagram, keep in mind those steps that need to happen in order and which can be split and handed off to multiple people for action at one time.
After you have drawn out your diagram, make sure that all the people that were present and involved with the design of the process review it for accuracy. Make sure that all the details were captured appropriately and accurately. Where you uncovered details about data or forms, be sure that those are documented in a requirements document as well. Sometimes, in addition to the pawn diagram, a requirements document that describes the various actors, the actions they will take, and the data or form requirements is possible at this stage in the process definition.
If you have not gotten to this level of detail yet, schedule follow-up meetings. Be sure to get all the stakeholders and SMEs in a room and continue working on the details. By spending the time up front to get to a detailed design of the process, you will save development effort and rework time later. It is worth the extra meetings.
There are several key design principles that will help you document your process. Some of these are K2-specific, and others are principles for business process automation and management. All are important parts of your toolkit in identifying your process and interacting with the stakeholders to accurately design your process, and be able to translate it into the K2 platform after the design is complete.
Remember that in Chapter 2 we defined what business process management meant. In this chapter, we are focusing on a process. A process is defined as a particular course of action intended to achieve a specific result. In the context of workflow, the K2 process is the logical representation of a course of action that must be followed. The process itself is composed of a combination of one or more activities capable of performing the individual logic and routing steps within the process. Each activity may contain one Client Event and multiple Server Events. A Client Event usually enables human to system interaction, while a Server Event usually enables system to system interaction. We will cover events in more detail in a little bit, but for now let's begin with the "flow" in workflow.
The next step in the modeling process is to define the relationships between the different actors in the process. Complex processes such as approval processes can have multiple alternatives, depending upon business rules. A process follows one or more paths to completion.
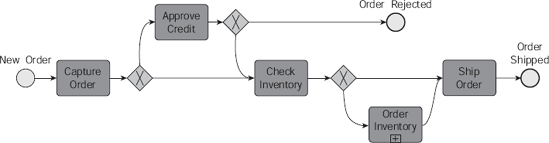
The happy path is defined as the route the request takes through the process if everything were to run perfectly, and there were no errors or alterations. Essentially, your goal is to identify the most commonly used process path. In Figure 8-6, we've added "start" and "end" identifiers, as well as arrows to describe the happy path.

Please make note of the following unique aspects. First, not all actors may be required in order to represent the happy path. Some actors may serve supporting roles in alternate flows, and others may simply be discarded when you pose the question, "How would you like the process to flow?" Be careful to understand the value of each actor. Now is the appropriate time to identify a process that is driven by exception, rather than a predictable or optimal flow.
Second, you'll notice that the same actor (Shipping Manager) is shown twice in Figure 8-6. This is by design; in this process the request has to go back to the Shipping Manager for completion at the end of this process. By showing where each actor participates in the process, and by using a different color (or in this black-and-white example a different shade or fill) per actor, you can easily see who plays a role when in the process. In this example, having the Shipping Manager touch this request twice, once at the beginning and once at the end, can facilitate additional discussions. Why is this necessary? Can the tasks be consolidated so that the Shipping Manager only has to touch a request once? This can drive efficiencies by recognizing redundant work by an actor in a process.
Alternate paths are those steps where the workflow branches. For example, the happy path as shown in Figure 8-6 assumes that each actor approves the request. Well what happens if a person declines the request? Or sends it back for rework? Or what if the request is over a certain amount and must go through multiple levels of approval? The alternate paths are designed to capture this information and route the request appropriately.
In order to identify an alternate flow, at each step in the process, ask what other options could occur? For example, if the Order Fulfillment role in the process above cannot fulfill the order, what happens? How do they handle that exception?
Properly defining the alternate paths is critical in fully defining the business process. However, many times these exceptions are handled on a one-off basis. Therefore, until the automated process is actually used, some of these highly unlikely cases may not be discovered. This is why we use an iterative approach when designing process-driven applications. Capturing the happy path and the most common alternate paths will meet the business need 80% of the time and the less likely alternate paths can be added at a later date. K2 handles this flexibility in adding alternate paths through actions and outcomes, which will be discussed in detail later.
One of the first alternate paths that usually comes up in discussion is the scenario where an approver is presented a form with data, and they decide not to approve the content. Usually, the actions available to the approver are Approve and Decline. If an approver declines the data in a specific step within the process, usually the status of the request changes and the request goes back to a previous step, perhaps for rework. Other times, a decline action may end the process. One example of the decline scenario is shown in Figure 8-7.

In this example, the request would go back to the Order Fulfillment actor, perhaps to rework the data or for data to be revalidated before continuing on.
Another common alternate path is if a request needs to be canceled. For example, if the business rules affecting the process or other external factors render the current request no longer applicable, the request should be canceled in its current state. Upon cancellation, data can be restored to a specific state, the status can be changed, or a secondary process can be started. Either way, a cancellation brings the current process to a conclusion. Figure 8-8 displays a cancellation component.

Notice that the alternate path lines are a different line type (and when viewed in color, a different color). This is to strongly denote the differences between the happy path and an alternate path. Also note that status descriptions have been added to all lines in this process. These statuses can be used as a process field in order for the stakeholders in the process to know exactly where the request is in the process. These statuses should be descriptive, such as "Awaiting Review" or "Declined by Booking Agent" so that, at a glance, the status of the request is known.
So far in this chapter we've focused on the people-centric workflow concept, and have been using the pawn diagram for examples to show paths and statuses. Let's now look a little deeper at the people part of this process. In any good business process, a pawn should not represent a single person. This represents a single point of failure for your business process. However, in many smaller organizations this is true. A single person may play multiple roles in a process. But, in the pawn diagrams shown earlier, you did not see a person labeled as "Mike" or "Sue," but rather "Shipping Manager." It is important to denote the generic role or job title that person plays in the process rather than the individual's name.
The pawns in the diagrams represent Destinations, which is a rule that K2 blackpearl uses to assign tasks to people or roles. These destinations are created when defining the process, and destination rules will be discussed in more detail later in the chapter. For now, recognize that people play a key role in a business process, and K2 calls these destinations.
The first step in the modeling process is to identify the actors that will be participating in the process. You have already done this by abstracting the blocks into people or roles. There may not be a one-to-one correlation between blocks and actors. There can be more or less actors than blocks. There may also be steps in the process that are not done by a person, but rather by a system or an automated task, such as looking up information from the order system.
Figure 8-9 represents a set of actors participating in an example process. Notice that each actor is a different color (or in this black-and-white example, a different shade or fill type) and includes a title. Additionally, you could have an actor that is the server or code, for those activities that do not require a person to intervene, but are a logical component of the process.

How do actors in a process translate into users in K2? K2 relies on user providers to bring user information into the context of the K2 platform. K2 configures Active Directory and SQL user providers, but other user providers can be added. The default user provider is Active Directory and uses the "K2" security label. The SQL user provider uses the "K2SQL" security label. Labels are used to identify user providers.
User providers can display users from various systems, such as Active Directory, SQL Server, or any custom user provider that has been developed to work with K2. Once the user provider has been defined, those users are displayed in the Object Browser under the User Browser tab and can be given permissions on processes.
Because we have been careful when defining our actors in the process as generic job titles rather than specific individuals, we have not been defining the individual users who participate in a process, but rather the roles.
Users can be added to processes directly as destinations but a more flexible approach is to add users to roles and use the roles as destinations. This way, when responsibilities change, the role membership can be modified without having to redeploy the process definition. Much like groups or roles in other K2 systems, such as Active Directory, roles in K2 blackpearl are groups of users. Unlike other systems, roles in blackpearl can be dynamic if based on SmartObject queries, and they can include users from multiple systems, which is particularly useful if your process involves external participants.
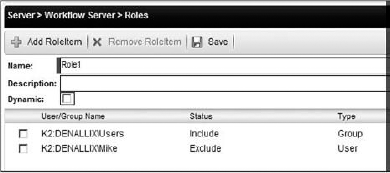
Roles are set up using the Management Console in K2 Workspace, and can be used across business processes. Therefore, it is important when you are designing roles for use in your process that you be specific about the roles. For example, naming a role "HR" is too broad and may confuse other processes designers. A better name would be "HR New Hire Approvers," as this describes both the department and the function being performed, in this case approving new hires.
As mentioned, roles can span user providers, meaning that roles can contain users with different labels. Role membership can also be configured to exclude users. This is useful, for example, when an Active Directory group contains individuals who should not receive notifications or worklist items.
A new role is given a name and one or more role items. These items can be based on the following entities:
Users or Groups from Active Directory or SQL
Other K2 roles
Result from SmartObject methods
As shown in Figure 8-10, all users are included in the Role1 role, except Mike. SmartObject methods can also be included or excluded from the role.
Users can be added to processes directly as destinations but a more flexible approach is to add users to roles and use the roles as destinations. This way, when responsibilities change, the role can be modified without having to change the process. Chapter 15 will go into more detail on creating and maintaining roles. Destinations will be discussed in more detail later in this chapter.
When role membership changes, users removed from a role will no longer see worklist items associated with the role. Conversely, users added to a role will see worklist items associated with the role after the refresh interval. A refresh interval is the time period associated with a role to query for new role items. The refresh interval is set on a role after it has been used with a process. For example, Figure 8-11 shows Role1 being used in a process with a refresh interval of 10 minutes. This means that every 10 minutes the K2 server will query for changes to the role membership and will adjust the tasks that users see accordingly.

User and role permissions are resolved using a concept called the context grid, which allows for the definition and management of user permissions. For example, a role can be used in the destination rule for an event and all users in that role will see worklist items related to that event. The context grid allows actions to be assigned to users based on their role membership.
Let's discuss the context grid in terms of a scenario. We have an expense report process that allows a form to be submitted for approval by an employee (the originator of the request). The process is configured to route the expense report to the originator's manager. This manager has several actions, such as Approve, Decline, and Rework. The originator may view the form at this stage in the process, as can senior management. Assuming that the manager has not actioned the item in 48 hours, the senior management should now be able to Approve or Decline the request.
Think of the context grid as a way to map the task (in this case, the Manager Approval) and the action (in this case, Approve, Decline, or Rework) as well as who (the user, group, or role) can perform the action (in this case, the manager, or senior management)
A user who has been assigned a task can delegate it to another user, meaning that they can allow their delegate to act on their behalf. This is available from the K2 Worklist, from the worklist item, as shown in Figure 8-12.
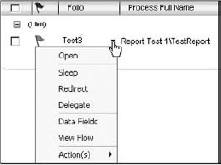
The delegator can determine which actions a delegate can perform. The work item will appear in both the delegator and delegate's worklist. The first user to select the work item will process the item.
This can be very useful for managers to delegate work to their subordinates, but control which actions they can do. For example, in an expense claim process, a manager can delegate a task to the project manager for review, but since that project manager has no direct approval authority, the manager can restrict the actions to only reject or rework. If the expense claim should be approved, the project manager can notify the manager, at which time the original manager can approve the claim.
Also from the action menu from the worklist item is redirect. This allows a user to send the selected worklist item to someone else to action. The worklist item will be removed from the original user's worklist, and will appear in the redirect's worklist.
This can be very useful for items that should go to another manager for approval. For example, perhaps you have an expense claim process that requires the employee's manager to approve. If the employee has been working on a project run by a project manager and has expenses related to that project, the manager can redirect the expense claim request to the project manager for approval.
After you've defined who is participating in the process, the next step is to identify what they need to do. Remember, as you were drawing boxes and lines on the whiteboard, you were identifying the things that needed to happen. These boxes are what we will define next.
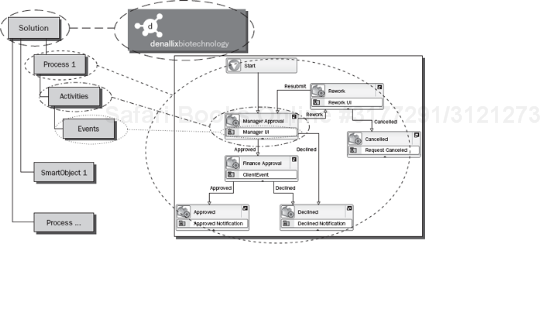
Figure 8-13 shows the structural hierarchy of a K2 solution. A solution is basically a storage container for processes and SmartObjects, and other artifacts (such as forms, Web services, etc.). In a solution, you have a Process. This Process is built up of activities and events, which we will describe in detail soon. When you deploy a K2 solution, you can select which process(es) or artifacts to include in the deployment. However, this goes down to the process level, which is made up in whole by the activities and events within them.
In the context of K2 blackpearl, a process is built using activities and events. A Process Wizard is basically a template for a Process that uses that particular feature. Process Wizards give you a jump start on configuring the workflow.
InfoPath Integration: The starting place when designing workflows that use InfoPath. This wizard takes you through the steps of adding an InfoPath form to your solution and integrating it as the starting mechanism for the process. If you have an InfoPath form that you want to use within your process, start with the InfoPath Integration Process Wizard to initially associate your workflow with an InfoPath form. Then, you can continue to build your process using any of the Server Events and as many InfoPath Client Events as you need.
SharePoint Events Process: Allows you to configure a workflow to run in response to certain SharePoint list events, such as a data field added, changed, or deleted, or an item added, changed, or deleted from a particular list or library. This Process Wizard allows the SharePoint list or library to be the starting point for the K2 process and does not require another form to start the process instance.
SharePoint Workflow Integration: The starting place when designing a workflow that will be a SharePoint workflow and deployed as a feature in SharePoint. The K2 blackpearl workflow can be associated with a library, list, or a content type. The workflow can either begin manually, using the Workflows item within SharePoint or the appropriate Office application, or it can be configured to start automatically when a new item is added or an item is changed.
These wizards set the stage for the process type, and enable K2 blackpearl to integrate tightly with the underlying technology, either InfoPath or SharePoint. You can use one of the above Process Wizards to start off, or you can start with just a blank K2 process and begin designing your process using the building blocks of activities and events.
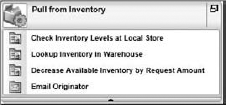
Activities act as the containers for events within a process. An activity within a process can potentially contain Client Events, Server Events, or Interprocess Communication (IPC) events. The business logic includes concepts like: "who must be involved in the activity," and "are there any prerequisites that must be met before workflow participants can start with the activity." Activities are the logical grouping of related events. For example, let's use an example of "Pull from Inventory" as an activity. In the "Pull from Inventory" step in the process, there are actually several tasks that need to take place, such as "Check Inventory Levels at Local Store," "Lookup Inventory in Warehouse," "Decrease Available Inventory by Request Amount," and so forth. The activity groups the related events together.
Activities are also important components in the process because they represent points where decisions are to be made, data is to be delivered, or actions are to be carried out. One of the most important properties of activities is the business rules associated with the activity. These Activity Rules represent the tools used to build business logic into the activity. For an activity to be useful, it must have at least one event associated with it.
Think of activities as the boxes on the whiteboard. They contain the events and all the logic around what needs to happen. The way the activities are connected, or lines, dictates the path of the request through the process.
It is important while designing your process to recognize that activities can group events together, but only events that should be performed by the same entity. For example, in the "Pull from Inventory" activity above, all of the subtasks are performed by the Server, via code. Because they all happen automatically by the K2 server, they can be grouped together. If a task requires a user to intervene, then it should be split into its own activity, so that the Activity Rules can be defined separately. Also, the order in which the events appear within an activity is the order in which they are performed by the K2 server. In Figure 8-14, the "Pull from Inventory" activity is displayed with the appropriate events. The order in which the events will occur is from top to bottom, with the "Check Inventory Levels at Local Store" occurring first, followed by the steps below.
Now that we know activities are containers for events with business logic surrounding the activities, let's look more in detail at what exactly are events.
Events are the tasks that can occur within an activity. So while an activity is a box that represents the steps in a process, an event is the item or substep within that activity. In the previous "Pull from Inventory" example, the tasks that take place are actually the events.
Events can be broken down into three key categories:
Client Events
Server Events
IPC Events (Interprocess Communication Events)
The Client Event represents the physical interaction that takes place between a human user and the process instance. Interaction is on an activity-to-activity basis. In combination, these events are used to create collaborative (human-to-human), transactional (human-to-system), and application integration (system-to-system) workflow solutions. Each activity can host only one Client Event, which performs one Client Event action. This approach categorizes tasks into single steps where one user task is handled per activity. Where multiple steps of Client Event interaction are required in a process, the tasks are linked together by successive activities each containing one Client Event.
A Client Event is always tied to a form. There has to be a way for the user to interact with the system. There are several technologies that are available for forms, and in Chapter 11 you will learn more about them. However, out of the box with K2 blackpearl, there are several types of Client Events that are available:
Default Client Event: Allows you to select a custom form to be displayed to the user, such as an ASP.NET Web page, a mobile Web page, or an Exchange Form. Using this Client Event allows you to use your custom forms to interact with a K2 process. These forms can be built using the K2 platform API to return information from the K2 platform. Additional information on ASP.NET forms can be found in Chapter 11. Figure 8-15 shows one screen of the Default Client Event Wizard, where you can specify the URL to your Web page.
Forms Generation Client Event: Creates a skeleton ASPX page automatically with the process data fields, including displaying the XML or SmartObject methods. You can modify this page; after the wizard is completed, a folder with all the necessary ASPX and code-behind pages are available on the file system in your solution folder. While the folder is not automatically added to your K2 solution in Visual Studio, you can add it manually and modify the skeleton page. Figure 8-16 shows one screen of the Forms Generation Client Event Wizard, where you can add data fields, XML fields, or SmartObject methods to be displayed in the generated Web page.
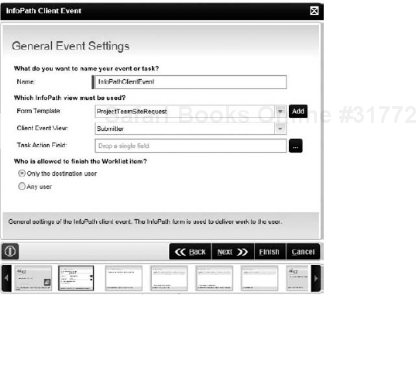
InfoPath Client Event: Allows you to specify an InfoPath form template and view to complete a client event. This InfoPath form can be a single form with one or more views shared among all client events in a particular process, or each client event can use its own form. For more information about InfoPath forms, please see Chapter 11. Figure 8-17 shows one screen of the InfoPath Client Event Wizard, where you can specify the Form Template and Client Event View to display to the end user.
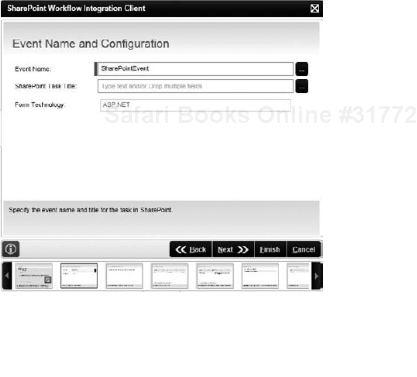
SharePoint Workflow Integration Client Event: Allows you to use a SharePoint workflow task item as a client event. Mirroring the workflow functionality within SharePoint, end users will not realize they are actioning a K2 process instead of a SharePoint process, but you get the full K2 suite of features, including robust reporting and access to line-of-business (LOB) data, which you do not get with SharePoint workflows. Additional information about the SharePoint integration with K2 can be found in Chapter 12. Figure 8-18 shows one screen of the SharePoint Workflow Integration Client Event Wizard, where you select the Event Name and the Task title that will show up in the SharePoint Tasks list.


All Client Event wizards have some screens in common. For example, all Client Events have the option of sending an E-Mail Notification to the destination user that a task is waiting their attention. All Client Events also have actions and outcomes that are defined per activity. These will be described in detail a little further in this chapter. And all Client Events also configure the destination user, or the person or people who are responsible for completing this Client Event. Destination Rules will also be covered in a little while. For now, it is important to realize that regardless of the user interface or form that is displayed to the user, notifications, actions, outcomes, and Destination Users are common properties set when configuring all Client Events.
The Server Events execute server-side code. A Server Event has no Client or User interaction. This creates application integration (system-to-system) workflow solutions. Examples of Server Events are the Mail Wizard, and all of the SharePoint wizards (server events for creating a site, list or library, or list item).
Server Events are basically code that executes based on the step in the process, using the data available to the event at that time. There are several Server Events that are available in K2 blackpearl out-of-the-box:
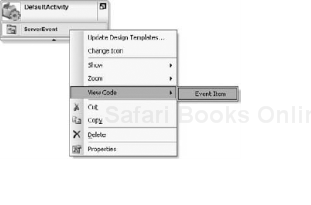
Default Server Event (Code): Allows you to write custom C# code to execute on the server. When you use the Default Server Event, an event is added to the process, where you can edit the code. You can use the K2 APIs to access any K2 platform data, or you can access external references, such as Web services. If you can code it, your process can do it. Figure 8-19 shows the Default Server Event on the process design canvas, and how you can edit the C# code behind the event.
Default Server Event (WF): Allows you to create a Windows Workflow Foundation (WF) sequence activity that will run on the server. Just like the Default Server Event that uses C# code, this event uses a WF schedule for you to customize the event. K2 blackpearl supports the following Windows Workflow Toolbox items:
Mail Event: Allows you to send an e-mail without waiting for a client response. You can include Process or XML data fields in the e-mail subject or body. This wizard can be used to send notification e-mails of the status of the request to the Originator or other interested parties. For example, if a request has been declined, perhaps that is the end of the process. But, you want to e-mail the Originator of the request the reason the request was declined. Figure 8-20 shows one screen of the Mail Event Wizard.
IPC Event: Allows you to invoke another workflow synchronously or asynchronously. Stands for Interprocess Communication Event. Allows you to call a child process either synchronously, meaning the parent process will wait for the child process to complete, or asynchronously, meaning that the parent process will continue without waiting for the child process. Process data fields can be mapped between the parent and child process. Figure 8-21 shows one screen of the IPC Event Wizard, where you specify the process to call as well as the calling method.
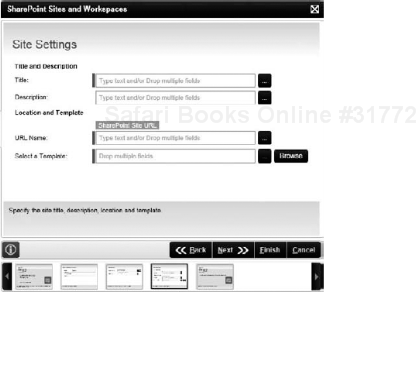
SharePoint Sites and Workspaces Event: Allows you to create, modify, or delete a SharePoint site. The site template can be one of the built in templates, or you can use your own, custom site definition. This site can be created on any SharePoint Site collection. For example, this wizard could be used to create an automated site provisioning workflow, where after approval, the site is automatically created. Figure 8-22 shows one screen of the Sites and Workspaces Event wizard, where you can specify the Title, Description, URL Name, and Template for a site to be created.
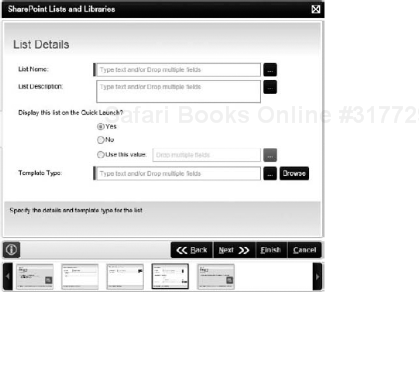
SharePoint Lists and Libraries Event: Allows you to create, modify, or delete a SharePoint list or library. The list template can be one of the built-in templates, or you can use your own, custom list template. This list can be created on any site. In the automated site provisioning workflow example that was previously covered, you could also use the Lists and Libraries Event to create a set of document libraries, project calendars and tasks lists, and so on in the newly provisioned site. Figure 8-23 shows one screen of the Lists and Libraries Event Wizard, where you can enter the Name, Description, and Template Type for the list or library to be created.
SharePoint List Items Event: Allows you to manipulate a list item within SharePoint, such as creating, copying, or deleting a list item, or retrieving or updated list item metadata. For example, you could use this wizard to change the status of an item stored in a Change Request Register to completed, or delete the list item if the request has been canceled. Figure 8-24 shows the options that you can select from when working with the List Items Event Wizard.
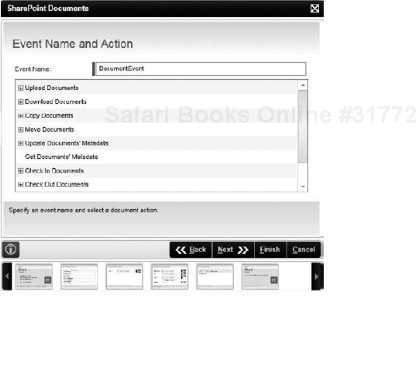
SharePoint Documents Event: Allows you to manipulate documents within SharePoint, such as uploading, downloading, checking in or out, moving, copying, deleting, or reading, or updating metadata properties. For example, the SharePoint Documents Event Wizard could be used to move a document upon approval, or delete the document if it has been declined. It can also be used to check in a major version of a document upon review and approval. Figure 8-25 shows one screen of the SharePoint Documents Event Wizard, with some of the options that can be performed on a document.
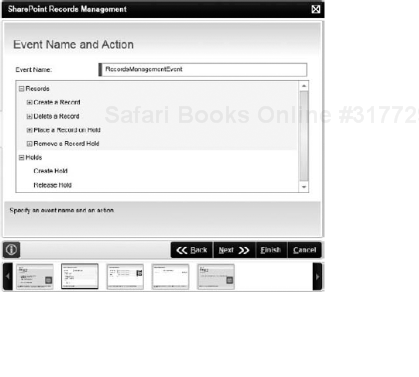
SharePoint Records Management Event: Send a document to the Record Center or place or release a hold using this wizard. This wizard can be used to send documents to the Record Center, or create a hold. For example, you could create a hold based on a Legal Action workflow, and then create records in the Record Center and place them under that hold. This wizard will only work with Microsoft Office SharePoint Server 2007, as it relies on the records management features of SharePoint. Figure 8-26 shows one screen of the SharePoint Records Management Event Wizard with all the options you could choose from this Event.
SharePoint Search Event: Allows you to search in SharePoint List or Library or across a List or Library Type, and then use the results in the process. You can build elaborate search queries involving multiple fields and Boolean logic. Following the Legal Action workflow example that was previously covered, you could search across the site for all documents with a certain metadata field (for example, where the client matches, or the status is approved), and then store those search results in a content field. Together with the Records Management Event, you could place those documents that met the search criteria on a hold in the records center. The Search Event Wizard will work with both Microsoft Office SharePoint Server 2007 and Windows SharePoint Services 3.0. Figure 8-27 shows one screen of the Search Results Event Wizard, where you enter the Search Filters using fields and Boolean operators to build your search criteria.
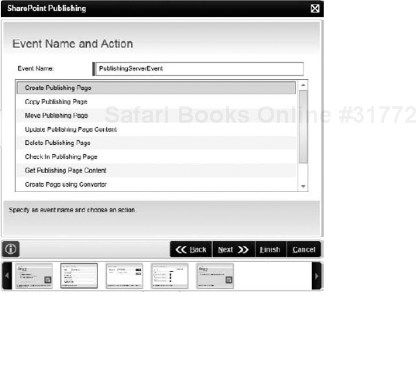
SharePoint Publishing Event: Allows you to create, copy, move, delete, and check in publishing pages; update and copy page content; and create, update, or delete reusable content. This wizard will only work with Microsoft Office SharePoint Server 2007, as it relies on the publishing features of SharePoint. Figure 8-28 shows the various options you can select when using the SharePoint Publishing Event Wizard.
SharePoint User Management Event: Allows you to add, change, or delete users, groups, or permissions and change site, list, or library permission inheritance. This Event Wizard can get complicated, as it follows the security mechanisms and the granularity of security properties from SharePoint. In the automated site provisioning workflow example that was previously covered, you could include the User Management Event Wizard to give the Originator of the request access to the newly created site. Figure 8-29 shows one screen of the User Management Event Wizard, where you can select the specific site permissions to grant for a user or group on a SharePoint site.
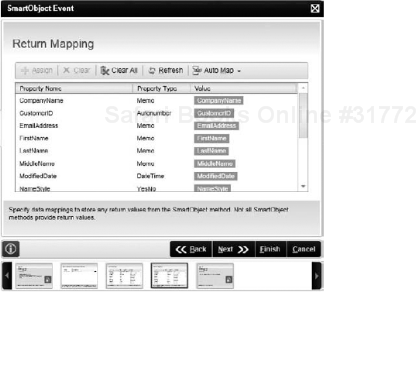
SmartObject Event: Allows you to call a SmartObject method and bind to input or output fields. This event can be used to bind process data to a SmartObject method input to create new records, or to a SmartObject method output for use later in the process. For example, based on a Company Name selected on a form, you may need to pull additional information out of your Customer SmartObject to use in a Mail Event. Figure 8-30 shows one screen in the SmartObject Event Wizard where values from the SmartObject properties are mapped to process data fields.


These are the Server Events that are out-of-the-box with K2 blackpearl. Additional wizards can be created using the K2 API and the K2 Wizard framework. For additional information, refer to the K2 Developer Reference.
IPC Events are a special category of Server Events that allow processes to be called by other processes. This allows for the modular design of processes and allows reuse of common process steps. For example, a parent process will call a child process. There are two types of IPC Events: synchronous and asynchronous.
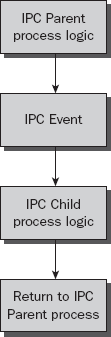
Synchronous: Means that the process will execute in series, meaning that the calling or parent process will wait at this event for the IPC or child process to complete, before it can continue. For example, you are applying for a line of credit on a car. The sales process requires some personal information, this process then performs a synchronous IPC to the credit check process. You now have to wait for the credit check to complete before the sales process is allowed to complete, just in case the client doesn't pass the credit check, in which case they will be unable to purchase the car. A synchronous IPC example is shown in Figure 8-31.
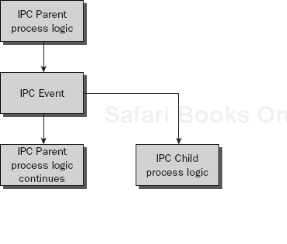
Asynchronous: Means that the two processes can execute in parallel, so the calling or parent process will start the IPC or child process and immediately continue with the next step in the parent process without waiting for a return signal from the child process. For example, think of a purchase order process. Once the request has been approved, the process can hand off the request to a fulfillment process, which in turn checks inventory and fulfills the order, using its own business process and rules. The original purchase order is not concerned with the fulfillment process; therefore it continues on with the invoicing process. This is shown in Figure 8-32.
Due to the fact that the child process is a completely autonomous process, the IPC Event should not be used for creating reusable process modules. The child process must represent a business process within the organization that operates almost independently from the parent business process. You can, however, pass in data fields to the child, as well as pass back return data fields from the child to the parent.
There are several considerations when using IPC Events:
Incorrect credentials will cause the IPC to fail: The K2 Server Service Account must have start rights on the child process in order for it to kick-off the process instance. If an IPC fails to start, verify that the permissions are set properly.
Reporting with IPC Events can be complicated: With the out-of-the-box K2 reports, you will be able to see that the IPC Event was called, but the data surrounding the activities and events within that IPC process will be stored with the child reporting data, not the parent. Therefore, you will need to create some custom reports in order to show the data from both the parent and child process in a single report.
Child Processes should be fully operational processes: IPCs should not be used for parts of processes, but for standalone processes that can be started as steps in other processes. For example, in a car purchasing process, a credit check could be a child process. However, the credit check process could be a standalone process and be started on its own, without having to be called from the parent process.
At the time of writing, there is a limitation within K2 blackpearl that requires the processes to be part of the same K2 project. Therefore, the IPC Event can only call a process on the same physical K2 server where the project has been deployed. Additional information about IPC Events can be found in the K2 blackpearl product documentation.
When you move from the design environment to the execution environment, you encounter a few new concepts that you need to understand. An understanding of these run-time concepts will also help you in the process design stage.
A workflow process is usually "kicked-off" by a user that completes some kind of form and then submits the form by clicking a Submit button. As soon as the user has submitted the form, the K2 server receives a message that tells the server to Plan or Start a new process. The K2 server will then do this by creating a new Process Instance. From now, the K2 server will push the Process Instance to the various activities by evaluating certain conditions like Line Rules.
As soon as the Process Instance arrives at an activity, the K2 server will create a new Activity Instance. If the activity has any events associated with it, the Server will also create an Event Instance for each event.
During the execution of a process, the K2 server maintains certain properties for each of the Instances that are created. The properties for a Process, Activity, and Event Instance will be discussed next. These properties are surfaced in the K2 Reports and also in the worklist.
For each Process, the following properties are available per instance during run time:
Process Folio: A user-friendly name for the Process Instance. It is strongly recommended that the developer assigns a meaningful value to this property. If a value is not assigned to this property by the developer, it will be blank, resulting in all Process Instances having the same Process Folio and making it very difficult to distinguish between the various Process Instances. The Folio also helps users manage their worklists. Think of it as a folder or binder.
Start Date: The Date and Time when the Process Instance was created, in other words when the user submitted the initial form, for example.
Finish Date: The Date and Time when the Process reached the last activity in the Process, and K2 flagged the instance as Completed.
Originator: The name of the user that started this Process Instance, in other words the user that submitted the initial form.
Status: The current Status of the Process Instance. Possible values include Active, Completed, and Error.
Duration: How long the process ran or has been running in terms of days, hours, minutes and seconds.
For each activity in the process, the following properties are available during run time:
Activity Name: The name of the activity as defined during design time.
Start Date: The date and time when the Activity Instance was created.
Finish Date: The date and time when the activity was flagged as Completed.
Priority: The priority of this activity as defined during design time. Possible values are High, Medium, and Low.
Status: The current Status of the Activity Instance. Possible values include Active, Completed, and Error. When an Activity Instance is Active, it is displayed on the worklists of the appropriate users. Note that the Activity Status is different from the status seen in the worklist, which could be Available, Open, or Allocated.
Duration: How long the activity was or has been active in terms of days, hours, minutes, and seconds.
For each Event Instance in an activity, the following properties are available during run time:
Event Name: The name of the event as defined during design time.
Start Date: The date and time when the Event Instance was created.
Finish Date: The date and time when the event was completed.
Destination: Indicates who is responsible for performing this action as defined by the activity's Destination Rule.
Priority: The Priority of this event as defined during design time. Possible values are High, Medium, and Low.
Status: The current Status of the Event Instance. Possible values include Active, Completed, and Error.
Duration: How long the event was or has been active in terms of days, hours, minutes, and seconds.
These properties are surfaced in the K2 Reports and will help communicate the details of what path the process instance followed and each activity and event that the process instance encountered. Therefore, it is critical that you name each activity and event with a descriptive name and give a meaningful Folio for the process instance. Take the time during the designing of your process to identify these titles, keeping in mind that the reports will be the most visible use of these titles and Folios.
One of the things you will notice as you build out your K2 blackpearl processes is where you actually set the actions that the User performs and how that action affects the outcome of your activity. So what exactly are actions and outcomes?
Actions and outcomes allow processes to separate what decisions, or actions, users are able to make from the implications, or outcomes, of those actions. Because actions and outcomes are defined outside of the form, maintenance of those decisions and routing logic is simple in K2 blackpearl. In short, actions are the decisions that the user can make about the process step. Outcomes are K2's way of taking the business decision and deciding where the process moves to next.
Let's discuss a simple example. You have a standard expense claim in your organization that goes through the Finance department. Ask yourself two questions:
What can Finance do with the Expense Claim?
Approve Request
Decline Request
Query Request
What is the possible outcome(s) based on Finance's action?
K2 blackpearl allows you to decouple the user interface from the process design. The K2 server will tell the form which actions are available based on the process, and will also tell the form which actions are available to the user. Remember, this concept is called the context grid, where only items that the user has permission to see are displayed.
Based on the action chosen by the user, the outcome of the activity is decided by the K2 server. Regardless of who did what on the form, the process only cares that this outcome evaluates to True, therefore, this is the path to follow. We will talk about configuring lines and rules in a little bit, but the concept that is important here is that you can add new actions without reconfiguring the user interface or the line rules, greatly reducing the development time and maintenance of your process.
There are some key points to remember regarding actions and outcomes:
Action and outcomes are defined in the process, not in the form:
Therefore, if you are adding an action to the process, you do not have to go and change the form; just update the process and the form will pick up the new action.
Actions do not care what the user interface is, merely that it exists.
Actions and outcomes do not have to be a one-to-one mapping, meaning that one action can trigger multiple outcomes.
The user interface is rendered automatically with only actions that are available to the user:
The K2 server manages which options are available, based on the process and the user's permissions.
Because only the actions that the user can perform are displayed, there is no risk of the user performing an action for which they do not have permission.
Because there is no change to the form, there is no risk of a user filling out an "old" version of the form; therefore, no additional training is required.
This results in faster development and richer user interfaces.
Same form can go against multiple versions of the process:
Because the logic is no longer stored in the form, changes to the process logic do not require the User Interface Designer to get involved.
Because the form does not change, you do not have to train the users on new forms; no new communications are needed about replacing the form; just update your actions and go!
Therefore, the cost to implement and maintain user action logic is dramatically reduced.
Actions and outcomes are defined within the properties of a Client Event. While actions remain part of the event, the outcomes are actually defined within the scope of the activity. So, when a user selects the action in the form, K2 evaluates that action against all of the outcome rules. And, based on the outcome of the activity, the lines are evaluated, and those Line Rules that are True are followed.
We have not discussed lines in detail yet, so let's talk about the various types of lines and rules available in K2 blackpearl.
Lines provide the ability to connect the outcome of one activity in a process to another activity. While a line is a visual representation on the design surface, it also has properties called Line Rules. In fact, many properties of an activity are rules of some kind or another. These Activity Rules represent the tools used to build business logic into the activity, and are the most important properties of an activity.
The set of rules is determined per activity, as shown in Figure 8-33.

The rules follow the order shown in Figure 8-33, and will be described in detail next. As the Activity Rules are defined on the activity, regardless of the events stored within, you can add an empty activity to your design canvas. You can open the Activity Strip by clicking on the down arrow next to the name of the activity or by running the Activity Wizard to see all of the properties of the activity. The Activity Strip, as well as the Activity Wizard icon, is shown in Figure 8-34.

If you want to delay the start of an activity until certain conditions are met, you will define a Preceding Rule. The Preceding Rule is a logical expression that must evaluate to true before an activity can be created. Stated in another way: What conditions must be true before the activity is created for the instance? If the Preceding Rule evaluates to False, none of the other Activity Rules will be evaluated and an instance of the activity will not be created.
A Preceding Rule is not a "wait until this is true" type of rule. Every time a specific line is followed, the Preceding Rule is evaluated once, and if it returns true, then that activity will start (the only remaining question then is when it will start, and that then gets determined by the start rule).
For example, say your process splits into two parallel Activities A and B and then combines them at Activity C. You want both Activity A and B to complete before Activity C is started. You would create a Preceding Rule for Activity C. If Activity A completes, the Line Rule from A to C would evaluate to True, but the Preceding Rule for C would not be true; therefore, Activity C would not begin. Once Activity B completes, the Line Rule from B to C would evaluate to True, and then your Preceding Rule for C would also evaluate to True, and Activity C would begin. Figure 8-35 shows an example of a Preceding Rule based on the previous example.
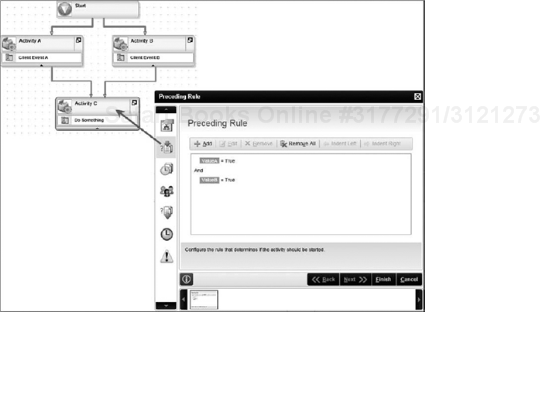
Remember, a Preceding Rule is a property of the activity. To set, open the Activity Strip and click on the second icon, or open the activity properties and select the Preceding Rule tab. You can then add your rules based on variables from your process data Fields or SmartObjects, using Boolean logic (And, Or, XOr), and indenting rules to build extensive logic into your Preceding Rule, as shown in Figure 8-36.

The Start Rule is time-related and dictates when an activity can start. When you think about the Start Rule, think of time. The start of an activity can be delayed by a specified amount of Days, Hours, or Minutes after a base date. The base date can either be the Activity Start Date, or a date value that is kept in a process data or XML field. The Start Rule can only be evaluated if the Preceding Rule evaluated to True.
For example, if you have a business process that should start on the first of every month, use a Start Rule to dictate when the activity should begin. Figure 8-37 shows the Start Rule properties screen. Note that the K2 Object Browser has been expanded by clicking on the arrow on the right-hand side of the wizard. This can be done on any of the K2 wizards to make it easy to drag-and-drop fields onto the wizard screen.

If the activity involves a Client Event, which in turn has some kind of human interaction, the person or people who are responsible for that event must be specified. By stating who can action the activity, the workflow participants are stored in a Destination Rule. The Destination Rule determines who will receive the events defined in the activity.
We discussed destination users in an earlier section. However, when you set a destination for a Client Event, you are actually modifying the Destination Rule of an activity.
The Destination Rule generally uses the User Browser tab within the K2 Object Browser. This allows you to use users, groups, and roles that have been defined. By default, the User Browser integrates with the configured Security Providers, which out-of-the-box, are Microsoft Active Directory or SQL. Destination Rules can also be one of two types: static or dynamic.
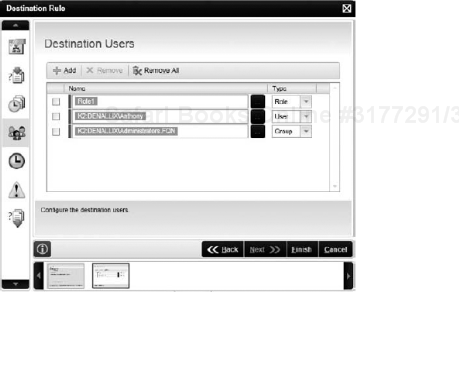
Static Destination Rules are explicitly defined by dragging a user or group to the destination, as shown in Figure 8-38. You can also mix users, roles and groups into the Destination Users for an activity. However, if you drag a single user into the Destination Rule, if you wish to update the Destination Rule you will need to modify the process definition, make the change, and deploy your process again. This is not a very flexible method, but is very easy when prototyping your process or testing the business logic and routing in your process. You can always go back into the Destination Rule and change to use a dynamic method later.
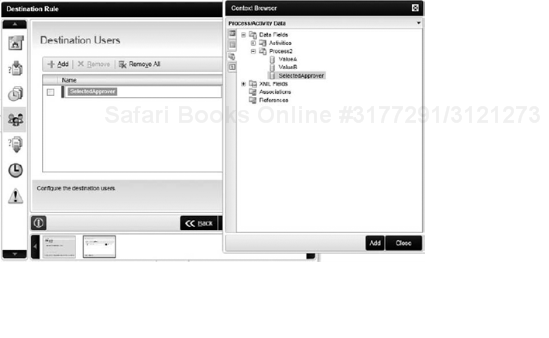
A Dynamic Destination Rule allows the "who will receive the task" to be defined outside of the activity. For example, you can use a process data or XML field as a Destination User. At run time, the value of this data field will be evaluated and the activity will be assigned to the appropriate person or people. This is shown in Figure 8-39.
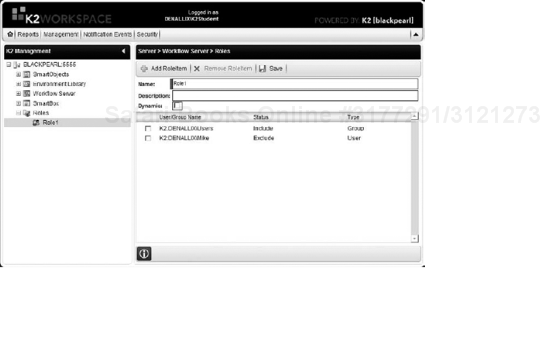
Another way of handling Dynamic destinations is by using roles. Although in the Destination Rule, the role will be explicitly defined, because the items that make up that role are defined outside of the process definition, changes can be made without having to export the process again. Roles are defined in the K2 Workspace, as shown in Figure 8-40.
For more information on how to create roles, please see Chapter 15.
Once the destinations have been defined for the activity, there are some advanced options that can be set. If you go into the Destination Rule page on the Activity Properties, you will see that the Back button is enabled. By clicking Back, you can select to run the Destination Rule wizard in Advanced Mode, which opens up many more options for Destinations.
Slots determine how many worklist items can be simultaneously open for the activity. As soon as a user clicks on a worklist item, the status immediately changes from Available to Open and one activity slot is occupied. The number of slots can be limited to a specified number, or a slot can be created for each destination.
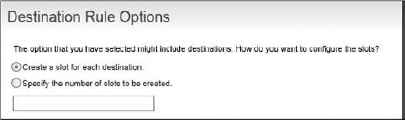
For example, creating a slot for each destination can be useful for a voting or collaborative work scenario, which requires all recipients to work on the item. On the Destination Rule Options page, select the "Create a slot for each destination" option, as shown in Figure 8-41. Then, the worklist item will appear on each recipient's worklist, regardless if others have opened it already.
If no special Succeeding or Line Rules are specified, however, the activity will complete as soon as all of the listed destinations has completed the client event, causing the work item to disappear from all destination users' worklists.
For more information on some of the advanced destination scenarios, please refer to Chapter 22.
The other option is to specify the number of slots to be created, as shown in Figure 8-42. For example, if you want to send an item to a group of five people, but only the first two that open the item may work on it, set the number of slots to be created to two.
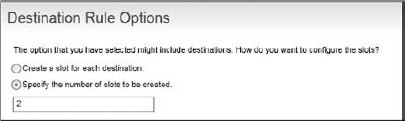
As soon as the first two users open the work item on their worklists, it is allocated to those users and disappears from the worklist of the other three users.
There are some general guidelines to keep in mind when using multiple slots:
Succeeding Rule: If the number of Slots = 1, then no Succeeding Rule is required. However, if the number of Slots > 1, then a Succeeding Rule is required in order to keep the activity from completing before all slots have responded. We will discuss Succeeding Rules in just a bit.
Data Fields: Multiple slots will cause the value of a process data field to be overwritten each time a user completes a work item. Use activity data fields to store responses from each user.
Line Rules: The Line Rules determine the required direction to follow in the workflow. The direction needs to be modeled around the activity data fields and slots for multiple responses. Line Rules will be discussed in more detail later, but you will need to modify the default Line Rules if you have multiple slots and want the behavior of the process to behave differently based on the activity data fields.
Actions and Outcomes: Succeeding Rules and Line Rules are automatically generated and configured according to defined actions and outcomes. By default, all slots will need to select the same action in order for the outcome to evaluate to true. However, this can be changed by modifying the Succeeding Rule.
In order to understand the different Destination Rule options, let's look at a few common scenarios. These scenarios will hopefully help you understand how the slots and Destination Rules can affect the process flow.
Chapter 22 will have additional information on the advanced destination rules. However, there are some common destination options that involve setting destination rules with different slots and combinations, which we will discuss next.
Figure 8-43 shows an example of Scenario #1. In this scenario, an actor submits a request to multiple destinations simultaneously (A). The first actor to respond to the request (C) does so for the remaining actors (B and D). In this situation, the first response returned from the actors is processed, and the remaining work items are no longer applicable.

The First Response approval is beneficial in processes where the request is sent to a destination consisting of a group of people; in our example above, the HR New Hire Role. With a single slot and the default plan (Plan Just Once), as soon as one person opens the worklist item and actions it, the request can continue on in the process without waiting for the others to respond.
Figure 8-44 shows an example of Scenario #2. In this type of step, an actor submits a request to multiple destinations simultaneously (A). The process requires that each destination in parallel (B, C, and D), review the same items, and provide similar and congruent responses before the request is submitted to the next destination. As responses are received, they are held in a waiting state and verified against the business rule (for example, waiting for the Succeeding Rule to be true). If destination C responds with an action of decline, the entire request is declined and the responses from destinations B and C are nullified.

Scenario #2 is beneficial in situations where a unanimous approval is required. An example might be a purchase agreement that requires engineering, manufacturing, and finance to agree to the terms. Engineering would look at the technical specifications, manufacturing at the service and support terms, and, of course, finance at the financial terms. If any one of these reviews is unsatisfactory then the agreement will need to be renegotiated.
This behavior can be done in K2 blackpearl by adding multiple Destinations to a single activity. The Succeeding Rule would check the actions, and if a "decline" action was performed, the outcome would need to be set appropriately to route the request down the decline path instead of to the next step in the process. Succeeding Rules will be discussed in a little bit.
If, however, you wanted different data to be displayed to each Destination (in this example, engineering, manufacturing and finance), you would need to have three separate activities with three separate Client Events, each mapping to the appropriate user interface.
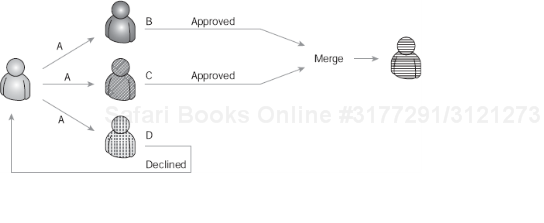
Figure 8-45 shows an example of Scenario #3. In this type of step, an actor submits a request to multiple destinations simultaneously (A). The process requires that each destination in parallel (B, C, and D) reviews the request before the responses are merged together and routed to the next destination.
In this scenario, the process will remain in the step until all destinations have provided input. If one destination is lax in its response, this may delay this specific step and lengthen the overall duration of the process. A classic real-world scenario is an editorial review process where an author submits an article to multiple reviewers, who, in turn, pass along their recommendation to the editor for final review.
In the preceding scenario, you will need to store any data in activity fields rather than process data fields to prevent each destination user from overwriting the others' responses. The Succeeding Rule would wait for all destinations to respond, meaning all slots have responded, but regardless of the actions selected, the process would continue on to the next step.
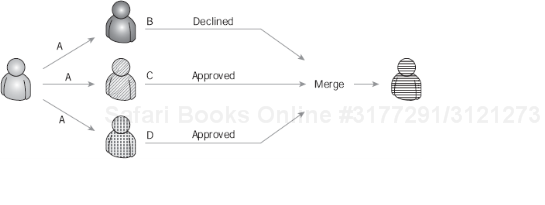
Figure 8-46 shows an example of Scenario #4. In this type of step, an actor submits a request to multiple destinations simultaneously (A). The process requires each destination in parallel (B, C, and D) to review specific data within separate sections of the request. Similar responses (for example, approvals) are merged together and routed to the next activity, while other actions (for example, declines) are routed to a different activity.
An example of this type of process is a procurement request. In this example, a hiring manager submits a request for a PC, a phone, and an office chair for a new employee. This request is routed to IT, Communications and Office Supply, where the PC and phone are immediately available and sent on for provisioning. The office chair is unfortunately on back order, and will have to be procured in another way.
While the Succeeding Rule would wait for all slots to respond, the process could go down multiple paths once it has completed this activity. This would be handled with Line Rules, which will be discussed in a later section.
When working with Dynamic destinations such as roles and multiple slots, the behavior of the activity can become very complicated. It helps to write down the desired behavior of the activity when doing your process design. For example, in an HR new hire approval workflow, the activity could go to the entire HR department for processing. However, the first one that opens the worklist item and actions will complete the activity, and the rest of the department should no longer see the worklist item. This would correspond to a Destination Rule where the HR New Hire Role is used for the destination, and the default behavior of a single slot is desired. If however, you required two HR approvals before the activity could complete, you would need to change the number of slots created. The Succeeding Rule should then wait for the two slots to be completed before firing.
Your organization might have a business rule that states a specific activity must be completed within eight (8) hours; if not, some special action must be taken. The Escalation Rule is used to specify when and how this special action takes place.
We will discuss escalations in a later section. However, when you set an escalation you are actually modifying the Escalation Rule of an activity.
A Succeeding Rule is a logical expression that must evaluate to true before an activity can be completed. Stated in another way: What conditions must be true before the activity is allowed to end?
The logic for when the activity is complete is stored in this rule. This idea ties to the outcomes that were discussed previously. The Succeeding Rule cares about what the outcome of the activity was, but not who actioned it or selected which option in a form. The Succeeding Rule defines the outcome of the activity, which is what the Line Rules that were automatically generated by K2 blackpearl use to evaluate which Line Rules should be followed.
Succeeding Rules are extremely important if you have multiple Activity Slots. A Succeeding Rule can be thought of as the following equation:
Succeed (Complete Activity) =
       (Conditions you define) OR (All Worklist Items = Complete)
For one slot the Succeeding Rule will evaluate to True as soon as the user completes his work item, regardless of the Condition you defined.
A Succeeding Rule can be used for multiple approvals. For example, a form is sent to three managers for approval. It is required that at least two managers approve, and none reject the form. If the first manager rejects it, the Succeeding Rule can immediately complete the activity, without waiting for the other managers to respond. If the first manager approves the form, the Succeeding Rule will wait for a second approval before completing the activity, leaving the worklist item available for the other managers.
In addition to the above rules, which are, in effect, properties on the activity, you can also create Line Rules. These are rules that are properties of the Line on the design canvas and can be used to route the business logic for the process. These Line Rules generally occur in a workflow process in a junction point, where the process can flow into one or more directions depending on certain conditions. These are indicated with lines, and conditions are constructed using Line Rules.
When we discussed actions and outcomes in an earlier section, we assumed that if an outcome resolved to True, then that path was followed in the process map. The way that K2 blackpearl handles this is by defining a Line Rule that basically says "If this outcome is true, then this line is also true." By default, K2 blackpearl will create Line Rules that map to each outcome in order to help you quickly design your process. This can be seen in Figure 8-47.
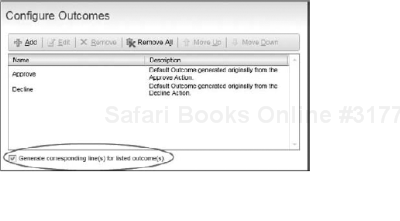
These default lines will help you easily map your process, and if new actions and outcomes are added to a particular activity, you can generate lines for the newly added option. You can also add new lines, or edit these default lines, to add additional business logic. Basically, if we want the process to follow a specific route we would write a conditional statement that would evaluate to True. On the other hand, the same conditional statement must evaluate to False, if that route must not be followed.
Line Rules are configured by right-clicking on the line and clicking Properties. On the Line Rule Property page of the wizard, you will see the Line Rule that was automatically generated based on the outcome. You can edit or add new conditions to this Line Rule, as shown in Figure 8-48.
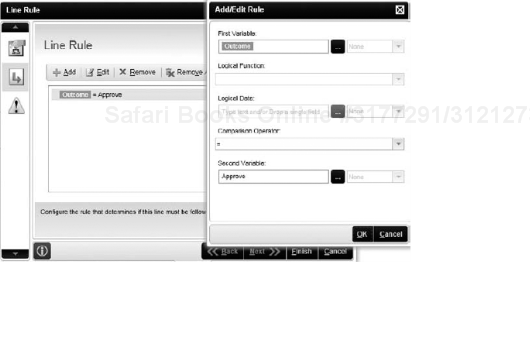
A Line Rule can consist of multiple statements connected with Boolean AND, OR, and XOR operators. Because of operator precedence you will, under certain conditions, want to group statements together with brackets. Consider the following Binary Operations table, and notice the difference in the results columns.
f1 | f2 | f3 | f1 OR f2 AND f3 | (f1 OR f2) AND f2 |
|---|---|---|---|---|
0 | 0 | 0 | 0 | 0 |
0 | 0 | 1 | 0 | 0 |
0 | 1 | 0 | 0 | 0 |
0 | 1 | 1 | 1 | 1 |
1 | 0 | 0 | 1 | 0 |
1 | 0 | 1 | 1 | 1 |
1 | 1 | 0 | 1 | 0 |
1 | 1 | 1 | 1 | 1 |
You can also indent the operators to create complicated logic statements. Be sure to test each branch in your process definition during the testing phase of your project, to ensure that the process follows the correct path based on the Line Rule logic. It is very easy to make a simple mistake in your Boolean logic that will cause certain branches in your process to never fire.
Once a Process Instance has started, it will basically flow through the defined process using the activities, events, and lines as the map. There are a few K2 features though, that you can use to help the request move smoothly through the process, in particular, escalations and notifications.
One great advantage of automating a business process is the fact that we can, with absolute precision, tell when a specific activity was started. This enables us to enforce a business rule that states how long the activity should take to complete. If the activity takes longer to complete than the expected time, we can use escalations to raise an alert of some kind. The Escalation Rule for an activity determines what must happen if an activity is not completed within a specified time.
The escalation principle applies to both a process and an activity, since an activity that is not completed will prevent an entire process from not completing. Therefore, escalations can be configured at process and activity level.
There are two types of Escalation Rules:
Escalate On: Enables the process designer to select either a specific date or a dynamic date. The escalation can be extended further by enabling the option to be repeated.
Specifying an escalation date hardcodes a date and/or time by which the escalation will occur. The disadvantage with this option is that once the date is reached, the process will need to be redeployed to the server for new instances of the process to be created. The Specific date functions the same as a hardcoded value. Unless it is changed, the escalation will take place if the date specified has expired.
The Dynamic Date option allows dates to come from SmartObjects or process or XML data fields where a date field is provided and the escalation is dependent on the value contained therein.
Escalate After: This option is best suited for reusable, short duration escalations, for example, submitting a support request or leave request, where a response is expected within a short time and the lack of action requires a short-term escalation.
The Escalate After rule template configures escalations in days, hours, minutes, and seconds. The escalation can be repeated. For example, escalate after eight hours, three times.
All fields can be configured using dynamic fields, including SmartObjects or process data or XML fields.
An Escalation Rule determines what to do if the process or activity is not completed within the allocated time. Multiple Escalation Rules can be configured for a single process or activity. An escalation is linked to time elapsed from the start of the process or activity. And, if working hours have been defined, escalations are linked to working hours as well.
There are several types of escalations. For processes, activities, and events, the following escalation types are available:
At a process level, you can also use an escalation to change the flow of the process:
Goto Activity: Configures the process to expire the current activity and move onto the specified activity. For example, you can move the process instance from the Frontline Manager Approval Activity to the Department Manager Approval Activity.
At an activity level, two additional templates are available:
You can also use .NET code to manipulate the rule or the escalation action. After you've defined the escalation, you can view the code, as shown in Figure 8-49. The action code can be manipulated using a Windows Workflow Foundation (WF) schedule. The Default Escalation will stub out an empty WF schedule for you to drop the activities you wish to customize the escalation. The rule code also will create a WF schedule, with the rule code embedded as C# code.

Escalations can be effective tools to ensure that your process continues to move forward. For example, escalations can be used to send a reminder e-mail eight (8) working hours after the task has been assigned to a destination user. This reminder e-mail can be sent to the originator as well, to let them know that their request has not been acted upon. Perhaps this reminder happens for three days, after which the task is redirected to an additional user, perhaps to the destination user's manager.
Escalations also can be done on a process level, to perhaps e-mail the K2 administrator or process owner that the request has not completed in a timely manner. In this way, the K2 process can be proactive in letting the administrator or process owner know that there may be an issue, rather than having to watch each process instance closely for bottlenecks.
On each Client Event, there is an option to send a notification of the event to the destination user. By default, this notification is an e-mail message, but this can be configured to use other notification engines. This notification is important to factor in to your process design. If you choose not to send a notification to the destination user, how will they know they have a task item? Only if the user accesses their worklist, either through the K2 Workspace or the Worklist Web part, will they see the new worklist item.
Beyond notifying a destination user they have a worklist item, notifications can be important in two other aspects:
E-mail Events: Use the Mail Event to send an e-mail. It can be used in any activity and can use any process data or XML fields. This type is used within the process design.
Notification Designer: The Notification Designer in the K2 Workspace allows anyone with process rights to create additional notifications outside of the process design. Additional information about the Notification Designer can be found in Chapter 20.
It is important to factor in notifications in the process design for several reasons:
To notify the destination user of a worklist task needing action
To remind the destination user that they have not actioned the item in a certain period of time
To keep key stakeholders in the business process informed at each step in the process
To keep the originator informed of their request as it moves through the process
Working hours can be defined at the K2 server level. This allows the K2 administrator to set up the hours in which to count for escalations and start rules. Remember that you can set escalations on a time basis, meaning that if a user has not actioned the item in a certain time period, an escalation can be performed. Working hours allow you to set up zones to determine when an escalation should be active. The zone also takes into consideration in which time zone the destination user resides.
For example, if your standard business hours are 8 A.M. to 5 P.M., if a request is submitted at 6 P.M. with a 2-hour escalation, the escalation clock does not start until 8 A.M. the following morning. This is important for businesses with set office working hours; for 24x7 Help Desks, this may not be as important.
When setting an escalation, you can choose which zone to use. It is important to remember what the destination of the activity is and select the appropriate zone accordingly.
Working Hours determine during which hours and on which days the "escalation clock" is ticking. Working Hours are configured through the Management Console using Zones.
Zones are configured to a Greenwich Mean Time (GMT) zone and have standard working hours for a seven-day week. You can configure the working hours, special dates, and exception dates per zone. More information on configuring zones can be found in Chapter 15.
Exception dates can be created for public holidays or all-hands meetings. Special dates can also be configured to set hours where the group is not working, for example at town hall meetings or department-wide meetings. Chapter 15 will also describe special dates in more detail.
There is another type of workflow design that is common when working with workflow solutions but does not fit the "normal" view of workflow steps.
There are a number of design cases in workflow solutions where the "order of steps" is not known or cannot be determined at design time. An example of this is where certain steps might occur more than once (for example, a specific manager needs to keep reviewing a document until conditions have been met), or where the user is involved in determining the next step of flow of events (for example, a user might wish to route a document directly to the regional manager instead of the departmental manager).
Frequently, during these types of solutions, the workflow designer attempts to solve this by linking each workflow step to each of the possible next steps in the process. However, this can result in a very complex spaghetti workflow process with lines linking everywhere. There, in order to clean up this "ad hoc" style workflow, one of the possible solutions is the Spider Workflow approach.
To some degree, the Spider Workflow approach has been overhyped as the silver bullet for ad hoc workflow. However, this is a logical approach for flexible workflow design, which is why it is discussed here. This solution is very difficult to report on, because of the vast number of Routing Step instances, which makes it difficult to accurately measure the the process. However, with its flexible design, it is a viable solution for ad hoc workflow.
Spider Workflow is a workflow design approach in which the workflow gets handled by a central "router" hub step, and a number of single "spoke" steps. Using this approach, the workflow design is centered on an intelligent central hub step that determines which step (or steps) the workflow should route to next.
The Spider Workflow design could also be described as a hub-and-spoke design.
During the workflow run time, the request will be routed from one spoke to another, until a specific condition is met such that the workflow is complete. In this manner, any spoke can follow a previous one (or even the same spoke more than once if required).
Referring to the diagram shown in Figure 8-50, the Spider Workflow is implemented using the Routing Step as the central activity of the process. This is an activity that contains a single Server Event that evaluates data in order to set an Outcome data field. Each line that emerges from the Routing Step contains a simple Line Rule that checks the value of Outcome to establish whether it needs to be followed or not.
For example, the line that runs from the Routing Step Activity to the Manager Approval Activity could have a line rule that checks whether Outcome = Manager Approval, and if true, the Manager Approval Activity would be the next step.
This can continue indefinitely until an exit condition is met. For example, again referring to Figure 8-50, the process might need to continue until all four parties (Manager, Finance, Regional Manager, and CEO) have approved a specific document. In this case, the Routing Step would evaluate the Approval data fields, and if all four of them are set to Approved. then it would set the Outcome data field to Continue, potentially exiting the spider portion and continuing on in the process.
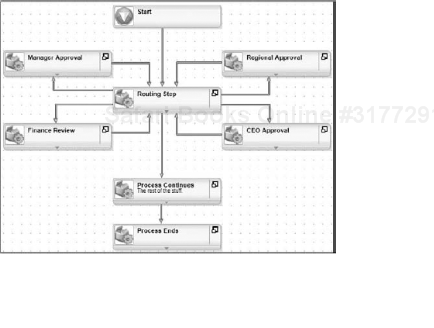
Because this can be a difficult process definition to understand, let's take a look at an example. This example uses a Corporate Policy Approval process. The originator submits a new policy document to start the process. By default, if the originator does not specify the first approver, the process follows a default order (Manager > Regional > Finance > CEO). So this request is routed to the Manager Approval activity.
The Manager takes a look at the document but feels that the policy is too expensive, so they specify on the form presented that the task must be routed to Finance next. After submitting the form, the Routing Step evaluates the data fields set by the Manager, and routes the task to the Finance Review step.
The Finance team reviews the document and approves the request, but they do not specify the next approver. The Routing Step checks the default order, notices that the Manager has already approved and the next default person is the Regional Manager, so then the request is routed to the Regional Manager.
The Regional Manager is happy with the request, but they see from the process history that the Manager routed it directly to Finance with some concerns. Therefore, the Regional Manager adds some additional comments, and routes it back to the Manager to review the document again.
The Manager gets the document (for the second time), reviews the approval history and comments, and is now satisfied with the document and therefore approves it again. The Routing Step now determines that the only person that has not seen the document is the CEO, so the request is routed to CEO Approval.
The CEO has a look at the request, sees everyone else has approved the document, and approves it.
At this point, the process reaches a specific condition where the Routing Step evaluates all the requirements and establishes that everyone who needs to approve the request has already done so. Therefore, the request is now routed to the Process Continues Activity (where the document might be uploaded to SharePoint, and the originator notified).
This is just a simple run-through of a single process; however, it should be apparent that this process can be approved in any order, any number of times, all driven by the conditions coded into the Routing Step server event.
This design can be taken further than the simple scenario painted in the previous section. It is relatively easy to extend this solution to allow parallel approvals in the workflow. There is no reason why this document cannot be reviewed by the Regional Manager and by Finance at the same time. The logic in the Routing Step needs to be modified to handle the parallel processing. The process can get as complex as required, and the exit condition will always be "if all conditions have been met, the process can continue."
Extending the design further, the spoke steps could be IPC Events to additional processes. There is a downside to this approach, where the data is passed back to the parent process only after the child process has completed. However, by using SmartObjects to encapsulate the data, this downside is eliminated as SmartObjects can be accessed and updated from anywhere.
You have now been introduced to all of the pieces of the K2 process puzzle. You have learned about pawn diagrams, and how translating boxes to people helps with the communication and change management aspects of process automation. You have also learned about the "who," (actors and roles), the "what" (activities, events, actions, and outcomes), the "when" (escalations and notifications), and the "how" (Activity Lines, including Destination Rules and Line Rules) with respect to process design. In the next chapter, you will build your first K2 blackpearl process and put some of these concepts into practice.