
Data Binding
Most business applications deal extensively with data. As a developer, you have a constant need to expose data in a user interface.
You can do that in a brute-force fashion by writing a lot of code to move data between user interface elements and data containers. However, such code is repetitious, bug-prone, tedious to write, and difficult to maintain.
Recognizing the problems with that approach, user interface technologies often offer an alternative called data binding, which automates much of the process of moving data into user interface elements. You're probably familiar with data binding from such earlier user interface technologies.
XAML includes a data binding subsystem, and it's one of the most advanced and powerful of any user interface technology stack. If you have been skeptical of data binding in other technologies, you should put that doubt aside and fully embrace data binding in XAML. It's a necessity for developing anything more than trivial programs.
Data Binding: Fundamental Concepts
At its most fundamental, data binding is an association between a property on one object and a property on a different object. The value in one of the properties is used to automatically update the value in the other property.
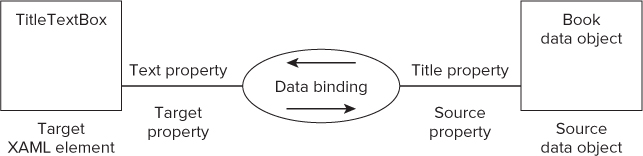
Suppose a data object of type Book had a property named Title. You can set up a binding in XAML so that the value in that property was automatically moved into the Text property of a TextBox named TitleTextBox.
To get some terminology straight, in this case the Title property of the Book object was the source of the data, and the Text property of TitleTextBox was the target. That distinction is important; several data binding capabilities require you to understand it. Typically, the source is where the data comes from, and the target is something in a user interface to expose the data to the user. Figure 12.8 diagrams the objects used in this example, and applies this new terminology to them.
Figure 12.8 The Book object on the right contains the source property, named Title. The TitleTextBox object contains the target property, which is the Text property
For XAML data binding, the target property is always a property on a XAML object. The source property might be on a XAML object, too, or it might be on some other .NET object, such as a Book object created in code.
The target property of a data binding must be a special type of property called a dependency property. Almost all the properties you would ever likely use as the target of a binding are dependency properties, so this isn't normally a concern. However, if you advance to writing your own elements that need bindable target properties, you'll need to learn more about dependency properties. Creating objects with dependency properties is an advanced XAML topic, and is not covered in this book.
The Binding Class and Binding Expressions
The ellipse in the middle of the diagram in Figure 12.8 represents the activities needed to transfer property values back and forth between the target element and the source data object. Those activities are carried out by an instance of the Binding class.
The Binding class has properties to configure the binding. The two most commonly used properties are the Path property, which specifies the source property for the binding, and the Mode, which determines which ways the property values can flow.
Binding objects are most commonly defined in XAML with a binding expression, which is a special type of markup expression.
What Is a Markup Expression?
A markup expression is a XAML construct that allows definition of a fairly complex object instance in a single string. The string is delimited by braces, and the first word inside the leading brace indicates the type of markup expression.
You have already seen one simple markup expression. The syntax for assigning a property to a resource is a markup expression:
Foreground="{StaticResource ReusableBrush}"
The StaticResource type of markup expression tells the XAML parser to go look for a resource with the name that is included in the expression.
What Is a Binding Expression?
The specific type of markup expression used to define a data binding is usually called a binding expression. The result of a binding expression is an instance of the Binding class, with appropriate property values set on the instance.
Here is a simple binding expression that will bind the Text property of a TextBox to a Title property of a data object:
<TextBox Text="{Binding Title}" />
This is actually a shortcut version of a slightly longer binding expression, which is:
<TextBox Text="{Binding Path=Title}" />
In this binding expression, it's more explicit that the Path property of the Binding object is being set to point to a Title property. If necessary, additional properties can be set for the Binding object, with each property setting in the binding expression separated by a comma. This example sets both the data property and another property called Mode:
<TextBox Text="{Binding Path=Title, Mode=TwoWay}" />
The Mode property specifies whether data is transferred only from the data object to the visual element (Mode=OneWay) or if data is transferred both ways between the data object and visual element (Mode=TwoWay). Depending on the XAML platform other values for Mode are also possible. Note that a OneWay binding is essentially read-only—changes to the visual element based on user input are not transferred back to the data object.
The default for the Mode property varies depending on the XAML platform. For Silverlight and Windows 8, the default mode is always OneWay. For WPF, the default is more complicated; if you need details, consult the Mode property in the WPF documentation.
Other properties that are commonly set in binding expressions are the ElementName property, which allows the data source to be another element instead of a normal data object, and Converter, which specifies an object for converting the data during the binding process. Both are discussed in the next section.
DataContext
The previous examples assume there is a data source object (in our case with a Title property), but the binding expression contains nothing to identify the data source. How, then, does a binding on a XAML element find its data source? That is done with an element property called DataContext.
If no data source is specified in a binding, then the Binding object uses an object specified by the DataContext property as its data source. However, it's not necessary to set DataContext for every element that has a binding. DataContext can be set on a container, and elements inside the container are able to use that DataContext.
To be a bit more precise, DataContext is an inherited property. Elements that don't have a setting for the property inherit the setting from something further up the tree of elements in the user interface.
Normally, DataContext is set at the root level (for a UserControl or Page), or for a panel on a visual surface (such as Grid or StackPanel). DataContext can be set for individual elements such as TextBox elements, but it's rarely appropriate to do that.
Data Bindings between XAML Elements
As mentioned earlier, the target of a data binding is always a XAML element. The default data source is specified by the DataContext property.
However, there are other possibilities for the data source. One of them is to let the source be another XAML element.
If the source is also a XAML element, you can specify that element as part of the binding. To do that, you use the aptly named ElementName property of the binding. ElementName can be set to any XAML element in your XAML page that has a name.
Binding between XAML elements can provide more interactivity in your interface designs. Here is an example to illustrate. Suppose you would like to have a user interface with a CheckBox to indicate if a patient smokes, and a TextBox to find out how many cigarettes a day the patient smokes. Good interactive design would suggest that the TextBox needs to be enabled only when the CheckBox is checked.
Let's assume the CheckBox is named PatientSmokesCheckBox, and the TextBox is named Number-OfCigarettesTextBox. You can create that behavior described previously by binding the IsEnabled property of the TextBox to the IsChecked property of the CheckBox. The binding would be set up on the TextBox, and would look like this:
<TextBox IsEnabled="{Binding ElementName=PatientSmokesCheckBox, Path=IsChecked}"...
If you include such a binding, checking the CheckBox will cause the TextBox to be enabled and thus available to the user. Unchecking the CheckBox will disable the TextBox.
In previous user interface technologies, you could only make such an association in code, by handling an event on the CheckBox and subsequently setting the TextBox to be enabled or disabled. In XAML, you can do it declaratively, allowing faster development and less chance of a bug.
Here's another example: Suppose you have a button that sits on top of content the reader might need to see. You may wish to allow the user to make the button translucent, so that the content underneath can be seen. In XAML, you can accomplish that by setting a binding between a value on a slider control and the Opacity property of the Button. The following XAML snippet contains an example. You can try it out by creating a new XAML application in Visual Studio for any of the three platforms, and including the XAML snippet:
<StackPanel>
    <TextBlock >The button can become translucent</TextBlock>
    <Slider Name="OpacitySlider"  Value="1" Maximum="1"
            Minimum="0.1" LargeChange="0.1" SmallChange="0.01" />
    <Button Opacity="{Binding Path=Value, ElementName=OpacitySlider}"
            Name="Button1" Width="75">
        Slide the bar to make me translucent
    </Button>
</StackPanel>
Notice that the Slider restricts its value to be between 0.1 to 1. That's because the Opacity property is in the range from 0 to 1, with 0 being completely transparent. With the lowest value set to 0.1, the Button cannot completely disappear.
The binding expression on the Button is:
Opacity="{Binding Path=Value, ElementName=OpacitySlider}"
This sets the Opacity property of the button to the Value property of the OpacitySlider control, with no code or event handling required. If you create the example, you can see this in action. As you move the slider, the Button will become translucent to match the slider's Value setting.
Other Ways to Specify a Data Source
There are two additional properties of a binding that can specify the source object; the Source property and the RelativeSource property.
The Source property names an object already defined in XAML as the source object. It differs from ElementName because the source object need not be a XAML element. It can be any .NET object that can be defined in XAML.
Most commonly, the Source property is set to an object that is defined in XAML as a XAML resource. That can lead to a fairly complex binding expression. Here's an example of the syntax:
<UserControl.Resources>
    <local:Settings x:Key="MySettings" MaxPages="50" />
</UserControl.Resources>
<Grid>
    <TextBlock Text="{Binding Source={StaticResource MySettings},
Path=MaxPages}" />
</Grid>
The Source property is set with another markup expression inside the binding expression. That inner markup expression indicates that the data source is the Settings object declared as a resource.
The RelativeSource property points to an object indirectly, by using the bound element as a starting point of the reference. The object can point to itself, so that one of its properties is bound to another.
The RelativeSource property can also point to the parent of the bound object, or to some other ancestor. This capability is most often used in data templates and control templates. You won't be showing any examples of that usage in this chapter.
Property Change Notification
Binding objects always know when properties change in XAML elements. That capability is part of the dependency property system.
However, binding objects also need to know when data source objects change. That's no problem if they are elements, that is, if ElementName or RelativeSource is used to specify the data source. However, for normal data objects, an additional capability is needed called property change notification, which means that the object raises an event when a property changes.
Data objects that you create do not have property change notification unless you build it into the classes for those data objects. If you leave it out, changing the value of a source property in code will not typically cause the XAML element that is bound to the property to be updated.
To give property change notification capability to your data objects, you must implement an interface called INotifyPropertyChanged. This interface predates XAML, so many data object frameworks will have this interface in place on the data objects they create.
Data Conversion during Binding
Sometimes the value in a data object can't be used directly to set an element property. For example, a phone number might be represented in a data object as nine consecutive digits, but you would prefer it to be placed in a TextBox as a formatted phone number with parentheses and dashes. When an edited phone number is transferred back to the data object, the formatting needs to be stripped out.
Direct binding also might not work if the data types of the source and target properties don't match. For example, suppose you had a TextBox that was bound to the quantity on hand of an item. A negative quantity means the item is on backorder. You might want the background of that TextBox to be different for items on backorder.
That means the Background property for the TextBox needs to be bound to a Quantity property on a data object. However, the Quantity is probably an integer property, and Background is a Brush. So it's necessary to peek at the value in Quantity and return an appropriate Brush to paint the background of the TextBox.
To handle such binding cases in XAML, you must create a type of object called a value converter. This object is responsible for any necessary conversion of values in either binding direction. It can convert between two properties of the same type, as in the phone number scenario, or between two properties of different types. The binding between a Quantity (of type Integer) and a Background (of type Brush) would be an example of a binding between two different data types. An example of such a value converter is presented in the section “Example: A Quantity-to-Brush converter.”
The IValueConverter Interface
A value converter is a .NET class that implements the IValueConverter interface. In WPF and Silverlight, this interface is in the System.Windows.Data namespace. In Windows 8 / WinRT, the interface is in Windows.UI.Xaml.Data.
The IValueConverter interface contains two methods. The Convert method takes the value in the source property (usually a property of a data object) and creates the value that should be placed in the target property (usually a property of some XAML element). The ConvertBack method does the reverse; it takes the value in the target XAML element and changes it as necessary to place it back in the source.
Note that the ConvertBack method isn't needed if the binding is one-way, because it will never be called. It still must be implemented in the class to satisfy the interface, but it can just return a null value.
The method signature for Convert and ConvertBack are slightly different in value converters for Windows 8 XAML. That means you can't simply copy value converter code used in WPF or Silverlight straight to Windows 8. You will need to make minor changes to the argument lists in the Convert and ConvertBack methods.
Example: A Quantity-to-Brush Converter
To create a value converter example for the Quantity to Brush conversion discussed earlier, three parts are needed. First, you need a data object with a Quantity property. Second, you need a value converter that peeks at a quantity value and returns a Brush. Finally, you need a data binding that applies the converter for a particular TextBox.
The complete, running example is available in the code downloads for this chapter, in all three XAML platforms. This walkthrough shows the parts needed and how they look in XAML or code.
For the data object, you will use a very simple Book class. This class is just to demonstrate the concept; it lacks even property change notification, and is not intended to show what a production data object would be like.
Public Class Book
    Public Property Title As String
    Public Property Author As String
    Public Property Quantity As String
End Class
Our XAML will need an instance of this class declared as a DataContext for our UserControl:
<UserControl.DataContext>
    <local:Book Title="Ender's Game"
                Author="Orson Scott Card"
                Quantity="-5" />
</UserControl.DataContext>
The value converter, which takes in a quantity value and outputs a corresponding Brush, looks like the following code (code file: QuantityToBrushConverter.vb):
Public Class QuantityToBrushConverter
    Implements IValueConverter

    Public Property PositiveBrush As Brush = New SolidColorBrush(Colors.White)
    Public Property NegativeBrush As Brush = New SolidColorBrush(Colors.Yellow)

    Public Function Convert(value As Object, …
        If CInt(value) < 0 Then
            Return NegativeBrush
        Else
            Return PositiveBrush
        End If
    End Function

    Public Function ConvertBack(value As Object, …
        Return Nothing
    End Function
End Class
Ellipses are used in the argument list for Convert and ConvertBack, because those lists vary a bit between platforms. The complete example in the code download contains complete code for each platform.
To be used in a binding, an instance of this value converter can be declared as a resource:
<UserControl.Resources>
        <local:QuantityToBrushConverter x:Key="QuantityToBrushConverter1" />
</UserControl.Resources>
Then a TextBox can be created in XAML to allow editing of the quantity value, and display a different background depending on whether the quantity is positive or negative:
<TextBox Name="QuantityTextBox" Text="{Binding Path=Quantity, Mode=TwoWay}"
         Background="{Binding Path=Quantity, Converter={StaticResource
 QuantityToBrushConverter1}}" />
The code downloads show all these parts in action, with a few minor variations between platforms. The downloads also include property change notification, so that when the user changes the quantity, if needed, the background of the TextBox also changes when the user leaves the TextBox.
The XAML parser only knows about classes after a build in Visual Studio. Sometimes when you attempt to enter XAML, such as the value converter example for converting a quantity to a brush, you'll get an error in the XAML that claims the element is unrecognized. This is usually because you have not done a build on the assembly containing the newly created value converter. Until the build is done, the XAML parser doesn't know the value converter class exists.
Another Example: Collapsing Unneeded Elements
Because value converters are such an important part of the XAML developer's toolbox, let's quickly look at one more example to stretch your mind a bit.
Sometimes there are elements on a screen that are not always needed. A typical example is the second address line in a mailing-label style address. If the second address line is an empty string, then the element holding that line (typically a TextBlock) is unnecessary or even annoying.
A better user experience is gained if the TextBlock simply disappears if it's empty. That is done by binding its Visibility property to the string. The Visibility property type can take values of Visible or Collapsed. (WPF has an additional value of Hidden.)
It's easy to write a value converter that deals with that situation. It peeks at a string value to see if it's a null value or an empty string. If so, it returns a Visibility value of Collapsed. If the string has a length greater than zero, it returns a Visibility value of Visible. Here is such a value converter in code (code file: AutoCollapse.vb):
Imports System
Imports System.Windows
Imports System.Windows.Data

Public Class AutoCollapse
    Implements IValueConverter

    Public Function Convert(ByVal value As Object, …
        If value Is Nothing OrElse value.ToString.Length = 0 Then
            Return Visibility.Collapsed
        Else
            Return Visibility.Visible
        End If
    End Function

    Public Function ConvertBack(ByVal value As Object, …
        Return Nothing
    End Function
End Class
Dealing with Binding Failures
Data bindings which fail do not cause an exception. Instead, the binding simply doesn't do anything, and program execution continues. This is by design, because data binding is used internally for concepts such as control templates in XAML, and a missing or malformed control template that only affects cosmetics should not cause a program to crash.
You can get information on a binding failure in the Output window in Visual Studio. This capability is important because a binding can fail for a number of reasons. For example, if you specify a property on the source data object that does not exist on that object, the binding cannot succeed, and the message in the Output window will include information about the property that was not found.
There are quite a number of other reasons a binding might fail. If a binding is attempted between properties of different types, and no value converter is available to convert the types, the binding will fail.
While the silent failure of data binding makes sense overall, it introduces the possibility of bugs in your XAML programs that you won't notice without looking very closely indeed. Take special care when crafting your bindings, and try to check each one individually in your running program if you can. And check your Output window a lot during development.
Complex Binding Paths
In some cases, a binding needs to specify a more complex source than a simple property off of the source object. For example, suppose our earlier Customer class also had a Contact property, and the Contact property itself was an object representing information about a person, such as name, phone number, and title. This scenario can be represented graphically in Figure 12.9.
Figure 12.9 A class diagram of a Customer class and a Contact class, with a property on the Customer class that holds a Contact instance

Now suppose our user interface for a customer also needs to show the name and phone number of the Contact for that customer. The following XAML defines two TextBlock elements that include bindings to that information:
<TextBlock Text="{Binding Path=Contact.Name}" . . . />
<TextBlock Text="{Binding Path=Contact.Phone}" . . . />
In this case, the Path setting for the binding is not a simple property. It is, in effect, a property of a property. The Path of a Binding can be set using dot syntax to chain together the required references to get to the final property value needed.
This example only went two levels deep on the path. A Path setting can have any number of levels.
One of the most common reasons to use a multilevel path for a binding is working with a property that is a date. Suppose you have a date property called DatePublished, and you want to bind to the month or year of the date. You would need binding paths that looks something like the following:
<TextBlock Text ="{Binding Path=DatePublished.Month}" . . . />
<TextBlock Text ="{Binding Path=DatePublished.Year}" . . . />
Working with Data Bindings in Code
So far, all the data bindings you've seen have been set up in XAML. Data binding can also be set up and managed in code. The objects that handle the binding process, including the Binding object and various helper objects such as value converters, can be instantiated and managed in code just as any other .NET object can be.
You should create your data bindings declaratively in XAML most of the time, but there are situations where that is impractical or impossible. For example, if you are creating highly dynamic user interfaces, the information needed to set up the binding might not be known until runtime. Since XAML is static and completely set when the program starts, any such dynamic management of bindings must be in code.
Creating a data binding in code is not difficult, though the syntax is more complex than the equivalent XAML. You must instantiate the binding, set its properties, and finally tie the binding to the appropriate property. Here is a code sample that creates a binding of a Text property on a TextBox to a Balance property:
Dim b As New Binding
b.Path = New PropertyPath("Balance")
BalanceTextBox.SetBinding(TextBox.TextProperty, b)
The Path property of the binding can't just be set to a string. The Path property is of type PropertyPath, so it must be set to a PropertyPath instance. When declaring a binding in XAML, the PropertyPath instance is created automatically via a TypeConverter, but you must create it yourself if you create the binding in code.
To tie the binding to the target property, the SetBinding method of the XAML element is used. The identifier for the property is Shared/Static member of the class for the element. That is, to refer to the Text property of BalanceTextBox, you use TextBox.TextProperty.
You may set as many properties on the binding in code as you need. The same properties available in XAML (Mode, ElementName, etc.) are all available in code.