
Creating a File Watcher Service
To illustrate the outlined steps, the following example monitors a particular directory and reacts when a new or changed file is placed in the directory. The example Windows Service application waits for those files, extracts information from them, and then logs an event to a system log to record the file change.
Creating a Solution for the Windows Service
First, you need an appropriate solution in place to hold the Windows Service. To do so, follow these steps:
At this point, you have a Windows Service that is compiled and ready to be installed, but it doesn't do anything yet. The preceding steps are very similar for every Windows Service you would create; the main points that vary are the name and the type of account you choose to use. The next part, however, is specific to a particular Windows Service: creating the application logic to support the functionality you need in the Windows Service.
Adding .NET Components to the Service
This example service will have the capability to watch a directory for file changes and log events to report its activity. Two .NET components will facilitate these capabilities: the FileSystemWatcher component and the EventLog component.
The FileSystemWatcher Component
The FileSystemWatcher component is used to monitor a particular directory. The component implements Created, Changed, Deleted, and Renamed events, which are fired when files are placed in the directory, changed, deleted, or renamed, respectively.
The operation that takes place when one of these events is fired is determined by the application developer. Most often, logic is included to read and process the new or changed files. However, you are just going to write a message to a log file.
To implement the component in the project, drag and drop a FileSystemWatcher control from the Components tab of the Toolbox onto the design surface of FileWatcherService.vb. (Be sure not to drag the component onto ProjectInstaller.vb. If ProjectInstaller.vb is still the displayed design surface, you'll need to click on the tab for the FileWatcherService.vb design surface.) This control is automatically called FileSystemWatcher1.
The EnableRaisingEvents Property
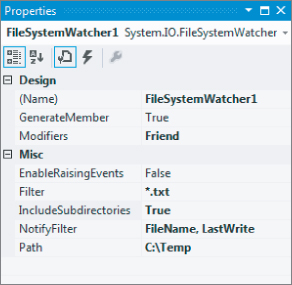
The FileSystemWatcher component should not generate any events until the service is initialized and ready to handle them. To prevent this, set the EnableRaisingEvents property of FileSystemWatcher1 to False. This prevents the component from firing any events. You will enable it during the OnStart event in the service. These events fired by the FileSystemWatcher component are controlled using the NotifyFilter property, discussed later.
The Path Property
The path that you want to monitor is the TEMP directory on the C: drive, so set the Path property to C:TEMP (be sure to confirm that there is a TEMP directory on your C: drive). Of course, this path can be changed to monitor any directory depending on your system, including any network or removable drives.
The NotifyFilter Property
For this example, you only want to monitor when a file is freshly created or the last modified value of a file has changed. To do this, set the NotifyFilter property to FileName, LastWrite. Note that you can specify multiple changes to monitor by including a comma-separated list. Even though the property has a drop-down, you'll need to type in the value to get both parts of it.
You could also watch for other changes such as attributes, security, size, and directory name changes as well, just by including those options as part of the NotifyFilter property.
The Filter Property
The types of files that you will look for are text files, so set the Filter property to *.txt. Note that if you were going to watch for all file types, then the value of the Filter property would be set to *.* (which is the default).
The IncludeSubdirectories Property
If you wanted to watch subdirectories, you would set the IncludeSubdirectories property to True. This example leaves it as False, which is the default value. Figure 16.2 shows how the properties should be set.
Figure 16.2 Properties for FileSystemWatcher
Adding FileSystemWatcher Code to OnStart and OnStop
Now that some properties are set, let's add some code to the OnStart event for FileWatcherService.vb. You want to start the FileSystemWatcher1 component so it will start triggering events when files are created or copied into the directory you are monitoring, so set the EnableRaisingEvents property to True. Choose to View Code on FileWatcherSErvice.vb and update the OnStart handler as shown in the following snippet:
Protected Overrides Sub OnStart(ByVal args() As String)
    ' Add code here to start your service. This method should set things
    ' in motion so your service can do its work.
    ' Start monitoring for files
    FileSystemWatcher1.EnableRaisingEvents = True
End Sub
After the file monitoring properties are initialized, you are ready to start the monitoring. When the service stops, you need to stop the file monitoring process. Add the following code shown to the OnStop event.
Protected Overrides Sub OnStop()
    ' Add code here to perform any tear-down necessary to stop your service.
    ' Stop monitoring for files
    FileSystemWatcher1.EnableRaisingEvents = False
End Sub
The EventLog Component
Now you are ready to place an EventLog component in the service to facilitate the logging of events. Event logs are available under the Windows operating system, and were discussed in Chapter 6. As with many other system-level features, the use of Event Logs is simplified in .NET because a .NET Framework base class does most of the work for you.
Depending on your system's configuration and installed software, there should be several Event Logs on the system. Normally, your applications should write only to the Application Log. A property of a log entry called Source identifies the application writing the message. This property does not have to share the same name as the executable of the application, but it is often given that name to make it easy to identify the source of the message.
You can look at the events in the Event Log by using the Event Viewer. On Windows 7 or Windows Server 2008, select Start ⇒ Control Panel ⇒ System and Maintenance ⇒ Administrative Tools ⇒Event Viewer. If you are on Windows 8 and turned on the administrative tiles, select the Event Viewer tile from your Start screen.
It was mentioned earlier in the chapter that the AutoLog property of the ServiceBase class determines whether the service automatically writes events to the Application Log. The AutoLog property instructs the service to use the Application event log to report command failures, as well as information for OnStart, OnStop, OnPause, and OnContinue events on the service. What is actually logged to the event log is an entry indicating whether the service started successfully and stopped successfully, and any errors that might have occurred.
You can turn off event log reporting by setting the AutoLog property to False in the Properties window for the service, but leave it set to True for this example. That means some events will be logged automatically (without you including any code for them). If desired, you can add some code to the service to log additional events not covered by the AutoLog property.
Drag and drop an EventLog control from the Components tab of the Toolbox onto the designer surface of FileWatcherService.vb. This control is automatically called EventLog1. Set the Log property for Eventlog1 to Application, and set the Source property to FileWatcherService.
The Created Event
Next, you will place some logic in the Created event of the FileSystemWatcher component to log when a file has been created. This event fires when a file has been placed or created in the directory that you are monitoring. It fires because the information last modified on the file has changed.
Bring up FileSystemWatcher1.vb in the code editor. Select FileSystemWatcher1 from the left-hand drop-down list and then select Created from the right-hand drop-down list. The Created event will be added to your code. Add the following code to the Created event:
Public Sub FileSystemWatcher1_Created(ByVal sender As Object, _
           ByVal e As System.IO.FileSystemEventArgs) _
           Handles FileSystemWatcher1.Created
     EventLog1.WriteEntry("File created in directory - file name is " & e.Name)
End Sub
Notice that the event argument's object (the System.IO.FilesSystemEventsArgs object named “e” in the event parameters) includes a property called Name. This property holds the name of the file that generated the event.
At this point, you could add the other events for FileSystemWatcher (Changed, Deleted, Renamed) in a similar way and create corresponding log messages for those events. To keep the example simple, you will just use the Created event in this service.
Build the service again to compile the new functionality. You are now ready to install the service and test it.
Installing the Service
The utility for installing the service, InstallUtil.exe, must be run from a command line. InstallUtil.exe is located in the .NET utilities directory, found at C:WindowsMicrosoft.NETFrameworkv4.0.xxxxx (“xxxxx” is a placeholder for the version number of the .NET Framework you have installed).
You'll need a Developer Command Prompt for VS2012 window to access this utility. You can start this by using the start menu and going to All Programs ⇒ Visual Studio 2012 ⇒ Visual Studio Tools. You should right-click on the link for the command window and select Run as Administrator. Note that if on Windows 8, you'll just want to select the “Developer Command Prompt for VS2012” tile that should be on your Start screen near the Visual Studio 2012 tile. Right-clicking that tile will display the option to ‘Run as Administrator” at the bottom of your screen.
In the command window, change to the directory that contains FileWatcherService.exe. Right click on your project in the solution explorer and select the “Open folder in File Explorer” menu item. From here you'll go to the bin folder. Next, if you are currently using a Debug configuration you will find it in the Debug folder; otherwise, you will find it in the Release folder. After navigating your command window to this location (cd <paste your path here>) run the following command:
InstallUtil ProVB_FileWatcherService.exe
Check the messages generated by InstallUtil.exe to ensure that installation of the service was successful. The utility generates several lines of information; if successful, the last two lines are as follows:
The Commit phase completed successfully.
The transacted install has completed.
If the preceding two lines do not appear, then you need to read all the information generated by the utility to find out why the install didn't work. Reasons might include a bad pathname for the executable, or trying to install the service when it is already installed (it must be uninstalled before it can be reinstalled; the uninstall process is described later). Also, if you did not select Run as Administrator for the command window, you may get an error relating to insufficient security privileges.
Starting the Service
Later in this chapter, you will create your own “control panel” screen to start and stop the service. For now, to test the new Windows service, you will use the Service Control Manager built into Windows to start the FileWatcherService service. It was shown previously in Figure 16.1. Open the Service Control Manager and locate the FileWatcherService service. If you already had the Service Control Manager open, you'll need to refresh it after installing the FileWatcherService.
If the FileWatcherService service does not appear in the list, then the installation failed. Try the installation again and check the error messages. Right-click the FileWatcherService service and select the Start menu option.
To test the service, copy or create a .TXT file in the C:/TEMP directory (or any other directory you decided to use). You should be able to see a corresponding event in the event log for your machine, using the Event Viewer as described earlier.
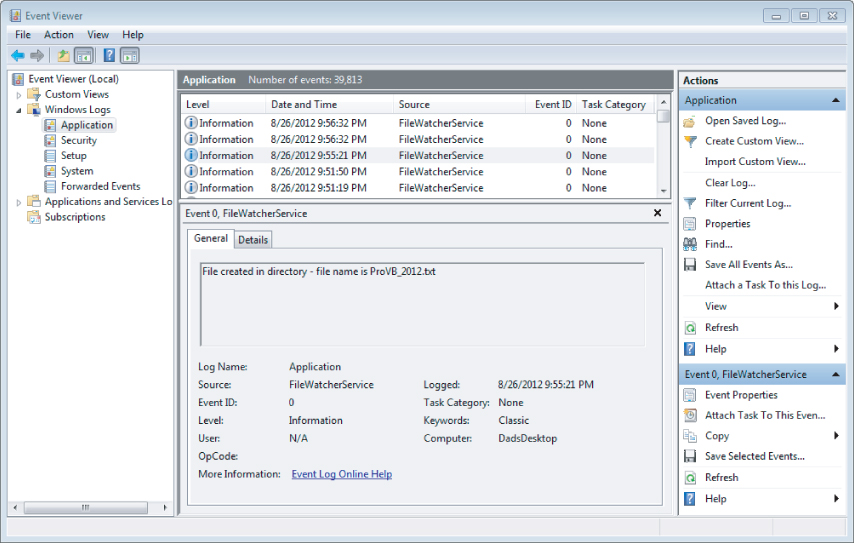
Figure 16.3 shows the Event Viewer with several example messages created by the service. Notice that the message corresponds to the event log message you constructed in the Created event of the FileSystemWatcher control in the service. Play with it a little; notice how if you create a new file and rename it, only the default new filename is shown. Similarly if you rename a file, no message is generated. The only action triggering those events is the creation of new files in that folder.
Figure 16.3 File watcher even for new ProVB_2012.txt file
Uninstalling the Service
Uninstalling the service is very similar to installing it. The service must be in a stopped state before it can be uninstalled, but the uninstall operation will attempt to stop the service if it is running. The uninstall operation is done in the same command window as the install operation, and the command used is the same as the one for installation, except that the option /u is included just before the name of the service. Remember that you need to navigate to the project folder and go to the Debug (or the equivalent Release folder, depending on your current configuration) to run the following command:
InstallUtil.exe /u FileWatcherService.exe
You can tell the uninstall was successful if the information displayed by the utility contains the following line:
Service FileWatcherService was successfully removed from the system.
If the uninstall is not successful, then read the rest of the information to determine why. Besides typing in the wrong pathname, another common reason for failure is trying to uninstall a service that is in a running state and could not be stopped in a timely fashion.
Once you have uninstalled FileWatcherService, it will no longer show up in the list of available services to start and stop (at least, after a refresh it won't).