
Have you ever found yourself looking desperately at your RStudio console showing a runtime error? Doesn't it make you think of those wonderful moments a few days ago, where you were happily executing your code?
Have you ever thought "If I just had a time machine, I would go back to those days!"?
Well, what we will show you here is exactly that—a way to add your RStudio project to a time machine.
The name of this time machine is Git, which is a popular version-control system created by Linus Torvald; yes, he is the same guy who created Linux.
The basic rationale behind this kind of software is quite simple: the changes within a script (and actually every kind of file) are stored in commits and all commits are stored in one repository.
In every moment of code development is possible to restore previous commits and get back in time.
Git actually offers a lot more, for example, letting you create branches in your code, to develop and test new features or just fix bugs, and then merge them back into main repository, integrating only the differences.
The place where these commits are stored in an ordered way is called a repository. There are several web services for online repository hosting, but the most popular one is GitHub. This platform has been around since 2008, and can now boast about hosting websites by Google, Microsoft, and other prestigious software companies.
First of all, you need to install Git on your device. You can find the appropriate version of your software at http://git-scm.com/downloads.
After downloading and installing Git, you are now ready to link it with RStudio and start using it on an RStudio project.
- The first step is to link Git with RStudio. To apply this step, you first need to locate your
git.exefile (on PC) orgit.appon Mac. You can do this from RStudio's Global Options...:
Once the Global Options... window is open, you will need to place the path on your Git application in the Git executable field, as shown in the following screenshot:

- The next step is to launch Shell. You can easily find the Shell... control under the Tools menu:

- Now we need to authenticate to Git. In the just-launched shell, write your GitHub username and e-mail ID:
git config --global user.name "AndreaCirilloAC"
git config --global user.email "[email protected]"
- Create a new repository on GitHub from www.github.com:

- Copy the repository's SSH address. You can find the SSH address directly in the window that you will access after creating the repository:

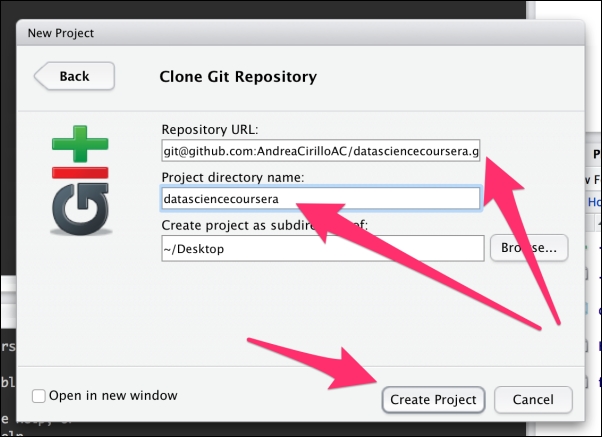
- Create a new RStudio project. After selecting the new project control, select the version control option:


- Paste the copied SSH address, as shown in the following figure:
- Submit your first commit. Just to be sure that everything is OK, you can commit whatever you like in your GitHub repository.
This can be done in the Git tab on the upper-right side of the toolbar of your RStudio window, as shown in the following screenshot:

After making changes to your R script (or any other file within your repository), you will be able to commit it using the Commit control visible in the preceding screenshot.
To commit something, you first need to check the corresponding file in the list associated with the Git pane:

Clicking on the Commit control on the upper-left side of the Git tab will then result in the following new window:

In this window, you will be able to see all the changes made to your code from the previous commit (green highlights are used for code addition, while red highlights are reserved for deletion). Every commit will need to be associated with a commit message.
Clicking on the Commit button will result in a pop-up window and confirm the successful end of the committing step:

- Go back to the GitHub repository. After performing a reasonable number of commits (this is just common sense, since no minimum level is required), you can now send your commits to the online GitHub repository, by clicking the Push button:

A new window will pop up, and a message will confirm the successful end of your push to the GitHub server:

- Next, visualize your commits history. As promised at the beginning of this chapter, we are going to see the full history of your code here by just clicking on the clock placed in the Git tab of RStudio:

This will pop up a new window, showing all the performed commits. As usual, you will find that highlighted in red lines deleted with that given commit, and green-colored added lines of code:

This is great, isn't it? If you are already falling in love with the Git version control system, you just have to look at the next section to know where to look for further information on your new-found love.
As you are already guessing, Git is a really powerful tool for programming tasks, particularly when working in a team.
Describing the advantages and the complete list of functionalities of Git is out of the scope of this recipe; nevertheless, I would like to point out a really good introductory interactive tutorial on Git provided by Code School, which can be found at https://try.github.io.
If you are looking for something more articulate and complete, you can always turn to the official project website, http://git-scm.com/.