6
Physics, Behaviors, and Meshes
With a workable rig now in place, we can now dive further into Character Animator’s strengths. We can set up a rig to not only interact with movement or other entities, but layer-specific and universal behaviors can add more interactivity and realism. We will also look at meshes and how they can help change the rig further.
More specifically, we will cover the following topics:
- Adding physics and danglers
- Modifying universal behaviors
- Creating layer-specific behaviors
- Refining animation with meshes
By the time we finish this chapter, you will have an enhanced rig that reacts to different environmental effects – a great way to create subtle animations without having to do it by hand.
Technical requirements
Be sure to have your tagged character open in Character Animator. Or, you can access Chat_with_Chaz.chproj and load Version 2 under the History panel if you wish to work with the book’s example.
Version 2 will also be referencing Chaz_Host_v3.psd in the event you need to access that file.
Adding physics and danglers
Being able to add physics to your rig is a great way to create automatic movement based on various factors. As an example, we can have hair bounce in reaction to what action the rig is taking. We can adjust gravity strength and direction. We can even enable wind and have hair or clothes flowing.
With our hair now ready for physics, we will need to add new handles to the rig. Given we learned about handles in the previous chapter, this process should be straightforward.
These handles will tag what we want to add physics to. Here, we will use Chaz’s hair as our point of reference. To begin this process, we need to perform the following steps:
- With Version 2 ready to go, click on the Rig tab.
- If Heads is not visible, toggle it on and make sure 3-4th Head is visible.
- Under the Chaz puppet, locate Hair in the 3-4th Head group.
- Select the crown icon for the layer to enable independence.

Figure 6.1: Hair will be set as independent (indicated by the crown icon)
- Select the now visible origin point for Hair and move it over Chaz’s sideburn.
Figure 6.2: Set the origin point near the bottom right of the Hair layer
Next, we want to add a handle to coordinate the physics. To do this, follow these steps:
- Select the Handle Tool (by pressing L on the keyboard).
- Click the top of the hair to add the handle.
- With the new handle selected, in the Tags panel, under Physics, enable Dangle.

Figure 6.3: Dangle will be assigned to the new handle on the hair
Now, click the Record tab to see the result. There isn’t much going on with this handle. You can see the hair is hanging down, so physics is applied, but that’s our only sign.

Figure 6.4: Gravity is affecting the handle we applied
But without moving the character, or adding behaviors, we can’t really see this in action yet. So, let’s add some behaviors next!
Modifying universal behaviors
Universal behaviors are actions or stimuli that interact with our rig based on what tags were applied. Using the previous example, we have a handle set to interact with physics. We can adjust the physics so that every handle marked Physics will react, and this applies to other tags and behaviors as well.
Another nice thing is we can change universal behaviors in real time while recording, which allows us to refine and tweak the effect to our liking. Let’s look at this now:
- Click on the Record tab.
- Click once on the CHAZ rig, which is located at the bottom of the timeline.
- On the right, you will see the Properties panel. Under that, the heading Puppet Track Behaviors is listed.

Figure 6.5: The Puppet Track Behaviors panel allows for adjustment to universal behaviors
Physics is a subcategory under this panel. Click the arrow next to the heading to expand and see the options. There are many options you can adjust here, and each project will have its own unique requirements.
- Let’s try adjusting Wind Direction to –80. The hair should be bouncing now, with the origin point keeping the back end of the hair locked down.

Figure 6.6: The hair is revealing the head underneath (this is something we can go back to and fix if the issue persists)
Go ahead and play around with the other Physics parameters if you wish.
Let’s play with some more behaviors:
- Go back to the Rig tab.
- Click on the character’s Left Hand handle.
- Enable the Dangle physics through the Tags panel.
- Go back to Record and witness what happens. You should see the left hand flapping in the breeze along with the hair. Play around with the wind direction to see the result.
Figure 6.7: The wrist is now susceptible to the wind physics
You may also notice we have other universal behaviors to enable and adjust. Here is a brief description of each:
- Dragger: Enables or disables the ability to grab and drag points. You can also adjust the range and whether the dragger stays in place after being moved.
- Eye Gaze: Used to toggle whether the camera, mouse, or keyboard is used to control the eyes. These settings are also nice if the movement is too extreme and needs to be dialed back.
- Face: Covers a wide range of options: from disabling the camera for face control to the strength of eyes, brows, and your character’s mouth.
- Lip Sync: Enables or disables mouth movement by using a microphone.
- Physics: As discussed above, allows us to adjust gravity, wind, and more.
- Transform: Moves, scales, and aligns the rig to your specifications.
- Triggers: Enables or disables trigger control.
We can set each of these to record (indicated by the red circle to the left of the behavior name). When we do this, whenever we go the Record tab to animate, any behavior with a red record icon will animate and add keyframes to the timeline. This means you can focus on as many behaviors as you want each time you record, making the process more managable.

Figure 6.8: The list of behaviors for the currently selected puppet
So, what if you have multiple physics-based handles but want different wind controls for each? That’s where layer-specific behaviors come in.
Creating layer-specific behaviors
Let’s control the wind strength for two dangle-based handles. We already have these set up for the wrist and hair, so it’s just a matter of applying these specific parameters. To illustrate this, take the following steps:
- Click on the Rig tab.
- Click the Hair layer under 3-4th Head.
- On the right side of the screen, direct your attention to the bottom. Look for Behaviors.
- Click the + button next to Behaviors and choose Physics from the list.

Figure 6.9: You can add new behaviors by clicking the + button
- A new set of options will appear. Click Physics.
- New Physics options will now appear under Behaviors. These options should be identical to the ones we set when on the Record tab.
- Now set Wind Strength to 73% and Wind Direction to 1.
- Go back to Record. Notice how the hair is blowing up as we set it. But the hand is still being blown to the right, based on the universal physics behavior.

Figure 6.10: Note how the hand and hair are blowing in different directions
You will also note the Puppet Track Behaviors panel listed the hair physics behavior among the universal behaviors (labeled Physics [Hair]). This means we can adjust universal and layer-based behaviors in real time as we animate. It also gives much more control to the rig, as we can target any layer to set this process up.

Figure 6.11: Layer-specific behaviors will be added to the panel
We will work with both types of behaviors as we continue to progress through the book. For now, it’s important to know the difference in how they function.
Refining animation with meshes
As we continue to add handles to create behaviors, we are actually altering a mesh that was automatically created when we imported the .psd file. While we can’t do much to alter this mesh beyond this, it allows us to see how Character Animator is interpreting the bends and flexibility of the layers. To see this, follow these steps:
- Go to the Rig tab.
- To view the mesh, locate the Mesh buttons under the rig. They are to the right of the Show Rigging Issues button, which is the triangular icon with an exclamation point.
Figure 6.12: The right mesh button will show an outline, while the left will reveal the entire mesh
- Click on the left mesh button (labeled Show Mesh). This will show us every part of the mesh on the rig.
- Now click on the Front Arm layer. You should see the mesh being more defined by the handles, especially since we added sticks in the previous chapter.
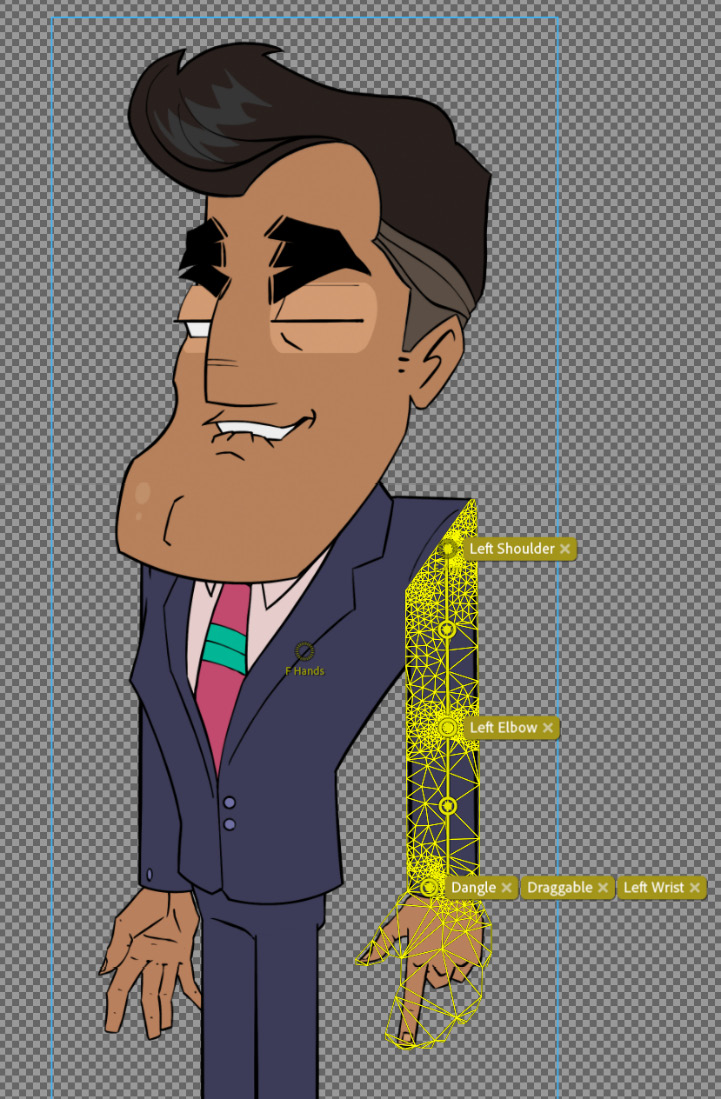
Figure 6.13: The mesh is tighter around the bends due to the sticks we added
If we remove the sticks, we get a mesh that looks like the following screenshot:
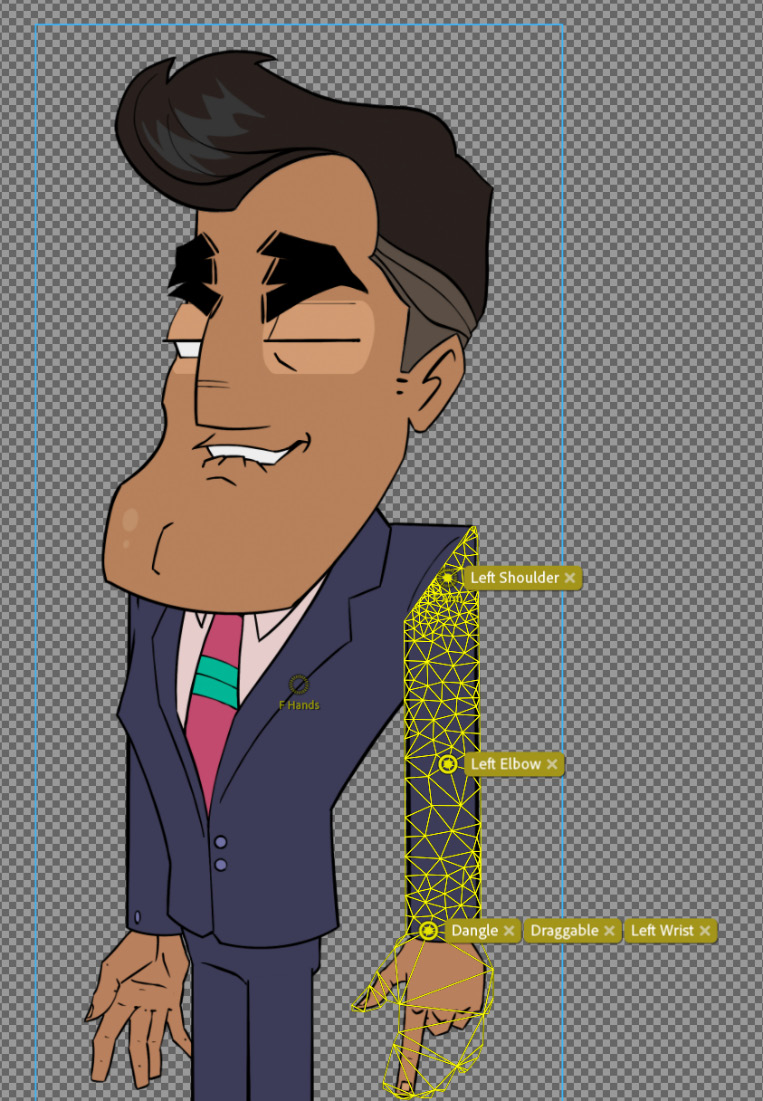
Figure 6.14: Removing the Sticks makes the mesh more relaxed
Again, this is mostly used as a reference if you’re having issues getting meshes to look or function a certain way. Leave the mesh view on if you find it to be useful.
You will find a new version, Version 3, in the History panel if you need to view the final result for this chapter.
Summary
Setting behaviors is a big part of the animation process and allows us to create rig or layer-based changes in real time. Danglers are great for adding physics to any layer you wish; they can be subtle or extreme, it’s completely up to you! If you’re having issues with getting things to link properly, viewing the mesh may give some insights. Being able to control all these elements will allow for a smooth recording process.
In the next chapter, we will focus on triggers, which allow for lip-syncing, swappable props, and more. Before you know it, we will animate a scene with your first fully functional rig!