12
Getting Started with Adobe Substance 3D Stager
We have reached the last part of this book, which is about Adobe Substance 3D Stager, also known as Stager.
Stager allows you to create scenes and render them using the efficient staging tool. You can upload materials and set up your scenario and modify the physical lighting as well as image-based lighting by adding textures and materials. Stager allows you to save cameras with various resolutions and subsequently produce real-time photos.
You are free to make selections based on your imagination in this situation. With real-time alterations and compositional improvements, you can edit and visualize complex materials with intricate lighting and shadows. Using quick, effective, and complex tools, you can create your own realistic 3D scenes.
Stager is an easy-to-use and effective design tool for creating 3D scenes. Staging is a term used to describe the process of creating a 3D scene. Layout, texturing, lighting, and framing are the steps involved.
A wide range of projects can be produced using this staging method. You can organize virtual products and commodity pictures. You can produce many creative 3D designs, such as rooms or other areas, brand images, and drawings.
You can make artistic choices when using Substance 3D Stager. In real time, you can alter and fine-tune your compositions, editing and visualizing sophisticated lighting and shadows in advanced materials. With the aid of effective and speedy smart tools, you can create realistic 3D scenarios.
You can block out forms, snap objects together, turn on physics to prevent model collisions, and create basic lighting. Stager includes models, supplies, and lighting to get things going. Alternatively, browse and utilize the tens of thousands of premium assets that are a part of your Substance 3D Collection plan, which was created by 3D professionals. In this chapter, we will be going through User Interface and Navigation inside Stager so that we can prepare to work on any Stager project.
We will cover the following topics in this chapter:
- Understanding the UI
- Understanding the navigation controls
Understanding the UI
The interface of Stager is quite self-explanatory and a no-brainer. Like other Adobe Substance products, Stager is also simple to use.
When you first launch Stager, you are welcomed with a home screen. You can create, open, and view recent documents on the home screen. To get started producing new papers or discovering recent work, you can go to the home screen.
To practice on Stager’s UI, click on Open on the home screen, as shown in Figure 12.1, and open the Chapter_12_Practice.ssg file given in the Substance_Stager_Exercise_Files folder.

Figure 12.1 – Adobe Substance 3D Stager home screen
There are two different modes in Adobe Substance 3D Stager – Design mode and Render mode.
Design mode
This mode is used to stage 3D scenes and construct compositions. It is used for editing the environment where you add stuff and alter it to create a composition. Let us dissect Stager’s Design mode interface, as labeled in Figure 12.2.

Figure 12.2 – Adobe Substance 3D Stager Design mode interface
A: The Design and Render tabs
You can switch between the Design mode and Render mode with the help of these tabs. They are located next to the home screen button, as shown in Figure 12.3.

Figure 12.3 – Design and Render tabs
B: The ASSETS panel
Access to the starter assets and Creative Cloud Libraries is provided through this panel. You can access and arrange content for Substance 3D Stager in the ASSETS panel.

Figure 12.4 – ASSETS panel
The main purpose of using the ASSETS panel is to utilize materials from a library or the startup assets. It also shows different types of 3D models, and when you click on them, they are created in the center of the 3D viewport.
Drag the asset into the window to perform the desired action (for 3D models, it will load at the target position).
The ASSETS panel is divided into Starter assets and Libraries, so let us go through them in the next section.
Starter assets
Stager comes with a large selection of models, supplies, lighting, and pictures. These resources are a terrific way to rapidly start learning and working and can all be used royalty-free in any project.
The initial assets allow you to do the following:
- Locate an asset by name, using search
- Discover assets by kind
- Use filters – models, materials, lighting, and photos can all be filtered
- Include an asset in your scene – click or drag it into the viewport

Figure 12.5 – Starter assets
Libraries
We can organize cloud-synchronized information for usage across applications, projects, devices, and teams, and access Creative Cloud Libraries via the Libraries panel.
Use Creative Cloud Libraries to do the following:
- Create, remove, and rename libraries
- Add, remove, rearrange, and manage content in a library
- Exchange a library
- Utilize Adobe Stock to find and purchase content
C: Toolbar
Tools for interacting with scene content are available on the toolbar. You can also access the Render Settings panel and the ASSETS panel from here.

Figure 12.6 – Toolbar
D: Viewport
The viewport in Adobe Substance 3D Stager serves as the main workspace. You can interact with the 3D scene by using the tools and actions available here. It is impossible to describe all of the characteristics of the viewport in one area since it is so essential for editing operations in Stager.
Through the rendering mechanism, the viewport renders the data from the 3D scene. Stager renders material by combining real-time and ray tracing methods. You can alter the look of the viewport (and the finished product) by adjusting the render parameters.
Although you can fine-tune content using the properties panels, engaging the viewport is often faster. A variety of tools and actions are used to interact.
Each tool has a distinct purpose. Objects can be moved and selected using the transformation tools. Cameras are controlled by the camera tools. Throughout the picture, the Sampler tool instantly samples and applies elements.

Figure 12.7 – Viewport
E: Viewport control bar
The render engine, current camera, and viewport parameters are controlled by this bar.

Figure 12.8 – Viewport control bar
F: Render settings panel
The settings and active render engine are controlled by this panel. You can manage the rendering quality of both the viewport and the finished product. Modes share the same render settings.

Figure 12.9 – Render settings panel
G: SCENE panel
All of the information in your current scene is summarized in this panel. Models, the setting, cameras, and lighting are all included in this.

Figure 12.10 – Scene panel
H: ACTIONS panel
The contextual actions for the currently selected option are shown in this panel. Actions are often shorter commands that modify the scene in a specific way. The app has various locations where actions can be found.
The app menus, the viewport control bar, the Scene panel, the Properties panel, and occasionally the viewport itself all have the Actions panel. Although there are many different kinds of actions, creating objects or changing important characteristics are frequent actions.

Figure 12.11 – ACTIONS panel
I: PROPERTIES panel
Properties for chosen items are shown in this contextual panel. The thorough control of scene material is managed in this panel. The specific characteristics of an object that determine its position, appearance, and behavior are called its properties.
Hopefully, you are now familiar with the Design mode. In the next section, we will study the Render mode.

Figure 12.12 – PROPERTIES panel
J. Application menu bar
The application menu bar holds common menus such as the File menu, Edit menu, Object menu, Camera menu, Select menu, View menu, Window menu, and Help menu.

Figure 12.13 – Application menu bar
Render mode
The render mode is used to produce generated images of the highest quality. You can set up several renderings in the render mode as shown in Figure 12.4.

Figure 12.14 – Adobe Substance 3D Stager render mode interface
Each of these renderings is explained here:
- Viewport: It occupies a sizable portion of the application window’s center. The viewport in render mode displays the final produced pictures at a pixel-accurate size.
- RENDER SETTINGS panel: The settings and active render engine are controlled by this panel. You can manage the rendering quality of both the viewport and the finished product. Modes share the same render settings.
- EXPORT SETTINGS panel: The format, save location, and cameras to export are all controlled by this panel.
- RENDER STATUS panel: As renders are finished, this panel displays their progress.
Hopefully, you are now familiar with Stager’s interface, which makes it easier for you to work with this application, especially when we are moving to navigation, which is important for any 3D application to view your 3D mesh.
Understanding the navigation controls
Navigation controls in Stager are similar to other Adobe Substance 3D tools. The view that you see in the viewport is basically a camera view. Stager comes with a camera by default, so when you are navigating inside Stager, you are actually controlling the camera.
There are three tools that are available for the camera movement:
- The camera spins using the Orbit tool
- The camera may be panned up, down, left, and right Pan
- Forward and backward camera movement is accomplished with the Dolly tool
You may access each of the camera tools from the toolbar or the tool access shortcuts that follow. For a brief period, you may move from your primary tool to the camera controls by using fast access shortcuts. Your initial tool will once again be accessible when you release the shortcut.
Navigating with hotkeys
You can use the following hotkeys to navigate the Adobe Substance 3D Stager camera:
For Windows:
- Orbit tool: Alt + left click
- Pan tool: Alt + middle click
- Dolly tool: Alt + right click
For Mac:
- Orbit tool: Option + left click
- Pan tool: Option + middle click
- Dolly tool: Option + right click
To move the camera to focus on your choice, press F. This will focus on every item in your scene if nothing is selected.
Navigating with the toolbar
You can navigate in Stager using hotkeys or buttons in the toolbar as shown in Figure 12.15.

Figure 12.15 – Camera navigation tools
A: Orbit tool
View the area with the camera rotating. You can access this tool with hotkey 1. If you keep the Orbit tool button pressed, you will get some extra orbiting tools, as shown in Figure 12.16.
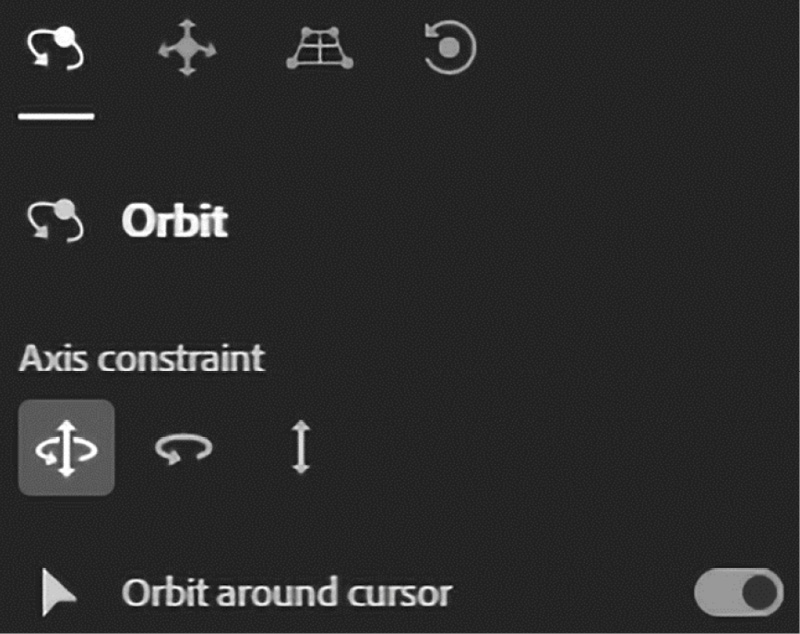
Figure 12.16 – Extra Orbit tools
The extra tools contain the Tripod orbit mode, Horizon orbit mode, and Roll orbit mode.
- Tripod: Turn the camera to scan the area.
- Horizon: Aim the camera at the horizon of the ground.
- Roll: Position the camera at an angle.
Moreover, if you want your camera to be constrained on an axis, you can use Axis constraint, and if you want the camera to orbit around where your cursor is, then you can toggle on the Orbit around cursor button.
B: Pan tool
This tool allows the camera to move left, right, up, and down. You can access this tool with hotkey 2. If you keep the Pan tool button pressed, you will get some extra Pan tools, as shown in Figure 12.17. If you want the camera to pan around where your cursor is, then you can toggle on the Pan under cursor button.

Figure 12.17 – Extra Pan tools
C: Dolly tool
This tool allows you to move the camera forward and backward. You can access this tool with hotkey 3. If you keep the Dolly tool button pressed, you will get some extra Dolly tools as shown in Figure 12.18.

Figure 12.18 – Extra Dolly tools
These tools are explained as follows:
- Field of View: Angle the camera’s lens differently
- Dolly Zoom: To keep the framing, adjust the field of view and move the camera
Summary
Hopefully, you are now familiar with the Adobe Substance 3D Stager’s user interface and navigation system. You should know by now that Stager’s interface is quite simple but powerful. We have also gone through all its panels and learned how to use them. Moreover, we have learned that the navigation system of Stager is a no-brainer, and studied how to navigate inside Stager in this chapter.
In the next chapter, we will learn how, in real time, a composition is refined and adjusted. The next chapter covers comprehensive knowledge of basic 3D models and materials and how to use them in real-time projects. We will explore ASSETS Starter assets and the Library, Geometries, Materials, and Lights. We will also learn how to sample materials and work with collision-based transformation.