14
Cameras and Rendering inside Adobe Substance 3D Stager
This chapter will cover how the visualization and manipulation of intricate lighting and shadows work when rendering a scene. We will also look at how to set up any camera inside Adobe Substance 3D Stager and how to render the scene with it.
Before setting up the camera and rendering our final scene, we will learn how to import Substance Painter and Designer files into Stager, so let us start with that.
We will cover the following topics in this chapter:
- Importing Substance Painter and Designer files
- Setting up the camera
- Adding spotlights and environment lights
- Rendering the scene
Importing Substance Painter and Designer files
It’s a quite cumbersome process when you import or export a file from Substance Painter or Designer and then apply materials to it. However, we will look at an easier way to bring Painter and Designer files into Stager:
- First, you need to launch Adobe Substance 3D Painter and open Retro_Television.spp from the Substance_Painter_Exercise_Files folder.
- Once Retro_Television.spp is open in Painter, go to the File menu, hover over Send to, and choose Send to Substance 3D Stager:
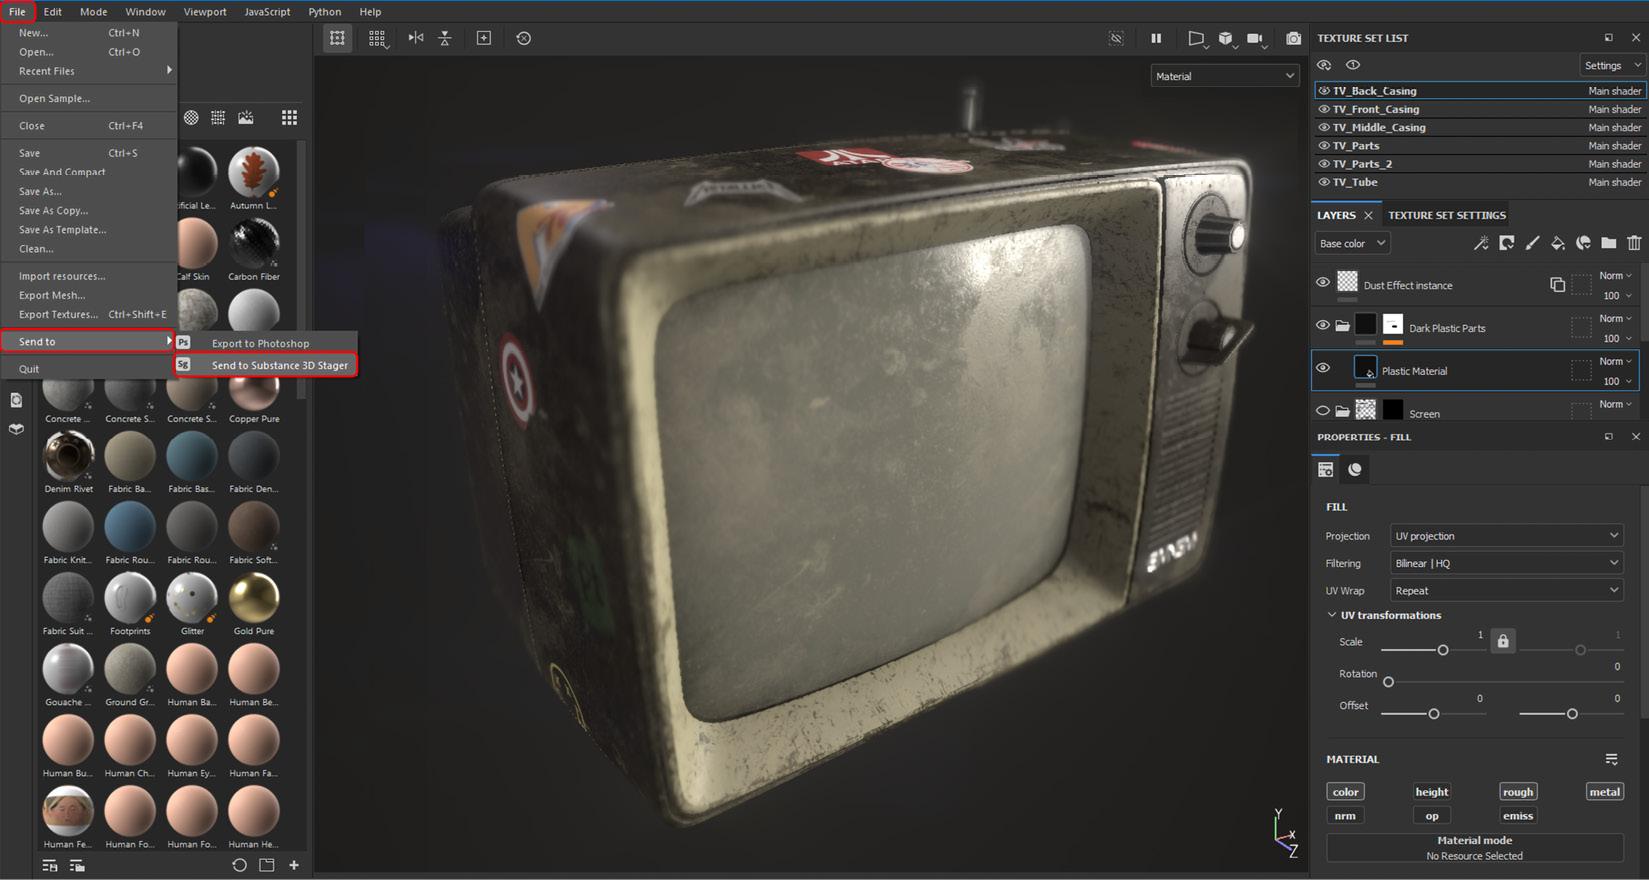
Figure 14.1 – Sending the Painter file to Stager
- Once you select the Send to Substance 3D Stager option, Stager will automatically open and may load a message as shown in Figure 14.2. You just need to select Skip because we need to preserve the UVs of our Painter file:

Figure 14.2 – Skipping UV generation
- The Retro_Television model size will be quite small when you import it for the first time, as shown in Figure 14.3, and for a realistic lighting effect, the model size should be closer to a realistic size:
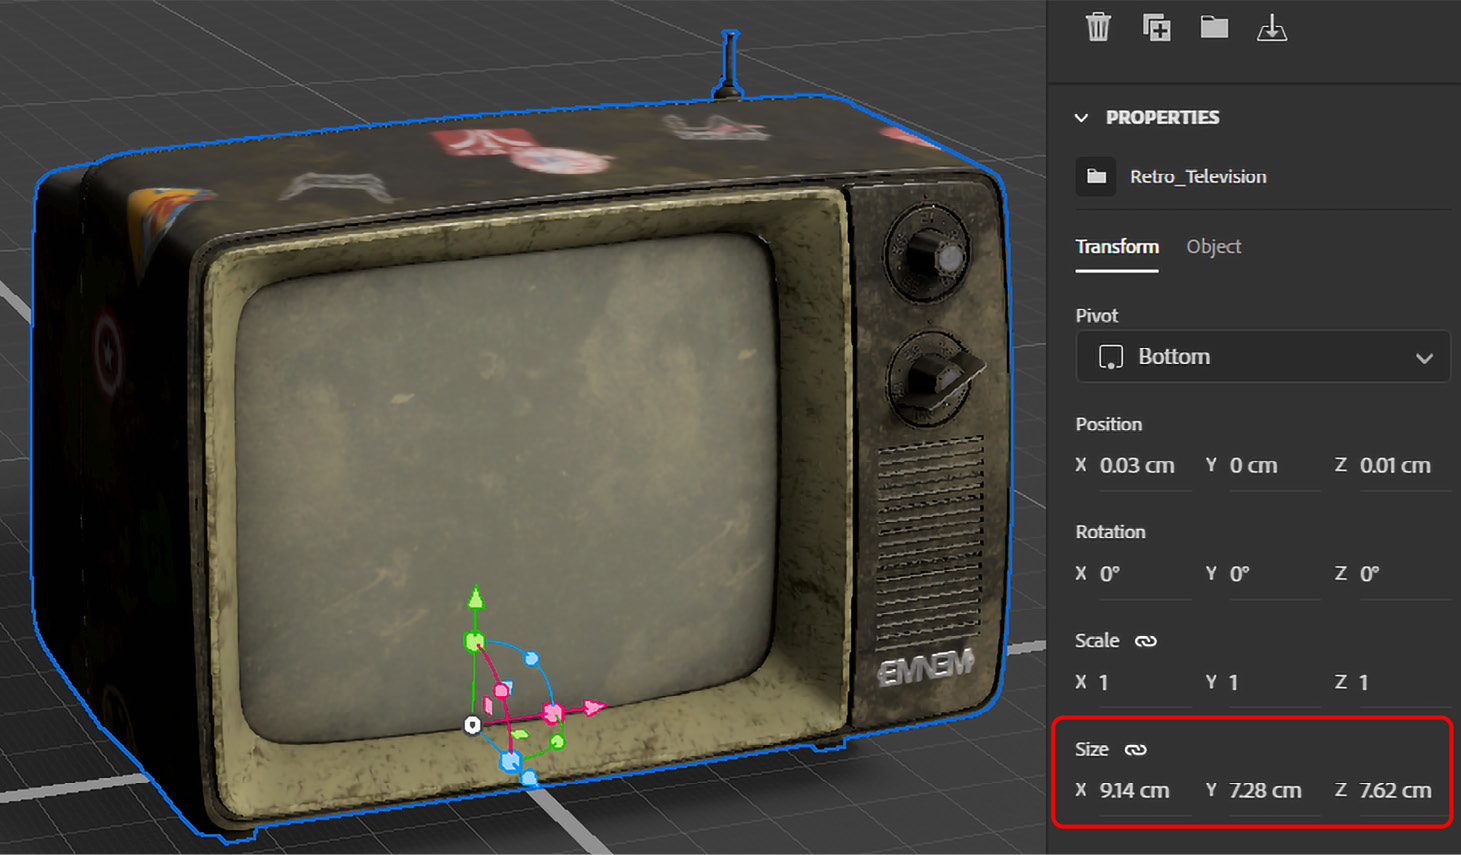
Figure 14.3 – Original dimensions of the Retro_Television model
- The average size of a CRT television is around 50 to 53 cm wider and higher – therefore, change the size of the Retro_Television model to the following:
Size: X = 50 cm, Y = 39.81 cm, Z = 41.67 cm:

Figure 14.4 – Rescaling the Retro_Television model
- Now, keep Stager open, launch Substance Designer, and open TV_Shelf_Model.sbs from the Substance_Designer_Exercise_Files folder. Once the TV_Shelf_Model.sbs file is open, right-click on it in Designer’s EXPLORER window and choose Send to Substance 3D Stager:
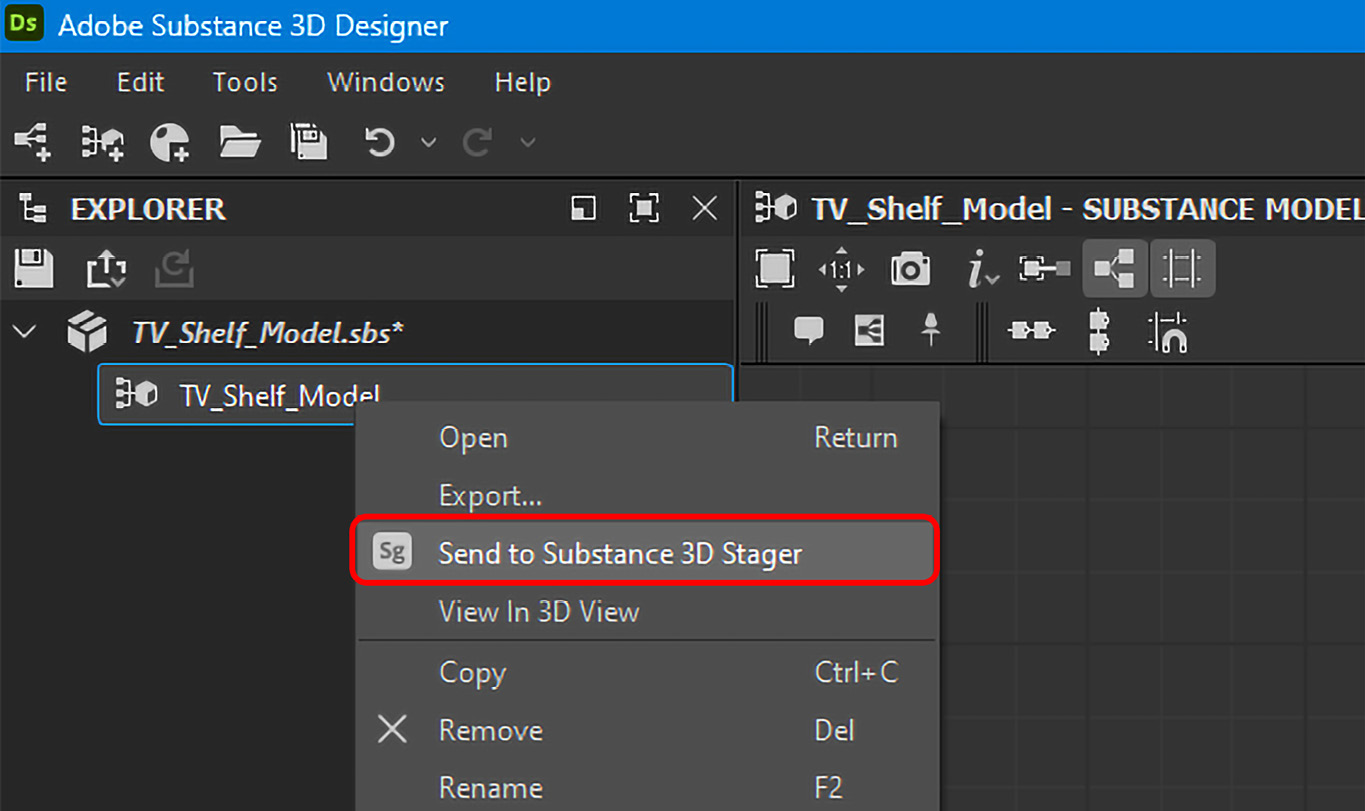
Figure 14.5 – Sending a Designer file to Stager
- Once TV_Shelf_Model.sbs is imported inside Stager, it will be at exactly the same location as the Retro_Television file. The file is also smaller in size and is blending into the ground as shown in Figure 14.6:
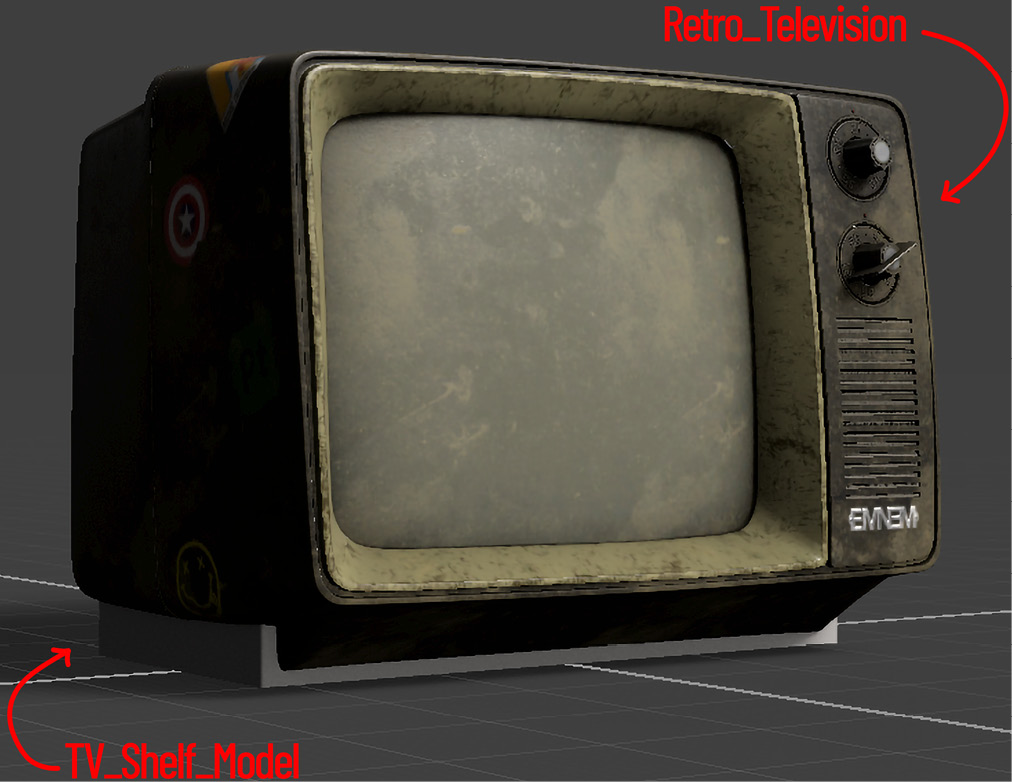
Figure 14.6 – TV_Shelf_Model inside Stager
- We need to move Retro_Television and TV_Shelf_Model apart and rescale TV_Shelf_Model with the following values:
Size: X = 72.98 cm, Y = 35.68 cm, Z = 34.06 cm
Now, the Retro_Television and TV_Shelf_Model sizes match as shown in Figure 14.7.
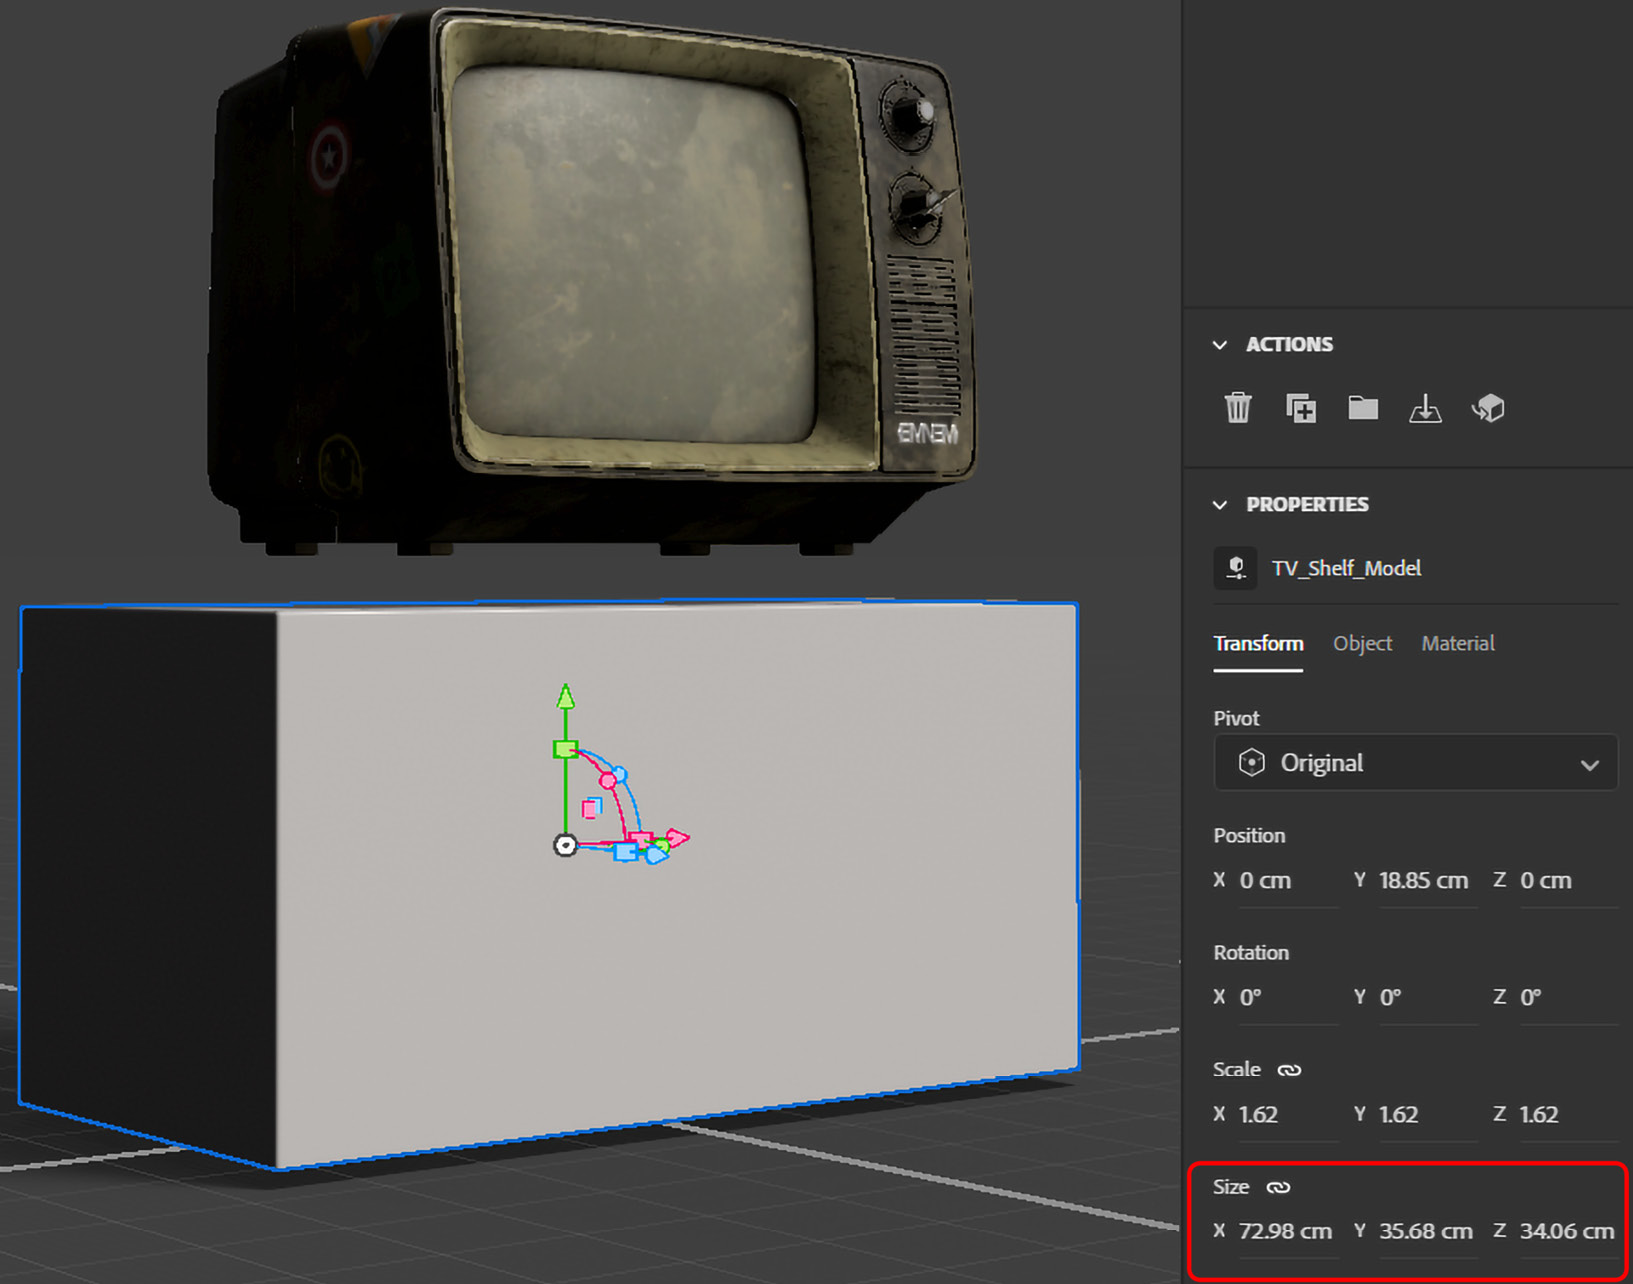
Figure 14.7 – Rescaling TV_Shelf_Model
- Now, open TV_Shelf_Substance.sbs from the Substance_Designer_Exercise_Files folder in Designer. Right-click TV_Shelf_Substance.sbs and choose Publish .sbsar file:
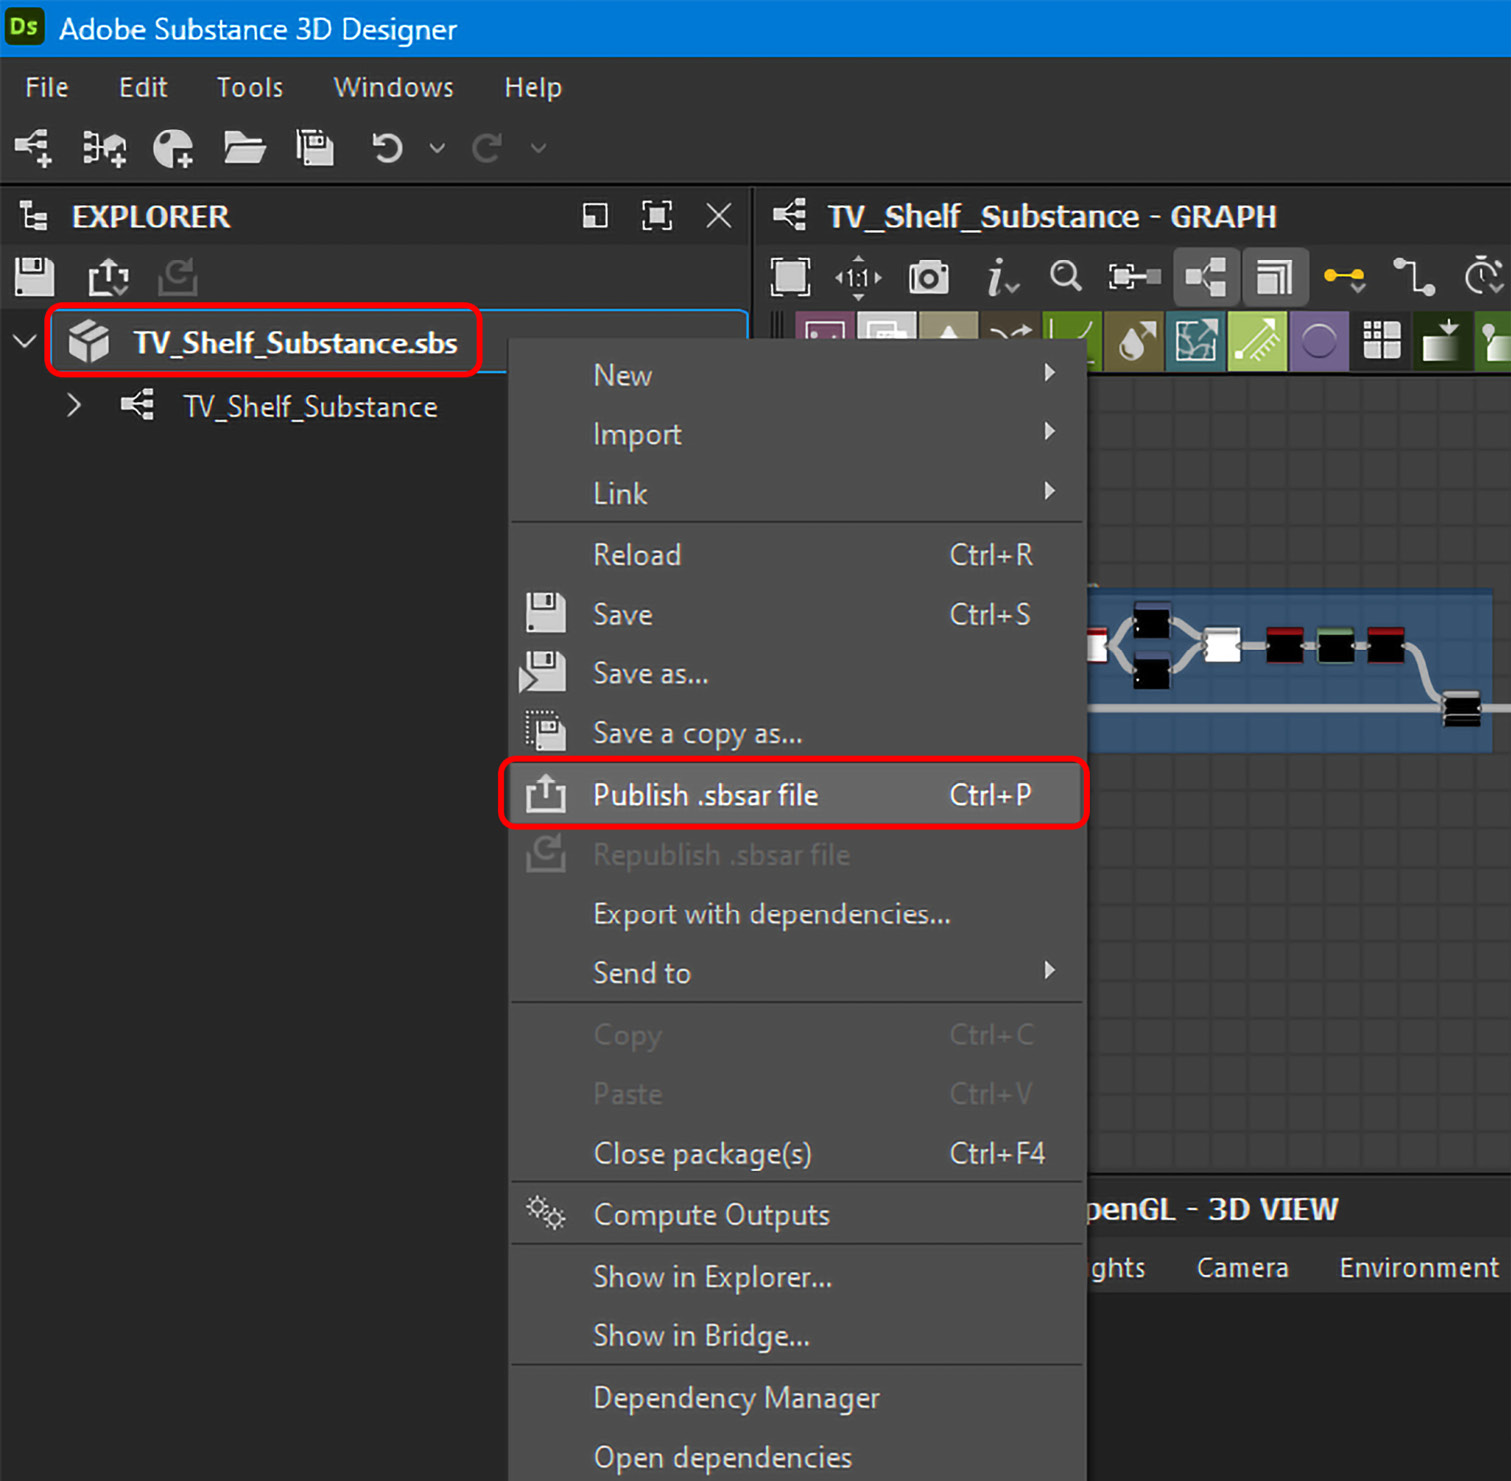
Figure 14.8 – Publishing the .sbsar file for TV_Shelf_Substance.sbs
- When you select Publish.sbsar file, the Substance 3D asset publish options window will open. From there, choose the three dots next to File path.
- Choose your Substance_Stager_Exercise_Files folder so you can keep all the Stager files in one location for better organization and save it as TV_Shelf_Substance.sbsar in that folder:
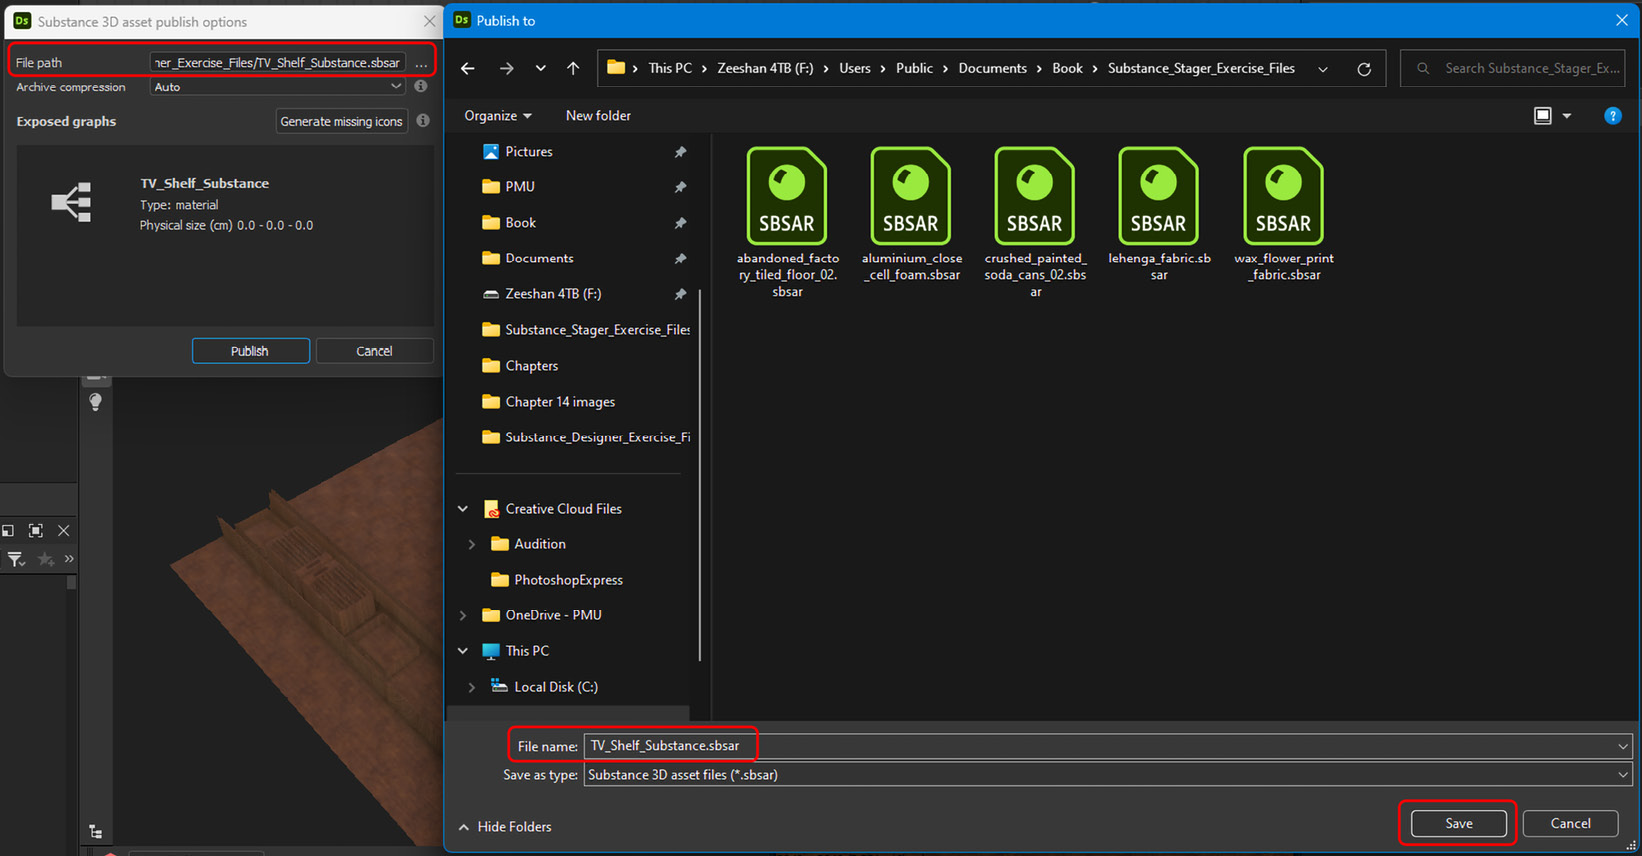
Figure 14.9 – Saving TV_Shelf_Substance.sbsar
- Now, finally, you can press the Publish button and your TV_Shelf_Substance.sbsar file will be saved:
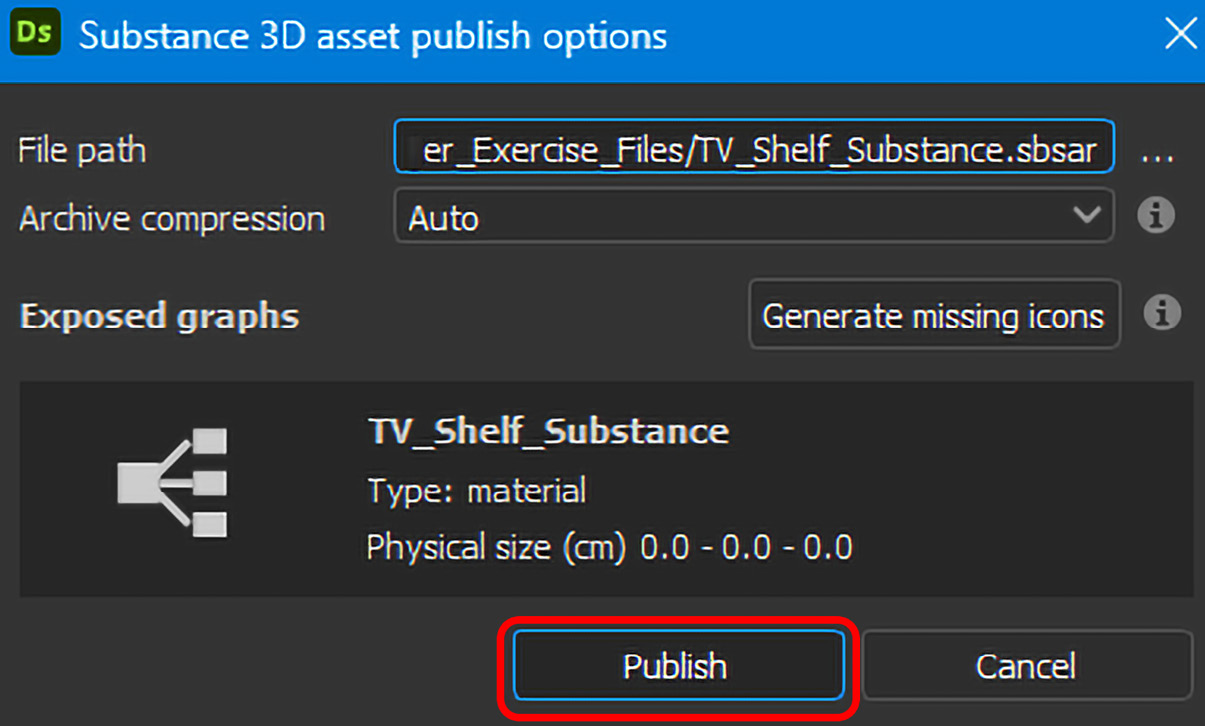
Figure 14.10 – Publishing TV_Shelf_Substance.sbsar
- Now, you can close Designer and go back to Stager and select c model from the SCENE panel, go to the File menu, hover over Import, and choose Place material on selection:

Figure 14.11 – Placing material on selection
- When the window opens for selecting the material file, choose the TV_Shelf_Substance.sbsar file. You will notice that the material is flat once it is applied to TV_Shelf_Substance.sbsar. Therefore, to give it some depth, you need to select TV_Shelf_Model in the SCENE panel, then go to the PROPERTIES panel, and turn on Displacement under the Object tab:
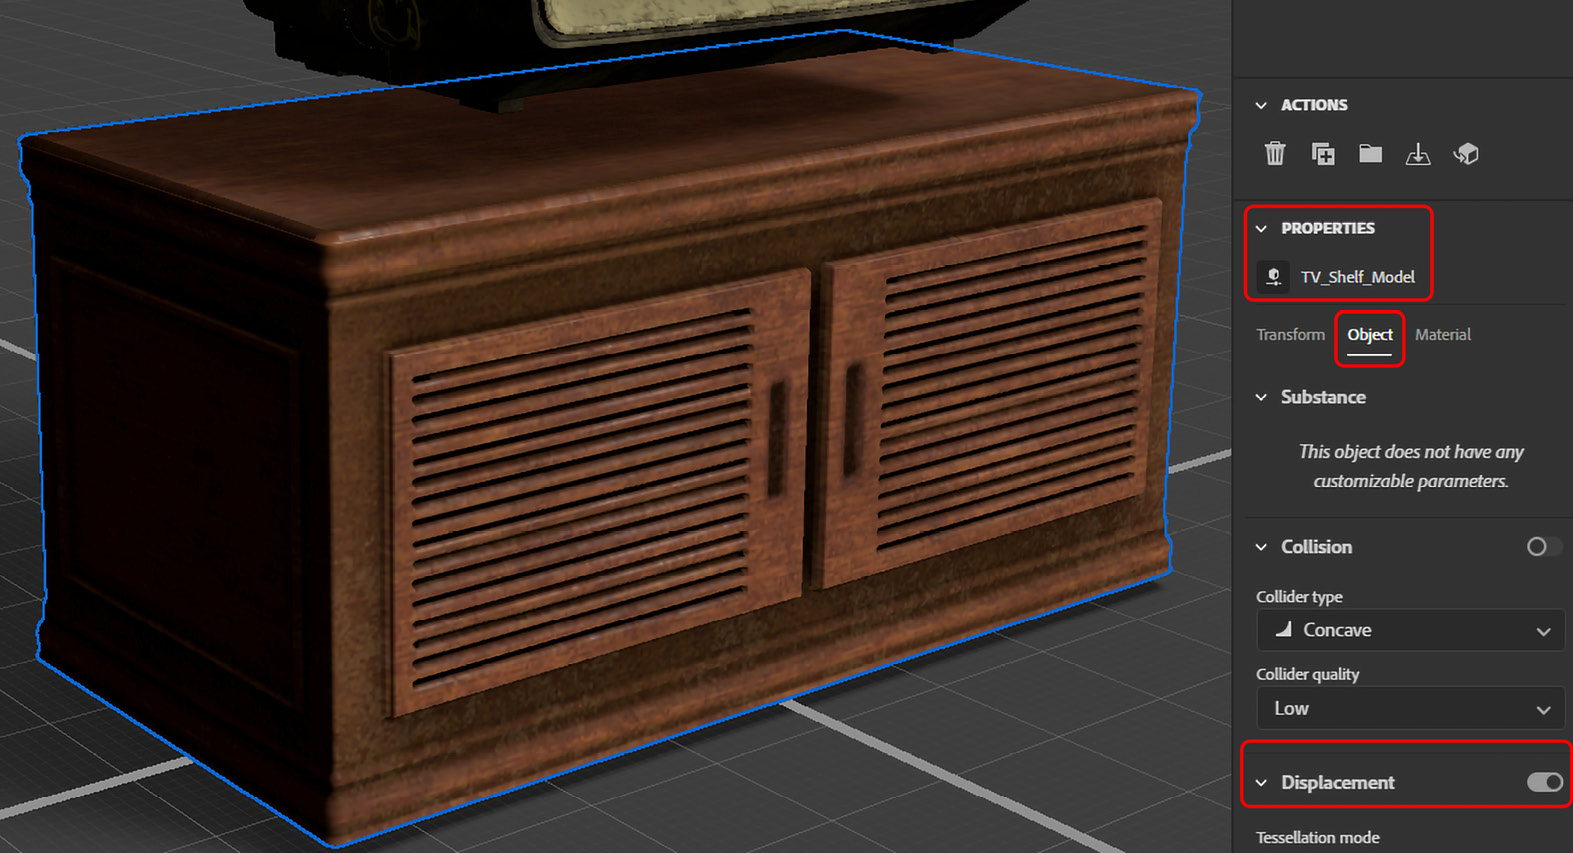
Figure 14.12 – Toggling on Displacement
Now, you can turn on the collision for the TV and the shelf and place them on top of each other. There are a few Painter files inside the Substance_Stager_Exercise_Files folder and we need to import them to Stager to create a scene.
- Open Room.spp in Painter and repeat step 2 and step 3.
- Once Room.spp is imported into Stager, it will be significantly bigger. Scale it down to match it with the TV and the shelf and rearrange the scene as shown in Figure 14.13:
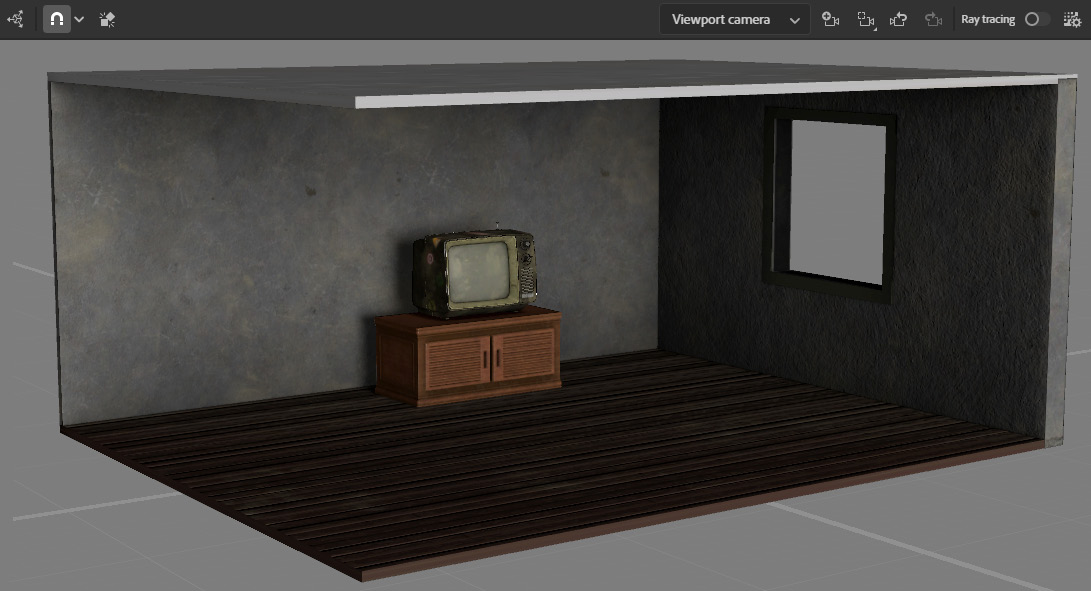
Figure 14.13 – Arranging Room, Retro_Television, and TV_Shelf_Model
- The following are the Painter files given in the Substance_Stager_Exercise_Files folder and you need to import them into Stager using the same steps as step 2 and step 3:
- Book_Shelf.spp and Room.spp (if not imported before)
- Carpet.spp and Sheet.spp
- Coffee_Table.spp and Sofa.spp
- Curtain.spp and Wall_Clock.spp
- painting.spp and Wall_Light.spp
- Now, you can finally arrange the room the way you want – by moving, rotating, and scaling the models. For example, you can see the room arranged as in Figure 14.14. You can also toggle the Displacement option ON for all the models as you did in 14:
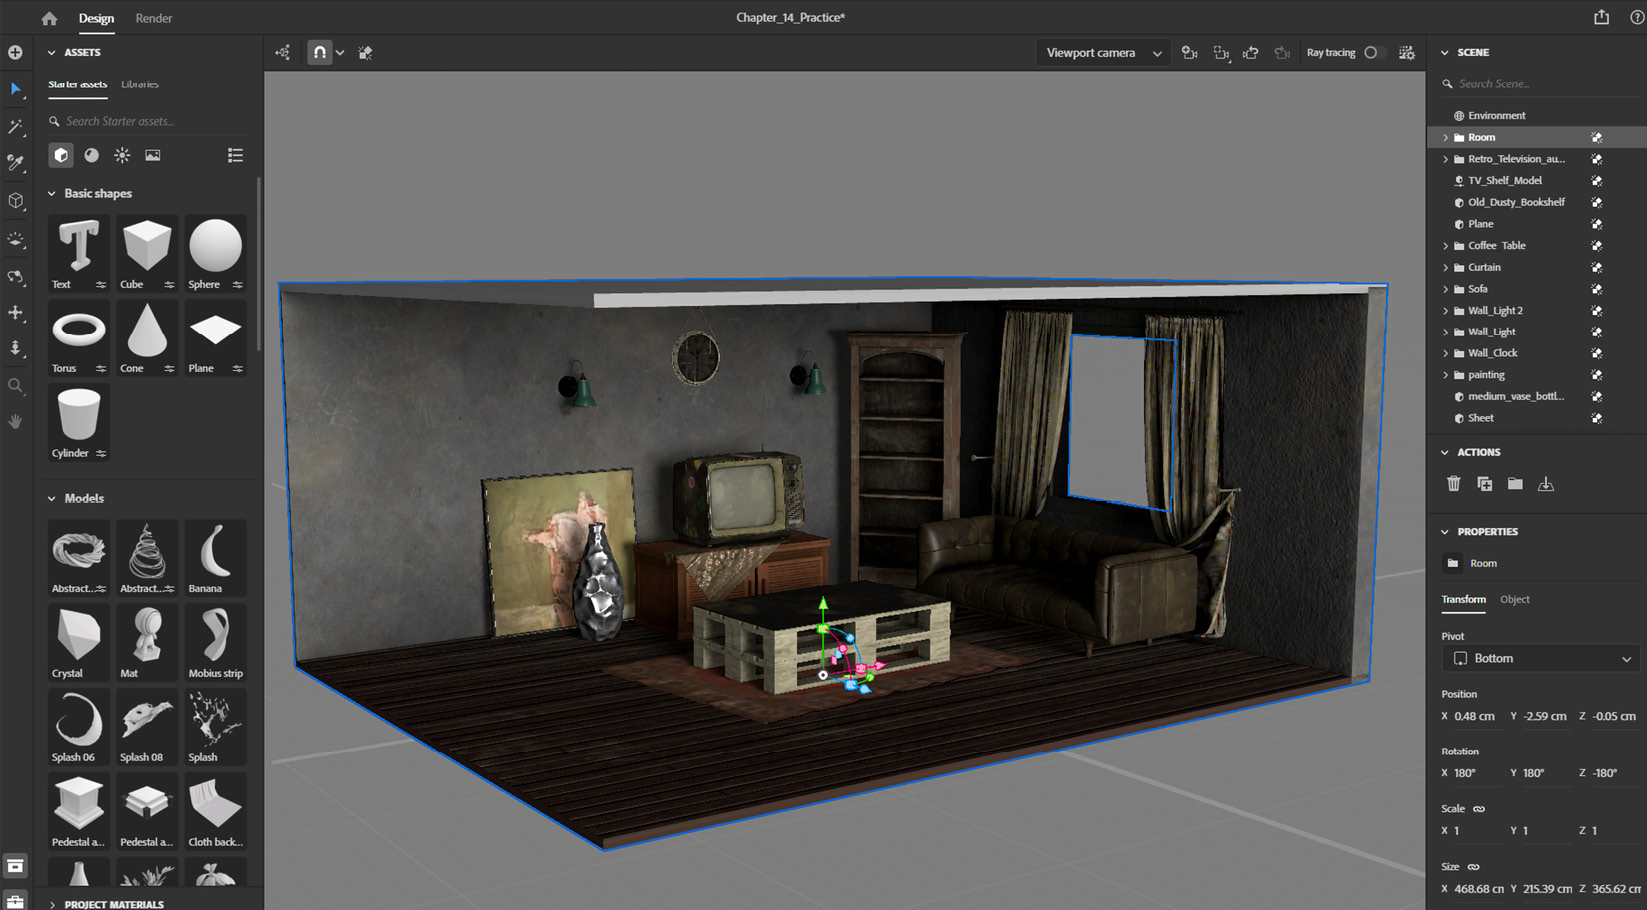
Figure 14.14 – Creating the scene inside Stager
Now, as we have our scene ready, it is time to set up a camera, so let us create some cameras inside Stager in the next section.
Setting up the camera
To create and render a good scene, you need a good camera angle. You can create more than one camera in Stager depending on what you need. There are two different kinds of cameras – the viewport camera, which is the default camera, and the one you create with the Add camera option:
- To create your own camera, go to the top bar on the viewport and choose Add camera as shown in Figure 14.15. You can also frame a focal point and undo and redo the camera movement or any other changes that you have applied to it:

Figure 14.15 – Adding a camera to the scene
- Now, you can set up the camera using the same navigational control that we learned about in Chapter 12, Getting Started with Adobe Substance 3D Stager. You can set up two different kinds of cameras as shown in Figure 14.16. One camera can show the whole room and the other camera can show a closeup of the TV and the shelf:

Figure 14.16 – Creating two cameras
- You can now rename the cameras in the SCENE panel Front Scene and TV Closeup. You can switch between the cameras from the View camera option as shown in Figure 14.17:

Figure 14.17 – Switching between cameras
- Now, select the Front Scene camera from the SCENE panel and go to the Object tab under the PROPERTIES panel. Set up Output size. You can also add your own Background if you want by placing a simple Plane basic shape that is visible from the window and applying any background texture of your choice to it. Change Focal length to 35 mm, which is an ideal focal length for a full-frame scene:

Figure 14.18 – Setting up the camera
- You can also turn on Depth of field from the Object tab under the PROPERTIES panel. Moreover, you can set the focus point by selecting the Set focus point option, clicking on the focus point as shown in Figure 14.19, and configuring the Blur amount settings. However, you can only see Depth of field when you are in the Ray tracing option:
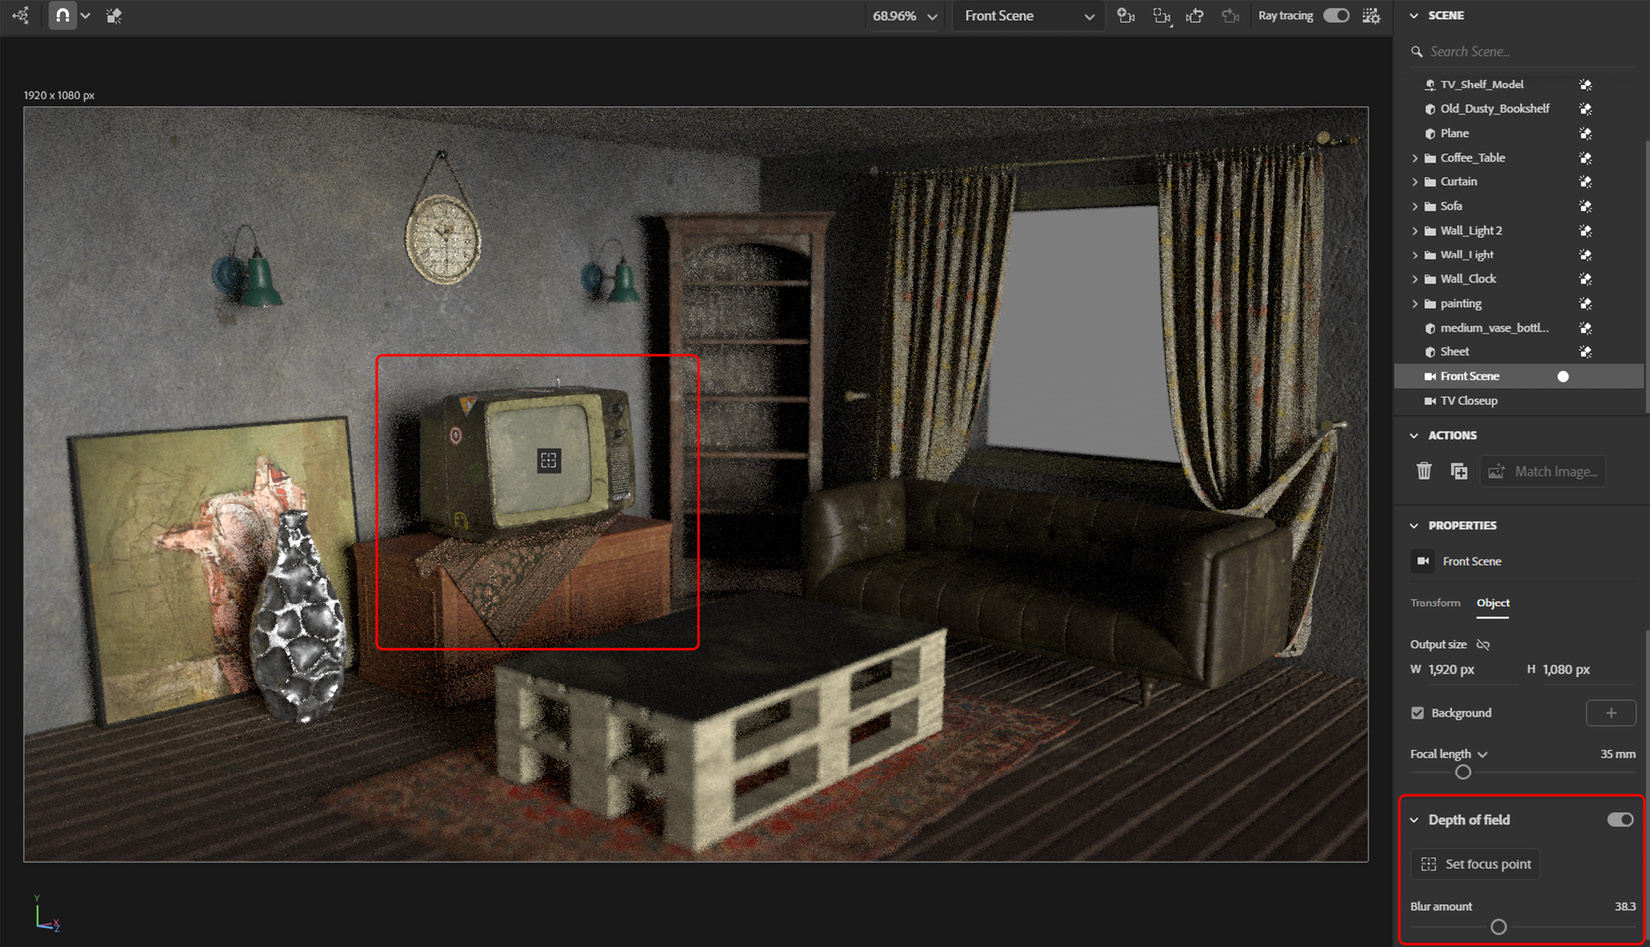
Figure 14.19 – Setting Depth of field
Now, as we have set up our cameras, it’s time to learn about adding some spotlights and environment lights in the next section.
Adding spotlights and environment lights
A scene is not complete unless it has good lighting. There are spotlights in Stager that provide realistic photometric light effects and environment lights that provide high-definition, realistic lighting effects, so let us add some lighting in this section:
- Add two spotlights from Physical lights in the ASSETS panel and place one in each wall light model in the viewport.
- Move the lights inside the wall light folders in the SCENE panel as shown in Figure 14.20. You can change the Object parameters of the spotlights as shown in Figure 14.20:

Figure 14.20 – Adding and setting spotlights
- To add realistic ambient lighting to your scene, you can go to Environment lights under the ASSETS panel and choose Small apartment.
- Select Environment in the SCENE panel, go to its PROPERTIES panel, and switch to the Lights tab.
- Under the Lights tab, you can adjust the Environment light settings for Intensity and Rotation.
For this exercise, I will change the Intensity settings to 50% and Rotation to 0 degrees:

Figure 14.21 – Adjusting the Environment light settings
Once you are satisfied with your light setup, you can start rendering the scene, which we will learn how to do in the next section.
Rendering the scene
To finalize the output of any 3D scene inside Stager, we need to render it. We need to switch to the Render mode and go through the following steps:
- Go to the Render mode.
- Toggle ON the Render with GPU settings if you have a good GPU. Otherwise, leave it OFF.
- In the left-hand sidebar, under the Preset option, you can choose the preset that suits your system. For this exercise, I will choose High, which will set Samples to 2,048 and Noise Level to 1 while keeping Resolution set to Full.
- On the right-hand sidebar, choose your camera. I chose Front Scene, and rename the export filename Chapter_14_Practice.
- Go to Export formats, select PSD (32 bits/channel), and choose the output folder in the Save to option. I will choose the Substance_Stager_Exercise_Files folder for this exercise.
- Once you have set everything up, click Render. The render will save the output file automatically to your Save to folder:
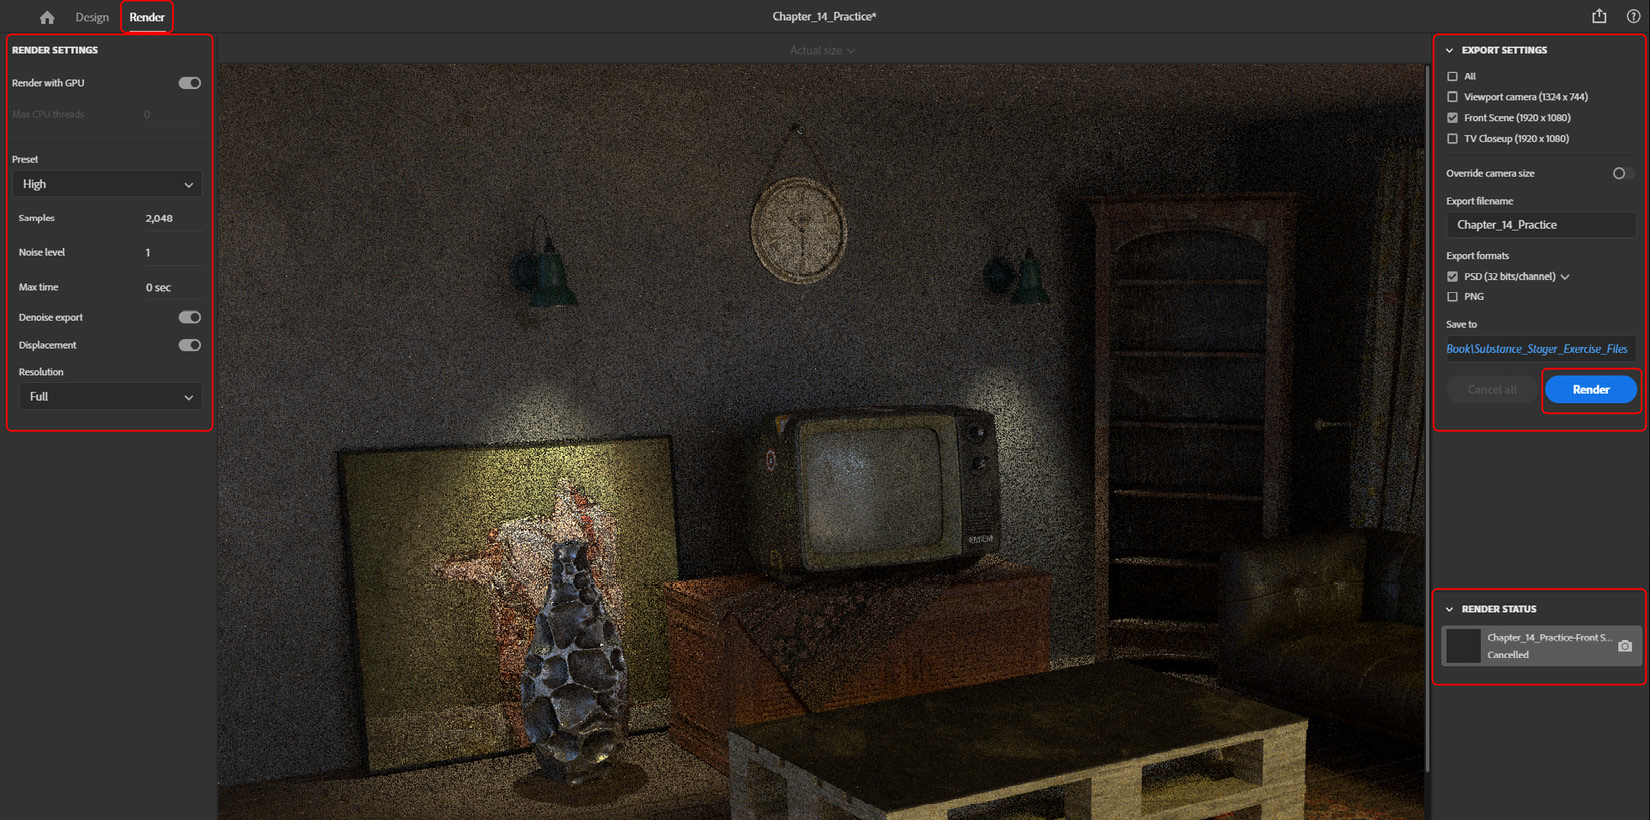
Figure 14.22 – Rendering in Adobe Substance 3D Stager
- Since you have saved the 3D render as a 32-bit PSD file, you can open it in Adobe Photoshop. Once you open it in Photoshop, you will find that Stager has stored the Render passes as Photoshop layers, which you can tweak for more creative and high-quality effects:

Figure 14.23 – Opening the final render in Adobe Photoshop
I hope that now you have acquired the skill sets to produce hyper-realistic renders inside Adobe Substance 3D Stager.
Summary
We covered all the skills for using Adobe Substance 3D Stager in this last part of the book. We have gone through all the skills for importing 3D assets from different Adobe Substance 3D applications, setting up cameras, and adding light inside in this chapter.
Hopefully, you are now able to produce realistic assets inside Adobe Substance 3D Painter, Adobe Substance 3D Designer, and Adobe Substance 3D Planar, and stage them creatively and professionally inside Adobe Substance 3D Stager.
I hope you have learned a lot about this amazing Adobe Substance 3D suite and acquired the skill sets to produce astonishing creative projects. You can now present your 3D object in context with Adobe Substance 3D Stager and set up the ideal shot by dragging and dropping 3D objects, materials, lighting, and cameras.
You can choose a brush in Substance 3D Painter and texture your asset quickly and easily, utilizing layer manipulation to quickly alter current paint strokes. You can now also quickly turn a representation of the real world into a 3D substance using Adobe Substance 3D Sampler.
Finally, thanks to Substance 3D Designer’s node-based approach, you will now have total authoring control over material development. For more tutorials and videos, you can visit my YouTube channel at www.youtube.com/@zinteractive.