
IN THIS CHAPTER
In the early days of the Internet, one of the really cool things about it was the capability to transfer files and programs from one computer to another. Using the File Transfer Protocol (FTP), anyone with a modem could connect with and download massive repositories of text files, shareware and freeware applications. People still use FTP all the time, although it is often obscured through the many graphical FTP clients. As you learned in Chapter 3, “Installing SUSE Linux,” you can even install SUSE Linux with the help of FTP.
FTP’s ease of use comes with a hidden price, however. FTP is not a secure protocol. Virus-laden files and other malware can be easily uploaded to FTP servers and spread across the Net. Unencrypted passwords and email addresses can pass through the network to be harvested by spammers and others with bad intent.
Fortunately, you can use new, more secure applications to get the benefits of FTP in a more secure environment. The Secure Shell (SSH) includes sftp, a more secure FTP client, and scp, the Secure Copy client. Both programs make file transfer safer and are still easy to use.
Another way of moving files around the Internet is by means of peer-to-peer technologies such as BitTorrent and Gnutella. These technologies are apparently as controversial as they are popular, but they use very simple methods of moving data across the network.
This chapter will look closely at file transfer software available in SUSE Linux, using FTP and peer-to-peer technologies. You’ll also learn about creating a secure FTP server with SUSE Linux.
The next section discusses FTP clients, and the server information is discussed later.
FTP uses a client/server model to move files across a network or across the Internet. It allows for the display of remote file directories. With the right permissions, users can open and edit files on remote directories with FTP as well.
By itself, FTP poses a security risk for both client and server, in part because it allows for login information, including usernames and passwords, to be entered (as well as sent across the network) via clear text. So “anonymous” FTP became a standard practice on the Internet. If clients are not given credentials to use to attach to and manipulate stored data on the FTP server, clients can connect to an FTP site with a generic account by using “anonymous” as the username. A custom developed in which the user’s email address was used as a password. This would allow you to log on, but with general rights given to that of an anonymous user. Today, in addition to anonymous FTP, SUSE Linux users can be more secure in their file transfers by using the Secure FTP client that comes with OpenSSH, the free version of the Secure Shell. This section will help you use sftp and other FTP clients.
It’s good to use a text-based FTP client to learn what is actually going on in a file transfer. Dragging and dropping a file from one place to another is a fine way to simplify what is going on, but to understand the half-dozen commands that are being executed when you drag that file over can help you troubleshoot problems.
YaST installs LukemFTP as the default file transfer client for SUSE Linux. This client was written for the NetBSD version of UNIX, and it works quite well. It replaces the standard FTP client, so you can use all the standard FTP commands.
Following are the most common commands used in a typical FTP session. Be aware that after you have connected with a remote server, most shell navigation commands (cd, ls, and pwd, especially) work nicely.
ftp—This command starts the FTP client. You cannot connect without typing this first.open—This command connects with the remote FTP site, using either the IP address or the domain name. Typeftpat the prompt before using this command.close—This closes your connection, but stays in FTP so you can log in to another server.bye—This command closes your connection, exits FTP, and returns you to your shell prompt.quit—Same asbye. This command closes the connection, exits FTP, and returns you to the shell prompt.
ascii—Sets a transfer as ASCII text. Use this when sending or receiving text files only.bin—Sets a transfer as binary. Use this when uploading programs, images, or compressed archives. Also make sure that any program, image, or archive you download is marked with this tag. Some Windows clients upload files as ASCII by default; these are useless when downloaded later.
get—Initiates a download of a single file from the remote server to your machine. Syntax:get <filename>.put—Initiates an upload of a single file from you to the remote machine. Syntax:put <path/filename>.mget—Initiates a download of multiple files from the remote machine to your machine. Accepts wildcards as an argument. See alsoprompt. Example:mget *.png.mput—Initiates an upload of multiple files from you to the remote machine. Likemget, it takes wildcards as an argument. See alsoprompt. Example:mput *.png.prompt—This is an interactive command that gives you some control overmgetsandmputswith wildcards. Prompt will ask you before you transfer if you want each matching file. This is especially good if you have a slow connection and find yourself downloading a duplicate, or otherwise unwanted, large file. This option is turned on by default.hash—Tells FTP to give you a progress bar of hash marks (#) to indicate how the transfer is going.
FTP includes many other useful commands, which can vary from server to server. If you want to check whether a server supports a particular command, run help after you have connected to your site. You’ll get a list (but not a description) of available commands.
The lftp command is not included with a default SUSE Linux installation, but can be installed by YaST. This can be useful if you have a dial-up connection and a transfer stalls or your connection dies in midtransfer. This package supports restarted downloads (as long as the server does, too) and can also support multiple downloads in a single session with job control.
wget
wget is a useful tool for managing noninteractive transfers, such as mirroring remote directories. It works using standard protocols such as FTP and HTTP, and also secure protocols such as HTTPS. Its noninteractivity might not appear to be a blessing, but this feature enables you to download files in the background or write scripts using wget to back up a directory to a remote location. This utility also supports restarted downloads.
Check out the online documentation at http://www.gnu.org/software/wget/manual.
The Secure FTP client, sftp, was developed as part of the OpenSSH secure shell project to tighten up security problems in some of the fundamental Internet programs. SSH replaced telnet as the remote-connection tool of choice for many users, and sftp does the same for file transfers.
The goal of sftp is not so much to manage the file transfer itself, but to securely transmit login information. This way, files that don’t belong in an anonymous FTP directory can still be accessed by those who need them. Instead of connecting with a standard FTP server, sftp connects to the sftp-server component of OpenSSH, allowing for username and password encryption when you log in. sftp does not include all the built-in commands that standard FTP does (you can’t use wildcards, for example), but the subset is still quite useful.
If you are concerned that the transfer itself should be secure, you can use the scp (secure copy) command instead of sftp. For this, you’ll need to have explicit access to the remote host and also need to know the structure of the file system (that is, where the directory you want to transfer to is located). Secure file transfers are slow because the bits are encrypted, but the lack of speed is well compensated by the peace of mind accompanying the security of the transfer.
Returning to sftp, you can use this only if the remote server has OpenSSH installed. See more on OpenSSH in Chapter 25, “Setting Up Networks and Samba,” in the section “Securing Network Services.” Secure FTP access is turned on by default in OpenSSH.
Chances are you’ll want to use sftp in interactive mode. Enter the IP address or remote hostname with the command to access the remote machine:
sftp <IP address>
sftp docs.protek.edu
By default, the remote machine will recognize you as the current user on your machine. If you have a different username on the remote machine, use the command a little differently:
sftp [email protected]
It will now connect to docs.protek.edu and identify you with the new username.
sshd is usually configured to run on port 22, and this is where sftp tries to connect by default. Some servers can be configured to listen on a different port number, and you can specify that port using the -o switch:
sftp -oPort2221 [email protected]
Now you are connected and see a command prompt on the remote machine. To see exactly what commands are available, type help or a question mark (?) at the prompt. Proceed with your session and quit at the end.
SUSE Linux includes three standalone graphical FTP clients. Of course, all the web browsers (Konqueror, Epiphany, Mozilla, Galeon, Opera) have FTP clients built in as well. Konqueror in file-management mode (and the Nautilus file manager for GNOME) also has no problem connecting to a remote server and transferring files. Just type the URL for the remote machine into the Location box. In this section, you will learn about gFTP and KBear.
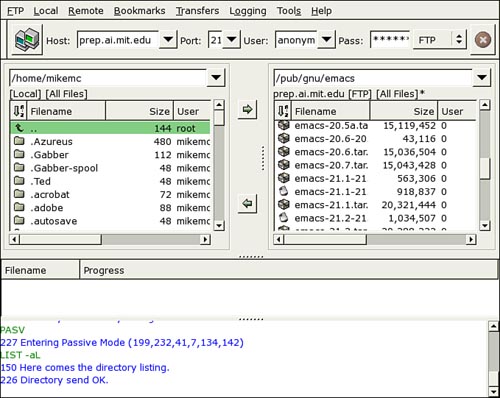
The gFTP client for GNOME makes it easy to transfer files from any remote host. When you open it up, you’ll see your home directory in the left panel (as you can see in Figure 17.1). When you connect to a remote site, its home directory will appear in the right panel.
The program comes with bookmarks for some of the largest FTP file repositories, including the SUSE FTP servers, so you can browse around for interesting files if you’re so inclined. If you already know the site you want to connect to, make the connection by typing the address and the additional information into the Host field. After you have connected, you can go to the Bookmarks menu to add this server to your bookmarks for easy access later.
By default, gFTP is set up for anonymous access and delivers your local email address (<username>@linux.local) as the password. You can change the default address in the Options menu, located under FTP. The program also supports sftp and other SSH protocols. To check the settings for secure transfers, go to the FTP menu, and then select Options, SSH.
Figure 17.1 shows the Emacs directory on the GNU project server at the Massachusetts Institute of Technology. At the bottom of the screen, you can see the text stream noting the commands that have been entered. You cannot directly type commands into this window, but all the standard commands are available from the menus. The right-click context menus work well, too.
As always with Linux systems, the default transfer type is Binary, so if you are uploading or downloading a text file, go to the FTP menu and select Ascii.
Note
Use the ASCII transfer option only if you are moving plain-text files readable with a text editor. Word processing and spreadsheet files are binaries.
To start a transfer, select a file or group of files and drag them from one directory window to the other. You can also use the arrow buttons in the middle of the screen if the download directory is displayed. You must use the cd command to display subdirectories in either window. Select the directory you want to display and use the context menu or the Local or Remote menus (depending on what you’re changing) to run the command.
The directory listings are sortable by any of the columns included, so if you want to see the latest additions at the top, click the Date column heading. The columns are also resizable if you can’t see everything you want.
When a file is being transferred, it is listed in the transfer window under the directory listings. It will have progress information listed as well. When you have completed your transfers, press Ctrl+Q to issue the bye command and close gFTP.
Many KDE users prefer using Konqueror to manage remote file transfers and local file-management tasks. If you are more comfortable with a traditional FTP two-panel interface or simply have trouble wrapping your mind around the idea that remote files are just another directory structure, KBear can help. Essentially it opens a series of Konqueror windows that appear side-by-side, with a set of FTP-specific menus to help you along.
The first time you run KBear, you are asked to walk through several screens of a configuration wizard. Newbies may be intimidated, but accepting the default settings should work fine. You can always revisit the settings later from the Configure KBear menu under Settings. (The settings menu can also run the wizard for you again.)
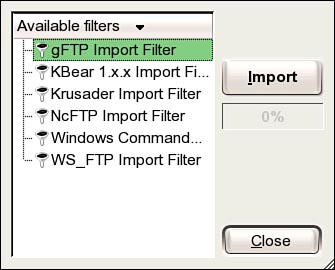
KBear’s bookmarks feature is called the Sitemanager, and it includes many of the same sites gFTP does, with some additional KDE-specific locations (KDE.org, Qt). The Sitemanager edit screen will import gFTP and other bookmarks (including WS-FTP for Windows) with just a couple of clicks. Figure 17.2 shows this dialog box.
KBear supports multiple connections and transactions, although the interface can get cluttered with the Konqueror toolbar at the top of each window. It also supports sftp and the other SSH protocols. One helpful tool is the two-click Synchronize Current Directories operation. This is good both for remote backup operations and website updates.
As controversial as it is popular, peer-to-peer (P2P) file sharing is unlikely to go away anytime soon. As long as Linux serves the “Information wants to be free” crowd (which will be forever), there will be Linux P2P tools.
Two general types of file-sharing protocols exist:
The traditional, Napster-style model, where files are uploaded and downloaded from one computer to another.
The BitTorrent model, where large files or packages are downloaded faster by allowing bits to come from several sources and combining them at the end.
Note that all types of files can and do circulate on file-sharing networks, including perfectly legal open-source software. At the same time, be aware that any file can be easily renamed and shared, so that the innocent-looking wav sound effect you pick up may be replaced by an active virus.
In this book, we’re not going to examine the legal and moral questions of P2P file sharing. We note that, as of this writing, 6 of the top 10 downloads at the Sourceforge open-source development center (http://sourceforge.net) are file-sharing clients. Whether (and how) you choose to use these tools (as with all the other tools mentioned in this book) is entirely up to you.
SUSE Linux includes several clients that support each of these styles, which you will learn about in the following section.
While recording industry legal attacks against the original Napster application and network have transformed the original concept, there are still many applications and file-sharing networks that have sprung up to meet consumer demands, especially for electronic music files.
Gnutella, eDonkey/Overnet, and FastTrack (aka KaZaa) are perhaps the best known of the file-sharing networks to rise since Napster’s fall. What makes them similar to Napster is the user’s side of the process.
A user goes online to locate and download a copy of a file (for example, an MP3 music file).
The client connects to the P2P network and searches for the requested file among the shared directories of computers online at that moment.
The client then displays a list of matching files and a little bit of information about the computer the file is on (mainly download speed).
The user selects one copy from the list, and the client downloads the file from the selected computer.
The good thing about the system is that no matter what you’re looking for, chances are someone on your network has it. The downside of this model relative to BitTorrent is that you’re a prisoner of your partner’s connection: No matter how fast your broadband or LAN is, if the person you’re sharing with has a flaky dial-up that is only online an hour a day, that’s the connection you get. If your client finds another copy of the file on another, faster computer, it will start a new download, but this can mean your hard drive begins to fill up with a bunch of partial downloads of the same file.
KMLDonkey is the KDE-based GUI for MLDonkey, a traditional P2P client that is looking for interoperability with several of these networks. GTK-Gnutella is its GNOME counterpart. They are both a little troublesome to work, but you should be able to avoid some of the pitfalls with this guide.
MLDonkey is a multi-network P2P client, which wants to work with all file sharers the world over. It began as a client for the eDonkey2000 network, now known as the Overnet, but now supports (to varying degrees) the Gnutella and FastTrack networks.
KMLDonkey is the GUI front for this client. Curiously enough, SUSE Linux includes this package, but not the core MLDonkey program—without which KMLDonkey cannot function.
As a would-be KMLDonkey user, you must first go to the MLDonkey website (http://www.mldonkey.org) to download the “core” package and the server lists. Several stable versions of the core MLDonkey package are stored here as tarballs. Download the latest and install it into your home directory. Those who want to ride the bleeding edge can download and compile from CVS here, too. The server lists are included in the mlnet package (in some places also defined as the “core”).
When both files have been downloaded, extract the MLDonkey tarball into your home directory. Then extract MLNet into the MLDonkey directory. Now run KMLDonkey, either from the Internet, Peer to Peer menu, or from the shell. If your servers don’t appear (or you get a Failed to Connect message), run the MLNet file manually. The servers should now appear in the KMLDonkey window and you should be on your way.
When you connect to the Donkey network servers (the default setting), the main KMLDonkey screen should look like Figure 17.3.
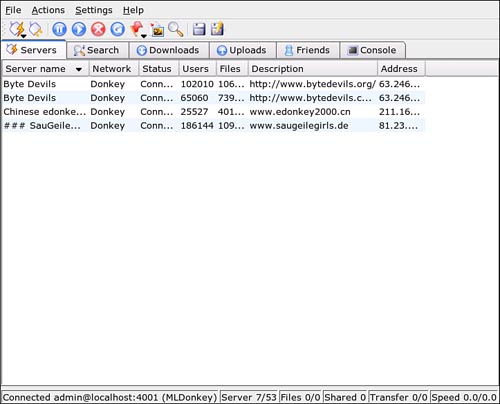
By default, the Servers tab displays all the servers you can connect to. This is useful on a first run when you’re trying to make sure something’s connecting, but may be tiresome after that. Go to Settings, Configure KMLDonkey to uncheck the Show All Servers box.
Click the Search tab to look for a file. Enter your search keyword(s) at the top and any modifiers further down. The categories are mostly self-explanatory, but if you are looking for an MP3 file, you may want to set a minimum bitrate. This indicates the relative sound quality of a music file. A bitrate of 128 is equivalent to a standard CD recording. The higher the bitrate, the bigger the file, so if you set your “max size” at 500KB and a bitrate of 128KB, you may see files that last only a few seconds.
These are file sharing networks, so do your part by designating at least one directory on your system for access to others (and probably not more than that). By default, KMLDonkey shares the Incoming directory where it places its own completed downloads. You can add more by going to the Uploads tab and right-clicking anywhere. Choose Share Directory from the context menu and type the path into the dialog box. Unfortunately, there is no Browse button in this dialog box, so you must type the full path.
Gnutella was one of the first decentralized networks to be created. Written by a developer at Nullsoft, the creators of the Winamp MP3 player for Windows, Gnutella was released under the GPL, and only officially available for one day. Nullsoft’s owners, then called AOL/TimeWarner, were not pleased by this offering. A community of developers quickly formed to work on the code, and many clients have since been developed to support the Gnutella network.
The Gnutella2 network was created in 2003 and is designed to be a faster and a more efficient protocol than the original Gnutella protocol. Both networks still function.
GTK-Gnutella is a GUI client based on the Gimp Toolkit. It functions much like MLDonkey, but accesses only the two Gnutella networks.
The GTK-Gnutella interface is not exactly a thing of beauty, but it runs nicely. Like KMLDonkey, it first displays the servers you’re connected to. To search for something, click in the New Search box and type your keyword(s). You’ll be taken immediately to the Search Results window, which you can see in Figure 17.4.

Figure 17.4. The GTK-Gnutella Search Results window. Select your file(s) to download from this list. Note that the Search box on the left displays all your active searches and the number of hits it has generated.
You can modify your search in this window. Click Edit Filters. Not especially user-friendly, these filter dialog boxes are nonetheless pretty easy to understand. You can set filters for size and name, along with several other parameters.
Select the file(s) you want to download from the search list and click the Download Selected button at the bottom to begin downloading. Searches remain active as long as GTK-Gnutella is running, and whatever main window you’re in, you can always see the current results of your search in the Search window below the New Search box.
Settings are also fairly technical in the way they are presented, but if you are not sure what a setting will do, try mousing over the setting; often you’ll see a ToolTip with an explanation or hint.
Whatis.com describes the most important advantage of BitTorrent as follows: “Rather than having to send a download to each customer requesting it, the distributor or holder of content sends it to one customer who in turn sends it to other customers who together share the pieces of the download back and forth until everyone has the complete download. This makes it possible for the original server to serve many requests for large files without requiring immense amounts of bandwidth.”
For the most part, BitTorrent is the sharing format of choice for big collections of archived text, books, and audio and video clips, including entire taped concerts and movies. With SUSE Linux 10, Novell joined the ranks of Linux distributors offering BitTorrent downloads of its ISO images, making it just a little easier to pull down that 3.1GB package.
BitTorrent works a little differently from the traditional file-sharing arrangement discussed in the preceding section. It goes something like this:
Someone with content to share creates a .torrent file to wrap the content in. This is done in the BitTorrent client. This person is referred to as the Seed.
An announcement is made on a website or mailing list that this torrent (or set of torrents) is available, with instructions given on finding its location.
People who want this file point their BitTorrent clients toward the seeded file.
Any other clients that have the file (or some pieces of it, depending on the client) and are online contribute bits to every other client that is downloading the same file. This eases the load on the Seed and speeds the download for each client because more bits are coming down at the same time.
When a download is complete, it’s proper form to remain online and keep your client open for awhile so others can benefit. The client monitors the upload/download ratio and often can turn itself off when you have uploaded as many bits as you’ve downloaded (that is, a ratio of 1.0:1.0).
Finding torrents is not always an easy task. One site that attempted to be a BitTorrent content clearinghouse shut down after the Motion Picture Association of America threatened a lawsuit. The safe choices are downloading from official sources and getting music from “trade-friendly” artists (think jam bands: Phish, Grateful Dead, Leftover Salmon, String Cheese Incident). An excellent site for the latter is http://bt.etree.org (this is the BitTorrent part of this large music-trading community).
The most manageable BitTorrent client for Linux is a bit of open source Java code called Azureus. Named for a species of frog notable for its blue coloring, Azureus is easy to install and easy to work with.
To install Azureus, head to the download page at http://azureus.sourceforge.net/download.php. Download the appropriate client for your system (choose between the GTK and Motif versions for Intel x86 processors, or the AMD64 or PowerPC versions for those processors). You will get a tarball that you can open with your favorite archiver.
Extract the tarball into your home directory, where it will create an /Azureus subdirectory. That’s all you need to install the program. To set up Azureus the first time, you need to run the program from the shell. From the home directory, type ./azureus/azureus to start the Configuration Wizard. The wizard will identify your connection speed and adjust if necessary. Click Next to continue.
The next wizard screen tests the BitTorrent listen port to see if it is available. Click Test to run the test. If it fails, you need to reconfigure the Firewall in YaST or your hardware router to permit regular BitTorrent operations. See the next Tip for more detailed information.
Tip
BitTorrent works best when other clients have direct access to your bits. BitTorrent clients communicate through port 6881. If you’re using the SUSE Firewall, you have to configure it to open the port. Go to the YaST Security and Users module and click Firewall. Click Next twice to get to the Firewall Configuration: Services page. Click the Expert button to add services. In the Additional TCP Services box, type 6881. Click OK, and port 6881 should be listed under Additional Services at the bottom. Click Next twice more, and then click Finish to confirm your changes.
If you have a hardware router that is your Internet gateway (as is often the case with broadband connections), you may have to configure that to permit BitTorrent communications as well. Visit http://www.portforward.com/routers.htm for helpful information on configuring several popular routers for BitTorrent.
BitTorrent clients will work even if you can’t get the listen port open, but your upload/download speeds will suffer.
The last screen in the Configuration Wizard asks where to store your .torrent files. Accepting the defaults is perfectly OK. Click Finish to open Azureus.
When you have completed the installation, go back to the Azureus download site to get (via BitTorrent) the latest Java Runtime Environment (JRE). As with the Azureus client, click the appropriate client for your system. The difference is that Azureus will now open up to manage the download instead of your browser. You may even see the Upload Speed column activate as someone else uses some of the bits you’ve already downloaded.
Tip
When installing any new Java product, it’s a good idea to check for a new JRE. Not everyone will have a convenient link like Azureus does. Go to http://www.java.com/en/download to get the latest and greatest. After the new JRE is installed, go to YaST and remove the earlier version.
Azureus has several plug-in enhancements for your BitTorrent experience, and a simple Installation Wizard to obtain and maintain them. Go to the Plugins menu and select Installation Wizard. Select By List from Sourceforge.net to see all the plug-ins downloadable from the Azureus site. Click the plug-in name for a description of the tool, and check the box to install it. Click Next, then Finish to begin the download. After it’s installed, the Azureus Update Manager will automatically keep both the main program and any installed plug-in current. You’ll also notice that plug-ins download into your torrent directory, and you become a seed for the next plug-in download.
FTP is a client/server process. Most of this chapter has been about the client side because it is most likely that you will be trying to find files for download. In this section, you will learn about SUSE Linux’s file-serving capabilities.
As alluded to before, two types of FTP servers exist: Authenticated (or standard) servers and Anonymous servers. A standard FTP server requires a valid username and password to give access. Anonymous FTP allows anyone access.
Anonymous servers are convenient for users, but can pose a security threat if not cared for. Fortunately, SUSE Linux uses logical permission schemes and a default configuration that makes it difficult for you to make mistakes.
SUSE Linux users can build both types of FTP servers, but this section will focus on securing an anonymous server with the Very Secure FTP server package, vsftpd.
Starting an FTP service in SUSE Linux is relatively simple, thanks to YaST. Go to the Network Services section and click Network Services (inetd). Inetd was the original Internet services daemon, but has largely been replaced by xinetd, which allows you to apply individual access policies for different network connection requests, such as FTP. You can choose either package when you install SUSE Linux, but it is much better to select xinetd.
To turn VSFTP on xinetd, first click the Enable button at the top of the Network Services Configuration screen. The various services that can be controlled by xinetd become active and are no longer grayed out. Check the Status column—you can start or configure any of the services marked with three dashes (---). The dashes indicate that a service is inactive; any services that are running now are labeled ON and are also configurable.
Depending on what you have installed, you should see two Services labeled ftp, and both should be inactive. Click vsftpd, and then click Toggle Status (On or Off) at the bottom. Figure 17.5 displays the screen.
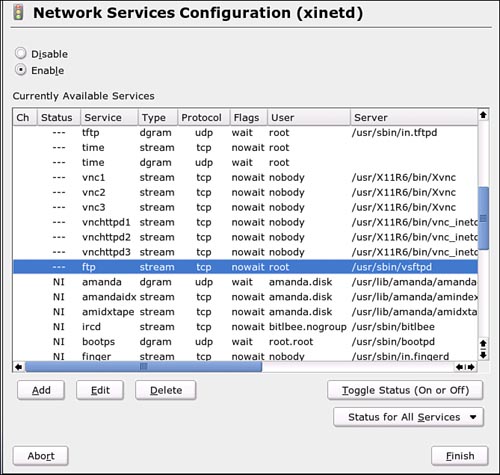
An X should appear in the Change column on the left. Click Finish to start the Server.
The Very Secure FTP main configuration file, vsftpd.conf, is located in the /etc directory with the rest of the configuration files. You can edit it as Root. The default settings are designed for minimum setup of an Anonymous server. The Anonymous FTP User Settings section of this file sets up the rules for these users. Following are some suggestions:
If you want to remove Anonymous access and make it an authenticated server, set anonymous_enable to NO.
To allow Anonymous download of only files that the World (Others) have Read access to, set anon_world_readable_only to YES.
To allow Anonymous users to upload files to your server, set anon_upload_enable to YES. This line is commented out by default.
To allow them to create directories, set anon_mkdir_write_enable to YES. Otherwise, set to NO. This line is commented out by default.
To allow Anonymous users to write (edit and delete) files in the public directories, set anon_other_write_enable to YES. Otherwise, set to NO.
You can make many adjustments while reading this file. Read the man page for vsftpd.conf (or visit http://www.vsftpd.beasts.org/vsftpd_conf.html for the HTML version).
http://www.vsftpd.beasts.org—The Very Secure FTP.
http://www.cert.org—The Computer Emergency Response Team. The place to go to learn about current security holes, and the latest “virus alert” email.
http://www.openssh.org—The open-source Secure Shell home. OpenSSH includes the Secure FTP client.
http://www.cert.org/tech_tips/anonymous_ftp_config.html—Excellent guidelines for safely setting up an anonymous FTP server.
http://www.gftp.org—The GNOME FTP client.
http://kbear.sourceforge.net—A KDE-based FTP client.
http://www.ncftp.com/ncftp/doc—Documentation for the NcFTP client and server.
http://wget.sunsite.dk—Wget, the GNU tool for non-interactive (scripted) file transfer.
http://enterprise.linux.com/article.pl?sid=04/12/20/1910209—A pithy description of what you can do with wget.
http://www.gnutelliums.com/linux_unix—A list of Unix/Linux Gnutella clients.
http://gtk-gnutella.sourceforge.net—GTK-Gnutella.
http://bittorrent.com—Bram Cohen’s BitTorrent home page.
http://azureus.sourceforge.net—Azureus, the Java BitTorrent client.
http://www.java.com/en/download—Download the latest Java Runtime Environment here.
http://www.portforward.com/routers.htm—Get help opening your hardware router for BitTorrent.
http://gift.sourceforge.net—The GiFT open-source FastTrack peer-to-peer project.
http://apollon.sourceforge.net—A GUI for GiFT.
http://kmldonkey.org—KMLDonkey GUI client.
http://www.nongnu.org/mldonkey—The home of MLDonkey, where you can download the core program. Front page links to all the file-sharing networks the client supports.
http://www.mldonkeyworld.com—News, downloads, and support forums for all MLDonkey users.
http://wiki.etree.org/index.php?page=BitTorrent—The eTree BitTorrent FAQ page, with much good information on BitTorrent clients, how BitTorrent works, and where to find content.