
IN THIS CHAPTER
The heart of Linux security is determining who can use what file and what kind of use is permitted. This is not all there is to making Linux a more secure system, but ultimately what is the purpose of computer security? Keeping the bad guys out of your files.
In this chapter, you will learn about setting up user accounts and creating and managing groups that work together. There are decisions to make about user passwords: Does the user select them, or does the administrator? How strong must passwords be? How often to change them? In this chapter, you’ll get advice about security. In short, you’ll learn about the human side of system administration.
This stuff is particularly important for system administrators in a multiuser office setting, but even if you are working by yourself, you will need to become familiar with permissions and passwords. This is the area where trouble often starts, and it’s the first thing to check when you can’t run something.
All Linux systems require one administrator, the Root, and at least one generic user, who can be the same person. The Root is, as noted often here, all powerful. Generic users can be restricted to the point of being able to read only a single file, or have full run of the system as the SuperUser (su). This section will help you better understand how the permissions system works, beyond what you learned in Chapter 5, “Getting Started with SUSE Linux.”
The first user account is set up during the SUSE Linux installation. Adding users is a simple task in YaST.
In YaST, go to Security and Users. Click Edit, Create Users. YaST will review the current user accounts and display them in the first screen (see Figure 19.1).
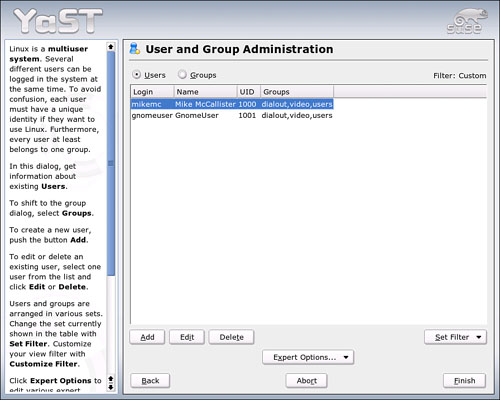
Besides the standard operations of Adding and Deleting users, you can perform several user-related tasks from this screen:
Change passwords and access rights for existing users.
Allow some users to log in without a password.
View and edit system users (more about this in the next section).
Set default permissions and groups for new users.
Set password encryption standards.
Configure user-related information for Lightweight Directory Access Protocol (LDAP), Samba, Network Information Service (NIS), and Kerberos services.
You will explore some of these options later, but for now you’ll create a new user. In this example, you’re going to create a user called drone77. Click Add. Figure 19.2 will appear.

YaST asks for the user’s full name. This is not required, but YaST will use this information to provide a suggestion for the system username. Because we already have a username picked out, enter drone77 on the User Login line. Type an initial password for this user. The Help pane on the left offers some pointers. The password must be between 5 and 72 characters; it is case sensitive (so mix in some capital letters) and can include spaces and just about any character on the keyboard.
To give drone77 a chance to select his own password, you need to set the expiration date. Click Password Settings and Figure 19.3 opens.

The default settings are for a system in which passwords are set once and never changed. This is OK for a single-user system with a modem connection to the Internet, but it’s a bad idea if you have an “always on” connection, such as a DSL or cable-modem connection.
Frequent changes of your users’ passwords is another way of staying one step ahead of the attackers. A good rule is to reset passwords every 3–6 months. drone77 is set to change passwords every 90 days.
Tip
Setting the Minimum Number of Days for the Same Password item for greater than 0 prevents users from changing passwords when forced and then immediately changing them back.
To let drone77 choose a password on login, you must set the Expiration Date for today, and set the Days After Password Expires with Usable Login to 1 or 0. The Days Before Password Expiration to Issue Warning can stay at the default, but can be adjusted to your preference. The system will then prompt drone77 to change passwords. When that happens, you should return here to delete the Expiration Date.
Click Next when you complete this dialog box to return to the main Add User screen. Click Details to review the other defaults associated with this user. These default settings are generally OK, but there may be items to adjust. In this dialog box, you can set the following:
User ID (UID)—Every user must have an ID number. Generic users must have UIDs greater than 499; YaST starts at UID 1000 to be safe. You can change this if you want, but do this only when you create the account. Ownership rights are associated with UID numbers, so changing the number will orphan any files outside of the user’s home directory.
Home Directory—By default, this is
/home/<username>, but you can change this here. The best reason to change the home directory is if this user is really just a “persona” of another user (like you, for example), who wants to have a single/homedirectory to store data in.Additional User Information—This line is for
fingerinformation. For privacy’s sake, leave this blank. (see “Changing User Information” in Chapter 5).Login Shell—This is the default shell for this user. By default, it’s
bash.Use the drop-down menu, which has the path to every installed shell on the system, to change shells.Default Group and Additional Group Membership—By default, YaST assigns users to the Users group and also to the Dialout and Video groups. You’ll learn more about assigning groups in the next section.
When you’re through adjusting these settings, click Next to return to the main Add User screen. You can now click Create to add this user to your system. drone77 should now appear on the list of Local Users. Click Finish to return to YaST.
Some applications need to own their files and processes to function securely. This is accomplished by creating system users. These are usually the daemons that always run in the background (man, lp/print, mail, news, and bin), but also include a few other applications, such as MySQL and the Games user. System users do not log in or have home directories, but they have passwords. They also have control over files that other generic users do not have. System users belong to their own group; that is, bin belongs to the Bin group.
View the list of system users in the User Administration screen by clicking Set Filter and selecting System Users. You should never have to configure these yourself, even as Root.
Most of the practicalities of setting permissions were covered in Chapter 5. The focus there is on the hows of permissions. It’s just a question of assigning Read, Write, and eXecute permissions to the Owner, Group, and World groups. You can do this either from the shell, using the chmod command, or in a GUI file manager. From the shell you can use octals or letter switches.
In this section, the focus is on why you want to set permissions in a particular way. Consider that permissions are the heart of security, as previously mentioned, and start with trying to think like a black hat—a would-be attacker. How can you use these three switches—RWX—to your advantage?
Read—The safest permission to grant is Read. Giving Read access to a file allows viewing the contents of a file. Read access to a directory allows access to the list of files in that directory. In most cases, someone viewing a file (with bad intent or not) is harmless. But what if it’s a critical document that needs to be kept from prying eyes? You probably want to encrypt the file as well, but removing the Read option is another step. What if an attacker wants to see if a file known to have a security hole is on your system? An attacker (or a software bot) can do that with World Read access to that directory.
Write—Giving Write access to a file allows someone to change the content of a file. Write access to a directory means permitting renaming or deletion of existing files and creation of new files in that directory. It’s a little easier to see the danger. Give World Write access to your web-server directory, and your site is a prime candidate for defacement. Give an attacker Write access to your
.loginfile (even without Read access), and someday you won’t be able to login because that filename will have been changed. These types of things probably don’t happen often, but they are the kinds of mistakes that happen frequently enough to be troublesome.Execute—Theoretically, any file in Linux can be made executable by setting this permission. In practice, executable files are standard programs or files that can be used as scripts. In a directory, execute rights are also called search permission. It means you can use the directory’s name when accessing its files.
Groups are the easy way to handle the “need-to-know” issues that always crop up when dealing with users on a network. Create a group when there is a set of people who need to have similar permission to work on particular files or directories.
As with users, there are two types of groups in SUSE Linux: Local and System. Generally speaking, Local groups are composed of real-life users, and System groups are for managing applications and their files.
Every user on a SUSE Linux system is assigned to the Users group, so common permissions can be set up for everyone. By default, all users are also assigned to the Dialout and Video groups, although this can be changed in YaST.
Adding a new Local group to your system is very much like adding a user. From the YaST Security and Users section, choose Edit and Create Groups. You can also come to this page directly from the Edit and Create Users page by clicking the option button. On this page, you will see the existing Local groups (by default, just the Users group). Click Set Filter and then click System Groups to look at those groups instead.
To define a group of writers on this system, click Add to display the screen shown in Figure 19.4.

Note
When you are working with Group Administration in YaST, you are actually editing the /etc/group file that stores information about groups on the system. YaST also backs up the old file (as /etc/group.YaST2save) when it makes changes, so you can revert to the old file if you need to.
In addition to YaST, the SuperUser can use several commands to manage groups: groupadd (to add a group), groupdel (to delete a group), gpasswd (to set a group password), and grpck (to check /etc/group for typos) are among the most commonly used.
You can also edit this file directly (as the SuperUser). Back up the file first, as YaST does, and run grpck afterward.
This process is straightforward. The only thing you have to do is to name the group and identify its members from the list of local and system users on the right. If you want to set a group password for extra security, define that here as well. YaST sets the default Group ID (GID) number starting at 1000. You can change this, but there’s no real need to.
When you have checked the box of the members of the group, click Next to create the group and return to the main page. You should see the Writers group on the list of Local Groups, along with its membership. You can add and remove members through this screen, and also through the User screen.
Note
Because the User and Group Administration tools share the same page, the Expert Options button appears in both. Except for the Write Changes Now option, nothing here really applies to groups. Use Write Changes Now if you are switching to the User Administration page before leaving YaST.
Click Finish to confirm your changes and close this window. Now you can choose to restrict some files and directories to the Writers group by assigning those files and directories to the Writers group and setting appropriate permissions.
Studies have shown that one of the leading causes, if not the primary cause, of system break-ins is an easily broken password. SUSE Linux aims to help the system administrator train all users (even if there’s only one) in password integrity and safety.
The YaST Security Settings lets you set minimum standards for user passwords and offer additional ways of securing your passwords. In this section you’ll learn how to configure these to your best advantage. First, however, there is some theory to cover.
A user isn’t a user until he or she has a password. Back in the “old days,” all user passwords in Unix and Linux were stored in a single /etc/passwd file, accessible to anyone with Read access. That’s still true, after a fashion, although all the “passwords” are now marked with an X.
In the mid-1990s, John F. Haugh II created the Shadow Suite to deal with the problem of readable passwords, and support for the software spread through the various Linux distributions by 1998. The idea is simple: Keeping plain-text passwords in a single file with World Read access makes it too easy for attackers to get access to passwords. Although making /etc/passwd unreadable is one solution, that would cause too many problems. The solution is to put real user passwords in a file only Root can read.
Both passwd and shadow are database files. passwd has seven fields that store the following for each record or user:
Username
Password (or holding place)
UID
GID
Finger information
Path to the home directory
Default shell
That is, every field included in the YaST User Add screen.
shadow has nine fields for each record/user and shares just one with passwd: the username. The other fields are
Encrypted password
When the password was last changed, expressed as the number of days after January 1, 1970; also known as the epoch.
The number of days before the password can be changed.
The number of days before the password must be changed.
The number of days the user gets before being warned the password is about to expire.
The number of days after a password expires that the account is disabled.
The number of days (if any) since the epoch that the account has been disabled.
The last field is reserved for future use; that use has yet to be determined.
These fields are set in the Password Settings dialog box for each user.
Passwords have become a way of life with just about every computer user. There are system login passwords, web portal passwords, online banking passwords, ATM passwords—the list goes on, possibly forever. Yet it is undeniable that you need all these passwords to protect yourself, your money, your files, and all the other things that we password-protect.
Your Linux files are only as secure as your password, so it’s important to select passwords carefully. Following are some very basic tips on making your passwords secure:
Choose something easy for you to remember, but hard to guess.
Don’t use your name, address, birthday, or other well-known fact about you as a password. The story goes that heiress Paris Hilton had her cell phone’s address book hacked when she used her “favorite pet’s name” as a password hint. System administrators have been known to check user passwords with a personnel file in their hands, using birth dates, spouse’s names, and the like. An unusual combination of some of these characters can be successful, though.
The longer the password, the better. By default, your system password must be at least five characters. Using the Blowfish password-encryption standard (see the next section for more information on this), your password can be up to 72 characters. It’s hard to remember that many, however.
Always remember: Passwords are case sensitive. Use a combination of upper- and lowercase letters in nontypical locations. It’s OK to start your password with a capital letter, but throw some in the miDdLe too.
Always use a combination of letters, numbers, and special characters.
T3st1n@is much better thante$ting.
The trick is not getting too comfortable with one password, or endless variations on a single theme. Even if you’ve got what you think is a bulletproof password, come up with a couple more. You just never know when a password-cracking script will get lucky.
To quote the Linux-PAM System Administrator’s Guide:
It is the purpose of the Linux-PAM project to separate the development of privilege granting software from the development of secure and appropriate authentication schemes. This is accomplished by providing a library of functions that an application may use to request that a user be authenticated.
In short, Pluggable Authentication Modules (PAM) extend the traditional Unix/Linux principle of doing one thing well. If an application needs to confirm (authenticate) a user, they can access the PAM libraries, instead of creating their own mechanism to do so.
The YaST Security Settings serve as the GUI front end for PAM. Go to Security and Users in YaST and then to Security Settings. On the first page, you can choose from three default configurations: Home Workstation (a standalone personal or family computer not connected to the Internet), Networked Workstation (for networked computers, either with other machines on a local area network or with an Internet connection), or Network Server (the highest level of security).
Chances are you will want the Networked Workstation option as a base. You can certainly leave things at that, but perhaps you want to tweak the settings.
Table 19.1 shows the differences in settings between the three default configurations.
Table 19.1. YaST Default Security Settings
Setting | Level 1 Home Workstation | Level 2 Networked Workstation | Level 3 Network Server |
|---|---|---|---|
Checking New Passwords | N | Y | Y |
Plausibility Test for Password | N | N | N |
Password Encryption Method | Blowfish | Blowfish | Blowfish |
Number of Significant Characters in the Password | N/A (applicable only to DES Encryption) | N/A (applicable only to DES Encryption) | N/A (applicable only to DES Encryption) |
Minimum Acceptable Password Length | 5 | 5 | 6 |
Minimum Days to Password Change Warning | 0 | 1 | 1 |
Maximum Days to Password Change Warning | 99999 | 99999 | 99999 |
Days Before Password Expires Warning | 7 | 14 | 14 |
Ctrl+Alt+Del | Reboot | Ignore | Ignore |
Shutdown Behavior | All Users | Only Root | Only Root |
Delay After Incorrect Login Attempt | 1 | 6 | 3 |
Record Failed Logins | Y | Y | Y |
Record Successful Logins | Y | Y | Y |
Allow Remote Graphical Login | N | N | N |
User ID Limitations | 1000–60000 | 1000–60000 | 1000–60000 |
Group ID Limitations | 1000–60000 | 1000–60000 | 1000–60000 |
Setting of File Permissions | Easy | Easy | Secure |
Root | Nobody | Nobody | |
Current Dir in Root’s Path | Y | N | N |
Current Dir in Path of Regular Users | Y | N | N |
Enable Magic SysRq Keys | N | N | N |
To change any of these defaults, you must click Details. YaST will walk you through the four pages of settings.
Some of these items may be perplexing. Read the helpful descriptions for each setting in the left pane of the screen when deciding how to handle each setting. The following list looks at a few:
Password Plausibility Test—Enforces some of the rules for passwords suggested in the previous section.
Password Encryption Method—There are three. By default, YaST chooses the Blowfish method at all three levels. This open-source algorithm was developed by security expert Bruce Schneier in 1993 and is faster and safer than the other two choices. Data Encryption Standard (DES) encryption was developed by the U.S. government in the mid-1970s and was the original free encryption algorithm. Passwords using this method are limited to eight characters. MD5 transforms a data string of any length into a shorter, fixed-length value. No two strings of data will produce the same hash value.
UpdateDB—This program runs daily and works with the
locateprogram to quickly find files. If Root runsUpdateDB, all files are updated. If the system user Nobody runsUpdateDB, only files that Nobody has access to are updated.Magic SysRq—The SysRq key is usually located next to the Scroll Lock key on your keyboard. When used with the Alt key, it can permit an orderly shutdown of a crashed system. The bad news is that someone with remote access to your healthy system can bring it down instantly. Given the rarity of system crashes, it is better to leave this disabled.
Monitoring user activity is part of the sysadmin’s duties, and an essential part of tracking how system resources are being used. If you have multiple users on your SUSE Linux system, and especially if you don’t, you should become familiar with some of these monitoring tools.
As the all-powerful sysadmin, you can monitor nearly everything your users do on the computer, held back only by the hours in the day. Fortunately for all concerned, even the Bastard Operator From Hell doesn’t have time to do this. Any good sysadmin will check in periodically, just to keep the invaders at bay.
The acct system accounting package is essential to pull together all the commands you’ll need to keep tabs on your system. There are a bunch of handy tools there including sa, accton, and lastcomm.
You may need to start the acct service at startup. To do this, log in as SuperUser and type
/etc/init.d/acct start
SUSE Linux will now track resource usage in the /var/run/utmp and /var/log/wtmp files. You can access these files with the following commands.
The w command will tell the sysadmin who is logged in, where he or she is logged in at, and what they are up to. No one is able to hide from the SuperUser. The w command can be followed by a specific user’s name to show only that user—by default, it will show all current users.
The ac command provides information about the total connect time of a user measured in hours. It accesses the /var/log/wtmp file for the source of its information. To generate a list of users with their login hours, type
ac –p
Even if you’re a sole user, if you log in and out religiously, you might find this command useful. To get a list of total hours logged in on the system for a calendar day, type
ac -d
Tip
Interestingly, a phenomenon known as “timewarp” can occur, where an entry in the wtmp files jumps back into the past, and ac will show unusual amounts of time accounted for users. Although this can be attributed to some innocuous factors having to do with the system clock, it is worthy of investigation by the sysadmin. It can also be the result of a security breach.
The ac command can prove itself most useful in shell scripts when you want to generate reports on operating system usage to show management what OSes your users run.
The last command searches through the /var/log/wtmp file and will list all the users logged in and out since that file was first created. The system user reboot exists so that you might know who has logged in since the last reboot. A companion to last is the lastb command, which shows all failed, or bad, logins. It’s useful to determine if a legitimate user is having trouble, or if someone is trying to break into your system. The hoped for result of lastb is always a message telling you that the btmp log does not exist—meaning there have been not bad/attempted logins.
It has been said here frequently: it is generally a bad idea to log in as Root and do work. Too much damage can be done, and if you’re connected to the Internet, you can actually lose control of your system to an attacker. Nonetheless, there are tasks and operations that can be done only by Root, and you may find yourself needing to be Root on a daily basis. Fortunately, there is a built-in solution to this problem: becoming the SuperUser.
There are two ways to perform Root tasks while being logged in as a generic user. The su command allows anyone with the Root password to become Root. In a larger system, Root can also assign specific tasks to users without handing out the Root password by implementing the sudo command.
When you run YaST to make changes in your configuration, you are first asked for the Root password. You have just used su to become Root.
Whether the task is installing software, troubleshooting problems, or some other system-related issue, you will need this command sooner or later.
Note
Although most often run on a system to gain SuperUser access, su is not the “SuperUser” command. It stands for “Substitute User,” and you can log in as any other system user with the correct password.
To run su from the shell prompt, use this syntax:
su <option> <username> <arguments>
Typing su by itself means you want to log in as Root, and you’ll be prompted for the Root password. You’ll also retain your own environment settings. To gain Root’s environment, type su -.
To run a single Root command from the shell and return to your user prompt, use the -c switch. Try something like this:
su root -c chmod 600 /etc/shadow
When you have completed your Root tasks, type exit to return to your user prompt.
When you’re the system administrator of a large system with lots of users, you don’t want to give out the Root password to everyone who wants to install software on his or her computer. You can solve this problem with SuperUser Do, or sudo.
You configure sudo by editing /etc/sudoers with the special visudo editor. As you might guess, visudo is a version of vi made for use with this file. It checks for parsing errors in your edits, so you should definitely use this, rather than your regular editor (even if you normally work with vi). You may want to return to the vi section of Chapter 5 to review some of the commands if you are not familiar with this editor.
Run su to log in as Root before running visudo. To begin, run visudo with no arguments; that is:
visudo
The default /etc/sudoers file appears in the shell, looking something like this:
# sudoers file.
#
# This file MUST be edited with the 'visudo' command as root.
#
# See the sudoers man page for the details on how to write a sudoers file.
#

# Host alias specification

# User alias specification

# Cmnd alias specification

# Defaults specification
Defaults targetpw    # ask for the password of the target user i.e. root
%users ALL=(ALL) ALL # WARNING! Only use this together with 'Defaults targetpw'!

# User privilege specification
# You should not use sudo as root in an SELinux environment
# If you use SELinux, remove the following line
root    ALL=(ALL) ALL

# Uncomment to allow people in group wheel to run all commands
# %wheel    ALL=(ALL)    ALL


# Same thing without a password
# %wheel    ALL=(ALL)    NOPASSWD: ALL


# Samples
# %users  ALL=/sbin/mount /cdrom,/sbin/umount /cdrom
# %users  localhost=/sbin/shutdown -h now
Before editing sudoers, you may want to review the man pages for both sudoers and visudo (sudo itself has a man page as well) for instructions on how to use these files.
Feel free to uncomment any of the default lines to activate them. Instead of editing the default lines, you should add new lines (with a comment to document what you want to do). The basic format of a sudoers line is
user host_computer=command
The user can also be a group; so, for example, to grant permission to the Writers group to run YaST Online Update, add this line:
writers ALL=/sbin/yast2
To grant the Writers group this same permission without having to enter a password, add this line:
writers ALL=/sbin/yast2 NOPASSWD: ALL
When you’re finished editing, press :q to save changes and return to the shell prompt. Type exit to return to your user prompt.
Once configured, sudo is very easy to use. Anyone in the Writers group should now be able to type this command to run YaST:
sudo /sbin/yast2
Depending on how you set it, writers may be prompted for their own user password to confirm that they are the person that is logged in.
http://tldp.org/LDP/sag/html—The Linux System Administrator’s Guide.
http://tldp.org/HOWTO/User-Authentication-HOWTO—Setting up passwords.
http://tldp.org/HOWTO/HOWTO-INDEX/admin.html#ADMSECURITY—The Linux security HOWTOs all in one place. Be sure to read over the Security-HOWTO for an overview.
http://www.tldp.org/HOWTO/Shadow-Password-HOWTO.html—Explains the shadow password system.
http://www.novell.com/coolsolutions/feature/11685.html—A brief, but nice, overview of permissions and how to set them in Nautilus/GNOME.
http://www.gratisoft.us/sudo—The
sudoprogram lets you delegate specific administrative tasks to particular users without turning over the Root password.http://www.kernel.org/pub/linux/libs/pam—Pluggable Authentication Modules in Linux.
http://publib.boulder.ibm.com/infocenter/pseries/index.jsp?topic=/com.ibm.aix.doc/aixbman/security/pam_overview.htm—This guide to PAM under IBM’s flavor of Unix is helpful to Linux users, too.
http://www-106.ibm.com/developerworks/linux/library/l-sc7.html—This article on “Practical Linux Security” offers an interesting take on handling users.
http://searchenterpriselinux.techtarget.com/originalContent/0,289142,sid39_gci928466,00.html—This Linux Security Learning Guide is a handy set of articles and links on the range of security topics.
http://www.schneier.com/blowfish.html—The Blowfish encryption algorithm home page.
http://linuxgazette.net/issue81/vikas.html—A summary of the Magic SysRq process.