
IN THIS CHAPTER
Maybe you’ve heard it a hundred times, perhaps not at all, but it’s true: You will lose data one time or another. It’s a question of when, not if.
Bad things happen to good data. A group of computer users in an office working on a Linux file server share data in a folder named SHARE. One of the users accidentally deletes a very important file in that folder that all other users use. No fear—because you backed up the system, a quick restore will be able to get that file back in place, as long as the backup was originally successful. This chapter is about preparing for that eventuality.
Backing up data is not fun. It takes time and resources, and 99.999 percent of the time it’s not productive. For one person, it can be hard to justify taking the time to back up data, buy new storage media, and make sure your existing backups still work. But the day your hard drive decides to join the scrap heap is the day that all that time pays off. That’s when you’re reminded that backups are like insurance; you hope you never need it, but when you need it, you’re really happy it’s there.
The trick is knowing how much to back up, what to back up, and how often to back up. This section will help you sort out these issues before you start.
When you think about it, data stored on a computer is a fragile thing. Nothing but ones and zeros stored electromagnetically on a cheap metal platter. The storage industry does a fine job of protecting those digits, but it’s almost a wonder that users don’t lose more data than they do.
Aside from the times when you consciously press the Delete key or type rm <filename> at a shell prompt, when you talk about data loss, this is usually an unintended consequence stemming from various causes. Mother Nature is often at the root of the problem: thunderstorms leading to electrical power surges, tornadoes, floods, hurricanes, and fire can all make data disappear or become useless in an instant.
Floppy disks are fragile things. They can get bounced around enough to damage the disk and corrupt files.
Consider the unstable, buggy program you’re using to create new data. When it hangs or crashes, you get a message warning you that All unsaved data will be lost.
Hard drives do die, no longer capable of storing your ones and zeros on their platters. Manufacturers even use a rating system of Mean Time Between Failures (MTBF) to quantify the number of hours a hard drive should function. And using wildcards to remove batches of unwanted files can result in wanted files disappearing, too.
Too often, however, data loss results from what technical support people call (privately) “keyboard-to-chair problems”—good old human error. As long as there are humans, no matter how intelligent they happen to be, they will do not-so-intelligent things that can result in some level of data loss. Backups minimize the risk from all these causes of data loss.
In many ways, deciding on a backup strategy is predicated on the answers to two simple questions: What files do I need to back up, and how often do those files change?
The answers get down to a more critical question that lies beneath: What data is important to me?
When you have those issues settled, the question then becomes: What can I afford, in both time and money, to protect that important data? The answers to these questions diminish in importance if you have access to massive amounts of bandwidth or empty warehouses that can store terabytes of data in every square foot of the property. That probably does not describe you, however.
Some backup methods take longer than others, and the same is true for restore methods.
Consider the situation where you have to restore everything. Can you afford to be down as long as it takes to restore using your method? If it’s just your machine, will you have to sit there swapping disks in and out every few minutes, or can you automate the process?
These are the questions that will help you formulate your backup strategy. After you have that strategy, it’s important to practice it religiously and test it periodically.
Whatever strategy you select, make sure to carry out these practices with similar fervor:
Have more than one copy of critical data at all times.
Label the backups using some consistent method (by date, by type of file).
Store backups in a secure area with consistent temperatures.
Store critical data somewhere offsite. If all your backups are in your house, and the house catches fire, you’re in trouble.
Try restoring from a backup regularly to make yourself comfortable with the process, and test the medium you’re using.
Test your media. Problems with the CD or defects with the tape can mess things up.
Everyone’s situation is different, but we can make some generalizations about different types of users and their backup strategies.
Home users—The critical issue for home users is not rebuilding the operating system and applications. With the SUSE Linux installation CDs, reinstalling the base packages for your system should take about an hour. What is critical is preserving your home directory and your configuration files. Backing up email is optional, depending on the volume and how important you think it is. Configuration files are generally stored in the
/etcdirectory, so backing up/homeand/etcis your primary task. If you have applications installed outside of YaST, you should back these up as well. Unless you have critical projects in the works, a weekly backup to a CD-RW or some other external storage drive is all that’s required.Small Office/Home Office (SOHO)—Like home users, SOHO users can focus on keeping the data in the home directory secure, along with configuration files, business-related mail, and applications installed outside of YaST. SOHO users need to be more rigorous about backups than ordinary home users, because the consequences are greater. Daily backups of important files are a good idea. Because files stored on tape drives are faster to restore than other media, you may want to consider investing in a tape drive, although CDs may be just as good. Redundant drives may also be possible for you.
Many backup strategies are used today, but in this section we’ll review some of the more popular ones. Tweak any one of them for your own purposes.
Caution
If you are running Windows and Linux on the same computer, don’t back up both file systems in one fell swoop. Back up your Linux files with a Linux tool and Windows files in Windows.
YaST System Backup will also back up your partition table. See “Using YaST System Backup,” later in this chapter.
If all you need is to back up a few small documents and some configuration files, you only need a floppy disk or two. Copy the files directly.
If you have a Zip drive or other high-capacity floppy, you can choose to back up the entire Documents directory for each user, plus the /etc directory for all your configuration files. Zip disks come in 100, 250, and 750MB varieties.
With a CD-RW or DVD-RW on hand, you should be able to use K3b to burn the entire home directory for all your users to a single 700MB CD.
The beauty of this strategy is that you can back up files on the spot, simply by copying every changed or new file to your chosen medium, although this is harder to do with a CD. It becomes problematic when your backups grow beyond a single disk. At that point, you’ll want to adopt a more formal strategy, as in one of the following.
This is the standard backup process where you archive everything to your chosen medium on a weekly, biweekly, or monthly basis. The frequency depends on the importance of the data and how often it changes. Ideally, you can perform this backup to a designated network server, but depending on how much room your files take up, multiple CDs or DVDs may work.
The best way to do this is with archiving software, which is discussed later in the chapter.
This is the standard corporate backup routine used in medium-to-large networks. There’s no technical reason smaller businesses can’t do this, but it may be less necessary. With this strategy, you make a full backup to a tape weekly and back up new and changed files every day.
There are two ways of defining what is “new and changed”—that is, what to include in an incremental backup. The easiest way to do this is to have a single tape (Level 1) reference the last full backup (Level 0) each day. This way, you have to keep track of only two tapes. The danger is that if a lot of things change during a given week, you may run out of tape.
The alternative is to have separate incremental tapes for each day. If you perform your full backup on Friday night, your first increment is Saturday, and it references the full backup. You then remove Friday’s tape and insert Sunday’s tape, which will include changes since Saturday, and onward to Thursday. So if someone comes to you and asks for the file they accidentally deleted on Wednesday, you can easily find Tuesday’s backup tape and restore from there.
It’s best to use a professional backup solution, such as Amanda or BRU, for these complicated backups. As a system administrator, then, all you have to worry about is changing tapes. The software handles the actual backup.
Leaving aside the warehouse full of terabytes, you need to decide how to store your backed up files. Making a copy of all the files on your hard drive and storing it on another partition on the same drive may be useful in some situations, but not when the drive goes bad.
Given this reality, you must choose another medium to back up your files to. This section gives you a brief overview of your choices and includes some suggestions to help you find the right one for you.
A redundant array of inexpensive disks (RAID) setup offers a system administrator a great opportunity to have a real-time permanent copy of everything on a particular hard drive. Mirrors are additional volumes that contain an exact copy of whatever data is stored on the “parent” volume. Whenever an operation writes data to the parent volume, it is immediately written to the mirror volume as well. If the parent disk were to fail, the mirror disk can immediately take over, ensuring that data isn’t lost. With relatively inexpensive hard drives available, this can be a great solution because, as we learned earlier, drives will always eventually fail.
Be aware, though, that mirrors don’t check for corrupt files on the parent. They will write corrupt files to their disks as easily as they write good files.
For more information on setting up RAID arrays, see “Setting Up Mirror Disks and RAID Arrays” later in this chapter.
Using some type of removable media is the standard backup solution for home and SOHO users. Although the 1.4MB floppy disk is slowly disappearing from the computing landscape, other, more robust, choices can make backups less of a painful experience. Anything that helps users get into the backup habit is a good thing.
Besides ordinary floppies, these choices exist for removable storage.
SUSE Linux has excellent support for the large capacity floppy drives from Iomega. Coming in 100, 250, and 750MB sizes, these drives can play a role in your backup strategy. These drives also have a choice of connections, serial and USB, which make the drives quite portable. The drive-and-disk combination can be more expensive than comparable CD-R/RW combinations. Zip disks also have a history of experiencing the “click of death,” with sudden wiping of the disk. This is not so much of a problem with newer drives, but it still happens.
Keychain drives (called that because they are so small you can attach them to a keychain) are so cool you might have trouble thinking of them as part of a serious backup program. With these gadgets, you can buy 128MB of storage for around $25 and 1.5GB for around $150. Plug them into a USB port and copy any files you want. Keychain drives use flash memory to store data. USB-based portable hard drives are also coming down in price, with 80GB of storage for about $100, and 400GB for less than $500. SUSE Linux will identify these drives as SCSI storage and mount them like any other volume on your system.
The key thing to remember about both types of drives is that you really need USB v2.0 to make the transfer time worthwhile. Older computers with USB 1.0 ports cannot take advantage of the tremendously higher speeds of the new ports. If you have room for another PCI card in your machine, you can add USB 2.0 ports to your system.
These portable drives use a different interface (IEEE 1394) than the USB drives do, but are otherwise similar. The interface is popular with portable music players and digital cameras. Most of these drives were created for the Macintosh platform, but the Linux kernel supports them.
For newer computers that have some kind of built-in recordable CD or DVD drive, it’s hard to debate other choices for your backup. CD-R disks hold 700MB of data and cost less than a dollar; CD-RW (Read-Write) disks are only a little more for the same amount of space.
CDs are durable, compact, and provide a mountable file system. This makes them more versatile than tape for restoring files. They are less fragile than Zip drives and use a more mature technology than the keychain drives. Transfer speeds vary depending on the drive, but all are acceptable. You still have to be careful not to scratch the disk, but they can be protected by jewel cases.
Recordable DVD drives are also now becoming part of new PC installations. DVDs can hold up to 4.4GB of data, and cost around $2. The only issue is that there are two incompatible formats for recordable DVDs: DVD-RW and DVD+RW. You need to know what format your drive supports and buy the appropriate disks. Lately, DVD±RW drives have become available that allow you to use either format.
SUSE Linux provides several command-line tools to burn CDs and DVDs. The k3b utility gives you an excellent GUI interface for these applications, whether you run KDE or GNOME, and supports both DVD formats. To run k3b, simply open a terminal session and enter kb3 at the shell prompt.
Although enterprise-level systems can take advantage of Network Attached Storage (NAS) setups, where the backup storage volumes are on the network directly, rather than needing to be restored to a server, there are other options for the rest of us.
Your Internet Service Provider (ISP) may offer some file storage, either as part of a website package, or straight out.
Some commercial storage space companies (such as www.xdrive.com) offer space for a monthly fee.
Google’s Gmail service offers a gigabyte of mail storage for free. Richard Jones has written a program that converts some or all of that space into a working Linux file system. Find it at http://richard.jones.name/google-hacks/gmail-filesystem/gmail-filesystem.html.
Tape drives have been the standard corporate backup medium for a long time. The TAR archive format for Unix, which groups individual files into a single “tarball” for easy retrieval, stands for Tape ARchive. Tape cartridges can hold up to 70GB of data (more if the data is compressed), although capacities can vary.
Tapes are very reliable when maintained, but they do degrade over time. Tape drives can and do fail as well.
As always, YaST is here to help simplify the backup task. It will not back up your entire drive, but it can get all the critical files you need to boot your system if your system fails. You can use this tool to create several backup profiles, depending on your strategy.
The System Backup and Restore System tools are both located in the YaST System page. You’ll learn more about the Restore tool later in the chapter.
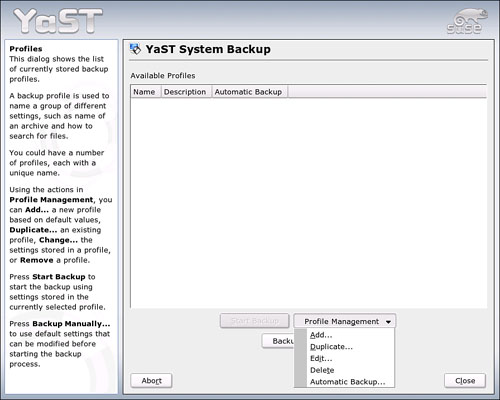
The first time you start System Backup, you will get a blank page. You must first create a backup profile. Go to Profile Management and click Add to create a new profile, as shown in Figure 20.1.
In this section, you learn how to make an initial backup to the home directory for later burning to CD. The first Add Profile screen, Archive Settings, explains a little about the process and asks you where you want to store your backup. Type the full path and name the file in the File Name line, as shown in Figure 20.2.
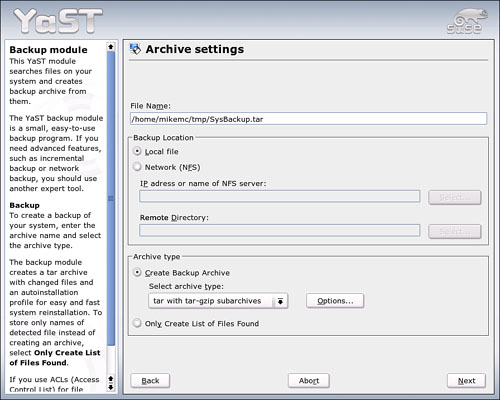
Figure 20.2. Define the location for your backup file and choose the type of archive you want to use in this screen.
If you have the Network File System (NFS) running and can back up to a remote volume, click the Network button and select the NFS Server name and your directory in the appropriate boxes.
By default, YaST compresses your system files with the GNUZip (gz) tool and places all the compressed files into a Tape ARchive (TAR). You can also choose to compress with the newer bzip (bz2) archive format, or leave the files uncompressed in another TAR wrapper. If you are using Access Control Lists (ACL), YaST advises using the star format for the subarchives. There’s no harm in selecting the defaults, but bzip gets slightly better compression rates than GNUZip.
Click Next to continue.
In the File Selection screen (see Figure 20.3), you are defining files that won’t be backed up. By default (and there isn’t really any way to change this), YaST backs up every file from packages that have changed since installation. Checking the Backup Files Not Belonging to Any Package box backs up everything, including data files. The Check MD5 Sum Instead of Time or Size option uses the MD5 hash algorithm to determine whether a file has changed. MD5 transforms a data string of any length into a shorter, fixed-length value. No two strings of data will produce the same hash value. If you don’t check this box, YaST will use the last modified date or a changed size to determine whether a file has changed. The latter backup will be faster, but perhaps not as accurate.

Figure 20.3. The File Selection screen defines files that will not be backed up, rather than files that are backed up.
Tip
You can (and perhaps should) have separate backup profiles for packages, data (files not belonging to any package, with your ~/Mail directory excluded), and mail (with ~/Mail included). See the Search Constraints screen to learn how to take directories out of the backup.
If you want to see a list of the files to be backed up before YaST completes the backup, check the Display List of Files Before Creating Archive box. To add a description of this particular backup profile, type in the appropriate box.
If you have a dual-boot system, and the boot manager sits on your hard drive, it is a good idea to back up your partition table. This is not done by default. Click Expert at the bottom of this screen, and then check Back Up Hard Disk System Areas. Clicking Options shows that Back Up Partition Tables is checked automatically when you choose to back up the system areas. If you have an ext2 file system (instead of the default ReiserFS), you can use the Options to back up critical areas of the file system as well.
By default, YaST stores the backup archive while it’s being built in the /tmp directory. You can change this in the Expert options, but you should need to do this only if that directory is exceedingly low on space.
When you’ve finished setting the Expert options, click OK to return to the File Selection screen. When you’ve made all your selections, click Next to continue. The Search Constraints screen (see Figure 20.4) appears.

Figure 20.4. By default, YaST excludes any Windows volumes, remote directories, the /var directories that store transient information, and other mount points that should not be backed up. You can edit this list and add files matching regular expressions.
The final screen in the Backup Wizard lists directories and file systems to be ignored in the backup process. By default, directories that store transient system information and “alien” file systems such as CDs and floppies that happen to be sitting in their respective drives, Windows volumes, and remote directories are not backed up by default. You can add or delete any directory or file system to or from this exclusion list. You can also exclude files matching a defined regular expression.
Click OK to complete the backup profile. You will return to the main System Backup screen. Click Start Backup to begin the process.
YaST System Backup covers only vital system files. Many other tools exist to help you back up your more ordinary Linux files. They range from the simple command-line archiver TAR to commercial industrial-strength products like Arkeia and BRU. In this section, you’ll learn more about archiving with tar and two GUI applications, File Roller and Ark, that will help create archives for backup purposes.
The Tape Archive utility, tar, is one of the oldest in the Unix toolkit. It masterfully follows the Unix philosophy of “do one thing well.” That thing is grouping files together in one easy-to-transport package. For doing backups, tar offers a simple command-line solution. This command archives the whole /etc directory and places the archive in the current directory:
tar cvf etc.tar /etc
These options create a new archive with the filename etc.tar that copies all files in the /etc directory to the archive. As it does this, tar is verbose in telling you what it’s doing; that is, you’ll see a stream of filenames rolling down the shell as each is added to the archive.
If you add the z switch to this command—that is
tar cvfz etc.tar /etc
You will also compress the files with Gzip. Similarly, adding the j switch would use the bzip formula.
The tar utility can also be used to back up data directly to a tape drive. Most tape drives use a SCSI interface and are accessed through /dev/stx; where x refers to the number of the tape drive in the system (st0, st1, st2, and so on). For example, if you have a single SCSI tape drive in your system, you would access it through /dev/st0.
To create a backup job and send it to the tape drive, complete the following:
Using YaST, make sure your tape drive was detected during boot and that the correct driver was loaded. Usually this isn’t a problem, especially if you use a widely recognized SCSI board in your computer (such as those from Adaptec).
Insert a tape in your tape drive and wait for it to load and queue up.
Open a terminal session.
At the shell prompt, enter
taroptions/dev/stx path_to_be_backed_up. For example, to create an archive of the/homedirectory (and all its subdirectories) on the first SCSI tape drive in the system, you wouldentertar -cvfz /dev/st0 /home. If the size of the archive exceeds the capacity of your tape, you will need to remove the-zoption and add the-Moption. This will allow the tar archive to span across multiple tapes.When the job is complete, you can rewind the tape and eject it at the command prompt using the
mtutility. This is done by enteringmt -f /dev/st0 rewoffl. Themtutility can also be used to perform a number of other tasks with magnetic tapes, such as erasing, rewinding, and fast forwarding. Check out the man page formtfor more information.
A key component of an effective backup strategy is to make sure backups occur regularly. Using the crond daemon, you can configure tar to automatically back up your system at a set time each day (usually later at night when you aren’t using the system). This relieves you of the responsibility of remembering to manually start the process. Invariably, the day you forget to run a backup is the day you will end up needing it. Review the tar man page to discover the power and flexibility of this utility, and then put it to work in your backup scheme.
Ark is a very easy-to-use application that can create or open plain and compressed archives in several formats: tar, gzip, bzip, zip, rar, jar, to name a few. It’s the default archive tool if you’re using your SUSE Linux system with a KDE shell. As with many applications designed for KDE, it will work under GNOME as well. To create a new archive using Ark, complete the following:
Select Kmenu, Utilities, Archiving (assuming you’re using KDE).
Select File, New.
In the Create New Archive screen, enter a name for the archive in the Location field.
In the Filter field, select the type of archive you want to create. Most of the time, you will probably want to create a gzipped tar archive.
Select Save.
To add data to the archive, select either Action, Add File or Action, Add Folder.
Wait while the files are added to the archive.
Alternatively, you can also create an Ark archive by right-clicking files from within Konqueror and selecting Compress, Compress as archive_name.tar.gz from the menu. The new archive will be created and saved in the location you specify.
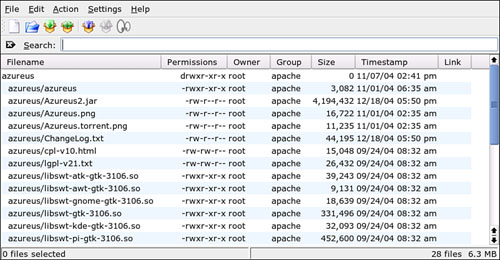
After it is saved, you can open any existing archive and add files to it. This is helpful if you have some files in other directories. Figure 20.5 shows you how an existing archive appears in the Ark window.
File Roller is the default archive tool for SUSE Linux even if you’re using the GNOME shell. It integrates well with Nautilus, the GNOME file manager, allowing for drag-and-drop adding of files to new archives.
If you open Nautilus and then File Roller in the same desktop, you can drag files from Nautilus to File Roller. The archiver then asks if you want to create a new archive with the selected files. Click Yes to open the dialog box you see in Figure 20.6.

If you have two or more hard drives in your computer, one way to preserve files is to have one drive act as a mirror for another. This is the principle behind the RAID concept.
There are several levels of RAID arrays implemented in Linux.
RAID-0 (Stripe Mode)—Multiple disks combined to appear as a single device. Data is saved in small “stripes” on each disk. This can dramatically increase your system performance because large chunks of data are split up between the drives and read or written concurrently. Unfortunately, RAID-0 doesn’t offer any form of data protection. If problems arise on one disk in the array, files on both drives can become corrupted.
RAID-1 (Mirror)—Data is saved redundantly to all disks in a mirrored array. Instead of splitting data between disks, an exact copy of data being written is saved on multiple drives in the array. Each drive contains a “mirror” of every other drive. Mirroring doesn’t improve system performance. However, your chances of retrieving a file stored in a mirrored array are excellent. With most RAID-1 controllers, a mirrored drive can be configured to instantly “take over” in the event that the main drive in the system fails, providing a high degree of data protection.
RAID-4—Has three or more striped disks included in the array, with one of them storing “parity information.” The parity information makes it easier to reconstruct data if one disk in the array fails. In essence, it creates an array that provides the speed of a striped array along with the protection of a mirrored array.
RAID-5—Same as RAID-4, but parity information is distributed evenly among the disks. As with RAID-4, RAID-5 provides the benefits of both RAID-0 and RAID-1. RAID-5 is more commonly implemented than RAID-4. RAID-5 boards are usually much more expensive than RAID-0 or RAID-1 boards.
RAID-0+1—Although this is not an official RAID level, many newer RAID controllers provide you with the option of creating a mirrored striped array using four hard disk drives. This provides the speed and redundancy benefits associated with RAID-5 at a much lower cost.
It’s important to note here that RAID can be implemented in two ways:
Hardware—With hardware RAID, you install a special disk interface into an expansion slot in your system to which your hard drives are attached. All RAID configuration tasks are completed using the BIOS of the RAID board. The RAID board itself, then, represents the entire array to the operating system as a single hard disk drive. Using a RAID board is generally considered to provide faster performance than a software RAID solution (although at a higher cost).
Software—With software RAID, your system’s hard disk drives are connected using the standard, non-RAID interface in your system. The operating system, then, is used to create a RAID array using these disks. Software RAID is usually much less expensive than hardware RAID, but is also considered to provide slightly slower performance.
SUSE Linux will support either type of RAID implementation. In fact, setting up a software RAID array on SUSE Linux is quite simple with the YaST Expert Partitioner.
Caution
It is always best to set up a RAID array when first installing SUSE Linux so that nothing can happen to your existing data when you’re working with the Expert Partitioner.
The steps outlined here apply when you have purchased a drive to serve as your mirror drive after your initial installation. Be sure to back up critical files before starting this process. You will be changing the partition table for your system as part of the setup.
Before installing the new drive, you should convert your Root partition to change the SystemID. Start Expert Partitioner by going to YaST, System, Partitioner. Select your Root partition (marked Linux Native /) and click Edit. In the resulting dialog box, click Do Not Format. Use the drop-down menu to change the File System ID to 0xFD Linux RAID. Click OK to confirm. Click Apply to convert the File System ID.
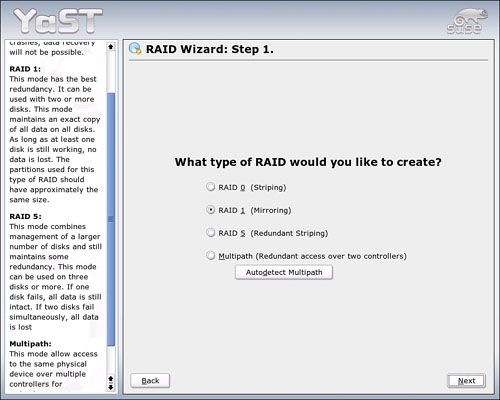
When the conversion is complete, shut down the system and install the new drive. SUSE Linux should recognize the new hardware and ask how to format it. At this point, you want to create your RAID array (see Figure 20.7).
Caution
Although it’s technically possible to create a software RAID array using two partitions on the same hard disk drive, you should never do this. The mirrored or striped partitions should always be located on different disks.
You will create a mirror. Click Next to continue.
The second screen (see Figure 20.8) allows you to define the drives you want to mirror. For this example, we created a dummy drive. In a real scenario, the mirror should be at least as large as the active drive. Select both partitions and click Add to create the mirror. Click Next to continue.
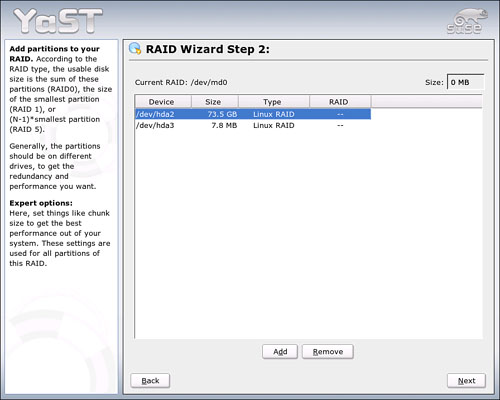
The final screen in the RAID Wizard sets options for the mirror (see Figure 20.9). For a mirroring (RAID 1) operation, there’s no reason to shift from the defaults. To confirm the settings and return to the main Expert Partitioner screen, click Finish.

When you have finished with the RAID Wizard, click Apply to create the RAID array.
If you chose to use a hardware-based RAID array, you won’t have to complete any of these steps. The RAID board will present the array to SUSE Linux as a single hard disk drive. Simply partition and format the logical drive just as you would a physical hard disk drive.
When your system is broken and you can’t boot, it’s a nightmare you don’t want to confront. But here you are. Fortunately, you have been backing up regularly and have an archive to restore from. In this section, you’ll learn how to get your system back in shape.
The SUSE Linux installation disk included with this book is bootable and can get you into Rescue mode. First, make sure your BIOS is set to boot from your system’s CD/DVD drive before the hard drive. Insert the first SUSE Linux CD into the drive, and boot. You may select Manual Installation to enter special boot parameters under Boot Options, but do this only if you know what you’re doing. As you boot from the CD, you will be asked to select the correct language and keyboard layout.
Select Start Installation or System in the main menu.
Select Start Rescue System and identify where the rescue system is located. By default, this is the CD. If you have access to an NFS volume with a Rescue System on it, choose this option. If you have a set of Rescue floppies, see the next section to learn that process.
The Rescue System starts. You can log in as Root with no password. Skip to the “Using System Restore” section to see what to do next.
YaST will let you make a series of boot disks on floppies that will allow you to boot the rescue system when your CD-ROM drive is down. Go to the System page in YaST to locate the Boot Disk module. The number of floppy disks you will need to complete this operation depends on your system, but usually falls in the range of four to six disks. When you finish making the boot disks, you should return to YaST to make a separate disk containing the Rescue system.
When you need to recover, insert the first boot disk in the drive and then start your computer. You will be asked to insert the Rescue system disk after you boot. As with the CD boot, the Rescue System starts, and you may log in as Root without a password. Proceed to the next section to restore your system.
Regardless of how you started the system, after you’ve gotten into the Rescue system, there is work to be done. To mount your hard drive from the Rescue system, you need to know the device names for your mount points. This is where it comes in handy to have an accessible copy of your /etc/fstab file. By default, your Root mount point is /dev/hda1. You need to carefully mount the system step by step, using the following method. Type the following command:
mount /dev/hda1 /mnt
This gives you access to the full Root partition. If you have set any other mount points (except for Swap, which is not important here), mount them under the /mnt point as well, as in this command to mount the /usr partition:
mount /dev/hda2 /mnt/usr
If you have simply misconfigured a configuration file to cause the boot problem, you should now be able to go to /etc and locate the file to reedit back to health. You also have the option to use YaST System Restore to retrieve a backed up file. Follow these steps to use System Restore.
Note
Depending on the state of your system, you may get the graphical YaST, where the images in the upcoming figures come from, or the shell version. The menus are identical.
If you prefer to work in a graphical environment (and you can run X), type startx to run the X Window System and your preferred environment. Otherwise, just type yast.
Use the down arrow to go to the System module, then tab to the components side, and arrow down to Restore System. Press Enter to start the module. Figure 20.10 shows the first Restore screen.
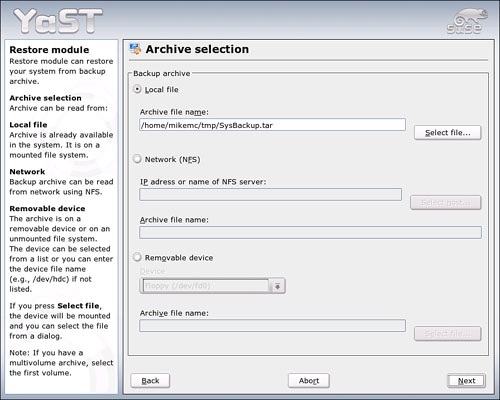
Use this screen to locate your Backup file. In this instance, it’s a local file. If you have burned the backup to CD, use the Removable Device option to show that (make sure the disk is in the drive first). Click Next to continue. YaST will read the contents of the backup archive file.
The second screen gives you some basic information on the archive: when it was created, where it is located, and any comments you made about the archive when you created it. To see a list of the packages and files you backed up, click Archive Contents. This is just a list; selecting files and packages to restore happens in the next screen.
By default, YaST restores packages to the / directory (that is, its original location), runs SUSEConfig to make sure everything’s in order after the restoration, and reloads your bootloader (if you have one). If you have a good reason to change any of these options, click Expert Options to make those changes. Click Next.
In the final screen, you can select the package(s) and files to restore. By default, YaST restores everything (see Figure 20.11). Choose Deselect All, Select Files to choose your package(s) yourself.
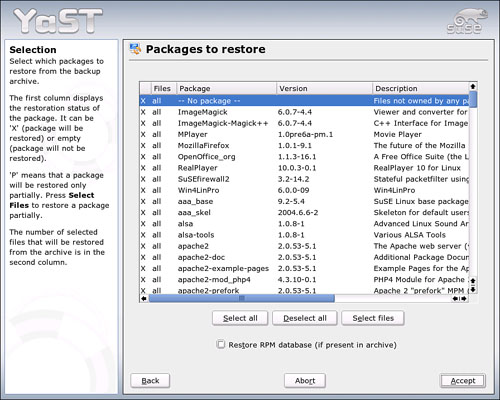
When you’re finished selecting files, click Accept to restore your files. When the process is complete, you return to the shell prompt. Remove the CD from the drive, and type reboot to reboot the system normally.
http://www.tldp.org/HOWTO/Linux-Complete-Backup-and-Recovery-HOWTO—How to back up your system to support a bare-metal recovery.
http://www.tldp.org/LDP/sag/html—The Linux System Administration Guide. See Chapter 12 on backups.
http://www.tldp.org/HOWTO/Ext2fs-Undeletion.html—Undeleting files from an Ext2/3 file system.
http://tldp.org/HOWTO/Software-RAID-HOWTO.html—Learn about software-based RAID arrays in Linux.
http://amanda.sourceforge.net—The Amanda home page.
http://www.backupcentral.com—Storage Mountain. Much information and links on backups and other storage-related issues.
http://linuxgazette.net/104/odonovan.html—An excellent and easy-to-understand article on using rsync and cron for automated backups.
http://www.k3b.org—The home of K3b, the KDE CD/DVD burning tool.
http://richard.jones.name/google-hacks/gmail-filesystem/gmail-filesystem.html—The GMailFS program, which allows you to convert your gigabyte of Gmail storage into a working Linux file system.
http://www.bluehaze.com.au/unix/cdbkup.html—Using a shell script to back up to CD.
http://www.mondorescue.org—A rescue tool that can produce bootable CDs to restore a broken system.