
IN THIS CHAPTER
In this chapter, we look at database creation and client access with SUSE Linux. Databases can be considered digital phonebooks—when there is a need for highly organized storage of a massive amount of information, a database is called for. There are very special requirements associated with databases; therefore, it shouldn’t seem strange that it takes special software to create a storage system that is highly organized by items such as fields, records, and tables. Databases (if optimized and running properly) can store massive amounts of data, such as logging information for a web server. The blending of Apache web server software, the PHP scripting language, and the MySQL database engine is basically what fuels most of today’s website development. PHP will be covered in Chapter 31, “Creating Dynamic Websites.”
This chapter is only an introduction to these two technologies. Entire publications have been dedicated to the topic of building databases, especially with MySQL, one of today’s hottest web-based database technologies in use.
Your operating system comes with an open-source database that is very popular with today’s web development teams—MySQL. This chapter covers the installation and configuration of MySQL as well as how to access a MySQL database with a client.
A database is a collection of information organized in such a way that a computer program can quickly select desired pieces of data based on a query that you provide. As previously mentioned, databases are the storage sites for the world’s data.
Database services are based on a client/server model. In SUSE Linux, you can install components based on that model for both the client and the server portions of the database. You can install a database server by installing MySQL. You can also use various database clients to access the database service running on your system.
By installing the service, you install the software needed to run, operate, and manage database protocols such as SQL. SQL stands for Structured (or Standard) Query Language; it is a standard language for accessing and manipulating databases. SQL defines statements that can be used to retrieve and update data in a database, such as SELECT, UPDATE, DELETE, INSERT, and WHERE.
You can access a MySQL database in various ways—via the command prompt using the mysql command, using specialized client software such as Knoda, or through a web browser.
Before getting too far into this chapter, we need to discuss how databases work. There are two general types of databases: flat-file databases, which are much like your /etc/passwd file, and relational databases, which are much more complex and require much more “structure” to organize them. Flat-file databases are poor performers and are not truly scalable. A flat-file database is the opposite of a relational database, which is hierarchical. Relational databases, on the other hand, are specialized to handle large amounts of data. They are scalable, which means that they grow well, unlike their flat-file counterparts.
Relational databases are organized by fields, records, and tables. In a relational database, a field is a single piece of information. A record is one complete set of fields, and a table is a collection of records. This is essentially what makes up the logical structure of databases.
In a database, each table is identified by a name, such as Contacts. Each table contains records, also called rows, that contain the actual database data. For example, suppose we were to define a table called Contacts and create the following three records:
Last          First         Address             City             State
Coughanour    David         578 E. 200 N.       Santaquin        Utah
Johnson       Brian         113 N. 1111 E.      Rigby            Idaho
Corry         Jason         57 E. Wrangler      San Antonio      Texas
Using the SQL language, you can create queries that return specific data from the database. For example, suppose you were to compose the following query:
SELECT Last FROM Contacts
The database would return the following data:
Last
Coughanour
Johnson
Corry
In addition to creating queries, the SQL language also allows you to update, insert, and delete records. This is done using the following commands:
SELECT—Retrieves information from a tableUPDATE— Modifies information in a tableDELETE—Removes information from a tableINSERT INTO—Adds new data to a table
In addition to manipulating data within a table, SQL commands can also be used to manage the table itself. This is done using the following commands:
CREATE TABLE—Creates a new tableALTER TABLE—Modifies an existing tableDROP TABLE—Deletes an existing table
A key feature of a relational database is that you can create “relations” between tables, which enables you to create powerful interrelated data sets. A relational database is also known as a relational database management system (or RDBMS). RDBMS is a type of database management system (DBMS), but this one focuses on the relational model just discussed.
When you install the database service with YaST, you can create the system of fields and such where the data will be stored and organized in a way that information can be managed efficiently. If data is managed this way, it is quick to retrieve and easier to manage, mine, and control.
MySQL is a freely downloadable open-source RDBMS that uses SQL. Before continuing, you need to understand that there are two versions of MySQL:
MySQL—This is the “standard” version of MySQL that is included with your SUSE Linux distribution.
MySQL-Max DB—This is the “heavy duty” version of MySQL that is designed for use by large enterprises.
In this section, we’re going to focus on MySQL. You’ll learn how to install and configure MySQL on your SUSE Linux system.
Most likely (especially if you installed SUSE Linux with a minimal amount of services), you will not have MySQL installed because it’s not installed by default. As long as you have the installation CD-ROMs, you can install it quickly and easily using the YaST Software Management module, as shown in Figure 29.1.

To install MySQL on your system, complete the following:
Run YaST and navigate to Software, Software Management.
In the Search field, enter
mysql; then select Search.In the Package column, select the following packages, as shown in Figure 29.1:
mysql
mysql-administrator
mysql-client
mysql-shared
There are many other MySQL-related packages that you could install. Most of these packages, such as apache2-mod_auth_mysql, are used to enhance the functionality of the MySQL service. You can, optionally, install these packages as well:
In the Search field, enter
knoda; then select Search. The knoda package provides a database client that can be used to access your MySQL server.Mark the knoda package in the right frame.
Select Accept.
When prompted that the packages are installed, select Finish.
When you are done with your installation, you are highly encouraged to run the YaST online update so that you can patch up your databases with any new tools, security fixes, or patches that may be available. You may also be interested in viewing the www.MySQL.com website for the latest version of the product. You can download the source files in an RPM package and install the latest version if your needs require it.
After installing MySQL, a number of initial configuration tasks must be completed before you begin working with your first database table. We’ll look at these tasks next.
After installing your MySQL packages, you need to do the following:
Initialize the grant tables.
Start the MySQL server.
Secure the MySQL user accounts.
Let’s discuss how to do each of these.
One of the first tasks you need to complete is to set up your MySQL server’s grant tables. To understand the grant tables, you must first understand that MySQL access controls, including user accounts and permissions, are managed from within the MySQL service itself. This is done using five tables within the MySQL database:
user—This table is used to specify whether a specific user is allowed to connect to the MySQL server.
db—This table is used to define which databases a user is allowed to access.
host—This table is used to define which hosts are allowed to access a given database.
tables_priv—This table is used to define access privileges for a given table.
columns_priv—This table is used to define access privileges for specified columns of data for a given table.
These tables must be initialized before you can use MySQL. This is done by running the mysql_install_db script from a shell prompt. To do this, complete the following:
Open a terminal session and switch to your Root user account.
At the shell prompt, enter
cd /usr/bin.At the shell prompt enter
./mysql_install_db.
Grant tables are then installed and initialized, as shown in Figure 29.2.
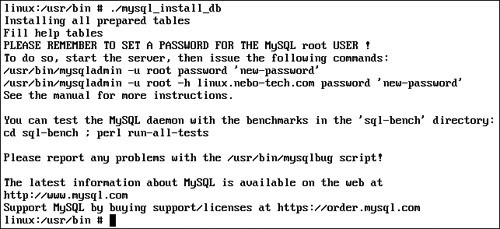
You need to run mysql_install_db only once after initially installing the MySQL packages. The script creates the database’s data directory, the grant tables, and a test database that can be used to test your implementation. The utility also creates entries in the grant tables for two MySQL user accounts:
root
anonymous-user
Note
It’s important that you understand that MySQL has its own user accounts that are separate from your SUSE Linux system’s user accounts. Even though MySQL uses an account named root, it’s not the same as the root account on your Linux system. The MySQL database runs on your system as a Linux system user account named mysql, which is created when the MySQL packages are installed.
With the grant tables initialized, you now need to start the MySQL service. Let’s review how to do this next.
You can start the MySQL service on your server by entering the following command from the shell prompt:
mysqld_safe --user=mysql &
The --user option specifies which Linux system account the MySQL server should run as. The ampersand at the end of the command indicates that the process should run in the background. You may have to wait for a few minutes for the server to finish loading.
To verify that the server is running, enter the following command at the shell prompt:
mysqladmin version
You should see output similar to that shown in Figure 29.3.

Note
The commands presented in this subsection assume that you haven’t created a password for your MySQL Root user account yet (we’ll talk about how to that later in the chapter). If, by chance, you’ve already created a Root user account, you’ll have to use the following syntax for the commands presented here:
command -h localhost -u root -p option
For example, to perform the preceding test, you would enter the following:
mysqladmin -h localhost -u root -p version
If you want to make sure your MySQL service automatically starts at boot, open YaST and navigate to the System, System Services (Runlevel) module and configure the mysql daemon to start at the desired runlevels (probably 3 and 5).
At this point, you can execute several tests to verify that the MySQL server is functioning properly. Complete the following:
At the shell prompt, view the databases currently on the server by entering
/mysqlshow. You should see the databases shown in Figure 29.4 displayed.View the tables contained within the MySQL database by entering
mysqlshow mysql. You should see the tables shown in Figure 29.5.


Now that you’re sure the MySQL server is running properly, you need to work with your MySQL user accounts. Notice in Figure 29.2 that you are prompted, after initializing the grant tables, to secure your MySQL Root user account. We’ll talk about how to do this next.
After running msql_install_db, your root MySQL user account is created but has no password, allowing anyone access to your MySQL server. This is something you should change as soon as possible. To do this, complete the following:
Open a terminal session and switch to your Root user account.
Verify that your MySQL server is currently running.
Create a password for your MySQL Root user by completing the following:
At the shell prompt, enter
mysqladmin -u root password’your_new_password’.At the shell prompt, enter
mysqladmin -u root -hyour_system_hostnamepasswordyour_mysql_root_password.
Now that your MySQL server has been installed and initialized, you can learn how to use the MySQL Control Center.
Because the services are installed on your Linux system, let’s look at how to manage them. First, you will have to open the MySQL Control Center. This can be found by launching your KDE Menu to the Office, Database section. You will see that you now have access to both the console and Knoda. Select the mysqlcc shortcut to open the Control Center, as shown in Figure 29.6.
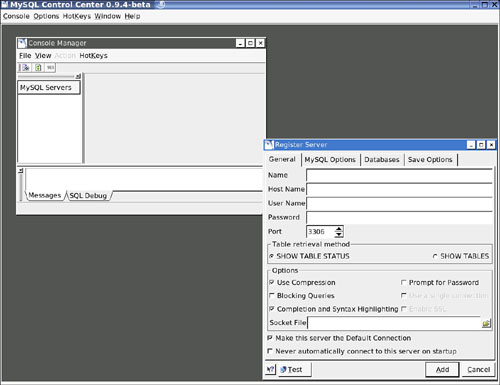
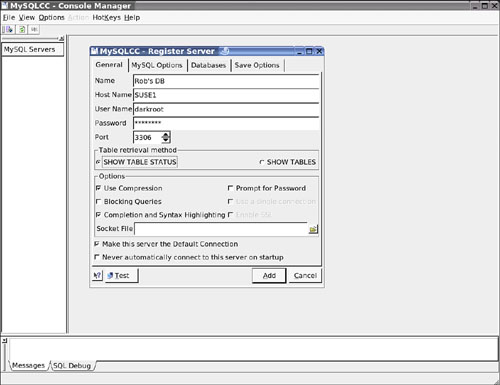
After you open the Control Center, which includes the Console Manager, you will immediately need to add your own server (or a remote one) as a manageable server in the console in the Register Server dialog box shown in Figure 29.6. To do this, add your server by entering the required information, as shown in Figure 29.7.
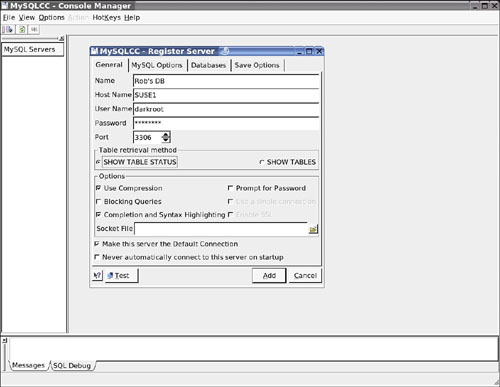
The Name field is the name of the manageable entity in the MySQL Console Manager. The Host Name is very important. If you don’t know what your host’s name is, you can use YaST again in the Network Services section under the DNS and Host Name section. When you are done adding your client server (which, by the way, can be either MySQL or PostgreSQL if you change the driver), click Add to add your server to the console, as shown in Figure 29.8.
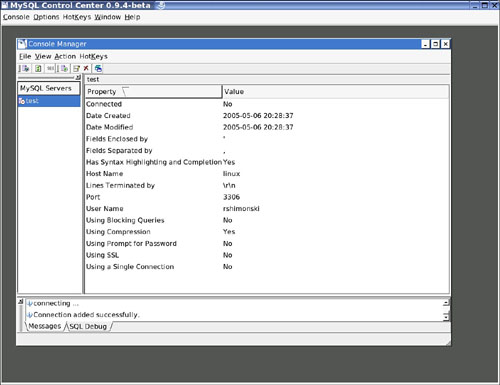
If your server is up and operational, all you need to do is connect a client to it to test it.
Now that you have installed and configured your database, you will need to connect to it and access data. This can be done in many ways. For instance, you can use the plethora of tools from the command line—some tools are proprietary, some open source. You can also use most standard web browsers. You can also use tools such as the MySQL Control Center, as seen in the previous section, or another client, called Knoda, that comes with your SUSE Linux CD-ROMs.
Let’s begin by learning how to use a simple command-line database client called MySQL Monitor.
The MySQL Monitor client allows you to connect to a MySQL server and manipulate its databases. To establish a connection, complete the following:
Open a terminal session and switch to your Root user account.
At the shell prompt, enter
mysql -h localhost -u root -p.When prompted, enter the password you created previously for your MySQL Root user account. The screen shown in Figure 29.9 is displayed.

Notice that the shell prompt has been replaced with a mysql prompt, indicating that mysql is running. From this prompt, you can enter commands to manage and manipulate your databases.
For example, suppose you want to create a new database named contacts, create a table within it, and insert data into the table. You can do this by completing the following:
At the mysql prompt, enter
CREATE DATABASE contacts;. You should be prompted that the database has been created.To tell the mysql client to use the database you just created, enter
USE contactsat the mysql prompt. The utility should respond withDatabase changed.To see the tables that have been defined by default within the contacts database, enter
SHOW TABLES;at the mysql prompt. It should reportEmpty set, indicating that no tables have been defined.At this point, things get a little more complex. You will need to use the CREATE TABLE command to create the table. That’s easy enough; however, you will also need to define your table’s columns in the command as well. To do this, you first need to define the columns that you want to include in the table. Then you need to decide what kind of data will be stored in each column as well as how long the data in the table will be.
In the table we’re building here, let’s suppose we want four columns:
first
last
phone
lastcontact
We know that the first and last columns will contain alphabetical characters of an undetermined length. We know that phone will contain 10 numbers with two hyphens (area_code-prefix-number). The lastcontact column will contain the date of last contact. In the next step, you will enter the CREATE TABLE command that will create a table named vendors and format these columns.
At the mysql prompt, enter
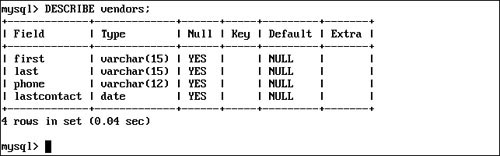
CREATE TABLE vendors (first VARCHAR(15), last VARCHAR(15), phone CHAR(12), lastcontact DATE);.Verify that the table and columns were created correctly by entering
DESCRIBE vendors;at the mysql prompt. You should see that the vendors table and its associated columns were created, as shown in Figure 29.10.Notice in Figure 29.9 that each column is null, indicating that no data has been added to the table. In the next step, you will use mysql to add a vendor named Diana Nelson, whose phone number is 801-555-1234 and was last contacted on July 24, 2005.
To insert the preceding data into the table, enter
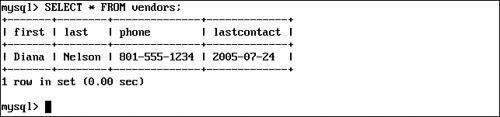
INSERT INTO vendors VALUES (’Diana’,’Nelson’,’801-555-1234’,’2005-07-24’);at the mysql prompt. The utility should prompt you that the query was OK and that one row was affected.To view the data in your table, enter
SELECT * FROM vendors;at the mysql prompt. Your MySQL server should respond with all the data in the table, as shown in Figure 29.11.
You’ve just built a very basic MySQL database and table. This is only a small taste of what you can do with MySQL. If you want to learn more advanced MySQL skills, visit http://www.mysql.com.
Let’s now take a look at the Knoda database client.
Knoda is a database front end for MySQL and PostgreSQL and contains a generic ODBC driver. You can use it for creating tables and databases, forms, reports, and queries. Knoda has also an export/import filter for CSV files. The package contains a general library with dialog boxes for the handling of databases, which can be used in other applications. It can be accessed by going to the KDE menu and selecting Office, Database, Knoda. You can see the Knoda client version 0.7 in Figure 29.12.

To configure the client, you can select mysql from the drop-down box so that the MySQL database can be accessed and managed with the Knoda client. To adjust the client, click the Options button on the Knoda client. The Preferences dialog box opens, as shown in Figure 29.13.
To attach to the database, click the Connect button on the Knoda client. This will either connect you to or stop you from connecting to the MySQL database. Most times, problems will be miniscule. Other times, the issues (and what you need to do to resolve them) could take weeks. Working in the world of programming and development will take some time, practice, and patience. If you have problems connecting to your database, try rebooting your system and checking inetd for the running service or the local firewall to make sure that MySQL ports are able to be used by the systemthe system .
Tuning your MySQL server for increased performance is exceptionally easy to do, simply because you can see huge speed increases by getting your queries right. But this chapter isn’t about traveling up the learning curve, it’s about quick tips that will make things work better now. MySQL can do that, too, as long as your system has enough RAM.
The key is understanding how MySQL’s buffers work—there are buffers and caches for all sorts of things, and finding out how full they are is crucial to maximizing performance. MySQL performs best when it is making full use of its buffers, which in turn places a heavy demand on system RAM. Unless you have 4GB of RAM or more, you don’t have enough capacity to set very high values for all your buffers. Picking and choosing is required.
When you add indexes to your data, it enables MySQL to find data faster. However, ideally you want to have these indexes stored in RAM for maximum speed, and the key_buffer_size variables define how much RAM MySQL can allocate for index key caching. If MySQL cannot store its indexes in RAM, you will experience serious performance problems. Fortunately, most databases have relatively small key buffer requirements, but you should measure your usage to see what work needs to be done.
To do this, log in to MySQL and type SHOW STATUS LINE ’key_read’ ;. That returns all the status fields that describe the hit rate of your key buffer. You should get two rows back: Key_reads and Key_read_requests, which are the number of keys being read from disk and the number of keys being read from the key buffer. From these two numbers you can calculate the percentage of requests being filled from RAM and from disk, using this simple equation:
100 – (Key_reads / Key_read_requests) x 100)
That is, you divide Key_reads by Key_read_requests, multiply the result by 100, and then subtract the result from 100. Plug in some numbers and you can get a result. Suppose Key_reads is 1,000 and Key_read_requests is 100,000. Divide 1,000 by 100,000 to get 0.01. Move the decimal point two spaces to the right to multiply by 100 and get 1.0. 100 – 1 = 99; this is the percentage of requests being filled from RAM. Be happy.
Most people should be looking to get more than 95% of their requests served from RAM. The primary exception to this rule is if you update or delete rows often. It’s hard to cache something that’s always changing, and MySQL won’t do it. If your database is largely read-only, the ratio should be closer to 98%. Lower figures mean you might need to bump up the size of your key buffer.
If you are seeing problems, the next step is to check how much of your current key buffer is being used. Use the SHOW VARIABLES command and look up the value of the key_buffer_size variable. It is probably something like 8388600, which is eight million bytes, or 8MB. Use the SHOW STATUS command to look up the value of Key_blocks_used.
You can now determine how much of your key buffer is being used by multiplying Key_blocks_used by 1,024, dividing by key_buffer_size, and multiplying by 100. So if Key_blocks_used is 8,000, you multiply that by 1,024 to get 8,192,000; dividing that by key_buffer_size (8388600) gets us to 0.97656. Multiplying that by 100 gives us a key buffer ratio of 97.656, or nearly 98% of your key buffer is being used.
Now to the important part. You have figured out that you are reading lots of keys from disk, and you also now know that the reason for reading from disk is almost certainly because you do not have enough RAM allocated to the key buffer. The general rule: Allocate whatever RAM you can spare to the key buffer, up to 25% of everything you have. This translates to about 128MB on a 512MB system. Beyond that, you will go the opposite way, slowing things down immeasurably if you have to access Swap for the key buffer.
Open /etc/my.cnf in your text editor and look for the line that contains key_buffer_size. If it is not there, create one under the line [mysqld]. When you set the new value, don’t be arbitrary about it. Try doubling what you have there now (or 16MB if it’s a new line); see how that goes. To set 16MB as the key buffer size, the line should look like this:
[mysqld]
set variable = key_buffer_size=16M
datadir=/var/lib/mysql
Restart your MySQL server with rcmysql restart, and then go back into MySQL and run SHOW VARIABLES again to see the key_buffer_size. It should be 16773120 if you have it set to 16MB. Because MySQL just got reset, all its values for key hits and the like will also have been reset. You need to let it run for awhile so you can assess how much has changed. If you have a test system you can run, so much the better.
After your database has been accessed with normal usage for a short while (if you get frequent accesses, this might be only a few minutes), recalculate how much of the key buffer is being used. If you get another high score, double the size again, restart, and retest. Keep trying until your key buffer usage is below 50%, or you find out you don’t have enough RAM to do this properly. Again, never use more than 25% of your physical RAM for the key buffer.
Newer versions of MySQL allow you to cache the results of queries so that if new queries come in that use the same SQL, the result can be served from RAM. In some ways, the query cache is quite intelligent. If, for example, part of the result changes because of another query, the cached results are thrown away and recalculated next time. However, in other ways it is very simple. For example, it uses cached results only if the new query is the same as a cached query, even down to the capitalization of the SQL.
The query cache works well in most scenarios. If your site has an equal mix of reading and writing, the query cache will do its best but will not be optimal. If your site is mostly reading with few writes, more queries will be cached (and for longer), thus improving overall performance.
You need to find out whether you have the query cache enabled before we try anything else. To do this, use SHOW VARIABLES and look up the value of have_query_cache. If all is well, you should get YES back, meaning the query cache is enabled. Look for the values of query_cache_size (the amount of RAM allocated to the query cache) and query_cache_limit (the maximum result size that should be cached). These should be set at something like 8388608 (8MB) and 1048576 (1MB).
An 8MB query cache should be enough for most people, but if you are storing an especially large amount of data, consider doubling that. You should never need a query cache of more than 32MB, though.
Next, type SHOW STATUS LIKE ’Qcache%’; to see all the status information about the query cache. You should see values for eight variables from which we can determine the current use of the query cache.
Add the totals of Qcache_hits, Qcache_inserts, and Qcache_not_cached. This gives you the total number of queries received. Dividing Qcache_hits by the total queries and multiplying the result by 100 gives you the percentage of queries being served from the query cache. The higher the number, the better off you are. If the gods smile upon you, it will be in the mid-to-high 90s.
Using the query cache does not incur much of a performance hit. When MySQL calculates the result of a query normally, it simply throws it away when the connection closes. With the query cache, it hangs on to those queries, so there’s no extra work being done.
If you have tuned your key buffer and optimized your query cache and still find your site struggling, there are a handful of smaller changes you can make that will add speed to your database.
When reading tables, MySQL has to open the file that stores the table data. How many files it keeps open at a time is defined by the table_cache setting, which is set to 64 by default. You can increase this setting if you have more than 64 tables, but be aware that there are limits on how many files can be open at a time. Think things out before exceeding 64 tables in a database.
The other thing that is tweakable is the size of the read buffer, which is controlled by read_buffer_size and read_buffer_rnd_size. Both of these are allocated per connection, meaning you need to exercise care to have large numbers. Whatever you choose, read_buffer_rnd_size should be three to four times the size of read_buffer_size. If read_buffer_size is 1MB (a good size for a very large database), read_buffer_rnd_size should be 4MB.
The biggest speed-ups can be seen by reprogramming your SQL statements so they are more efficient. If you follow these steps, your server will thank you.
Select as little data as possible—only the fields you need.
If you only need a few fields, use
LIMITto select the number you need.Declare fields as
NOT NULLwhen creating tables to save space and increase speed.Provide default values for fields, and use them where you can.
Be very careful with table joins because they are the easiest way to write inefficient queries.
If you must use joins, be sure you join on fields that are indexed.
Find and fix slow queries. Add
log-long-formatandlog-slow-queries = /var/loog/slow-queries.logto your/etc/my.cnffile, under [mysqld], and MySQL will tell you about queries that took a long time to complete.Use
OPTIMIZE TABLE tablenameto defragment tables and refresh the indexes.
In this chapter we looked at deploying a hierarchical database using SUSE Linux. You can install MySQL and have a fully functional database operating within minutes. After it is installed and configured, you can use the mysql or knoda clients to access the database.
http://www.mysql.com/—The MySQL database home page, with news, downloads, and documentation.
http://dev.mysql.com/doc/—MySQL database home page’s documentation repository. If you want to learn more about MySQL, visit the documentation center.
http://www.postgresql.org/—PostgreSQL database home pages. PostgreSQL is one of the world’s most advanced open-source databases supporting almost all SQL constructs, including subselects, transactions, user-defined types, and so on.
http://www.postgresql.org/docs/—PostgreSQL database home page’s documentation repository. You can start here to find a wealth of PostgreSQL information available online. This section of the website contains current and archived manuals for PostgreSQL users and administrators.
http://www.knoda.org/—The home page to download the newest Knoda client or learn more about it.